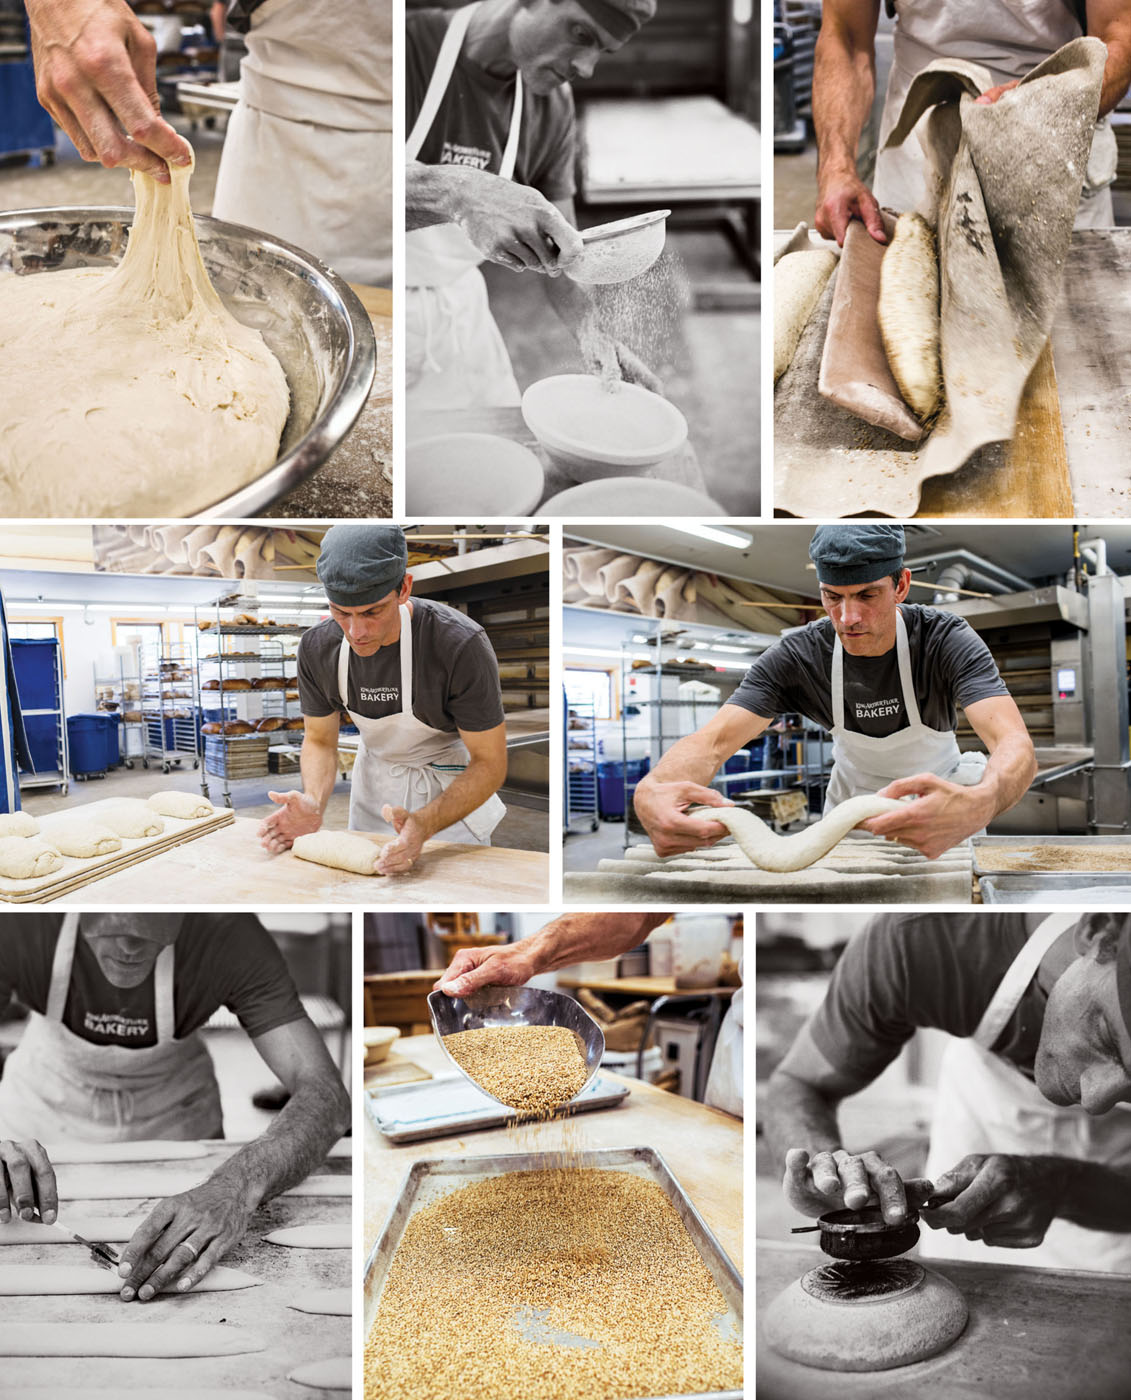
Gather grain, thresh, winnow, mash, grind, or mill. Mix with water, then stir, form, and bake. These are the timeless, primary steps in bread making. Over thousands of years, our relationship with each step in this process has deepened as we have moved from broadcast seed to cultivars, past hand milling to bagged flour, and onward to wood-fired and commercial baking. But through these changes, the essentials of the bread making process remain intact. We begin with milled grain, most often wheat, chosen for its ability to form gluten; then we add water, salt, and a leavener such as yeast or sourdough culture. This mixture ferments over the course of a few hours before we shape, proof, bake, and eat. Let’s add some detail to these steps.
Once ingredients are measured and our water temperature is set, we proceed to mixing. Mixing is the process of combining ingredients until homogeneous.
To mix, put the ingredients in a large mixing bowl (12 to 14 inches in diameter) in the order detailed in the steps for each recipe. With hand mixing, this process usually begins with final dough water or other liquids and a preferment, if applicable. Then the dry ingredients, including the flour, salt, and yeast, are added. Using the handle end of a wooden cooking spoon, stir the mass until homogeneous with the spoon held at a right angle to the bowl and counter. The handle end is small and narrow and moves through the mixture quite easily. If it becomes difficult to work, reach in and bring it together with one hand, pressing and kneading while steadying the bowl with the other hand. If you find it easier, after stirring for a bit, you can scrape the dough out of the bowl with a plastic scraper onto a work surface and knead briefly with your hands just until the dough comes together. Resist the urge to use more than a light dusting of flour. Then scrape down and clean the sides of the bowl with a plastic dough scraper before returning the dough to the bowl, where it will rise during bulk fermentation and folding, the period of time before dividing and shaping. If you are making a bread that has soakers, refer to the mixing instructions. Some will be incorporated at the beginning with the final water while others (more commonly) will be added on top of the dough after mixing.
Other Techniques and Further Reading
The dough mixing procedure for breads in this book is purposefully written with the most of emphasis placed on proper scaling (using the digital scale), proper water temperature (through the use of desired dough temperature), a short mix, folds for strength, and long fermentation for further strength and flavor.
In the world of artisan baking there are many, many variations on this theme. As you read and explore you will come across different terms and techniques, all with their own results and benefits. From “Autolyse” to “Slap and Fold” to “No-Knead” and mechanical mixing, there are almost as many ways to make great bread as there are bakers.
When I began to bake seriously I read as much as I could and relied heavily on a few books. Raymond Calvel’s The Taste of Bread, Jeffrey Hamelman’s Bread, and Special and Decorative Bread, by Raymond Bilheux and Alain Escoffier, which is the bread volume of the Professional French Pastry Series. While I enjoy seeing new books, I still rely most heavily upon these three for inspiration and education.
After mixing, check the dough temperature. When you use the DDT calculations you should be relatively close (within a few degrees). If a dough is too warm—say, for example, it is 82°F and the DDT is 76°F—place it in a cooler spot and consider shortening bulk fermentation by 10 to 25 percent. Conversely, if the dough is too cool, do the opposite. If your dough is 72°F and the recipe suggested 78°F, find a warmer spot and consider lengthening bulk fermentation by 10 to 25 percent. The important thing is that if you see something—a dough that needs to be encouraged toward a warmer or cooler temperature—do something. If you are off a little, it doesn’t mean that you’ve made a mistake. It’s simply a sign that some action needs to be taken. After checking the temperature, cover the dough and set a timer for your first fold. One final note about this. On a recent cool day I did some testing. At the end of mix, my dough temperature was great, 78°F. But after an hour or so in my 62°F kitchen, I found that the dough temperature was plummeting. I turned on the oven for just a few minutes, enough to warm it slightly, and then turned it off. I placed the bowl of dough in the oven to rise and was mostly back on track, lengthening fermentation only slightly. So again, be aware, and change course as necessary.
Stand Mixers
If you want to use your stand mixer, here’s what you may do. Put the dry ingredients in the bowl and mix to combine with a dough hook, then add the liquids and any preferments. When the ingredients are fully incorporated (this may take 5 minutes or more on a gentle speed; be sure to check the bottom of the mixer bowl to see that there are no dry bits), shut off the mixer and cover the bowl with a plastic bag (you may leave the bowl attached to the mixer, with the hook also attached; just make sure the bowl is well covered). At each folding interval, remove the plastic bag and turn on the mixer to “stir” (or the lowest setting) until the dough hook has worked its way around the dough mass for one full rotation. Proceed with the normal instructions for dividing and preshaping at the end of bulk fermentation.
There are many successful methods for folding doughs. A good baker reads the needs of each dough with hands and eyes every time contact is made. A stiff dough requires less folding, a wet dough more; some bakers prefer to dump dough onto a counter for more vigor, others swear by gentle folds in a bucket.
Here’s what I do. I call it “cardinal” folding, as I fold the dough from each point of the compass: Using a plastic scraper for wetter doughs (such as baguettes) or wet hands for drier doughs (such as Pain de Mie, Mama’s Bread, or Jalapeño-Cheddar Bread), reach under the mass of dough, stretch it upward and press it into the center of the mass, pressing down with your hand or the scraper. Turn the bowl 90 degrees and repeat the process, reaching under, pulling upward, and pressing down. Repeat this process, performing a stretch and fold at each point (north, south, east, and west) of the compass. Some doughs may require a little more than just four stretch and folds. The number varies, depending on the dough, and on the stage of fermentation (a dough in the first hour of bulk fermentation may take more before tightening, whereas a more mature dough in its second or third hour will take only four). In the first hour of fermentation the dough will feel slack and, while smoothing somewhat, will still feel mostly inert. But as the mass wakes up and gluten strands begin to cross-link, you will notice changes. When it’s time for a fold, first moisten your fingers (so that they don’t stick) and then pull up a section of the dough. You will notice over the course of time how the dough initially shreds or rips rather than stretches; as development occurs, you will see that you can stretch it very, very thinly. A piece gently stretched between the fingers can be thinned until transparent—something we call the “windowpane” test. This ability to stretch is what will allow the loaf to capture gas as the dough rises in the bowl and, eventually, in the oven. I should note that often, even with wetter doughs for which some prefer to use the plastic scraper, I use wet hands. I enjoy touching the dough, and it gives me a better sense of the dough’s activity, strength, and weakness.
At the end of bulk fermentation dough should be domed, and in most cases it will have risen noticeably. It should feel soft, silky, and active. The transformation that has occurred should be evident—a fragrant mass will be waiting for you.
To divide, begin with a light dusting of flour on your bench or work surface. Using a flexible plastic scraper, gently scrape the dough out onto the dusted surface. All the folding and attention to detail exhibited thus far should continue. Be gentle.
Refer to your recipe to determine the number of pieces for your divide. If you have 1 kilo (1,000 grams) of dough and the baguette weight per piece (in a bakery we say, “scale weight”) is 250 grams, visualize the mass divided into the required number of pieces. Visualizing the pieces will help you to have a single, large piece of dough with a small piece on top in case your guess was a little low. A loaf consisting of a single cut of dough has better potential for greatness than a loaf made of many bits. Think of dough as a skein of yarn; long pieces make a more beautiful sweater than many small pieces. With a slight dusting on the top surface of your dough, begin dividing, using your gram scale to ensure accuracy. Don’t obsess over a gram or even 5 grams of variance. Place the divided pieces to the side on a dusted portion of the bench and finish dividing. If you find yourself with a small extra portion of dough you may divide it among the pieces. Proceed directly to preshape.
Preshaping is an important step between the dividing and final shaping steps of bread making. It adds strength, removes any large gas bubbles that may remain after fermentation, and gives dough pieces uniformity, which will, in turn, support good final shaping. The most common preshaped form is a loose ball, or what bakers refer to as a “round.”
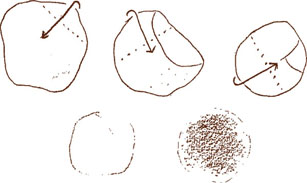
PRESHAPE ROUND: On a lightly floured surface, gently pat the dough to remove any large bubbles, then stretch the outside edge of the dough slightly away from its center. Next, fold the dough back to its center, pressing down to gently seal. Repeat this process, working your way around the entire dough piece in five or six movements. You will notice that the motion is not unlike the folding motion performed during bulk fermentation. Set the dough to rest on a lightly floured surface, seam side down and covered to prevent a skin from forming, until shaping.
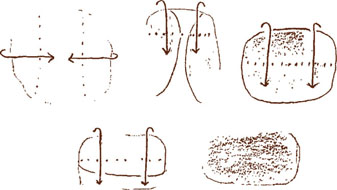
PRESHAPE TUBE: On a lightly floured surface, gently pat the dough to remove any large bubbles and gently stretch it into a rough circular form. Next, fold the sides toward the middle, pressing down to gently seal. Beginning with the side farthest from you, fold the piece one-third of the way toward the leading edge and pat gently to seal. Repeat this process two times, sealing as you go. Set the dough to rest on a lightly floured surface, seam side down and covered, until shaping.
After a rest of 10 to 15 minutes, most doughs will be ready to shape.
Seam Side or Top Side
During preshaping, shaping, and rising, and even when placing loaves in the oven, bakers refer to the unbaked loaf as having two sides. The bottom of the loaf, where seams of dough are gathered during preshaping and shaping, is called the “seam side.” The smooth opposite side, containing no seams, is referred to as the “top side.” From this point, all the way until the shaped loaf is baked, this orientation will be maintained, with the top side being the surface that will be scored before loading.
We maintain this differentiation because the seam side is structurally the weakest part of the loaf. During baking, when the loaf expands rapidly, it is important that the seam side is against the baking stone or pan, held in place by the weight of the loaf. An exposed seam will open during baking, causing the loaf to deform. If the seam is held in place all the energy of the expanding loaf is directed upward to those parts of the loaf where we create weakness intentionally by scoring, or cutting it. See Scoring for more information.
There are many paths to the land of beautiful bâtards, boules, and baguettes; here are some steps that I have found helpful.
Shaping Videos
In addition to reading these descriptions I encourage you to look around in the virtual world as there are many resources online where one can see bread shaping. While the steps are important, it is also informative to see how hands move and how the dough responds.
Boule
Shaping the boule, or round form, is very similar to the process of preshaping. Place a preshaped dough piece seam up on a lightly floured surface and, taking the edge of the dough piece, pull upward and outward slightly, then fold toward the center, pressing gently to seal. Repeat this process, working your way around the entire dough piece until the dough tightens noticeably. Next, invert the dough so that the seam side is on the bench and push it forward and backward, tensioning the dough as it adheres slightly to the bench. Avoid the inclination to overwork the dough. If tears or small rips appear, stop—you’ve reached the stretching capacity of the dough, and further work will only cause harm.
Bâtard
The bâtard shape is an elliptical form, longer than a boule but shorter than a baguette. To form a bâtard, begin with a preshaped round of dough that has relaxed for 10 to 15 minutes. Place the preshaped dough, seam up, on a lightly floured surface and stretch gently to elongate on the north-south axis. Pat gently to remove any bubbles that formed during the rest period. Next, fold the dough from the top down one-third of the way. Then, fold the top left and top right corners of the dough toward the center on a 45-degree angle. Next, fold the top of the dough down two-thirds of the way and seal gently with the heel of your hand. Next, fold the sides toward the middle and pat to seal. Then, fold the dough once more, all the way to the leading edge of the dough, and again seal with the heel of your hand. Last, beginning in the middle of the form, roll your hands back and forth, rolling the dough and elongating and tapering it as both hands move away from the center.
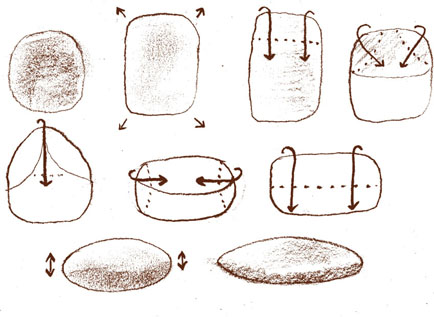
Baguette
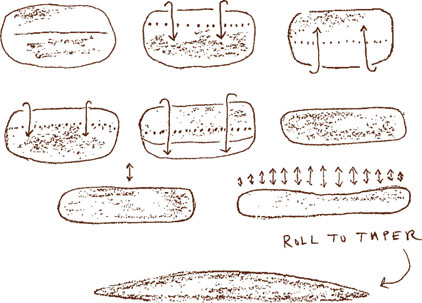
To form a baguette, begin with a preshaped tube of dough that has relaxed for 10 to 15 minutes. Place the preshaped dough tube, seam up, on a lightly floured surface; stretch gently to elongate on the east-west axis; and pat to remove any bubbles that formed during the rest period. Next, fold the dough from the top down two-thirds of the way and pat with the heel of your hand to gently seal. Next, fold the dough from the bottom up two-thirds of the way and pat with the heel of your hand to gently seal. Next, fold the top down two-thirds of the way and again pat to seal. Last, make a gentle east-west divot in the middle of the dough from end to end, and then fold the dough from the top down to the bottom edge and pat to seal with the heel of your hand.
This is what I call the folding, or origami, phase of shaping, after which you should have a somewhat taut tube that is even in size and shape from end to end. After completing the folding phase, and with the seam side down on the bench, place a single palm in the middle of the dough and roll gently back and forth. With light pressure, a depression will form. Next, add your second hand and roll side by side, pushing the dough back and forth, slowly moving hands apart toward the tips, adding pressure in order to taper the tips. If the dough is resistant, go back to the middle and make another pass.
Pan Loaf
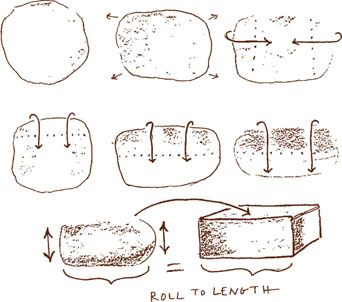
The pan loaf is the easiest for the beginner. Doughs that are baked in a pan are generally lower in total hydration. Less hydration (less water) means dough releases from your hands and from the shaping surface more easily, and as it will rise and bake in a pan, the vessel does much of the forming work.
To form a pan loaf, begin with a preshaped round of dough that has relaxed for 10 to 15 minutes. Place the preshaped dough, seam up, on a lightly floured surface and stretch to elongate on the east-west axis and pat gently to remove any bubbles that formed during the rest period. Next, fold the sides toward the middle, pressing gently down to seal. Beginning with the side farthest from you, fold the piece one-third of the way toward the leading edge and pat gently to seal. Next, fold the top down two-thirds of the way and seal gently with the heel of your hand. Finally, fold the dough once more, all the way to the leading edge of the dough and seal again with the heel of your hand. Place the loaf in the greased prepared pan with the seam side on the bottom.
Roll
Rolls may be shaped with the same steps used to shape larger pieces of dough. You may make tiny boules, miniature baguettes, short bâtards; anything is possible.
Fendu
Fendu, literally meaning “split” in French, is not really a shape but more of a finishing technique that can be used with any of the standard bread forms. After shaping, the loaf is set to rest for a few minutes. After the top side of the loaf has been generously floured, insert a dowel, thin rolling pin, or transfer peel is used to press down on the loaf, making a deep impression that will remain through proofing, giving a fissured appearance to the baked loaf. The fendu is most commonly proofed top side down (the top side being the side pressed with the pin) on a floured baker’s linen (couche) or tea towel. During baking, the top side, floury from contact with the dusty linen, develops a nice contrast as the loaf opens and expands to reveal the split. It is not necessary to score the fendu shape, as the split creates a natural weakness or expansion point.
Baskets, Linens, and Couches
After shaping, some loaves are set to rise in baskets, which are called bannetons or brotforms. The baskets support the loaves as they rise, preventing them from spreading laterally under their own weight. Other loaves rise on baker’s linen, a sturdy woven material made from flax linen, called a couche. Prior to receiving the dough, baskets and linens receive a light but thorough dusting of flour through a sifter. This prevents the sticky dough from adhering to the basket or linen during proofing. It also gives a beautiful contrast and visual appeal to the finished loaf. The amount of dusting flour required is somewhat subjective. Dusting flour should be enough to give the linen coverage during proofing, but not so much that the finished loaf will be caked with raw flour. Remember also to flour the sidewalls of the basket, as the loaf will expand during proofing. The shaped dough is placed in the basket or on the dusted couche with the seam side up. If loaves are rising on a couche, pleat folds of material between them to prevent them from rising into one another. Once the dough is in the basket or set upon the linen, give a small additional dusting to the seam side of the loaf as further insurance against sticking.
A floured cotton tea towel may be substituted for the baskets and baker’s linen mentioned above. But note, cotton is much more likely to adhere to a loaf than the sturdy baker’s linen. I offer the tea towel, but encourage you to consider the bannetons and baker’s linen as early investments. One trick to help the tea towel is to use a blend of 50% rice flour/50% whole wheat flour (or all-purpose flour) for dusting baskets and towels. Rice flour is very resistant to sticking. You can keep this blend in a labeled jar in the freezer for a long time, removing it for use only when dusting. Do not use it for shaping, as the seams of your breads will inevitably open.
Dusting Flour
Dusting flour used on baskets, boards, or linens where loaves proof should match the dough type. For example, when dusting a basket for the Sourdough Miche use whole wheat flour or whole rye flour as it is the appropriate wholegrain visual garnish for the loaf. Similarly, when your baguettes (Poolish, Straight, or Country) are rising, don’t dust the linen with buckwheat flour; it’s not the appropriate garnish. Dusting flour should match the constituent flours of the loaf; it is the first thing we see when we greet the bread.
Other Shapes, New Shapes, Creating
Finding new shapes and learning and practicing the old ones are sizable areas of play. Almost as long as we’ve eaten bread, bakers have toyed with its forms, exploring endless possibilities for adding character to it. As you practice shaping, first study the standard forms listed above and then, when your hands are proficient, look around. Available in books and on the Internet are numerous surveys of classical shapes, from the rough, organic forms of Italy, which appear to have split from the earth, to fanciful French shapes, which resemble everything from ballet shoes to horseshoes, to name just a few. Those who are particularly drawn to weaving and textiles will find many ways to play with braided forms of challah as well. And if you run out of inspiration, take the matter into your own creative hands.
Shaping Rye
A couple of things to note about shaping rye doughs: Because a rye dough lacks the extensibility (remember that this is the ability of a dough to stretch) and the elasticity (the snap backward after the stretch) of wheat-based doughs, shaping it is more a process of folding than tensioning. Follow the steps that you would normally use, paying careful attention to the order of folds, but don’t expect to feel any dough tension. Furthermore, use enough rye flour on your work surface to prevent the dough from sticking (but not so much that raw flour is pushed into the folds of the loaf). Finally, be brief. Don’t overfold; be gentle. A strong hand or fingers, gripping and pulling, will only leave you stuck in the dough, getting stickier and messier. Be deft, and practice!
Rye
There are several recipes in the book that contain a significant portion of whole rye flour (Wood’s Boiled Cider Bread, Pain de Seigle, Citrus Vollkornbrot). If you are new to rye flour, you may think that something has gone significantly wrong in your mixing bowl or on your bench. The dough is sticky, even gummy; it adheres to your hands and refuses to unstick itself. . . . This is normal. Rye does contain gluten, but it largely lacks the elastic characteristics of wheat flour and, if that isn’t enough, it also contains starches, which are quite sticky when hydrated. Due to these characteristics, during shaping the dough feels more like cookie dough or modeling clay than a supple, elastic wheat dough. But fear not, all the trouble is worth it. Rye ferments extremely well, has an entirely unique flavor (which has nothing to do with caraway!), and is incredibly nutritious.
Crust Treatments, Seed Trays, and Garnishes
Many breads and rolls are made more delicious and beautiful through the addition of grains, seeds, nuts, or coarsely ground flour to the exterior of loaves and rolls after shaping. During baking, the crust, enhanced with grains and seeds, skyrockets as it toasts and crisps. Our visual enjoyment is heightened as well when we savor the contrast of texture and color.
Almost any crust can be amended. Some consideration should be given to how the loaf will be scored; some loaves with seed crusts (such as pumpkin) must be cut with scissors rather than scored with a utility razor. To apply a crust, follow these steps:
1. Prepare a “seed tray.” A seed tray is essentially two small sheet pans, one of which contains a seed blend or grains that will be applied, and another holds a well-moistened towel.
2. After shaping, place the top side of the shaped piece on the moistened towel, then set the moistened top on the seed tray and roll it to coat it. Moisture from the towel, transferred to the shaped loaf, will enable the seeds to stick. For the most thorough coating, leave the loaf on the seed tray for 5 to 10 seconds before placing it on a dusted baker’s linen, in a dusted banneton, or in a loaf pan or some other form to proof.
Once loaves are shaped and rising for the last time, they enter a phase we refer to as proofing. During proofing, fermentation continues and the loaf expands, supported by the network of strength developed during folding and shaping as well as by the basket, linen couche, or pan where it is rising.
In the recipes, I give timings for the final proof that should put you close if your dough is moving at a reasonable rate (remember DDT and all the information in Setting Temperatures) and if the dough has proofed in a moderate ambient environment. Those of you in summertime Arkansas with no air conditioning or in winter wonderland Vermont with a drafty house will need to shorten or lengthen, respectively, your proofing times.
When checking the level of proof, I look for a few things. First, don’t wait until the fifty-ninth minute of an anticipated 60-minute proof to see what’s happening. Check in after 30 minutes and feel the loaf. With the most sensitive pad portion of your index or middle finger, gently apply pressure to the dough surface. Don’t poke with the end near the nail, which has only calluses and no feeling. When pressing, tune in to the resistance you feel. Does the finger depress the dough easily, like pushing into a pillow or cotton candy, or does it meet a slight resistance? Does it spring back immediately? All of this information should be thought of as clues, with each rising loaf giving hints via the resistance felt when you check the proof. With experience, you will see that pan loaves can be proofed until they feel very soft, whereas others, such as baguettes, need to be baked while they still give your fingers resistance.
Cold Proofing
After shaping, loaves may be covered and chilled; this forces them to proof more slowly in response to cold conditions. In bakers’ parlance this is called cold fermentation, which is a fancy phrase for “life just got easier” as loaves may proof while we sleep and bake the next day. In general, loaves that are leavened entirely with sourdough culture may be covered and chilled for 12 to 18 hours after shaping. For example, after shaping the Sourdough Miche let it rise for an hour or so and then place it inside a plastic grocery bag (to avoid drying) and find space in the fridge. The next day, check the level of proof and determine when to heat the oven, proofing for a while at room temperature if necessary. It is not uncommon in the bakery to take loaves from the cold and immediately score and bake. Chilled loaves do not feel the same as loaves proofed at room temperature. The dough firms overnight and may feel slightly leathery on the outside. When scoring it, use a deeper cut than you would normally, making sure to get through the outermost, leathery layer of dough. In addition to the differences in scoring, breads given cold fermentation also tend to be slightly sourer, as certain bacteria active within sourdough culture are tolerant of the cooler temperatures.
Breads leavened with yeast may also be cold-proofed, but I have found that they do best, generally, with only a few hours of cold fermentation. Further, keep a close eye on cold-proofing yeasted loaves until you get a sense of the schedule and tolerances of different doughs.
Before loading breads into the oven, we often make light cuts in the top surface of the shaped loaf. This is called scoring and the resultant marks are called cuts. From a distance, scoring seems a cursory; simply pull a blade across the loaf, and you are done. However, as your skills, knowledge, and experience increase, you may begin to see more nuance, a universe of possibilities for this microspace where blade meets dough. You will notice that blade angle, blade shape, blade speed, the qualities of the shaped loaf, and other factors all affect what comes out of the oven. Scoring is a hand skill not unlike the relationship between the artist’s hand and the brush or the sculptor’s grip and a chisel. What happens in this connection between the hand and the tool takes time to develop and longer to master.
According to legend, scoring originally evolved as an identification system for large peasant loaves, which were baked in communal ovens. After the bake, one could identify each loaf from the cut and return it to its maker. Whether the tale is true or not, what is important is that scoring serves a function. In the early minutes of baking, yeast and bacteria populations quickly increase their activity as the loaf heats. Moisture in the dough converts to steam, then the loaf expands and springs until the crust sets and yeast and bacteria perish. During this period of expansion, the shaped loaf, unsure which way to move, needs guidance. Scoring is the baker’s way of applying guidance, using a razor to “tell” the loaf where to open.
A few things to consider as major components of scoring:
BLADE: As noted in the Tools section a double-edge safety razor is best. There are a few (literally fewer than five) doughs that I cut with a serrated knife or scissors; the rest of the time I use the razor. The blade should be sharp and clear of dough bits from prior use. When loading the blade onto the lame, the baker may make a choice of a straight or curved aspect. The majority of bakers use the curved lame for cuts that we would like to open energetically, forming what is referred to as an ear; and a straight blade for cuts that we want to open with a flatter, horizontal aspect. Good ears, or good cuts, in baker’s parlance, signify that the loaf was well shaped, that it was at a proper level of proof when entering the oven, and that the oven had ample heat and steam. This is not to say that good cuts equal perfect bread. Perfect bread should be defined as that which the baker or eater finds most pleasing to see and eat. I have had marvelously delicious bread with bad cuts and poor loaves cut with mechanical precision.
DOUGH SURFACE: The condition of the cutting surface of shaped loaves has an impact related to scoring. I advise placing shaped baguettes on baker’s linen with the seam of the shaped loaf up when ambient humidity is high. In other words, the top side of the loaf—the side that will eventually be cut—should be in contact with the dry, lightly dusted linen. This places the top surface away from moist air. Too much humidity guarantees that the cutting surface will be slightly tacky and, when we are cutting, regardless of how well we do with all other aspects of our work, the blade may stick to the loaf, dragging and disfiguring rather than moving quickly, delicately, across the surface.
Many options exist for scoring bâtards and baguettes. Here are a few examples, ranging from a single cut to more involved cross-hatching and chevron forms. For the baguette, I prefer classic options. Baguettes that are sized for the home oven look best with a three-cut. I’ve included examples of the five- and seven-cut as well, as they are the full-length, bakery standards.
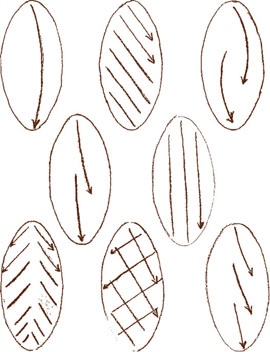
In broad terms, baguettes and bâtards, which should open with energetic cuts, do best when the dough is still youthful, rising, gaining activity, not flabby or overproofed. These breads prefer strong heat and good steam for nice ears to form.
For boules and larger rounds, which we call miches, we can push the proof further, as most are cut with a vertical blade angle in anticipation of cuts that will open laterally. Other breads, such as Ciabatta, the Olive and Rosemary Rustique, and Pane Genzano, can be pushed until quite gassy because they are not cut at all. Follow the timings that I suggest in each recipe, and you should be close.
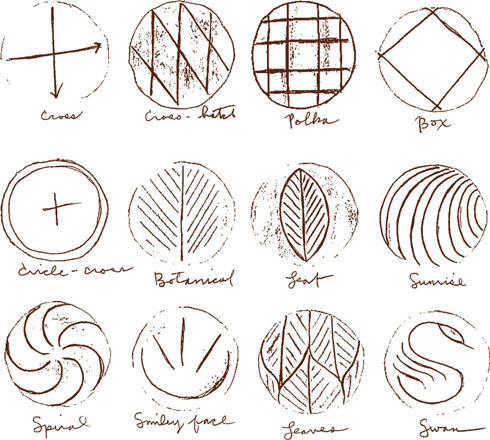
Cross
One of the easiest, perhaps one of the oldest, and still one of the best. The cross releases the loaf, allowing it to move in all directions as it expands during baking.
Holding the blade perpendicular to the surface of the loaf, cut first on the north-south axis, then on the east-west axis, so that the cuts intersect.
Crosshatch
Another common and highly functional cut is the crosshatch. Well suited for large rounds or miches, the design works well to fully release the loaf and enable a low profile.
Holding the blade perpendicular to the surface of the loaf, begin with the central north-south cut as you would for the cross, then place parallel cuts on either side. Then apply additional cuts running at a low angle diagonally across the initial lines.
Polka
The Polka cut also releases the loaf well and can be executed with little fuss.
Holding the blade perpendicular to the surface of the loaf, begin with evenly spaced cuts on the north-south axis, then place additional cuts on the east-west axis. As with other cuts, even spacing and consistent cut depth are key to achieving a beautiful result.
Box
I like the Box cut for loaves that I plan to stencil. Cuts are placed on the “shoulders” of the loaf (where the top transitions to steeply sloping sides), leaving a wide-open area for play.
To score, think of the loaf as a clock face and place your blade at twelve o’clock. With a confident, quick cut, move the blade to three o’clock. Then begin the next cut just outside the first cut and move confidently to six o’clock and then continue onward to nine o’clock before ending the journey back at twelve o’clock.
Circle
For the Circle cut, begin a single cut at twelve o’clock on the shoulder of the loaf and proceed all the way around, returning to the starting point. Hold the blade at a low, flat angle (note that this differs from the grip for the preceeding cuts). You may stencil the top surface or keep it simple and cut a cross.
Botanical
The Botanical cut begins with a single north-south cut. Then lighter cuts, which are more decorative than functional, are made, suggesting the veins of a leaf.
Leaf
The Leaf is similar to the Botanical cut, but you may cut the border and center vein of the Leaf with deeper cuts, and then, using light decorative cuts, make the smaller veins.
Sunrise
The Sunrise is one of Jeffrey Hamelman’s favorite cuts for a miche. I like it for large rye loaves. Rye, lacking the structural strength of wheat flour, can be a great surface for intricate scores, as loaves containing a high percentage of rye spring less in the oven. The contrast of darkening rye and dusting flour on the exterior is intensely beautiful after baking.
Begin with the longer cuts, arching around the form of the loaf, diminishing and shortening as you proceed.
Spiral
For the Spiral, imagine a small circle at the center of the loaf with arcing lines coming off it. The lines emanate from the center and proceed to the shoulders of the loaf. This cut is best made with a low blade angle, similar to the angle used in cutting baguettes.
Smiley Face
Someone must have a better name for this cut? But regardless of the lack of a better term, it is a favorite for loaves that are strong and expand well in the oven.
The semicircle “mouth” of the smile is made with a low blade angle, the line running along the shoulder line of the loaf. The three additional cuts are made with a vertical blade angle, helping the loaf to expand additionally on the side opposite the more substantial cut. When well executed, the “mouth” will form a large “ear,” or grigne, which darkens to mahogany as it bakes.
Leaves
Similar to the Botanical and Leaf cuts above, Leaves is a combination of substantial, deeper cuts and light, decorative cuts.
Begin by cutting the outlines of the leaves; the initial cuts will look like two “Y” shapes that intersect. After the outlines, cut the center ribs of each and then, using light cuts that barely break the surface, cut the veins of the leaves.
Counting backward from when you estimate you will load the oven, preheat it for 45 to 60 minutes. This amount of time is necessary only when you are baking loaves on a baking stone. Everything else (for example, pan loaves or pans of rolls) simply requires that the oven be preheated and set to the proper temperature. For the hearth-baked loaves, which bake directly on a baking stone, preheat the stone on a rack in the lower third of the oven.
Depending on how (if at all) you decide to steam, your steaming system should be in place during preheating. Under the stone, on the floor of the oven, place a roasting pan loaded with lava rocks or a cast-iron skillet with metal scraps or pie weights. If you plan to bake in a cast-iron Dutch oven, a cloche, or some other device that serves as an oven within an oven, rather than on the surface of your baking stone, you should preheat that item during this time period. This is a good time to roast some vegetables or meat, bake a lasagna, etc. However, don’t place these items on your baking stone, as it will not fully preheat. Instead, use an empty rack placed above the stone.
For breads, rolls, scones, biscuits, and anything else baked in or on a pan, loading simply means sliding pans onto the rungs of the oven to bake. With loaves that bake directly on a baking stone (we’ll call them “hearth loaves”), there are a few steps to learn.
HEARTH BAKING STEPS
FIRST, GATHER THE TOOLS:
• Parchment paper cut to the size of your baking stone. You will eventually graduate away from using parchment paper under the loaf. When you do, a little semolina or whole wheat flour can act like ball bearings, allowing the loaf to slide onto the baking stone.
• Transfer peel or flipping board for moving elongated loaves from their proofing spot to the parchment paper.
• A half-sheet pan, a pizza peel, or any other stiff, thin piece of material that can be used to slide the loaves onto the baking stone.
• Razor and lame for scoring (if the loaves are scored, like baguettes)
• Water for steaming (I like to use a long-necked wine bottle to pour the water into the roasting pan or heated cast-iron skillet)
• Oven mitts
TO LOAD:
• Place the prepared parchment on a pizza peel or an upside-down sheet pan. As I note above, with some practice and experience you can simply sprinkle flour, semolina, or cornmeal onto the peel, aiding the sliding action that will deposit the loaf onto the stone.
• Gently invert the proofing loaf from its basket, towel-lined bowl, or linen couche onto the prepared parchment paper. In some cases (baguettes, for example) you will use a transfer peel or “flipping board” (see Tools) to move the loaves. Remember that with hearth breads we most often proof the loaf seam side up with the top of the loaf against the floured surface of the proofing vessel. With some recipes that yield multiple loaves (again, baguettes), distribute them on the parchment paper evenly for best baking results.
• Score the loaf as directed or by referring to an example in the scoring diagram for options.
• Slide the loaf and parchment paper onto the preheated baking stone. Make any necessary adjustments to the placement of the parchment paper on the stone. Careful, hot!
• Steam the oven and set a timer, referring to the instructions for the recipe.
Loading
If loading the oven is a new process, I would advise a couple of dress rehearsals. One day when the oven is off, practice the loading steps using a 1- or 2-pound bag of beans or rice as a pretend loaf, imaginarily rising on a tea towel or in a proofing basket. Practice inverting this “loaf” onto a transfer peel and then onto a piece of parchment paper cut to the size of your stone. Practice sliding the whole thing into the oven onto the stone a few times, making any necessary adjustments to the placement of the parchment paper on the stone. Remember that when you are actually loading, the stone will be very hot. Be precise with your movements in order to avoid burns. A little practice will go a long ways toward helping you to be smooth and relaxed. You’ve got this!
Consider the size of the real loaves and their distribution on the parchment paper so that when they rise and expand in the oven they don’t touch. I like to place the parchment paper on the underside of a half-sheet pan (18 by 13 inches) and distribute the loaves so that each has the maximum space possible without falling off the stone; this also allows for some flubbing on my part. If the side of the loaf has become tacky or sticky during proofing, dust it slightly with flour so that when you put the loaves on parchment paper you will be able to make some small adjustments with their placement.
Steam allows the baking loaf to stretch and expand further in the oven, increasing its volume while also producing a better interior loaf structure and a crisper and well-colored crust.
Here is an overview of common steaming methods proceeding from nothing to complicated:
STEAMING METHODS
NO STEAM: Just skip it. You may feel that the difference between the matte loaf with a little less volume and color and the loaves with shine and a more open aspect is not worth the additional trouble. I understand. One of the best baguettes that I ate this year came from an outdoor wood-fired oven with no steaming mechanism. It baked in just over 10 minutes (fast!) and looked very poor on the outside, but when cut open it revealed a glossy, webbed crumb with the yellow hue of grain held inside the shell of crunchy crust. The simplicity, the honesty, and the smile and pride of the baker more than compensated for the visuals.
SPRAY BOTTLE, PRESSURIZED GARDEN SPRAYER: I tried spray bottles when I first began working with artisan bread at home. The hand sprayer is easy, but it generates only meager steam, much of which flies out the door or vent immediately. A pressurized garden sprayer delivers a significant quantity of moisture if pointed at the oven walls, but the spray often hits the surface of my loaves directly, causing a splotchy crust. Further, if you hit the oven light with water, it will explode. Trust me.
PREHEATED CAST-IRON SKILLET OR BAKING PAN: While the oven is preheating, place a sheet pan or a large cast-iron skillet in the bottom of the oven. After loading, pour a cup of boiling water into the pan or the skillet. For even better results, put scrapmetal objects into the pan or the skillet. Things such as metal cutlery, metal pie weights, blacksmith scrap, and old chain have good surface area and mass which, when heated and then hit with water, will create substantial steam. With an electric oven this method produces ample steam and great results. For gas ovens, I’ve found that I need some additional tricks to be happy with my bread. The poor results with a gas oven relate to venting. See Oven Types for additional information related to the differences between electric and gas home ovens.
Steaming, Scoring, and Ears
I regularly see questions on home baker forums that relate to scoring and “ears.” Frequently, scoring, the actual cutting action, is identified as the culprit. In actuality, most of the time when I see a thread with a subject like “HELP! NO EARS?” and I see the picture that is attached, it is clear that the problem is not blade angle, dough strength, proof, flour type, or something hidden under any of the other rocks that have been overturned in the search. The answer is steam. I have seen great ears on baguettes scored from every possible blade angle at many levels of proof and I have never seen great ears on bread that was poorly steamed. Get the steam right and you will be close; mess up the steam, and you will have edible bread but no ears.
At my house I have a gas oven. In the bottom of the oven, hidden from view but within the baking chamber, are a burner and an igniter. The gas burns, heating the air, and the oven’s interior and the combustion by-products exit via vents in the top of the oven, near the rear burners. The effluent pouring out of these vents is so hot that if I leave a pan at the back of the range and then try to move it with a bare hand, it will burn me. The gas oven, because of the combustion by-products, must be vented. So, anything introduced to the bake chamber (like wonderful steam!) will be immediately purged. Working around this requires some creativity. Electric ovens, on the other hand, are much tighter—when vents do exist, they are smaller and move much less air.
SELF-STEAMING: Loaves baked inside a cloche, in a Dutch oven, or on a baking stone with a metal bowl on top will essentially self-steam. During baking, in the closed environment (the cloche and the Dutch oven have their lid or cover on during most of baking; the metal bowl placed over the top of a loaf loaded onto a baking stone has the same effect), moisture from the loaf turns to steam. This works quite well for baking boules or a large miche. Remove the lid or the metal bowl approximately one-half to two-thirds of the way through baking to ensure that the loaf properly dries and darkens.
ROASTING PAN, LAVA ROCKS: This method uses two pieces of equipment—once I started following it, I looked no further. Place the baking stone on a rack in the lower third of the oven. Under the stone, on the floor of the oven, place a roasting pan loaded with lava rocks and mostly covered with aluminum foil. Leave a 1-inch channel of exposed rocks along the short side of the pan. Preset a chafing dish on an upper rack. After loading, pour water from a spouted vessel (I use a wine bottle) into the channel, onto the exposed rocks, then place the chafing dish over the loaves with an edge overhanging in such a way as to catch the steam rising from the lava rocks. Having the aluminum foil channel right under the lip of the roasting pan ensures that the maximum quantity of steam is directed to the bread. As with the self-steaming methods, remove the cover two-thirds of the way through the baking.
Be careful when steaming, and protect your hands and arms as you work. Water can cause hot glass oven doors to break. Place a towel over the glass while loading to reduce this risk.
We have come to the final moment. All that we have controlled and guided, from ingredients to mixing, folding, dividing, shaping, scoring, and loading, has been delivered to hot stones. As the oven is loaded and steam is introduced, our control wanes, our cuts open without us, and the loaves expand, swelling and darkening with chaos and color.
During baking, check to see if the loaves require any shuffling to brown evenly. Do this around two-thirds of the way through the baking. At this time, remove any covers or lids used for steaming as well as parchment paper under the loaf (the bottom will brown better without it). If you are baking your miche with a mixing bowl over it, remove the bowl. If you are baking in a cloche or Dutch oven, remove the lid. If you are trying the roasting pan method, remove the chafing dish (the lava rocks can stay in the oven), and so forth. The steam has done its job; it’s now time to set the crust and allow the loaf to dry and color. At the end of the estimated baking time, turn off the oven and leave the door open a few inches to set the crust.
When Is Bread Done?
How do we know when bread is done? In a decade of baking I’ve pulled millions of loaves and rolls from hot ovens. This repetition and daily practice have refined my senses somewhat. Like many bakers I know, I largely rely upon my eyes to judge when a load of bread is done. With the baker’s peel and long handle I can reach deep into the dark oven, scooping up loaves, pulling them into daylight to sense if they are done or need more time. I look for an even color that is appropriate to the bread I’m baking. A buttery pain de mie should be deep golden and toasty with good color and a firm crust on all sides. The Irish Levain Kvassmiche or Ciabatta should be deep mahogany, close to dark chocolate or roasted coffee beans. If my eyes want a second opinion, I pick up a loaf and quickly feel its weight relative to its size. I give a gentle squeeze to sense the firmness of crust and glance at the bottom to check the color on that side as well. Opening the oven door always gets the nose involved, yet another clue to the state of things. All of this information falls into the category of empirical knowledge. Experience collected from the senses, informed and confirmed through repetition, is the best teacher.
Gaining this knowledge and experience as a home baker can be challenging. As in the case of mixing, shaping, scoring, and baking, limited repetitions (how much bread can your family and neighbors actually eat?) can mean a slower learning process. Using the times and temperatures specified in the recipes and, more important, using your senses, you will quickly come into your own.
SO, FIRST, LOOK. Does the loaf have a deep color that is appetizing, not insipid? Deep crust color translates to flavor with bread in the same way that roasted vegetables, caramelized onions, and seared short ribs all benefit from browning. This color, which relates to the Maillard reaction, is important and the first clue to what flavors await.
NEXT, TOUCH. With oven mitts or a pair of work gloves dedicated to oven use, hold the loaf and give it a squeeze. Hearth-baked loaves should be firm and should not yield easily; pan breads should merely give resistance, which indicates that they will remain set after cooling. Holding the loaf will also give some feedback regarding moisture loss during baking. Does it feel light for the size?
I haven’t found any success with the use of a digital probe thermometer for judging doneness. Baking loaves (especially those in direct contact with the hearth or baking stone) reach 190°F to 200°F, or, “done,” just two-thirds of the way through baking. I promise that the bread is not even close to done. So save the thermometer for use in measuring dough temperature or checking a roast or making jam and leave the heavy decision making to your powerful eyes, nose, and fingers.
