Find Your Information
One of the biggest reasons to store your stuff in DEVONthink (as opposed to, say, the Finder) is its fast, smart, and flexible filtering and searching. This chapter describes ways to find things in DEVONthink, from simple to complex, including a look at how to Use Smart Groups. It also discusses how to Search Using the Concordance, a specialized way of searching based on the frequency with which words appear in your database.
Use Filters
Early in this book, I talked about how to sort your information in List and Column views (see View as List, the sidebar A Word About Sort Order, and View as Columns). If you have hundreds or thousands of items in a single group or inbox, however, mere sorting might not be sufficient to pick out a particular item quickly. DEVONthink 3 adds filters, which provide various ways of narrowing down the items shown in a given view. (Unlike searching, which can extend across groups or even databases, filtering applies only to the list of documents currently shown in the item list, which is in turn dependent on what’s selected in the Navigate sidebar or on your search results. So, you can use filters to further narrow down a search, but not as a substitute for searching.)
Three filter categories exist: info (which encompasses dates and marks—flag, label, read/unread state, and locked/unlocked state), tags, and location. You can display these filters at the bottom of the Navigate sidebar by choosing Tools > Filters > Info (Control-I), Tools > Filters > Tags (Control-T), or Tools > Filters > Maps (Control-G)—or click the Info ![]() , Tags
, Tags ![]() , or Maps
, or Maps ![]() icon at the bottom of the sidebar. Figure 61 shows each of the filter views.
icon at the bottom of the sidebar. Figure 61 shows each of the filter views.
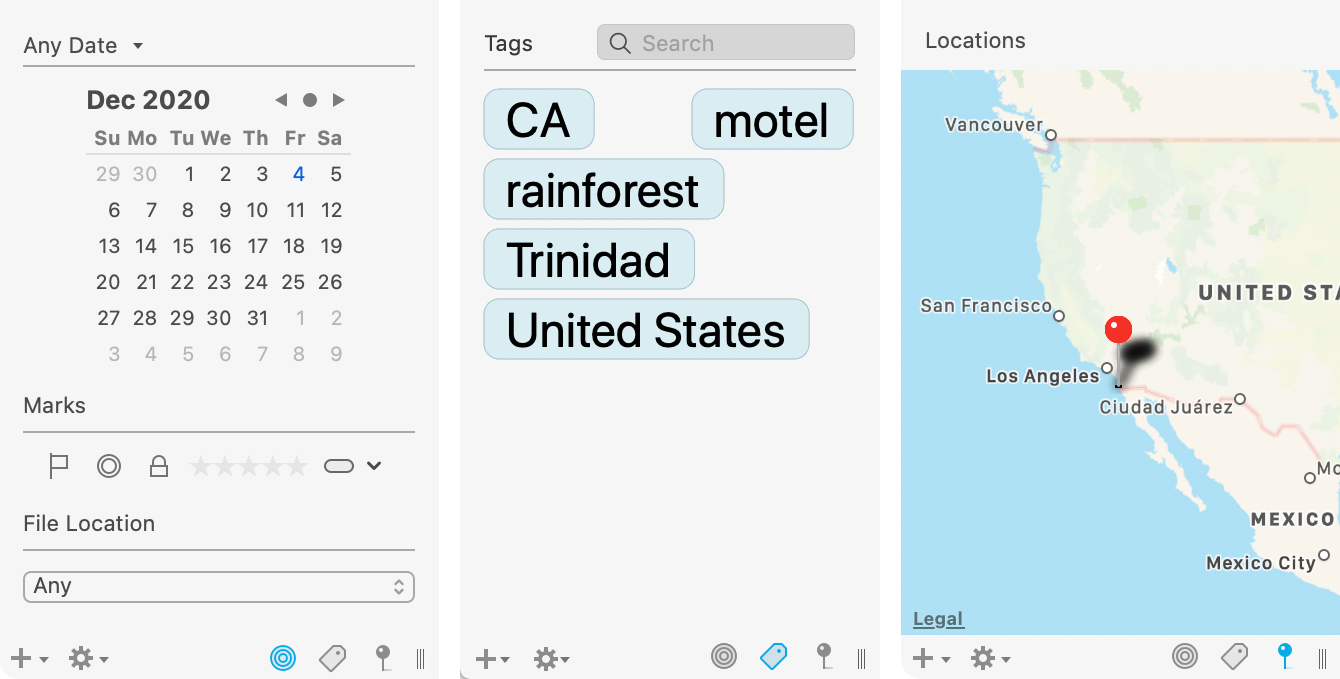
Here’s how to filter your view with each category:
Dates: From the pop-up menu at the top of the info filter, choose Any Date (the default), Date Added, Date Created, Date Modified, Date Opened, or Date Due. Then click a date on the calendar or drag to select a date range. DEVONthink hides any documents in the current view that are outside your specified date parameters. You can also choose Indexed or Imported from the File Location pop-up menu to filter by those locations, or Any to show all locations.
Marks: Click the flag
 , read
  , or unlocked
  icon to show only flagged, unread, or locked documents, respectively, in the current view. Or click the label
  icon and choose a label from the pop-up menu to display only items with that label.
Tags: Click a tag to display only items in the current view that include that tag. To narrow down further, continue clicking to add more tags. To remove a single tag from the filter, delete it from the information bar; to remove all tags from the filter, click Reset on information bar.
Maps: Click a pin on the map to display only the items (such as photos) with that geolocation data.
In all these cases, closing the Filters pane removes any filters from the item list, showing its full contents again.
Perform a Simple Search
Most searches in DEVONthink are simple and straightforward—and the process couldn’t be easier. Type your search term into the search field on the toolbar, and DEVONthink almost instantly returns matching documents from anywhere in the current database—with default settings, you need not even press Return (Figure 62).
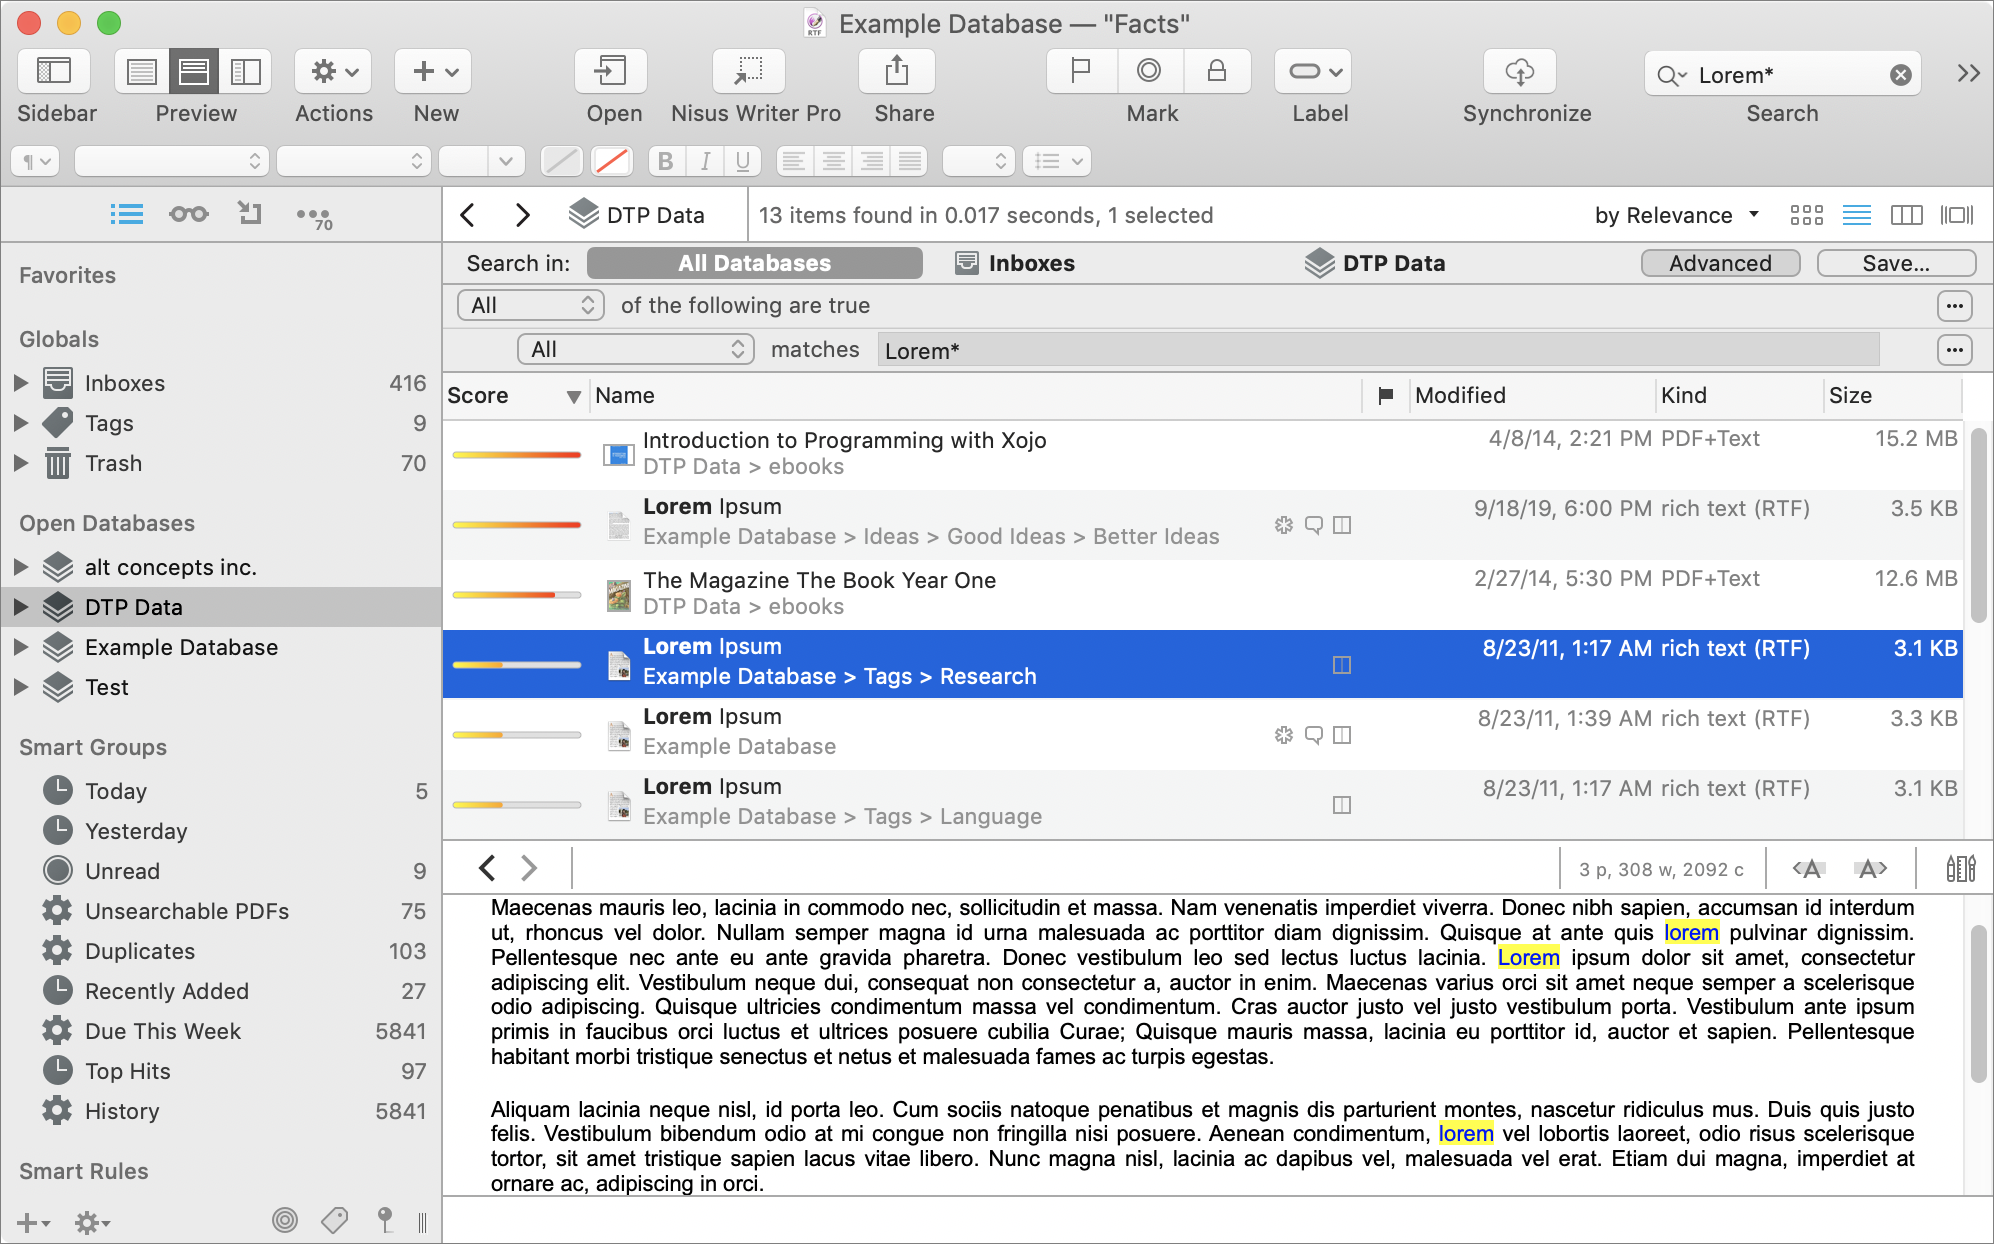
By default, results are ranked by relevance, and each item has a colored bar that graphically indicates its score. Any occurrences of your search term are bolded in the results list and highlighted in the documents themselves (partial-word matches aren’t highlighted, however).
Refine a Search with Search Options
If a simple search doesn’t return the results you’re looking for (or returns far too many results)—or if you want to change the manner in which results are returned—you can click the magnifying glass ![]() in the search field to display a pop-up menu with additional search options. Choose one of these to refine your search—and note that your choice remains in effect for future searches until you change it (even if you quit and reopen DEVONthink), so you may want to reset it right after use to avoid future confusion.
in the search field to display a pop-up menu with additional search options. Choose one of these to refine your search—and note that your choice remains in effect for future searches until you change it (even if you quit and reopen DEVONthink), so you may want to reset it right after use to avoid future confusion.
The first group of options, under the “Options” label, affects the way results are returned as you type:
Live while typing: When this is selected, as it is by default, DEVONthink starts returning results immediately as you type. If you deselect this, you must press Return or Enter to complete your search.
Partial matches while typing: Keep this option selected to have DEVONthink return items containing words beginning with whatever letters you’ve typed—even without pressing Return or Enter.
When “Partial matches while typing” is unchecked, you must press Return or Enter to perform a search. And, even when it is checked, you can press Return or Enter to search for whole words—not only those beginning with whatever you typed. For example, if “Partial matches while typing” is checked and you enter
appin the search field, documents containing strings like “approval” and “application” may appear as potential matches—as though you’d included a wildcard asterisk at the end of the search term:app*. But when you press Return or Enter, only those that contain “app” as a full word remain in the list.
The second (unlabeled) group of options affects how matches occur:
Ignore Diacritics: With this option selected, DEVONthink ignores all diacritical marks (such as umlauts and accents) when searching, so, for instance, a search for
creme bruleewith this option enabled will match a document containing “crème brûlée”, and vice versa.Fuzzy: With Fuzzy on, DEVONthink looks for alternative spellings with similar sounds (although I’ve rarely found this option to produce any useful effects).
Options in the third group, under the “Search in” label, affect where DEVONthink searches and appear only after you have begun your search:
All Databases: Searches in all open databases
Inboxes: Searches only in your inboxes (including the global Inbox)
The current database or group: Searches in that location
At the bottom, there may be additional items:
Recent Searches: If you’ve performed searches recently, they appear here so you can perform them again quickly. However, note that (regardless of your settings in the first group of options), recent searches appear here only if you press Return or Enter after typing your search term.
Clear Entries: To remove recent searches from the pop-up menu, choose this command.
Use Search Prefixes
Ordinarily, DEVONthink searches look everywhere—in documents’ titles, contents, and metadata. But suppose you want to search only in the title or only in the tags? For more specific searches like these, DEVONthink 3 introduces search prefixes, which are simply words, followed by a colon, that you type before a term in the search field that restrict the search in some way. (Spotlight has offered a similar option for many years.)
For example, if you want to search for “cat” but only if it appears in a document’s name, you could enter name:cat in the search field. If you want to search for “cat” only when used as a tag, you can enter tags:cat. There are dozens of these search prefixes, which cover any type of metadata as well as various search scopes. They’re all detailed in the DEVONthink documentation—look for the “Search Prefixes” topic in the appendix. That topic also talks about how you can use operators besides the colon character (which means “equals,” more or less) to perform other types of comparisons (“earlier than,” ”is not,” “ends with,” “contains,” and so on).
Although search prefixes are quite powerful, they’re not terribly user-friendly, and you can perform most of the searches they permit in a simpler way with an advanced search, as I describe next.
Do an Advanced Search
Whether or not you modify your search criteria or use search prefixes as described above, you can extend a search with much more elaborate options than the search field offers alone. To do this, press Return or Enter after your search. A new bar appears below the path bar (Figure 63), and though the DEVONthink documentation doesn’t give it an official name, I’ll call it the search scope bar, since it displays controls allowing you to change the scope of your search.

Near the right side of the search scope bar is an Advanced button. Click that to expand the view with even more options, as shown in Figure 64.

With the advanced controls showing, you’re now ready to perform an advanced search:
Choose a search scope by clicking All Databases, the name of the current database, or Inboxes on the search scope bar.
Enter your first search criterion. Start by selecting a predicate (that is, a search context) from the pop-up menu to the left of the word “matches.” You have dozens of choices, such as Content, Recipient (for email messages), Composer (for music), width (for graphics), word count, and date modified, not to mention any custom metadata you’ve created.
Once you’ve selected a predicate, enter any additional requested information. The exact options depend on the predicate. For example, you can choose
[Content] matchessome text,[Height] [Is Greater Than]number of pixels, or[Date Added] [Is] [This Year].Optionally, to add more criteria, click the plus
 button to the right of the first criterion and repeat steps 2 and 3 as necessary.
When you have two or more criteria, you must tell DEVONthink whether to look for items that match all of them (choose All—the default—from the pop-up menu next to “of the following are true”) or items that match at least one of them (choose Any).
You can also have compound predicates, which let you nest Any/All criteria so you can search using expressions like “(A or B) and C” or “A or (B and C).”
To turn an existing single predicate into a compound predicate, hold down the Option key and click the ellipsis
 button to the right of any criterion (where the plus
  button usually is); then choose Any or All from the new pop-up menu that appears below the existing criterion and fill in the details for the additional component just as in steps 2 and 3.
Repeat as needed to create the set of conditions you’re looking for.
To cancel a search, click the X
 icon in the search field.
DEVONthink returns live search results as you add and modify your search criteria, so there’s nothing further to do unless you want to save your advanced search as a smart group; see Save an Advanced Search.
Use Smart Groups
Suppose you construct an elaborate search that returns just the documents you’re looking for, and you suspect you may have to search again later with the same criteria. Or, say you always want quick access to documents having some set of attributes, even though their tags, groups, and other metadata may change. In cases like these, you might be able to use a smart group, a type of saved search that appears much like a regular group—but whose contents change dynamically along with the contents of your database. You can create a smart group in two ways: save an advanced search or use the Smart Group Editor (a method that provides more flexibility).
Save an Advanced Search
After performing an advanced search (as described just previously), click the Save button just above the search criteria. Type a name for the saved search and click OK. A new smart group with a special gear ![]() icon appears in your database.
icon appears in your database.
Use the Smart Group Editor
If you don’t want to start with an advanced search, you can build a smart group from scratch; doing so gives you a few extra options over an advanced search. If you’re familiar with creating smart folders in the Finder, smart playlists in Music, or smart mailboxes in Mail, you’ll be at home in the Smart Group Editor.
To create a smart group with this method, follow these steps:
Choose Data > New > Smart Group.
In the Smart Group Editor (Figure 65), enter a name for your smart group.
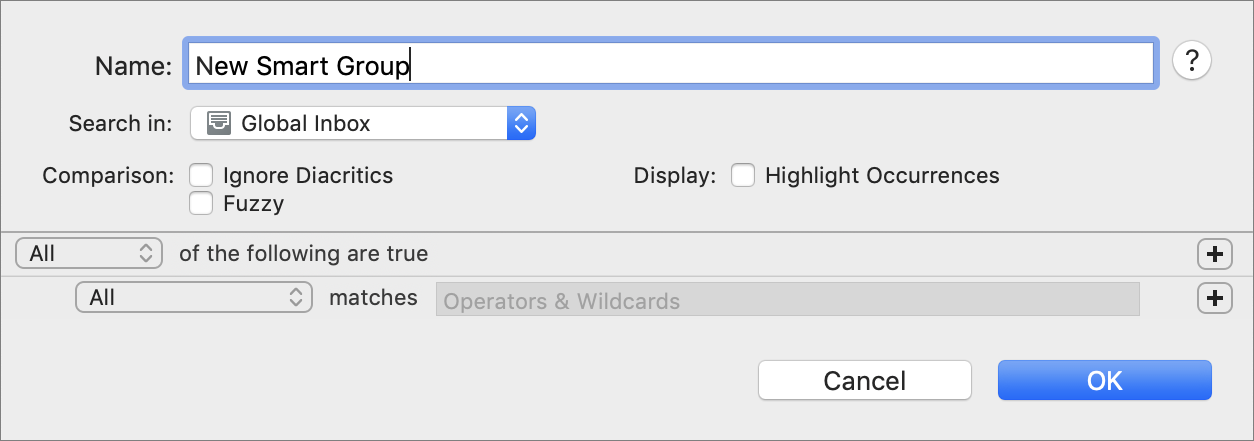
Figure 65: Use the Smart Group Editor to construct more elaborate smart groups. Choose a search location from the “Search in” pop-up menu and optionally check Ignore Diacritics and/or Fuzzy—all these options work just as for other types of searches.
Optionally select Highlight Occurrences to highlight matching terms in the documents themselves, just as during a regular search.
Enter your search criteria just as in an advanced search.
Click OK.
DEVONthink saves your new smart group—under Smart Groups in the sidebar if your search includes multiple databases, or at your current location in the database otherwise.
To display the smart group’s contents, click it, or click the disclosure triangle next to it (depending on the view).
Modify or Delete a Smart Group
To edit an existing smart group, double-click its name. The Smart Group Editor appears; make any changes you want and then click OK.
To delete a smart group from the sidebar, right-click (or Control-click) it and choose Remove from the contextual menu. To delete a smart group from a location other than the sidebar, select it and press Delete.
Search Within a Document
The kinds of search we’ve covered so far are mainly intended to help you find matching documents. (And, as we’ve seen, they can also highlight search terms within matched documents.) But if you simply want to find something within a document—or if you want to do a find-and-replace operation—there’s a new interface to do so in DEVONthink 3: the Search inspector.
To use the Search inspector, make sure a document is selected or open, and then press ⌘-F or choose Edit > Find > Find. (You can also choose Tools > Inspectors > Search (Control-U), or click the Search ![]() icon at the top of the inspector.) The Search inspector (Figure 66) appears.
icon at the top of the inspector.) The Search inspector (Figure 66) appears.
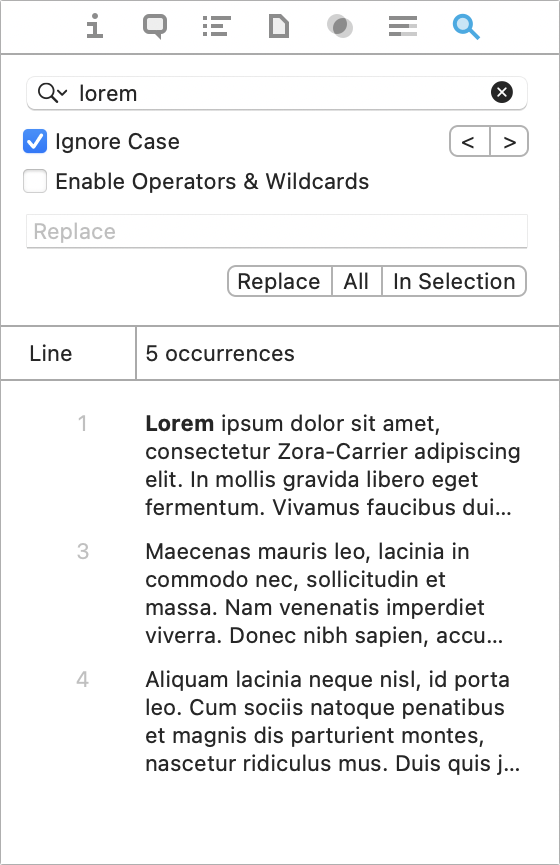
To use the Search inspector, type a term into the search field and press Return or Enter—there’s no live searching as in the regular search field. (There’s also just one search option: Ignore Case, which is checked by default.) Matches appear in boldface in the list below; they’re also highlighted in the view/edit pane. You can also select an item in the list to jump right to it, or use the forward ![]() and back
and back ![]() arrow buttons to navigate.
arrow buttons to navigate.
There are two search options:
Ignore Case: Selected by default, this makes searching case-insensitive.
Enable Operators & Wildcards: Deselected by default; if you select it, the Search inspector lets you use operators such as
AND,OR,NOT, andNEAR, and wildcards such as*, when searching within documents. See Searching for details.
To do a find-and-replace, enter replacement text in the Replace field and click Replace (for just the current or next occurrence), All (to replace all occurrences), or In Selection (to replace all occurrences within the currently selected text).
Search Using the Concordance
The final method of searching—available only in Pro and Server editions of DEVONthink—is to use the Concordance, which provides a list of all the words in the current selection, along with their usage frequency and other statistics.
To use the Concordance in a single document, select it and choose Tools > Inspectors > Concordance > List (Control-8) or click the Concordance ![]() icon in the inspector. The concordance inspector appears on the right side of the window (Figure 67) with every word listed by frequency (number of occurrences).
icon in the inspector. The concordance inspector appears on the right side of the window (Figure 67) with every word listed by frequency (number of occurrences).
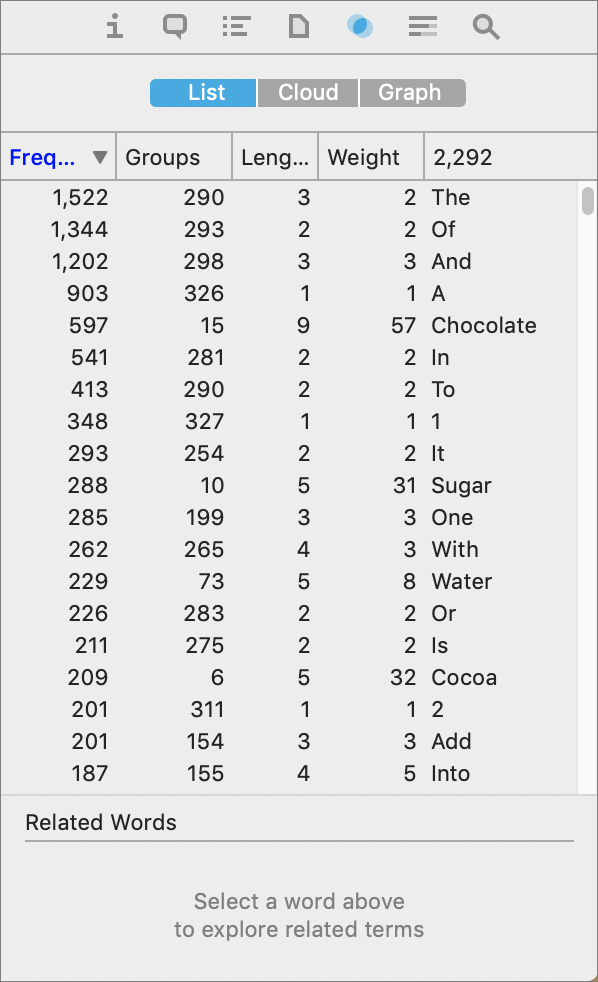
You can click a column header to sort by that criterion, and click again to reverse the sort order. You can also drag to rearrange the columns’ order. The columns are:
Frequency: The number of times this word appears in the document.
Groups: The number of groups in this database that contain this word.
Length: The number of characters in the word.
Weight: An indication of the word’s relevance in a given database.
Words: An alphabetical list of words. The number at the top indicates the total number of unique words in the document.
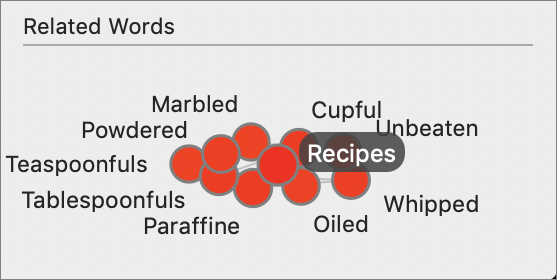
Select a word, and DEVONthink highlights each occurrence in the document. You can select multiple words by ⌘-clicking. If you select a single word, the (resizable) Related Words area at the bottom (Figure 68) shows a graphical depiction of other words that frequently appear in proximity to this one throughout your database—not necessarily in this document.
Although the Concordance’s list view is generally the most useful, DEVONthink 3 adds two more views. Click the Cloud tab at the top of the inspector to display a word cloud, in which each term’s size is relative to its weight; or click the Graph tab to show a simple (unlabeled) line graph of word frequency in the document.
If your needs extend beyond a single document, such as analyzing word usage in a large corpus of texts, you can select multiple documents, a group, a tag, a smart group, or pretty much anything else to see statistics for the whole set. To show a concordance for a whole database, select the database in the Navigate sidebar and then make sure no items within that database are selected (meaning the view/edit pane should say “No Selection”).