3.2 Multiway Branches
“Would you tell me, please, which way I ought to go from here?”
“That depends a good deal on where you want to get to,” said the Cat.
LEWIS CARROLL, Alice in Wonderland
Any programming construct that chooses one from a number of alternative actions is called a branching mechanism. The if-else statement chooses between two alternatives. In this section we will discuss methods for choosing from among more than two alternatives.
Nested Statements
As you have seen, if-else statements and if statements contain smaller statements within them. Thus far we have used compound statements and simple statements such as assignment statements as these smaller substatements, but there are other possibilities. In fact, any statement at all can be used as a subpart of an if-else statement, of an if statement, of a while statement, or of a do-while statement. This is illustrated in Display 3.3. The statement in that display has three levels of nesting, as indicated by the boxes. Two cout statements are nested within an if-else statement, and that if-else statement is nested within an if statement.
Display 3.3 An if-else Statement Within an if Statement
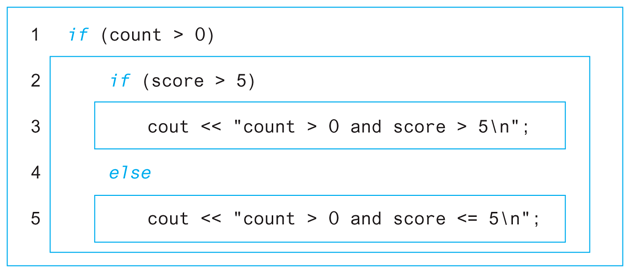
When nesting statements, you normally indent each level of nested substatements. In Display 3.3 there are three levels of nesting, so there are three levels of indenting. Both cout statements are indented the same amount because they are both at the same level of nesting. Later in this chapter, you will see some specific cases where it makes sense to use other indenting patterns, but unless there is some rule to the contrary, you should indent each level of nesting as illustrated in Display 3.3.
Programming Tip Use Braces in Nested Statements
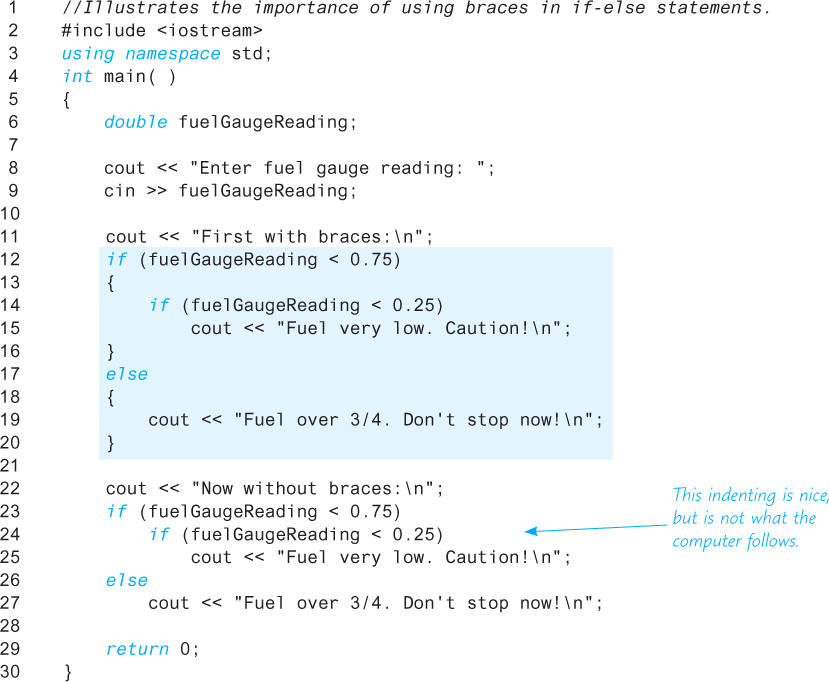
Suppose we want to write an if-else statement to use in an onboard computer monitoring system for a racing car. This part of the program warns the driver when fuel is low but tells the driver to bypass pit stops if the fuel tank is close to full. In all other situations the program gives no output so as not to distract the driver. We design the following pseudocode:
If the fuel gauge is below 3/4 full, then:
Check whether the fuel gauge is below 1/4 full and issue a low fuel warning if it is.
Otherwise (that is, if fuel gauge is over 3/4 full):
Output a statement telling the driver not to stop.
If we are not being too careful, we might implement the pseudocode as follows:
if (fuelGaugeReading < 0.75)
	  if (fuelGaugeReading < 0.25)
		cout << "Fuel very low. Caution!\n";
else	   cout << "Fuel over 3/4. Don't stop now!\n";
Read text to see what is wrong with this.
This implementation looks fine, and it is indeed a correctly formed C++ statement that the compiler will accept and that will run with no error messages. However, it does not implement the pseudocode. Notice that this statement has two occurrences of if and only one else. The compiler must decide which if gets paired with the one else. We have nicely indented this nested statement to show that the else should be paired with the first if, but the compiler does not care about indenting. To the compiler, the preceding nested statement is the same as the following version, which differs only in how it is indented:
if (fuelGaugeReading < 0.75)
 	   if (fuelGaugeReading < 0.25)
		cout << "Fuel very low. Caution!\n";
 else
		 cout << "Fuel over 3/4. Don't stop now!\n";
Unfortunately for us, the compiler will use the second interpretation and will pair the one else with the second if rather than the first if. This is sometimes called the dangling else problem; it is illustrated by the program in Display 3.4.
Display 3.4 The Importance of Braces
Sample Dialogue 1

Sample Dialogue 2

The compiler always pairs an else with the nearest previous if that is not already paired with some else. But, do not try to work within this rule. Ignore the rule! Change the rules! You are the boss! Always tell the compiler what you want it to do and the compiler will then do what you want. How do you tell the compiler what you want? You use braces. Braces in nested statements are like parentheses in arithmetic expressions. The braces tell the compiler how to group things, rather than leaving them to be grouped according to default conventions, which may or may not be what you want. To avoid problems and to make your programs easier to read, place braces, { and }, around substatements in if-else statements, as we have done in the first if-else statement in Display 3.4.
For very simple substatements, such as a single assignment statement or a single cout statement, you can safely omit the braces. In Display 3.4, the braces around the following substatement (within the first if-else statement) are not needed:
cout << "Fuel over 3/4. Don't stop now!\n";However, even in these simple cases, the braces can sometimes aid readability. Some programmers advocate using braces around even the simplest substatements when they occur within if-else statements, which is what we have done in the first if-else statement in Display 3.4.
Multiway if-else Statements
An if-else statement is a two-way branch. It allows a program to choose one of two possible actions. Often you will want to have a three- or four-way branch so that your program can choose between more than two alternative actions. You can implement such multiway branches by nesting if-else statements. By way of example, suppose you are designing a game-playing program in which the user must guess the value of some number. The number can be in a variable named number, and the guess can be in a variable named guess. If you wish to give a hint after each guess, you might design the following pseudocode:
Output "Too high." when guess > number.
Output "Too low." when guess < number.
Output "Correct!" when guess == number.
Any time a branching action is described as a list of mutually exclusive conditions and corresponding actions, as in this example, it can be implemented by using a nested if-else statement. For example, this pseudocode translates to the following code:
if (guess > number)
	cout << "Too high.";
 else if (guess < number)
	cout << "Too low.";
 else if (guess == number)
	cout << "Correct!";
The indenting pattern used here is slightly different from what we have advocated previously. If we followed our indenting rules, we would produce something like the following:
if (guess > number)
	cout << "Too high.";
 else
 	   if (guess < number)
		cout << "Too low.";
 	   else
 		   if (guess == number)
			cout << "Correct!";
Use the previous indenting pattern rather than this one.
This is one of those rare cases in which you should not follow our general guidelines for indenting nested statements. The reason is that by lining up all the else’s, you also line up all the condition/action pairs and so make the layout of the program reflect your reasoning. Another reason is that even for not-too-deeply nested if-else statements, you can quickly run out of space on your page!
Since the conditions are mutually exclusive, the last if in the nested if-else statement above is superfluous and can be omitted, but it is sometimes best to include it in a comment as follows:
if (guess > number)
	cout << "Too high.";
 else if (guess < number)
	cout << "Too low.";
 else //(guess == number)
	 cout << "Correct!";
You can use this form of multiple-branch if-else statement even if the conditions are not mutually exclusive. Whether the conditions are mutually exclusive or not, the computer will evaluate the conditions in the order in which they appear until it finds the first condition that is true and then it will execute the action corresponding to this condition. If no condition is true, no action is taken. If the statement ends with a plain else without any if, then the last statement is executed when all the conditions are false.
Programming Example State Income Tax
Display 3.5 contains a program that uses a multiway if-else statement. The program takes the taxpayer’s net income rounded to a whole number of dollars and computes the state income tax due on this net income. This state computes tax according to the following rate schedule:
No tax is paid on the first $15,000 of net income.
A tax of 5 percent is assessed on each dollar of net income from $15,001 to $25,000.
A tax of 10 percent is assessed on each dollar of net income over $25,000.
Display 3.5 Multiway if-else Statement
 1	   //Program to compute state income tax.
 2	#include <iostream>
 3	using namespace std;
 4
 5	//This program outputs the amount of state income tax due computed
 6	//as follows: no tax on income up to $15,000; 5% on income between
 7	//$15,001 and $25,000; 10% on income over $25,000.
 8
 9	int main( )
10	  {
11		  int netIncome;
12		  double taxBill;
13		  double fivePercentTax, tenPercentTax;
14
15
16		  cout << "Enter net income (rounded to whole dollars) $";
17		  cin >> netIncome;
18
19		  if (netIncome <= 15000)
20			  taxBill = 0;
21		  else if ((netIncome > 15000) && (netIncome <= 25000))
22			  //5% of amount over $15,000
23			  taxBill = (0.05 * (netIncome - 15000));
24		  else //netIncome > $25,000
25		  {
26			  //fivePercentTax = 5% of income from $15,000 to $25,000.
27			  fivePercentTax = 0.05 * 10000;
28			  //tenPercentTax = 10% of income over $25,000.
29			  tenPercentTax = 0.10 * (netIncome − 25000);
30			  taxBill = (fivePercentTax + tenPercentTax);
31		  }
32
33		  cout.setf(ios::fixed);
34		  cout.setf(ios::showpoint);
35		  cout.precision(2);
36		  cout << "Net income = $" << netIncome << endl
37			   << "Tax bill = $" << taxBill << endl;
38
39		  return 0;
40	  }
Sample Dialogue
Enter net income (rounded to whole dollars) $25100
Net income = $25100.00
Tax bill = $510.00
The program defined in Display 3.5 uses a multiway if-else statement with one action for each of these three cases. The condition for the second case is actually more complicated than it needs to be. The computer will not get to the second condition unless it has already tried the first condition and found it to be false. Thus, you know that whenever the computer tries the second condition, it will know that netIncome is greater than 15000. Hence, you can replace the line
else if ((netIncome > 15000) && (netIncome <= 25000))with the following, and the program will perform exactly the same:
else if (netIncome <= 25000)Self-Test Exercises
What output will be produced by the following code, when embedded in a complete program?
int x = 2;
cout << "Start\n";
 if(x <= 3)
 	   if (x != 0)
		cout << "Hello from the second if.\n";
 	   else
		 cout << "Hello from the else.\n";
cout << "End\n";
cout << "Start again\n";
 if (x > 3)
 	   if (x != 0)
		cout << "Hello from the second if.\n";
 	   else
		 cout << "Hello from the else.\n";
cout << "End again\n";
What output will be produced by the following code, when embedded in a complete program?
int extra = 2;
 if (extra < 0)
	cout << "small";
 else if (extra = = 0)
	cout << "medium";
 else
	 cout << "large";
What would be the output in Self-Test Exercise 6 if the assignment were changed to the following?
int extra = −37;What would be the output in Self-Test Exercise 6 if the assignment were changed to the following?
int extra = 0;What output will be produced by the following code, when embedded in a complete program?
int x = 200;
cout << "Start\n";
 if (x < 100)
	cout << "First Output.\n";
 else if (x > 10)
	cout << "Second Output.\n";
 else
	 cout << "Third Output.\n";
cout << "End\n";
What would be the output in Self-Test Exercise 9 if the Boolean expression
(x > 10)were changed to(x > 100)?What output will be produced by the following code, when embedded in a complete program?
int x = SOME_CONSTANT; cout << "Start\n"; if (x < 100) cout << "First Output.\n"; else if (x > 100) cout << "Second Output.\n"; else cout << x << endl; cout << "End\n";SOME_CONSTANTis a constant of typeint. Assume that neither"First Output"nor"Second Output"is output. So, you know the value ofxis output.Write a multiway
if-elsestatement that classifies the value of anintvariableninto one of the following categories and writes out an appropriate message:n < 0 or 0 ≤ n ≤ 100 or n > 100Given the following declaration and output statement, assume that this has been embedded in a correct program and is run. What is the output?
enum Direction { N, S, E, W };
//...
cout << W << " " << E << " " << S << " " << N << endl;
Given the following declaration and output statement, assume that this has been embedded in a correct program and is run. What is the output?
enum Direction { N = 5, S = 7, E = 1, W };
// ...
cout << W << " " << E << " " << S << " " N << endl;
The switch Statement
You have seen if-else statements used to construct multiway branches. The switch statement is another kind of C++ statement that also implements multiway branches. A sample switch statement is shown in Display 3.6. This particular switch statement has four regular branches and a fifth branch for illegal input. The variable grade determines which branch is executed. There is one branch for each of the grades 'A', 'B', and 'C'. The grades 'D' and 'F' cause the same branch to be taken, rather than having a separate action for each of 'D' and 'F'. If the value of grade is any character other than 'A', 'B', 'C', 'D', or 'F', then the cout statement after the identifier default is executed.
Display 3.6 A switch Statement
 1	   //Program to illustrate the switch statement.
 2	#include <iostream>
 3	using namespace std;
 4	int main( )
 5	{
 6		char grade;
 7		cout << "Enter your midterm grade and press Return: ";
 8		cin >> grade;
 9		switch (grade)
10		  {
11			  case 'A':
12				  cout << "Excellent. "
13					   << "You need not take the final.\n";
14				  break;
15			  case 'B':
16				  cout << "Very good. ";
17				  grade = 'A';
18				  cout << "Your midterm grade is now "
19					   << grade << endl;
20				  break;
21			  case 'C':
22				  cout << "Passing.\n";
23				  break;
24			  case 'D':
25			  case 'F':
26				  cout << "Not good. "
27					   << "Go study.\n";
28				  break;
29			  default:
30				  cout << "That is not a possible grade.\n";
31		  }
32		  cout << "End of program.\n";
33		  return 0;
34	  }
Sample Dialogue 1
Enter your midterm grade and press Return: A
Excellent. You need not take the final.
End of program.
Sample Dialogue 2
Enter your midterm grade and press Return: B
Very good. Your midterm grade is now A.
End of program.
Sample Dialogue 3
Enter your midterm grade and press Return: D
Not good. Go study.
End of program.
Sample Dialogue 4
Enter your midterm grade and press Return: E
That is not a possible grade.
End of program.
The syntax and preferred indenting pattern for the switch statement are shown in the sample switch statement in Display 3.6 and in the box entitled “switch Statement.”
When a switch statement is executed, one of a number of different branches is executed. The choice of which branch to execute is determined by a controlling expression given in parentheses after the keyword switch. The controlling expression in the sample switch statement shown in Display 3.6 is of type char. The controlling expression for a switch statement must always return either a bool value, an enum constant, one of the integer types, or a character. When the switch statement is executed, this controlling expression is evaluated and the computer looks at the constant values given after the various occurrences of the case identifiers. If it finds a constant that equals the value of the controlling expression, it executes the code for that case. For example, if the expression evaluates to 'B', then it looks for the following and executes the statements that follow this line:
case 'B':Notice that the constant is followed by a colon. Also note that you cannot have two occurrences of case with the same constant value after them, since that would be an ambiguous instruction.
A break statement consists of the keyword break followed by a semicolon. When the computer executes the statements after a case label, it continues until it reaches a break statement. When the computer encounters a break statement, the switch statement ends. If you omit the break statements, then after executing the code for one case, the computer will go on to execute the code for the next case.
Note that you can have two case labels for the same section of code. In the switch statement in Display 3.6, the same action is taken for the values 'D' and 'F'. This technique can also be used to allow for both upper- and lowercase letters. For example, to allow both lowercase 'a' and uppercase 'A' in the program in Display 3.6, you can replace
case 'A':
	cout << "Excellent. "
		 << "You need not take the final.\n";
 		break;
with the following:
case 'A':
 case 'a':
	cout << "Excellent. "
		 << "You need not take the final.\n";
 	   break;
Of course, the same can be done for all the other letters.
If no case label has a constant that matches the value of the controlling expression, then the statements following the default label are executed. You need not have a default section. If there is no default section and no match is found for the value of the controlling expression, then nothing happens when the switch statement is executed. However, it is safest to always have a default section. If you think your case labels list all possible outcomes, then you can put an error message in the default section. This is what we did in Display 3.6.
Using switch Statements for Menus
The multiway if-else statement is more versatile than the switch statement, and you can use a multiway if-else statement anywhere you can use a switch statement. However, sometimes the switch statement is clearer. For example, the switch statement is perfect for implementing menus.
A menu in a restaurant presents a list of alternatives for a customer to choose from. A menu in a computer program does the same thing: It presents a list of alternatives on the screen for the user to choose from. Display 3.7 shows the outline of a program designed to give students information on homework assignments. The program uses a menu to let the student choose which information she or he wants. A more readable way to implement the menu actions is through functions. Functions are discussed in Chapter 4.
Display 3.7 A Menu
 1	   //Program to give out homework assignment information.
 2	#include <iostream>
 3	using namespace std;
 4
 5
 6	int main( )
 7	{
 8		int choice;
 9
10		  do
11		  {
12			  cout << endl
13				   << "Choose 1 to see the next homework assignment.\n"
14				   << "Choose 2 for your grade on the last assignment.\n"
15				   << "Choose 3 for assignment hints.\n"
16				   << "Choose 4 to exit this program.\n"
17				   << "Enter your choice and press Return: ";
18			  cin >> choice;
19
20			  switch(choice)
21			  {
22				  case 1:
23					   //code to display the next assignment on screen would go here.
24					   break;
25				  case 2:
26					   //code to ask for a student number and give the corresponding
27					   //grade would go here.
28					   break;
29				  case 3:
30					   //code to display a hint for the current assignment would go
31					  //here.
32					  break;
33				  case 4:
34					  cout << "End of Program.\n";
35					  break;
36				  default:
37					  cout << "Not a valid choice.\n"
38						   << "Choose again.\n";
39			  }
40		  } while (choice != 4);
41
42		  return 0;
43	  }
Sample Dialogue
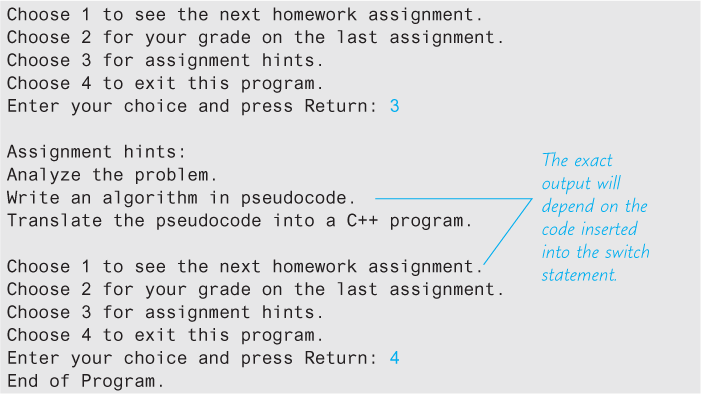
Blocks
Each branch of a switch statement or of an if-else statement is a separate subtask. As indicated in the previous Programming Tip, it is often best to make the action of each branch a function call. That way the subtask for each branch can be designed, written, and tested separately. On the other hand, sometimes the action of one branch is so simple that you can just make it a compound statement. Occasionally, you may want to give this compound statement its own local variables. For example, consider the program in Display 3.8. It calculates the final bill for a specified number of items at a given price. If the sale is a wholesale transaction, then no sales tax is charged (presumably because the tax will be paid when the items are resold to retail buyers). If, however, the sale is a retail transaction, then sales tax must be added. An if-else statement is used to produce different calculations for wholesale and retail purchases. For the retail purchase, the calculation uses a temporary variable called subtotal, and so that variable is declared within the compound statement for that branch of the if-else statement.
Display 3.8 Block with a Local Variable


Sample Dialogue
Enter price: $10.00
Enter number purchased: 2
Type W if this is a wholesale purchase.
Type R if this is a retail purchase.
Then press Return.
R
2 items at $10.00
Total Bill = $21.00 including sales tax.
As shown in Display 3.8, the variable subtotal is declared within a compound statement. If we wanted to, we could have used the variable name subtotal for something else outside of the compound statement in which it is declared. A variable that is declared inside a compound statement is local to the compound statement. Local variables are created when the compound statement is executed and are destroyed when the compound statement is completed. In other words, local variables exist only within the compound statement in which they are declared. Within a compound statement, you can use all the variables declared outside of the compound statement, as well as the local variables declared inside the compound statement.
A compound statement with declarations is more than a simple compound statement, so it has a special name. A compound statement that contains variable declarations is usually called a block, and the variables declared within the block are said to be local to the block or to have the block as their scope. (A plain old compound statement that does not contain any variable declarations is also called a block. Any code enclosed in braces is called a block.)
In Chapter 4 we will show how to define functions. The body of a function definition is also a block. There is no standard name for a block that is not the body of a function. However, we want to talk about these kinds of blocks, so let us create a name for them. Let’s call a block a statement block when it is not the body of a function (and not the body of the main part of a program).
Statement blocks can be nested within other statement blocks, and basically the same rules about local variable names apply to these nested statement blocks as those we have already discussed, but applying the rules can be tricky when statement blocks are nested. A better rule is to not nest statement blocks. Nested statement blocks make a program hard to read. If you feel the need to nest statement blocks, instead make some of the statement blocks into function definitions and use function calls rather than nested statement blocks. In fact, statement blocks of any kind should be used sparingly. In most situations, a function call is preferable to a statement block. For completeness, we include the scope rule for nested blocks in the accompanying summary box.
Self-Test Exercises
What output will be produced by the following code, when embedded in a complete program?
int firstChoice = 1;
 switch (firstChoice + 1)
{
 	  case 1:
	   cout << "Roast beef\n";
 		  break;
 	  case 2:
	   cout << "Roast worms\n";
 		  break;
 	  case 3:
	   cout << "Chocolate ice cream\n";
 	  case 4:
	   cout << "Onion ice cream\n";
 		  break;
 	  default:
	   cout << "Bon appetit!\n";
}
What would be the output in Self-Test Exercise 15 if the first line were changed to the following?
int firstChoice = 3;What would be the output in Self-Test Exercise 15 if the first line were changed to the following?
int firstChoice = 2;What would be the output in Self-Test Exercise 15 if the first line were changed to the following?
int firstChoice = 4;What output is produced by the following code, when embedded in a complete program?
int number = 22;
{
 	   int number = 42;
	cout << number << " ";
}
cout << number;
Though we urge you not to program using this style, we are providing an exercise that uses nested blocks to help you understand the scope rules. Give the output that this code fragment would produce if embedded in an otherwise complete, correct program.
{
	int x = 1;
	cout << x << endl;
	{
		cout << x << endl;
 		   int x = 2;
		cout << x << endl;
		{
			cout << x << endl;
 			   int x = 3;
			cout << x << endl;
		}
		cout << x << endl;
	}
	cout << x << endl;
}