5.5 General Debugging Techniques
Careful testing through the use of stubs and drivers can detect a large number of bugs that may exist in a program. However, examination of the code and the output of test cases may be insufficient to track down many logic errors. In this case, there are a number of general debugging techniques that you may employ.
Keep an Open Mind
Examine the system as a whole and don’t assume that the bug occurs in one particular place. If the program is giving incorrect output values, then you should examine the source code, different test cases for the input and output values, and the logic behind the algorithm itself. For example, consider the code to determine price for the supermarket example in Display 5.9. If the wrong price is displayed, the error might simply be that the input values were different from those you were expecting in the test case, leading to an apparently incorrect program.
Some novice programmers will “randomly” change portions of the code hoping that it will fix the error. Avoid this technique at all costs! Sometimes this approach will work for the first few simple programs that you write. However, it will almost certainly fail for larger programs and will often introduce new errors to the program. Make sure that you understand what logical impact a change to the code will make before committing the modification.
Finally, if allowed by your instructor, you could show the program to someone else. A fresh set of eyes can sometimes quickly pinpoint an error that you have been missing. Taking a break and returning to the problem a few hours later or the next day can also sometimes help in discovering an error.
Check Common Errors
One of the first mistakes you should look for are common errors that are easy to make, as described throughout the textbook in the Pitfall and Programming Tip sections. Examples of sources for common errors include (1) uninitialized variables, (2) off-by-one errors, (3) exceeding a data boundary, (4) automatic type conversion, and (5) using = instead of ==.
Localize the Error
Determining the precise cause and location of a bug is one of the first steps to fixing the error. Examining the input and output behavior for different test cases is one way to localize the error. A related technique is to add cout statements to strategic locations in the program that print out the values for critical variables. The cout statements also serve to show what code the program is executing. This is the strategy of tracing variables that was described in Chapter 3 for loops, but it can be used even when there are no loops present in the code.
For example, consider the code in Display 5.12 that is intended to convert a temperature from Fahrenheit to Celsius using the formula
When this program is executed with an input of 100 degrees Fahrenheit, the output is “Temperature in Celsius is 0”. This is obviously incorrect, as the correct answer is 37.8 degrees Celsius.
Display 5.12 Temperature Conversion Program with a Bug
 1    #include <iostream>
 2    using namespace std;
 3
 4    int main()
 5    {
 6        double fahrenheit;
 7        double celsius;
 8
 9        cout << "Enter temperature in Fahrenheit." << endl;
10        cin >> fahrenheit;
11        celsius = (5 / 9) * (fahrenheit - 32);
12        cout << "Temperature in Celsius is " << celsius << endl;
13
14        return 0;
15    }
Sample Dialogue
Enter temperature in Fahrenheit.
100
Temperature in Celsius is 0
To track down the error we can print out the value of critical variables. In this case, something appears to be wrong with the conversion formula, so we try a two-step approach. In the first step we compute (Fahrenheit – 32) and in the second step we compute (5 / 9) and then output both values. This is illustrated in Display 5.13. We have also commented out the original line of code by placing // at the beginning of the line. This tells the compiler to ignore the original line of code but still leave it in the program for our reference. If we ever wish to restore the code, we simply remove the // instead of having to type the line in again if it was deleted.
Display 5.13 Debugging with cout Statements
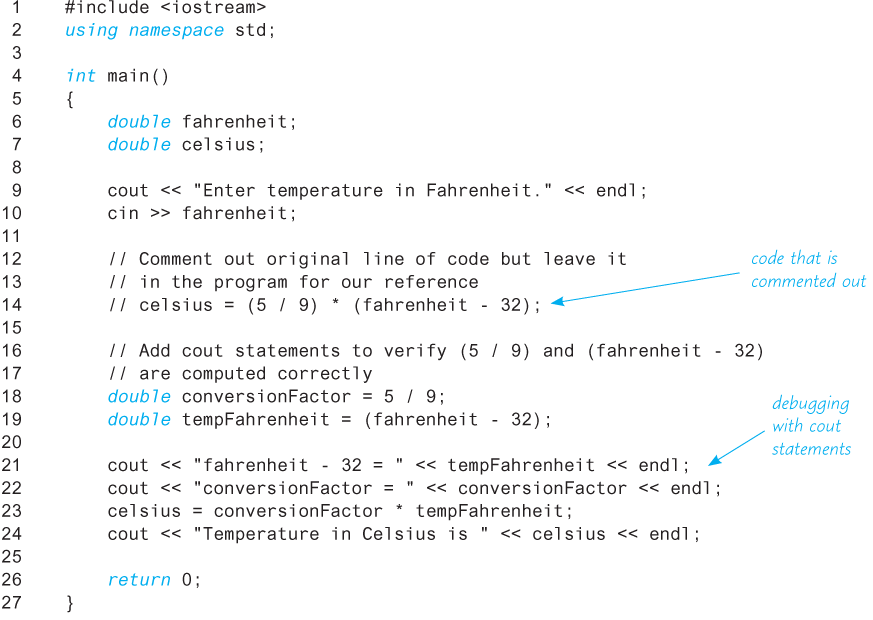
Sample Dialogue
Enter temperature in Fahrenheit.
100
fahrenheit - 32 = 68
conversionFactor = 0
Temperature in Celsius is 0
By examining the result of the cout statements we have now identified the precise location of the bug. In this case, the conversion factor is not computed correctly. Since we are setting the conversion factor to 5 / 9, this instructs the compiler to compute the division of two integers, which results in zero. The simple fix is to perform floating-point division instead of integer division by changing one of the operands to a floating-point type, for example:
double conversionFactor = 5.0 / 9;Once the bug has been identified we can now remove or comment out the debug code and return to a corrected version of the original program by modifying the line that computes the formula to the following:
celsius = (5.0 / 9) * (fahrenheit − 32);Adding debugging code and introducing cout statements is a simple technique that works in almost any programming environment. However, it can sometimes be tedious to add a large number of cout statements to a program. Moreover, the output of the cout statements may be long or difficult to interpret, and the introduction of debugging code might even introduce new errors. Many compilers and integrated developing environments include a separate program, a debugger, that allows the programmer to stop execution of the program at a specific line of code called a breakpoint and step through the execution of the code one line at a time. As the debugger steps through the code, the programmer can inspect the contents of variables and even manually change the values stored in those variables. No cout statements are necessary to view the values of critical variables. The interface, commands, and capabilities of debuggers vary among C++ compilers, so check your user manual or check with your instructor for help on how to use these features.
The assert Macro
In Section 5.3 we discussed the concept of preconditions and postconditions for subroutines. The assert macro is a tool to ensure that the expected conditions are true at the location of the assert statement. If the condition is not met, then the program will display an error message and abort. To use assert, first include the definition of assert in your program with the following include statement:
#include <cassert>To use assert, add the following line of code at the location where you would like to enforce the assertion with a boolean expression that should evaluate to true:
assert(boolean_expression);The assert statement is a macro, which is a construct similar to a function. As an example, consider a subroutine that uses Newton’s method to calculate the square root of a number n:
Here sqrt0 = 1 and sqrti approaches the square root of n as i approaches infinity. A subroutine that implements this algorithm requires that n be a positive number and that the number of iterations we will repeat the calculation is also a positive number. We can guarantee this condition by adding assert to the subroutine as shown below:
// Approximates the square root of n using Newton's
// Iteration.
// Precondition: n is positive, numIterations is positive
// Postcondition: returns the square root of n
double newtonSqroot(double n, int numIterations)
{
    double answer = 1;
    int i = 0;

    assert((n > 0) && (numIterations> 0));
    while (i <numIterations)
    {
        answer = 0.5 * (answer + n / answer);
        i++;
    }
    return answer;
}
If we try to execute this subroutine with any negative parameters, then the program will abort and display the assertion that failed. The assert statement can be used in a similar manner for any assertion that you would like to enforce and is an excellent technique for defensive programming.
If you are going to distribute your program, you might not want the executable program to include the assert statements, since users could then get error messages that they might not understand. If you have added many assert statements to your code, it can be tedious to remove them all. Fortunately, you can disable all assert macros by adding the following line to the beginning of your program, before the include statement for <cassert> as follows:
#define NDEBUG
#include <cassert>
If you later change your program and need to debug it again, you can turn the assert statements back on by deleting the line #define NDEBUG (or com-menting it out).
Self-Test Exercises
If computing the statement:
x = (x * y / z);how can you use theassertmacro to avoid division by zero?What is a debugger?
What general techniques can you use to determine the source of an error?