CHAPTER 3
Clinches, Choke and Takedown Defenses, Escorts, and Ground Survival
Close-quarters battle involves different contact ranges best categorized by the distance or proximity as a fight (d)evolves. From a long to medium range, fighters have unfettered movement to batter one another, usually involving long kicks, medium punches, and other hand strikes. From a short range, knees, elbows, head butts, and biting become options. A variety of standing entanglements incorporate medium and short strikes, trapping, clinching, throws, takedowns, and standing joint locks combined for close retzev. The final ground phase occurs when both fighters clinch up in various holds to unbalance and take each other to the ground. This involves medium and short combatives combined with locks and chokes.
Ground movement obviously differs from standing movement. Ground survival can allow one combatant superior control and positioning, preventing the other from defending, disentangling, or escaping as he might while standing. Krav maga groundwork should be thought of as “what you do up, you do down,” with additional specific ground-fighting capabilities such as practiced (secondary) weapon deployment for professionals. Remember, krav maga uses many standing combatives on the ground, including groin, eye, and throat strikes in combination with joint breaks and dislocations designed to maim the adversary.
Once engaged against an assailant, the key to most krav maga defenses is a deflection-redirection of the attack combined with a simultaneous body defense and an overwhelming counterattack. Krav maga is designed to stop the attack at its inception or at the earliest possible stage. Closing the distance between the defender and assailant is sometimes referred to as “bursting.”
The opposite of bursting is retreating to escape or create distance until an opportunity to close the gap presents itself. As noted, in counterattacking, krav maga usually targets the assailant’s soft tissue, including his groin, throat, eyes, and knees. These combatives specifically take into account the adversary’s physiological reaction to counterstrikes such as a knee or kick to the groin that will lurch the body forward or a thumb gouge to the eye that will jolt the head back, exposing the groin for further strikes.
If long-range lower-body strikes and intermediate-range upper-body strikes do not neutralize or at least keep your adversary at bay, your adversary can close the distance to grab hold of you. The fight then becomes an “infight” because it involves short combatives, including elbows, knees, uppercut and shovel punches, clinches, and holds. Striking and surprise attacks are integral to clinching and other standing control holds. To strike, you must create separation from your adversary.
Defending against grabs, traps, and takedowns is an indispensable skill. Upper- and lower-body strikes, if improperly executed or well defended by your adversary, can place you in a precarious position resulting in a trap or takedown. Well-executed upper- and lower-body combatives minimize this risk—but there is still a risk, especially if you are fighting against someone who is skilled in ground combat.
Clinching can broadly be thought of as any control grasp on an adversary’s body while both adversaries are still standing. Clinching can also involve compact, powerful strikes and control holds when two adversaries are standing in close proximity to one another. Certain types of clinches are also referred to in defensive krav maga vernacular as “bear hugs.”
In this chapter you’ll learn many infighting techniques and defenses. They all rely on the same principles: always fight back by attacking the weakest points of your adversary’s anatomy and by using his momentum against him. Once your assailant closes on you, he can attempt life-threatening choke holds, throws, strikes, and neck manipulations. Other types of close-contact grappling include hair pulling, headlocks, and bear hugs, all of which can put you into an extremely exposed position.
Striking in a clinch is different from striking from a distance. In a clinch, body contact can be used to control your adversary. This is especially relevant when an adversary goes to the ground and no longer has the upright support of his legs. Therefore, body contact dictates your fight strategy. In fighting, it is common for one or both adversaries to lose balance, either as a result of tactics or chance, so you need to be prepared for that possibility.
Off-balancing is key to close-quarters infighting. The objective is to take your adversary off balance by setting up retzev combatives including strikes, throws, and joint locks. Wherever the head goes, the body will follow. Taking an adversary off balance allows you to set up other retzev combative techniques because the adversary is not only concerned with protecting himself but with recovering his balance. Take the adversary in a direction he does not expect to go. Space restraints do not allow us to illustrate the all-important retzev or continuous combat follow-through; however, we have included a few techniques and shown partial retzev to give you adequate insight into combined defense and attack through continuous combat motion.
Clinching
In a superior clinch position, you can trap your opponent’s head and torso, making both defense and counterattack difficult for him while maintaining your own combative options—primarily, elbows, short punches, uppercuts, hooks, shovel punches, knee strikes to the groin and midsection (especially switching knees and roundhouse knee shots), locks, chokes, takedowns, and throws. (Clinches are also used for military tactics that are not depicted here for security concerns.) You may, of course, also gouge your adversary’s eyes with your thumbs prior to acquiring control of the head. You must be aware, however, that an adversary could deploy a weapon to attack you while both of your hands are occupied with controlling his head. The clinch can give you several advantages by controlling
- your adversary’s ability to strike you,
- your position for powerful, short, devastating combatives, and
- his attempts to take you down.
The last point requires emphasis. The clinch can both save you from being taken down and can allow you to take your adversary down, depending on how you use it.
We will focus primarily on the crown-of-the-head and rear clinches, which afford great control over your adversary. These clinches provide the option of strikes and takedowns into superior ground-fighting positions. A third clinching position heavily emphasized in the krav maga curriculum is the symmetrical clinch because it is frequently used.
Crown-of-the-Head Clinch
This powerful hold allows you strong control of your adversary by clasping the crown of his skull, setting you up to perform knee strikes, vertical-elbows guillotine chokes, and neck-torquing movements. You may also gouge his eyes with your thumb prior to encircling his head with your arms. Always vie for inside hand position to allow better control over the adversary. Inside hand position means both of your arms are inside your adversary’s arms and exerting pressure on the rear crown of his head. If you control the head, you can usually control the body. Try not to grab the base of the neck because the opponent can better resist the hold. Do not interlock you fingers in this (or any other) hold because your fingers can be broken and the opponent can more readily control your hands.
In addition, the crown-of-the head clinch is highly useful for transitioning to military terminal-force applications.

Place one hand on the crown of your adversary’s head and your other hand on top of the first. Squeeze your elbows together, forcing your adversary’s head to your chest level to further off-balance him. Do not secure him by his neck. Keep your adversary’s head lower than your own and pressed into your chest.

Again, do not allow his head to separate from your chest. To defend this type of clinch, you might target the groin and the eye socket—so, your adversary might do the same to you. This is one of the drawbacks of this technique.
Clinch Defense
The clinch can place you in a position susceptible to devastating knees, elbows, and neck manipulations. A simple defense is to keep one elbow close to your body and pointed downward to defend against knees while using your other hand to attack your adversary’s eyes with a thumb gouge or eye rake.
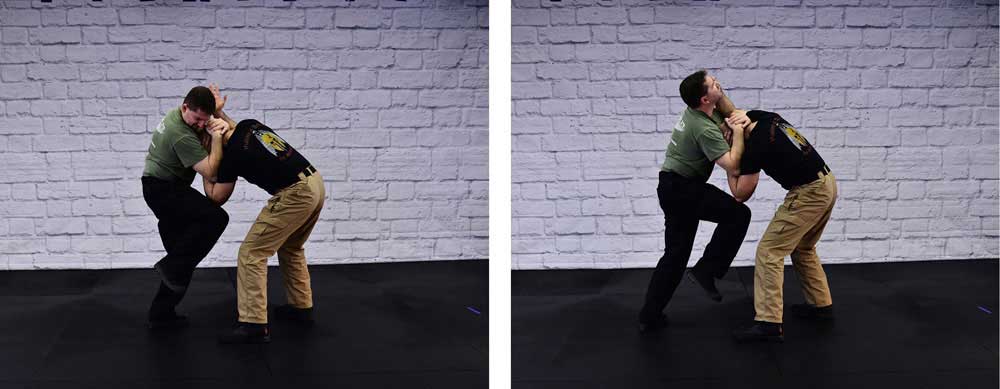
Keep one elbow down, using the tip to defend against knee strikes. Simultaneously access his eye socket even if he buries his head. Another defense is to yank down on one arm keeping your elbow tip down, positioned to defend against knee strikes.

Tackle Defenses
You must be able to defend against an adversary changing his level of attack. Combatants often set up successful takedowns using a distraction (usually an upper-body strike feint). While the combative distraction may or may not connect, it will allow him to lower his level and close on you to secure your legs.
Note: the following defenses assume the defender did not have time or the opportunity to deliver a straight kick or knee to the head, or to sidestep the takedown using a jam to the head or combatives.
Inline Sprawl
When defending against a tackle or two-leg takedown, if timing and distance do not allow a combative, evasive sidestep, or both, you may use an “inline” sprawl. Sprawl backward using one arm as the “brake” to prevent the assailant from taking you down or securing your legs.
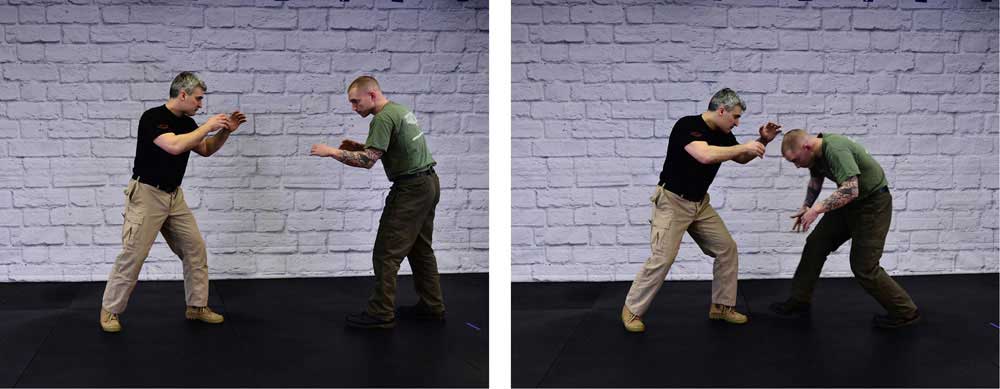
From your left outlet stance, as the assailant lowers his height to attempt the takedown, lower your level while dropping your right arm as you sidestep to intercept the assailant on his left trapezius muscle.

Sprawl on the balls of your feet while shooting your legs back and wide for a stable platform—but not so wide that you cannot comfortably rest on the balls of your feet.

As you drop down with the assailant, immediately knee him in the head to jolt the spine, rip his eyes, or use a north-south position to choke him.
Offline Sprawl
When defending against a tackle, if timing and distance do not allow a combative, you may use an offline sprawl where you stay on your feet to get up immediately and stomp the assailant’s head.

From your left outlet stance, as the assailant lowers his height to attempt the takedown, sidestep slightly to enable your right arm to shoot down, intercepting the assailant on his right trapezius muscle.

Shoot your legs back wide for a stable platform on the balls of your feet.
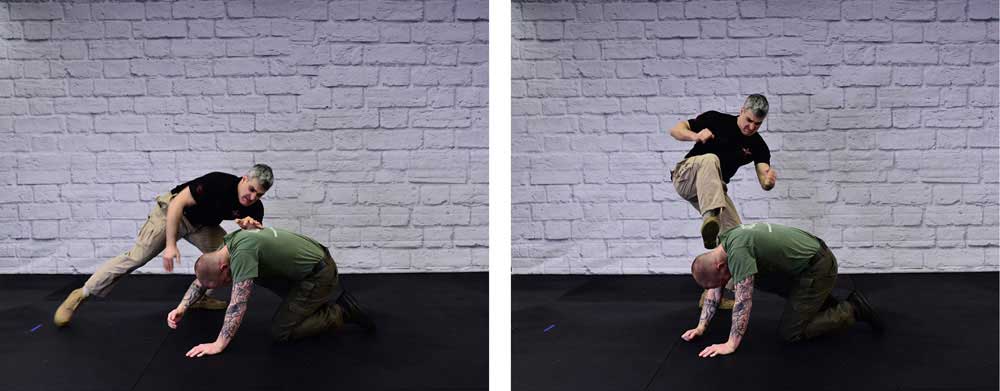
If you go down with the assailant, you can immediately knee him in the head to jolt the spine. Stand up immediately to deliver a heel kick to the assailant’s neck or head.
Release from a Standing Professional Blood Choke
This attack must be defended immediately. It is crucial that you clamp down on the assailant’s arm, using your core strength to exert counterpressure. If the adversary is using a figure-four or “professional choke” grip, you must yank down on the crook of the assailant’s elbow while clearing the other hand from behind your head.


Tuck your chin while grabbing the assailant’s forearm and biceps muscle with each of your hands. Use your core, not just your upper body, to yank down, applying counterpressure against the assailant’s choking arm.

Maintain strong counterpressure and continue to turn into the assailant’s choking arm. Simultaneously step around the assailant’s nearside leg (the same leg as his choking arm side) to take him down. As you turn into the assailant, simultaneously begin to trip him by catching his leg with your leg while forcing him to his rear nearside corner. You also have the option of sweeping the assailant’s leg as you force his upper body backward.

As you apply counterpressure, take a decisive step outside while maintaining contact with the assailant’s same-side leg. You must “marry” your leg to his. If you have separation, he could defeat the defense and continue to choke you.

Continue counterattacks as necessary.
Release from a Standing Professional Blood Choke, Variation
Once again, this attack must be defended immediately. It is crucial that you clamp down on the assailant’s arms using your core strength. This defense may be used if you errantly turn in the direction of the choke (the opposite direction of the previous defense). Use your core, not just your upper body, to yank down and apply counterpressure on the assailant’s choking arm and his hand clutching his own biceps.
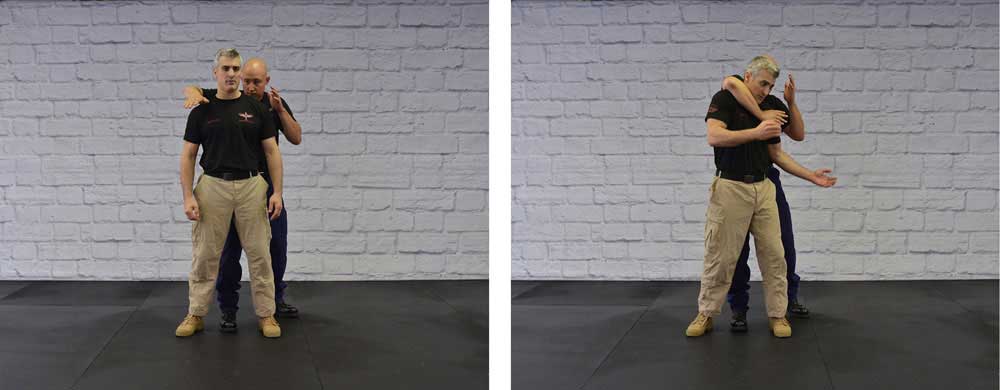
Tuck your chin while grabbing the assailant’s forearm and his opposite arm’s biceps muscle with each of your respective arms.

As you maintain steady counterpressure, continue to turn into the assailant’s choking arm and forcibly strip his hand from his biceps by getting the strongest grip on his fingers. Note the close-up of the hand strip.

After you momentarily relieve pressure from the choke by stripping the assailant’s hand, continue to apply counterpressure with both arms. As soon as the hand is stripped, move slightly to the side (defender’s right in the photo) to expose the assailant’s groin to hand strikes.
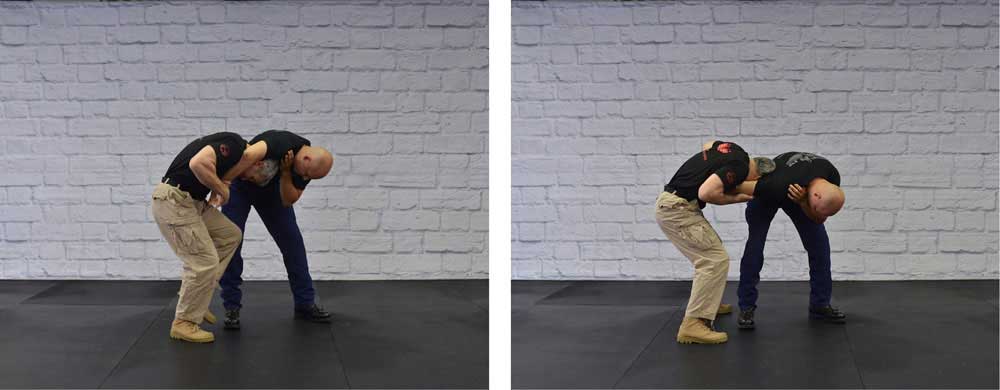
Continue to maintain counterpressure against the forearm as you counterattack and slip your head out of his hold. Be aware that your gear or webbing may impede your stepping back and underneath the hold to release.

After you force the assailant to release the tight choke, maintain contact and pressure with his forward arm. As you create an opening, take a slight step back with your inside leg (nearside leg in relation to the assailant). Maintain contact with his choking arm against your torso as you step out to release the choke. Continue to keep the arm pinned and deliver devastating knee counterattacks to neutralize the threat. Control #6 from this position is a good takedown for those who need to apply restraints.
Rear Naked Choke Defense Driven Forward into Seoi Nage Drop
These techniques allow the defender to naturally move forward with the forward choking pressure to counterattack by executing a strong throw. The seoi nage drop against a rear choke driving you forward requires you to slightly offset your hips from the assailant’s hips. The drop allows you to throw your assailant by sinking your hips lower than his to jettison him from your back. Note: gear and webbing may create space or “slack” between your torso and the attacker’s torso. Overcome any artificial space by securing his body as tightly to your torso as you can when you launch him. Note: this technique may also be performed with a double knee drop.
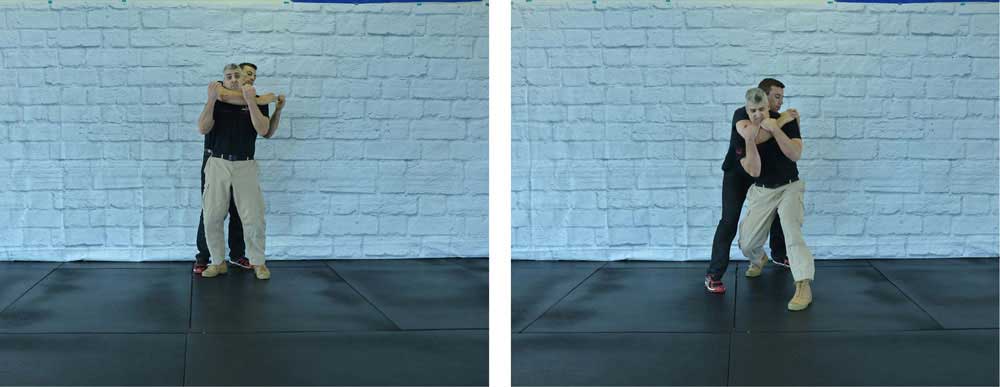
Yank down on the assailant’s choking arm (in this case the crook of the elbow) while tucking your chin. The adversary’s choking arm serves as a handle to launch him.

As the assailant drives you forward, drop to your inside knee while forcibly locking down on the choking arm. Whip your upper body slightly to the left (as depicted in the photo) to launch the assailant to the right corner.
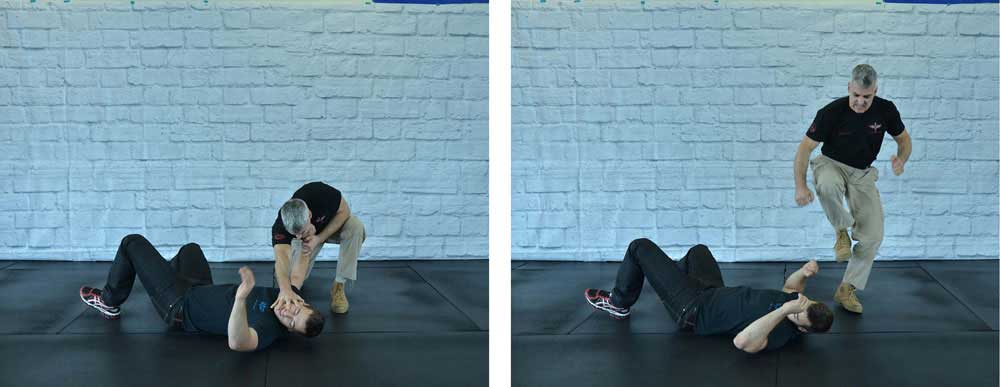
The moment you complete the throw, follow with retzev such as an eye gouge or kick to the head (only if necessary). If you fall with the assailant, be sure to drop your weight on him to both increase his impact with the ground and to save yourself from striking the ground.

If necessary, finish the defense with a heel kick or other combative.
Defensive Throw against an Assailant Jumping onto the Defender’s Back
Similar to the previous technique, this tactic allows the defender to naturally move forward with the forward choking pressure to counterattack by executing a strong throw. This hip toss defense to counter a rear choke driving you forward requires you to square or slightly offset your hips from the assailant’s hips. Use both the assailant’s forward momentum and your forward momentum against him.

Defend against a rear jumping headlock or choke by plucking or yanking down on the assailant’s arms while tucking your chin. The assailant’s choking arm serves as a handle to throw him. If the attacker hooks his left leg, use your left hand to thwart this attempt by peeling the top of his foot or heel while continuing to defend the choke with your right as you launch him.

Lock down on the assailant’s arm as you move forward with the momentum of the attack. Bend both of your legs slightly while turning your body to the side.

The moment you complete the throw, follow with retzev. If you fall with the assailant, be sure to drop your weight on him to both increase his impact with the ground and save yourself from impacting the ground.
Defensive Throw against a Rear Choke When the Assailant Is Pulling the Defender Backward (Osoto Makikomi Variation)
This is an extremely difficult attack to defend, as the assailant has created torso separation and is pulling you backward, undermining your base. The key to the defense is to proceed (as learned previously) with your upper-body counterpressure; however, to defeat this attack you must work with your left far-side leg by raising it in the air to generate momentum to throw him.

As the assailant ratchets up the pressure, pulling you backward, tuck your chin and latch on to his choking arm, using your core strength to resist the choke.

As you resist the choke, shoot your left far-side leg straight up and then sweep it backward to land on one or both of your knees. Lifting the leg is crucial to facilitate the torque you will need to throw the assailant forcefully over your back.

Depending on your core strength, it is possible for you to land all of your weight on your assailant by landing on the balls of your feet instead of your knees.
Escort Control Holds
Krav maga employs eight different escort control holds designed to move a prisoner or control a belligerent person. Anyone who has had to control or restrain a determined resisting subject (“controlee”) understands the difficulty of applying minimum use-of-force controls. Accordingly, krav maga advocates using a “softener” combative or series of combatives targeting the “green” zones or anatomical targets that, when struck, will not result in long-term physical damage or death.
The control holds switch from one control tactic to another when a person resists. The switch is a form of retzev. These holds can be applied by one or two escorting or controlling officers, agents, or security personnel. Part of our specific focus in krav maga is to allow multiple responding personnel to subdue a person quickly and efficiently without placing pressure or force against a controlee’s spine, base of the neck, or throat. I have elected to cover escort control holds #2, #3, #4, #6, and #7. I have omitted escort control holds #1 and #5, as these are somewhat height dependent and not suitable for all practitioners.
Krav maga also has countermeasures to its own control holds; however, once again with the goals of this book in mind, these are not depicted but reserved for vetted, in-person training. In learning the countermeasures to our own control holds, our trainees become more efficient in administering the control holds.
Standing Escort Control Holds #6 and #7 may also be used to take a hostile third party swiftly and efficiently to the ground to apply restraints, to wait for additional help, or to de-escalate a situation. These takedown holds are thoroughly covered in Krav Maga Weapon Defenses (YMAA, 2012), chapter 1.
Control #2
Control #2 is designed to restrain a standing controlee’s freedom of movement while allowing the controller to escort him or her to a different location.

With your left arm, seize control of the controlee’s right arm by his right wrist. Note: it is also possible to secure the controlee’s arm by securing the back of the controlee’s hand. As you seize control, drive the top of your right forearm (radial bone) into the controlee’s elbow joint, forcing the controlee to bend his elbow.
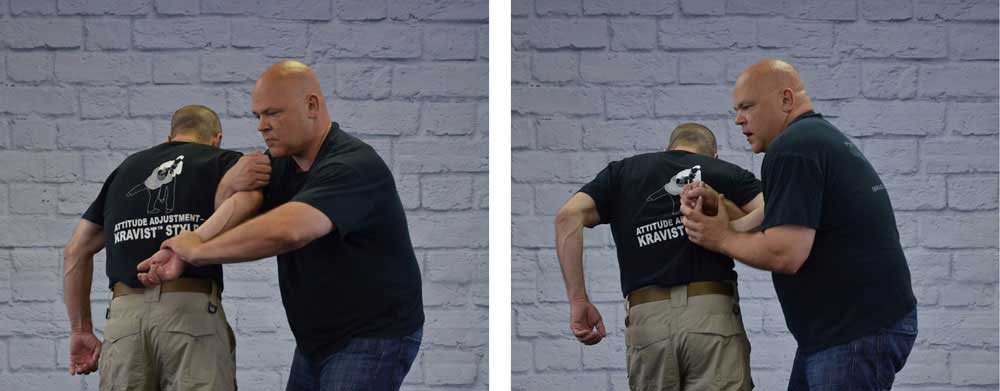
As you force the controlee’s arm to bend, use your torso and body mass to place the controlee’s arm against his body with your right arm interlaced between the controlee’s arm and the controlee’s body. Do not allow any space between your torso and the controlee’s arm. Once you have forced the controlee’s arm back and slightly away, seize the controlee’s hand, forcing it also back and away to apply a wristlock.

Once the wristlock is secure, you may let go of the controlee’s arm to seize the controlee’s wrist with both hands. Or you can administer a combination hold by reaching around to the controlee’s face to force the controlee’s nose, applying pressure at the philtrum, up and away to facilitate the escort while using de-escalation language to make the controlee more cooperative. Instead of the philtrum, you can also use his eye socket.
Control #3
Control Hold #3 is designed to restrain a standing controlee’s freedom of movement while allowing the controller to escort him or her to a different location or to force the controlee to the ground for additional restraints or de-escalatory tactics. By design, Control #3 flows from Control #2.

Similar to Control #2, with your left arm seize control of your adversary’s right arm. Grasp his right wrist by the back of the hand, forcing his arm toward his torso. Note: it is also possible to secure his arm by securing the back of his hand. As you force the controlee’s targeted arm to bend, use your torso and body mass to place his arm against his body with your right arm and hand clamping down on his inner triceps, just above the elbow. Do not allow any space between your torso and the controlee’s arm. Once you have forced his arm back and slightly away, if you are more physically powerful than the controlee or, perhaps, evenly matched with him and you can seize the initiative, you can force his arm and shoulder up and away, creating significant pressure to make him stoop forward. You may now escort the controlee away while using de-escalation language to make him more cooperative. If you feel it is necessary to take him to the ground, you can place greater pressure on his arm and shoulder, forcing him forward in a two o’clock position, or at about a 30-degree angle. Forcing the controlee forward at this angle prevents him from rolling on his side to undermine the control hold.
Control #4
Control #4 is designed to restrain a standing controlee’s freedom of movement while allowing the controller to escort him or her to a different location. By design, Control #4 flows from Controls #2 and #3 if the controlee resists and pulls his or her arm forward.

Seize control of your adversary’s right wrist with your left hand as you drive your right forearm into his elbow joint, forcing him to bend his elbow. He will likely pull back in resistance. Corral his momentum by securing his wrist, forcing his elbow and triceps muscle back toward your torso. Interlace your right arm between the controlee’s arm and his body. Do not allow any space between your torso and his arm. Once the wristlock is secure, you may let go of his arm with your left arm to seize his wrist with both hands. Or you can administer a combination hold by reaching around to the controlee’s face to force his nose (philtrum) up and away, facilitating the escort while using de-escalation language to make him more cooperative.
Control #6
Control #6 allows you to swiftly take down a controlee, driving him into the ground face first and achieving strong deadside positional control, as well as dominant control over any weapon. The hold places compliance or takedown pressure on the controlee’s wrist and shoulder while securing the controlee’s arm. Control #6 may be applied with or without preceding retzev combatives. An accompanying lower-body combative forces the controlee’s level down to facilitate Control #6. This control is designed to restrain a standing controlee’s freedom of movement while allowing the controller to escort him or her to a different location or force the controlee to the ground for additional restraints or de-escalatory tactics. (Also see pages 12–14 of Krav Maga Weapon Defenses [YMAA, 2012] for additional photos of Control #6 [otherwise referred to as Control Hold “A”].)

Seize control of your adversary’s right arm by his right wrist. Seizing the arm is usually accompanied by a lower-body combative to the green zone, such as a straight knee strike to the thigh or kick to the shin. After administering combatives, grab his right wrist with your left hand. Note: it is also possible to secure the controlee’s arm by securing the back of his hand. Use the radial bone (top of the forearm) of your right arm to knife through at the controlee’s elbow, forcing him to bend his arm. Raise your wrist to place upward pressure so his arm comes up with a 90-degree bend with fingers toward the ground. Reach over the top of his targeted shoulder, clamping down hard on the shoulder while snaking your right arm over the top of his right arm and across his shoulder to clasp your other arm. You must clamp down on the targeted shoulder to facilitate the lock. Reach around the arm and encircle it to grip your own forearm. Bring his elbow and wrist close to your body, torquing the shoulder upward while keeping hard pressure on the shoulder. Place considerable pressure on the shoulder by wrenching up and away while keeping the controlee’s torso flush with yours to force him forward in a two o’clock position, or about a 30-degree angle. Forcing the controlee forward at this particular angle prevents him from rolling on his side, thereby undermining Control #6.
Note: by torquing the arm upward, an escape—especially using a scissors takedown or counter—becomes much more difficult. Take a 180-degree (tai-sabaki) step toward two o’clock with your right leg to bring down your opponent. As your opponent is going down, keep the grip tight. You may further secure him and the weapon by placing your right knee behind his elbow, exerting pressure up on the shoulder, and your left knee on top of his neck. Remove any weapon by peeling it from the assailant’s grip, using your thumb at the grip’s base to keep the point directed at him and away from you.
Control #7
Control #7 allows an assailant to be taken swiftly backward and down with strong deadside control. This hold can be administered if the controlee has an edged weapon in his hand. Control #7 may be applied with or without preceding retzev combatives. Usually, the defender has delivered strong preceding combatives and has control of the weapon arm before applying the specific hold. The hold places compliance or takedown pressure on the opponent’s shoulder and wrist while controlling the weapon. (See also pages 15–17 of Krav Maga Weapon Defenses [YMAA, 2012] for additional photos of Control Hold #7 [otherwise referred to as Control Hold “B”].)
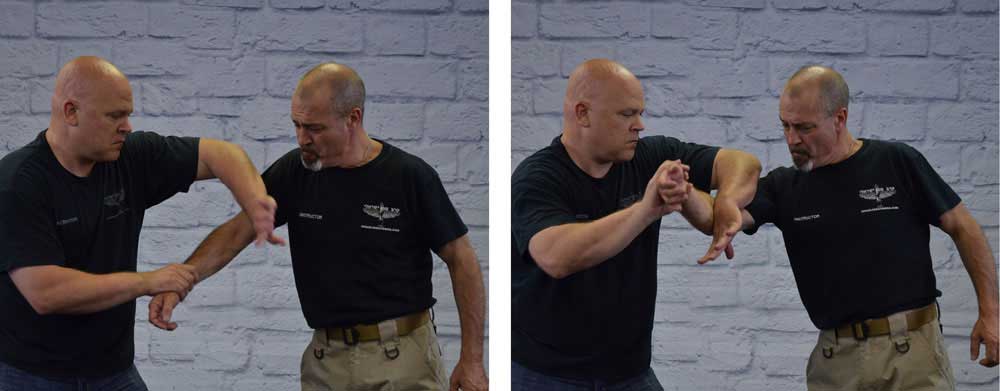
If you are facing or positioned to the side of your opponent, secure his right wrist with your left hand. Grip the flat of the back of his hand with a perpendicular grip. You can push his face away to cause a distraction. Curl his wrist in while slipping your other arm on the shoulder over the top of his targeted arm and across his forearm, using a figure-four grip.

Reach around the arm and encircle it to grip your own forearm, tightening your right arm to your body. Bring his elbow and wrist close to your body while keeping the grip tight.

For law enforcement and security personnel, or others who may wish to exert maximum control of the assailant, when effecting the hold against a perpetrator, armed or unarmed, once you have taken the opponent down on his back, you may reverse him onto his stomach. Yank up on his arm while still maintaining your figure-four grip, and then turn in the opposite direction. Do not break the movements by touching your knees to the ground. Be sure not to collapse with him, and keep upward pressure on his arm as you rotate him. Maintain the momentum of the takedown into an immediate reversal onto his stomach.
By keeping strong pressure on his wrist and shoulder to facilitate his turn, you have taken him down by combining a joint lock and a 180-degree step in one direction. Now take a 180-degree (tai-sabaki) step in the opposite direction. This second opposite turn begins to turn him onto his stomach. (See Krav Maga Weapon Defenses [YMAA, 2012], pages 15–17 for additional photos.) When employing this technique against an armed assailant, remove the weapon by peeling it from his grip, using your thumb at the grip’s base to keep the point directed at him and away from you. You are now in a strong position to remove the weapon, apply restraints, and control his movement. Once you have forced the controlee’s arm back and slightly away, seize the controlee’s hand, forcing it back and away into a wristlock.
Core Ground Survival Tactics
Beginning in the early 1990s, Grandmaster Haim Gidon began to revamp the krav maga curriculum, adding extensive ground survival tactics approved by Imi, who sat in Haim’s gym, monitoring, mentoring, and enjoying the continuing evolution of krav maga. What follows are some of the fruits of Haim’s dedication to improving krav maga.
As noted earlier, Israeli krav maga ground survival can generally be summarized, “What we do up, we do down.” In other words, whatever we do from an upright position, with modification and your weight properly positioned, we do from a ground position. This includes positioning the defender for optimum secondary-weapon deployment. And just as there are no rules in an “up” fight, there are no rules in a “down” fight. Groin strikes, throat strikes, eye gouges, and biting are all viable and are ground fighting options.
Do not go to the ground if it can be helped. A second assailant or multiple assailants could come to the first assailant’s aid. To state the obvious, fighting multiple adversaries on the ground is extremely difficult—hence the importance of developing your infighting and anti-takedown capabilities to remain standing.
Krav maga ground techniques incorporate both defensive and offensive tactics. In this book, we will only examine a few of the core techniques involving the most common ground survival situations.
Professional krav maga training also takes into account limitations that may be imposed on the defender’s movements and flexibility due to equipment, such as a duty belt, bulletproof vest, flak jacket, or backpack. It’s relatively easy to execute triangle chokes and other complex techniques in a dojo; on the street or in a combat zone, while wearing heavy equipment, it is much more difficult. Practical hindrances such as trying to apply an Achilles leg lock to an assailant wearing high rigid combat boots must also be taken into account when learning professional krav maga tactics.
Foreleg Brace Position (Modified “Z Guard”)
The “brakes” technique uses a horizontal knee brace to disengage you from an assailant who is trying to mount you or spread your legs. By turning on your side (which may also be used as a weapon-retention tactic until it is opportune to deploy a sidearm or edged weapon), raise one leg to use your shin and knee to keep an assailant at bay as you deliver combatives such as eye gouges, throat strikes, punches, and knee strikes. Your hips and legs are your most powerful muscle groups.
As you separate yourself from your assailant, forcefully extend your foreleg to both strike and push away from your opponent. You will likely gain the opportunity to kick him in the groin or head, using a straight kick or side kick while on the ground, both delivered with the heel. Make contact with your heel to the groin, midsection, or face. Get up immediately by sliding your underneath leg back and onto the ball of your foot while posting one hand on the ground and keeping one hand up to deliver more combatives and make your escape.
Foreleg Brace (“Z Guard”) Transitioning to a Handgun
The key to deploying a secondary weapon, in this case a handgun, is to create enough separation to be able to withdraw the handgun, get a clean line of fire (with none of your body parts in front of the muzzle), and squeeze the trigger as necessary. Crucially, the handgun must only be deployed when the defender is in a position to shoot. In other words, the assailant must not have an opportunity to disarm the defender or seize the weapon.
Legs play a crucial role in creating the necessary space. To push the assailant away to separation, krav maga’s preferred position on the ground is the foreleg brace position, or inserting the defender’s legs using one foreleg and the heel of the opposite leg.
Generally, the system does not embrace the guard because the groin is susceptible to attack including punches, elbow strikes, grabs, head butts, and biting. (Note: there are two positions in which the system does emphasize the guard: wrenching the neck and the seated guillotine.)

Roll onto your right hip and insert the shin and patella of your top leg against the assailant’s lower torso. Simultaneously insert your lower heel against the assailant’s hip or thigh. You may use your top leg to stop an incoming attack as depicted.

The separation created by pushing your two legs together (foreleg and opposite heel) will allow you to administer a strong heel kick to the face, throat, or solar plexus with your bottom-side leg.
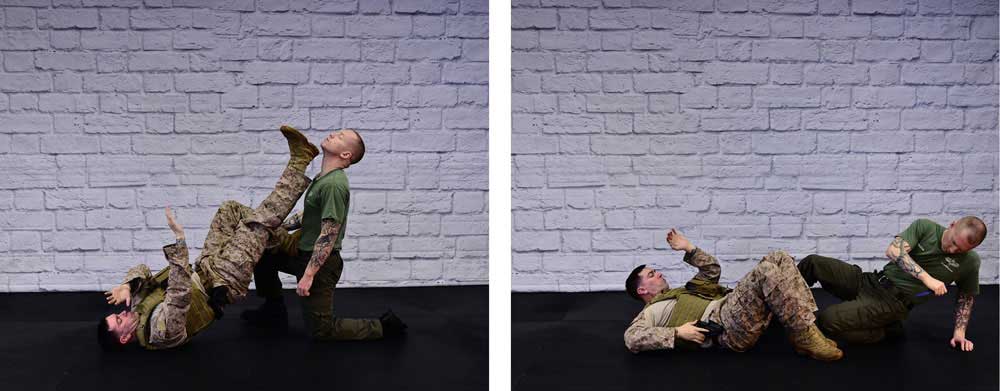
Deliver a strong heel kick to his head to create separation, enabling you to deploy your sidearm.
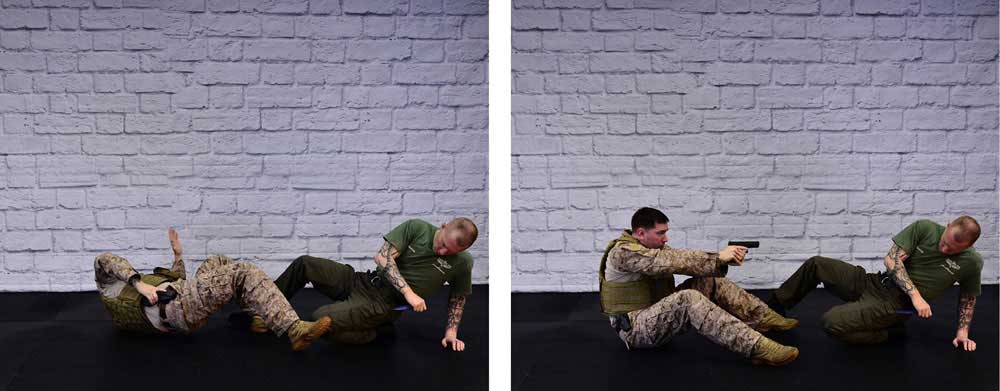
Use a modified shrimp or side shimmy to push yourself further away from the assailant while deploying your sidearm. Immediately position the handgun between your legs for a stable and accurate firing platform. Be sure to keep your legs down and away from the line of fire. It is possible to turn one foot parallel to the ground, toes facing the side (not toes up), to provide a kick option to create separation.
Foreleg Brace into Armbar
The foreleg brace also allows transitions into armbars (and triangle chokes, the next technique presented). Remember, the preference is to create separation and damage to the opponent with kicks, and get right to your feet. Again, being on the ground is dangerous for the myriad of reasons previously discussed. Nevertheless, ground survival by necessity incorporates maiming or strangling an opponent. This defense is a modification of a standing technique covered in chapter 2, Sliding Parry While Stepping Off the Line.

From the foreleg brace position, parry the punch by deflecting and sliding up the assailant’s right incoming arm with your left arm while simultaneously attacking his eyes with a finger strike (making sure to keep your fingers bent to avoid damaging them).

Secure the assailant’s outstretched arm by clamping down on it while using your striking hand to secure him at the trapezius, grabbing his shirt to prevent him from retracting his arm.

As you clamp down to secure the targeted arm, swing your left leg in front of the assailant’s face. Yank back forcefully on his right arm to extend it as much as possible as you extend your left leg across his face.
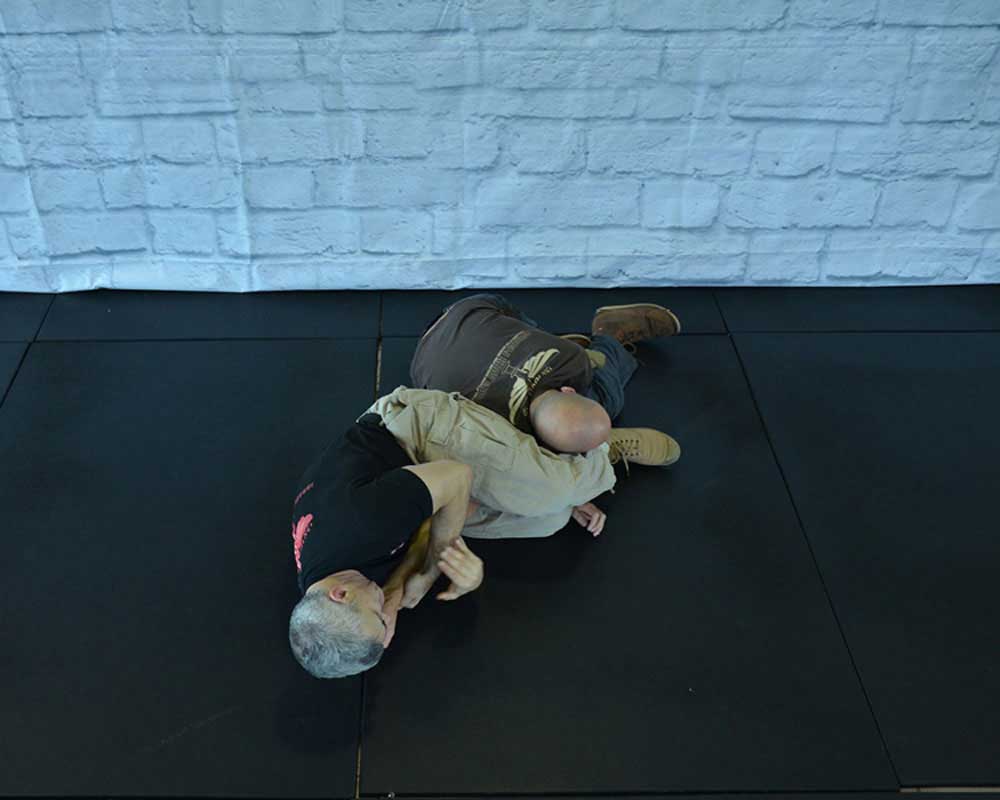
Secure the arm tightly, making sure the elbow joint is above your thighs, and extend your body back as you use your core strength to dislocate the elbow joint.
Foreleg Brace into Short Triangle Choke
The foreleg brace also allows transitions into triangle choke holds. Again, the best-case scenario is to create space, damage with kicks, and get to your feet. Surviving on the ground sometimes means maiming or strangling the enemy.

From the foreleg brace position, parry the punch by deflecting and sliding up the assailant’s right incoming arm with your left arm while simultaneously attacking his eyes with a fingers strike. Be sure to keep your fingers bent to avoid damaging them.

Secure the assailant’s outstretched arm by forcefully clamping down on it while swinging your bottom right leg over his left shoulder. Then wrap your right leg around his shoulder.

As you clamp down on his head and shoulders, raise your left leg up slightly to insert your right ankle in the crook of your left knee to create the triangle choke by restricting blood flow on both sides of his neck.

Squeeze your right leg down into his head while simultaneously clamping down on your right leg with your left leg to optimize the human vice. Pull his head toward you with your right arm to further increase the choking pressure.
Inside Knee While Attacking the Eyes
If you are unable to obtain the foreleg brace position, the next best position is inserting your nearside knee to keep the assailant from mounting you. Then create separation and deploy a weapon, as necessary.

Pull your nearside knee into the assailant to create a barrier. Use your fingers to rake his eyes to facilitate separation to allow additional kicks, secondary weapon deployment, and to get up off the ground.
Protecting Your Neck
Protecting your head, neck, and spine during a confrontation is vital. The ability to defend against chokes and neck manipulations is paramount in all aspects of a fight, particularly in a ground scenario. A broken neck or spine can paralyze or kill. Hair may be used to torque the neck, exposing the throat to attack. (To yank the head back, you need to grasp the front of the scalp, running your fingers through the hair and making a tight fist to increase the leverage of the pull.) Having closely cropped hair or no hair provides an advantage to guard against such neck manipulations.
Counterattacks to the head and neck can shut the body down temporarily or permanently. The neck is extremely vulnerable because of its vital air passages, arteries, and nerves that sustain proper brain function. The spinal column is highly susceptible to injury at the base of the neck from strikes, throws, and locks, with potentially lethal consequences if the spinal nerves are severed. Striking, manipulating, and twisting the neck can injure the arteries and vertebrae. In a defensive mode, you must take great care to protect these vital areas through proper technique and body positioning. Chokes are quick fight enders. Obviously, you must not allow anyone to get his hands, arms, or legs around your neck.
Techniques that force the head forward, back, or sideways can produce serious injury to the neck, specifically the cervical vertebrae. The key to executing proper chokes is using your hands and arms to provide leverage and compression against an adversary’s throat and neck, leaving him few, if any, defenses. The narrower the choking implement, the easier the penetration to the adversary’s neck. The ulnar and radial edges of the wrist and forearm are particularly well suited to apply compression to the throat and neck.
Defending the Mount
If an adversary were to successfully mount you, he could rain down a hail of strikes while pinning you to the ground. Gravity works for him and against you. Similar to most krav maga defenses, you need to attack his vulnerable anatomy—in this case, the groin. As you attack the groin, simultaneously buck him off you.

Counterattack his groin using a short elbow strike.

Another option is to deliver a hammer fist to the groin while keeping your other hand up to protect your head. A third option is to deliver a downward straight punch, again keeping your cover hand up.

As you deliver the strike to the groin, buck the adversary to the opposite corner of the strike. In other words, the defender strikes with his right arm and propels the assailant at an approximate 45-degree angle to his left (the assailant’s right).

Continue to throw the adversary to the designated corner using your upper body in concert with your hip buck. Continue your counterattacks, including eye strikes and additional combatives to the groin. Get up immediately.
Protecting the Throat and Neck

Protecting your throat and neck is vital. Tuck your chin and keep your shoulders shrugged as an initial defense against an attack to the neck; however, these are only preliminary measures and you must reverse the position immediately.
These preliminary defenses can easily be defeated by an assailant who yanks your hair back or applies pressure against your philtrum, eye sockets, or other pressure points. Professional krav maga focuses on just a few proven neck breaks and strangleholds. It is not appropriate to show these tactics here.
Deadside and Positional Control Strategy Revisited
Once committed to a fight, put yourself in a dominant position. Never turn your back to your adversary in any type of fight situation, especially if this puts you facedown on the ground, the worst possible position. From this position the back of your head and neck are exposed to attack. Nearly as dangerous is if the adversary secures you from behind or “takes your back” with his legs hooked around your torso or employs a body triangle clamp where he folds one leg under a knee, creating a figure four. As with deadside position in a standing fight, optimally you will achieve a side-mount or rear-mount position in a ground fight. There are four preferred krav maga ground positions: rear mount, side straddle, side mount with chest down, and the high mount while controlling the adversary’s arms. Punishing combatives, joint-break locks, and choke options are readily available from these positions.
Krav maga rarely relies on joint-lock breaks and chokes without first engaging in retzev combative attacks. Think of it as softening up your adversary. An adversary defending against combative strikes may put himself in a vulnerable position for joint-break locks and chokes. Many fighters rely heavily on the hands for combatives and the feet primarily for movement. Keep in mind that in a ground fight the legs become highly important for gaining control over an adversary. To achieve a lock, it is paramount that you keep your hips close to your adversary’s targeted joint. Positional control is crucial. Ease of transition or ground retzev must be second nature.
A Note on the Mount and High Closed-Guard Positions
The mount (where you are straddling your adversary with his back to the ground and your heels are hooked underneath his ribcage) and the high closed guard (where your back is to the ground and your adversary is pincered between your legs, which are hooked at the ankles) are well-known and formidable fighting positions. There should be little doubt of their proven efficacy in the ring. Yet there is one crucial street-fighting vulnerability if your adversary maintains proper position: your groin, throat, and eyes are also susceptible to attack.
Note that the best release and defense against locks, either while standing or on the ground, is to avoid putting yourself in a vulnerable position in the first place. As noted, chokes and joint-lock breaks are fight enders. While you can use them with great efficiency, remember they can be used against you. Keeping your chin tucked and limbs safe is key. This preemptive body positioning cannot be overemphasized.
Rear Naked Choke Defense (Warding Off the Hooks)
When fighting on the ground, if an assailant takes your back, you are in grave danger that he will apply a choke. He can also rake your eyes and pummel your head. A good ground fighter will pincer his legs around you to prevent your escape, and extend his body by stretching his legs and upper body in opposite directions to strengthen the choke or face bar. You are also in jeopardy of the assailant delivering punishing heel kicks to your groin (as you might do to an adversary).
A choke from the rear mount is one of the worst positions you can find yourself in, but it is not indefensible. However, it must be defended immediately before the adversary can sink the choke and hook his legs around you. Biting the assailant’s forearm is an effective option to facilitate the release.
Your objective is to roll into the crook of your assailant’s elbow and onto your stomach to break the hold. Maneuver your body away to the opposite side of his choking elbow to create some space to turn back into the crook of his elbow, create separation, and defeat the choke. Note: the turn onto your stomach must be forceful. The goal is to turn and end up facing the assailant, allowing counterattacks such as eye gouges, knees, and other combatives. “About-facing” your torso will break his grip. Do not in any way use your hands to push his legs away, as this leaves your neck and throat exposed.

To ward off the assailant’s hooks, raise your right leg to prevent him from sinking his leg hooks into you while keeping your elbows at your sides to further prevent him from sinking his hooks in.

Keep your chin tucked, and with both of your arms yank down on his choking arm prior to his sinking the choke. If he sinks the choke with his right arm, you must yank down on his right arm just below the elbow and just above the elbow at the “V” of his arm. A second option is to yank down on his right arm just above his wrist with your right hand and use your left hand to remove his left hand from the back of your head. Use your torso and legs to push back by bridging to place your entire body weight on him. Once you have shifted your weight back, if he has sunk his hooks, you must flatten your legs out and bring them together while still using your core upper-body strength to resist the choke. You must force the assailant on his back with your torso weight firmly against him so he cannot lean back and apply additional choking pressure.

As you resist the choke, slide your left leg up and through to grapevine around one of his hooks. Then slide your right leg over the other hook.

Once you have slid your hips out, still pinning him with your torso, bridge again by raising your body on the balls of your feet. Slide your hips perpendicular to the opponent’s torso and begin breaking the choke hold. Counterattack the groin to create further separation and continue to pin him to the ground as you begin your defensive torso turn.

Use your body weight, enhanced by the bridge, to maneuver your body away approximately 90 degrees (to the opposite side of his choking elbow) to create space. Once you have broken the initial choke, deliver strong elbow strikes to his groin.

Once you have created separation and released his initial grip, turn forcefully onto your stomach to end up facing the assailant, which will allow counterattacks such as eye gouges, knees, and other combatives. In about-facing your torso, you will break his entire grip while continuing to counterattack.

Get up by continuing to place pressure on his head and body, and finish with kicks and stomps as necessary.
Note: if your assailant is able to sink his leg hooks, a third option is to keep your chin tucked and use both arms to remove his left hand from the back of your head to counterattack with a straight armbar over your shoulder. Be sure you have defended against the choke adequately before going on the counteroffensive. Sliding your hips out will increase pressure on the arm. Be sure to keep his thumb pointed up. Note: you must execute this move quickly because both of your hands are committed, leaving you vulnerable.
Rear Mounted Naked Choke Defense against a Figure-Four Leg Lock
This type of choke—like all chokes—is extremely dangerous. Of course, the best way to defend it—again, as with all chokes—is not to get put into it. As with the preceding rear naked choke defense, do not let the assailant get his legs around you, especially when he is attempting a figure-four type of lock. A strong opponent with long legs can use a figure-four hold to hamper your mobility, break your ribs, and literally squeeze the life out of you, using both his upper body and lower body.
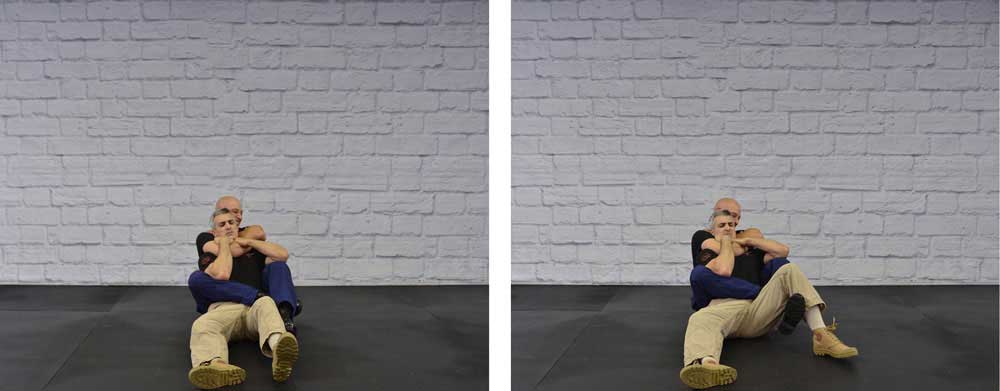
To defend this type of choke, use the same defensive options as covered previously in tucking your chin and exerting counterpressure at the “V” of his elbow, except you must wrap your nearside leg around the assailant’s dangling lower leg to apply a vicious ankle lock.

Once your nearside leg is hooked over, extend your leg to exert breaking pressure on his ankle joint. Be sure to maintain steady counterpressure against his choke until he either releases the figure four or the choke. Defeat the choke as covered in the previous defense, Rear Naked Choke Defense (Warding Off the Hooks).
Defense against the Rear Mounted Naked Choke When Facedown
This is an extremely dangerous position to find yourself in and should be preempted or prevented if possible. There are professional assailants who, once they have this position, will not let go. So, the key is to avoid and prevent being placed in this dangerous choke. But if you find yourself facedown with an assailant on your back attempting to apply a rear naked choke variation, you must immediately tuck your chin and apply counterpressure. Because of the position, you may have to secure the assailant at the wrist and upper forearm next to the elbow hinge to apply counterpressure. The goal once again is to turn and end up facing the assailant, allowing counterattacks such as eye gouges, knees, and other combatives. “About-facing” your torso will break his grip. Once you create enough separation to breathe comfortably, counterattack his eyes and groin, followed by retzev.
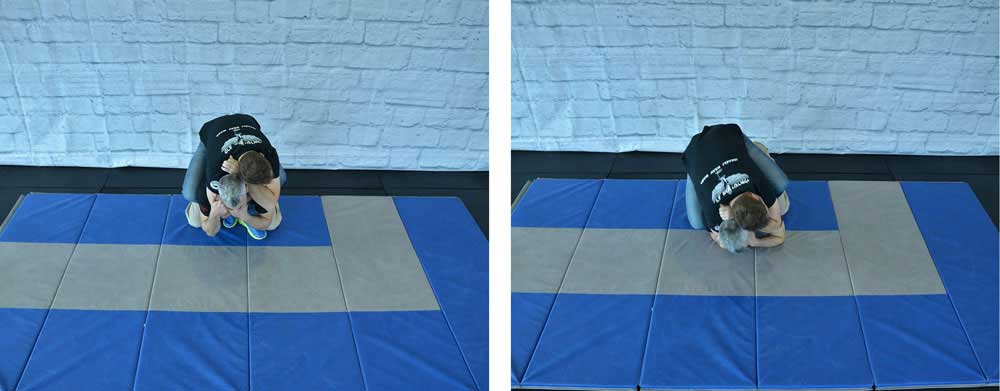
To release, maintain counterpressure against his choking arm. As you resist the choke, try to rise to your knees.

If you can rise to your knees, as you begin to buck the assailant forward, scissor your legs outward in the direction of the choking arm. In other words, if the assailant is applying the choke with his right arm across or around your neck, you will scissor your legs out and to your right. Similar to the rear-mounted choke with your back to the ground, this scissoring action allows you the best possibility of breaking his grip. Continue to turn into the assailant.
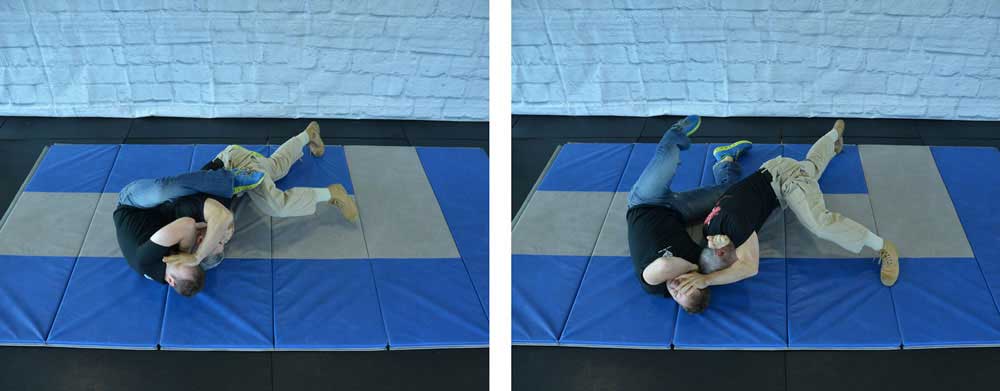
Roll into the crook of your assailant’s elbow and forcefully onto your stomach to break the hold while attacking his eyes. Maneuver your body away to the opposite side of his choking elbow to create space.
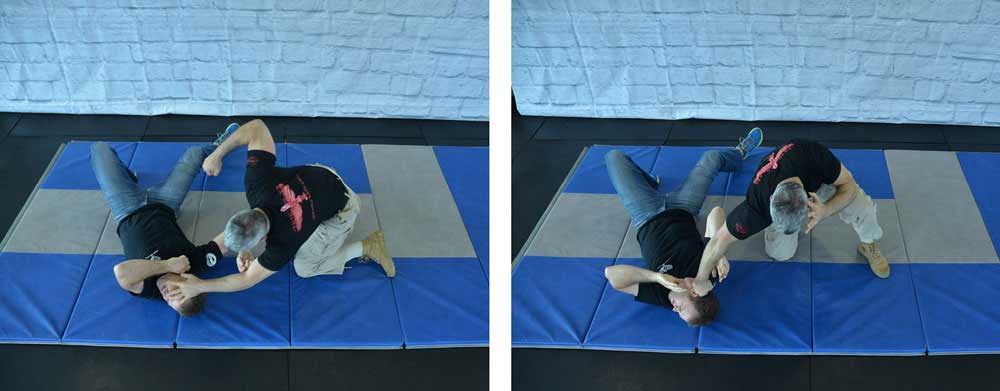
Continue to turn into the crook of his elbow to create separation and defeat the choke.
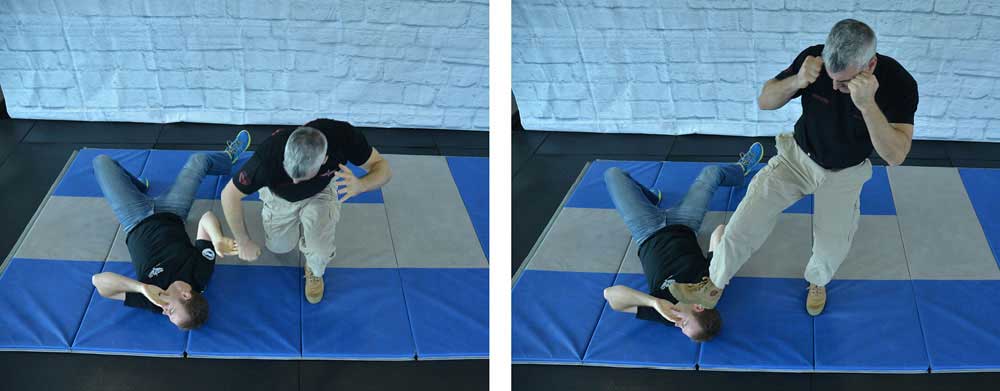
Get up, kick the assailant, and continue combatives as necessary.
Defending the Guard
If you maintain proper upright body position, the opponent’s groin is open to strikes.

Strike your opponent’s groin using straight punches (depicted), vertical elbows (depicted), or hammer fists. You may also trap one or both of the opponent’s arms while delivering simultaneous combatives.
Defending the Guard if the Opponent Pulls the Defender In
If your opponent successfully breaks your posture and clinches your head, use thumb gouges to the eyes to disengage, followed by retzev.

Immediately insert one or both of your thumbs into the opponent’s eye sockets.

Extend both of your arms and use the rule of thumb that if you find the cheekbone, you find the eyeball. Press your thumbs into the assailant’s eyeballs to break the attack. Continue to counterattack anatomical vulnerabilities as opportune.
Neck Crank from the High Guard
The neck crank from the guard can have serious consequences for your adversary, especially if you keep your legs pincered. (Note: this powerful technique is also readily available from the inside clinch.) While on your back, you have drawn your adversary into you, facing you between your pincered legs.

Securing your adversary’s head from its rear into your chest, you will force your adversary’s chin sideways while your other arm reaches around to secure his forehead or nearside eye socket. Clamp down on his torso with your closed guard and torque or crank his neck forcefully to the side.
Krav maga recognizes that you may end up on your back in a fight. So you must be capable of defending against all manner of combatives, especially strikes and chokes. When you close your guard by wrapping one ankle around the other, and if you react quickly to protect your groin by pulling your adversary’s torso close to you, the guard position offers the opportunity to deploy a weapon secured on your leg.
You must maneuver quickly because your groin is exposed to counterattack. By immediately forcing the assailant’s head into your torso while burying your head against your shoulder or biceps to protect your eyes, deploy your weapon.
Offenses from the Rear Mount
When there is no choice but to go to the ground, “taking” the adversary’s back—placing your chest to his back with his torso between your legs—is the most advantageous position, provided you are not facing multiple opponents. This is because you have an array of combative strikes and chokes at your disposal, including elbows and forearm strikes to the back of the neck, eye gouges, and heel kicks to your adversary’s groin and abdomen. Keep in mind that if an adversary takes your back, all of these offensive tactics may be used against you.
Rear Naked Choke with Heel Kicks

As you apply the choke and sink your hooks, use your heels to deliver withering, debilitating strikes to his groin.
Rear Naked Choke with Eye Rake
If the adversary is resisting your choke, rake his eyes with your non-choking arm to expose his throat and neck to apply the choke.

To facilitate exposing the opponent’s neck to apply a choke, you may embed your fingers in the opponent’s eyes and rake his head back. Significant pressure applied to the eye sockets when pulling to the rear will force the opponent to pick his head up, thereby lifting his chin in an attempt to alleviate the pressure.
Rear Naked Choke with Philtrum Rake (Not Depicted)
To facilitate exposing the opponent’s neck to apply a choke, you may use your forefinger to lift underneath the opponent’s nose (his philtrum) to force his head back. Significant pressure applied underneath the philtrum when pulling rearward will force the opponent to pick his head up, thereby lifting his chin in an attempt to alleviate the pressure. Note: you must apply this technique quickly and precisely to avoid being bitten.
Boxing the Ears and Striking with Elbows
Highly effective combatives involving the ear also include “boxing” the ears with palm heel strikes or using elbow strikes to the base of the skull or back of the head.

Palm heel strikes to the ears.

Elbow strikes to the back of the head.
Counters to Defensive Measures against Your Rear Naked Choke Attempt
If the adversary defends your rear naked choke attempt by yanking down on your choking arm, you may use your other arm to apply the choke. Note: you may also grab your own clothing, reinforcing the hold, while repositioning your other arm underneath his chin to execute an opposite arm choke. Basically, you are switching one choking arm for the other.
Offenses from the Mount
When obtaining the mount, do not sit on your adversary. Keep your weight settled high on his chest to maintain balance and control his arms. Protect your groin with a forward lean. Your knees must provide good balance platforms as you hook your heels into the side of your adversary. In addition, your knees should be close to his torso and as high as possible toward his armpits to limit his striking and evasive abilities. (In defending the mount, as a countertechnique, keep your elbows in to prevent the adversary from riding up the torso.)
Mount with Forearm Groin Shield
Place yourself in the best possible position to strike and control while defending your groin by grabbing onto the assailant’s shirt right in front of your groin.

Place your forearm in front of your groin to provide a partial shield, allowing you to attack with your free arm. This may be achieved by securing the assailant by the shirt with your weak-side arm to form a partial defensive shield against strikes to your groin. With your strong-side arm, pummel him with punches, palm heel strikes, vertical elbow drops, and forearm shivers.
Another strong option is to control the adversary’s arms, which provides two tactical advantages: you can rain combative strikes down on his head and throat with impunity along with armbar options and chokes, and you can prevent him from striking your groin. Even if you do not control your adversary’s arms, you can still pierce his defenses to attack his head and throat. From the mount you have more mobility, and gravity is on your side as you deliver withering combatives. It is highly advantageous to keep your adversary’s back pinned to the ground to limit his escape options.
You can also position yourself with one knee on an adversary’s arm while trapping his other arm to facilitate combatives. This option also allows for armbar variations against the adversary’s free arm. For example, you can transition from a control hold to an armbar combined with a throat grab. For the armbar throat-grab technique on the ground, you will trap one of the adversary’s arms with your knee or reverse the mount across into a far-side armbar.
The following points will help you to maintain and use the mount long enough to deploy a cold or hot weapon:
- To maintain the mount, you must develop good balance to counter the adversary’s body turns and push releases and to deploy your cold and hot weapons. One of the most common defenses is for the adversary to buck or throw you using his hips to bridge. Note: this is a krav maga defense against a substandard mount.
- If your adversary wishes to roll on his stomach, let him. Loosen your legs slightly to allow the adversary’s movement while deploying your weapon; if you tighten them he can throw you or roll you over.
- If your adversary tries to close the distance between you by using a “bear hug” from the bottom, you can use eye gouges (similar to the standing defense) or apply a painful arm brace to the jaw and throat by bracing his face across the jaw with your forearm or using the palm heel of one or both of your arms. The same technique will work if your opponent tries to grab your neck. Insert your arm as a brace against his throat and jaw.
Trapping the Adversary’s Arms for Weapon Deployment
Trapping an adversary’s arm or arms takes away both his ability to defend and to counterattack you, specifically your groin. You can deliver extreme punishment from this advantageous position and readily deploy your weapon. Trap your adversary’s arm by securing it firmly against your body with the inside of your forearm (both arms can be trapped in this way as well).