CONSTRUCTING
Model-making generally involves processes of construction rather than methods of sculpting. Raw materials are chosen which have already undergone some degree of formation, into sheets of a set thickness, or into strips, rods or tubes. Much of the model-maker’s initial skill resides in knowing which available materials would be most suitable for a given task. This suitability includes factors such as: which can be cut or shaped appropriately to the forms required or in the time available; which are cost-effective (even an expensive material can save money when weighed against a saving of time or effort); how easy they are to join or bond; whether they can be appropriately surfaced or painted; how durable they are against use or transportation; or if any permanency is intended. But added to this technical knowledge is a different kind of creative expertise that involves knowing or intuiting which out of an infinite array of ready-made forms can be utilized to make the job easier or quicker. It is these areas of knowledge and creativity which mark the skill of a model-maker, far more than any manual ability.
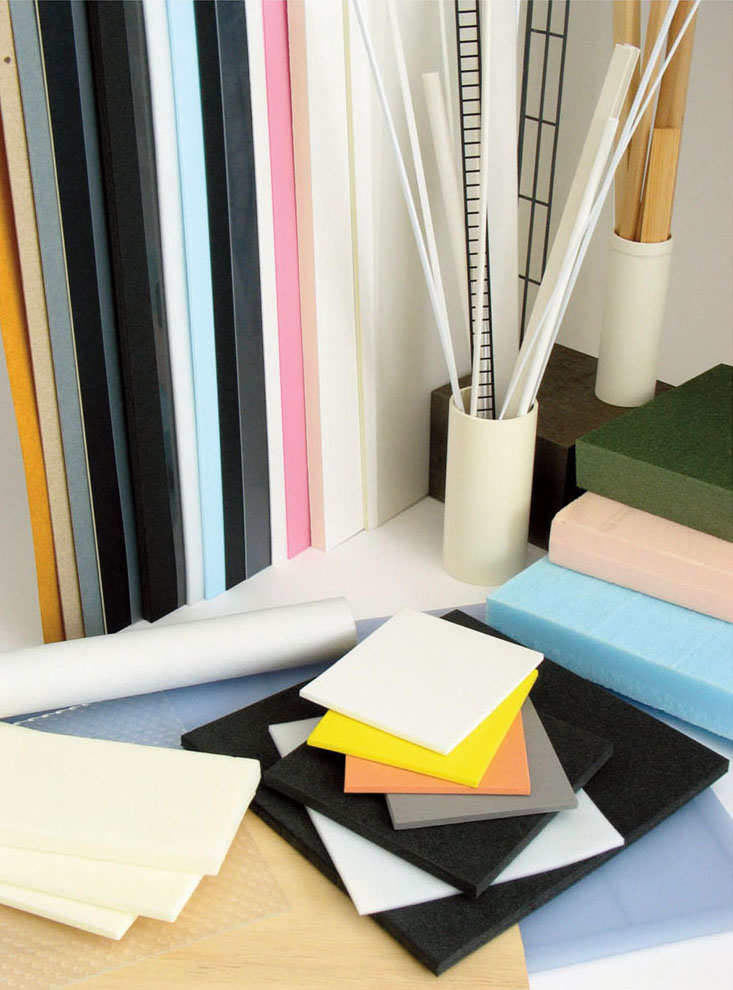
This chapter focuses on three distinct material types, each with different properties – card, plastic and foam. Wood is given some consideration here (using the constructional example of making a panelled door), but its usefulness in model-making lies more in the area of surfacing. It is therefore featured more in Chapter 6, ‘Creating Surfaces’. Whichever material one chooses to use, some general building guidelines can be applied to all.
Guidelines for starting
Planning
The importance of this first essential step can’t be repeated often enough. It involves having some initial idea of how a chosen material will behave and planning construction accordingly. It also involves having a fairly clear idea ahead of time how surfaces or painting will be achieved so that the right basic materials are chosen and so that any extra thickness added later is taken into account from the beginning. In addition, it makes sense to plan the construction so that individual pieces can be worked on flat (details built up, texture applied and painted) before being stuck together. Otherwise, it’s very difficult to achieve the kind of finish you want in a corner that’s difficult to get to with a brush!
Initial planning should also involve working out (as far as possible) the dimensions of each component part and compositing them on the sheet so that only half as many cuts need to be made and the material spared. This may seem rather too much micro-organization, but any decision that saves a little time will help in the end. The final stage of model-making is rarely a free-fall experience, such as modelling an abstract form in clay where the outcome is not yet known and the material remains flexible. Often the goal is minutely predetermined from the beginning and is just a case of copying in scale. All the dimensions are known or can be found. Planning is in this context not a straitjacket on creative freedom, but an insurance which should free time and mind to dwell on ‘higher things’! As suggested in the Introduction, since model-making is most often a means to an end rather than the end in itself, ‘effective’ is not only what looks good, well-made or convincing, but what has served the process of getting there. If the final model has taken a disproportionate amount of time to complete at the cost of other things (though it may well do anyway!), it has ceased to be a proper team-player.
Marking out and cutting
The following are some basic points which may be obvious to many, but are worth repeating here.
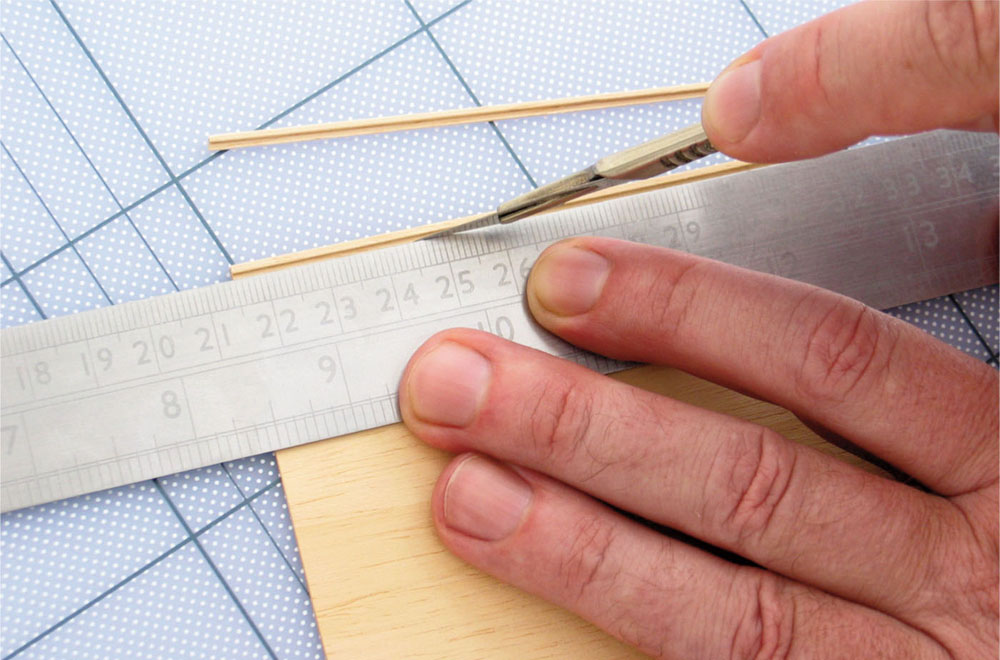
A hard pencil point should be used (for example, 2H) to make something between a dot and a dash to mark a measurement (a dot may be easily lost or mistaken, whereas a long dash can be inaccurate). When ruling a pencil line between points, your working light should fall towards the working edge of the (metal) ruler rather than creating a shadow. A pencil will never draw a line exactly on the metal edge, so you need to develop a feel for the right compensation; the same will apply (often more so) when using a blade. Placing masking tape along the underside of a flat metal ruler will help it to grip better. Many professionals mount their material on a drawing board for marking out, which saves a lot of time and effort in establishing steady lines and correct right angles. If this is not possible, a good try square will prove essential.
CUTTING CIRCLES
Circles or curves present a problem in any material. The less resistant the material, the easier it will be to cut them. The more pressure one has to exert on the knife, the more difficult it is to maintain the steady flow of the hand movement needed to keep the curve smooth to the line. It is essential to make the first run with the blade just a light scratch, as it were, to serve as a guide for the second where one can press harder. It may take three or four runs, but it is never a good idea to try to cut through anything manually in one go. For large circles, keep the blade at an oblique angle, that is, more parallel to the surface, because the length of blade will act as a smoothing guide for the line. If the curve is tight, the opposite is true and the scalpel has to be held more vertically. The gadgets sold to attach to a compass to cut a perfect circle may be fine for laying a guiding line, but it will be impossible to exert enough pressure this way to cut right through card or plastic.
Carpenters will always hatch pencil lines on the side they don’t want and doing a similar thing avoids confusion if you’ve marked out a number of shapes on one piece. Always try to cut on the same side of every line, even though this means having to rotate the sheet material often. This will help to maintain accuracy. Where the material is thick but still manageable with a knife (such as foamboard or foamed PVC sheet), it is easier to cut part-way on one side and cut the rest of the way on the other side (having extended the lines accurately round using the try square). This is not only a preferable method because the friction on the blade is halved, but also a perpendicular cut is easier to obtain.

Using a small engineer’s try square as an aid to marking out. This simple tool can save a lot of time.
Assembling
When assembling a model, the main concern is, at the risk of stating the obvious, gluing in exactly the right place and maintaining that position until the glue is at least partially set. PVA and superglue are opposites in this respect. When using PVA or any slow-setting adhesive, there is some room for repositioning so that a part could almost be slid slowly into place if need be. Once there, it usually has to be secured by some means because it needs time to take hold firmly. With super-glue, on the other hand, there is no chance for repositioning because it will bond immediately, but at least it will need no further assistance. Following are some guidelines that will help.
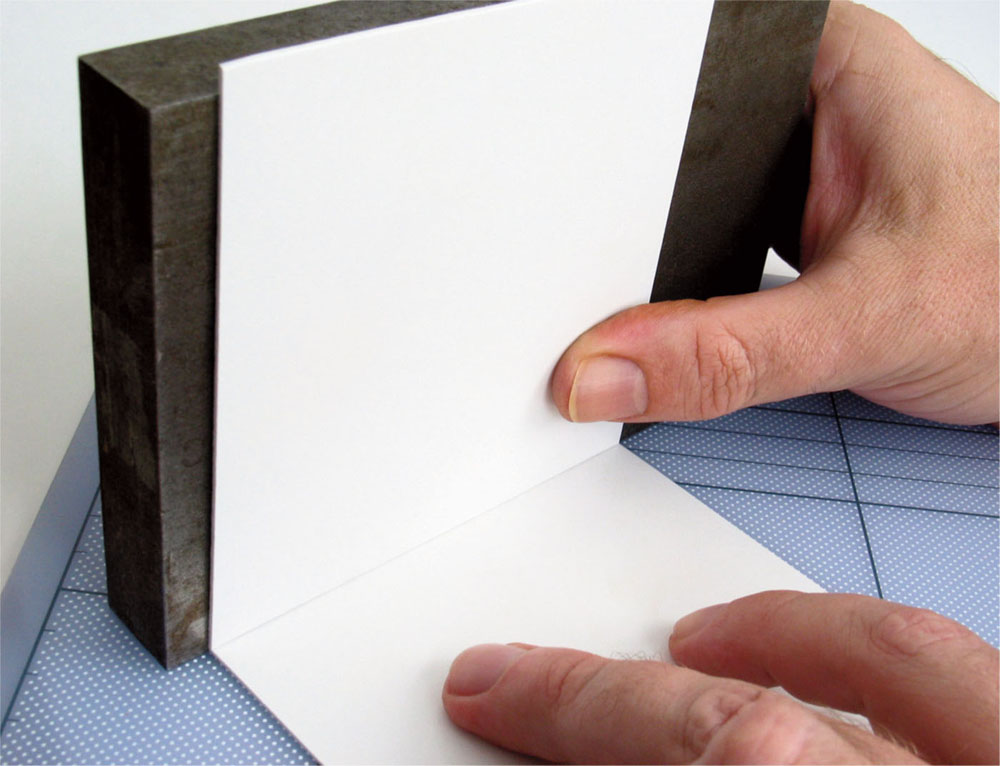
Using a straight-sided metal block as a construction guide.
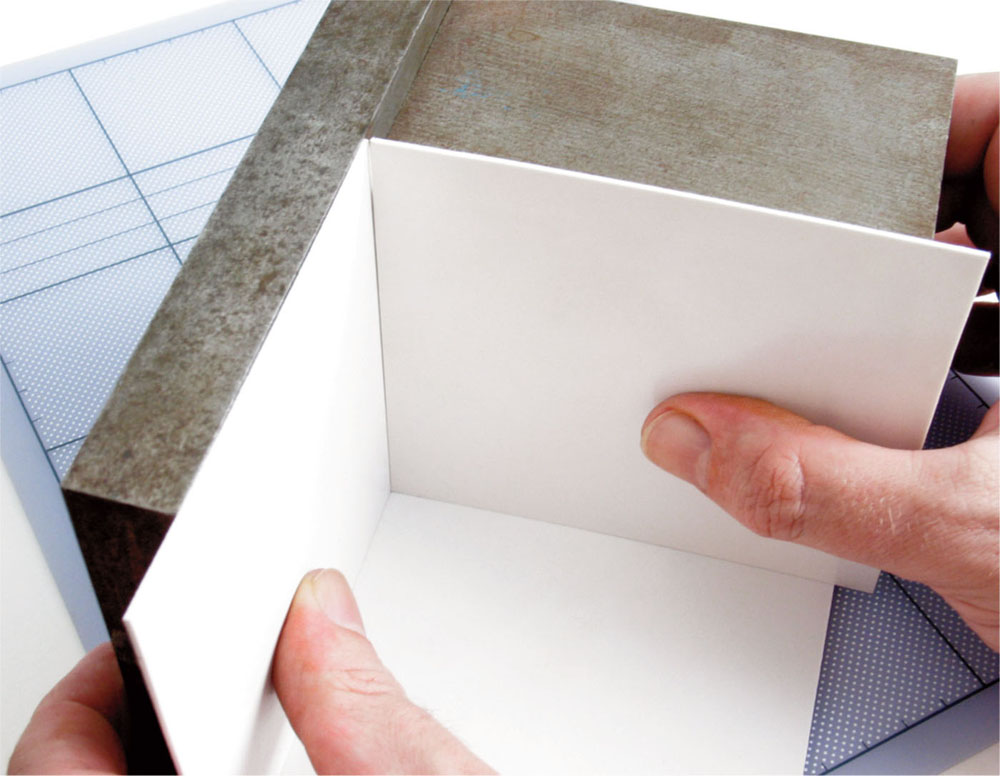
Two blocks aligned to help with a corner.
Instead of trying to align two edges of card by eye to form a right angle, such as a wall piece joined to the edge of a floor piece for example, turn the work over so that the wall piece rests flat on the work surface, then butt the floor piece up to it using the work surface as a stop while gluing. To avoid gluing to the work surface, put a piece of thin scrap paper underneath. This can be detached later and any small bits of paper that have become glued to the back can be sanded using a fine sanding block if necessary. A more versatile extension of using flat surfaces as guides or stops is to invest in some right-angled metal blocks.
The photos here show firstly how one of these blocks can help when gluing a right angle and then how two of these can assist in aligning the edges of a corner construction while gluing. These blocks need to be solid and weighty (so that they will not shift when pressed against) and the sides must be perfectly squared. The blocks shown here came as offcuts from a metal workshop and unfortunately are not available ready made in the shops, although they can be ordered from any firm willing to custom-cut metal.
An alternative is to make something like the assembly rig shown in the photo. It consists simply of two perpendicular walls attached to a firm baseboard. Thick MDF is an ideal choice here because of its smooth surface and it can be custom-cut by a timber merchant. All you need to do is to clamp the walls down while gluing, making sure that these remain at 90 degrees. The holes in the base are optional; they provide access for clamps if needed. The surface of the MDF should be kept clean and smooth. Paper should be inserted between the wood and anything being assembled so as to prevent gluing to the rig. An improvement would be to seal the surface with a tough polyurethane varnish.
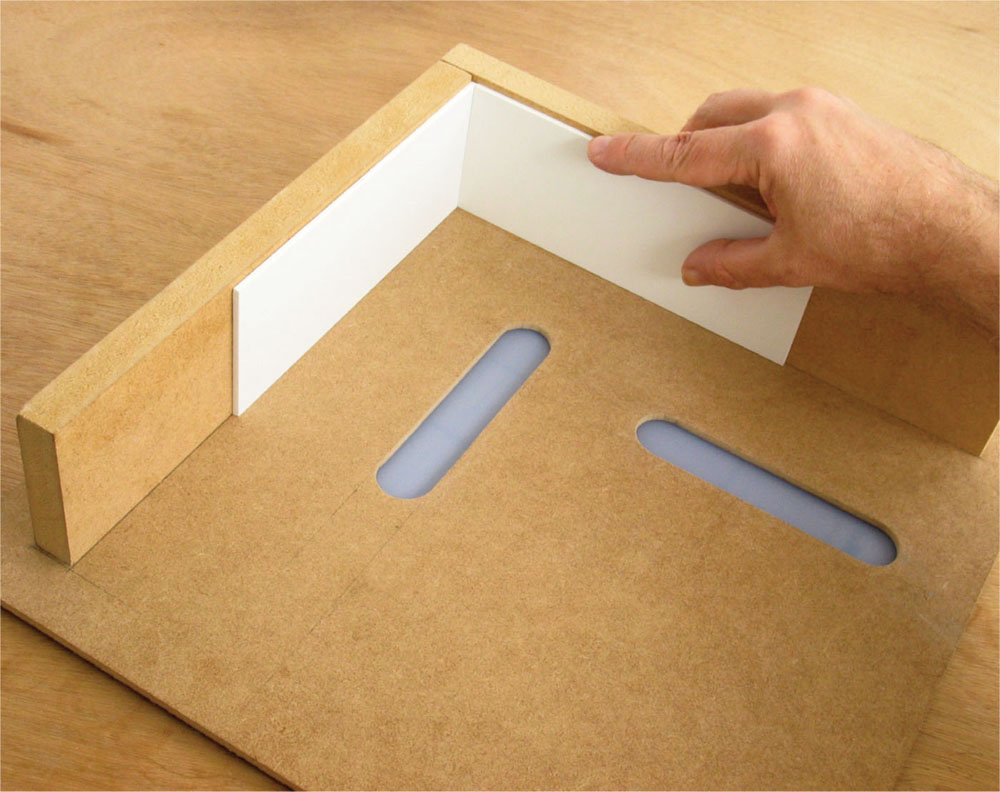
A custom-made assembly rig in MDF.
More on gluing
More specific information on individual glues and their uses can be found in the Directory of Materials under ‘Adhesives and solvents’ but a number of things are worth summarizing here. A general point that tends to be forgotten is the ‘less is more’ principle. The tighter the fit between the two parts being joined, the less gap-filling the glue has to be. The bond will be stronger and it will take less time to set.
The nozzle of a PVA bottle, for example, tends to condition us into thinking that this is how the glue should be applied. The thickness dispensed in this way may be exactly right when gluing and clamping wood, but far too much along an edge of card. It helps sometimes to thin the glue slightly with water and apply it with a brush instead, although this is understandably less convenient. Either that, or one should dab the edge with the finger to even the glue out and take off some of the excess.
Solvent-based tube glues such as UHU may also be convenient for some things but are notoriously difficult to control and not really suitable for fine, clean work. Unlike PVA, which contracts to almost nothing as it dries, these glues will always leave an unsightly residue. An exception might be using solvent-based tubes for contact gluing. Here, the glue is applied to both surfaces and left for a little while. During this pause the glue can be evened out, with the finger as before or with a stick of card. After a few minutes, the surfaces will be dry to the touch but will bond firmly when pressed together under pressure. This must be done in the right place first time, because, although the bond will be rubbery and flexible until the glue hardens more, it is not possible to reposition.
Another very clean method of bonding which can be considered is to use double-sided tape. For laminating (joining two flat surfaces) large areas of card or plastic this can be a quick alternative to contact gluing as long as those surfaces are flat and clean. Only small squares of tape need to be distributed at key points. Also, for attaching clear acetate to the backs of window frames, small strips of tape around the outer edge are ideal. Double-sided tape can even be used in fine strips on foamboard edges to assemble a construction together provisionally. Sometimes this will hold for years, but it depends on the atmosphere and it can loosen if it gets too hot or humid.
Constructional examples
The following examples suggest ways to solve some common constructional problems, but it is not assumed that the solutions given here will be the only ones. There is no single right way of approaching something and a lot depends upon personal preference.
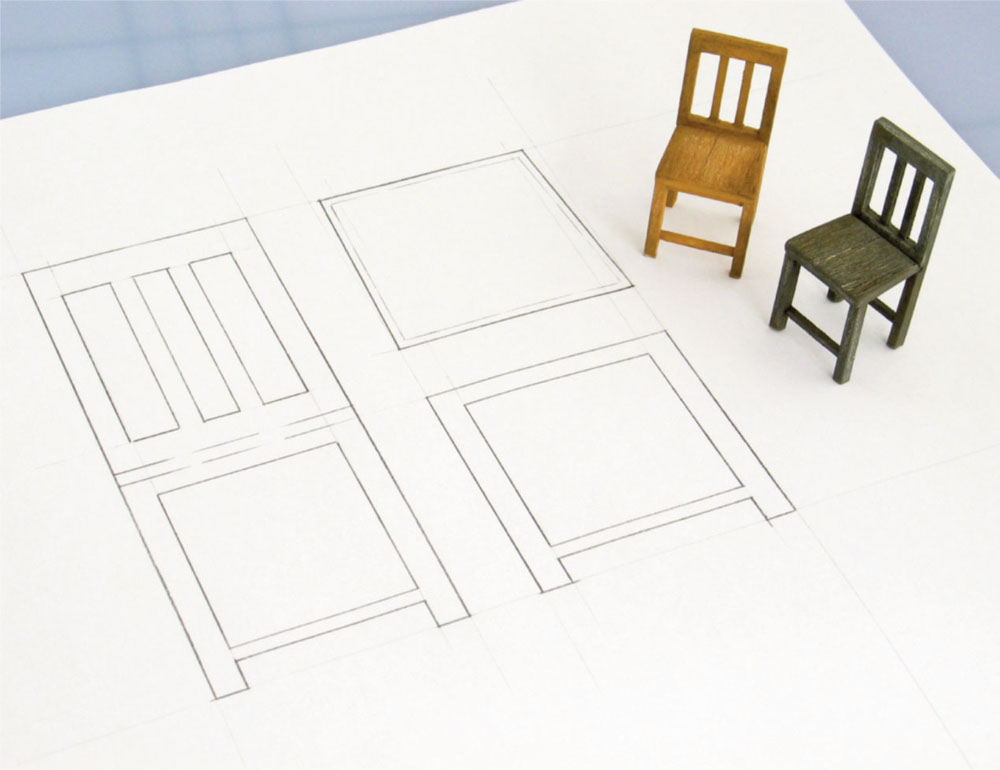
The parts of a chair drawn up at 1:10 scale with finished chairs at 1:25.
A simple chair
The example of making a simple chair has been chosen because it will be familiar to most. It is often assumed that the only way to build something of this delicacy properly is to take a ready made strip of an appropriate thickness in scale (for example, wood, or styrene) and painstakingly to assemble minute lengths together. This will, of course, work, but it is hard to keep such a minute construction straight and it will be fragile. The alternative approach suggested here is first to make fine cut-outs or silhouettes in a thin, stable material and then build upon them, adding strips to make up the right thickness. Foamed PVC is ideal for this method and more will be explained about this material later.
1. The first task is to draw up the parts of the chair (back, seat and front legs) on paper. In this case, the chair is 1:25 scale, but it is much easier to draw in a larger scale (1:10), then reduce the drawing (40 per cent) on a photocopier.
2. The reduced photocopy is then pasted onto 1mm foamed PVC. Spray Mount is best for this, although Pritt Stick could also be used, being careful to spread the glue evenly.
3. The parts of the chair can then be carefully cut out, through the photocopy and PVC. Foamed PVC is in many respects easier to cut than card, because there is less friction on the blade. It may not seem so at first though. If using this material for the first time it is important just to practise cutting it for a while, getting used to how much pressure is needed. When cutting small components like this it is better to keep them in place (still contained within the surrounding plastic) until all lines have been cut. This helps to keep cut lines straight.
4. Once the parts have been cut out they can be glued together as they are, but this will make a rather insubstantial chair. At least the legs and outer frame should have thin strips of PVC added. It is much easier to add to a firm template in this way than to piece together from scratch. Superglue has to be used with this type of PVC. The paper photocopy can be left where it is if it is still firmly stuck, otherwise it can be peeled away from the plastic. If edges still seem rough or uneven, the plastic can be sanded with fine sandpaper – disposable cardboard nail files are ideal for this kind of work.
5. Although the plastic will accept some acrylic paints, it is better to use a spray primer with them first. Enamel paint can be used without the need for a primer. The painted chairs in the first photo were given a base colour of Humbrol enamel and then rubbed with coloured pencil. The plastic for the seats was first scraped with coarse sandpaper (before being cut out) to simulate wood grain. These techniques are dealt with in Chapter 6, ‘Creating Surfaces’ and Chapter 7, ‘Painting’.
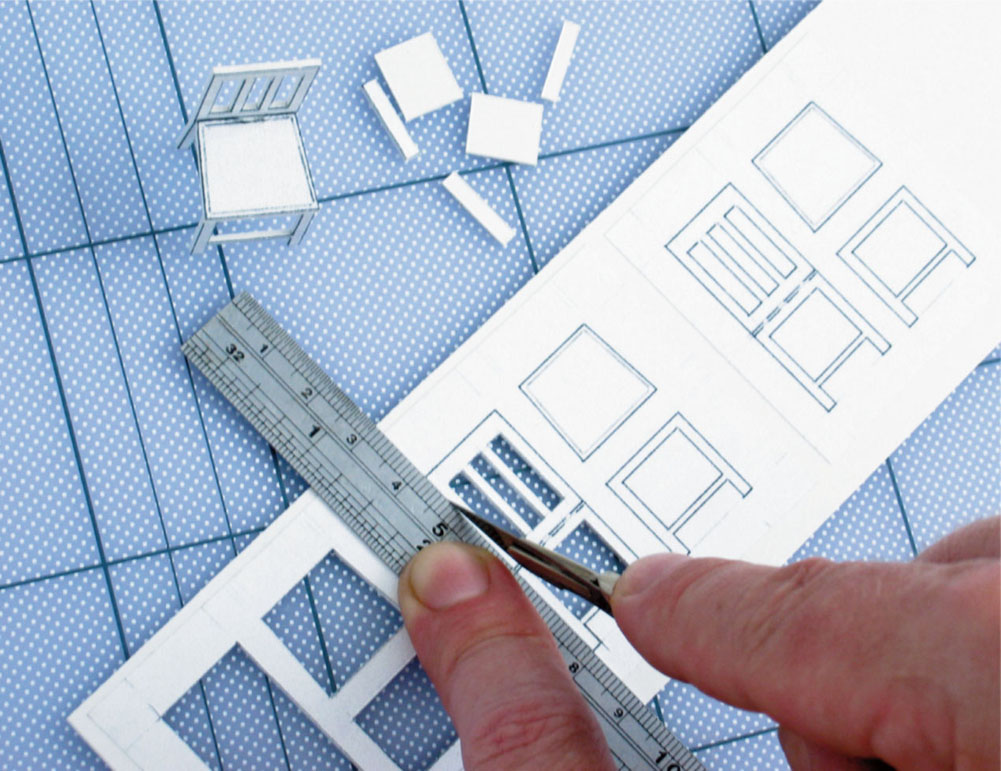
The chair parts being cut out. Using a very small metal ruler will help. A strip of masking tape has been stuck to the underside to make the ruler grip better. The best knife to use is a surgical scalpel (see ‘Tools’ in the ‘Directory of Materials’).
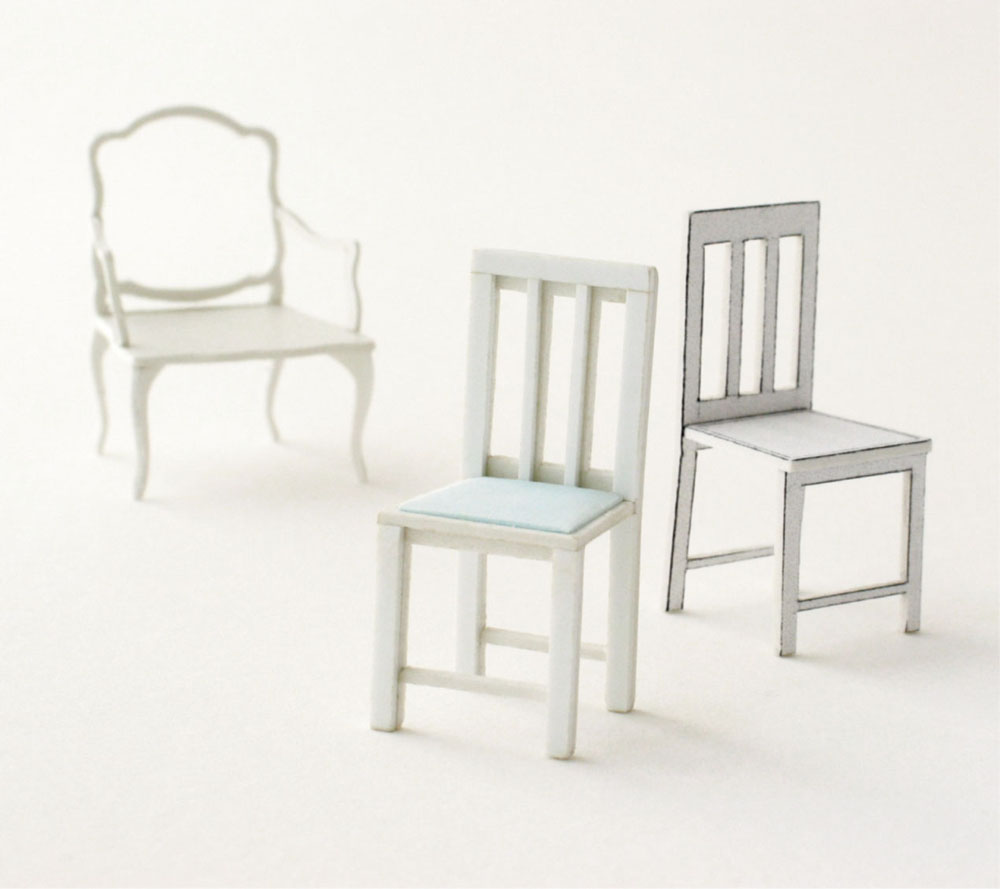
A thickened chair compared to the flat version. The other advantage of using plastic cut-outs as a basis is that more fluid, ornamental shapes are possible.
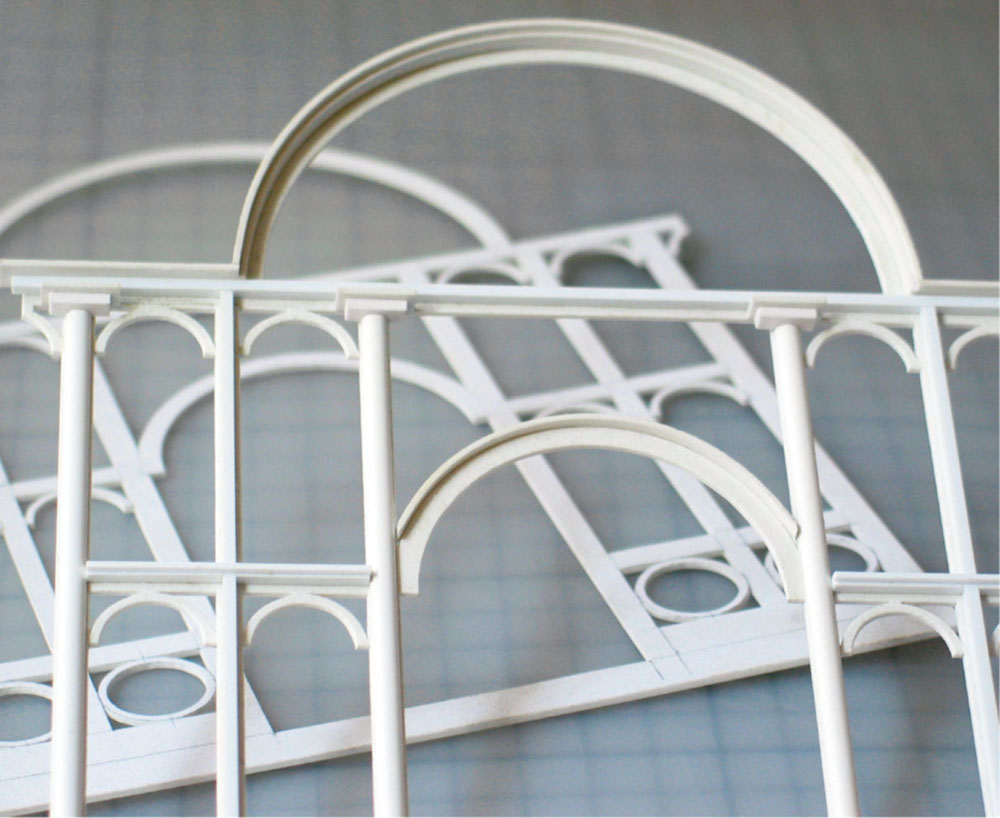
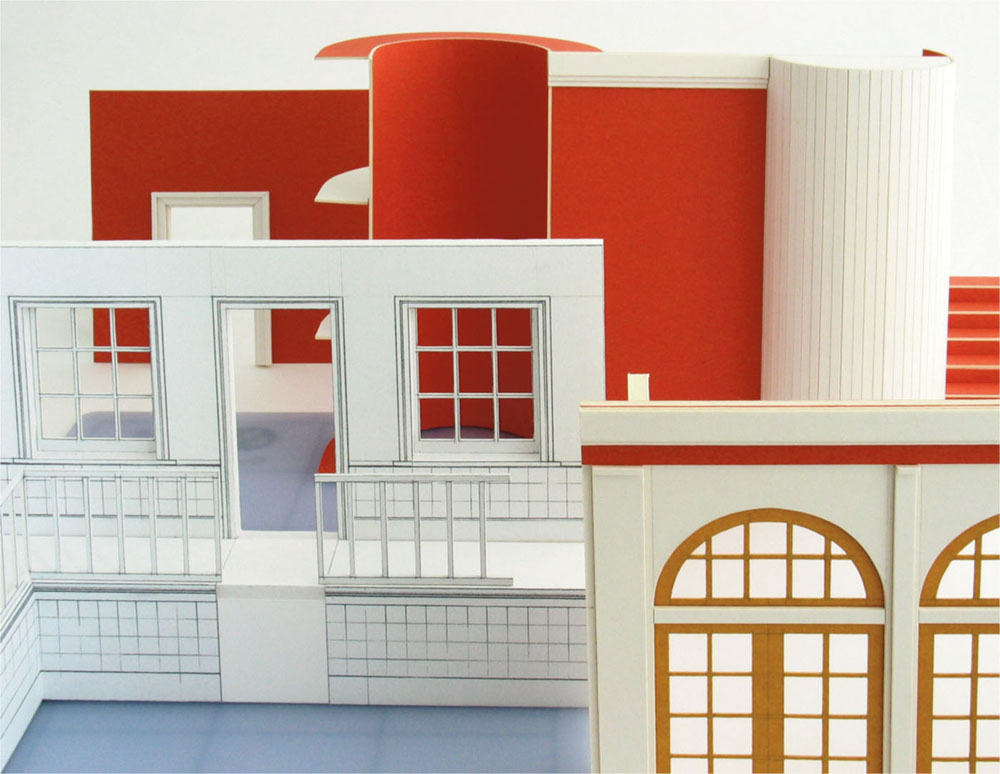
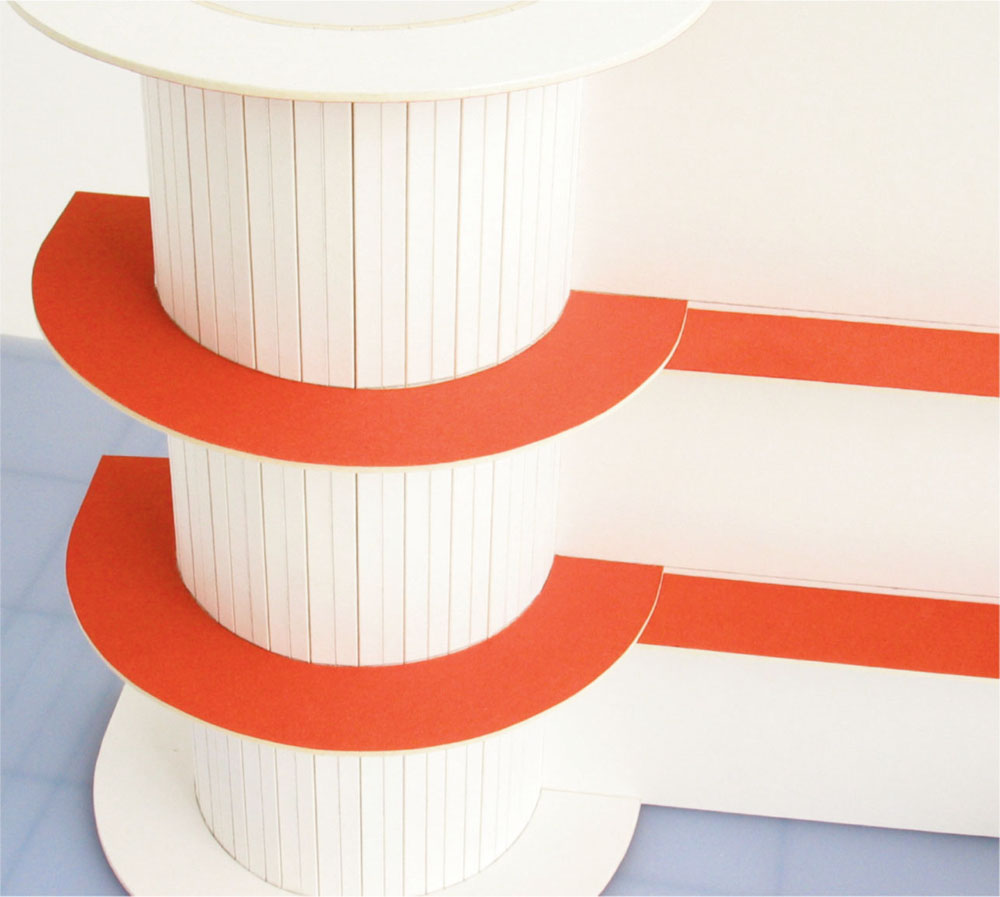
Work in progress. This piece of glasshouse architecture is being constructed in the same way as the chair, building thicknesses and profiles on a flat template.
AVOIDING CUTTING TOO FAR
When cutting anything like repeated windows in a shape the danger is always cutting too far (for example, cutting through a strut you want to keep), because you can’t see where you’re ending with the scalpel. One way of avoiding this is to cut all lines in one direction towards you first, stopping slightly short of the end of the line nearest to you. Turn the work right round and then complete the line from the other direction. Get into the habit of always cutting on the same side of the ruler. This will gradually help you to cut in the right place on a line each time.
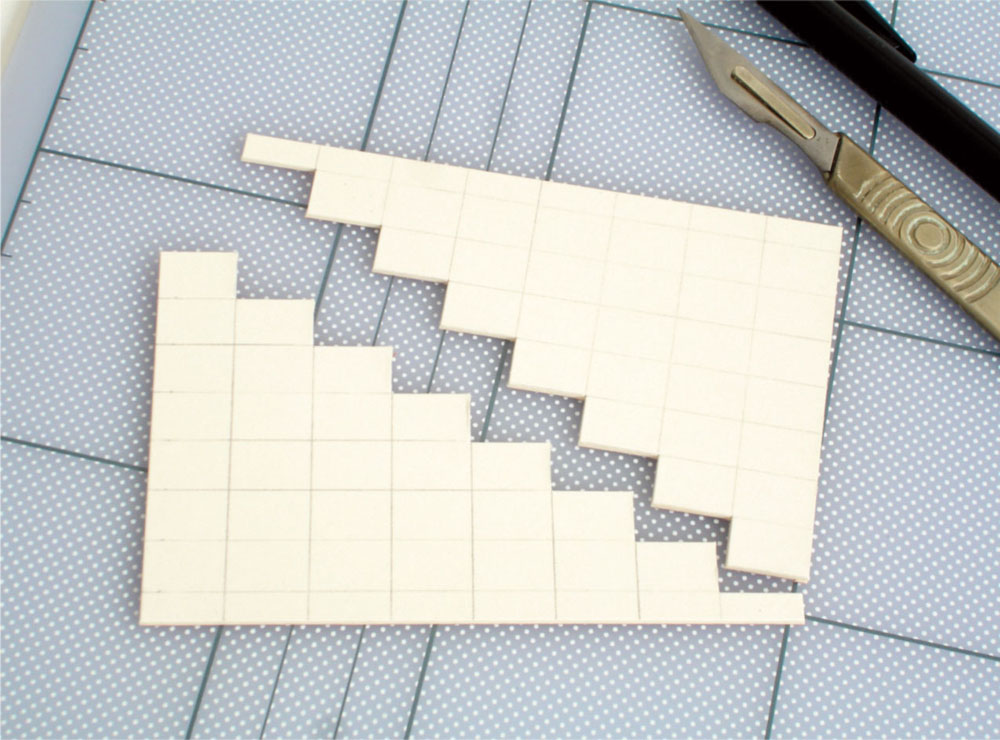
A stair unit
Deciding how to make stairs is an exercise in spatial thinking. Making a wall with a window or a door in it does not involve such a leap into space, in that one can think more clearly in terms of two-dimensional layers. There is the main one representing the wall surface with the appropriate holes cut in it, then there are whatever layers are required to build up frames or mouldings on the front, and whatever layers are required behind to indicate the thickness of the wall. The basis is a flat cut-out onto which everything else is applied, either on one side or the other. But steps need to be approached differently. They are too deep to build in layers and it helps to visualize them more from the side as a solid box with a profiled top.
1. The first place to start is with the profile and two identical ones are needed. Having worked out the riser and tread (the height and the depth of each) for each step, a grid-work of rectangles with these proportions can be drawn on card, using the drawing board or try square to keep them straight. It is better to do this first as a grid to maintain a check on the right spacing, rather than build up an isolated zigzag. Also, these extended lines will serve as a better guide for the ruler when cutting. The profile can then be cut out, as shown. If one is careful to keep to the line and enough space has been left above, the waste zigzag can be used for the second profile. The grid lines will help in matching up.
2. When these have been done (and one has checked that they match), the best way of ensuring a straight and stable construction is to put them on a base. Cut a strip of card long enough to make both the base and all the tops of the treads. This is where some forethought comes in. If the profiles are glued to a base and the treads sit on top of the profiles, the top of the unit (and the first step) will be two thicknesses higher than it should be. The equivalent amount needs to be taken from the bottom of the profiles to compensate. Having done this, the profiles can be stuck to the base, including right-angled pieces to keep them straight. The assembly rig would be useful here for alignment of the parts.
3. The tops of the treads can be cut from the same strip used for the base, making them all the right length. But these are put aside for the moment because it is easier to glue the risers in first. These will have to be shorter (by two thicknesses of card) to sit between the profiles. The easiest way is to cut a strip (like the one for the base and treads) and test this for width before dividing it up with the try square. PVA should be used for any gluing of card. This stays repositionable for a short while, so the flat of the metal ruler can be used in this case to push the risers level.
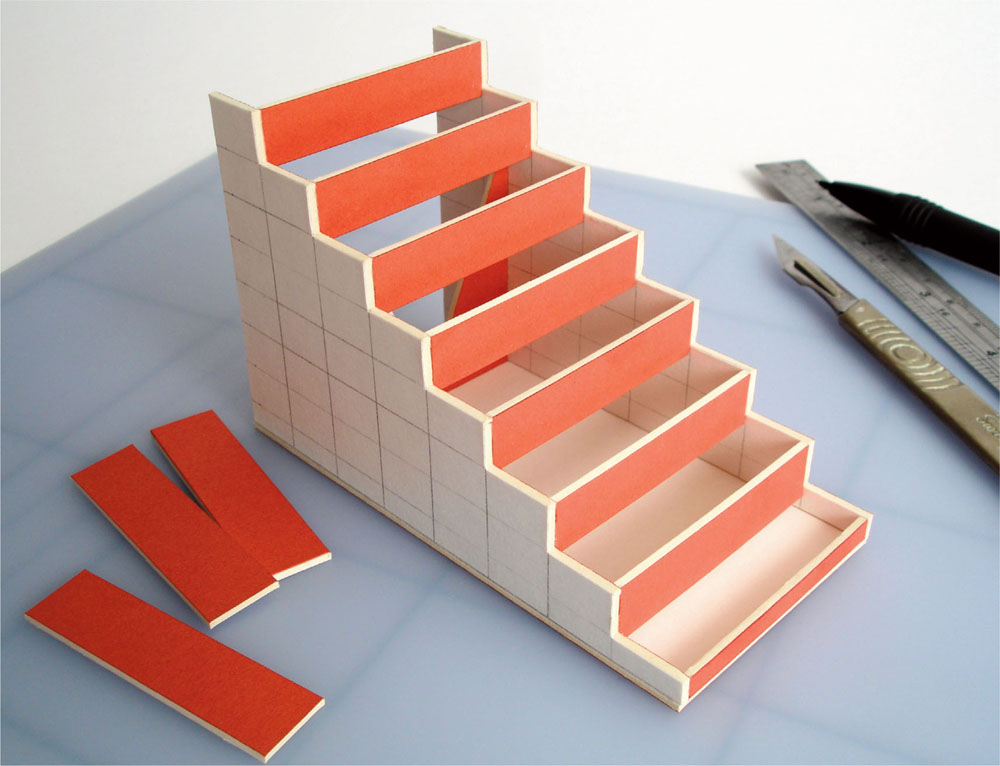
4. All that remains is to glue the treads in place, which is simple since all the supports are already there. If the unit needs to be treated to suggest a particular material, it is far better to clad it with a prepared surface than painting or texturing the card directly. Similarly, if wooden stairs are needed, cladding is simpler than constructing the whole thing in wood, although the extra thickness needs to be planned for.
Step profiles drawn and cut out. If cut accurately enough, the same zigzag can be used for both.
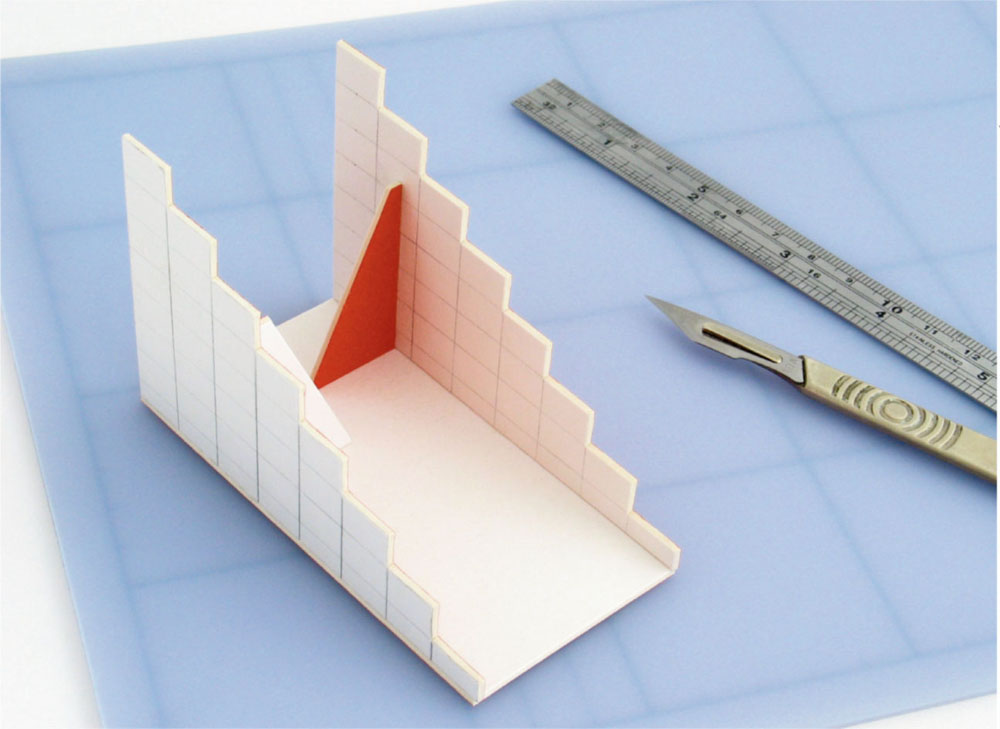
A base is important for keeping the construction together, but the extra thickness needs to be allowed for. Right angles help to keep the sides straight.
The risers are then glued in place.
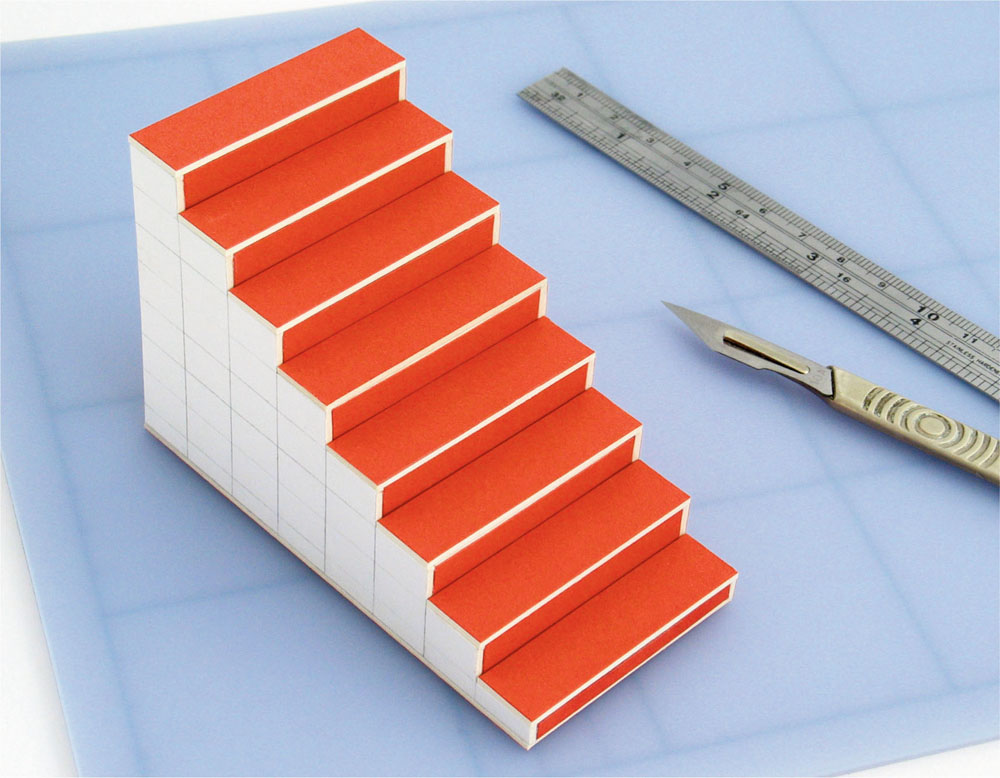
The completed stair unit.
A panelled door
This is again more a case of building up layers of an appropriate thickness rather than constructing. Obeche wood is ideal in this case because it is thin, flat and easy to cut.
1. Having drawn up the door (even the simplest things should be worked out on paper first, especially if they are being designed as you go; these paper records will also be invaluable for the future), the base layer can be cut from obeche sheet. Parts of this will be visible as the interiors of the panels.
2. Strips of obeche are then added to this base to form the framework around the panels. Because obeche (like any thin wood or card) will warp if too much water-based glue is used it is better to spot PVA on the parts to be glued rather than spreading it. Only minute spots are necessary here to hold the strips firmly in place. Care needs to be taken to keep the glue from visible surfaces if the wood is going to be stained later. It is also worth remembering that, for both decorative and real-life structural reasons, grain usually follows length.
3. In this case, delicate profile strips were inserted, following the edge of each panel, to complete the effect. This is painstaking work at its best, but worth it for the overall effect. It is, of course, best to make up a longer length of profile strip and cut it up as necessary, rather than making each individually. Also, rather than trying to glue two delicate strips together after cutting them both out, it is easier to cut the smaller strip first and glue it to the edge of a larger sheet. Once the glue has set, the bottom strip, with the smaller strip already attached, can be cut off the sheet. For gluing thin elements like this, PVA should be thinned with a little water and applied sparingly with a very fine brush or the end of a cocktail stick.

Three stages in building a door: base layer, framework, profile strips.
Cutting a profile strip.
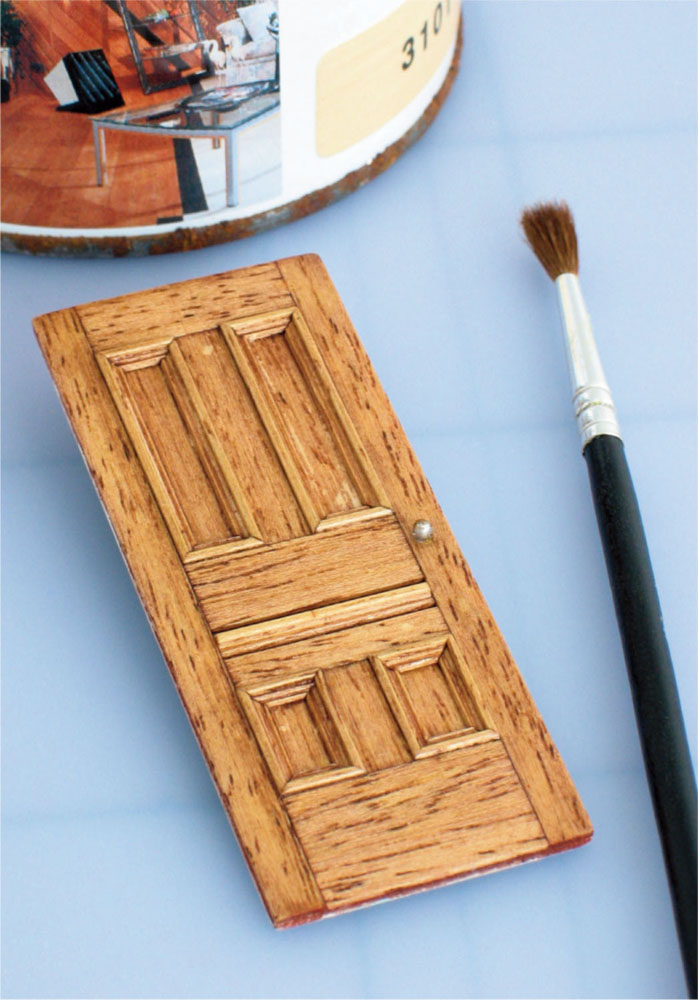
The finished door has been stained and waxed to emphasize the grain.
Working with card
Cardboard has always been a staple material, at least in theatre model-making and for other forms of a temporary nature. It will never become fully outdated, but as newer materials become more available its effectiveness should be questioned. Its main advantages remain that it is readily available in a variety of forms, is relatively cheap and is easy to cut with the simplest of tools. Its advantages become such a factor when faced with a tight deadline that many just accept or ignore its disadvantages without further question.
Cardboard of any kind has to be treated with care, that is, properly primed or sealed before it can be textured or painted. If not, it will warp badly! In fact, cardboard is so sensitive to atmospheric moisture or changes of temperature that it is usually bent before it gets to us. Ironically, despite its readiness to bend in this way it will not bend well when we want it to! It can be cut easily enough, but it can’t be shaped and its edges can’t be sanded in the way that those of wood can. Being absorbent, cardboard responds well to most glues, but as it is composed of layers this bond is only as strong as the outer layer and this is usually not very strong at all. Lastly, these layers will tend to separate when cut into thin shapes, making it unsuitable for any fine or detailed work.
Having listed all the disadvantages, it must be noted that the various forms of cardboard do have many useful qualities. The constructions featured here are works in progress which have been left unfinished to show the material and how the forms are put together. The scale used for all of these is 1:25. The various forms of cardboard and how to work with them are listed below.
Constructions in card. The most commonly used are mountboard and foamboard, but thinner types such as stencil paper are invaluable for finer work.
Mountboard
This is the most commonly used card for theatre set models. Like almost everything else, it has been appropriated by model-makers but was never intended for them. It is intended mainly for passepartouts (cut-out windows for framing pictures under glass), hence the range of pastel colours available. This has also determined its consistency and softness so that it can be cut fairly easily at a slant to form what is known as a chamfered edge. The surface is smooth and matt on both sides, one being covered with a slightly tougher coloured paper while the other is left white. Theatre designers tend to favour the standard black/white version as an all-purpose material because the black side can also be used for theatre model boxes or to convey black masking in the set model. If other colours are used and intended to be kept as the wall colour, bear in mind that the surface can be very susceptible to grease marks while handling. It may be better, especially if mouldings need to be applied to the surface, to take the white side and paint it once all the gluing has been done.
Showing strengtheners on the back of a mountboard construction. If mountboard is carefully scored halfway through, it can be made to follow a curve.
THE PROBLEM OF WARPING
Sometimes the strengthening framework illustrated in the photo is enough. It should go without saying that this should be done after the wall piece is finished (the example shown may be confusing in this respect, but it is left unfinished to show the materials). If the card warps after painting it is often possible to ease it back straight enough for the backing to do the rest. Mountboard has an advantage here because the harder, coarser kind of card known as greyboard will be much more difficult to straighten by hand. It is, incidentally, completely false to assume that the thicker the card, the less it will warp. All it means is that once it does warp it will be almost impossible to straighten! Sometimes, therefore, it will make sense to work on very thin card, or even thick paper, before remounting it (preferably using Spray Mount) onto normal card.
The other ways of combating warping have to do with methods of painting, or types of paint, and are considered in Chapter 7, ‘Painting’. Basically, either one can choose a spirit-based rather than a water-based paint, which will not usually affect the card, or one will have to prime or seal everything before painting. One slight advantage in using mountboard is that the coloured side is generally less absorbent, so if it is going to be painted it should be done on this side.
If used as a basis for building walls in the model, this material will hold up well enough but needs a lot of support. It will never be enough on its own and the photo illustrates the kind of framework needed on the back to keep it straight. It should not be necessary to buy wood for this because strips of card applied on edge will be surprisingly strong, unless the card has become so warped, for whatever reason, that something more forcible is needed.
Making strip mouldings and using a mitre guide
Some of the profiled mouldings (decorative strips) in these examples were made as longer strips which then had to be cut down, for example to form the doorframe. There is a limit to the detail or shape achievable with cardboard (see the later section on plastics in this chapter for other possibilities), but the way that cardboard and plastic are put together is the same. They are built up in layers of different width and thickness to approximate the effect needed. Each strip has to be cut separately, but rather than aligning them by eye while gluing, the handy metal block can be used as a guide.
Once ready, the strips have to be mitred in the case of the doorframe (the end cut at 45 degrees) to fit around a right angle, just like a picture frame. Mitre guides can be bought for carpentry, although they are far too big to serve here. It is necessary to make one’s own mini version. The one shown here has been made from sheet PVC so that it will last. All that is needed is a means of guiding the blade to make a cut at a consistent 45-degree angle.
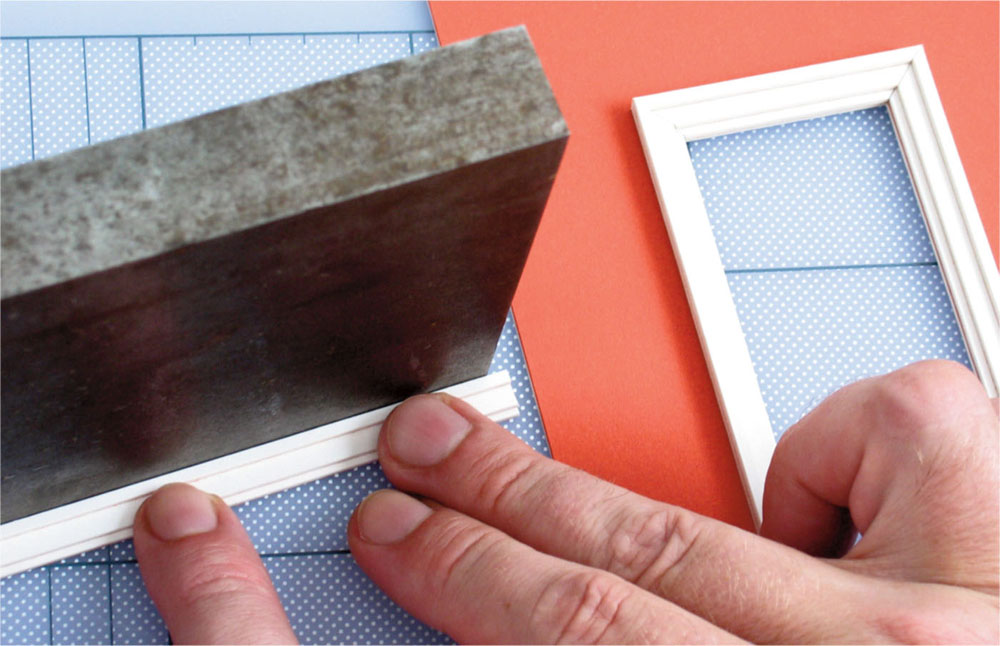
Making a profile strip for a doorframe using the metal block as a straight edge to glue against.
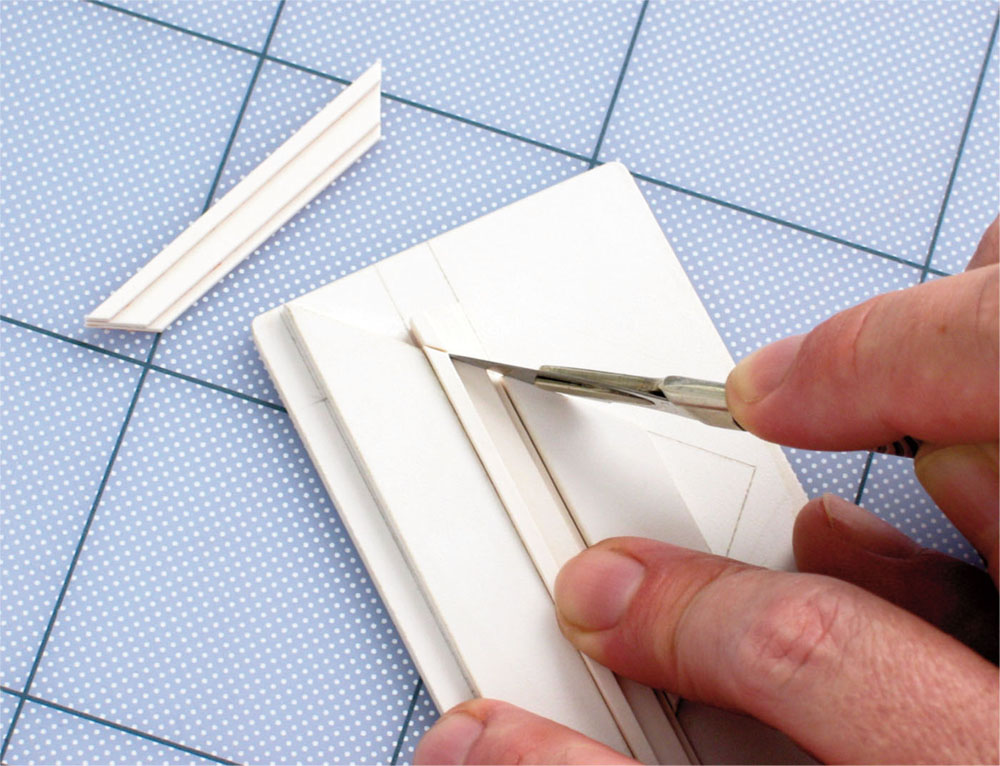
This custom mitre guide has been made especially for very small-scale work out of sheet PVC. It consists of two strips with angled ends, glued to a base. The work to be cut is positioned between them and the angles form a guide for the blade.
A collection of forms in stencil paper. The window frames at the back were cut from a continuous sheet to which mountboard elements have been added. Very delicate cut-outs are possible, remaining surprisingly strong, especially if supported.

Small chairs made from stencil paper. The back and seat are cut separately, but the legs are a continuous strip that is scored and bent before gluing together with PVA.
Parts of the mountboard wall featured here are curved. If card needs to be bent into a curve the only way to ensure a controlled, even bend is to make closely spaced, parallel cuts halfway through the card, as illustrated in the photo. This needs to be done on the side which will curve outwards. Once this curve has been secured in place, usually by backing it with curved supports, thinner card or paper will need to be glued onto the scored face for an even finish.
Stencil paper
This is more a thin card than a paper and is also known as oiled manila, but stencil paper is the name you’ll usually find it by. It is used for cutting fairly durable stencils for decorative painting. The linseed oil which impregnates the card gives it a distinctive and thoroughly traditional smell. It also determines the colour, which ranges from light ochre to nut brown. It will cut very cleanly with no fray and maintains its straightness even after painting with thin acrylic. The waxy nature will ensure a very smooth cut even on small or compound curves because it offers less resistance to the blade. The oil prevents water from soaking in, but, surprisingly, PVA will work perfectly well to glue it.
Stencil paper responds well to scoring and bending while still retaining surprising rigidity for card so thin. The constructions shown here make use of that. For example, the heavy panelling was not made by gluing layers together but by scoring, cutting and bending single sheets. Achieving it this way can be quicker and the layout is kept more precise, although there is a limit to the intricacy possible with this cut-out method. Having said that, the delicate window shutters are an example of achieving an effect by this method which would otherwise be very time-consuming to construct in a conventional way. They are made by cutting lines through the stencil paper and bending each strip into a slant. The form is surprisingly stable. The distinctive colour of oiled manila can be used to good effect when simulating wood and may only need a little darkening. It will accept stain or ink reasonably well, although it is better if these are spirit-based. The subject of treatment is taken up again in Chapter 6, ‘Creating Surfaces’.
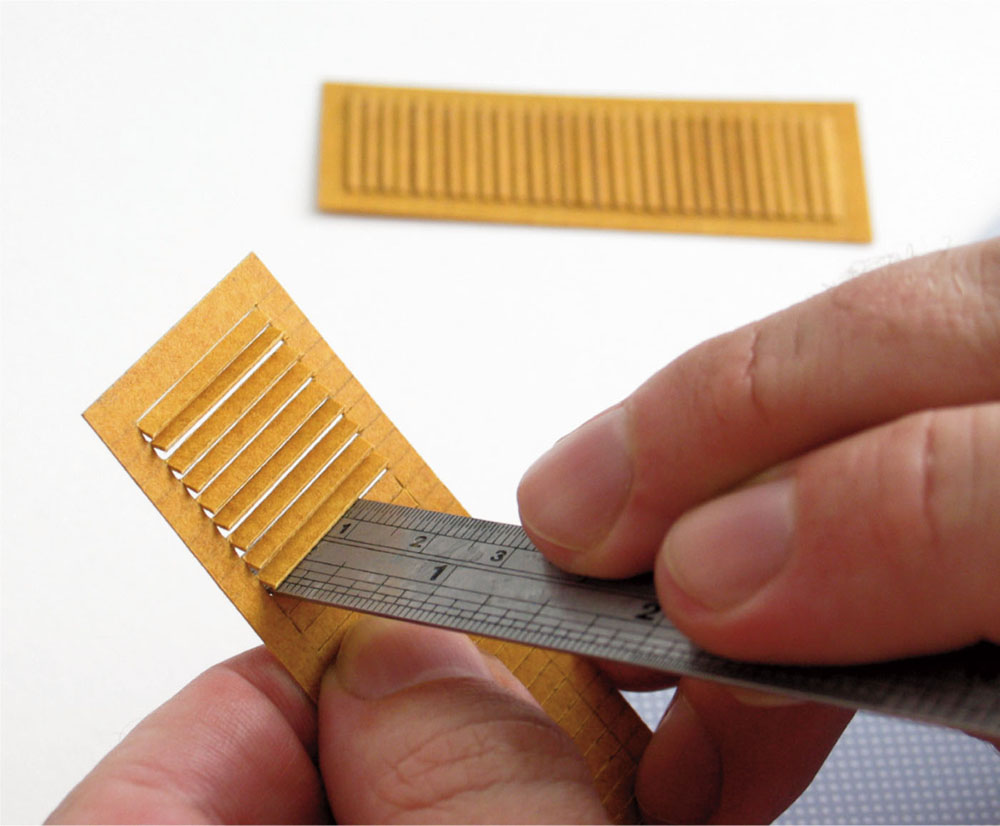
Complicated structures can be achieved sometimes just by cutting and bending. Here, window shutters can be created by slitting the stencil paper in the right places and carefully bending the strips into a slant.
Working with plastics
Plastics have been the materials of choice in architectural or product model-making for many years now, most often in sheet or strip form. Theatre designers, on the other hand, are only just beginning to consider them. The big advantage of plastics in commercial model-making is a combination of durability, workability and speed. As the technology produces more and more different types with different properties, so more of them filter down to craft and DIY shops and become accessible to model-makers.
Sheet plastics are much more robust than card and yet they are also flexible, allowing bending or shaping in ways that card cannot. Dependant on type, most are impervious to water or other solvents, so they won’t warp when painted or textured and are unaffected by atmospheric conditions. They can also be tooled in a variety of ways, for example carved, lathed, sanded or impressed. Some of them, such as foamed PVC, are easier to cut with a knife than card of equivalent thickness and much finer detail is possible without the material disintegrating under the scalpel. Bonding is easy, whether using plastic solvent or superglue. The bond is immediate and very strong; no time is lost in waiting for glue to set before continuing. There may be less freedom for repositioning, but that contributes to a good alertness training!
Against these many advantages the drawbacks seem a bit paltry, but they are enough to put off a lot of people. Neither superglue nor plastic solvent are particularly pleasant to have around and good ventilation is essential. In addition, only a few types of plastic may be available, if you’re lucky, at the local art shop. A professional model shop such as 4D in London will have many of them and it is worth visiting just to acquaint oneself with the range. But for other types, such as foamed PVC, one has to locate a plastics specialist. Some of these are listed at the end of this book. Many people assume that plastic will be more expensive than card. Some types are, such as clear Perspex or acrylic, but others, such as foamed PVC or styrene, generally work out cheaper as long as one accepts having to buy a little more than one needs at the time. It is also assumed that plastic will be more difficult to paint, which is only partially true. Surfaces will certainly need priming first if thin washes are intended, but acrylic from the tube will take quite readily to PVC or styrene, especially if these are lightly sanded first. A full account of the various methods of painting is given in Chapter 7, ‘Painting’.
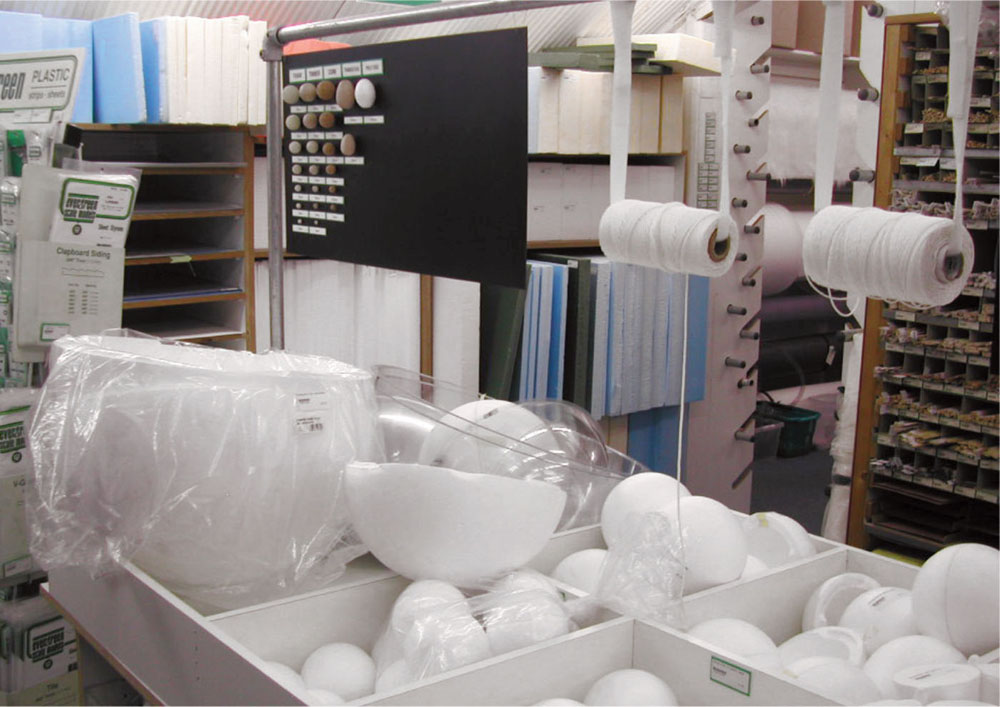
Dedicated professional stores such as the 4D Modelshop in London offer an invaluable range of materials at a glance. There is no better way to start learning about materials than simply to spend a bit of time browsing. Photo: courtesy 4D Modelshop.
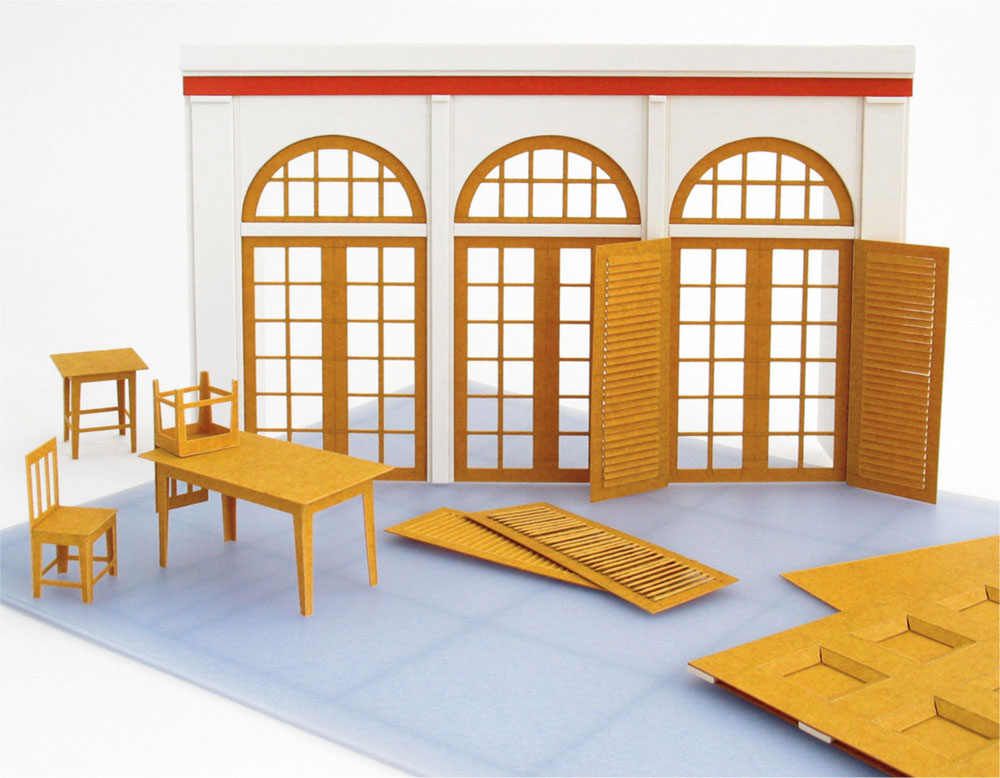
The examples shown here were made especially to illustrate the advantages of plastic over card. The glasshouse structure has already been referred to in the photos above. The materials used were foamed PVC sheet, thin sheet styrene and preformed styrene strip, all in common use. These materials are focused on here while information on other useful plastics (such as ABS, acetate or polypropylene) can be found in the Directory of Materials.
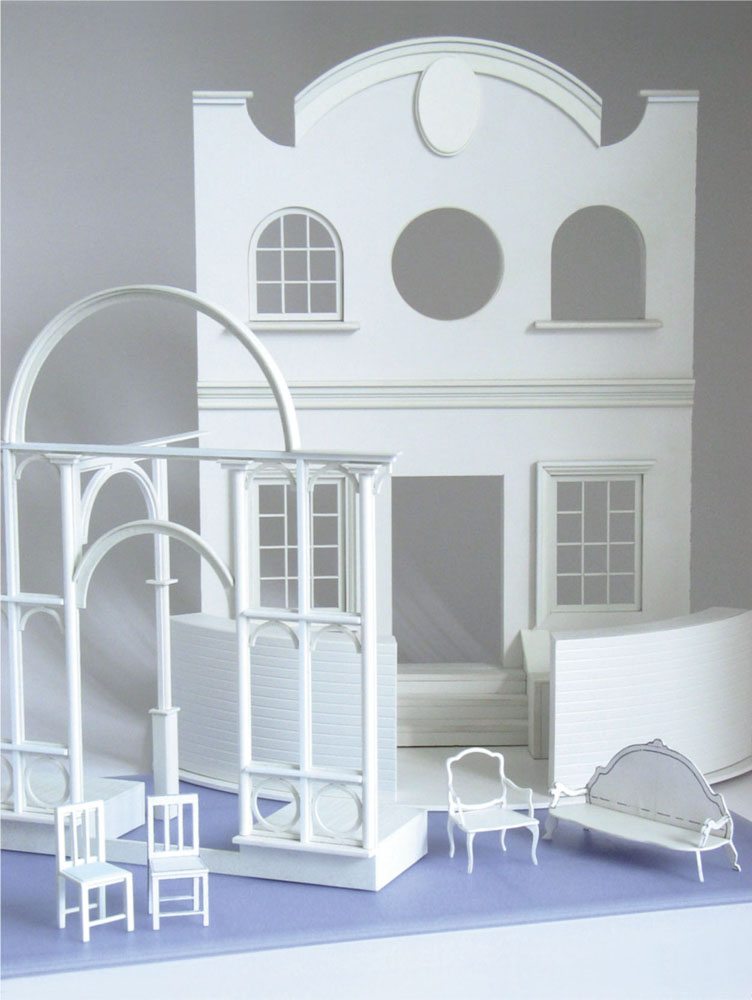
Constructions using foamed PVC and styrene.
PVC
The work of the model-maker has been greatly eased in recent years (perhaps even revolutionized) by the invention of one form of plastic in particular: foamed PVC (Polyvinyl Chloride) sheet. The fact that it is ‘foamed’ is significant, to differentiate it from normal PVC sheet which is too dense for model-making purposes. This type of PVC was developed mainly as a lightweight, weather-resistant alternative to sheet wood for the production of signage. It is lightweight because it consists of an aerated centre closed by a smooth, impenetrable layer on both sides. This structure gives it its rigidity, acting in much the same way as a cross-strutted girder, but it also makes it very easy to cut. Because the surface will ‘give’ ever so slightly under the knife, there is less likelihood of the knife blade slipping and the absence of grain will ensure a smooth, even cut. Cut edges can also be filed or sanded very easily. All these qualities enable the kind of sharpness and precision illustrated in the photo. It is available not only in white but also in a range of colours and also a range of thicknesses from 1mm to 18mm. It can be found under a variety of brand names such as ‘Foamex’, ‘Forex’ or ‘Foamalux’ in shops specializing in plastics or display materials.
Superglue will form a strong, almost unbreakable bond with foamed PVC, but it can also be glued using a form of solvent which plumbers use for ‘welding’ PVC pipes together. The example of the chair construction at the beginning of the chapter illustrates how useful it is for making fine but stable constructions. 1mm PVC measures just 2.5cm (1in) at 1:25 scale, for example making it a much better scale choice than mount-board for structures such as furniture or window frames. Unlike mountboard, it can be sanded easily for either a sharp finish or a softer edge as required. Because the surface will ‘give’ slightly, it can be embossed easily with any sharp tool and given a grain effect with coarse sandpaper. For the same reason it scores and bends without breaking.
Styrene
Sheet styrene has similar properties but is denser and not foamed. Styrene 1mm thick would be much more difficult to cut than the same thickness in foamed PVC. It is most often used in thinner forms (0.5mm, 0.25mm). Whereas PVC maintains its rigidity very well, styrene is much more bendable. It can be made even more malleable with heat (styrene is commonly used in vacuum forming). It will glue just as well with superglue, but can also be welded together using a solvent.
CUTTING STYRENE
When cutting sheet styrene, care must be taken when making an initial cut because the blade will easily slip. Often it is better to sand with a fine sandpaper first to provide a key. It is difficult to mark lines properly with a pencil unless this is done. Alternatively, if you want to keep the surface shiny and unmarked you can cover areas to be cut with masking tape and mark out, or spray-mount a photocopy and cut through that. The metal rule will then grip a lot better. Afterwards, the tape or paper can be peeled away. Because it is slightly brittle, styrene can also be scored and snapped to produce a clean break. These are also good methods for marking and cutting clear plastics such as acetate or thin acrylic.
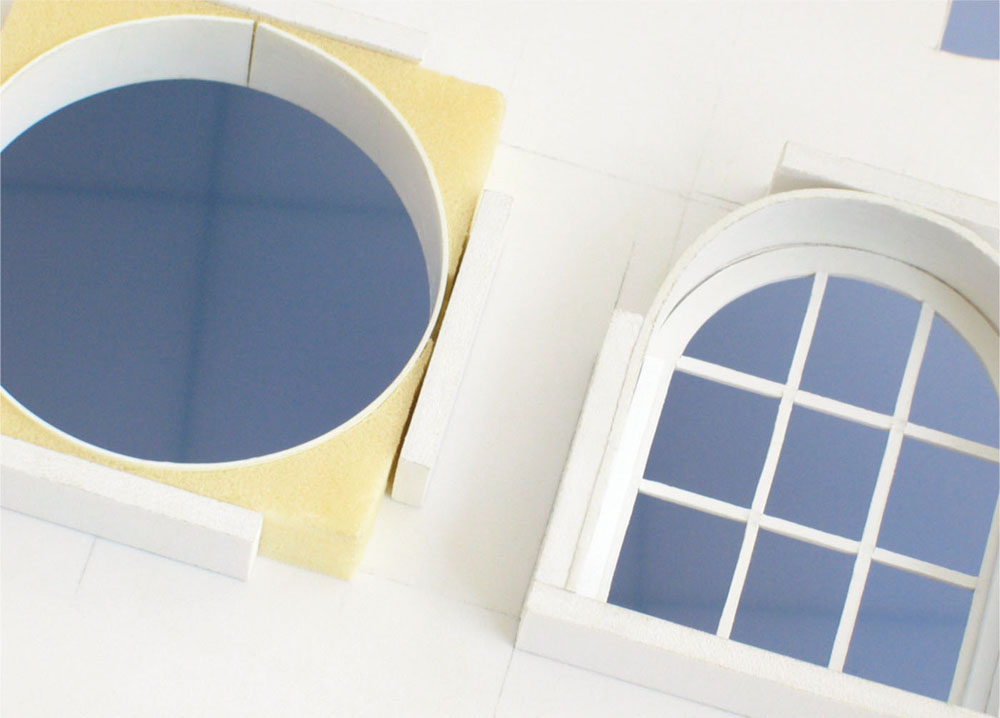
Wall thicknesses for the curved windows of the façade were faced with styrene strips.
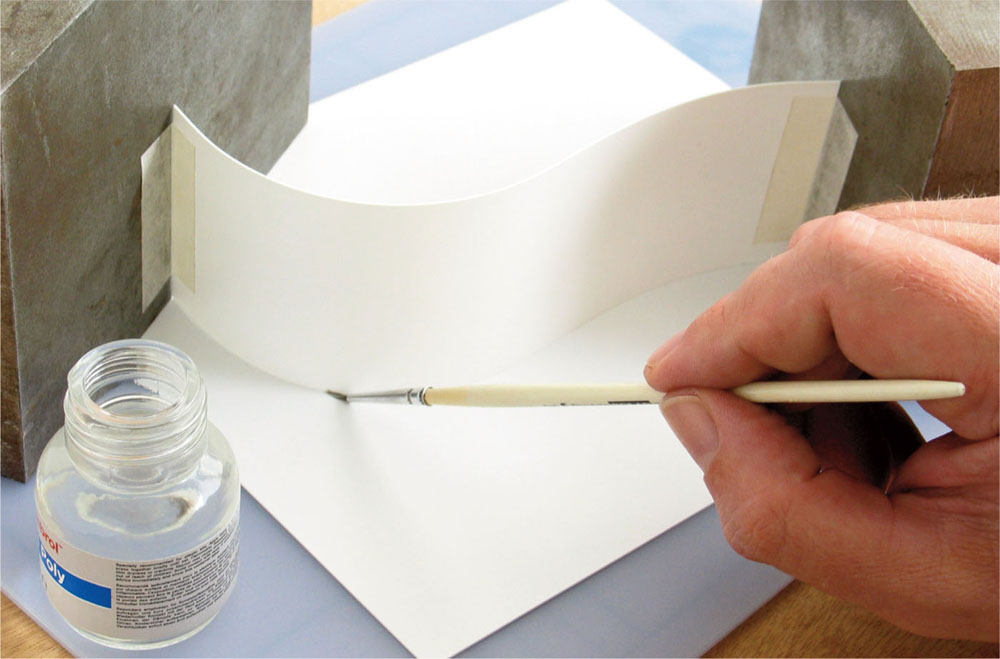
A curved wall of styrene is first taped into position between weights. Solvent can then be applied from the outside using a fine brush. The plastic will weld, leaving little trace on the outside. This will only work when gluing styrene to styrene.
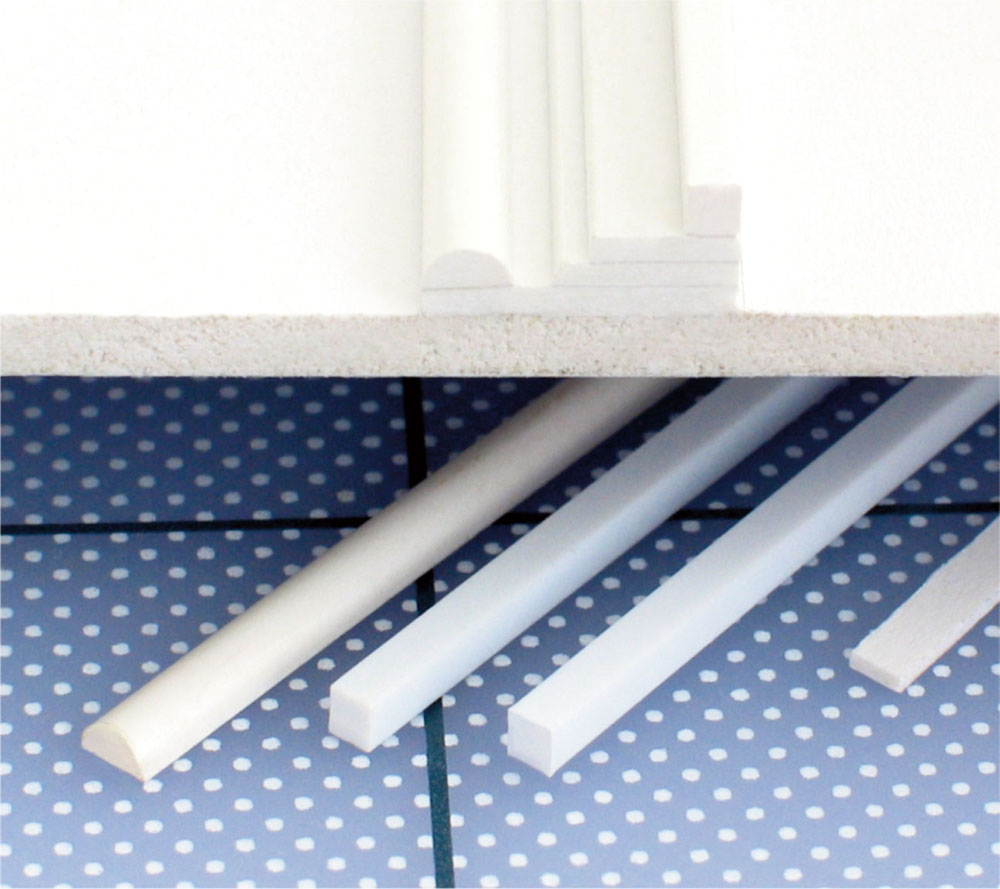
Composite profiles can be built up using preformed styrene strip.
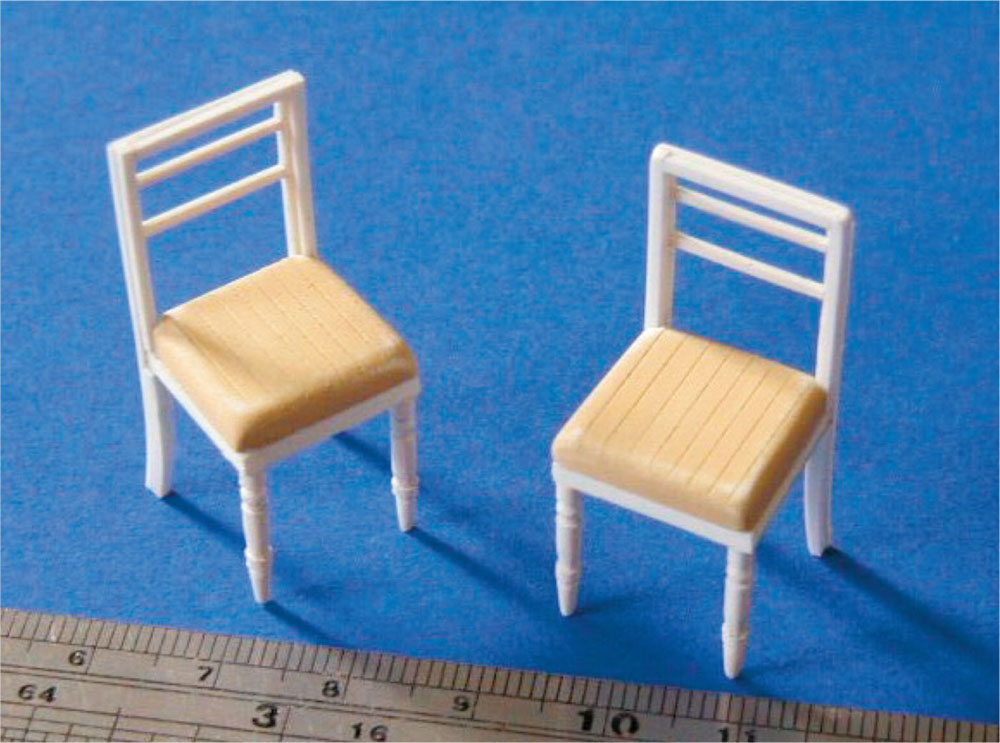
These chairs were also made from styrene strips. Styrene can be carved with the scalpel and sanded, achieving fine detail. Photo: David Neat