
Grill Types
There are two main types of outdoor grills: gas and charcoal.
Each has its advantages and disadvantages, but what they both do is cook food on a rack above a heat source.
For everyday cooking, I prefer the convenience and consistency of a gas grill. It can be lit in seconds and the temperature set with the twist of a knob. And with no hot coals to worry about, cleanup is a breeze. Turning on a gas grill is just as simple as turning on the oven!
Charcoal tends to burn hotter than gas, allowing for a better sear and more of that wonderful smoky flavor that you can only get from cooking over wood or charcoal, but lighting a charcoal grill does require more time and energy than lighting a gas grill.
Basically, there is no right or wrong answer. Use whichever grill works best for you.
Indoor Grilling
You can grill indoors? Yes!
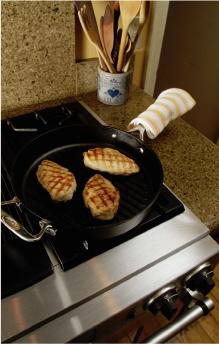
Not everybody has a backyard or a grill. And even if you do have a grill, cold and rain can put a damper on outdoor cooking. A stove-top grill pan is the solution.
Cast-iron grill pans are my preference. They evenly distribute and retain the heat and can withstand high temperatures—key elements to giving your food that tasty char that mimics outdoor grilling. Nonstick grill pans have a nonstick coating that can be damaged when heated at high temperatures.
To know which of my recipes can be made indoors, look for the grill pan icon.
Tip: A blazing hot grill pan gets hot all over, including the handle. It’s easy to forget this, and you can get badly burned. I angle the handle away from the heat and cover it with a pot holder as a reminder that the handle is hot.
Control the Heat
Most gas grills come with a thermometer or gauge to help you control the heat.
For gas grills without a thermometer or for charcoal grills, you can easily gauge the heat by simply holding your hand about 3 to 4 inches above the grates and counting the number of seconds you can stand the heat.
| Temperature | Thermometer | Hand Check |
| High | 400°F to 450°F | for 1 to 2 seconds |
| Medium-High | 375°F to 400°F | for 2 to 3 seconds |
| Medium | 350°F to 375°F | for 3 to 4 seconds |
| Medium-Low | 325°F to 350°F | for 4 to 5 seconds |
| Low | 300°F to 325°F | for 5 seconds or more |
When using a gas grill, you can control the heat by simply turning the temperature knob.
When using a charcoal grill, you can control the heat two ways. First, move the coals. If the fire is burning too hot, reduce the heat by spreading out the coals. If it is too low, increase the heat by pushing the hot coals closer together and adding more charcoal to the outer edges. Second, use the vents to fine-tune your grill temperature. To raise the temperature, open the vents to allow more oxygen to fuel the fire. To lower the temperature, close the vents.
Grilling Methods
While grills come in many shapes and sizes, there are only two methods for cooking on a grill: direct heat and indirect heat.
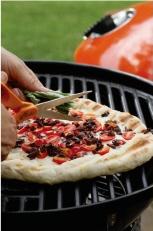
Direct grilling is the method of placing the food on the grill rack directly over the heat source. This method is best for searing and cooking small, tender cuts that cook in 30 minutes or less, such as steaks, burgers, boneless chicken, and vegetables.
Indirect grilling is the method of placing food on the grill rack away from or to the side of the heat source with the grill lid closed. This type of grilling cooks the food similar to roasting in an oven. This low and slow grilling method is best for cooking larger foods that take longer to cook.
For indirect grilling on a gas grill, just turn off one or more of the heating elements after preheating. To set up a charcoal grill for indirect grilling, place the hot coals on one side of the grill. A drip tray (a disposable foil pan) is placed below the food to prevent flare-ups from dripping juices and fats.
Since this book is about easily getting dinner on the table, most recipes in Simply Grilling will be cooked using the direct grilling method. The recipes that use indirect grilling methods have more detailed cooking instructions.
Tip: If you find that your fire is too hot or your food is burning before it is done, you can set up your grill for both indirect and direct cooking. Sear foods first over direct heat and then move them to an area with no heat to finish cooking by indirect heat. This two-zone grilling is especially helpful for cooking foods like bone-in chicken.
Checking for Doneness
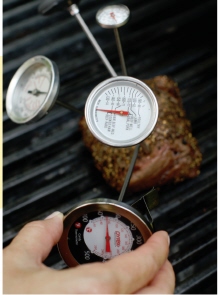
The best way to tell if a piece of meat is done is to use an instant-read thermometer. I’d be lost without mine.
Insert the thermometer into the center or thickest part of the meat, poultry, or fish to get the internal temperature. Make sure the tip of the thermometer doesn’t touch any bone.
| Poultry | 165°F |
| Pork | 160°F |
| Beef: Rare | 125°F to 130°F |
| Beef: Medium-Rare | 130°F to 135°F |
| Beef: Medium | 140°F to 145°F |
| Beef: Well-Done | 160°F and higher |
| Fish | 145°F |
The USDA recommends that ground beef be cooked to an internal temperature of at least 160°F and steaks be cooked to at least 145°F.
I suggest taking the meat off the grill a few degrees below the desired temperature is reached. Ideally, you should always let your meat rest for about 5 minutes before slicing to allow the juices to evenly distribute. During this time, the meat will continue to cook, bringing it up to the desired temperature.
If you don’t have a meat thermometer, you can use the “touch” test. As meat cooks, it gets firmer to the touch. Rare is really spongy and soft (like the flesh between your thumb and index finger when you pinch them together), medium is springy (like the flesh between your thumb and ring finger when you pinch them together), and well-done feels very firm.
A third way to test poultry and pork is to insert a skewer into the thickest part of the meat. If the juices run clear, the meat is cooked. If the juices are bloody, return the meat to the grill and continue cooking.
Fish should be cooked until it is opaque and flakes easily with a fork.
Dress Up Your Grilled Dishes: Marinades, Rubs, Sauces, and Salsas
Marinades 101: Soaking your grill-bound meats in a delicious, aromatic marinade will add flavor and tenderness.
• Rinse all meats and vegetables and pat them dry with a paper towel before marinating.
• Choose a shallow, nonreactive dish just large enough to hold the meat in a single layer. Avoid metal containers because they may impart an unpleasant metallic taste to marinated foods.
• Be sure to turn the meat in order to coat the marinade on all sides.
• Chicken, pork, and tougher cuts of beef can marinate up to overnight. Smaller cuts of beef and lamb require only 2 to 4 hours. Fish and shellfish should not be marinated longer than an hour. For best results, always follow a recipe’s suggested marinating times.
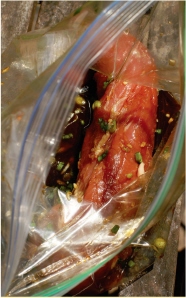
Resealable plastic bags are also great for marinating because you don’t have to dirty a dish.
Rubs 101: Slathering meats with savory blends of herbs and spices transforms an ordinary piece of meat into a masterpiece.
• Homemade dry rubs can be made in advance. Keep them for several weeks, tightly sealed, in your spice cabinet.
• Lightly brushing the meat with olive oil or mustard before adding the dry rub will help the dry rub adhere to the meat.
• Use your fingers when adding a dry rub. Spread the rub evenly over the meat and press slightly to make it adhere.
• When making a dry rub, be sure all the ingredients are evenly mixed.
Sauces 101: Sensational sauces add a boost of flavor at the end of grilling.
• Most sauces can be made a day or two in advance. Cover and refrigerate them until you’re ready to use them.
• Slather thick sauces on with a silicone or natural-bristle basting brush at the end of cooking.
• Sugar-based barbecue sauces should only be applied toward the end of cooking time since they burn easily.
• Oil-and-vinegar, citrus, and yogurt-based bastes and sauces can be brushed on the meat throughout the cooking time.
Salsas 101: Dress up your grilled dishes with a flavorful salsa.
• Most salsas can be made in advance. Store them covered in your refrigerator until you are ready to serve them.
• Salsas can be sweet or savory. Experiment with your favorite fruits and veggies.
• Fresh herbs tend to blacken when cut. Wait until just before serving to add fresh herbs to your salsas.
Tip: To prevent bruising delicate fresh herbs when cutting, snip them with a sharp pair of scissors instead of using a knife. It is super easy, and there’s no cutting board to wash!
Essential Grill Gear

Chimney starter: A must-have for charcoal grills. These metal cylinders are a safe, efficient, and environmentally friendly way to start a fire without charcoal fluid.

Heavy-duty grill brush: For best results, you need a clean grill. Scrub the grates while they are still warm.
Meat thermometer: An instant-read thermometer is the most reliable way to ensure food is cooked properly (see for a temperature guide).
Tongs: Metal tongs are the most frequently used cooking tool in my kitchen. I prefer the regular stainless-steel, spring-hinged tongs rather than the long handled tongs found in the barbecue section of the housewares store.
Metal spatulas: Because they are ideal for turning food, I recommend having both a long-handled, sturdy spatula as well as a wider-based fish spatula.

Brushes: Use for applying glazes, sauces, and oiling the grill grates. You can use either natural or silicone brushes. I prefer the natural brushes for glazes and thinner sauces and the silicone ones for thicker barbecue sauces.
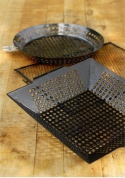
Grill basket or grill screen: These inexpensive gadgets will keep small items from falling through the grates.
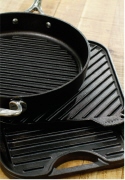
Cast-iron pans and Dutch ovens: Cast-iron cookware heats evenly and can withstand the high heat of the grill. Use them for simmering sauces and cooking sides right on the grill.
Metal or bamboo skewers: These are essential for kebabs and satays. If you are using bamboo skewers, be sure to soak them in water for at least 30 minutes to prevent burning the wood.
Heat-resistant gloves or long oven mitts: Protect your hands and forearms from a hot grill.
Grill cover: Keep your grill clean and rust-free by covering it with an inexpensive grill cover when the grill is not in use. Make sure your grill is cool before covering it.
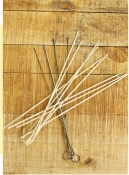
Bamboo Skewers 101
Ideally, bamboo skewers should be soaked in water for at least 30 minutes to prevent them from burning. If you are short on time or forgot to prep your skewers, a quick fix is to wrap the tips of the skewers in foil.
5 Tips to Master Grilling Meats
Keep the grate hot, clean, and oiled: A clean grill with oiled grates will keep food from sticking. Before placing food on a hot grill, scrub the grates with a heavy-duty grill brush, lightly brush the grates with oil using a brush or a paper towel, and scrub the grates one last time when you are finished cooking.
Turn just once: To get killer grill marks, turn the meat or veggies only after they have been on the grill for a couple of minutes. The meat is ready to be turned when it easily releases from the grill.
Grip, don’t stab: Use a set of tongs, not a barbecue fork, to turn a piece of meat. Forks poke holes in meat, allowing those precious juices to drain out.
Know when it’s done: Nothing is worse than an overcooked piece of meat. It is always better to err on the side of undercooking rather than overcooking. You can always put a piece of food back on the grill, but you can’t salvage an overcooked dish. See for a detailed guide on checking doneness.
Let it rest: Allowing a piece of meat to rest for 5 minutes before slicing will give it time for the juices to recirculate, resulting in a more tender, juicy dish.

Oil Your Grates
Oiling your grill grates creates a non-stick surface. I often use a brush with natural bristles to oil my grates. Another trick is to dip a paper towel or half an onion in vegetable oil and then use a pair of tongs to wipe the oil onto the clean, hot grill.
Food Safety
• If you are marinating something for an hour or less, then it should be fine to leave it out in a cool place, but when in doubt, refrigerate it. Do not set a dish out to marinate in the hot sun.
• If marinating overnight, pull the dish out 30 minutes before cooking to allow it to come to room temperature. If you stick a cold dense piece of meat on a hot grill, you risk drying out the exterior of the meat before you’ve given the inside a chance to cook through.
• Marinades and sauces that have come in contact with raw meat should not be used on cooked meats. Either discard the marinade or bring it to a boil for 2 minutes before using it on cooked dishes. When I know that I would like to brush a finished dish with additional marinade or sauce, I reserve some marinade in a separate container when I make it.
• Remove excess fats and marinades from foods to reduce flare-ups.
• Always make sure chicken and pork are thoroughly cooked before eating it.
• Do not return cooked foods to the unwashed platter or plate that held raw food.
Tips
Have you ever read a recipe and wondered if you could do a portion of the work ahead of time or substitute an ingredient in your pantry for a more exotic ingredient? I tried to think of all the different tips and variations that I wished the cookbooks on my shelves offered. Here are the six basic tips you will find throughout Simply Grilling. I hope they help.
 Cooking Tips: Detailed information on cooking techniques, substitutes, and “food facts” about the dishes and specific ingredients.
 Do-Ahead: Tips and strategies to take the stress out of dinnertime.
 Variations: Tips on how to put a unique spin on a dish.
 Marinate: To help you plan, I let you know at a glance how long a dish needs to marinate.
 Suggested Sides: Tips to help you plan your menu.
 Grill Pan: Too rainy or cold to grill? Don’t own an outdoor grill? This icon lets you knows which dishes can easily be made indoors on a grill pan.