
Classic Cocktail Sauce and Sophisticated Mignonettes
Black Trumpet and Rosemary Mignonette
Flavored Ices


Most people seem to think that serving shellfish on the half shell at home is some kind of Herculean feat. It’s fine on the one hand, because they keep coming back to Eventide for their fix (we thank you!). But it’s a shame on the other, because both oysters and littleneck clams are approachable luxuries, and there’s just no better way to kick off a memorable dinner party, summer lunch, or cook-at-home date than with a raw bar spread. It’s a way to beat people’s expectations and set the stage for a warm, sparkly kind of night. In that sense, it’s bringing the spirit of Eventide into your home.
THE ROCK
The raw bar program at Eventide is one of the things we are proudest of, because it brought an ultralocal, top-quality, widely varied oyster list to the fore in a casual, upscale restaurant setting in a way that hadn’t been done much before. We opened Eventide partly because nobody else was capitalizing on the staggering breadth of Maine oysters. We figured if we chose wisely and served everything simply and as fresh as possible, we might do well for ourselves.
One of the most fateful decisions we made during the run-up to opening Eventide was to have a custom stone oyster basin created as the centerpiece of the restaurant and our boundary-pushing raw bar program. No ubiquitous, stainless steel oyster displays would do. That’s how we found ourselves at Cosmic Stone, Lance Linkel’s stone yard in Topsham, Maine.
Being surrounded by giant earth-moving machines, massive slabs of granite, and the childlike energy of a man-monument like Lance all have a way of influencing a person. We arrived looking for a quaint little piece of stone to sit atop our new bar, which wasn’t even poured yet, and we soon found ourselves standing on top of a trapezoidal boulder the size and weight of a Ford Festiva. Lance had a wild look in his eyes and seemed as if he were having none of the reticence in ours. It didn’t take him long to close the deal. He “hogged out” a shallow tray across the top of the boulder and a drainage hole down through it before trucking it to Portland. We muscled it into the restaurant with the help of a Bobcat, an engine hoist, and fifteen line cooks.
The granite beast became known as “The Rock,” and we poured our concrete bar around it, on a whim adding a little lip on the outside at bar height that is now known as “the rail.” Through some stroke of dumb luck, the rail ended up being exactly the size of the used fish-poaching vessel lids that we stumbled upon and planned to repurpose as oyster-serving trays. Today, standing at “The Rock” and enjoying a dozen from the rail is the best spot in the house. So many things fell together that way, and we are skeptical that Eventide would be breezy like it is if we had followed some strict blueprint.
THE OYSTERS WE’RE FORTUNATE TO SERVE
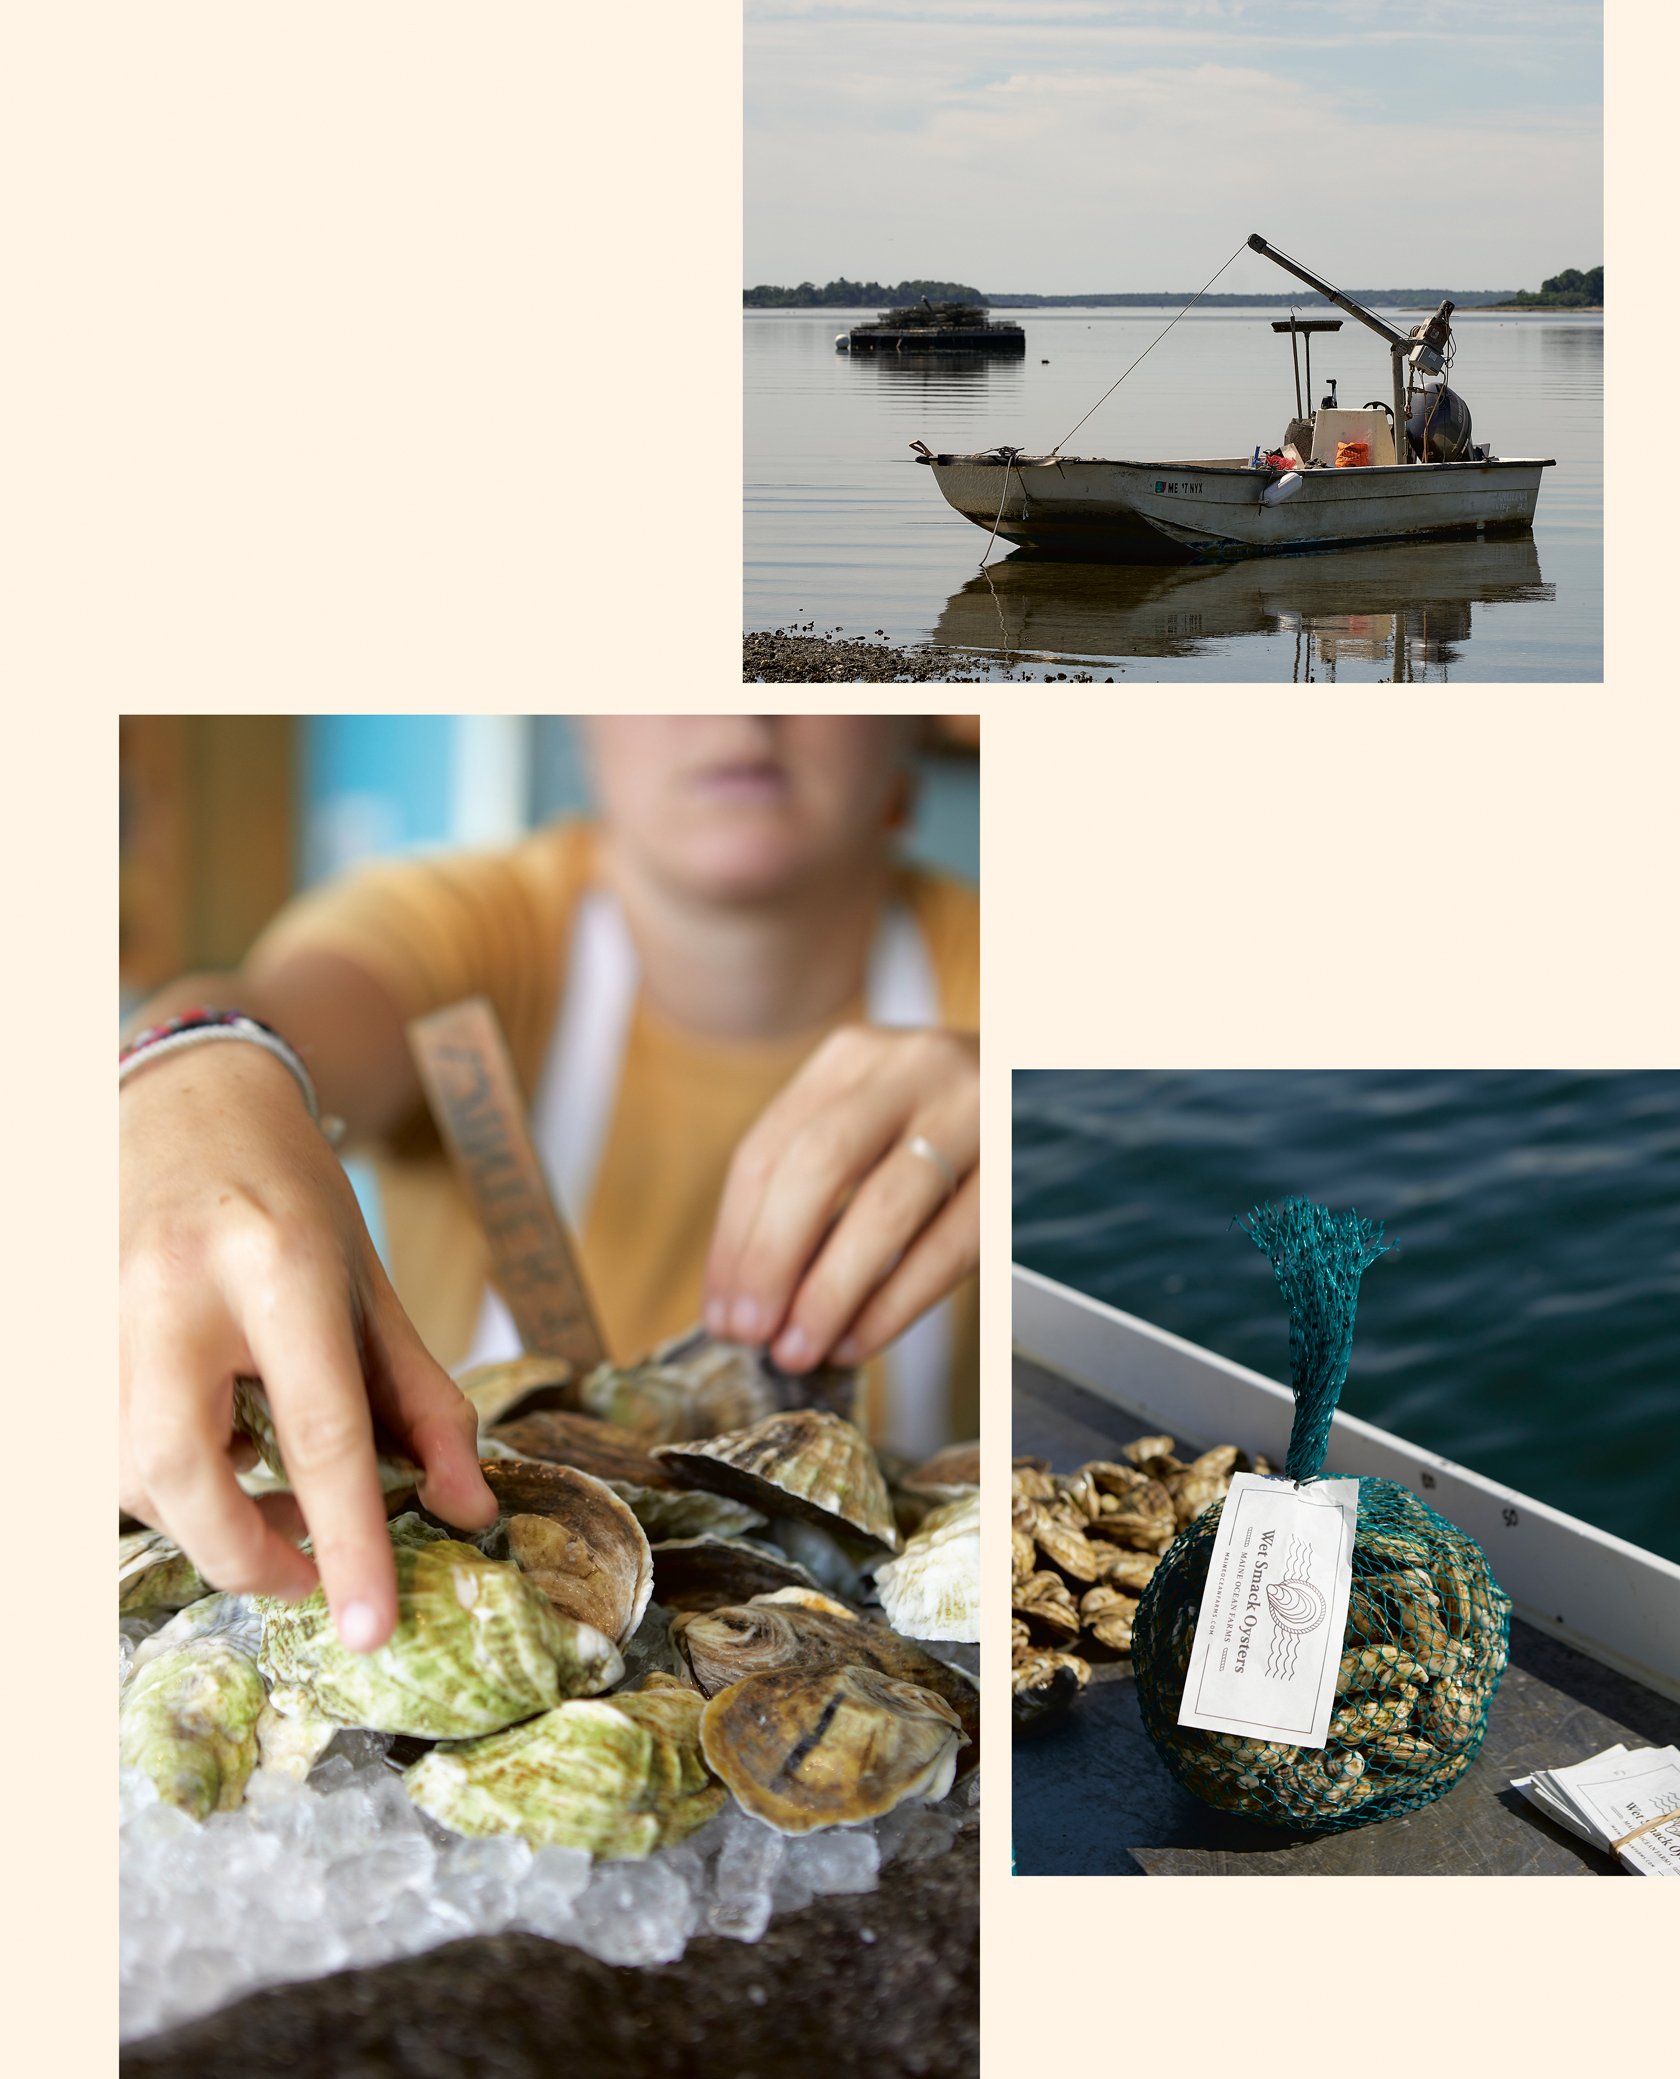
It just felt intuitive for us to have a huge selection of oysters and shuck each one to order in front of guests. As we kept improving and building on the program, we realized it was pretty unique. However, what most sets Eventide apart is not our shucking protocol, but the fact that we live on the doorstep of elysian shellfish beds. We believe that the shellfish grown here are the best in the world, thanks to the cold, clean, unparalleled quality of Maine’s coastal water, particularly the Damariscotta River.
More than three-quarters of the state’s farmed oysters and a lot of other products come out of the Damariscotta, which is actually a twelve-mile-long estuary northeast of Portland that drains into the Gulf of Maine. The next time you’re eating an oyster that transports you with its balanced salinity and freshness, let your mind wander to the Damariscotta. These are the forested, rocky-shored wilds of Maine, where freshwater runoff meets saltwater in a vibrant natural intersection. Thirty billion gallons of water surge through to cleanse the Damariscotta during every tidal cycle, making it an ideal setting to grow filtering bivalves like oysters, millions of pounds of which are harvested from these waters every year. The dynamic ecosystem is also home to seals, osprey, eagles, lobsters, horseshoe crabs, and numerous species of fish, including striped bass, bluefish, herring, flounder, and many more. It is close to the perfect biological interface, a place infinitely greater than the sum of its parts.
We came to appreciate the beauty and power of Damariscotta and similar rivers, like the New Meadows, through our friendship with John Hennessey, who along with his dad, Jim, owns and operates Winter Point Oyster Farm. During the stressful times running up to the opening of Eventide, John would show up in our doorway with bags of his oysters and clams. We’d sit and shuck them and drink beer and listen to him talk about oyster ecosystems and oyster farming. He helped us fully understand and appreciate one of the two local products, alongside lobster, that are the cornerstones of what we do.
There is such a deep love for the Damariscotta’s and Maine’s products here, and that signaled an opening as much as a barrier. From the beginning, our aim with our oyster program and broader menu has been to give people a new way to experience what they love, without completely unmooring them from their nostalgia. It’s our nostalgia, too.
EXPANDING THE REPERTOIRE
We knew we wanted to offer a more expansive oyster menu than just about anyone had ever done, and we started by taking a closer look at Maine oysters, which had yet to find much distribution outside of the Northeast. At the time, there wasn’t really enough variety of Maine specimens alone to carry a broad program like ours, so we contented ourselves with whatever high-quality ones we could find, including from beyond Maine, which we dubbed as “From Away” on the menu.
As demand for oysters shot up in the restaurant world and a bunch of places opened to celebrate the slurp—for example, The Ordinary (Charleston, South Carolina), The Walrus and The Carpenter (Seattle, Washington), Peche (New Orleans, Louisiana), Island Creek Oyster Bar (Boston, Massachusetts), Neptune Oyster (Boston, Massachusetts), and the John Dory (New York, New York)—entrepreneurial Mainers saw oyster farming as a more attractive way to make a living in a sustainable fishery. The results for us and for Maine’s economy were huge. From 2011 to 2017, the Maine oyster business nearly quintupled, with more than ten million shells harvested every year.
That is still a fraction of what is harvested in the Chesapeake Bay and the Gulf of Mexico, but with oysters, more than almost any other product, quality is everything, and the only thing. We have it here. All of a sudden, there were more varieties available in Maine, and the numbers we were moving meant that people wanted to develop relationships with us. Those bonds are written on our menu today: Winter Point, Norumbega, Johns River, Basket Island, Pemaquid, Flying Point, North Haven, Glidden Point, Otter Cove, Long Reach, Dodge Cove, Nonesuch, Wet Smacks, and Eros. We’ve all but abandoned the “From Away” portion of the oyster list at this point.
ELEMENTS OF SURPRISE
We had big plans to innovate on accoutrements, too, because the word hidebound doesn’t even do justice to the dressing situation for shellfish. We saw endless opportunities for playful, delicious accompaniments.
At Hugo’s, we experimented a lot with granités (shaved ices) to embellish oysters, and we took things a step further when we opened Eventide. First, we tested all kinds of ices and used a fork to scrape them into snowflakes for serving with raw shellfish. This is the approach that the home cook can use very effectively, which we map out in a few pages, but as demand started to go up, we eventually pulled the trigger and bought a shaved ice machine. That allowed us to mass-produce a good variety of concoctions, including many recipes in this chapter.
A BEAUTIFUL RAW BAR CAN BE YOURS
There is no scientific formula for putting out an amazing raw bar spread. The two most important factors are getting the highest-quality shellfish possible and handling it properly. Fortunately, it’s not just restaurateurs who have it easier today: sourcing products for a great raw bar experience has gotten dramatically easier for at-home shuckers, too. And handling your oysters properly takes some practice, but not to worry—we have tips for you.
Your local specialty fish market, high-quality grocery store, or the internet are great places to start the search for high-quality specimens. If you end up in a shop, you should ask the fishmongers working the counter what is freshest and most recommended. While it is technically true that oysters can live up to a month properly stored in the refrigerator, we certainly don’t recommend it. Five to seven days after they are harvested, they will not taste nearly as fresh and run the risk of drying out. Ask to see harvest tags (the tracking information that the Department of Marine Resources requires all handlers to have) or ask them to tell you the harvest date. If they’re reluctant to comply, you should be reluctant to buy.
Another option is going online to grab overnight delivery of Maine oysters harvested that day from the Pemaquid Oyster Company (pemaquidoysters.com), Glidden Point Oyster Farms (gliddenpoint.com), Johns River Oysters (johnsriveroyster.com), and many other producers. Take your time with the search and learn about the great farmers working all over the country.
Before you get your oysters, you’ll need a good oyster knife, which you can buy online, and a towel to protect your oyster-holding hand from injury. Once you get your oysters, you just need practice shucking. It could get a little messy. There will be some failures. But trust us, you can get the hang of it, just like we did (actually, Mike is still pretty lousy at it).
Here are our step-by-step guides to shucking oysters (this page) and clams (this page).
Once you’ve gotten reasonably confident about your shucking skills, the rest is lickety-split, if you follow our instructions.

Oyster Breakdown

➊ Lay oyster on top of a towel, with the hinge facing you. Be sure that the cup of the oyster is on the bottom and the flatter shell is on top.

➋ Fold the towel over the top of the oyster, leaving the hinge peeking out at the bottom. This will help protect your hands from the shell and oyster knife.

➌ With one hand on top of the towel, holding the oyster down, work the tip of the knife into the hinge, using it like a crowbar to delicately pop open the shell.

➍ Wipe away any grit or silt that might’ve collected on the knife with a paper towel or the towel under the oyster.

➎ Work the knife back into the oyster and slide the knife tightly along the underside of the flat top shell.
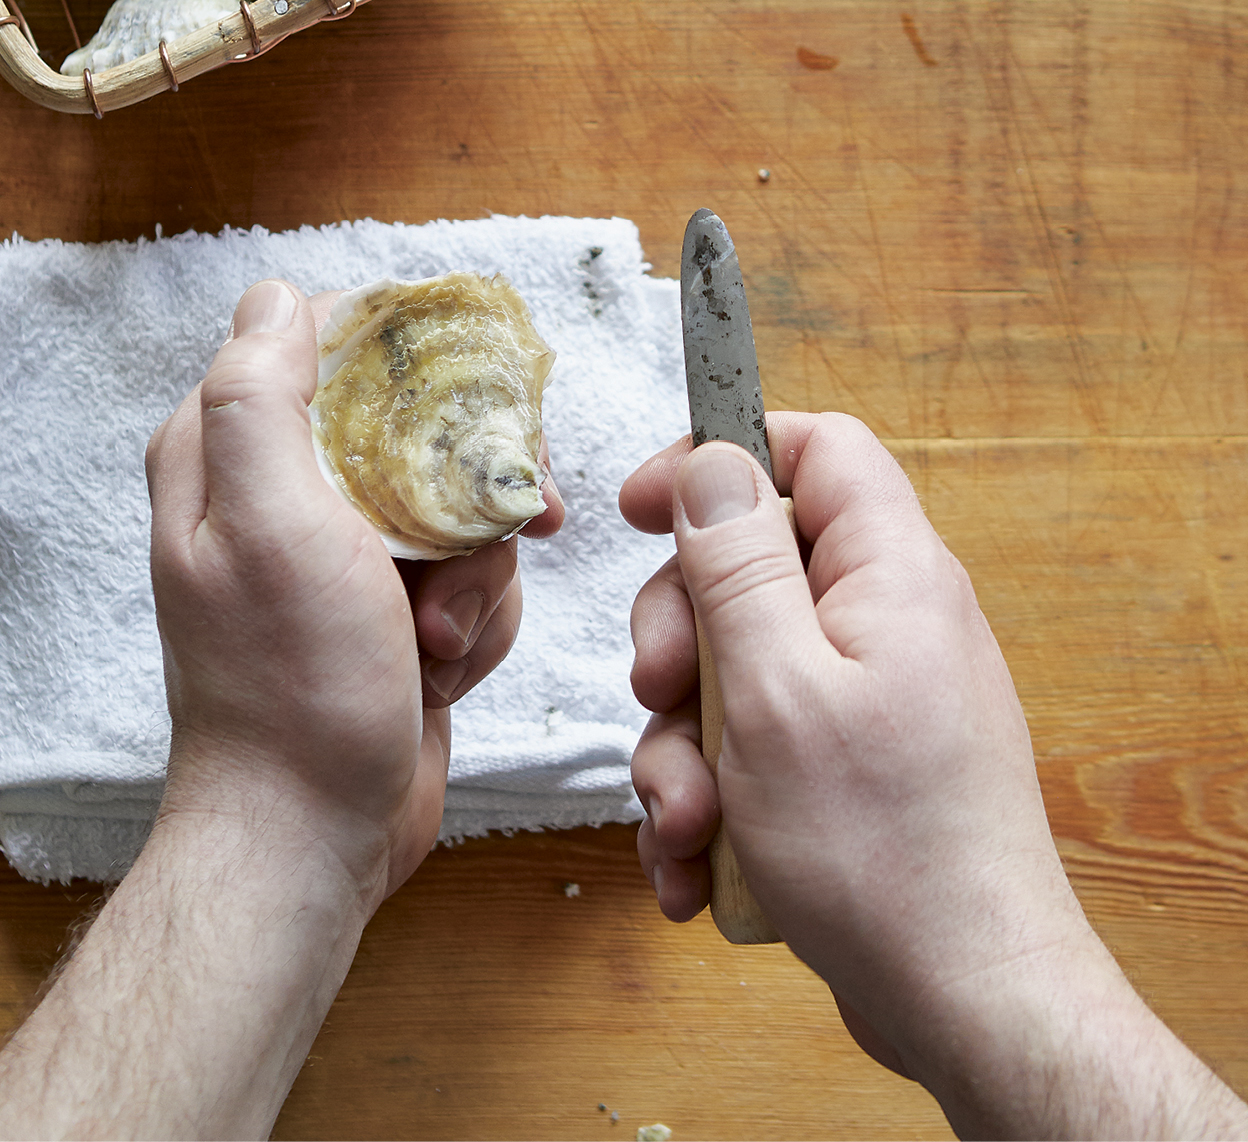
➏ To sever the adductor muscle, which holds the meat to the shell, work the knife away from you and all the way through the top of the oyster.

➐ Remove the top shell and inspect the oyster.

➑ Slide the knife between the underside of the oyster meat and the shell to sever the bottom of the adductor muscle.

➒ Remove any bits of shell that may have splintered off, and slurp.
GET AHEAD OF IT. Before you plan to serve your spread, think about getting the easy, non-perishable stuff out of the way. Pick your accoutrements, make a list, and do a grocery store run for ingredients. Then whip up the goods—like Classic Cocktail Sauce (this page), Red Wine Mignonette (this page), Kimchi Ice (this page), and Tabasco Ice (this page)—and store them in jars in the fridge (or freezer for ice).
GET CRISP, COLD DRINKS. Do not flout this rule. Stock up on lean, mineral-driven white wines like Muscadet and Sancerre. Up the ante with pale pink, high-acid rosés from Provence, France, or from some of the up-and-coming vineyards on Long Island, New York, like any of the fine white wines from Channing Daughters Winery. When it comes to bubbles, you can’t go wrong with dry, non-vintage blanc de blanc Champagne. If you’re a beer-drinking oyster eater, we suggest light-bodied Pilsners, citrusy American pale ales, and refreshing wheat beers. For an unexpected and surprising beer and oyster pairing, we enthusiastically recommend the bigger, bolder Allagash Tripel. This beer has been our go-to oyster pairing for years because its perceived sweetness nicely offsets an oyster’s complex brine, and its carbonation acts to wipe the palate clean between slurps. If spirits are your thing, stick with light, refreshing options like vodka, gin, and tequila. Cocktails or mocktails with vegetal or citrus notes (did somebody say Celery Gimlet, this page?) definitely fit the bill. Buy three times as much alcohol as you think you’ll need, and put it all in a large ice bucket somewhere very near the raw bar setup.
CALIBRATE YOUR FRESH SEAFOOD BUYING. The best approach, bar none, is to buy your oysters, clams, and fish the day you’re serving, provided you’ve internalized our dictates about freshness above. If you’re having anything shipped, make sure it arrives absolutely no more than a day or two in advance of putting out your spread.
CHOOSE STURDY, SEAFARING VESSELS. A wide, shallow, good-looking ceramic tray or platter is great for heaping with crushed ice and shellfish (or in a pinch, a foil tray—we won’t judge you). Small jars, ramekins, and cups with small serving spoons are good for your accoutrements. A couple of large slate or wooden boards are also worth having on hand, for things like our smoked shellfish (see this page) or a dramatic crudo board. Anything boosted from your eccentric Grandma’s collection will shine here. If you want to give it a real seafood shack touch, buy a batch of red-and-white checkered paper boats for people to use as hors d’oeuvres plates.
DON’T OVER-SHUCK YOURSELF. We all know that your Uncle Duke once ate one hundred oysters in one sitting at the Acme Oyster House in New Orleans, but think smaller scale for a dinner party. Assuming oysters aren’t the only food at your party, people need only a few slurps to be happy, so plan on three oysters per person alongside the other dishes you’re serving. If you’re hosting a happy hour where the focus is on oysters, plan for a half dozen per guest. Give yourself a good chunk of time (around 30 minutes) before serving to get the shellfish shucked and arrayed on a large platter covered with a 1-inch layer of crushed ice. Position the oysters so they sit sturdily facing up, to keep the liqueur from spilling out, and leave a little space between each one, arraying your sauces around the platter. Around the same time, you should be slicing and plating your crudo if you’re adding it to the spread (see chapter 2 for more detail). Do not be tempted to shuck the oysters or clams more than an hour ahead of time and store them in the refrigerator. You’re basically sacrificing the beautiful freshness of the product, because they will dry out and develop a kind of skin across the oyster that is not pleasing.
KEEP A SHARP EYE ON THE DETAILS. There are three things to avoid when presenting a raw bar setup:
-
Dead shellfish: Before you start shucking, sort through the shellfish and check that all the shells are tightly closed. Shells that are open even a fraction or sound hollow when tapped, oyster meat that looks dried out when you open the oyster, or oysters that are off-smelling are no-nos and should definitely be tossed.
-
Shells in your oysters or clams: You should make every effort to remove any remnant shell pieces with your oyster knife or finger (while being careful to preserve all the liqueur in the shell).
-
Scrambled oysters: Oysters shucked so poorly the meats are totally mangled. This is pretty much unavoidable for the novice shucker, and the good news is they still taste great, so don’t worry about it too much. But always keep it in mind that there is platonic ideal to strive for!
There’s an unavoidable learning curve when it comes to the raw bar, but take heart! Every time you screw up and pierce the belly of an oyster or make some other faux pas, you get to eat a free oyster. Good for you!
Clam Breakdown

➊ Make sure to have a clam knife and work over a towel.

➋ Hold the clam with the hinge in the palm of your hand and the round side—called the ‘lips’—facing your fingertips.
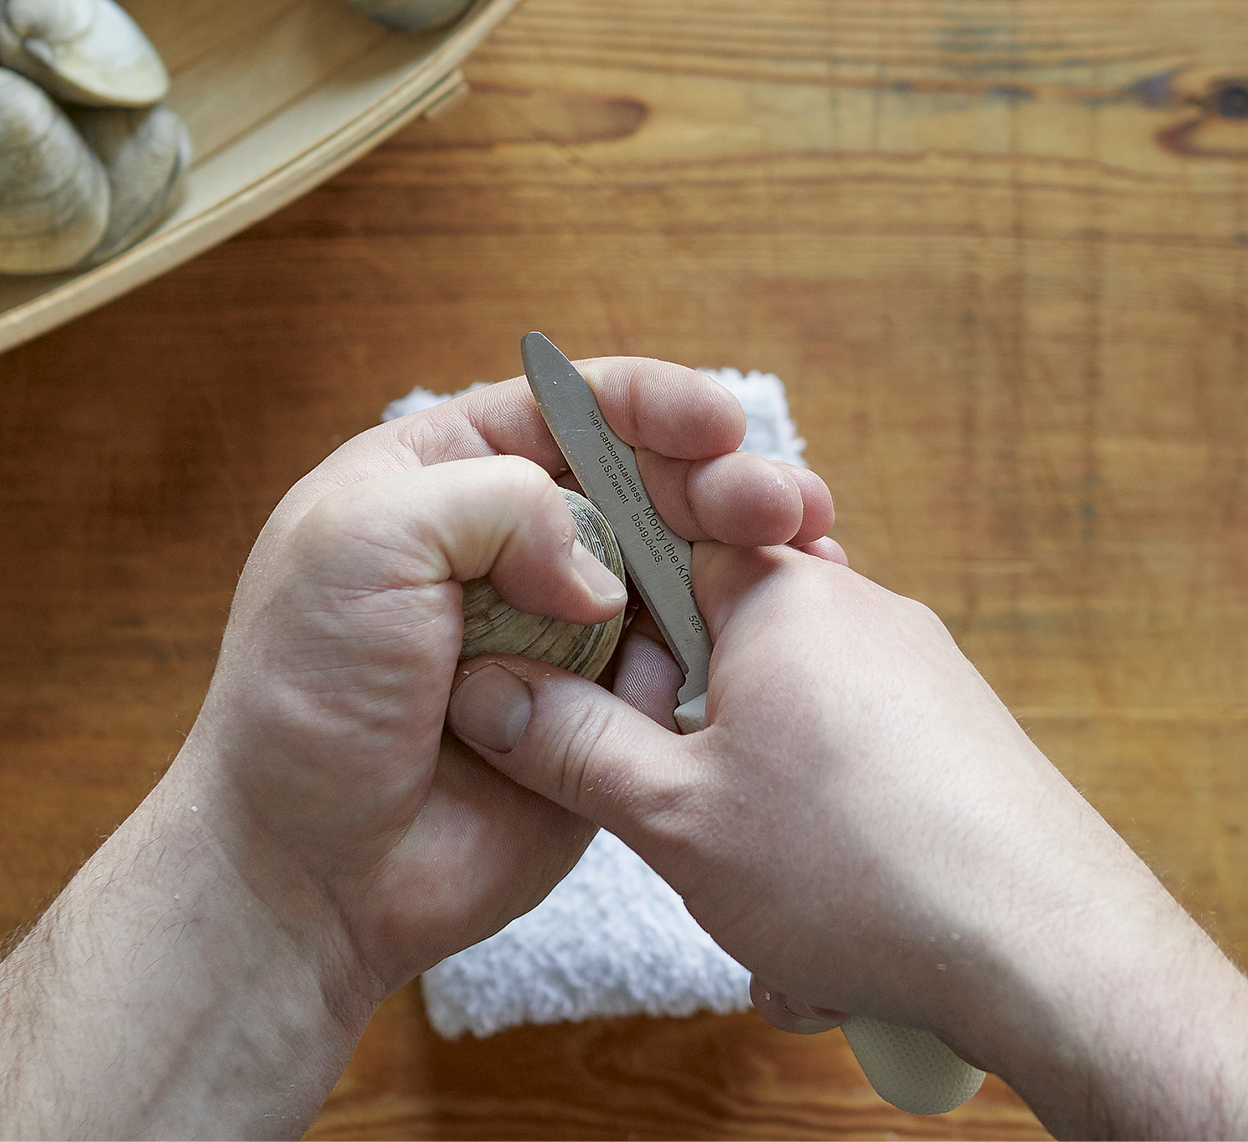
➌ Place the clam knife blade carefully between the lips, and wrap your fingers around the dull edge of the clam knife.

➍ Using a squeezing motion, pull the clam knife towards the hinge, and when done properly, the knife will slide in easily. Pull knife all the way to the hinge.

➎ Open the clam and using the tip of the clam knife, work the knife around the top shell and slide the clam meat onto the bottom shell.

➏ With a twisting motion, remove the upper shell from the bottom shell and discard.

➐ Using the tip of the knife, work under the clam meat to sever the adductors and free the meat from the shell.

➑ Double-check that the clam meat is completely free of the shell.

➒ Slurp.

CLASSIC COCKTAIL SAUCE AND SOPHISTICATED MIGNONETTES
Cocktail sauce and red wine mignonette sauce are two trusty old oyster warhorses we had to have as a part of our raw bar program. Why? Because (most) people love them. They are great with shellfish. We offer relatively straightforward versions, but look no further than our recipe for Black Trumpet and Rosemary Mignonette for a more adventurous take.
CLASSIC COCKTAIL SAUCE
MAKES ABOUT 2 CUPS
½ cup prepared horseradish
2 tablespoons fresh lemon juice
2 teaspoons Worcestershire sauce
1½ cups ketchup
In a small bowl, mix together the horseradish, lemon juice, Worcestershire, and ketchup. Serve immediately or store in an airtight container in the fridge for up to 1 month.
MAKES ABOUT 1 CUP
1½ teaspoons whole black peppercorns
2 shallots, minced
1 cup red wine vinegar
1 tablespoon balsamic vinegar
In a dry pan over medium heat, toast the peppercorns for 30 to 60 seconds, until they become fragrant, then remove them from the pan to cool slightly. In a spice grinder, grind the peppercorns to a coarse powder. In a small bowl, stir together the peppercorn powder, shallots, and both vinegars, and let sit for at least an hour, or up to overnight, so the flavors can meld. Store in an airtight container in the fridge for up to 1 month.
BLACK TRUMPET AND ROSEMARY MIGNONETTE
MAKES ABOUT 1¼ CUPS
1 sprig rosemary
1 pound fresh black trumpet mushrooms, finely chopped (fresh shiitakes and reconstituted dried black trumpets are suitable substitutes)
1 small shallot, minced
1 tablespoon water
½ cup balsamic vinegar
½ cup rice wine vinegar
2 tablespoons honey
Finishing salt
Turn on your gas range or light a torch or lighter and lightly wave the rosemary sprig over the flame until the leaves pick up a little char here and there. Kill the flame and set the sprig aside to cool. Pull the rosemary leaves from the stems and very finely chop the leaves.
Add the chopped rosemary, mushrooms, shallot, and water to a pan over medium-low heat and sweat until the mushrooms release their liquid and the liquid evaporates, about 3 minutes. Add both vinegars and bring the mixture to a bare simmer, then remove the pot from the heat. When the mixture cools to room temperature, stir in the honey and salt to taste. Serve immediately or store in an airtight container in the refrigerator for 1 month.

FLAVORED ICES
If shucking a smorgasbord of local oysters à la minute in front of our guests was the single most important concept behind Eventide’s raw bar program, then serving unique accompaniments was a close second. For R&D before opening the restaurant, we ate a lot of oysters and shellfish all over Portland, the rest of New England, New York, Charleston, northern California, and beyond. We were collectively stunned by the lack of creativity put toward such an essential aspect of the raw bar.
Flavored ices (also known as granités) were something we had started to play with as an accompaniment to shellfish at Hugo’s, and we ramped up our exploration when we were developing the Eventide raw bar program. Savory plays on ices aren’t found that often outside of fine dining restaurants, but we saw them as a great way to twist the classic oyster accoutrements, like our Tabasco or horseradish varieties. They are also a tool for cutting down on waste in the kitchen, which we do by using leftover pickling liquid in our beet and red onion ices. Flavored ices can capture and preserve the beautiful, height-of-season flavor of veggies like summer tomatoes and green chiles. Or, they can just give you a chance to try something new and different, like the kimchi or yuzu kosho ices that find their way into the rotation on our menu.
There are no hard-and-fast rules when making flavored ices. Generally speaking, you will see that most of our ices balance sweet and acidic ingredients because that’s what people typically associate with oyster accompaniments. Sugar is essential to making the ice easy to work with and giving it the right texture in the end. Don’t worry about precision here; our recipes will yield a delicious ice. If you want to be a nerd about it (like us), get a refractometer (see Glossary), which can measure the brix level (sugar content) of a solution. Generally speaking, for our purposes here, you want the brix level to be about 14°Bx.
As we mentioned, because of the sheer volume of ices that we go through, we use a shaved ice machine at Eventide, but all of these ices can be made by scraping with a fork, so they’re easy to do at home by hand. You’ll need only ½ teaspoon of ice for each oyster, so portion out a batch depending on how many oysters you’re serving and keep the rest frozen for use in slurping later.
PICKLED RED ONION ICE
MAKES ABOUT 1 CUP
1 cup brine from Pickled Red Onion (this page)
Freeze the red onion liquid completely by placing it in a bowl in the freezer for 3 hours. Once frozen, use the tines of a fork to scrape the mixture into a light, fluffy ice. Serve immediately or return to the freezer in a covered storage container. The ice will last for 2 months in the freezer; when you want to deploy it, just use a fork to scrape it again.
GREEN CHILE ICE
MAKES 3 CUPS
1½ cups freshly roasted green chiles (alternatively you could use any manner of store-bought roasted red peppers or frozen chiles from New Mexico), stemmed and seeded
¼ cup Simple Syrup (this page)
1 cup water
½ cup rice wine vinegar
In a blender, combine the chiles, simple syrup, water, and vinegar. Puree the mixture on high speed until completely smooth.
Freeze the mixture completely by placing it in a bowl in the freezer for 3 hours. Once frozen, use the tines of a fork to scrape the mixture into a light, fluffy ice. Serve immediately or return to the freezer in a covered container.
The ice will last for 2 months in the freezer; when you want to deploy it, just use a fork to scrape it again.
MAKES 1½ CUPS
½ cup Tabasco hot sauce
3 tablespoons Simple Syrup (this page)
1 cup water
Thoroughly mix the simple syrup, Tabasco, and water in a small bowl. Freeze the mixture completely by placing it in the freezer for 1 hour. Once frozen, use the tines of a fork to scrape the mixture into a light, fluffy ice. Serve immediately or return to the freezer in a covered storage container. The ice will last for 2 months in the freezer; when you want to deploy it, just use a fork to scrape it again.
MAKES ABOUT 2 CUPS
2 cups brine from Kimchi (this page, or drained from a good-quality store-bought kimchi)
Freeze the kimchi liquid completely by placing it in a bowl in the freezer for 3 hours. Once frozen, use the tines of a fork to scrape the mixture into a light, fluffy ice. Serve immediately or return to the freezer in a covered storage container. The ice will last for 2 months in the freezer; when you want to deploy it, just use a fork to scrape it again.
HORSERADISH ICE
MAKES ABOUT 3⅓ CUPS
1¼ cups prepared horseradish
½ cup champagne vinegar
⅓ cup Simple Syrup (this page)
1¼ cups water
Whisk all ingredients together in a bowl and freeze the mixture completely by placing the bowl in the freezer for 3 hours. Once frozen, use the tines of a fork to scrape the mixture into a light, fluffy ice. Serve immediately or return to the freezer in a storage covered container. The ice will last for 2 months in the freezer; when you want to deploy it, just use a fork to scrape it again.
PICKLED BEET ICE
MAKES ABOUT 1½ CUPS
1½ cups brine from Pickled Beets (this page)
Pour the liquid into a bowl and freeze completely by placing it in the freezer for 3 hours. Once frozen, use the tines of a fork to scrape the mixture into a light, fluffy ice. Serve immediately or return to the freezer in a covered container. The ice will last for 2 months in the freezer; when you want to deploy it, just use a fork to scrape it again.
TOMATO WATER ICE
MAKES ABOUT 3 CUPS
2¼ pounds super-ripe tomatoes, cored and cut into medium pieces
1½ teaspoons kosher salt
2½ tablespoons sugar
In a nonreactive bowl, toss the tomatoes with the salt and allow the mixture to sit for a couple of hours at room temperature. Pour the mixture into a blender and puree until totally smooth. Pour the mixture through a fine-mesh strainer lined with a double layer of cheesecloth into a nonreactive bowl. Place the strainer and bowl in the fridge and allow the tomato water to drain for at least 24, and up to 48, hours. Your yield will vary a bit depending on the juiciness of your tomatoes, but you should end up with just shy of 3 cups of tomato water.
In a blender, combine the tomato water and the sugar, and puree until the sugar dissolves.
Freeze the mixture completely by placing it in a bowl in the freezer for 3 hours. Once frozen, use the tines of a fork to scrape the mixture into a light, fluffy ice. Serve immediately or return to the freezer in a covered storage container. The ice will last for 2 months in the freezer; when you want to deploy it, just use a fork to scrape it again.
MAKES ABOUT 5⅓ CUPS
3 to 4 tablespoons yuzu kosho (see Glossary)
4 cups water
⅔ cup rice wine vinegar
1 cup sugar
⅓ cup yuzu juice (or substitute 3 tablespoons fresh lemon juice and 2 tablespoons fresh lime juice)
1 teaspoon kosher salt
In a saucepan, combine 3 tablespoons of the yuzu kosho, the water, vinegar, sugar, yuzu juice, and salt. Taste and add another tablespoon of the yuzu kosho if you want it spicy. Bring to a simmer over medium-high heat, stirring frequently to dissolve everything, then transfer to a bowl and let cool to room temperature.
Freeze the mixture completely by placing the bowl in the freezer for 1 hour. Once frozen, use the tines of a fork to scrape the mixture into a light, fluffy ice. Serve immediately or return to the freezer in a covered storage container. The ice will last for 2 months in the freezer; when you want to deploy it, just use a fork to scrape it again.
MAKES 1½ CUPS
2 tablespoons plus 1 teaspoon peppercorns, preferably Tellicherry (see Glossary)
1 cup water
¼ cup sugar
¼ cup fresh lemon juice
⅛ teaspoon kosher salt
In a dry pan over medium heat, toast the peppercorns for 1 minute or until they become fragrant, then remove the peppercorns from the pan and set aside.
In a small pot with a lid, combine the water and sugar and bring to a boil, stirring to dissolve the sugar. Add the peppercorns, cover the pot, turn the heat down, and simmer for 30 minutes. Turn off the heat, let the mixture cool for a few minutes, and then puree it in a high-powered blender. Strain through a fine-mesh strainer into a bowl and let cool.
Add the lemon juice and salt and freeze the mixture completely by placing the bowl in the freezer for 1 hour. Once frozen, use the tines of a fork to scrape the mixture into a light, fluffy ice. Serve immediately or return to the freezer in a covered storage container. The ice will last for 2 months in the freezer; when you want to deploy it, just use a fork to scrape it again.