
LIGHTLY CURED CHAR
Bagel, Pickled Beet, Crème Fraîche

Every so often, I get it in my head that I’m going to make really great flatbread, but I’ve failed over and over again. During one such fit of inspiration and dejection, I tossed a scrap of flatbread dough into a nearby fryer. And, wouldn’t you know it? That little throwaway scrap turned into a savory donut with a pleasant, alkaline flavor that was very bagel-like. I rolled another portion of the dough in some everything bagel spice and tried again. It worked like a charm and helped develop this dish—but I still can’t make good flatbread. —Mike
SERVES 4
½ cup kosher salt
½ cup sugar
10 ounces char fillet, skin and pinbones removed
BAGEL
1¼ cups warm water
2¼ teaspoons active dry yeast (1 packet or ¼ ounce)
2 cups all-purpose flour
1 cup rye flour
1 teaspoon kosher salt
¼ cup poppy seeds or white and black sesame seeds, for coating
Canola oil for frying
4 tablespoons crème fraîche
7 to 10 pieces Pickled Beets (this page)
A couple of pinches Pickled Red Onion (this page)
Micro sorrel (see Glossary) for garnish
To cure the char, lay out a large piece of plastic wrap and mix the sugar and salt in a bowl. Sprinkle one-third of the cure on the center of the plastic wrap. Place the char on top. Scatter the remainder of the cure atop the fillet and wrap tightly in the plastic wrap. Store in the refrigerator for 3 hours.
Rinse the fish thoroughly under cold water, pat dry, wrap in a clean paper towel, and store in a ziplock bag in the refrigerator.
To make the bagel, stir the water and yeast together in a large bowl an allow to bloom for 3 minutes. Add the flours and salt to the yeast and water mixture. Stir until just incorporated, cover the bowl with plastic wrap, and place in a warm spot. Allow the dough to rise until doubled in volume, about 2 hours, depending on temperature (the warmer the temperature, the less time needed to rise).
Portion the dough into three uniform balls and roll them into long snakes. Spread the seeds on a plate and roll the dough through the seeds. Cut the dough into 2-inch lengths.
Fill a large pot with 3 inches of canola oil and heat on high to 350°F (or bring a deep-fryer to 350°F). Line a plate with paper towels. Making sure not to overcrowd the pot, fry the dough pieces in batches until evenly browned, about 5 minutes. With a slotted spoon, transfer the pieces to the prepared plate. Once cooled, slice into bite-size pieces and set aside.
To assemble the dish, cut the lightly cured char against the grain into ¼- to ⅛-inch uniform slices. Swipe the crème fraîche artfully across a large platter or four plates. Place the pieces of char and bagels in a pleasing array over the crème fraîche, then spoon and scatter the pickles and sorrel evenly over the top. Serve within 30 minutes.
LIGHTLY PICKLED MACKEREL
Caramelized Onion, Dashi, Puffed Sushi Rice, Nori
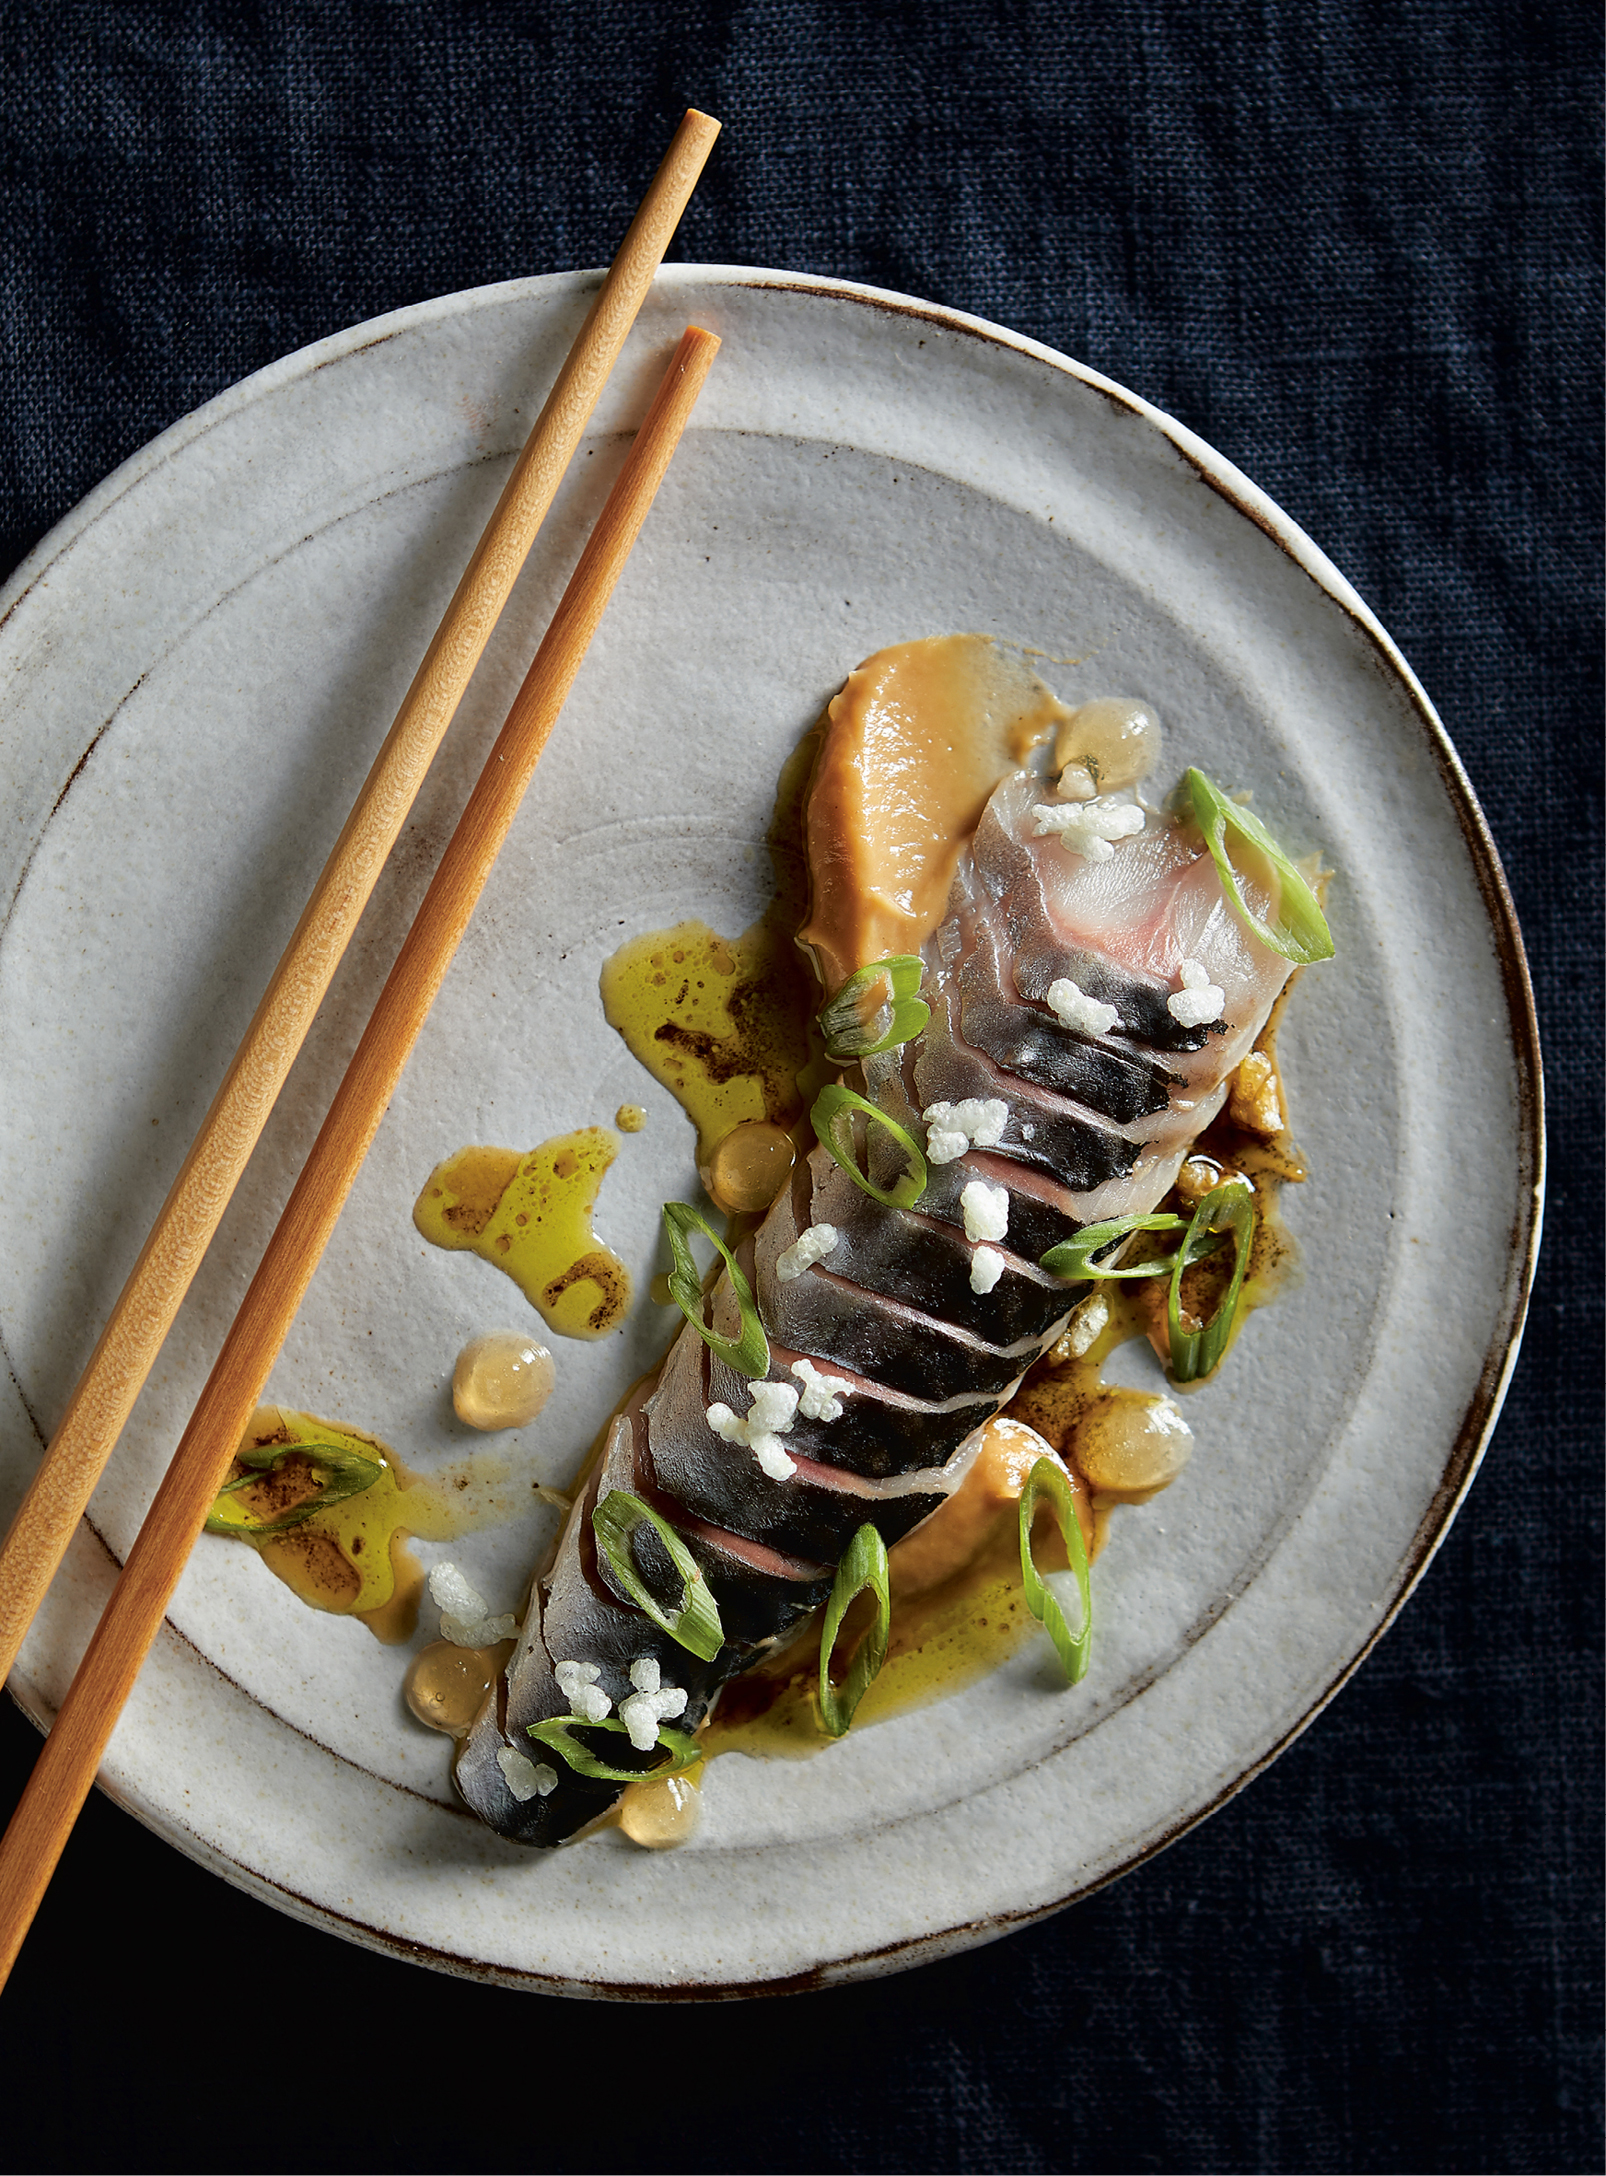
Mackerel can be a tough sell in the States due to its reputation as a bait fish, but when it’s fresh and handled well, it is delicious. If you’re near a coast—any coast—some type of mackerel is probably local to you, and virtually all species of mackerel are affordable and rated as highly sustainable. It’s also an easy and satisfying fish to butcher, making it particularly good for practicing your fish-cutting skills.
This dish actually predates Eventide. We concocted a version of it for the Hugo’s menu after being inspired by tasting things like pickled saba (mackerel) and kohada (gizzard shad) on trips to Japanese restaurants. Mackerel is a full-flavored, full-bodied fish, and the light vinegar pickle really complements the assertive flavor of the fish. Additionally, mackerel have a tough, unappetizing membrane on the outside of their skin that looks like translucent wrapping, which has to go and, thankfully, pickling the fish makes removal possible. —Andrew
SERVES 4
MACKEREL
1-inch knob peeled ginger
1¼ cups water
⅓ cup rice wine vinegar
4 teaspoons mirin
4 teaspoons tamari
4 whole fresh mackerel (about ½ pound each) or 8 skin-on fillets (2 ounces each)
½ cup Caramelized Onion Puree (recipe follows)
½ cup Dashi Gelée (recipe follows)
½ cup Puffed Sushi Rice (recipe follows)
Thinly sliced scallion greens for garnish
2 tablespoons Nori Vinaigrette (this page)
Finishing salt
To make the mackerel pickling liquid, grate the ginger finely. In a nonreactive container with a lid, combine the ginger, water, vinegar, mirin, and tamari and stir thoroughly. Refrigerate the mixture for 1 to 2 hours, until thoroughly chilled.
Fillet the mackerel, if whole, and rinse the fillets with cold water. Using a sharp knife, trim the fillets to be uniform in size, but maintain the natural shape of the fillet. Don’t remove the pinbones just yet—they’ll be much easier to take out once the fish is pickled.
Place the fillets skin-side down in a nonreactive container. Pour the cold pickling liquid over the mackerel and drape plastic wrap over the surface of the brine to ensure that mackerel floating near the top are fully submerged. Refrigerate for 20 minutes.
Remove the mackerel from the brine. Use fish pliers or tweezers to carefully remove the pinbones, running your hand over the fish to make sure you’ve gotten them all. Do your best to avoid tearing the fish.
Now for some trickery. With either your fingers, the corners of your fish pliers, or even a paper towel, try to lift a corner of the membrane and peel it back from the skin, removing as much as you can. When pickled properly, the thin membrane should come off in one piece but leave behind the colorful markings of the fish skin. Pat the fish dry with paper towels and return to the refrigerator in an airtight container for up to 48 hours before serving.
To assemble the dish, swipe a few streaks of caramelized onion puree across a large platter or four plates. With a sharp knife, slice the mackerel on the diagonal into ½-inch pieces and arrange them on top of the onion puree. Season the fish with salt. Dip the tip of a clean spoon into the dashi gelée and drop pieces of it around the mackerel. Scatter some puffed rice over everything and finish with a shower of scallions and a liberal splash of the vinaigrette. Serve within 30 minutes.
CARAMELIZED ONION PUREE
MAKES ½ CUP
¼ cup canola oil
3 yellow onions, thinly sliced
Water (optional)
Pinch of kosher salt
Pinch of sugar
In a sauté pan, warm the oil over medium heat and add the onions. Cook slowly and methodically until the onions are deeply browned and soft, 30 to 60 minutes. Should the onions catch the bottom and start to brown too quickly, add a splash of water to deglaze and scrape the fond at the bottom of the pan. When the onions are fully browned, season with the salt and sugar. Transfer the caramelized onions to a blender. Starting on low speed and gradually cranking up the power, puree the onions, adding water in small increments to reach a smooth consistency. Strain the mixture through a fine-mesh strainer into an airtight container and chill. Any unused purée can be refrigerated for up to 3 days and used to add a sweet, umami-heightening, oniony essence to dressings, marinades, stews, and other dishes.
DASHI GELÉE
MAKES 2 CUPS
5 sheets gelatin
2 cups Dashi (this page)
Kosher salt
In a small bowl, cover the gelatin sheets with ice water and soak for 5 minutes, until pliable (bloomed). Remove the gelatin sheets from the water and squeeze them lightly to remove excess water. In a small pot, combine the dashi and the bloomed gelatin and warm slowly over low heat until the gelatin melts completely. (The slower and lower you warm the mixture, the more holding power the gelatin will have.) Add salt to taste. Pour the mixture into a nonreactive container with a lid and cool to room temperature. Transfer to the refrigerator to set completely, at least 2 hours. It will be stiff enough to slice, like Jell-O. Extra dashi gelée will keep in the fridge for 1 week and can be added to soups, stews, and rice bowls for an extra umami kick.
MAKES 1 TO 2 CUPS
½ cup sushi rice
6 cups water
Kosher salt
Canola oil for frying
Rinse the sushi rice until the water that drains from it is clear.
In a saucepan, bring the water and a generous pinch of salt to a boil. Line a baking sheet with parchment paper and lightly grease the paper with canola oil.
Add the rice to the boiling water and cook like you would pasta, stirring frequently for approximately 15 minutes. Your goal is to overcook the rice, with each grain ending up a little soft and well past al dente. Drain the rice in a colander. Scatter the cooked rice grains on the prepared baking sheet, taking care to avoid clumping (clumps can result in uneven drying and worse, spoilage). Allow to dry overnight at room temperature or in the refrigerator, uncovered, until each grain is almost completely dry.
Fill a large pot with 3 inches of canola oil and heat on high to 400°F or bring a deep-fryer to 400°F. Line a plate with paper towels.
Test a few grains of rice at a time by dropping them in the oil. If they float to the surface and puff up, you’re good, and you can fry the whole batch, transferring the puffed grains to the paper towel–lined plate and seasoning with salt. If the test rice isn’t puffing, it may be too dry. In the event it won’t puff, mist the dried-out rice with water from a spray bottle and transfer it to a container with a lid. Allow a couple of hours for the rice to absorb the water, then try frying again.
Let the puffed rice cool and store in an airtight container until you are ready to serve. The puffed rice will keep for up to a month if stored in an airtight container at room temperature. Extra puffed rice can be used as garnish for other crudos or added to salads to give a bit of extra crunch.
AMERICAN UNAGI
Kabayaki, Celeriac, Bok Choy, Candied Sesame, Garlic Chive
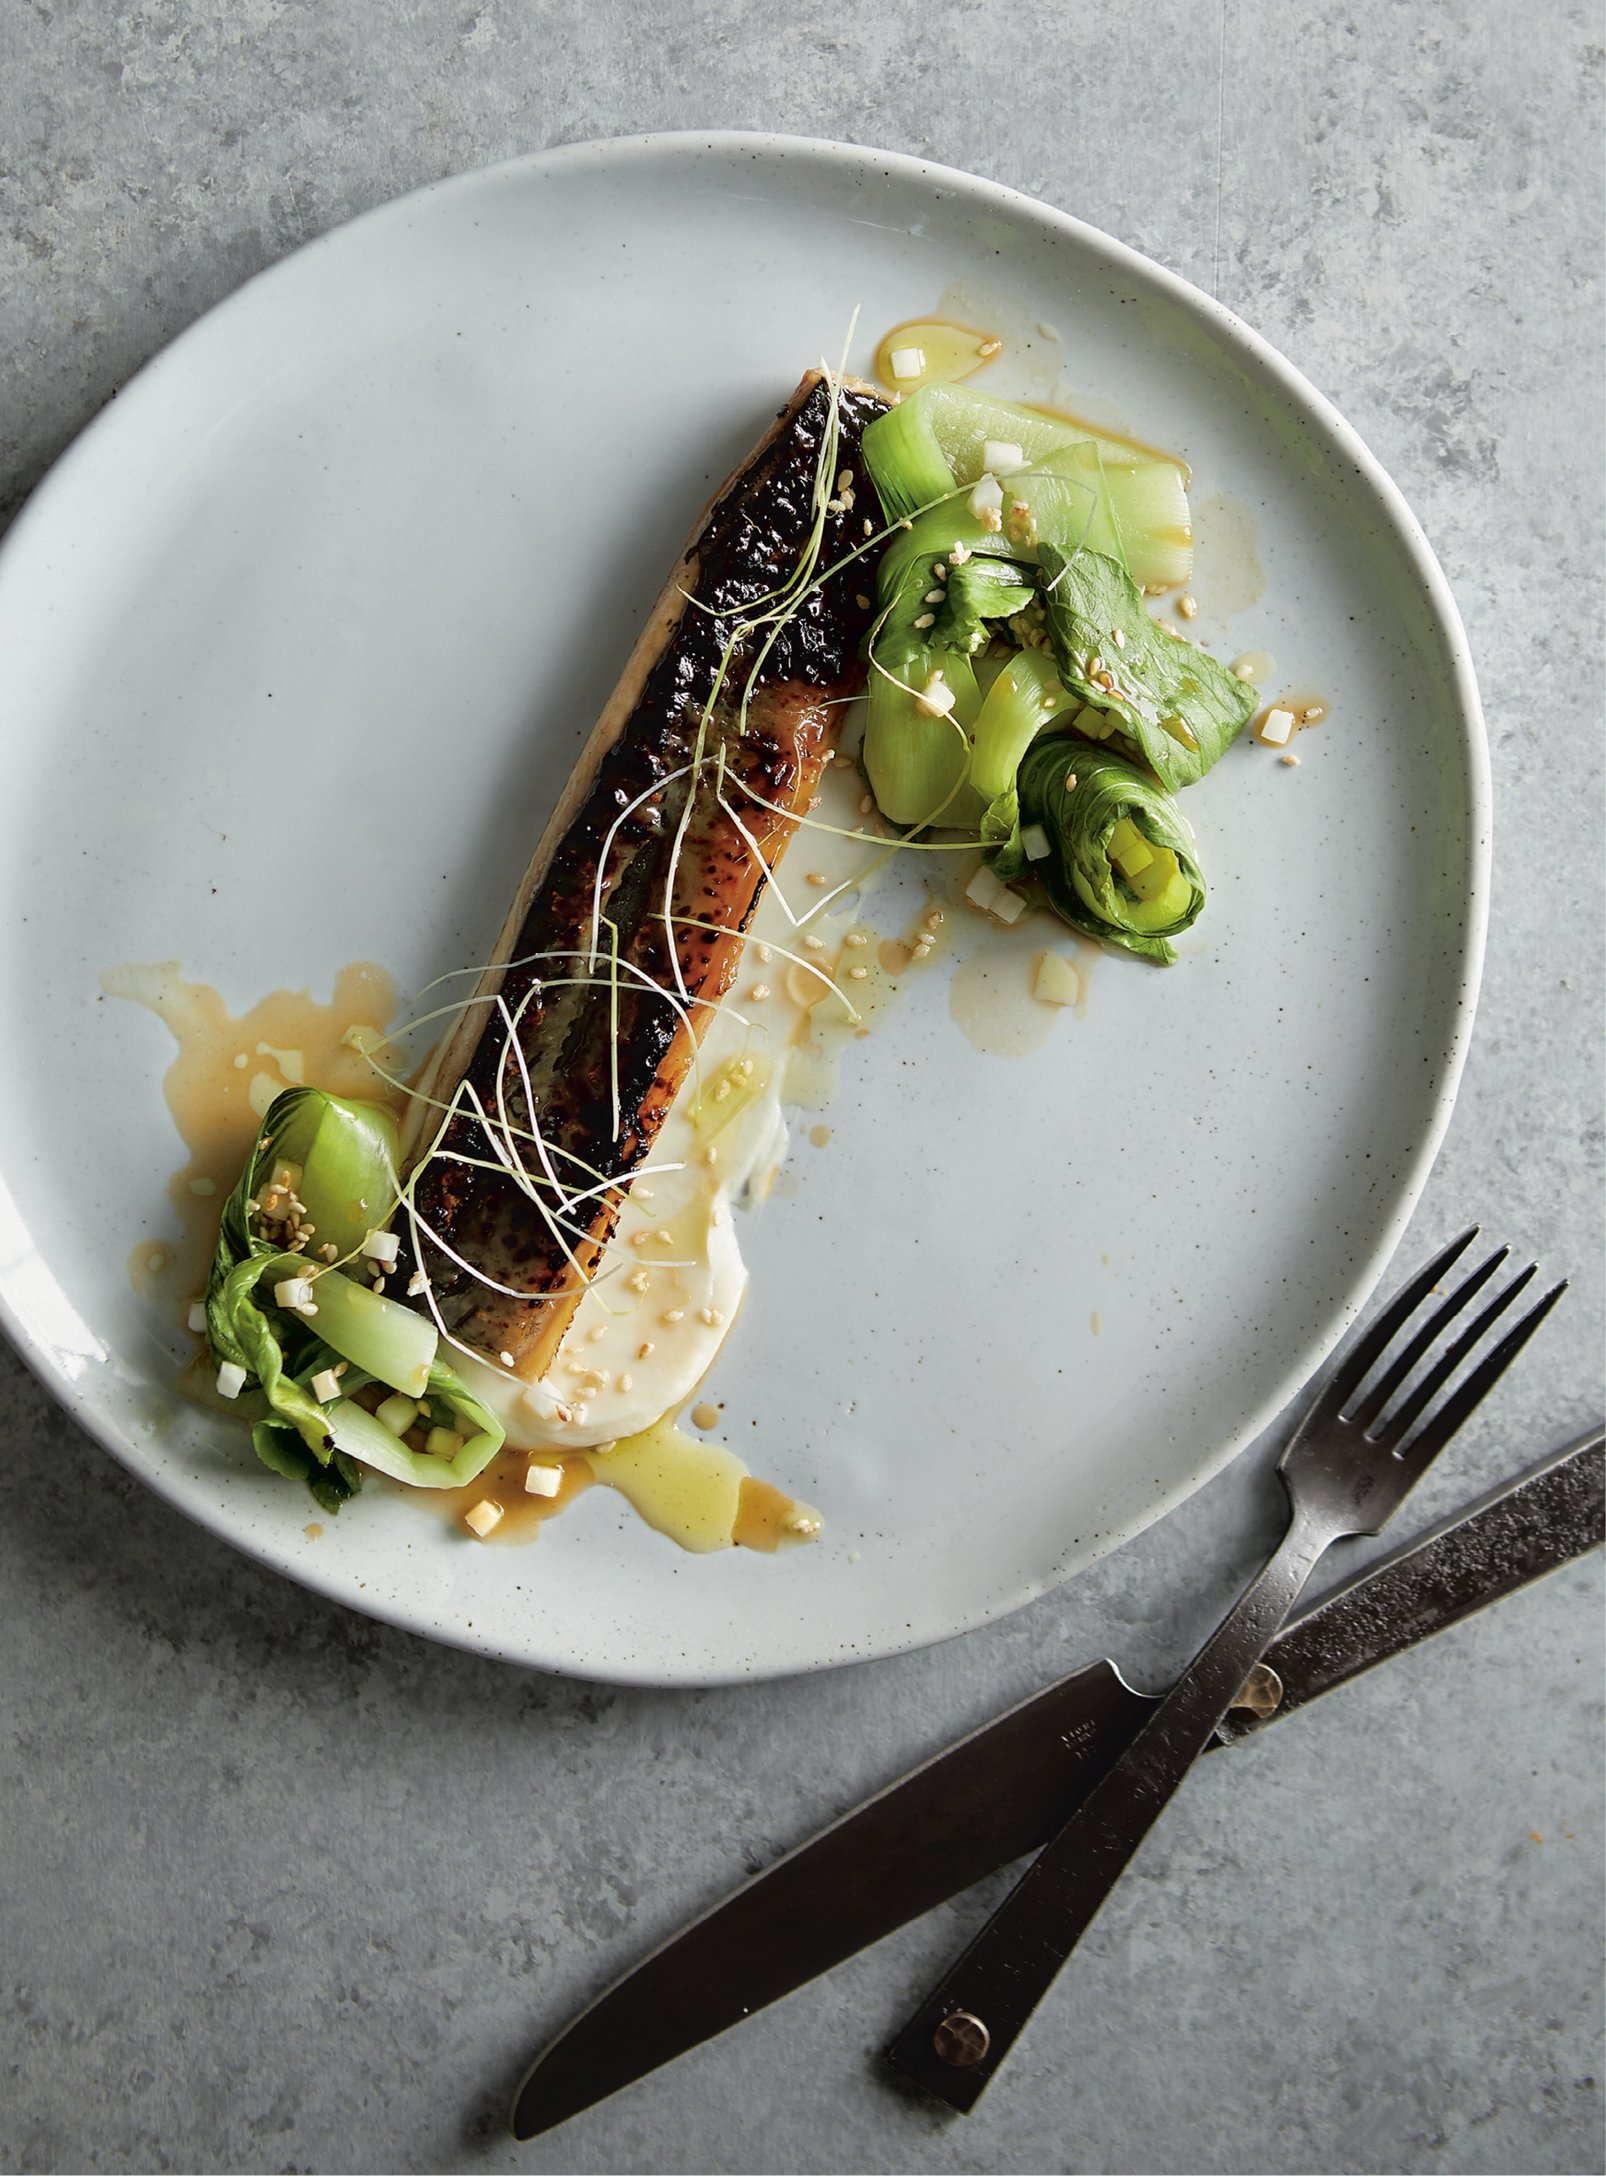
The eels we use at the restaurant are a really special product. Sara Rademaker raises them to full size at her American Unagi aquaculture facility in Thomaston, Maine. We know that may not sound revolutionary, unless you consider that nearly every other eel landed in Maine is shipped to Asia, raised to harvest weight, cooked, Cryovaced, and shipped frozen back to the United States. It goes almost without saying, but eel is more delicious when it hasn’t made a couple of intercontinental flights. Sara’s eels always arrive alive and kicking, and we’re thrilled to have access to such a wonderful Maine-made product to present to our guests. Good fishmongers will have eel in stock from time to time, or you can ask them to help you source them. Alternatively, you can do what most sushi joints do and simply purchase cooked and vacuum-sealed barbecued eel. If you’re using store-bought eel, you can skip all cooking steps apart from the final broiling step. —Mike
SERVES 4
EEL
4 cups water
3½ teaspoons kosher salt
4 cleaned, skin-on eel fillets
2 quarts Dashi (this page)
1 cup Kabayaki Sauce (this page)
1 small head baby bok choy
1 cup Celeriac Puree (recipe follows)
¼ cup Candied Sesame (recipe follows)
Finely chopped garlic chives or regular chives for garnish
Finishing salt
In a large nonreactive container with a lid, stir together the water and salt. Place the fillets in the container, cover it, and put it in the refrigerator for 4 hours, or overnight.
Remove the fillets from the brine and blot dry with paper towels. Place a wire rack inside a baking sheet, and place the eel fillets on the rack, skin-side up. Preheat the broiler to high with an oven rack in the uppermost position. Broil the eel until the skin is completely dried and lightly browned, 2 to 3 minutes. This step helps to remove some of the sliminess that is inherent in eel skin.
Preheat the oven to 250°F.
Place the eel fillets in a Dutch oven or braising pan with a lid on the stove and pour the dashi over them. Bring the mixture to a simmer over medium heat, then cover the pan, and move it to the oven for 1 hour. Check the eel fillets for doneness by piercing one with a cake tester or skewer, which should pierce the eel with no resistance. If it’s not done, return the eels to the oven, checking in 15-minute intervals, until the eel is fully cooked.
Remove the pan from the oven and allow to cool to room temperature. Carefully transfer the eel fillets to a container with a lid.
In a pot with a steamer insert or a bamboo steamer set over a wok, steam the bok choy for 5 minutes, or until tender. Transfer it to a bowl and season with kosher salt.
Put the eel fillets skin-side up on a lightly greased sheet pan. Preheat the broiler to high with an oven rack in the uppermost position, then broil the eel until it is caramelized, 1 to 2 minutes. Brush it with the kabayaki sauce and broil again until glazed, 1 to 2 minutes.
To assemble the dish, drop a large dollop of the celeriac puree onto a large platter or four plates and use the back of a spoon to streak it across the plates in a thin layer. Place one eel fillet on top of the puree and season with finishing salt. Arrange the baby bok choy or cut pieces around the eel, and sprinkle the candied sesame and garlic chives over the plates. Serve within 30 minutes.
CELERIAC PUREE
MAKES 4 CUPS
1 celeriac (celery root), peeled and cut into 1-inch cubes
3 cups whole milk
¼ cup (½ stick) unsalted butter, cubed
Kosher salt
Combine the celeriac and milk in a small pan. Bring to a simmer over medium heat and cook until the celeriac is fork-tender, about 35 minutes.
Use a slotted spoon to transfer the celeriac to a blender. Start the blender and slowly increase the speed, adding enough milk from the pan to get the mixture to catch the blade and create a vortex (it will take a decent amount of milk). Process the celeriac and milk on high until it is completely smooth, then add the butter and process again until smooth. Season with salt to taste.
Strain the puree through a fine-mesh strainer into a bowl. Store any extra in an airtight container in the fridge for up to 1 week. It can be used as a side dish (replacing mashed potatoes, for example) or as a flavor bed on which cooked protein can recline.
CANDIED SESAME
MAKES 2 CUPS
½ cup sugar
¼ cup water
1¼ cups white sesame seeds
In a stainless steel, small saucepan with a flat bottom, mix the sugar and water to achieve the consistency of wet sand. Over medium heat, bring the sugar and water to 270°F, stirring often.
While you’re cooking the sugar, toast the sesame seeds in a separate, small, dry pan over medium heat until they are fragrant and darkened, 30 to 60 seconds, then remove them from the pan.
Once the water and sugar reach 270°F, remove the pan from the heat and carefully add the toasted seeds. Stir with a rubber spatula, breaking up any clumps that may form. Pour the contents into a heatproof bowl and cool.
Any extra mixture can be stored in a covered jar in the fridge for a week, or frozen in a covered container for up to a month. It can be used to garnish noodle or rice dishes or grilled fish, chicken, or beef.

CHAWANMUSHI
Black Trumpets, Grilled Scallion, Uni
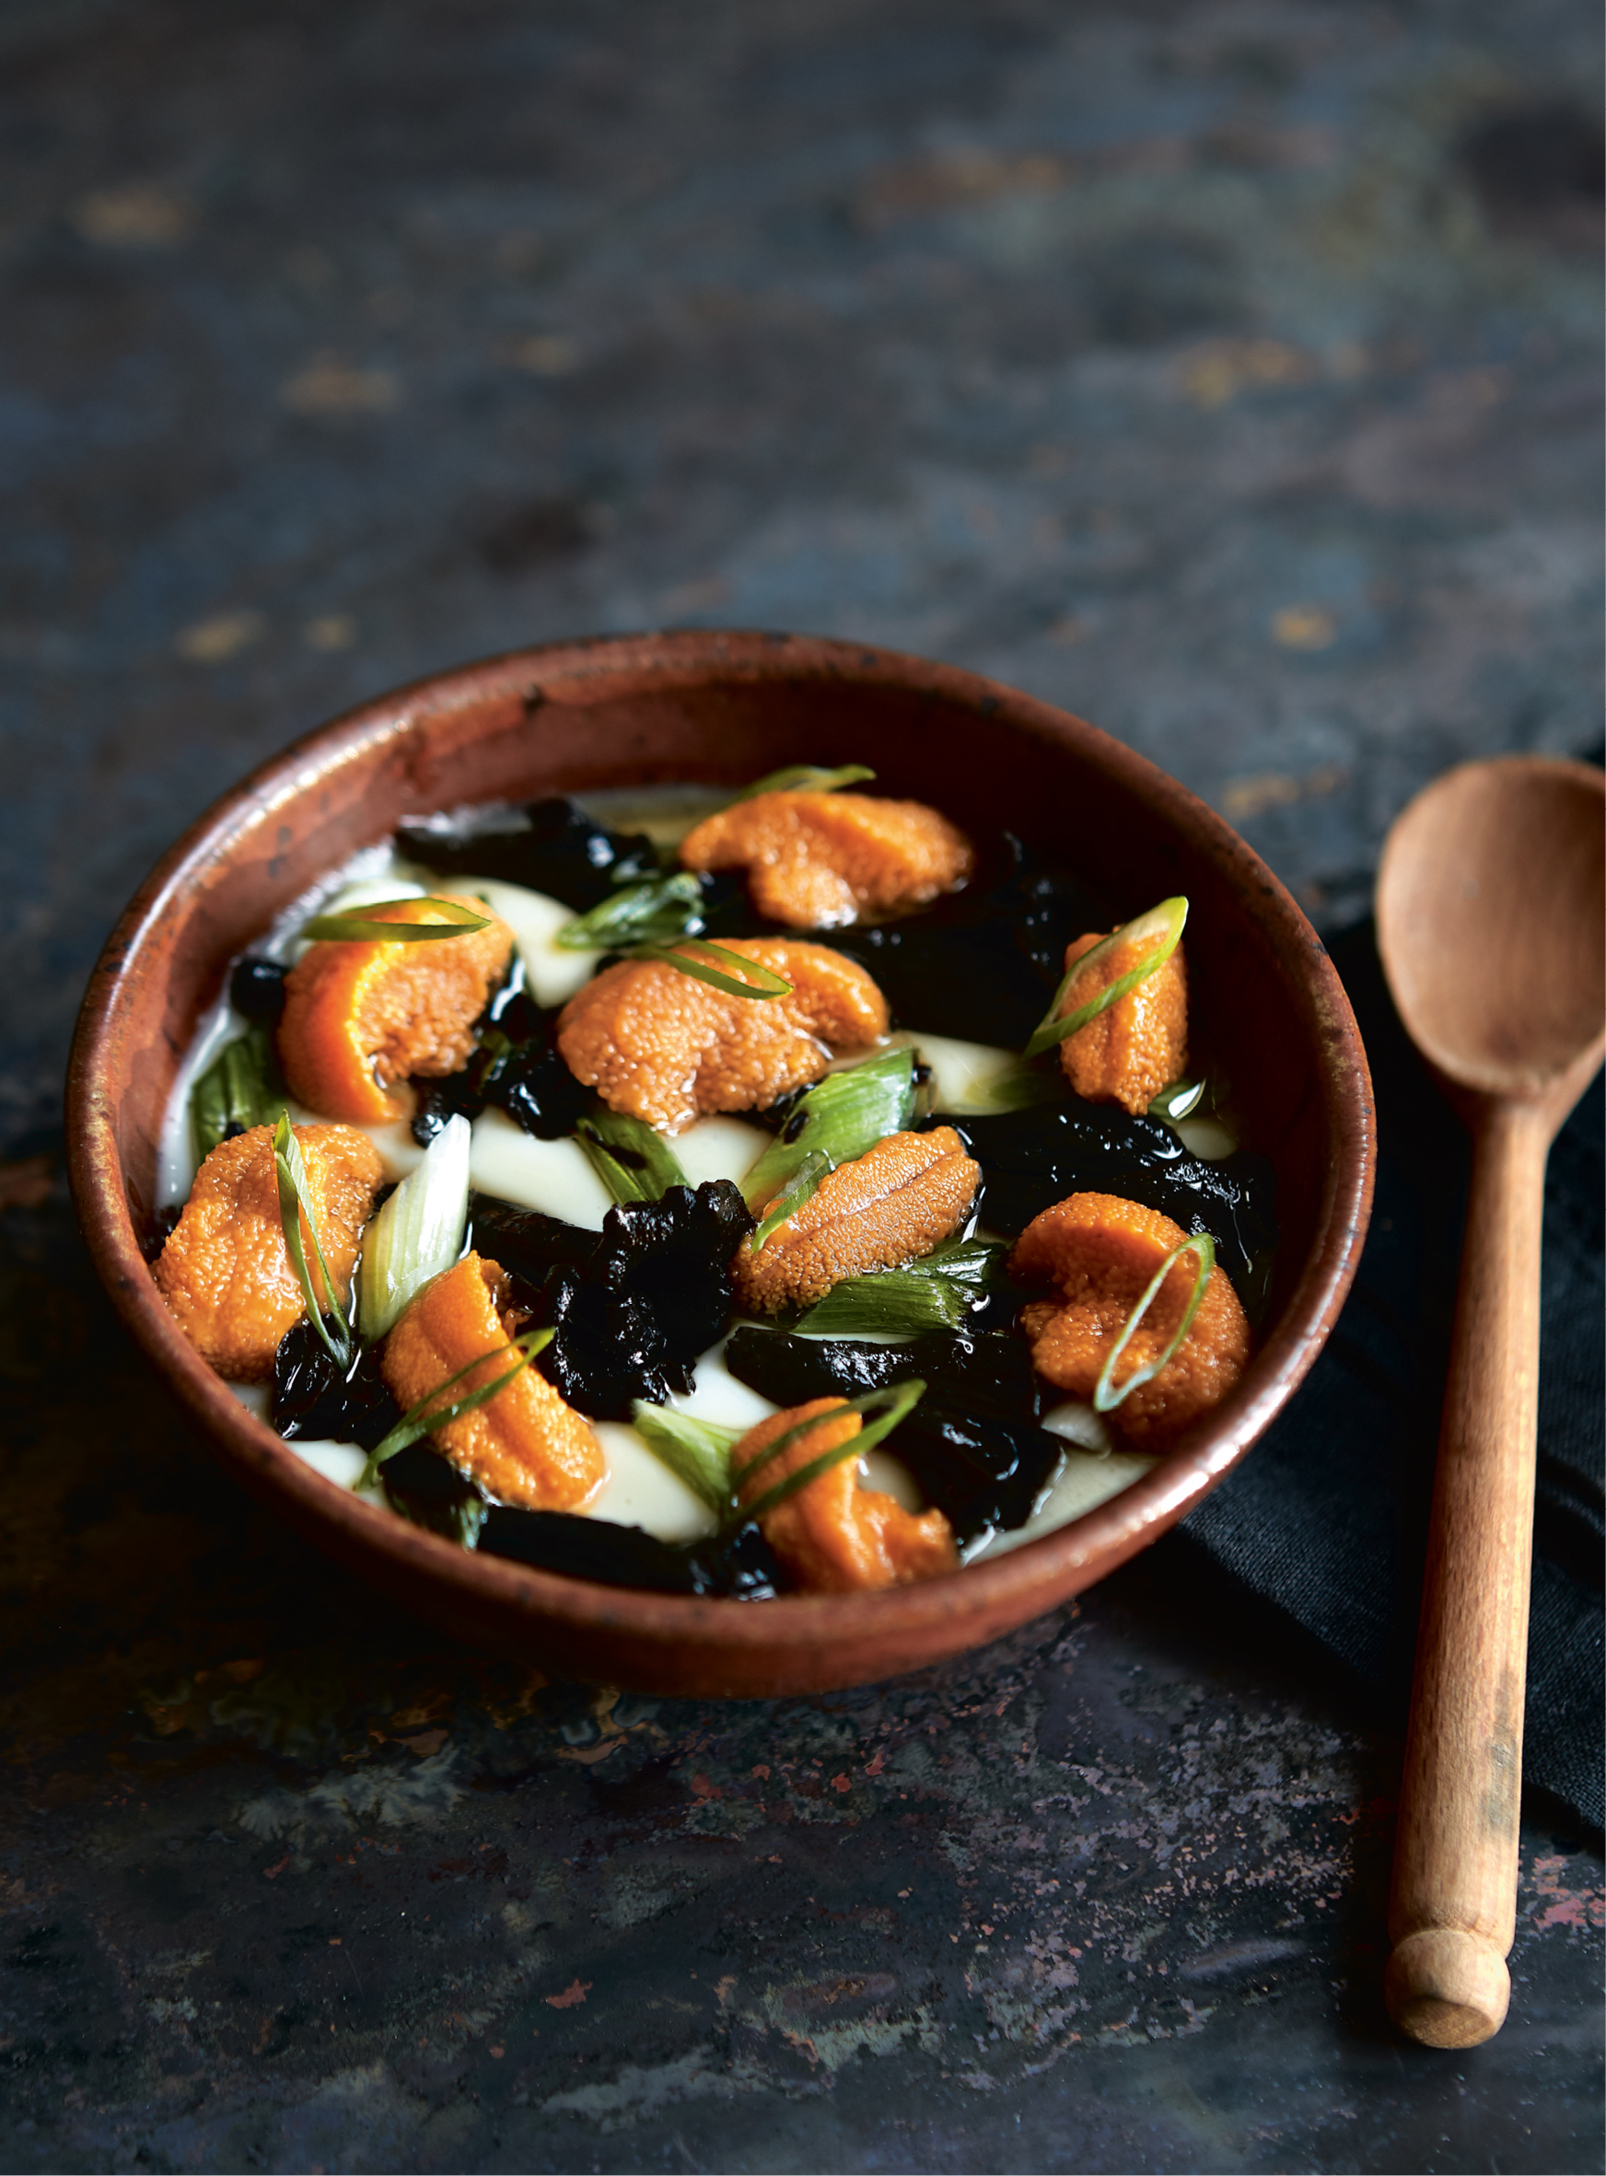
I used to eat at this little hole-in-the-wall Japanese spot in Seattle called Shiki, where the owner, a portly Japanese man usually sporting a Harley-Davidson T-shirt and leather chaps, also happened to be an incredible cook of lesser-known Japanese regional comfort food. In addition, he was one of the only chefs in Seattle who was licensed to serve blowfish. Shiki was my introduction to a wide variety of strange and delicious foods like poached cod milt (look it up), fried river crabs, vegetable and loach pancakes, raw blowfish and, of course, a version of the sublime dish you see here.
Chawanmushi is a dashi-based Japanese custard that is so delicate and velvety that it barely holds together. It is served as simple home or peasant food in Japan, especially on the north island of Hokkaido, which is a shellfish-rich, ski-crazy winter paradise that can get as much as five hundred inches of snow in a season. At Shiki, the chawanmushi was served hot with udon noodles, seafood, and a gingko nut set inside the custard. Since it’s pretty hard to regulate the cooking of the seafood inside the custard, we like to cook the custard first and then garnish it extravagantly. —Andrew
SERVES 4
4 large sea urchins
1 large egg
1¾ cups plus 2 tablespoons Dashi (this page)
Kosher salt
4 scallions, trimmed, white and light green parts only
1 cup Confit Mushrooms made with black trumpet mushrooms, plus a little Confit Mushroom Oil (this page)
To clean the sea urchins, with one hand in a work glove or in a thick kitchen towel and working over a small baking sheet, hold the sea urchin with its circular mouth (known as Aristotle’s lantern) facing up. In your other hand, use a pair of kitchen scissors (preferably Joyce Chen’s) to make a cut from the urchin’s mouth toward the widest part of the urchin, then cut around the perimeter of the shell, as though you were removing the top of a pumpkin to make a jack-o’-lantern. Cut open all of your sea urchins this way and line them up on the baking sheet before you remove the tongues.
Gently free each urchin tongue—the five vibrant orange parts affixed to the outer shell—from the shell by slowly working the tip of a very small spoon between the shell and tongue. Place each tongue on a plate or board. Once all five tongues are free from the first shell, flip the urchin over a bowl to let all the water and other bits drain into it. Repeat the process with the remaining urchins.
Fill three shallow containers with ice water. Place the urchin tongues into one container of ice water and jostle briefly to release grit and impurities. Very gently transfer the tongues from that ice bath to a second ice bath, doing your best to allow anything that isn’t a tongue to fall away between your fingertips. Then transfer again to the third bath, at which point the urchin tongues should be clean and free of impurities.
Arrange the tongues on a dry towel. Some tongues will be plump, orange, and gorgeous. Others will be less so. Reserve the ten or so most beautiful tongues for garnish on ice in a small plastic container, and set the others aside in a bowl for making the custard.
To make the custard, set up a pot with a steamer insert or a bamboo steamer large enough to hold four small bowls or ramekins over a wok. In a blender, puree the egg and the ugly urchin tongues until smooth. Add the dashi and continue to blend until perfectly smooth. Pass the mixture through a fine-mesh strainer into a bowl and season with salt to taste. Divide the custard base among four small bowls or ramekins. Wrap the bowls or ramekins tightly in plastic wrap, and steam them for 10 minutes, after which the custard should be fully set, but plenty jiggly.
To cook the scallions, toss the scallions in a little mushroom oil and grill (or broil) on one side for 1 to 2 minutes, until they are lightly charred. Allow to cool and thinly slice on the bias.
To assemble the dish, arrange the mushrooms, urchin tongues, and scallions evenly across the surface of the four small bowls or ramekins of warm chawanmushi (feel free to reheat the custards by steaming again before serving), then spoon a little of the black trumpet oil over the top. Serve within 30 minutes.
RAZOR CLAM
Parsley, Lardo, Grilled Bread Crumbs
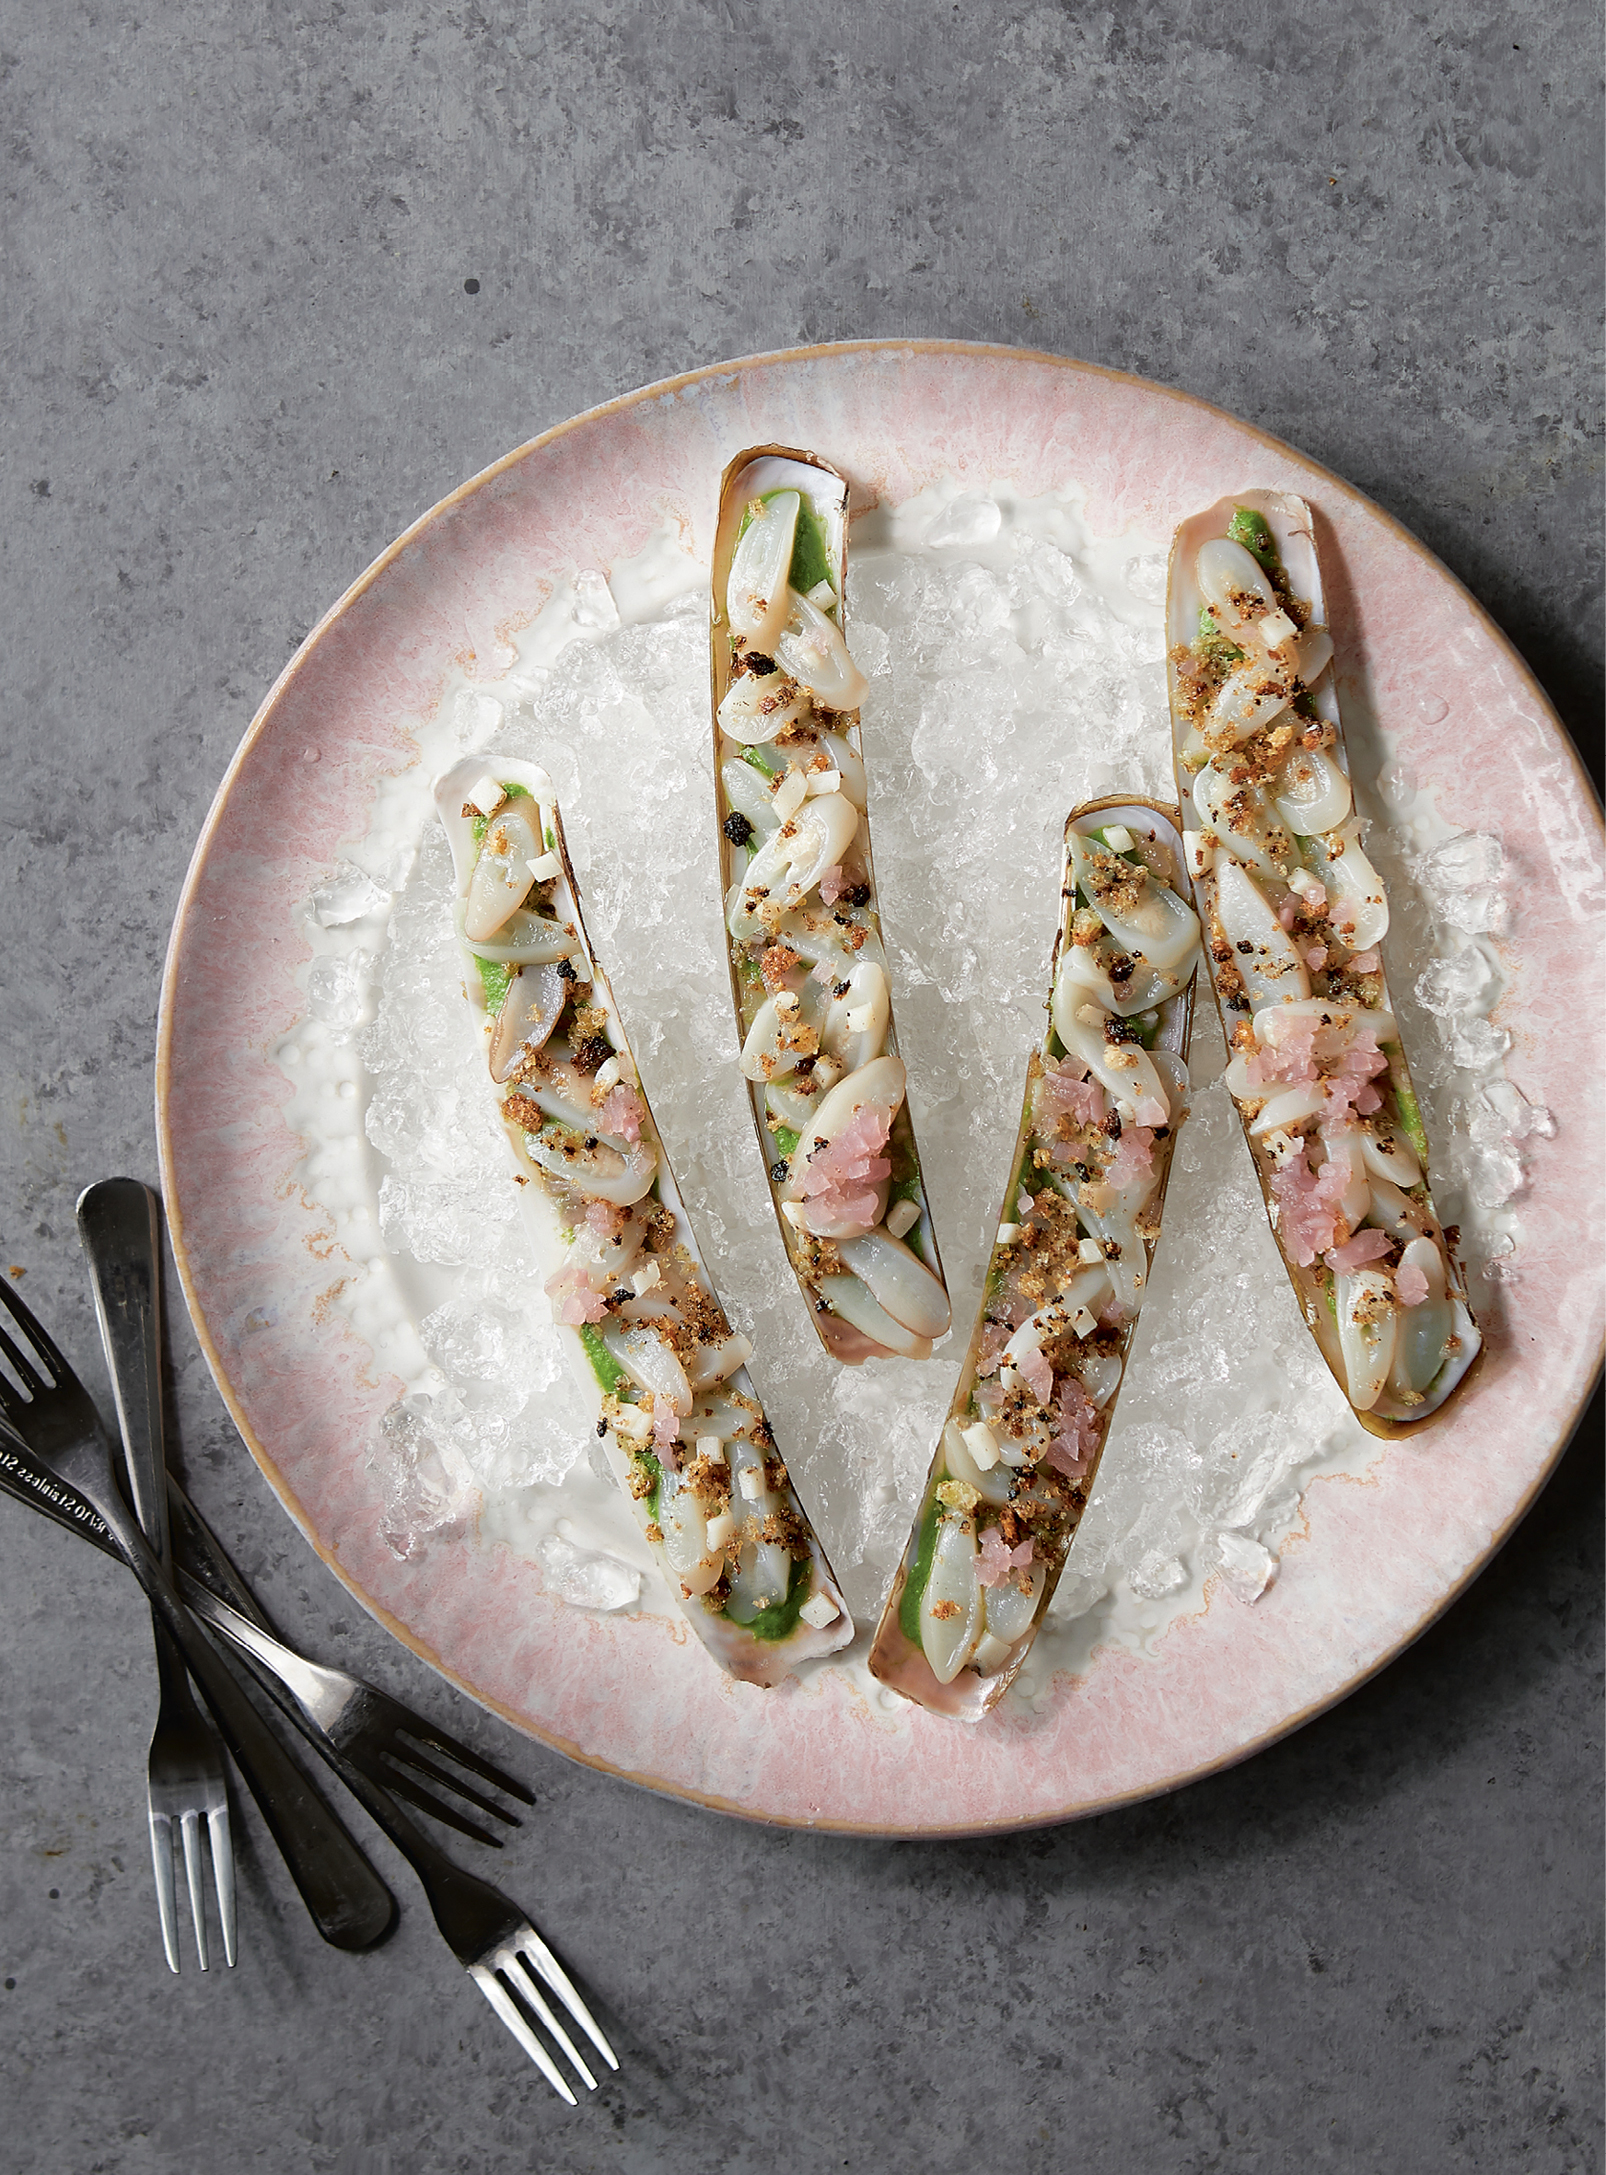
Pork and clams are a favorite of mine, and I come back to the pairing so often that our cooks make fun of me for it. It may be a cliché, but that doesn’t make it un-delicious. To defy the expectation a bit, we use lardo as the pork element in this dish, which adds nice, subtle richness without weighing things down or taking away from the flavor of the razor clams. Some people find them too full-flavored, in the clammy sense, but the bracing greenness of the parsley and the richness of the lardo provide balance in this preparation. Razor clams can often be found fresh at a good fish counter (or you can ask your fishmonger whether they can be special ordered), and many people make a hobby of digging them like regular clams. Preparing them is a fickle task. If you cook them for much more than a minute by any means, they can become tough, so serving them raw, with balancing accompaniments, is a good play. A note on the parsley purée: If your quantity of blanching water is insufficient in volume or temperature, the pot will lose the boil upon adding the parsley. Not only do you tempt the technical wrath of chef Thomas Keller in so doing, but you also risk a parsley sauce that is not vibrant green in color, which will be unacceptable. —Mike
SERVES 4
12 razor clams
Crushed ice for garnish
3 tablespoons finely diced Lardo (this page)
½ cup Parsley Puree (recipe follows)
½ cup Grilled Bread Crumbs (recipe follows)
Finishing salt
Submerge the clams in clean, cold salted water for 30 minutes to encourage them to release their grit. Slip a sharp knife between the razor clam shell and its meat, following the shells all the way around to release the meat. For this recipe, you’re looking to use just the foot, which looks like a little piece of white asparagus, and can be separated from the clam belly and strips with a flick of the knife. Place the feet on ice and discard the rest of the clam, which can be very sandy, or reserve for drying or making stock. Thoroughly wash four of the half shells for serving.
Set out the clam shells on a plate covered with a layer of crushed ice. With a sharp knife, slice the clam meat into small rings and season with salt. With a small spoon, drizzle a tablespoon of the parsley purée into each shell and scatter the clam slices over the purée. Sprinkle a light layer of the lardo and bread crumbs evenly over all the shells (it shouldn’t be blanketed, just lightly covered). Serve immediately.
PARSLEY PUREE
MAKES 1 TO 2 CUPS
2 bunches flat-leaf parsley, plus more for garnish
Canola oil
Kosher salt
Prepare a large bowl of ice water. Bring a large pot of heavily salted water to a rolling boil. Pick the leaves from the parsley bunches, discarding the larger stems, and add to the boiling water. After 10 seconds in the boiling water, use a spider or fine-mesh strainer to lift the parsley up from the boiling water and plunge into the ice water. Wring the blanched parsley dry and coarsely chop it.
In a blender, combine the chopped parsley with an ice cube and 2 tablespoons of canola oil and process into a smooth puree, starting at low speed and turning up to high as the parsley is incorporated. This will require a little finesse and practice. Ensure that you have enough ice and oil that the parsley will catch the blade as you turn it up slowly from low to high speed. Otherwise, your blade will just spin and things won’t come together. The resulting puree should be thick like paint. Season with salt to taste, and strain the puree through a fine-mesh strainer into a bowl.
The leftover puree can be stored, covered, in the freezer for a month and/or used to garnish other dishes like grilled fish, raw shellfish, or soup.
GRILLED BREAD CRUMBS
MAKES 1 TO 2 CUPS
6 slices high-quality sourdough bread
Extra-virgin olive oil
Kosher salt
Preheat the oven to 350°F. Brush the slices of bread with olive oil and grill or broil them until they take on a bit of char. Transfer the bread to a sheet pan and place in the oven, baking until the slices are completely dried out and no longer pliable, about 15 minutes.
Line a baking sheet with paper towels. In a food processor, pulse the grilled bread to achieve a very fine crumb and season with salt. Spread the crumbs out on the paper towel–lined baking sheet and bake for a few minutes to draw the excess oil from the crumbs.
Use immediately or store in an airtight container for up to 3 days at room temperature or in the freezer for 2 months and use for coating ingredients to be fried, adding body to meatloaf, or adding crunchiness to salads and other vegetable dishes.
GRILLED SQUID SALAD
Citrus, Castelvetrano Olive, Kalamata Olive, Confit Potato
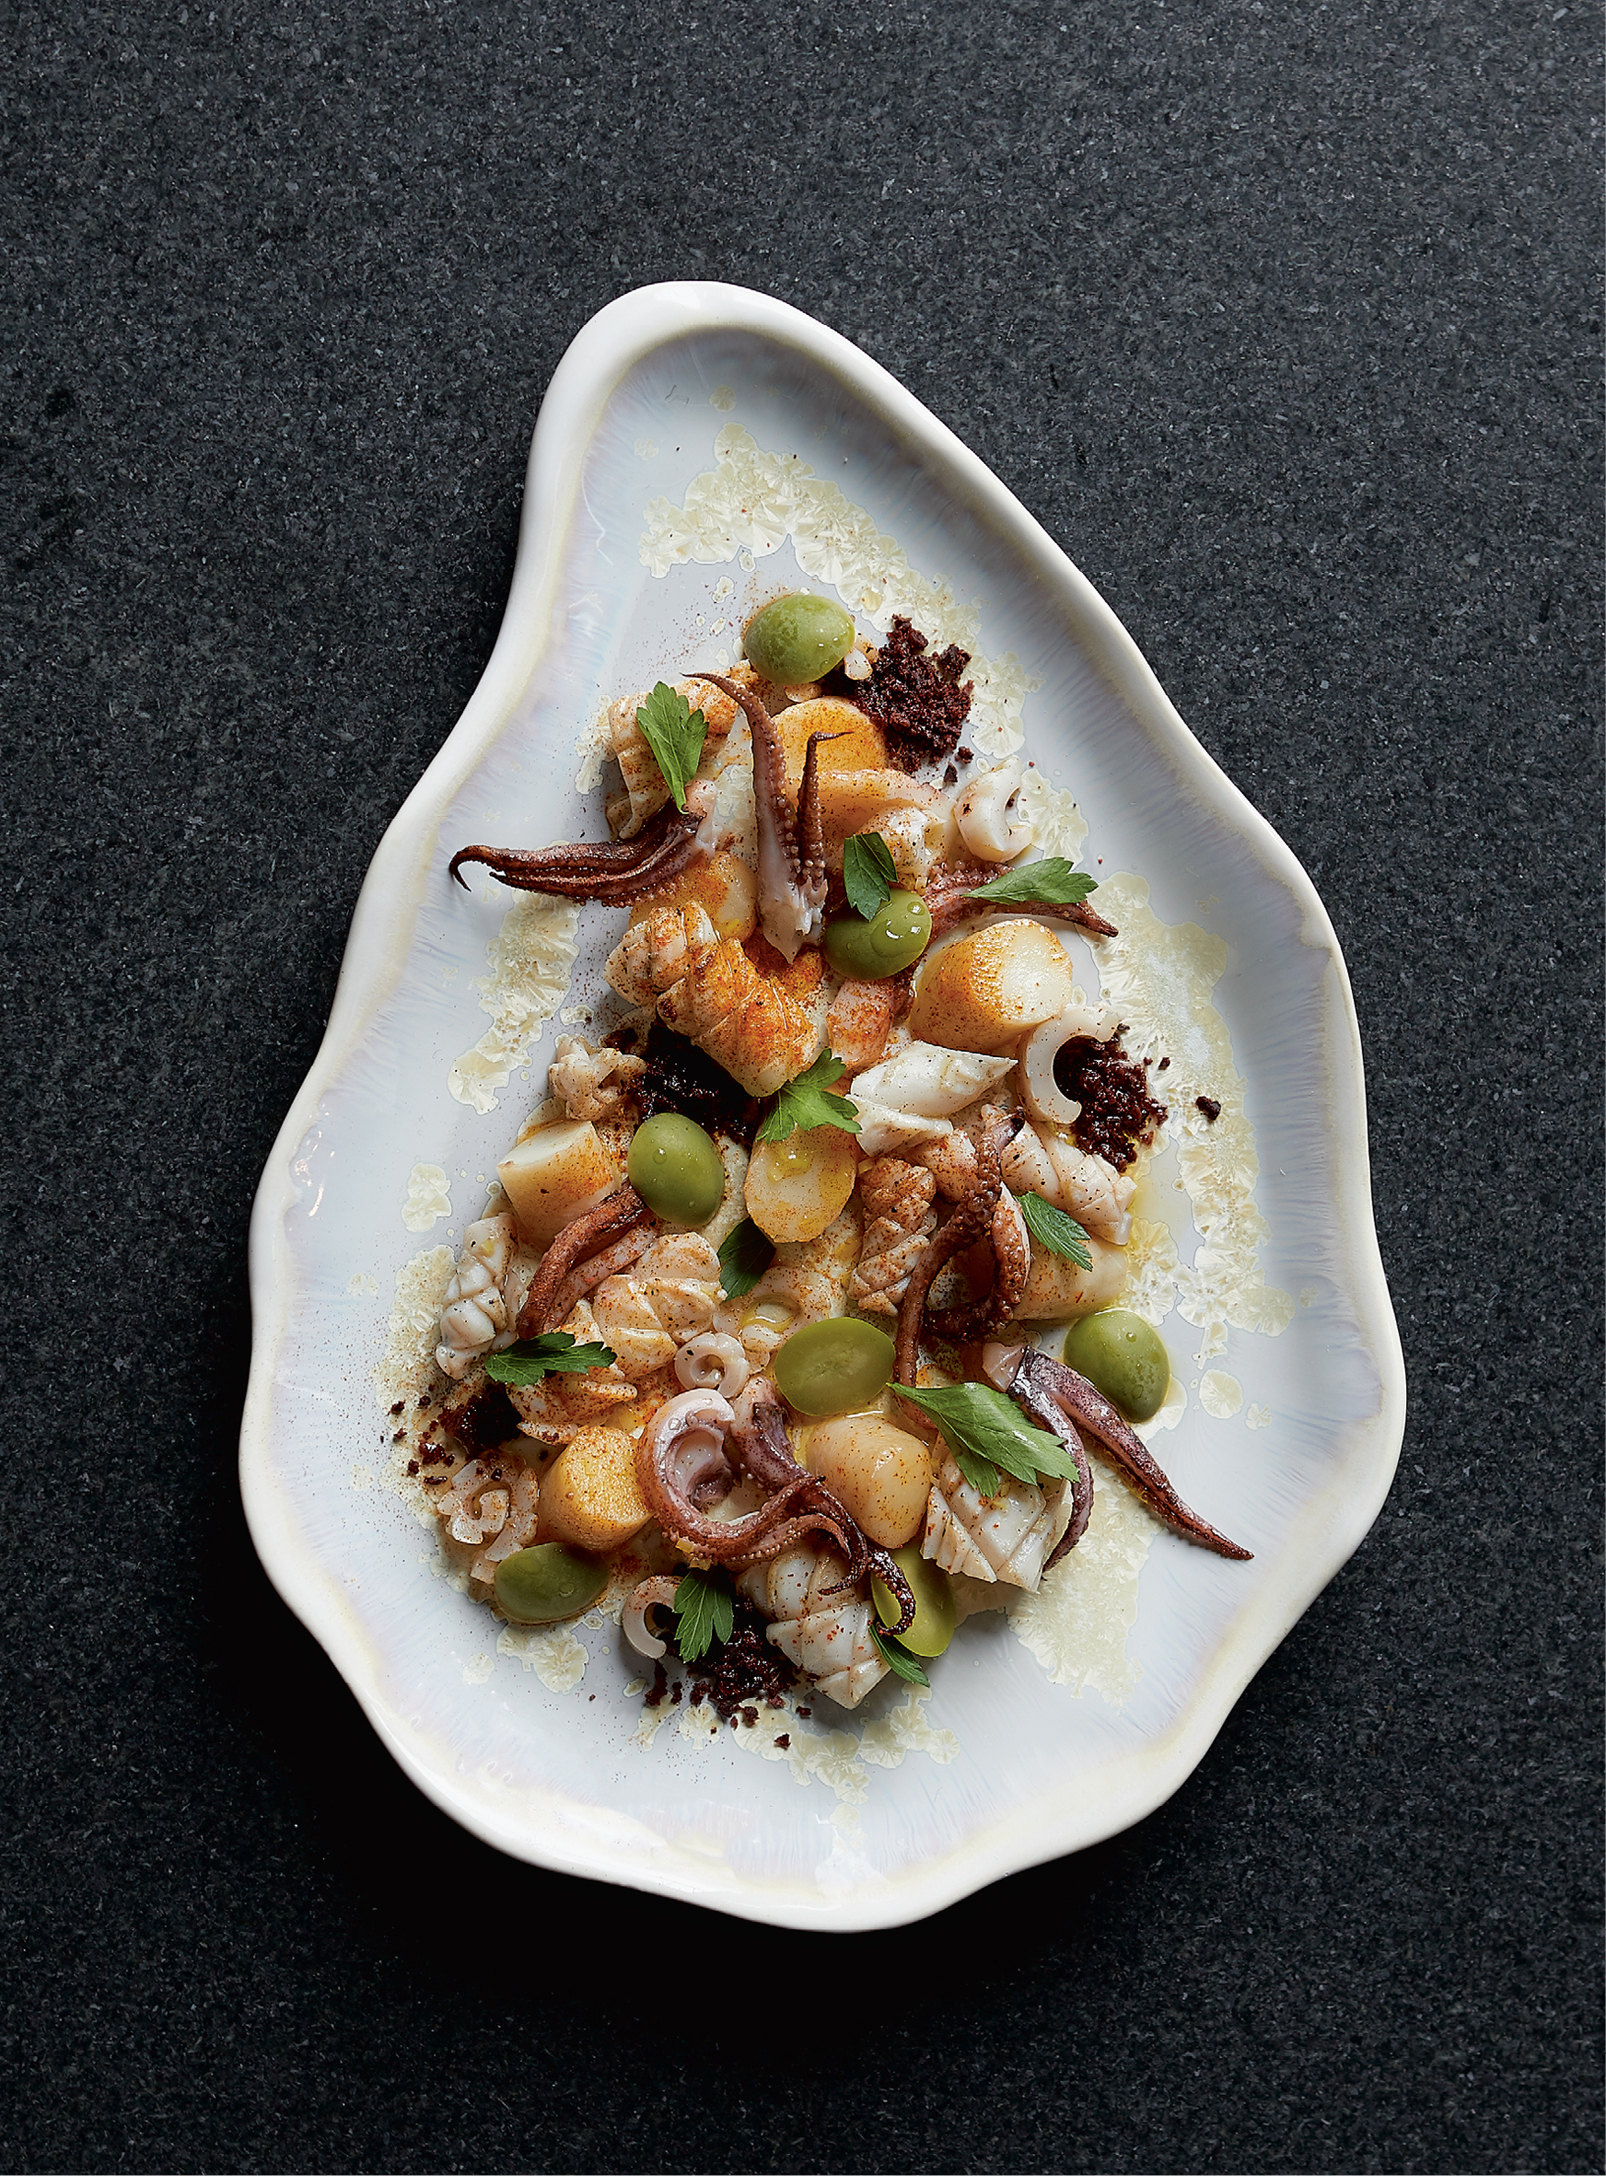
There’ve been many versions of this Spanish-inflected squid dish on our menu over the years, but they always include confit potato, olive crumb, and citrus. We just really love the texture of a perfectly cooked confit potato (it should be fudgy) alongside barely cooked, still-snappy squid, Your local fishmonger will be able to set you up with freshly caught, cleaned squid—especially in the summertime. If you must, you can use flash-frozen squid for this recipe; both squid and octopus suffer far less from freezing than fin fish do. —Mike
SERVES 4
2 pounds squid, cleaned, with about 6 bodies and 6 tentacle bunches
Canola oil
Finishing salt
8 Confit Potato cylinders (this page) made from russet potatoes, cut in half on the diagonal, at room temperature
½ cup Citrus Vinaigrette (recipe follows)
12 Castelvetrano olives, pitted and sliced
Kalamata Olive Crumb (recipe follows)
Flat-leaf parsley leaves for garnish
Butterfly the squid tubes by cutting from top to bottom on one side. With the pieces now lying flat, score each lightly in a crosshatch pattern. Toss the tubes and tentacles in canola oil to lightly coat. Separate the tentacles into clusters of three or four each, and leave the squid body whole.
Light a hot charcoal fire or get your gas grill ripping hot and give the squid tentacles a hard sear on each side for 2 to 3 minutes until they are browned. Grill the butterflied and scored squid bodies for 2 to 3 minutes until they’ve taken on some color and curled up nicely. Cut the bodies into bite-size pieces. Season everything lightly with salt.
To assemble the dish, lay three to five of the potato pieces on each of four plates. In a bowl, toss the grilled squid pieces in the vinaigrette and distribute them evenly across the four plates. Garnish with a few spoonfuls of the sliced olives, the olive crumb, and parsley leaves. Serve immediately.
MAKES 1 CUP
4 cups Kalamata olives, pitted and drained
In a food dehydrator or a 350°F oven that has just been turned off, dry the pitted Kalamata olives overnight or until they are completely brittle. Chop the dried olives with a sharp knife until you’ve achieved a fine crumb.
Store the leftovers in a jar with a lid at room temperature for 1 week and use as a garnish for salads, bagels and cream cheese, or other crudos.
MAKES 1⅓ CUPS
¾ cup extra-virgin olive oil
3 tablespoons fresh lemon juice
2 tablespoons fresh orange juice
¼ cup sherry vinegar
Kosher salt
Thoroughly whisk together the olive oil, citrus juices, and vinegar in a bowl to combine. Add salt to taste. Use immediately and store extra in a tightly sealed jar in the refrigerator for up to a month. This vinaigrette can be used as a dressing for salads or other vegetable dishes.
CURED SALMON
Scallion Tofu, Furikake, Yuzu Kosho
This dish combines a traditional Japanese method with a decidedly Western approach to quick-curing fish. Curing fish with kombu helps to impart a savoriness that plays especially well with fully flavored fish, like salmon. You won’t need much yuzu kosho—a spicy Japanese condiment of fresh chiles, salt, and yuzu zest—to garnish this dish, but you won’t regret buying it. It is one of the greatest condiments on earth. We use both red and green yuzu kosho; the green is grassier and the red has more of a chile-forward flavor, but both are delicious. —Mike
SERVES 4
SALMON CURE
2½ cups kosher salt, plus more for seasoning
1 cup sugar
Juice and finely grated zest of 2 lemons
Finely grated zest of 2 limes
Finely grated zest of 1 grapefruit
1 large piece kombu (see Glossary)
10-ounce salmon fillet, skin removed
Finishing salt
Green yuzu kosho (see Glossary) for garnish
½ cup Scallion Tofu Puree (recipe follows) for garnish
½ cup Furikake (recipe follows) for garnish
Micro mustard greens (see Glossary) for garnish
Finely grated zest of 1 lemon for garnish
To make the salmon cure, in a large bowl, combine the kosher salt, sugar, and citrus zests and massage aggressively with your fingers for several minutes in order to release the essential oils of the citrus.
Rinse the piece of kombu and lay it on a sheet pan. Place the salmon fillet on top of the kombu and cover it with a thick layer of the cure, patting the cure down a little bit to make sure it encases the fillet. Let cure for 15 minutes at room temperature. Dig the fillet out of the cure and rinse it under cold water, then pat it dry. Slice the fish crosswise into ¼-inch pieces and season with a sprinkle of lemon juice (you will not need it all) and finishing salt.
Load the yuzu kosho in a piping bag, squeeze bottle, or large ziplock plastic bag with a corner cut off. Lay the seasoned fish attractively on a large platter or four plates, then dot all over the plate and the fish with the Scallion Tofu Puree and the yuzu kosho. Finish with sprinkles of Furikake, micro mustard greens, and lemon zest. Serve within 30 minutes.
SCALLION TOFU PUREE
MAKES 3 TO 4 CUPS
2 tablespoons canola oil
4 bunches scallions, trimmed, white parts separated from green parts
1 large shallot, thinly sliced
2 cloves garlic, chopped
1 small waxy white potato, peeled and diced
⅔ block (9 ounces) firm tofu, diced
Kosher salt
In a large sauté pan over medium heat, heat the oil and add the scallion whites, shallot, garlic, and potato. Cook for 20 minutes, stirring often, until the vegetables have all but turned to mush.
Set up a bowl of ice water. Bring a small pot of salted water to a boil, add the scallion greens, and blanch for 10 to 15 seconds, until they have just started to go limp but retain their bright green color. Transfer them to the bowl of ice water. Squeeze them dry and set aside.
In a blender, puree the sauteed vegetables until smooth. Add the tofu and puree again until smooth. With the motor running, add the scallion greens (the puree should turn bright green) and salt to taste. Drain the puree through a fine-mesh strainer into a bowl, cover, and move it to the refrigerator to cool down a bit and maintain its vibrant color.
Once it has cooled, adjust the seasoning with more salt, if needed. To use, load the puree in a piping bag, squeeze bottle, or large ziplock plastic bag with a corner cut off. Store any extra in an airtight container in the refrigerator for up to 1 week, using it as a dip or dressing for vegetables or drizzling on rice or noodle dishes.
FURIKAKE
MAKES ABOUT 1 CUP
10 sheets nori
¼ cup Fried Aromatics (this page) made with shallots
2 tablespoons Fried Aromatics (this page) made with garlic
2 tablespoon mixed black and white sesame seeds
Finishing salt
Holding a sheet of nori with tongs, wave it over a gas burner flame a few times until it becomes lighter green and fragrant, about 1 minute. (Or heat a large skillet on high heat and toast the nori on both sides for 30 seconds.) Repeat with the remaining sheets.
Cut the nori sheets into small pieces and process in a food processor until reduced to consistent, small flakes.
In a small mixing bowl, combine the nori flakes with the fried shallots, fried garlic, and sesame seeds. Work the mixture with your fingertips for a minute or two to break down the shallots and garlic and bring the furikake together. Season with salt to taste. Store in an airtight container at room temperature for 1 week. The extra is great for sprinkling on rice or noodle dishes.
BLACK BASS CEVICHE
Pique de Piña, Cilantro, Lime, Masa
This dish was created by one of our old chefs, and it has been on the menu for years, which is quite an achievement for a restaurant where the crudo menu changes constantly. The pique de piña, which is a spicy, pineapple-flavored vinegar popular in Puerto Rico, is a really cool move that we encourage you to try out. It’s best used like a hot sauce, but it’s also a fun addition to dressings or marinades. —Mike
SERVES 4
10 ounces black bass fillets, skin removed
¼ cup Pique de piña (recipe follows)
Fat pinch of kosher salt
Juice of 1 lime
1 cup finely chopped fresh cilantro
½ cup Pickled Red Onion (this page)
1 jalapeño, seeded and finely minced
Masa Crisps (recipe follows)
Dice the black bass fillets into ¼-inch pieces and transfer to a stainless steel work bowl. Dress the bass with the pique de piña and salt. Toss the fish and allow to cure for a minute before transferring equal amounts to four bowls. Drizzle lime juice over the fish and scatter the chopped cilantro, pickled red onion, minced jalapeño, and masa crisps over the top. Serve within 30 minutes.
PIQUE DE PIÑA
MAKES 4 TO 5 CUPS
1 ripe pineapple, peeled, cored, and chopped
4 garlic cloves, crushed
1 jalapeño, quartered
3 to 4 teaspoons sugar
2 cups pineapple juice
2 cups water
Mix the pineapple with the garlic, jalapeño, sugar, pineapple juice, and water in a large jar or nonreactive bowl. Cover with a cheesecloth or towel and allow to ferment at room temperature until nearly fizzy and well soured, usually about 5 days (if it’s warmer, perhaps less; colder, perhaps more).
In a blender, puree the mixture, then strain it through a fine-mesh strainer into a pot. Bring the mixture up to 160°F and hold it there for 10 minutes to pasteurize.
Chill thoroughly and use or store in an airtight container in the refrigerator for up to 1 month. The extra can be used in splashes to add sweet and sour spiciness to almost anything under the sun.
MASA CRISPS
MAKES 2 TO 3 CUPS
Canola oil for frying
1 cup masa harina (see Glossary)
½ cup water, or more as needed
Kosher salt
Fill a large pot with 3 inches of the canola oil and heat on high to 350°F (or bring a deep-fryer to 350°F). Line a plate with paper towels.
In a bowl, stir together the masa harina and water to achieve a wet, shaggy dough (masa absorbs water eagerly, so you may need to add more water). Slowly and carefully press the masa harina dough through a ricer or mesh strainer onto a plate or into a bowl, then carefully pour the masa bits into the oil. Fry the masa crisps until golden brown, 2 to 3 minutes, and then use a heatproof slotted spoon or mesh strainer to transfer them to the paper towel–lined plate. Season with salt to taste. Use immediately.
Leftovers can be stored in an airtight container at room temperature for 1 week and used to add a crunchy component to salads or vegetable dishes.
MUSSELS EN ESCABECHE
Grilled Bread, Chorizo, Chive
As much as we love a good bowl of steamed mussels, we just never saw the classic white-wine-and-garlic preparation being a part of our menu. However, there is a fantastic mussel farm, Bangs Island Mussels, a couple of miles from our restaurant, so we almost always have a unique preparation of them on the menu. This one, which is inspired by the incredible tinned mussels I tried on a trip to Barcelona, was on our opening menu at Eventide and remains a favorite. En escabeche refers to the Mediterranean and Latin American tradition of cooking fish or meat and then placing it in an acidic mixture, sometimes flavored with smoked paprika or another piquant spice. —Andrew
SERVES 4
3 pounds mussels in shells
½ yellow onion, peeled, charred under a broiler, and coarsely chopped
½ bulb fennel with stalk, core removed and coarsely chopped
3 garlic cloves, crushed
Zest of 1 orange
4 ounces dry-cured Spanish chorizo, peeled and diced in ¼-inch pieces (scraps reserved)
1 cup dry sherry
Pinch of xanthan gum (see Glossary)
¼ cup sherry vinegar, plus more as needed
1 cup Paprika Oil (this page)
Kosher salt
Good crusty bread for serving
Pitted and chopped Castelvetrano olives for garnish
Minced fresh chives for garnish
Place a large, heavy pot over high heat. When it is very hot, carefully add the mussels, onion, fennel, garlic, orange zest, chorizo scraps, and sherry. Cover the pot and give it a shake. After 5 minutes, uncover the pot and remove any mussels that have opened, placing them in a large bowl. Continue to cook the mussels until all have opened (any mussels that remain closed after 10 minutes should be discarded).
Strain the cooking liquid through a fine-mesh strainer into a smaller pot and bring to a simmer, stirring occasionally over medium-high heat for 3 to 5 minutes, until the liquid reduces to about ¾ cup. While the cooking liquid is reducing, pick all the mussels from their shells and remove their little wispy beards, if necessary. Place the mussels in a heatproof bowl.
In a blender, combine the mussel reduction with the xanthan gum and ¼ cup sherry vinegar. Turn on the machine to puree, then slowly stream in the paprika oil until you have a loose, saucy consistency (it will tighten up as it cools). Season to taste with additional sherry vinegar and salt. Pour the liquid over the mussels and let cool to room temperature.
To assemble the dish, grill or toast the crusty bread. Put the mussels in a large serving bowl or four separate bowls, spooning extra sauce over the top, then garnish with the chorizo scraps, chopped olives, and minced chives. Serve within 30 minutes, with the bread alongside to sop up the escabeche liquid.
BONITO TATAKI
Chicharrones, Chile, Tomatillos

Bonito is a fickle little fish that rarely makes an appearance up here in New England. But when it does, usually in the fall, and you can get it really fresh, it is an absolute treat. Since it is a rich and oily fish, we love the tataki preparation, which is about cooking aggressively and quickly on one side to deepen the flavor, but leaving the majority of the fish raw. We then pair the bonito with assertive flavors like peppers or other nightshades that are around in the fall. —Andrew
SERVES 4
Canola oil
10 ounces bonito fillets
Chile Puree (recipe follows) for serving
Fresh lime juice
Finishing salt
Tomatillo Jam (recipe follows) for serving
7 ounces Puffed Pork Skin (this page) or store-bought pork rinds (chicharrones)
3 sprigs cilantro, leaves picked
Prepare a bowl of ice water large enough to hold the bonito. Preheat a charcoal grill or set a gas grill or grill pan or broiler to high heat.
Brush oil over the more darkly colored bloodline side of the bonito. Sear the bloodline side of the fish until it is deeply brown, 1 to 2 minutes. Remove it from the heat and carefully dip it in the ice bath to arrest the cooking. Place on a cutting board and pat dry. Chill completely.
Make a couple of artful streaks of chile puree across the center of a serving plate. Cut the bonito against the grain into ¼- to ⅓-inch slices with the grilled side resting on the cutting board. Make your knife strokes smooth and confident as you cut through the cooked fish; any hesitancy will result in raggedy cuts. Arrange the slices along the length of a plate, grilled-side up. Season the bonito with a squeeze of lime juice and salt. With a spoon, drop a few teaspoons of tomatillo jam around the fish. Garnish with pork rinds and cilantro leaves and serve within 30 minutes.
CHILE PUREE
MAKES ABOUT 1 CUP
10 dried ancho chiles
Water
Kosher salt
Sugar
Apple cider vinegar
With gloved hands, remove the stems, seeds, and ribs from the chiles. In a dry, hot pan, toast the chiles for 1 minute until they darken in color and become fragrant. Transfer the roasted chiles to a heatproof container and pour boiling water over them just to cover. Cover the container and let it sit for 30 minutes. Drain the chiles, reserving the soaking water. Put the chiles in a blender with a splash of the soaking water. Turn the blender on and drizzle in more soaking liquid, until the puree catches the blade and the mixture achieves a vortex. Blend on high for several minutes. Strain the mixture through a fine-mesh strainer into a bowl. Season with salt, sugar, and apple cider vinegar to taste. The excess can be stored in a sealed container in the refrigerator for 1 week or freezer for 3 months.
TOMATILLO JAM
MAKES 2¼ CUPS
5 tomatillos
2 cups pickling brine (see Pickles, this page)
2 tablespoons glucose (optional; see Glossary)
Pinch of sugar
Pinch of kosher salt
Remove the papery husk from the tomatillos. With a sharp knife, slice the rounded sides off of each tomatillo, leaving a cube to be finely diced into small, uniform squares. Save the scraps and place them in a small pot and add the pickling liquid just to cover. Simmer until the tomatillo scraps are completely broken down and tender, about 5 minutes. Transfer to a blender and puree until smooth. Add the glucose and blend again on high speed for a minute or two. The glucose helps bind the sauce and give it a sheen. Season to taste with a pinch of sugar and salt.
Fill a bowl with ice water. Bring a small pot of water to a boil and drop in the diced tomatillos, blanching them for 1 minute, until they just start to soften. They will turn to mush pretty quickly if you cook them too long, so be careful. Remove the tomatillos from the pot and dunk them in the ice water. Pat dry and fold the diced tomatillo into the tomatillo puree. Use immediately or store in a sealed container in the refrigerator for 1 month or the freezer for 3 months.
FLUKE CRUDO
Caramelized Crab, Sea Beans, Chile, Pickled Kombu

Fluke is a fixture on Eventide’s menu. It is abundant, locally available, and makes delightful crudos and tartares. Be sure to slice the fish very thinly, because it can be a little too toothsome if left in large slices. To the extent that you can, avoid serving fluke sliced from the tail end of the fillet as crudo; there’s a lot of connective tissue near the tail—it’s great for cooking though! Buy sea beans at specialty stores (or find them on Maine’s rocky coast). Be aware that sea beans can be woody and very bitter. If you can’t find them at their height of freshness—crisp and salty—then it’s better to leave them off of the dish. —Mike
SERVES 4
¼ pound sea beans
3 to 4 tablespoons Chile Crisp (recipe follows)
1 cup Caramelized Crab (this page)
10 ounces fluke fillet
Fresh lemon juice for garnish
Puffed Sushi Rice (this page) for garnish
Finishing salt
Pickled Kombu (this page) for garnish
Pull apart the sea beans into small, tender, bite-size pieces (they will come apart easily).
With a spoon, distribute the chile crisp and the caramelized crab across a large platter or four plates. Very thinly slice the fluke fillet and arrange in one layer over the chile crisp and crab. Season the fluke with a squeeze of lemon, a scattering of puffed sushi rice, and a sprinkling of salt. Scatter the pickled kombu and the sea beans over the fish for a briny, crunchy garnish. Serve immediately.
CHILE CRISP
MAKES 3 CUPS
10 to 15 dried chiles de árbol
10 to 15 dried Chinese red chiles
1 teaspoon freshly ground black pepper
1 tablespoon ground cumin
¼ cup ground Szechuan pepper
1 tablespoon dried mushroom powder
3 tablespoons ground Aleppo pepper
7 teaspoons Korean chile powder (gochujaru)
5¼ teaspoons kosher salt
1½ tablespoons sugar
2 black cardamom pods, split
3 star anise pods
3- to 4-inch piece of fresh ginger, peeled and thinly sliced
2⅓ cups Confit Mushroom Oil (this page) made with maitakes
10 to 12 large shallots, peeled and thinly sliced (about 2 cups)
20 garlic cloves, thinly sliced
With gloved hands, tear open the dried chiles and remove the stems and seeds. In a large dry skillet over medium heat, toast the chile pieces for 1 minute until they are fragrant. Transfer them to a bowl to cool. Grind them to a coarse powder in a spice grinder, then transfer them to a large heatproof bowl.
Wipe out the pan and, again over medium heat, toast the black pepper, cumin, and Szechuan pepper for 1 minute, until they are fragrant, and put them in a separate small bowl to cool.
Grind the toasted spices and the mushroom powder in a spice grinder and add them to the bowl with the ground chiles. Add the Aleppo pepper, Korean chile powder, salt, sugar, cardamom, star anise, and ginger and mix well.
Set up a fine-mesh strainer over a heatproof container. Line a baking sheet with paper towels. In a large heavy pot over medium heat, warm the maitake oil. Add the shallots and garlic and cook, stirring frequently to make sure that what is closer to the walls of the pot doesn’t cook faster than what’s in the middle. Let it cook for 3 to 5 minutes, until the shallots and garlic begin to turn golden (don’t let them get all the way to brown), then quickly and carefully pour the contents of the pot through the fine-mesh strainer, reserving the oil. Immediately shake the alliums in the strainer onto the paper towel-lined baking sheet in an even layer. Once cool, taste some. If they’re too dark, they will likely be too bitter and you’ll have to discard them, but if they are perfectly golden, they’ll be delicious. Well done! The crunchy shallots and garlic can be used immediately in the recipe or stored in an airtight container with a piece of paper towel folded in the bottom at room temperature for 3 days.
Pour the reserved maitake oil back into the pot and bring it to 375°F, then add it to the bowl with the dried spices and chiles, stirring to distribute everything. Allow to cool completely.
Discard the cardamom and star anise pods. Crush the shallots and garlic into small pieces (don’t pulverize) with gloved hands, then add them to the cooled, spiced oil. Put the chile crisp in a large jar or bowl and cover for 24 hours before using it. This concoction, a loose mixture of crispy solids and oil, will keep indefinitely in the refrigerator. It is good on virtually anything you want to add depth and spice to.
THE GREAT WESTERN NORTH ATLANTIC BLUEFIN TUNA
If the thick-shelled, briny oysters and the glorious North American lobster represent Maine’s two greatest gifts to us as oyster bar proprietors, then the bluefin tuna is a close third. From July to October, the western North Atlantic bluefin tuna’s northern migration lands it in the Gulf of Maine, sometimes within a mile of Portland. It is only during this time, and from this fishery in the Gulf of Maine, that we take advantage of this beautiful resource.
Bluefin tuna is, as it should be, a controversial product. Overwhelming demand skyrocketed in the 1980s and 1990s and pushed all stocks of bluefin tuna—including the western Atlantic stock—to the brink of endangerment. In the early 2000s, conservation groups led the effort to heavily restrict the bluefin catch and attempt to rebuild the fishery. While efforts to conserve the Pacific, eastern Atlantic, and Southern stocks have been challenging and are only just recently showing signs of rebuilding, the locations of the breeding grounds and limited migratory pattern of the western Atlantic stock have allowed a smaller international group of fisheries to coordinate a successful rebuilding of the biomass. As a result, catch limits have actually increased and minimum size requirements have shrunk in the past five years. We have worked with the Gulf of Maine Research Institute (GMRI) as Sustainable Seafood Culinary Partners to support their important role in the overall conservation effort.
Every bit of the effort is worth it for these spectacular animals, whose culinary gifts are abundant and diverse. Because bluefin season coincides with the busy season at all four of our restaurants, we can take a whole, 200- to 450-pound beauty and work through it in under seven days. Receiving whole fish allows us to control quality from the dock to the plate, as well as utilize the breadth of products like loin, chu-toro, toro, collars, tails, ribs, scrapings, spinal jelly, and bloodline. We like to think that a local bluefin tuna will be more fully utilized by us than just about anybody in the world.
The dishes in the following pages showcase some of that variety. The chu-toro and toro dishes require bluefin tuna specifically, and since we insist that you use only bluefin from the western North Atlantic, this might be challenging if you are not on the East Coast. However, the tuna crudo, tuna tartare, and broiled collar can be made with yellowfin, big-eye, or albacore tuna, all of which are rated as sustainable in most parts of the world.

Tuna Loin Breakdown
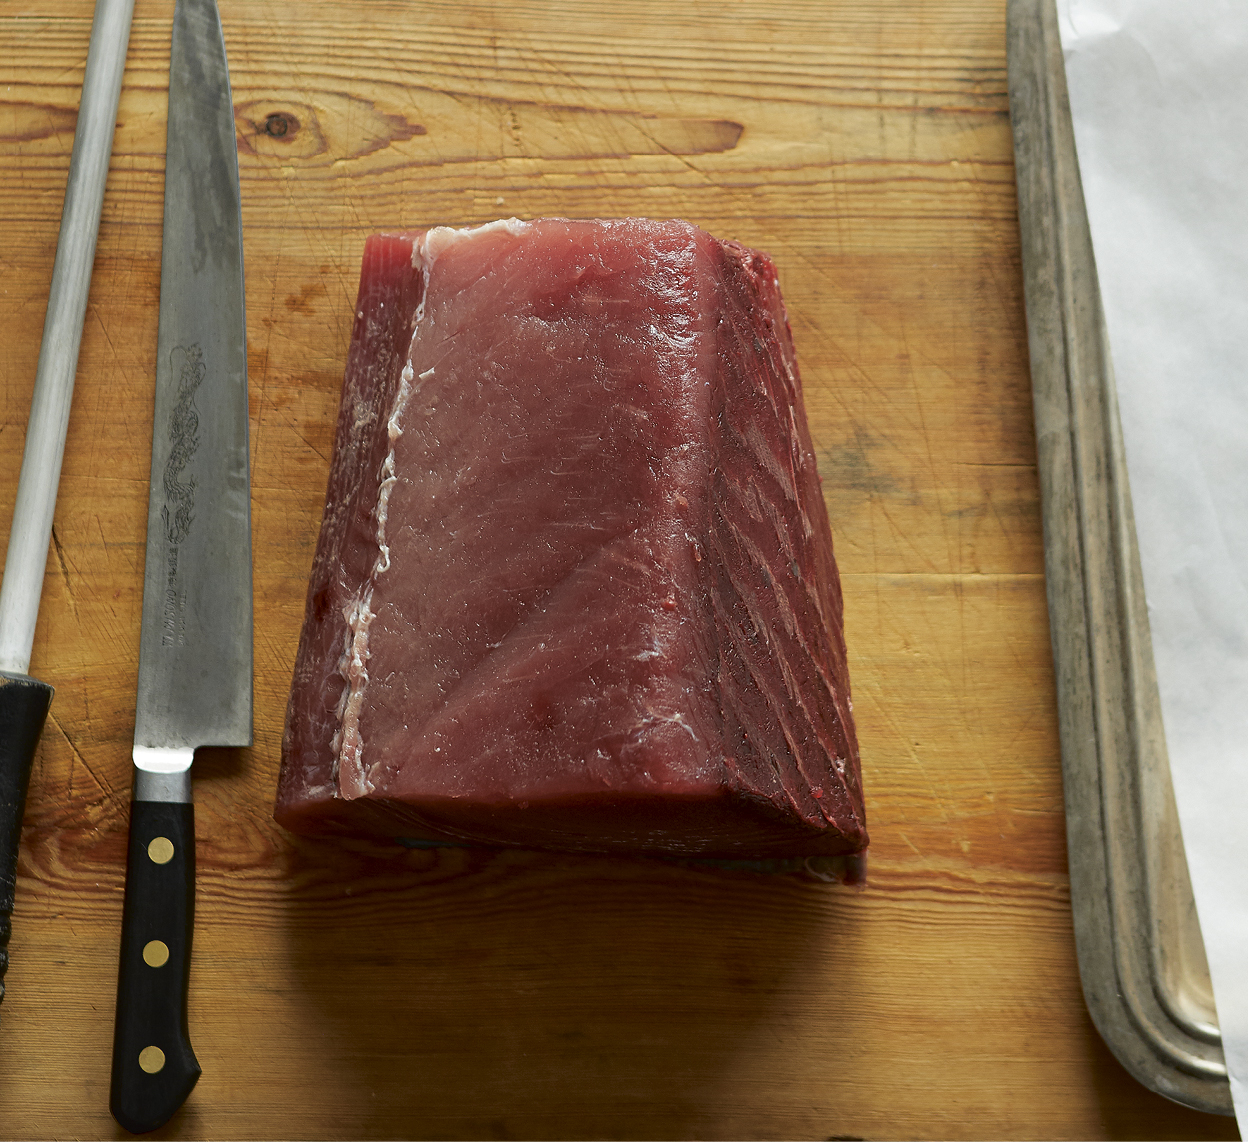
➊ Set up your work area with a long, thin slicing knife.

➋ If your loin of tuna has the skin intact, remove it by resting the loin skin-side down and running your knife between the fillet and the skin.
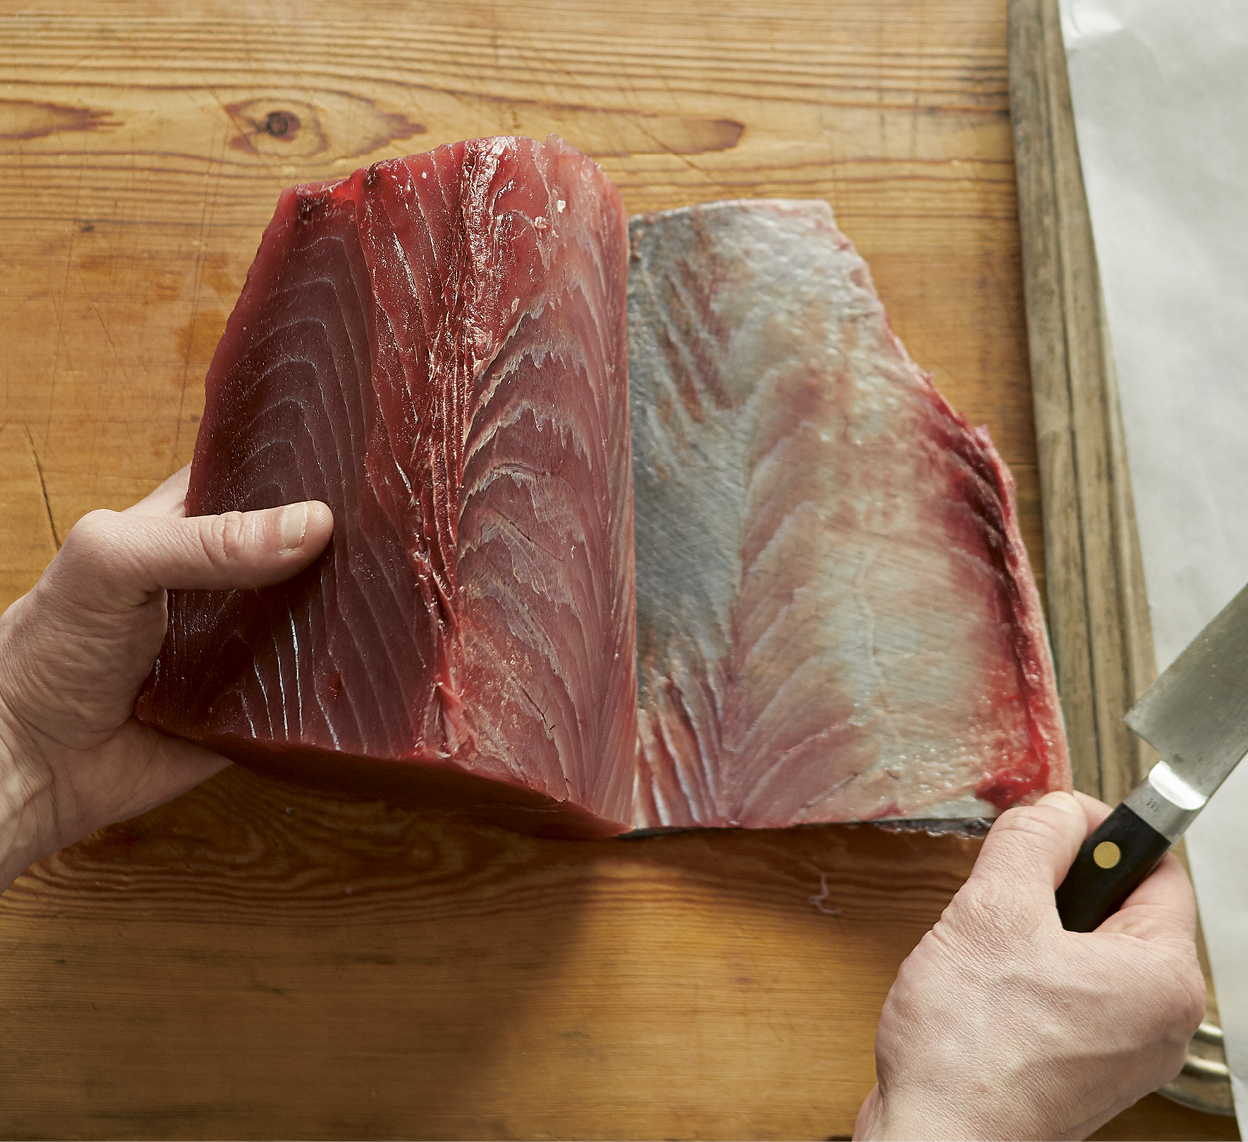
➌ Ease the skin away from the tuna loin and discard.
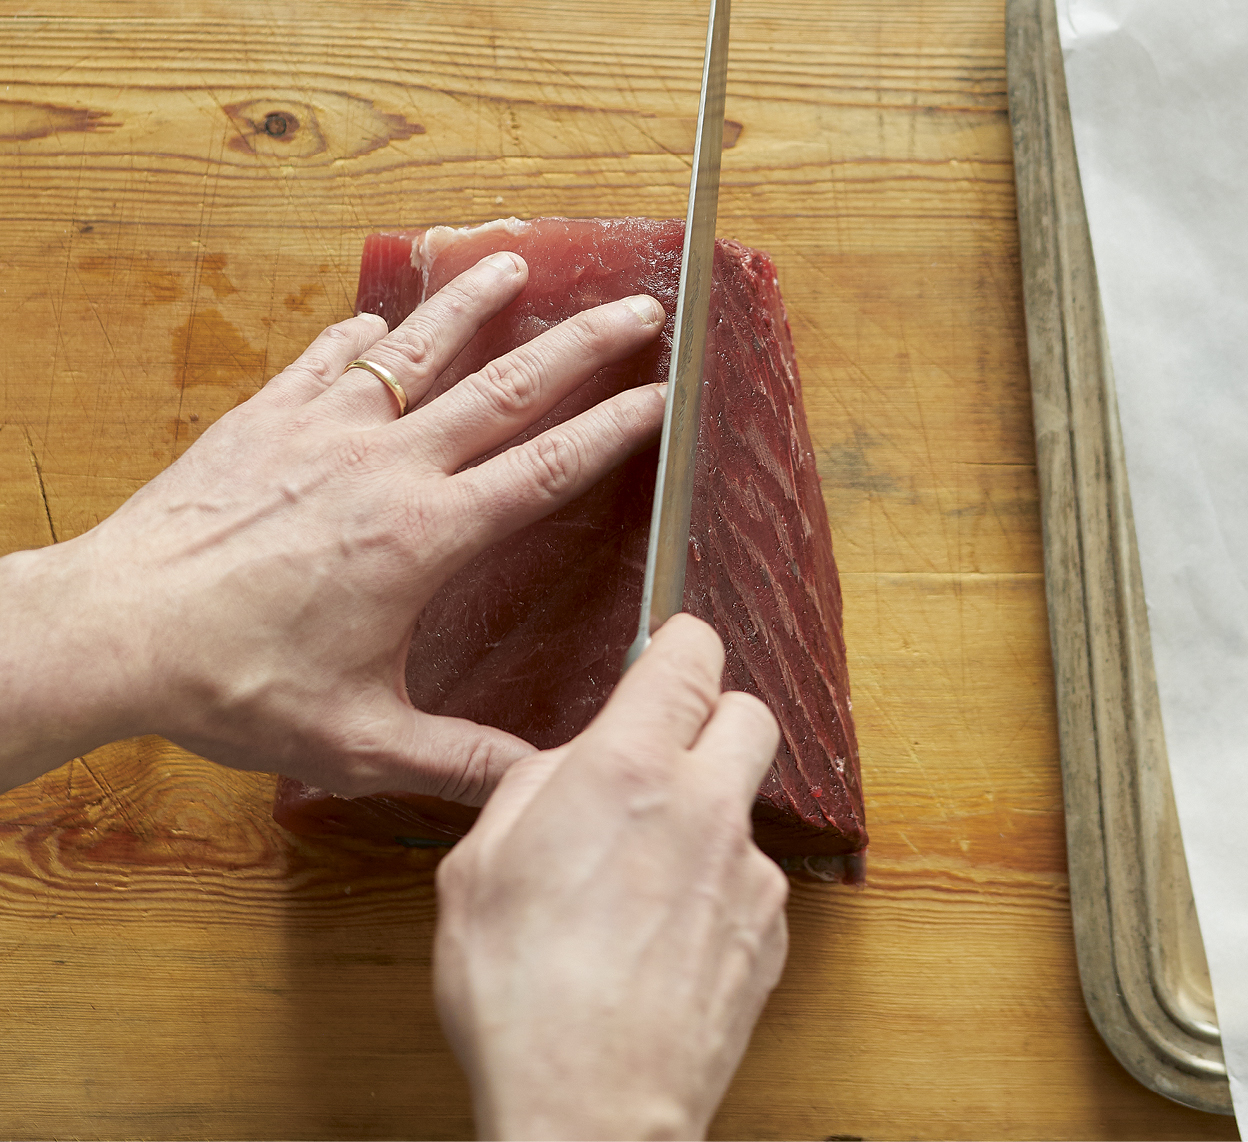
➍ Cut straight down the loin at 1-inch intervals to create several large rectangles.
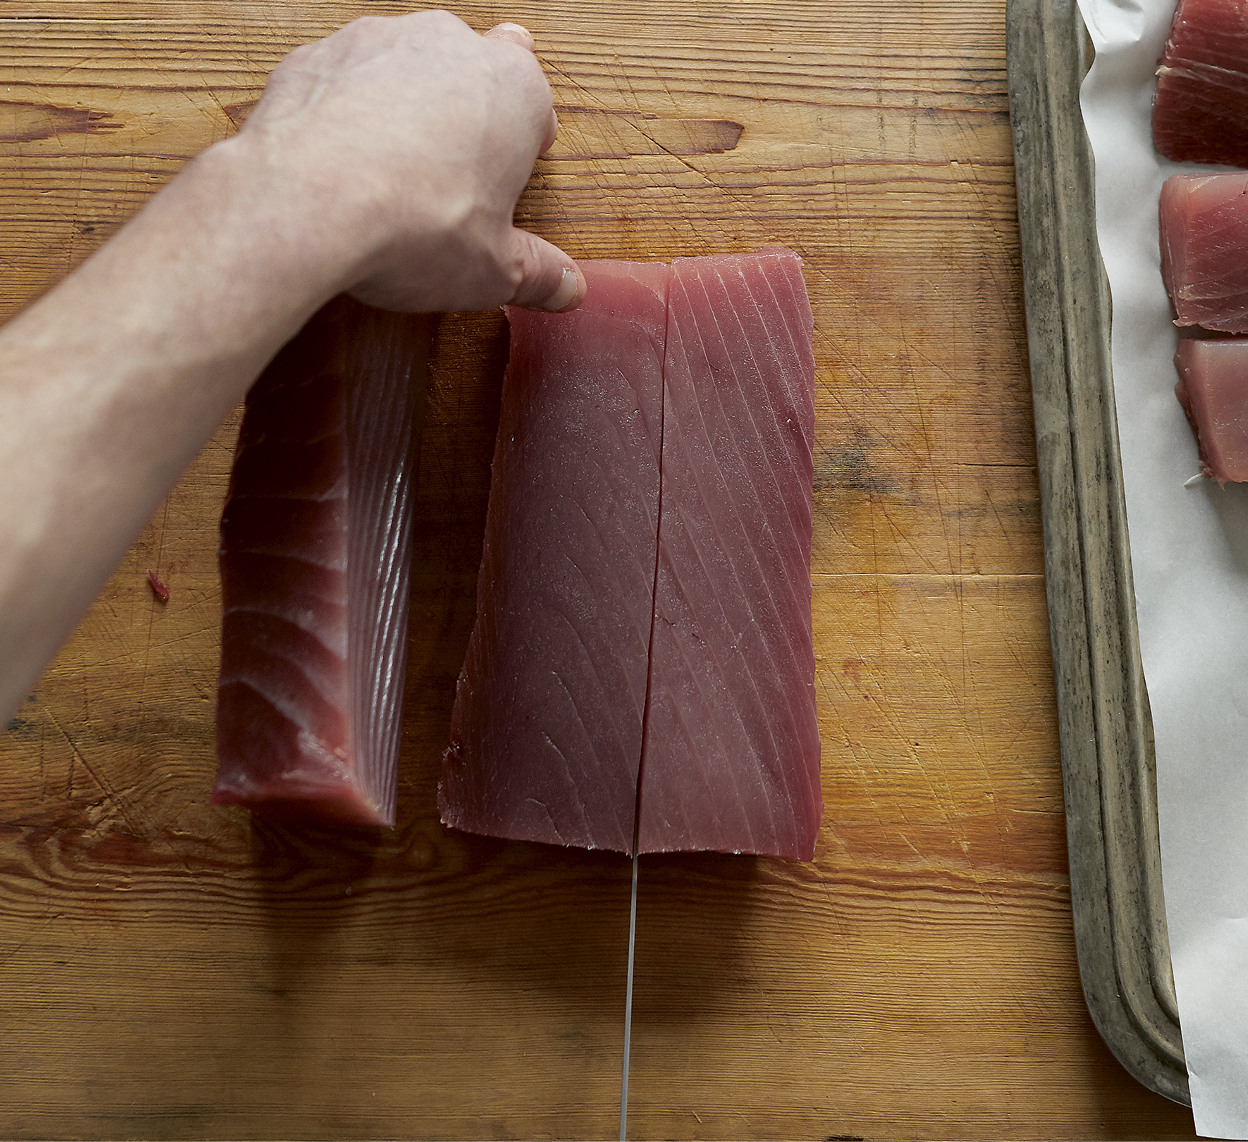
➎ Laying the large rectangles flat on your cutting board, cut in uniform ¾-inch intervals.
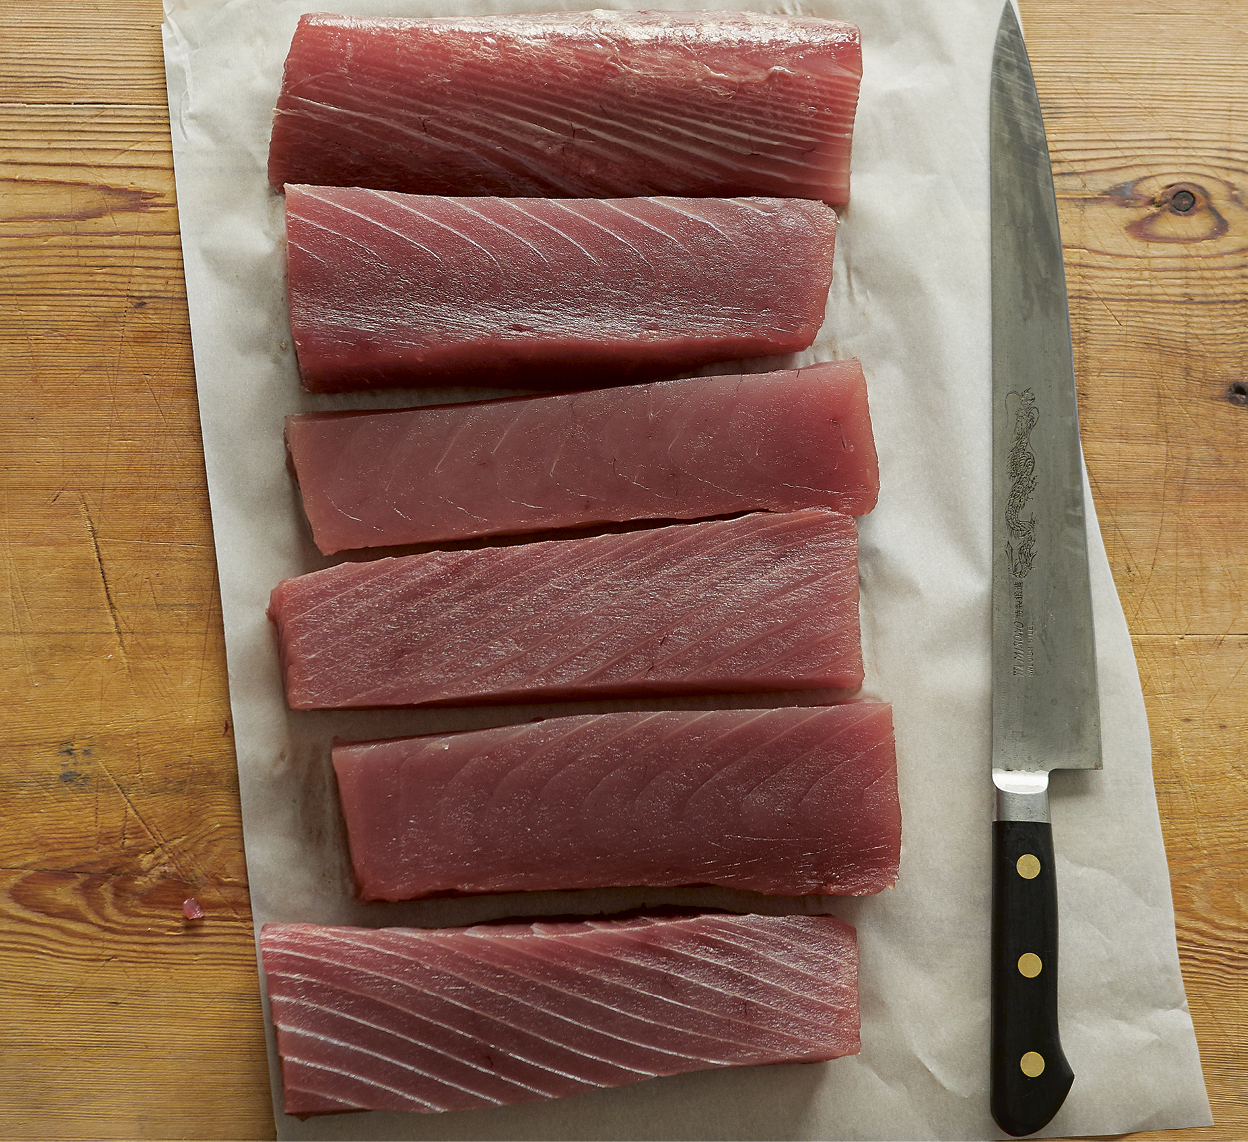
➏ You will have created what we call “blocks” at the restaurant.
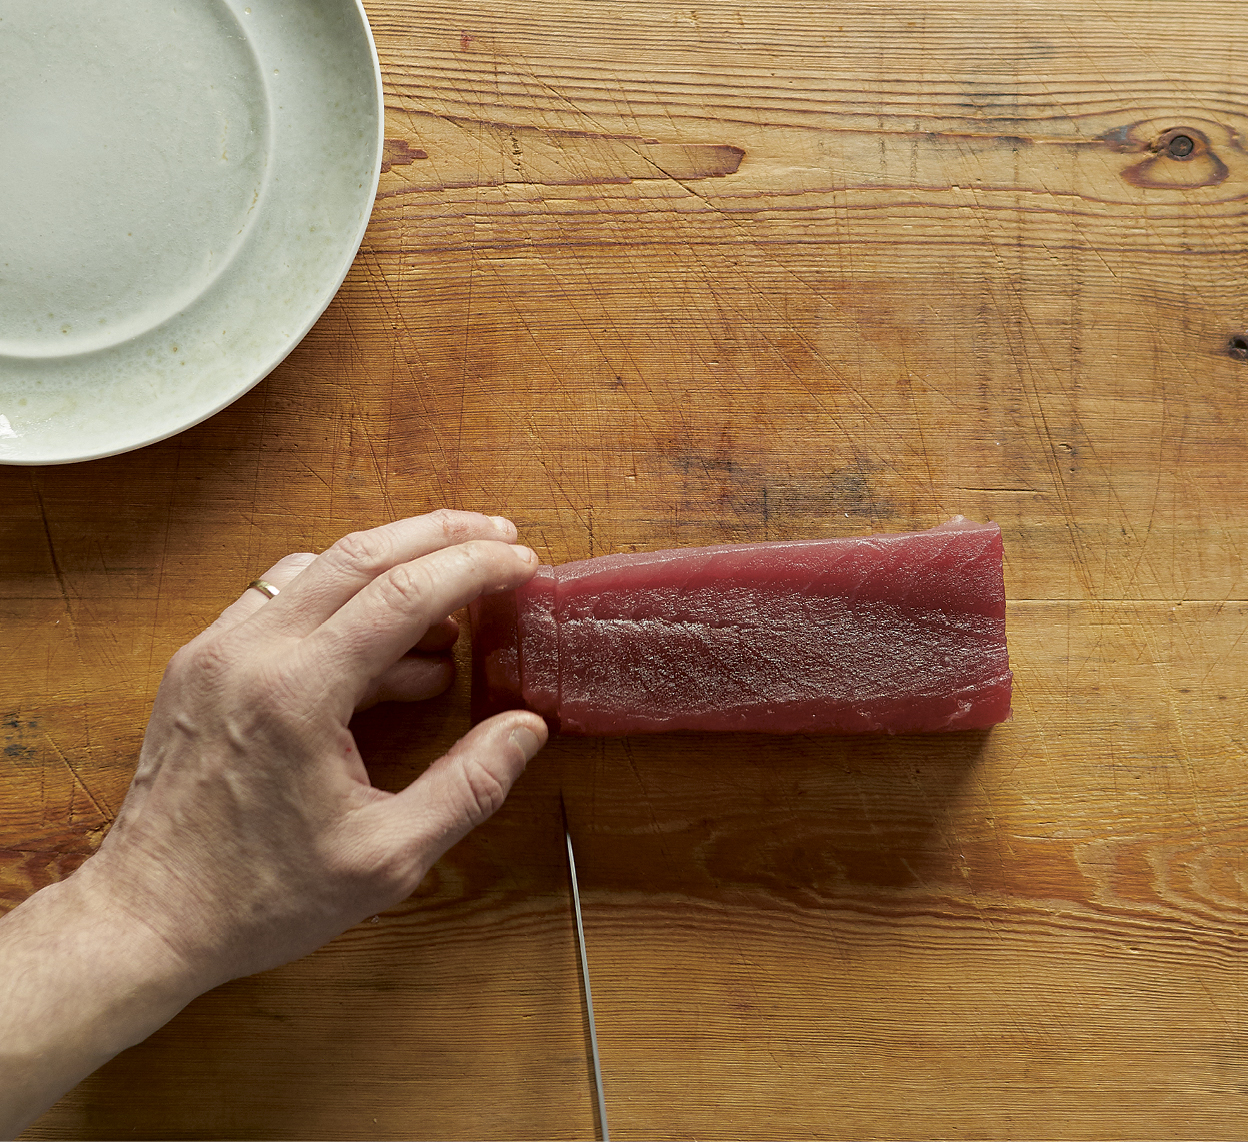
➐ Lay a block on your cutting board, cut a bite-size slice, and taste for freshness.
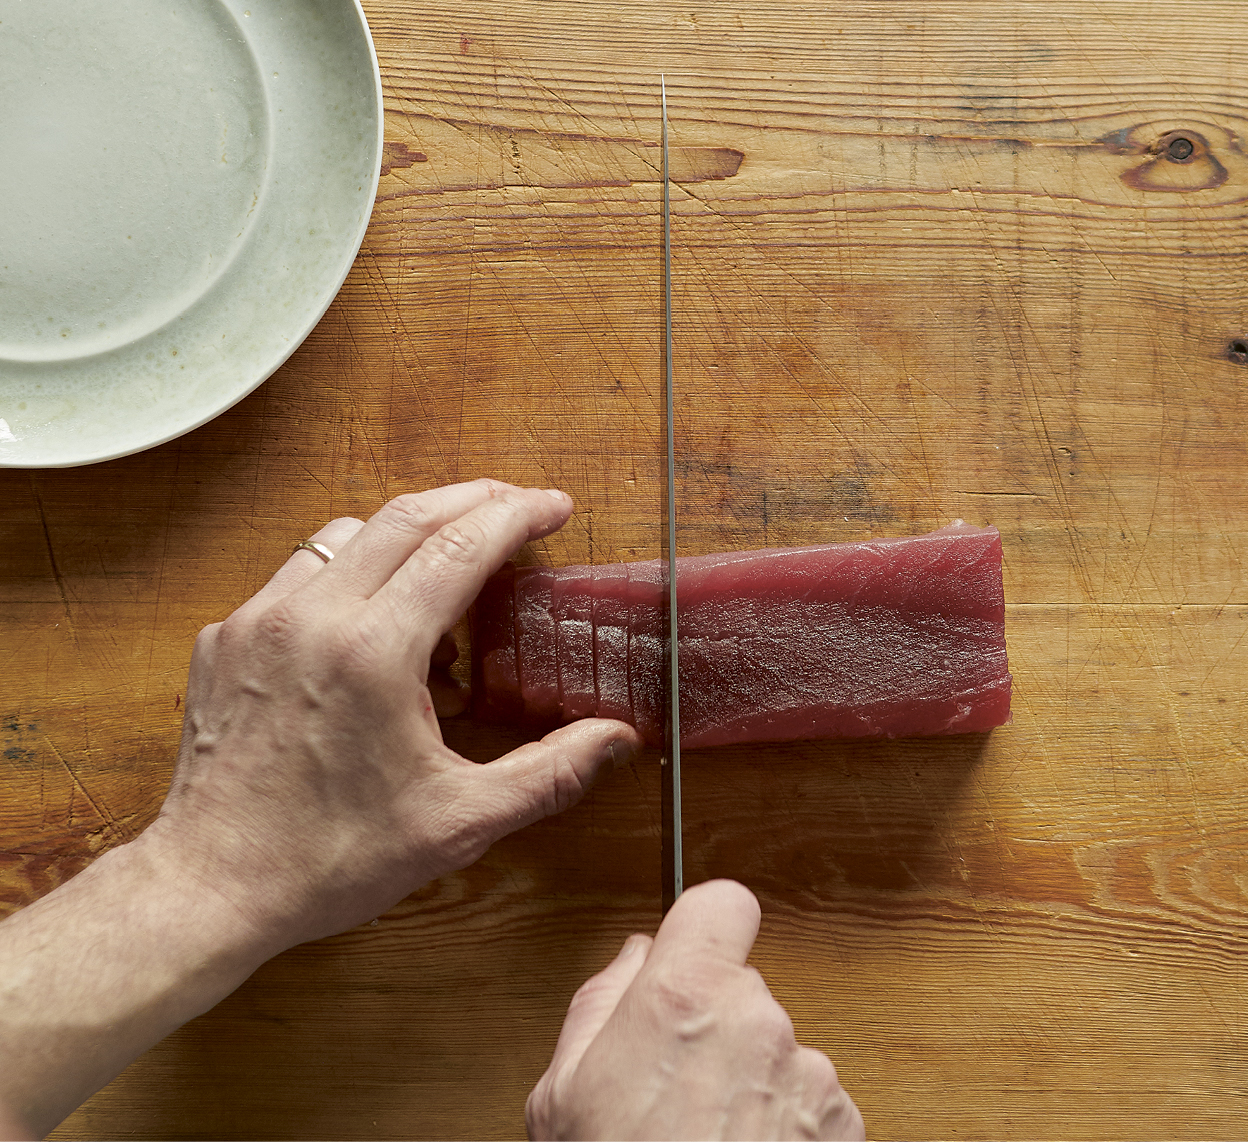
➑ Use a very sharp knife to cut ¼-inch slices off your block.
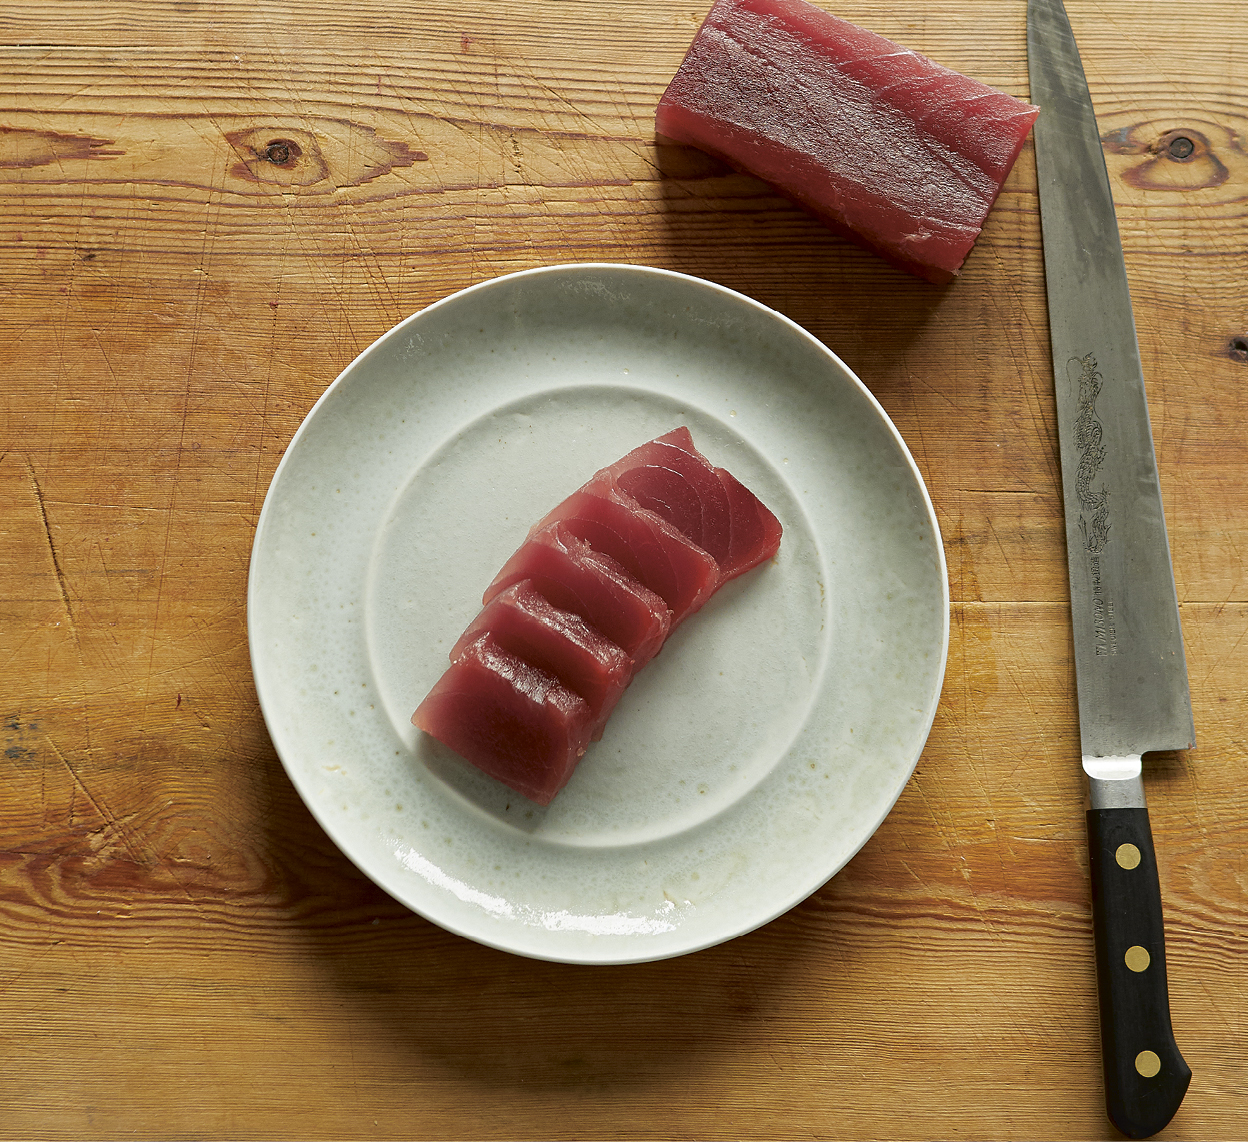
➒ Tile out your slices for a beautiful crudo!
TUNA CRUDO
Ginger Scallion, Tare, Radish
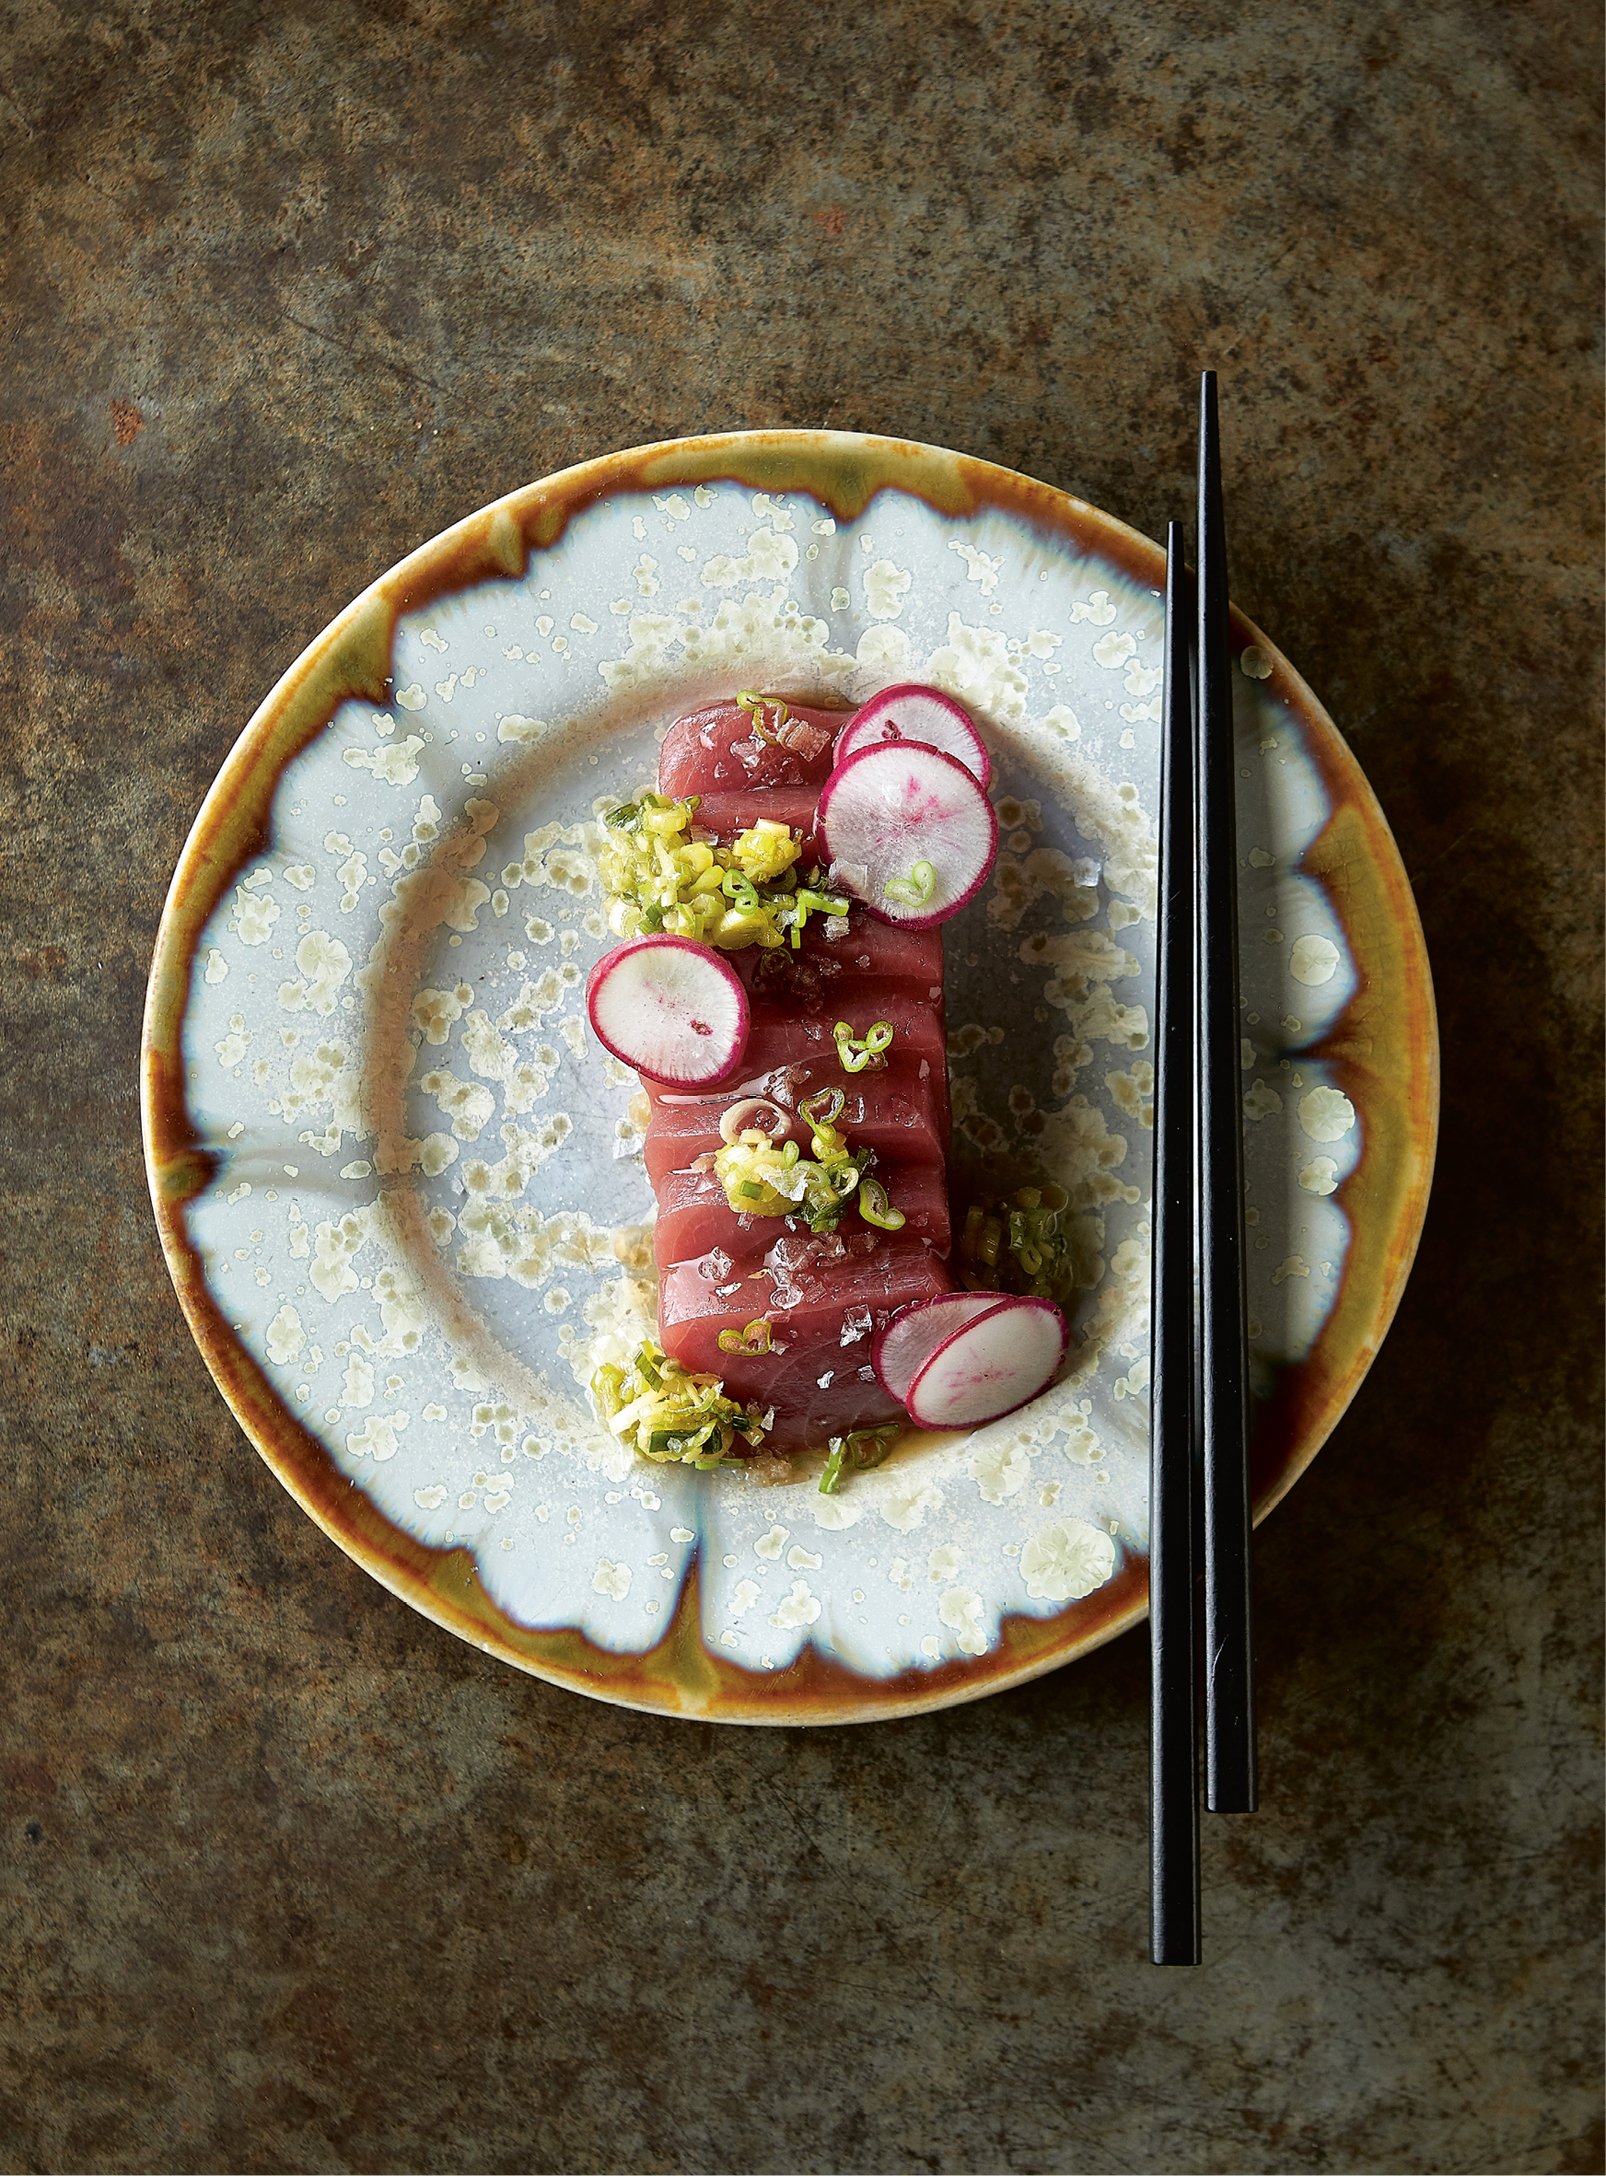
With ultrafresh tuna, a couple of great sauces, and crunchy radishes, this is the archetypal Eventide crudo. It’s been on the menu since Day One. Depending on the season, we make it with bluefin, yellowfin, and big-eye tuna (but if you can source western North Atlantic bluefin, that’s the best move). Our tip of the cap to David Chang for the ginger scallion sauce recipe. —Andrew
SERVES 4
10 ounces of the freshest, best-quality, most local tuna you can get your hands on
¼ cup Tare (this page)
¼ cup Ginger Scallion Sauce (recipe follows)
2 or 3 red or French breakfast radishes, sliced into very thin rounds
Finishing salt
Cut the tuna against the grain into uniform ¼-inch slices. Tile the tuna slices on a large platter or four plates, season with salt, and drizzle with tare and then with a light layer of the ginger scallion sauce. Shower the radish slices over the top in a thin layer. Serve within 30 minutes.
GINGER SCALLION SAUCE
MAKES 2½ CUPS
3 bunches scallions, trimmed and thinly sliced into rounds
½ pound ginger, peeled and minced (to yield 1 cup)
½ cup canola oil
1 cup light soy sauce
1 tablespoon sherry vinegar
Splash of mirin
Pinch of kosher salt
Mix the scallions, ginger, canola oil, soy sauce, and vinegar in a jar or bowl, and season with a splash of mirin and a pinch of salt. If possible, let the flavors meld for a few hours or refrigerate overnight before using. Store in a sealed jar in the refrigerator for 2 weeks. The sauce can be used to dress noodles, rice bowls, and salads.
TORO CARPACCIO
Celery, Sesame, Yuzu
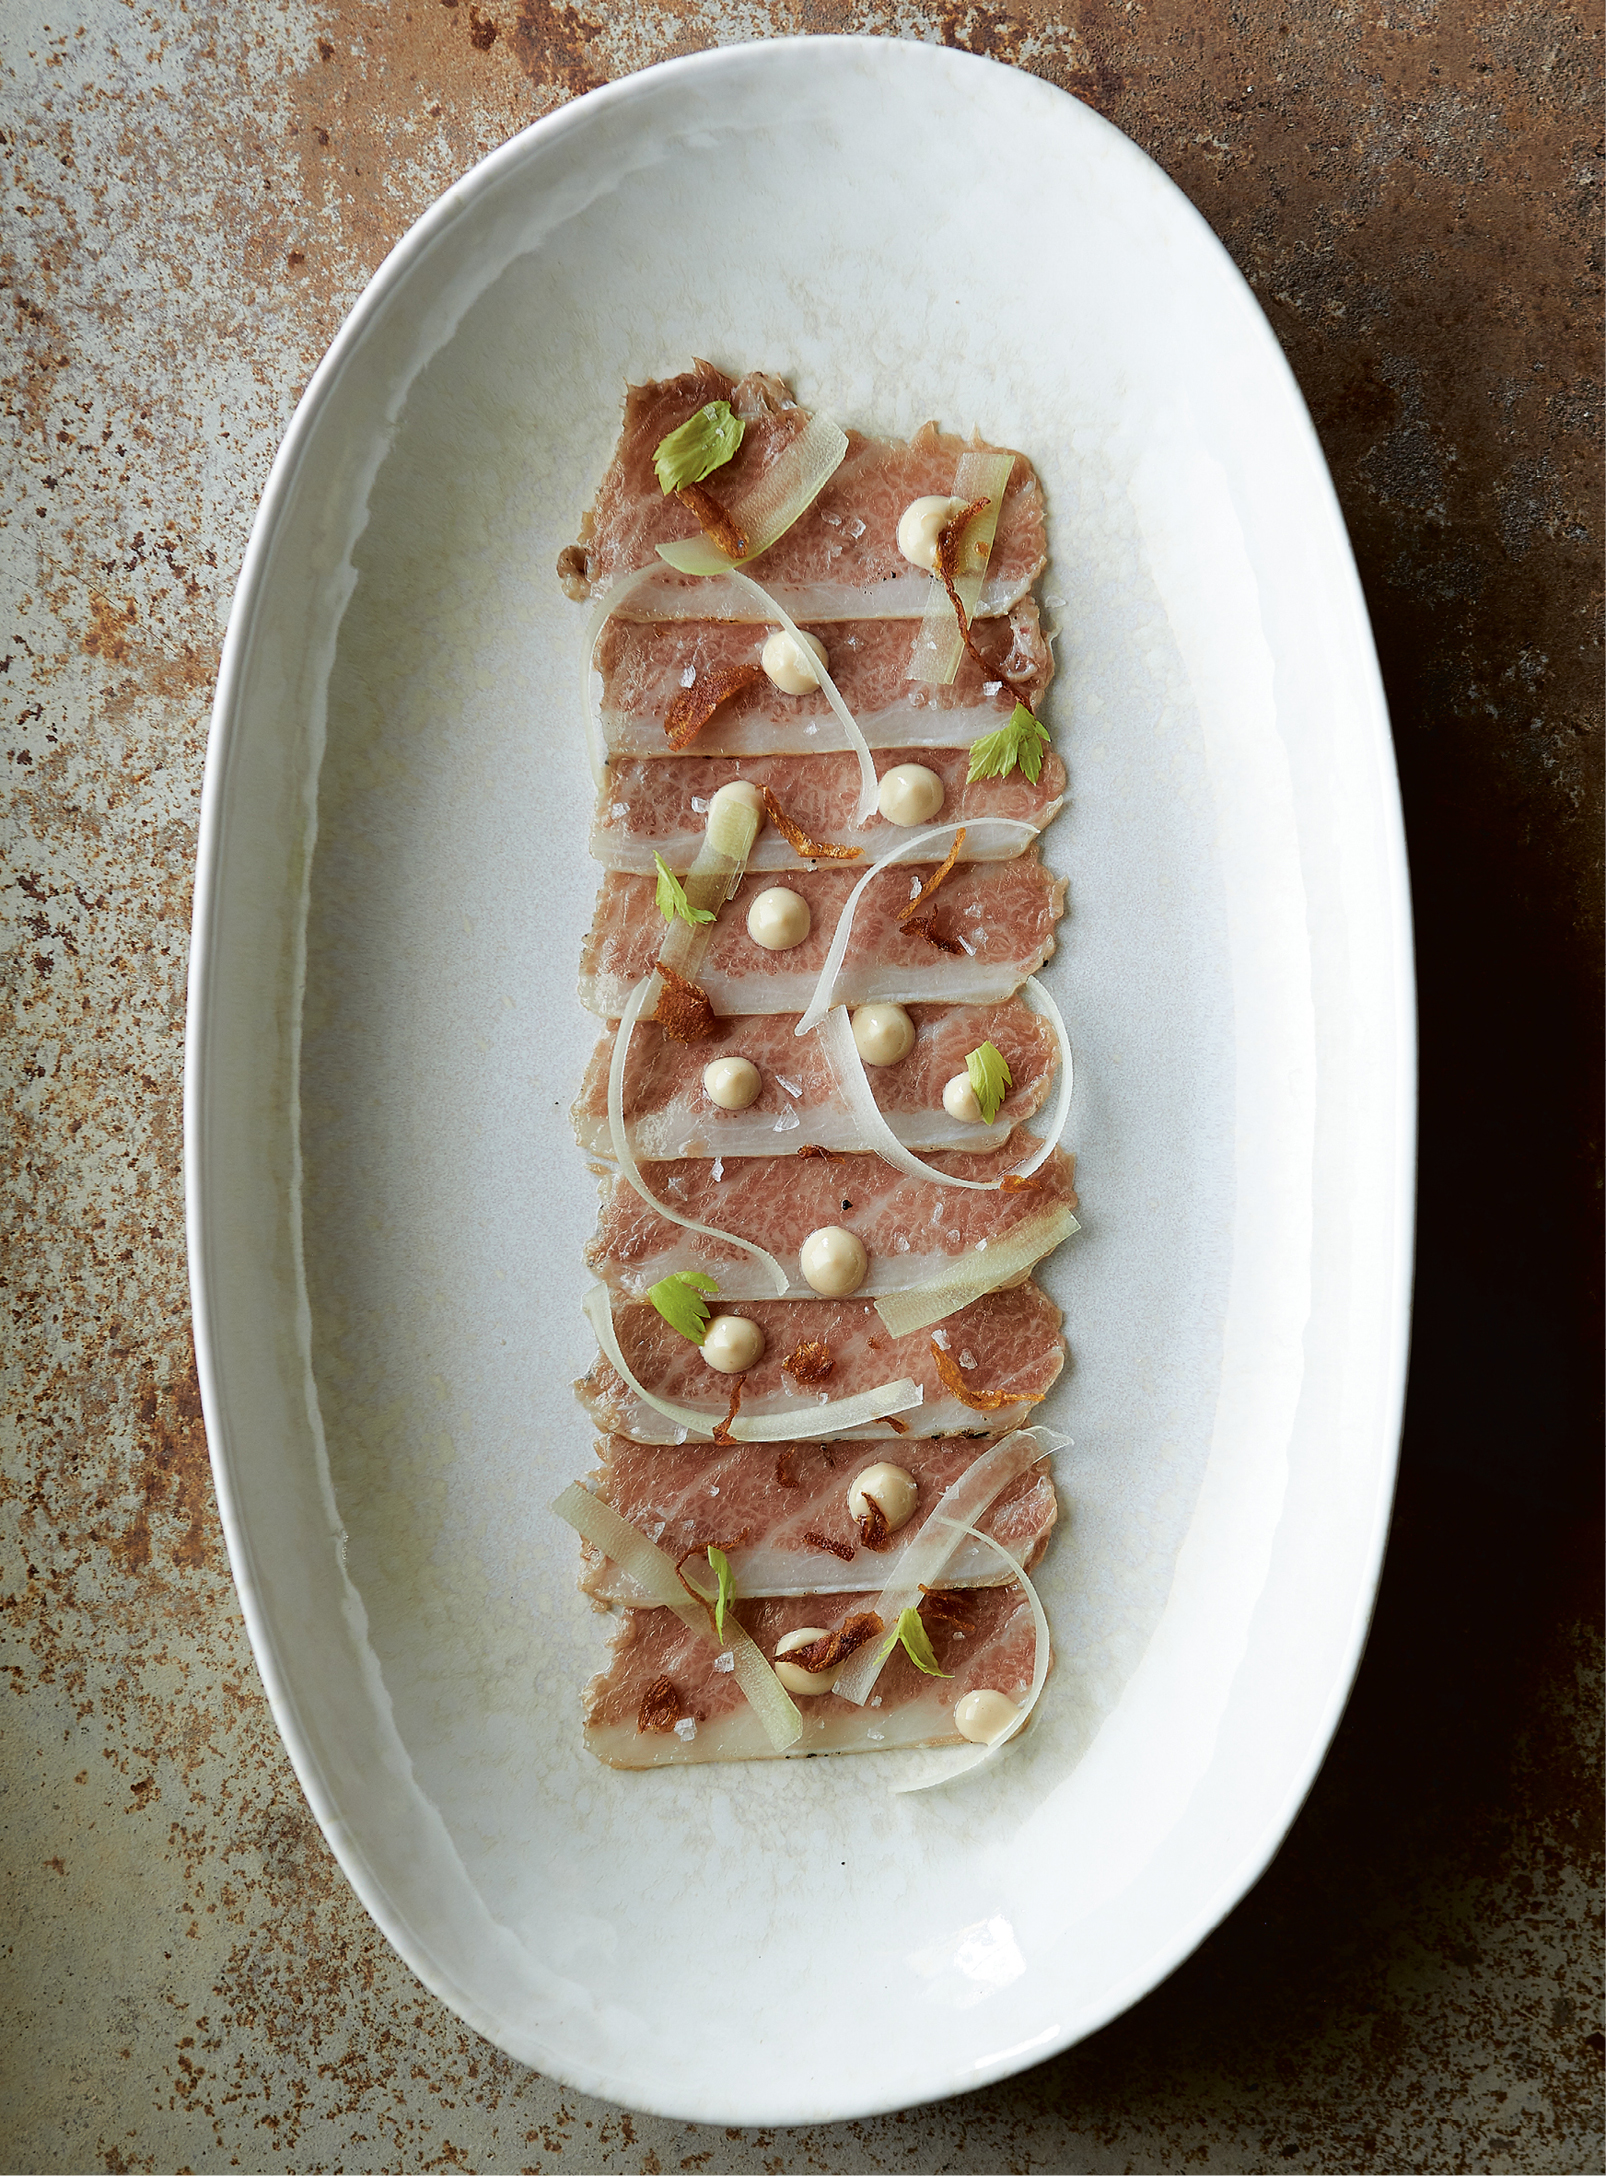
In our quest to achieve total utilization of bluefin tuna, we found a way to deal with the textural curveballs you sometimes encounter in tuna bellies, which are called otoro in Japanese. There are bands of sinew that run the gamut from inedible to disruptive. There’s little that can be done with the inedible sinew, but for the more delicate stuff, freezing and thinly slicing the tuna can be a great way to avoid textural pitfalls. Moreover, if you want to splurge on a pretty ritzy piece of tuna, this recipe will allow you to stretch it across many servings. And if you have a vacuum sealer, you could conceivably dominate a season’s worth of potlucks with this recipe alone by buying a large piece of toro and sealing and freezing it. —Mike
SERVES 4
TORO MARINADE
1 (12-ounce) can dry cider (we use Urban Farm Fermentory Dry Cidah)
1 garlic clove, minced
3 scallions, trimmed, white parts only, minced
¼ cup light soy sauce
¼ cup mirin
1 tablespoon kosher salt
1 teaspoon Asian sesame oil
8 ounces bluefin toro
4 celery ribs
1 tablespoon mixed black and white sesame seeds, toasted
½ cup Sesame Sauce (recipe follows)
Finishing salt
1 teaspoon yuzu juice
1 tablespoon Fried Aromatics Oil (this page) made with shallots
To make the marinade, in a small pot, bring the dry cider to a boil and boil vigorously for 30 to 60 seconds to cook off the alcohol. Cool the cider to room temperature and whisk in the garlic, scallions, soy sauce, mirin, kosher salt, and sesame oil, taking care to ensure that the salt is dissolved. Transfer to an airtight container large enough to hold the tuna and put in the refrigerator to cool completely.
Once chilled, put the tuna in the marinade, making sure it’s submerged. Allow it to marinate in the refrigerator for at least 1 hour, or up to overnight.
Preheat a charcoal grill or set a gas grill or grill pan to high heat. Remove the tuna from the marinade and pat dry. Over the hottest part of the grill, sear the tuna on each side for 1 minute. (The goal is to develop a little grill flavor while keeping the tuna completely raw inside.) Transfer the tuna to a plate and put it in the refrigerator to chill.
Once cooled completely, wrap the tuna in two layers of plastic wrap and freeze for at least 2 hours, or until it is hard enough to slice easily.
Peel the outside of each rib of celery to expose the stringy fibers that run the length of the stalk. With a paring knife, peel the fibers from the celery. Once you’ve cleaned up the celery nicely, use a mandoline or vegetable peeler to thinly slice it lengthwise into ribbons. Place the ribbons in ice water for at least 10 minutes, during which time they’ll crisp up and curl up.
In a small skillet over medium heat, toast the sesame seeds for 30 seconds until they are fragrant, then remove them from the pan.
Retrieve the tuna from the freezer, unwrap it, and let it temper for a couple of minutes. With a deli slicer or very sharp knife, thinly slice the tuna against the grain.
To assemble the dish, artfully lay out the tuna on a large platter or four plates. Dot the sliced tuna with the sesame sauce and scatter toasted sesame seeds over the top. Drain the celery ribbons well and transfer to a small work bowl. Season with finishing salt to taste and dress with the yuzu juice and shallot oil. Arrange the celery in an attractive tangle over the tuna and spoon the yuzu mixture over the fish. Serve within 30 minutes.
SESAME SAUCE
MAKES 2½ CUPS
1 cup white sesame seeds, toasted
½ cup shiro miso (see Glossary)
½ cup sake
1½ tablespoons soy sauce
1 tablespoon mirin
½ tablespoon sugar
1 tablespoon rice wine vinegar
1 tablespoon fresh lime juice
1 tablespoon cold water
1 tablespoon Asian sesame oil
2 tablespoons canola oil
Kosher salt
In a small skillet over medium heat, toast the sesame seeds for 30 seconds until they are fragrant, then remove them from the pan to cool.
Combine the sesame seeds, miso, sake, soy sauce, mirin, sugar, vinegar, lime juice, and water in a blender and blend until completely smooth. With the blender running, stream the oils slowly into the sauce to emulsify. Season with salt to taste.
To use, spoon into a piping bag, squeeze bottle, or large ziplock plastic bag with a corner cut off. Store extra sauce in an airtight container in the fridge for 2 weeks and use as a dressing for all types of other fish, grilled meats, and vegetable dishes.
CHU-TORO
Ramp Leaf–Almond Pistou, Pickled Ramp, Garlic Chips
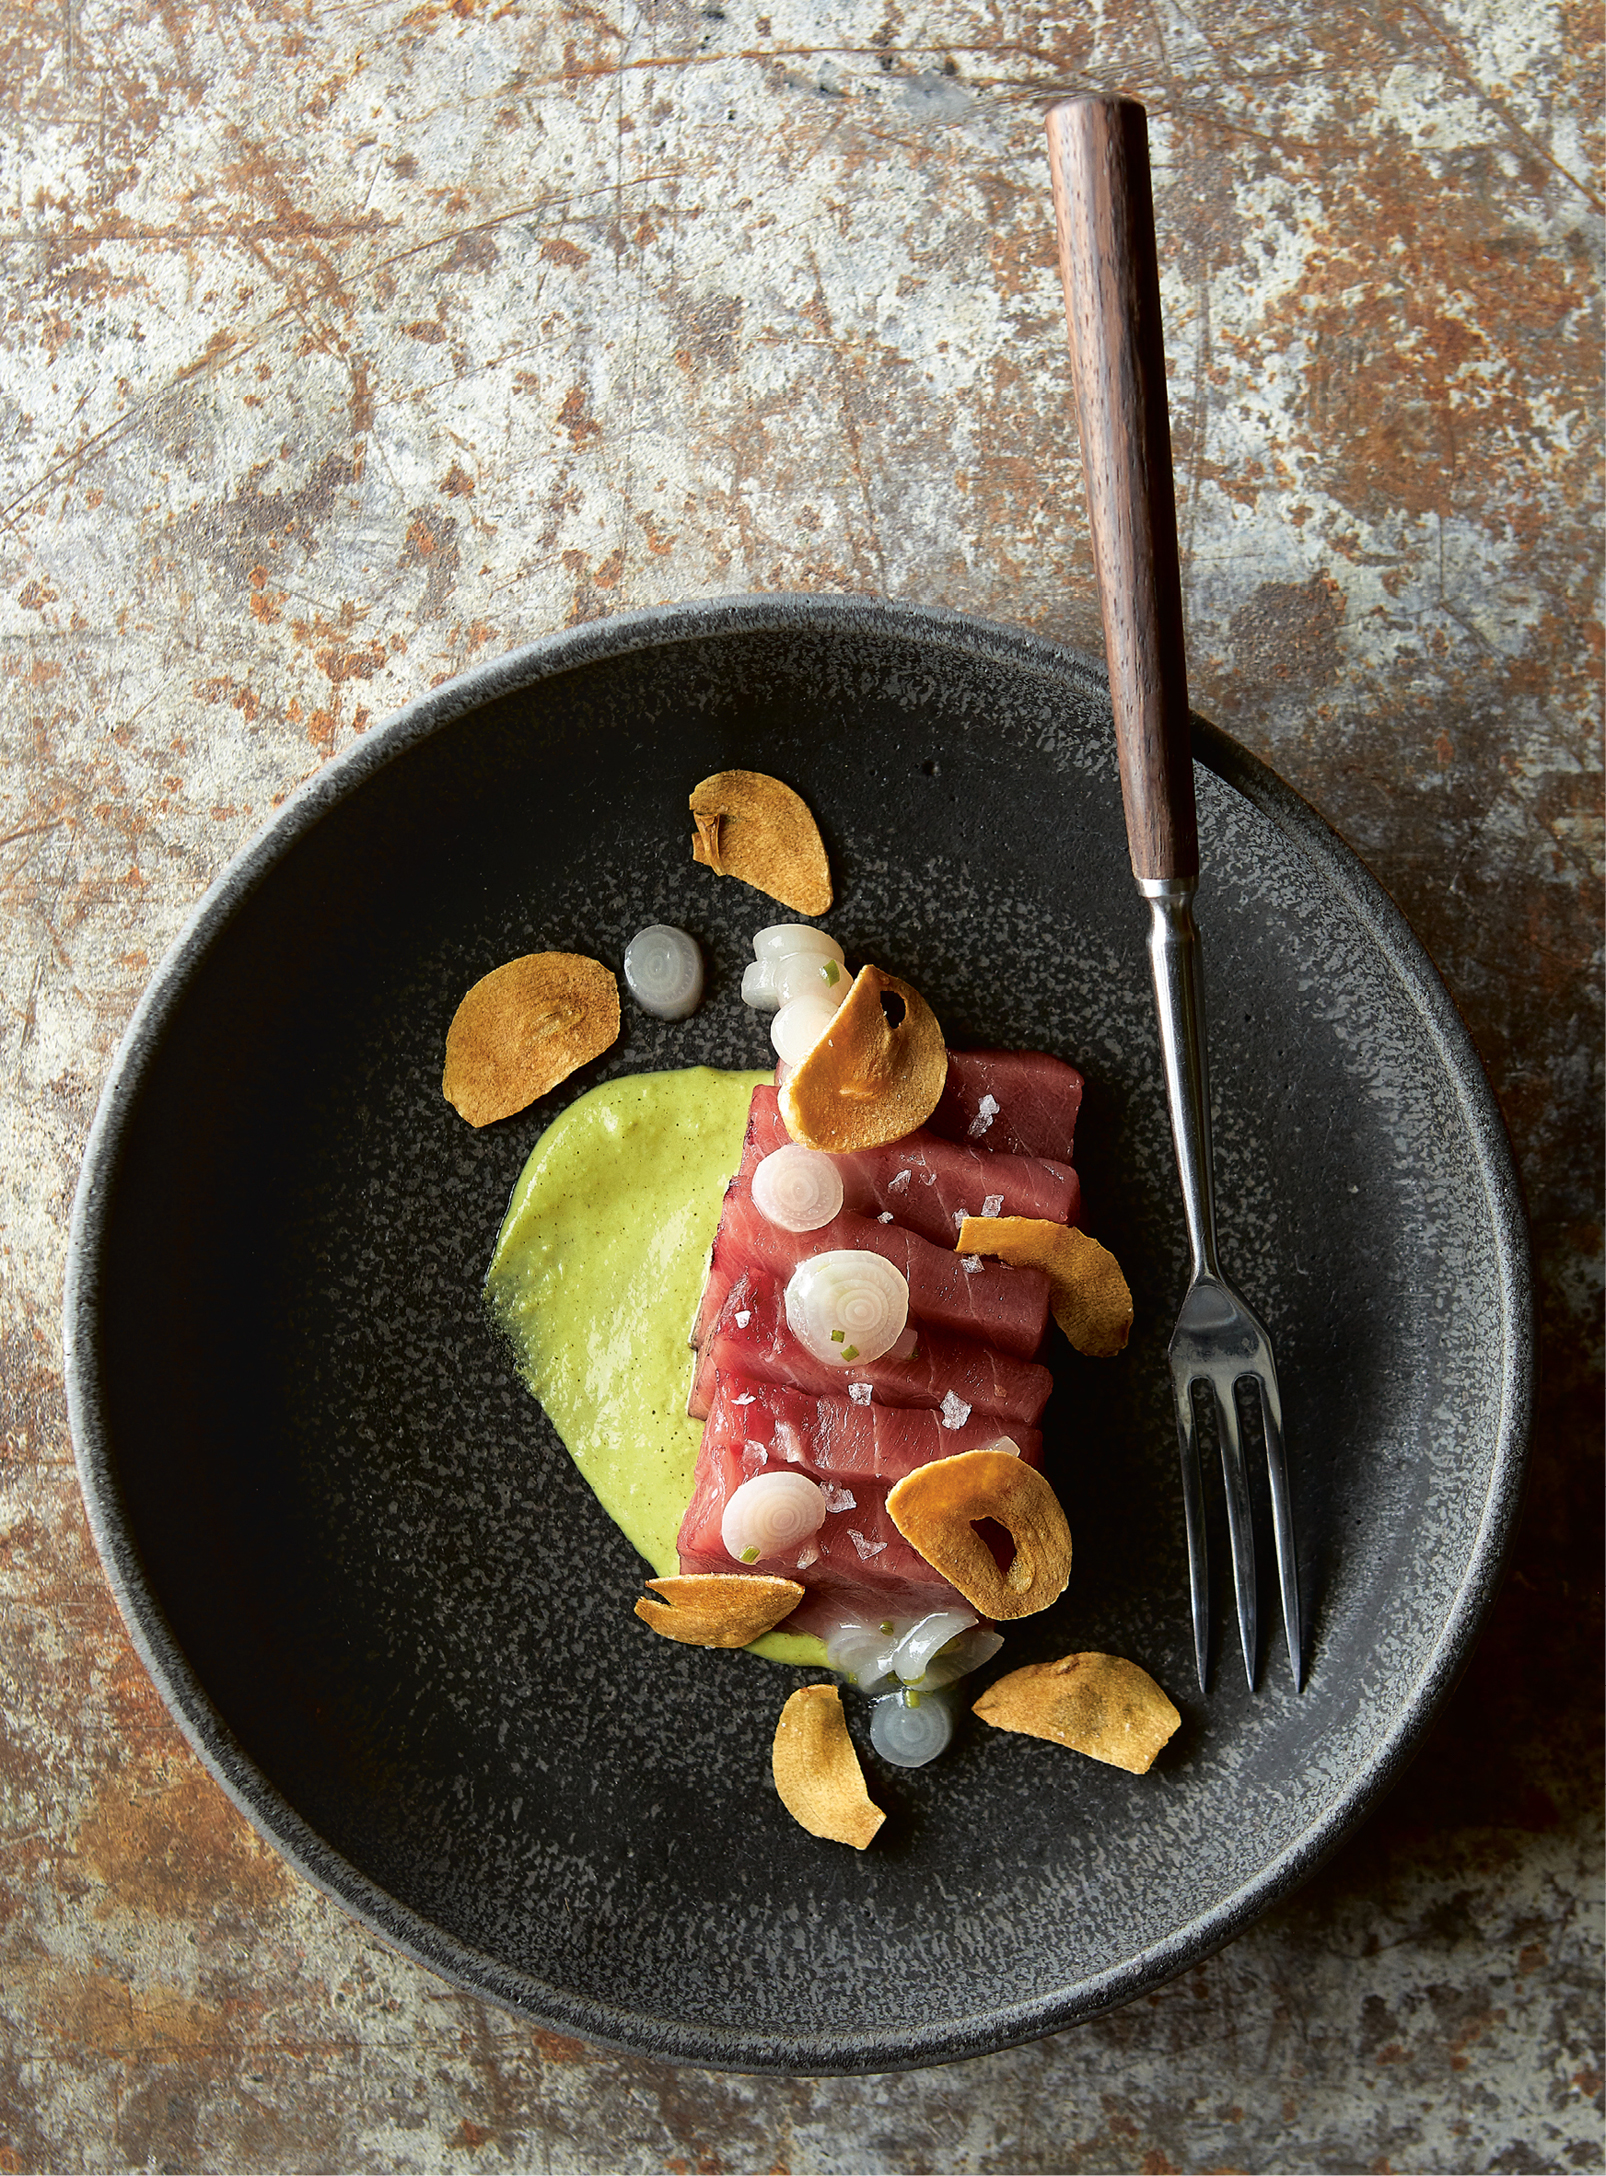
Though it probably wouldn’t fly in terms of the formal Japanese codification of bluefin tuna, we use the term chu-toro for all medium-fatty bluefin tuna cuts from the back and sides of the fish. This tightly marbled and rosy-pink cut is our favorite part of the bluefin to serve raw, because it has such a luxurious balance of richness and tender, creamy, supple texture. It is different from the pale and deeply marbled belly (otoro), which can be intensely rich and sometimes sinewy, and the deep red loin (akami), which is lean and slightly metallic in flavor. Chu-toro stands out when served simply with some sea salt, but it also holds up beautifully against assertive flavors like the ramps, almonds, and fried garlic in this recipe. —Andrew
SERVES 4
10 ounces chu-toro, trimmed into a uniform, pristine block
½ cup Ramp Leaf–Almond Pistou (recipe follows)
Finishing salt
½ cup Pickled Ramp Relish (recipe follows)
¼ cup Fried Aromatics (this page) made with garlic
Slice the block of fish against the grain into ¼-inch pieces. Place a pool of the ramp pistou on the bottom of a large platter or on four plates. Arrange the fish artfully on the pistou and season lightly with salt. Garnish with dollops of ramp relish and the fried garlic. Serve within 30 minutes.
RAMP LEAF–ALMOND PISTOU
MAKES 2½ CUPS
1 cup blanched and peeled almonds, toasted
1 pound ramp leaves, cleaned, bulbs saved for pickling (this page)
½ cup water
½ cup Fried Aromatics Oil (this page) made with shallots
2 tablespoons honey
Sherry vinegar
Kosher salt
In a large skillet over medium heat, toast the almonds for 60 seconds until they are fragrant and then remove them from the pan.
Preheat a charcoal grill or set a gas grill or grill pan to high heat. Grill the ramp leaves for 1 to 2 minutes on each side until they are dark green and smoky. Chop the leaves finely and puree in a blender with the almonds and water. With the blender running on high, slowly add the shallot oil until the mixture is thick and smooth. If it gets too thick for the blender, add more water a bit at a time to help create a vortex. Add the honey, sherry vinegar, and salt to taste. Let the mixture cool to room temperature.
Once cooled, you can use immediately, or store any extra mixture in an airtight container with a little shallot oil covering the surface in the refrigerator for up to 2 days. Or, pour in small containers and freeze for 2 months, thawing portions as needed. The excess can be used to add punch to soups, cooked fish dishes, and other crudos.
PICKLED RAMP RELISH
MAKES 1 CUP
½ cup Pickled Ramp bulbs, plus ½ cup ramp pickling liquid (this page)
1 tablespoon cornstarch
1 tablespoon water
1 teaspoon finely chopped chives
1 teaspoon mustard oil (see Glossary; optional)
Chop the pickled ramps finely and place in a heatproof bowl.
In a small bowl, stir the cornstarch and water together.
In a small pot over medium-high heat, bring the ramp pickling liquid to a boil, then turn down the heat to a medium boil. Whisking constantly, add the cornstarch and water mixture, a teaspoon at a time, until the mixture thickens enough to just coat the back of a spoon. Remove the pot from the heat, pour the mixture over the chopped ramps, and let it cool to room temperature. Stir the chives and mustard oil into the mixture.
Use immediately or store any extra relish in an airtight container in the refrigerator for up to 1 month, or freeze it indefinitely. The relish is a great addition to hot dogs, sandwiches, raw bar or cheese platters, or anything that benefits greatly from the addition of pickles.
TUNA TARTARE
Ramen Cracker, Umeboshi, Pickled Sea Vegetables
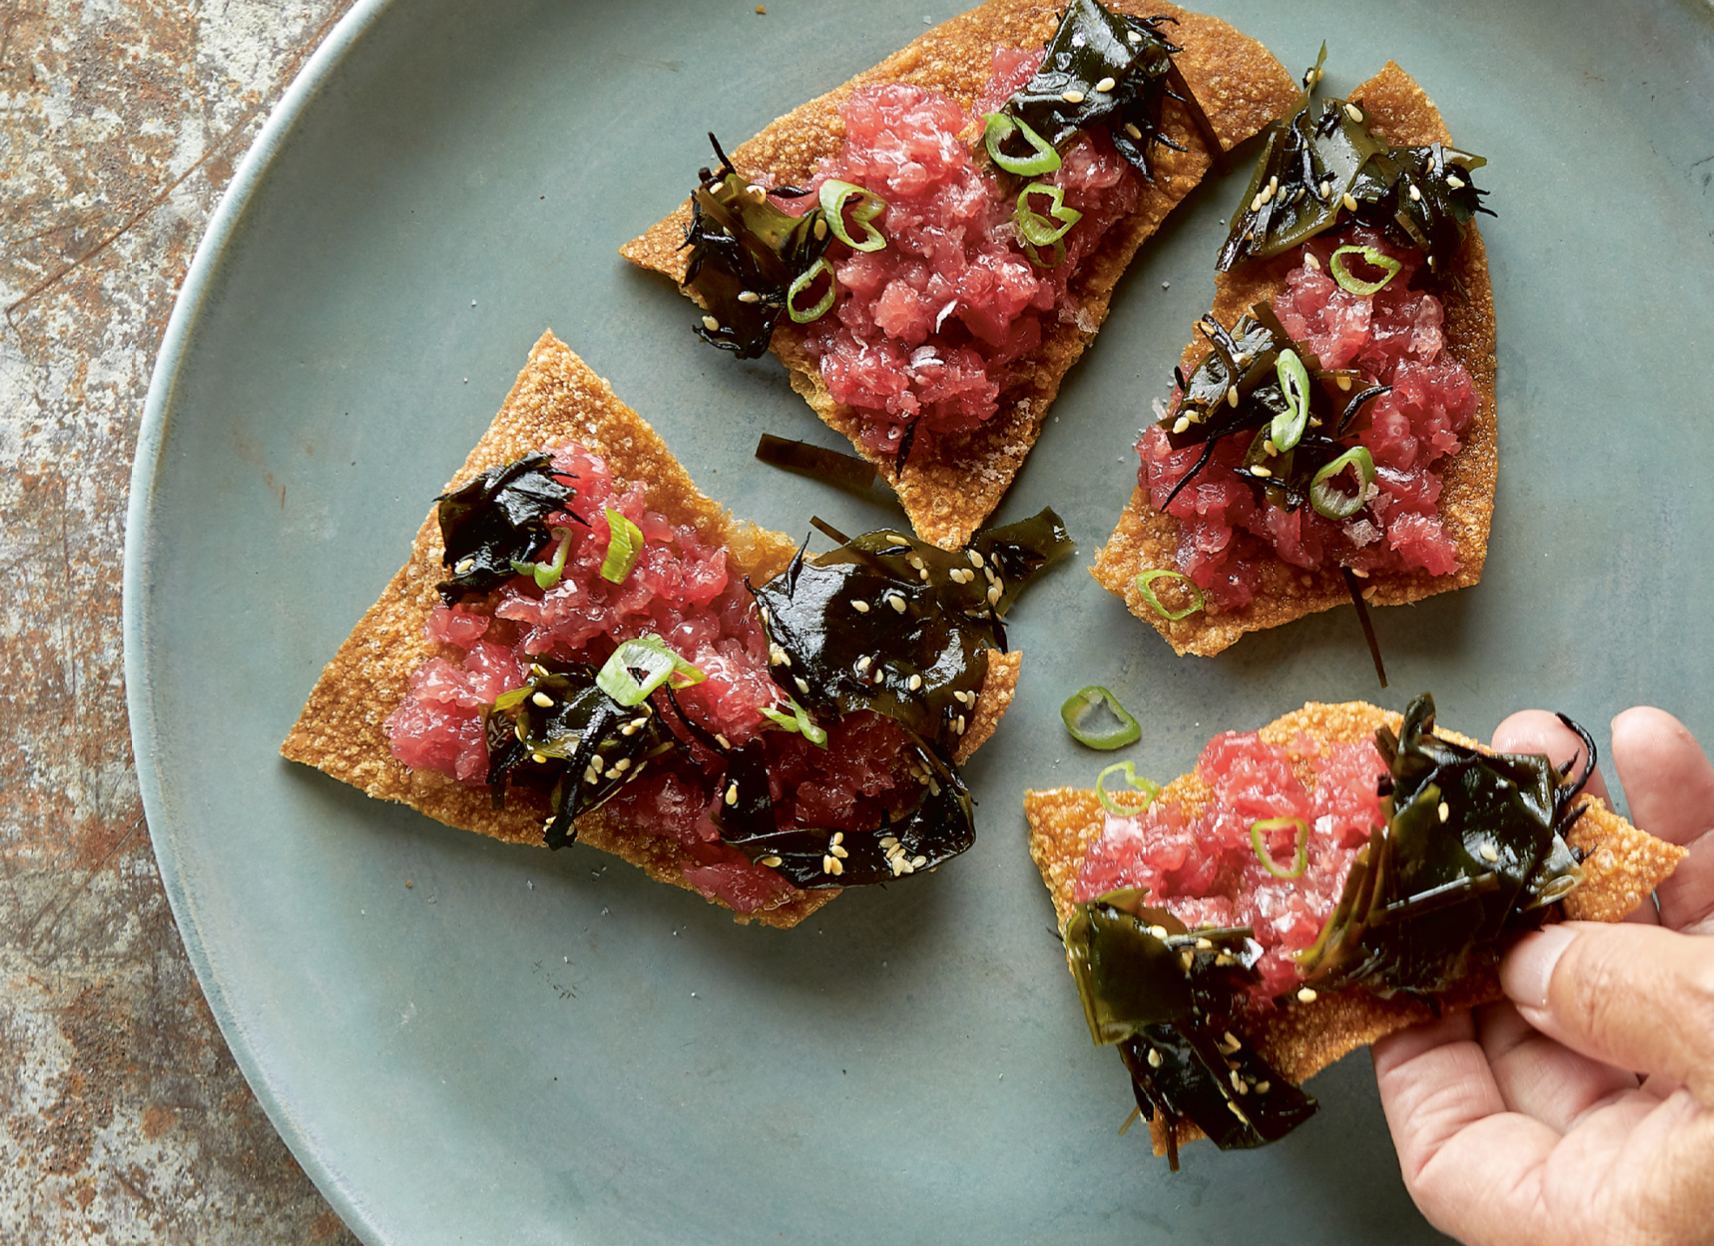
We’ve done many versions of tuna tartare over the years, and we’re pretty adamant that you need something crunchy to enjoy with any kind of tartare. These ramen crackers are nothing more than sheets of uncooked ramen noodle, but they have a wonderful noodle-meets-pretzel-or-bagel appeal. You can easily break the crackers up into bite-size pieces for a soigné little hors d’oeuvre, or (my preference) you can serve one enormous cracker on a plate that barely accommodates it. I like dropping off the larger version in front of large parties at the restaurant without any silverware. Eventually, everybody just starts cracking into it. —Mike
SERVES 4
10 ounces of the freshest, best-quality, most local tuna you can get your hands on
2 tablespoons Umeboshi Vinaigrette (recipe follows)
Kosher salt
Ramen Cracker (recipe follows), large enough to cover a large plate whole or in pieces
2 tablespoons Pickled Sea Vegetables (recipe follows)
Sliced scallion greens for garnish
Slice the tuna into smaller pieces, and then chop with a sharp knife to make a coarse tartare.
In a stainless steel work bowl, dress the tuna with the umeboshi vinaigrette, tossing lightly and seasoning to taste with salt.
Plate the tartare on a large cracker, or make bite-size crackers with the tartare balanced on top, or plate the tartare and use the ramen cracker like croutons in a salad. Garnish with the pickled sea vegetables and sliced scallions, and serve within 30 minutes.
RAMEN CRACKER
MAKES 1 LARGE CRACKER OR 50 SMALL CRACKERS
2 teaspoons baking soda
1 cup water
3½ cups all-purpose flour
2 heaping tablespoons kosher salt, plus more to season
Canola oil for frying
Preheat the oven to 200°F. Put the baking soda on a small sheet pan or piece of foil, and bake for 2 hours. Let cool.
In a small bowl, combine the baking soda with the water and stir until the baking soda dissolves.
In a separate bowl, combine the flour and salt. Add the liquid to the dried ingredients and knead by hand until the dough comes together. Turn the dough out onto a lightly floured surface and knead until you have a stiff, smooth ball. Wrap tightly in plastic wrap. Allow to rest for 30 minutes.
Roll out the dough with a pasta maker or rolling pin to a uniform thinness that should allow you to see the grain of a wooden cutting board or counter through it. Depending on how you plan to plate the dish, either keep the sheet the same diameter as your frying pot for a larger appetizer or cut the dough into uniform cracker shapes about the size of a regular saltine for a bite-size snack.
Fill a large pot with 3 inches of canola oil and heat on high to 350°F (or bring a deep-fryer to 350°F). Line a plate with paper towels. Carefully slip the dough pieces into the oil in batches, making sure not to crowd the pot, and fry until golden brown, 3 to 5 minutes. Using a slotted spoon or wire-mesh strainer, transfer the crackers onto the paper towel–lined plate and season lightly with salt. Let cool and store in an airtight container at room temperature for 1 week. They are great as a snack with cheese, dips, hummus, and more.
UMEBOSHI VINAIGRETTE
MAKES ABOUT 1 CUP
1 umeboshi (Japanese pickled plum), pitted
1 cup canola oil
5 tablespoons fresh lime juice
½ teaspoon fish sauce
Kosher salt
In a blender, combine the umeboshi, canola oil, lime juice, and fish sauce and puree. Season to taste with salt. Use immediately.
The extra can be stored in an airtight container in the refrigerator for 1 week and used to dress salads, vegetables, rice and noodle dishes, and a huge variety of crudos and cooked fish dishes.
PICKLED SEA VEGETABLES
MAKES 2 TABLESPOONS
1 pinch hijiki (see Glossary)
1 pinch wakame (see Glossary)
1 pinch Pickled Kombu (this page)
Finishing salt
Confit Mushroom Oil (this page) made with maitakes
1 pinch white sesame seeds
Place the hijiki and wakame in separate small heatproof bowls. Pour boiling water over them, and let sit for 10 minutes. Drain the hijiki and wakame and combine with the pickled kombu in a small bowl. Season the sea vegetables with salt and a drizzle of maitake oil.
In a dry skillet, carefully toast the sesame seeds until they are uniformly golden brown, then dump them into the bowl with the sea vegetables and stir to combine.