Equipped with an understanding of what yoga comprises and how to put its various disciplines into practice, you are now ready to embark on doing the exercises themselves. Set the scene by detaching yourself for a brief period of time from everyday concerns. Unite your physical resources with mental attributes such as your attentiveness and your ability to visualize, and with non-tangible components such as your breath and your belief in the infinite wisdom of the body’s wonderful healing system.
Because you will probably be practising on your own, without supervision, the exercises and procedures in this book have been carefully selected with your safety in mind. Before attempting to do them, however, please check with your doctor or other professional health-care provider to be sure that the techniques are right for you to do.
The main part of the book is Part 2, The Healing Power of Yoga, which is divided into sections that cover many common ailments and health problems. For each section, there are a number of recommended exercises to help bring relief and promote healing for those particular problems.
If you have a condition detailed in Part 2, please take a few moments to read about it, to help you to understand it or to refresh your memory. Then turn to the suggested exercises. With the permission of your doctor or other qualified health-care professional, try the regimen described, but by all means modify the exercises to suit your particular needs and level of functioning.
If you are in good health and wish to maintain it, please turn to Part 3, which provides a number of routines, from five to 20 minutes duration, suitable for both men and women. Select one that you think will be compatible with your current schedule and other personal needs. Feel free to tailor your chosen routine according to your specific requirements. Whatever you decide to do, however, please plan to practise regularly: every day if you can, but at least every other day so as to obtain maximum benefit from your workout. Wherever possible, incorporate exercises into daily activities, at home or at the workplace. Some of the warm up exercises and some of the breathing exercises (such as the Anti-Anxiety Breath) are suitable for this purpose.
This section also has routines for women who are pregnant or have recently given birth. No matter what your state of health is, you will undoubtedly benefit from reading the background information in the Introduction and the rest of this chapter. It will enhance your appreciation of why yoga is so beneficial and how breathing, relaxation and cleansing practices work to promote your healing system.
Before attempting any of the exercises, it is vital that you read the Warming Up and Cooling Down routines.
To derive the greatest enjoyment from your yoga exercises, you need to feel comfortable. You must be able to move and breathe freely. Do not, however, wear garments that are so long and loose-fitting that they cause you to trip or in any way impede your movements. Long, loose hair may be a distraction. A ponytail that places pressure on your neck is best avoided.
Remove any items that may cause pressure, discomfort or injury, such as glasses, jewellery or a tight belt. When exercising during breaks at your workplace, loosen your clothing a little, to facilitate breathing and stretching. When relaxing after a workout, keep a light blanket, a sweater and pair of warm socks nearby in case you feel chilled.
One of yoga’s attractions is that it can be practised in a variety of places, indoors or outdoors. Some techniques, such as breathing exercises (Pursed-Lip Breathing for example) can even be done while travelling. Others can be practised where space is limited, such as the Infinity Neck Stretches and yet others, such as the Pelvic Floor Exercise, can be done without those around you being aware of what you are doing.
Ideally, the place where you practise your exercises should be quiet and well ventilated. When performing at home, ask your family not to disturb you for the duration of your exercise session.
Practise on a level surface. If this is indoors, place a non-skid mat on a bare floor. This surface will be referred to as the “mat” in the exercise instructions.
You can practise yoga at any time. You can integrate some of the exercises into your daily schedule, however busy, at home or at work. You can even practise some of the techniques when travelling or at the airport while waiting to board a flight.
You can do a few exercises on awakening in the morning to counteract stiffness of joints and to stimulate circulation. If you feel particularly stiff, taking a warm (not hot) shower or bath before practising your exercises may make it easier for you to stretch and bend. You can do a pre-sleep routine (see Sleep Disturbances) to promote refreshing slumber. For some people, practising before breakfast is the most convenient time. Others find that they need a glass of juice or a slice of toast to offset the low blood sugar level that exists after a night’s sleep. In general, the best time to practise a session of yoga exercises is two to three hours after a meal, depending on its size and content. You may practise an hour after having a light snack.
If you have a specific yoga sequence you like, try to do it every day if possible. If this is not feasible, then certainly do it every other day so as not to lose the benefits gained from your previous practice session.
You may be more comfortable doing the exercises after emptying your bladder and perhaps your bowel, too. Some individuals also like to cleanse their tongue and nasal passages before doing a session of breathing exercises.
A proper warm up before an exercise session is imperative to prevent strain and injury. See for a selection of such exercises.
As mentioned on, if you are suffering from any medical condition or have health problems, please check with your doctor before attempting to do the exercises and procedures in this book.
You should not experience pain when doing an exercise. At the first hint of pain, stop. You may be doing the exercise incorrectly or it may not be an appropriate one for you to do at this time. In addition to the list below, please look out for other cautions and contraindications given in specific exercises.
• If you have had recent surgery, some of the exercises may not be suitable for you to do. Check with your doctor.
• When resuming exercise after a period of illness or inactivity, do so gradually. Consult your doctor or physiotherapist.
• If planning to do a vigorous workout just after waking up in the morning, make sure you warm up properly first. During sleep, spinal discs absorb extra fluid and so become more vulnerable than usual to compression and possible damage.
• If you are elderly or have been diagnosed with osteoporosis, you may be prone to fractures if you fall. Be especially attentive and careful when doing balancing exercises, such as the Tree Posture. Also, some forward-bending exercises like the Plough Posture are contraindicated if you have osteoporosis, as they may result in compression fractures or other damage to spinal bones. Check with your doctor.
• If you have an ear or eye disorder, omit the practice of inverted postures, such as the Shoulderstand and the Dog Stretch, which is also part of the Sun Salutation Series. Also omit inverted postures if you have high blood pressure, a heart disorder or any condition that produces feelings of lightheadedness when you hang your head down.
• The inverted postures are also best omitted during your menstrual period.
• Avoid rapid abdominal breathing, as in the Dynamic Cleansing Breath if you have a history of epilepsy, high blood pressure or heart disease.
• If you have a hernia, omit the Cobra, which is also part of the Sun Salutation Series.
• If you have varicose veins or venous blood clots, avoid practising the Sun Salutation Series; avoid staying in the Squatting Posture and in seated folded-legs postures such as the Easy Pose for any length of time.
If you are pregnant, please check with your health-care provider (family doctor, obstetrician, midwife or physiotherapist) before attempting to practise any of the exercises in this book.
• Do not do the asanas during your first trimester (three months) if you have a history of miscarriage, actual or threatened. Do not do the Dynamic Cleansing Breath.
• Omit any exercise that feels awkward or uncomfortable.
• Omit exercises done in the prone position (lying on your abdomen), such as the Cobra.
• After the first trimester, avoid doing exercises that require you to lie flat on your back, such as the Bridge. This position can restrict the delivery of blood and oxygen to mother and foetus by placing pressure on the mother’s vena cava (principal vein) and therefore draining the lower body.
Yoga asanas (postures, or physical exercises) are done slowly and attentively, in synchronization with regular breathing. Once a posture is completed, the position is held, for a varying period of time, according to the individual’s comfort. The same slow, focused movement (or movements) is executed when coming out of the posture, again synchronized with regular breathing.
Staying focused while performing the asanas is emphasized. It ensures control of your position and movement at all times, and it helps to prevent injury.
Because of the awareness required when performing the asanas, they may be considered a sort of meditation in action. Meditative practices often incorporate breathing and imagery, as do the asanas. When you are in the holding phase of an exercise (indicated in the instructions as “hold”), do employ imagery with which you are comfortable. For example, when maintaining the Spinal Twist, you may wish to visualize an increased blood flow to the kidney area, at the small of your back, bathing the adrenal glands and other nearby structures. You may also sense a comforting healing warmth in this part of the body.
A brief resting interval after each exercise is the usual practice. This period of relaxation is an important component of muscle activity. It helps to guard against stiffness and fatigue. A longer rest period, to cool down and recuperate, is generally taken at the end of an exercise session.
As a general rule, it is best to follow an exercise with a suitable counter posture. For example, after a backward-bending exercise such as the Camel, a forward-bending one such as the Pose of a Child is a logical choice.
The following points are worthy of note if you plan a session of breathing and meditation, separate from the asanas.
• Practise before, rather than directly after, a main meal. The process of digestion can interfere with concentration.
• Keep your body as relaxed as possible. Fidgeting detracts from the ability to stay focused. Make a quick top-to-toe check and consciously let go of unnecessary tension where you detect it.
• Unless otherwise instructed in a specific exercise, breathe in and out through your nose to warm, filter and moisturize the air on its way to the lungs. Keep your lips together but not compressed, and keep your jaw relaxed. Maintain a slow, even breathing rhythm, unless instructed differently. Do not hold your breath.
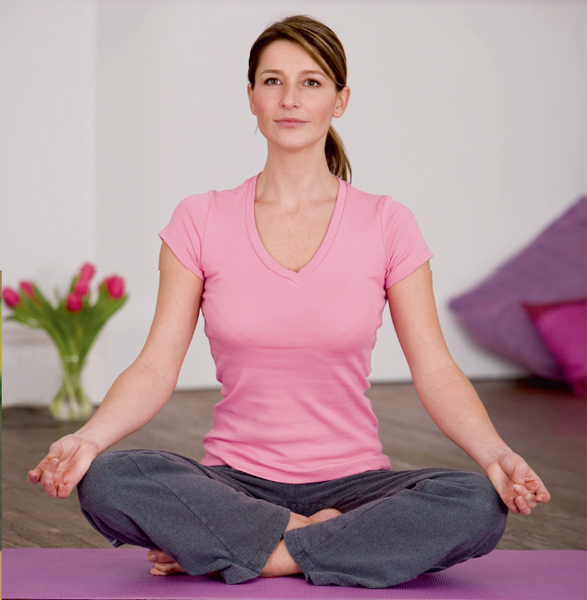
• You should sit still for several minutes to start with, and eventually up to 20 minutes. Here are three seated postures that will provide a comfortable seat and keep your spine properly aligned. They will also facilitate unrestricted breathing.
 How to do it
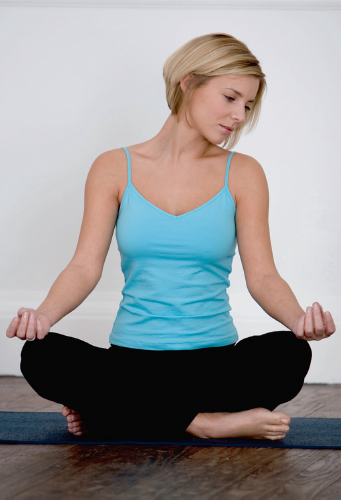
1. Sit tall with your legs stretched out in front of you.
2. Fold one leg inwards and place the foot under the opposite thigh.
3. Fold the other leg and place the foot under the bent leg. Let the knees relax downwards naturally.
4. Rest your hands in your lap or on your thighs or knees. Relax your jaw and breathe regularly.
 Notes
Notes
If at first you find it uncomfortable to sit as described, try it sitting on a cushion.
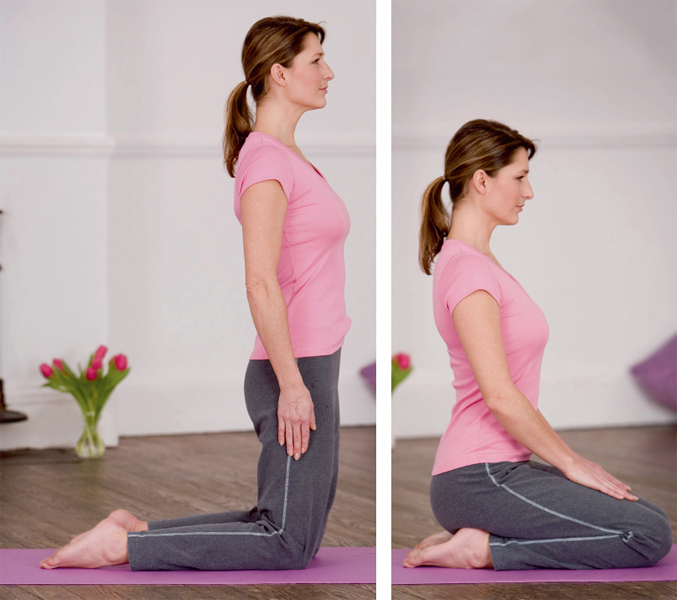
How to do it
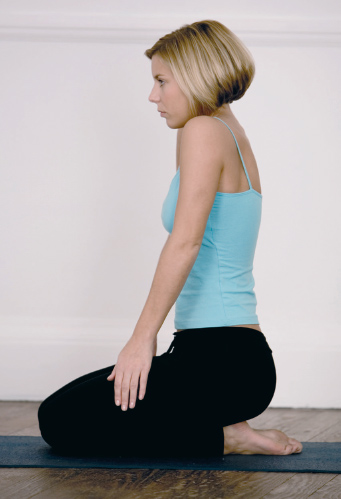
1. From a kneeling position with legs close together, lower your body to sit on your heels, Japanese style. Keep your trunk erect but not stiff, with the crown of your head uppermost.
2. Rest your hands on your thighs or knees. Relax your jaw and breathe regularly.
Notes
For greater comfort, you may insert a thin cushion or folded towel between your bottom and heels.
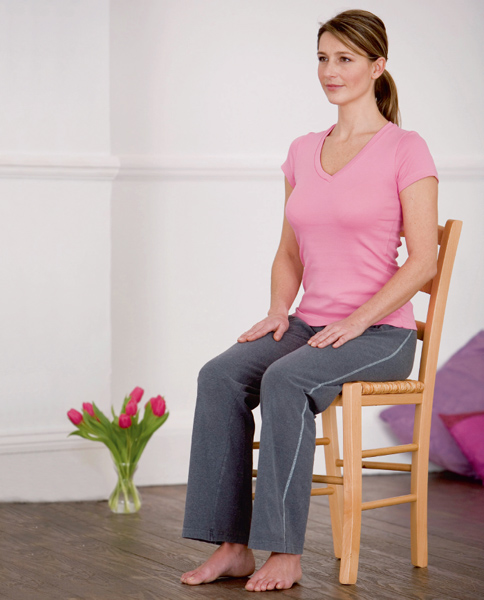
How to do it
1. Sit tall on a firm, straight-backed chair. Rest your feet flat on the floor.
2. Rest your hands on your thighs or knees. Relax your jaw and breathe regularly.
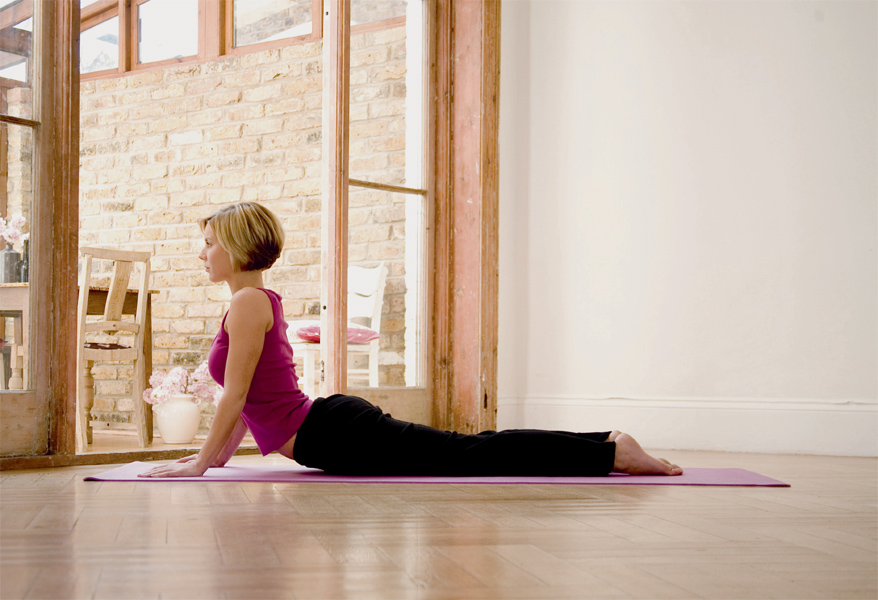
For the safe and effective practise of any exercise regimen, warming up before and cooling down after is imperative.
Warm up exercises slightly increase body temperature, help to reduce stiffness and improve circulation. They are therefore useful in preventing the strain of muscles and joints once the main exercises are in progress. They are particularly important if you plan to do a vigorous workout early in the morning, shortly after a night’s sleep. At this time, spinal discs are more vulnerable to compression and therefore to damage, since they will have absorbed extra fluid during the night. (As you move about during the day, the massaging action of the vertebrae reduces this fluid.)
Warm ups are also very important if you suffer from asthma. They help to avert the occurrence of bothersome symptoms that may arise during your workout.
Apart from the warm up exercises given on the following pages, you may also try the Sun Salutation Series. Do them slowly and with awareness, and synchronized with regular breathing. Start with two sets and increase this number as you progress in your practice.
A cooling down period after your exercise session gives opportunity for static muscle stretching. This allows your cardiovascular system to return gradually to normal functioning. Problems such as feelings of dizziness and lightheadedness, which are symptoms of a sudden drop in blood pressure, may therefore be prevented.
Cooling down properly also enhances flexibility. In addition, it gives protection against drastic temperature changes in the lungs, which can constrict airways and induce asthma symptoms in susceptible individuals.
Many of the warm up exercises that follow may be done as cool down exercises, except the Rocking Horse. You may also wish to try the Sun Salutation Series for this purpose, but be sure to do them very slowly and attentively. Always maintain good posture when cooling down, to avoid incurring back strain. You may finish your exercise session, as many yoga students do, with the Pose of Tranquillity.
 What they do
▶ Keep the cervical (neck) part of the spine flexible and counteract stiffness.
▶ Contribute to a healthy spinal circulation.
▶ Prevent tension from building up in the neck.
How to do them
1. Sit tall in any comfortable position. Relax your shoulders, arms and hands. Close your eyes or keep them open. Relax your jaw and breathe regularly throughout the exercise.
2. Visualize the Infinity symbol (a figure-eight lying on its side). Trace its outline with your nose. Do this slowly and smoothly, five or more times. Pause briefly.
3. Repeat the exercise in the other direction five or more times. Rest.
Note
You may also do these stretches while standing.
What they do
▶ Enhance the effects of the Infinity Neck Stretches.
▶ Keep the shoulder joints freely moving and prevent stiffness.
▶ Improve circulation in the shoulders.
▶ Prevent a build up of tension in the shoulders.
How to do them
1. Sit or kneel in a comfortable position. Close your eyes or keep them open. Relax your jaw and breathe regularly throughout the exercise.
2. Draw imaginary circles with your shoulders in turn. Do so slowly and smoothly five or more times. Pause briefly.
3. Repeat the shoulder rotations five or more times in the opposite direction.
Note
You may also do this exercise while standing.
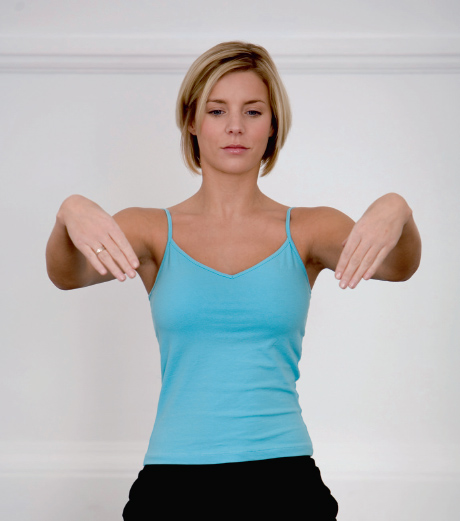
What they do
▶ Keep hands, wrists and fingers supple.
▶ Improve circulation in these areas and strengthen them.
▶ Prevent tension from building up in the hands.
How to do them
1. Sit tall in any comfortable position. Close your eyes or keep them open. Relax your jaw and breathe regularly throughout the exercise.
2. Imagine a large figure-eight lying on its side in front of you. Trace its outline with open hands, slowly and smoothly, five or more times. Pause briefly.
3. Repeat the exercise in the opposite direction five or more times. Rest.
Notes
• You may also do this exercise while standing or lying down.
• You may do it with one hand at a time.
What they do
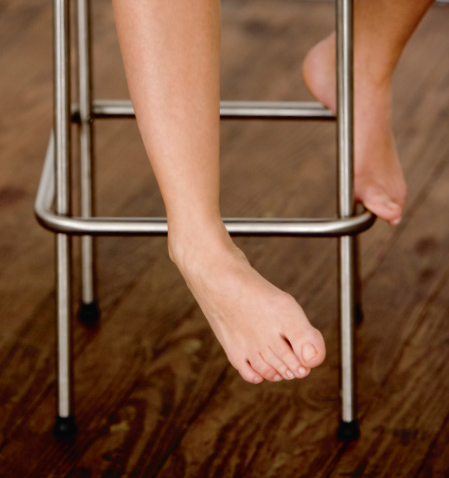
▶ Keep your ankle joints moving freely and prevent stiffness.
▶ Improve circulation in the feet.
▶ Help to strengthen the feet.
How to do them
1. Sit where you can move your feet freely. If sitting on the floor, lift and support one leg. Relax your jaw and breathe regularly throughout the exercise.
2. Draw imaginary circles with your foot or feet. Do this slowly and smoothly five or more times. Pause briefly.
3. Repeat the exercise in the other direction five or more times. Rest.
Notes
• If rotating one ankle at a time, remember to do the same number of circles on each side.
• Can be done lying on your back, with one leg raised.
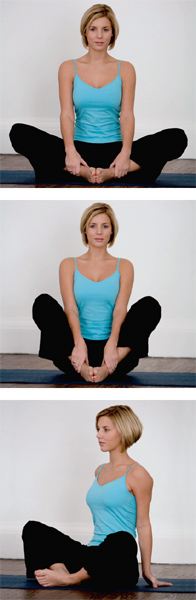
What it does
▶ Helps to keep the ankle, knee and hip joints moving freely and prevent stiffness.
▶ Stretches and tones the muscles of the inner thighs and groin.
▶ Improves circulation in the structures of the lower pelvis.
How to do it
1. Sit tall on your mat, with your legs stretched out in front. Relax your jaw and breathe regularly throughout the exercise.
2. Fold one leg inwards. Fold in the other leg and bring the soles of your feet together. Clasp your hands around the feet and bring them comfortably close to your body.
3. Rhythmically and at a moderate pace, alternately lower and raise your knees, like a butterfly flapping its wings. Do this from 10 to 20 times.
4. Carefully unfold your legs and stretch them out, one at a time. Rest.
 Caution
Omit this exercise if you have pain in you pubic area.
 Variation
1. Sit on your mat. Rest your palms on the mat beside your hips.
2. Fold your legs inwards, one at a time, and bring the soles of the feet together.
3. Alternately lower and raise your knees, from 10 to 20 times. in smooth succession.
4. Stretch out your legs and rest. Relax your arms and hands.
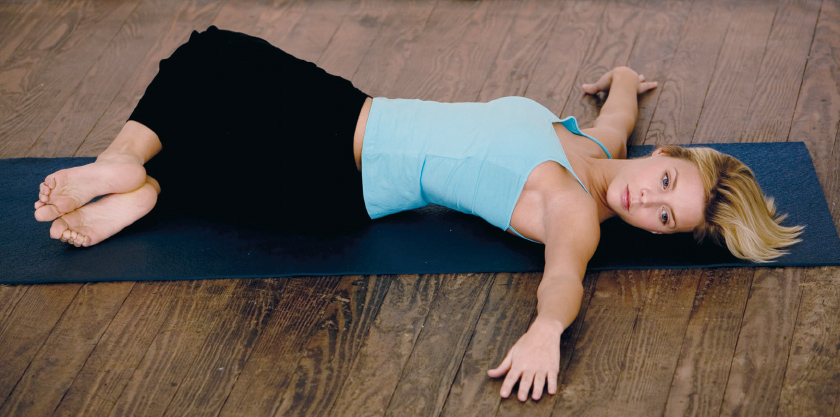
What it does
▶ Stretches, strengthens and tones the oblique and transverse abdominal muscles and those of the lower back.
▶ Helps to keep the midriff trim.
▶ Facilitates mobility in the area of the diaphragm (between chest and abdomen).
▶ Promotes the health of pelvic structures.
How to do it
1. Lie on your back with your arms stretched sideways at shoulder level. Relax your jaw and breathe regularly.
2. Bend your legs, one at a time, and rest the soles of your feet on the mat. Bring your knees towards your chest.
3. Keeping your arms, upper body, and the small of your back in firm contact with the mat, exhale and tilt both bent knees together to one side.
4. Inhale and bring your knees, as a unit, back to the centre.
5. Exhale and tilt your knees to the other side.
6. Repeat the side-to-side tilting of your knees, from 10 to 20 times in smooth succession.
7. Resume your starting position. Rest.
Variation
1. From a comfortable seated position, lean back on your elbows.
2. Bring your knees towards your chest.
3. Alternately tilt your knees, kept together, from left and right, synchronizing movement with breathing. Do this from 5 to 10 times in smooth succession.
4. Stretch your legs out and rest.
What it does
▶ Gently massages the back and helps to keep the spine flexible.
▶ Conditions the back and abdominal muscles.
▶ Loosens tight hamstring muscles (at the back of the legs). When these shorten, they affect the tilt of the pelvis and therefore posture.
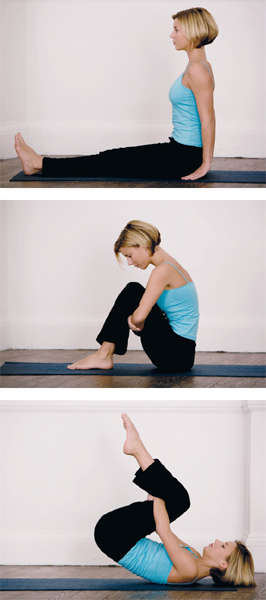
How to do it
1. Sit on your mat with your legs out in front of you. Bend your legs and rest the soles of your feet flat on the mat, close to your bottom.
2. Pass your arms under your knees and hug your thighs. Make your back as rounded as you comfortably can. Relax your jaw and breathe regularly.
3. Inhale and kick backwards with both feet at once, to help you to roll onto your back.
4. Kick forwards on the exhalation following, to help you return to a sitting position. Avoid landing heavily on your feet so as not to jar your spine.
5. Repeat the back-and-forth rolling, five to eight times in smooth succession. Rest.
Caution
Omit this exercise if you are pregnant or have been diagnosed with osteoporosis. Check with your doctor.