![]()
Maintaining a backyard farm can be an excellent way to not only increase the health of your family, but also save money, as long as you already have some tools and you are prepared to do some or all of the work yourself. If you purchase everything brand new, or have contractors come out to do all the work for you, you will not save money. Not even close.
Just as there are some tools that should be part of every backyard farm, there are some skills that every homesteader will want to know (or develop). The savings can be astronomical.
For example, the price of a small, well-built chicken coop at our local market was $450. The cost of my husband repurposing some old lumber and creating a chicken coop? Only $50 worth of chicken wire to cover the outer yard area. That’s $400 in savings right off the top. (See Chapter 1 for a photo of the finished coop.) If someone else builds your fence for you, it can cost anywhere from $10 to $15 per hour for a full day’s work, in addition to the building supplies and cost of materials.
If you are paying for everything out of pocket, chances are you’re losing money. Whether it’s worth it to you in terms of the cost versus time outlay to have the increased health benefits is something only you can decide for yourself. However, it is still necessary to have a basic understanding of repair skills because you have to expect the worst to happen, at the worst times. If your goat breaks through the fence in the middle of the night, guess when you have to fix the fence? And if you think you can call the local handyman for help at 10 P.M. you are sadly mistaken.
This chapter covers the basic skills and tools you should have or try to pick up before tackling your backyard farm.
There are certain hand tools that are absolutely necessary. I love a good spade, for example, and unlike my husband I do almost all my gardening using simple hand tools. He is the king of the shovel and triangle cultivator but I like to pick a cozy spot and hunker down and feel the dirt when I work.
When it comes to garden tools, size definitely matters. Pay attention to the handle size and test different lengths to see which is more comfortable for you, because if the handle is too short your hand tools will cost you a lot of energy to use. I like to find the handles that are in the 18-inch range for my hand tools, while my long-handled shovels and hoes are better in the 36- to 40-inch range given my shorter stature.
Can you have too many hand tools? Not as far as I’m concerned!
(Photo courtesy of Brannan Sirratt)
Garden Spade or Trowel
A garden spade is a must. I actually have two different styles that I like to use for different purposes. Plus my kids can confiscate one and I still have another to work with. Really, though, while they can be used interchangeably, there are times when one shines over the other.
A narrow spade is easier for creating small holes for seeds, or digging in dry, compact soil. The narrow blade on this spade means I won’t disturb the roots of other plants in an established garden bed, mixed border, or container planting.
I also have a deeper garden trowel that will move a larger amount of dirt. This is perfect when I’m transplanting plants and want to preserve a larger rootball. It’s also good for digging a slightly larger hole, a longer row, or building a new container planting, as it will move dirt faster.
Pay close attention to the make of the tool before you purchase it. Cheap wooden handles will dry up and become loose very quickly, so look for high-quality ash handles. Or consider the soft-grip, comfort handles with strong resin or vinyl handles. Weak metal blades will bend with the kind of use these tools will get at the backyard farm. High-carbon steel blades are more durable than flimsy metals and will hold up to lots of use.
Secateurs or Pruners
These handy tools are a must for the backyard farmer. You’ll definitely want a handheld version of pruners because it will be a lot easier to do controlled cuts on a fruit tree, berry bramble, or rose bush. There’s a level of control you can get with handheld tools that is really nice, and if you work through your garden on a routine basis you’ll be able to snip off branches while they are still young and easy to cut.
Bypass secateurs give a cleaner cut because instead of crushing the branch, the sharp blades are brought past each other. Be sure to buy a pair of pruners with blades that are easy to clean and sharpen, because with repeated cuts the blades will build up resin and sap residue and become dull. Some high-end pairs of pruners have gear-type mechanisms that help close the pruners, making them a better choice for gardeners with a weak grip.
Look for quality metal, not pressed steel, or blades that can be replaced when old ones are no longer serviceable. Handles should be comfortable to grip, sized appropriately to your hand, and made of a quality hardwood, like ash, or durable material.
OVER THE GARDEN FENCE
Just as it’s worth paying more for a good-quality metal, it’s also worth paying more for strong handles on your tools. You want your garden tools to last, so durable handles are a must. Quality hardwoods are one of the most popular materials for their longevity and durability.
Digging Fork
Digging forks are a must. They are extremely useful for breaking up the hardpan layer on new garden beds. After double digging a garden bed, before I add the bottommost layer of dirt back into the trench, I like to use a digging fork to break up the dirt as deep as possible. The strong, long tines of a digging fork allow you to punch deeper into the soil, loosening compacted areas so roots can delve deep for nutrients and water without as much effort.
Long-handled digging forks are also useful for turning over a compost bin. A digging fork’s open design allows less resistance than a shovel when trying to dig into a matted or compacted area. As with all garden tools, quality hardwood handles or durable nonslip grip handles will last much longer. Tines of the fork should be forged metal, not easily bent or broken.
I prefer short-handled digging forks for lifting established plants, as they will help preserve more of the root structure. I prefer long-handled digging forks that can be used when standing, for breaking up the bottom of digging holes, and for turning over compost bins. They can also take the place of a rake and shovel combination when cleaning out the muck from the goat pen or chicken house.
OVER THE GARDEN FENCE
Digging forks can be used to harvest root crops like potatoes because the tines are less sharp than a spade and are less likely to damage the vegetables during the harvest.

The shovel has a full blade on it and is primarily used for digging or moving dirt. The digging fork has tines that are strong and sturdy and can be used to break up hard soil, aerate compost heaps, and many other garden chores.
(Photo courtesy of Christiane Marshall)
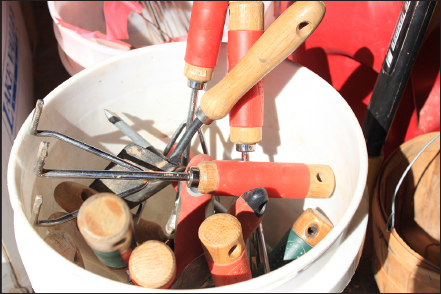
Hand Weeder and Hoe
A handheld weeder is a must in an established garden area. A full-size hoe could easily chop an established desired plant in a crowded vegetable bed or front border. A handheld weeder lets you get close and control your deadly blows to only the undesirables.
A new favorite type of hand weeder is the cobrahead weeder and cultivator. The curved head makes it comfortable to use and the longer digging portion of the tool means you can dig out long-rooted weeds like thistle or dandelion. The fact that the head is very thin allows you to get into small spaces between established plants.
The cobrahead cultivator makes weeding easy and lets you get in next to other plants already growing.
(Photo courtesy of Baker Creek Seeds)
One of my husband’s favorite weeders is the push-style, draw, or scuffle hoe. These have heads that are parallel to the ground and can be pushed along the ground just under the surface of the soil, severing the top of the weed from the root. We have a triangle-head weeding hoe that fits easily between growing plants. It’s used a lot at the beginning of the season when grass weedlings (what we call weed seedlings) are just starting to sprout and the vegetable transplants aren’t yet large enough to shade them out.
A stirrup hoe is another style that is usually used in a push-pull motion just under the surface of the soil. Again, it works to separate the leafy parts of the weeds from the roots, and is most effective before the weeds are well established. By chopping off their heads when they are still baby weedlings, you break up their growing cycle and starve the weeds out until your healthy veggies grow big enough to block the sunlight. Just picture yourself as the Queen of Hearts and run through your garden shouting, “Off with their heads!” and you’ll be alright.
Traditional hoes are great for digging furrows if you are planting crops in rows. They can be used to move mulch out of the way or hack a stubborn weed root. We have a wider-head hoe that we use both early in the season, and later in the season to cut up spent vegetable plants for adding to the compost bin. We also have a thin, angled hoe that my husband uses for miscellaneous garden chores.
Sometimes we select a particular tool for a specific area or job and sometimes we just grab whatever is close at hand. Regardless, you want your garden tools to have quality metal heads that won’t rust, bend, or resist sharpening when needed. And you want your handles to be the right size (shorter if you’re shorter and longer if you’re tall) and a high-quality material that is shaped comfortably for your hand.
While most people think of cultivating the land with a giant tractor, a smaller garden space means less expensive equipment! Whether you choose to use a mechanical device like a tiller or do everything by hand with a good shovel, a good-quality tool is a must.
Tiller
Tillers are used to dig into the ground and break it up into loose soil suitable for planting. In new garden areas, a tiller will cut through small roots, grass mats, and turf, as well as turn over the soil so you can get rid of rocks. A tiller comes with either rear tines or front tines. Rear-tine tillers are easier to maneuver and turn than front-tine tillers. Many tillers are self-propelling, which means that the tines help move the tiller across the ground.
We have a medium tiller with deeper tines that we use in tandem with double digging. We also use the tiller to turn under green mulch (I’ll discuss growing cover crops in Chapter 6) and increase the fertility of the soil. Depending on the size of your garden areas a tiller may not be necessary, but we get a good amount of use of our tiller in our backyard. You won’t need a large tiller regardless.
THORNY MATTERS
Before you invest in an expensive tiller, find out if there is a small machine shop in your area that can work on them. Inquire at the shop which brands they are able to get replacement parts for and which brands they can’t work on. If you can’t have a simple item fixed on the tiller you buy, you’re stuck with a useless machine that would otherwise need only a minor repair. They might also be able to tell you which brands they see a lot of—a hint to avoid them!
Shovels and Spades
These are the primary must-have gardening tools, and for most small-space gardens a shovel is the only tiller you’ll ever need. In many situations you can avoid the expense of a tiller completely (ours was a hand-me-down) and do all the garden preparation with a good, well-built shovel. Of all the tools you’ll invest in, the shovel should be the very last place you try to cut corners or save a buck.
Round-point shovels are the most common and most versatile shovels available. Every gardener needs a round-point shovel with a long handle to give them some leverage. Remember to sharpen your shovel as soon as you get it home because shovels and other gardening tools are always sold dull. Choose a blade with enough angle that when the blade is flat on the ground, the handle should be at a proper angle. This angle between the head and the handle of the shovel is called the lift.
Test the lift you need by setting the shovel at a straight angle so the head is straight, not angled as most people dig. You want your arms to be fully extended in front of you so when you pull your arms to your body, you will get the maximum lift, and use the least amount of work. If you have to push the handle past your body toward the ground you’ll strain your back and tire yourself out faster. Check out the video at BackyardFarmingGuide.com for a demonstration of good digging technique.
As a woman, I should mention that it is important to find a shovel that is also the right height for your body. I like the D handle shovels both to get the proper lift and to be able to grip the end of the handle without overbalancing myself. I have to be picky about the shovel I choose! I also use my lower body to push the shovel in, so it’s important to me that the step plate, or top edge of the shovel that you can mash on with your foot for extra oomph, is wide and well formed, instead of skinny and painful to step on. The bottom line is that you want your shovel to be comfortable because you’ll be using it. A lot.
Transplanting shovels, like transplanting spades, are long and thin shovels designed to get into more crowded growing areas. This is a tool that when you need it, proves its value on the first use by saving your other plants growing near the plant you’re trying to dig up. If you don’t have a transplanting shovel, a garden fork might work well instead.
A square shovel, or cutting spade, is rectangle shaped. It’s often used in landscaping to create the clean-cut edges between planter beds and lawns. We tend to use it as a muck shovel because the flat blade surface will scrape up the manure off the floor of the goat pen or chicken house more easily. For that alone it will save you enough time and trouble to make it worth the purchase. Again, a comfortable grip is an absolute must because soggy hay and manure can be heavy by the shovelful.
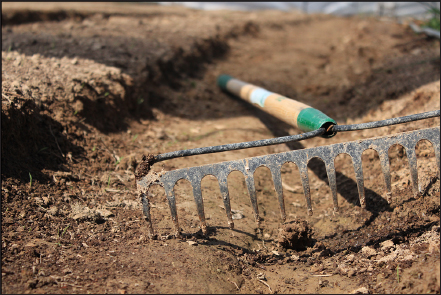
Garden Rake
This isn’t your springy, wimpy, autumn leaf rake. This is a true garden rake. Forged metal with tines that are stiff instead of yielding, the garden rake is heavy but moves easily over fresh-tilled soil. Nothing is better for creating a nice seedbed for planting small seeds than a good garden rake. You can push it deeper into the soil to loosen dirt clods and fish out rocks, or you can float it over the surface to create a fine seedbed for outdoor sowing.
The handle should be long enough to extend your reach across the full width of your garden bed (we have our garden sections 4 feet wide) without bending over or overreaching. Ours is actually completely metal with a metal handle and rake both making it balanced to maneuver, if heavy to actually lift and carry around. The heaviness of the rake means it will also move wet or soiled hay from the goat pen and rake it into a pile more easily. A leaf rake would just skip over the top of the muck and not actually move it into a pile.
Strong metal tines and a heavy head mean less force is needed to dig out dirt clods and rocks.
(Photo courtesy of Brannan Sirratt)
THORNY MATTERS
All tools with angles like a rake, spade, and shovel should be placed carefully when not in use. You know the cartoons where the gardener steps on the rake and it smacks him in the face? Don’t be that guy.
There are a lot of other tasks around the backyard farm other than just gardening, and basic building and fence building seem to be never-ending. These tools are items you’ll use again and again to build or repair your fences and outbuildings.
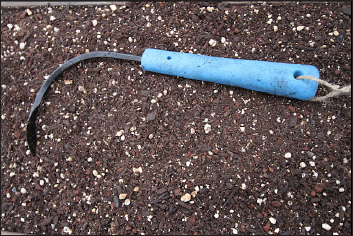
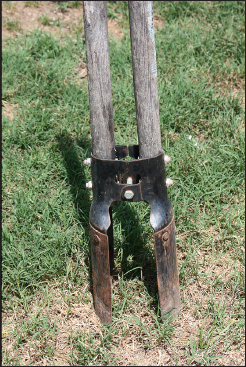
Posthole Digger
This awkward-looking contraption is used to dig a deep hole straight into the ground at any kind of depth. A posthole digger has two handles and a pincher mouth at the end with two moveable pieces. You press the handles together, which forces the mouth pieces apart, and drive them into the ground with force, then pull the handles apart, pinching the jaws shut, which will close up and hold a chunk of sod and dirt. Lift the jaws (don’t let them come apart and drop your dirt!) and move the dirt to the side, closing the handles back together as you do to open the jaws and release the dirt. This process repeats until the hole is as deep as needed for your fence post. Most fence posts are set at a depth of 2 feet. That’s really deep to try to dig with a shovel, so a posthole digger is a must.
Don’t try to dig a posthole when the ground is too wet, or your hole will fill with water.
We use a posthole digger to set clothesline posts, fence posts, and even corner posts for sheds and stationary outbuildings. I’ve also used the posthole digger for deep-rooted asparagus crowns because some of the roots are 2 feet or longer. It is handy for planting deeply planted bulbs in a pinch, too, and when working as a team, my husband Sidney and I planted 100 bulbs in an hour. He’d grab a pinch of soil, lift it up, I’d place in the bulb, and he’d replace the plug of sod right back where he grabbed it from.
It would be a lot harder to set a post without a posthole digger.
Make sure the moveable pieces of the jaws are well made. Cheap metal pins will break from the strain and leave you with two useless halves. The handles must be comfortable to use or you’ll soon tire out. Be sure that your blade edges are sharp! I cannot stress this enough. File your posthole digger edges after every use. It takes just a minute, and you’ll always have a fresh, sharp edge.
THORNY MATTERS
Always check for the placement of underground wires, gas lines, or water lines before digging around in your backyard. A quick call to your utility companies can save a great deal of hassle—or even your life.
These are especially handy when working with wire-and-post fencing as the pliers are specifically designed to hold wire (barbed or unbarbed), pull staples, cut wire, and assist in twisting wire so it stays in place. Fencing pliers are crazy looking—my kids call them dragon pliers—but they can sure get the job done. Good fence pliers also have a hammer piece and enough heft to act as a hammer when needed. It’s a great all-in-one tool for fence work, maneuvering chicken wire cages, or repairing holes in a panel or welded wire fence.
Wire Cutters
These won’t need to be a separate purchase if you’ve picked up a true pair of fencing pliers, which will include wire-cutting capabilities. To make your own anything on the homestead you’ll need a good pair of wire cutters. You can snip pieces of baling wire to use as ties on your trellis in the garden. Wire a gate closed. Make a compost bin out of scrap lumber and chicken wire scraps. Put together a brood box. Cut a length of welded wire that’s too long for the area you’re trying to section off. Wire cutters can cut any metal pieces of wire and fencing.
A good grip is a must because these tools rely so much on hand strength. Be sure the handles aren’t so far apart you lose your leverage, and look for high-quality metal blades that won’t dull too quickly. It’s a pain to have to stop halfway through a project to sharpen your blades because they won’t hold an edge.
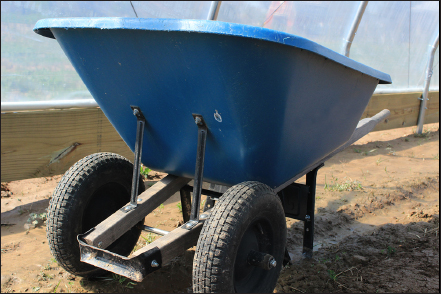
Wheelbarrow
You must have a good wheelbarrow for the garden and backyard farm. Most of us won’t need a mechanical garden cart or tractor in our small, intensive spaces. But a wheelbarrow will get a lot of use, and a high-quality model will last for years if cared for properly.
Look for a sturdy wheel instead of a cheap tire with tubing that will go flat within a couple months. When it comes to durability and ease of use, a wide tire is so much better, as a thin, hard tire can sink into soft soil or soggy areas, making it ten times more difficult to move your load. Check the wheel bearings carefully and look for a high-quality construction that won’t break down.
On the plus side, a two-wheeled wheelbarrow is more stable and less likely to tip over while moving. It can also be easier to push over shifting ground like loose gravel or sandy paths. On the downside, a two-wheeled wheelbarrow makes wider turns and needs more room to move through a garden area. When maneuverability is more important than stability, a one-wheeled wheelbarrow might be best.
A two-wheeled wheelbarrow will be more stable than its one-wheeled counterpart, but harder to turn and maneuver.
(Photo courtesy of Brannan Sirratt)
If you get a metal wheelbarrow bucket, or tray, be prepared to repaint it on a yearly basis to avoid rusting out the bottom and to cover the scratches that will inevitably develop during use. If you choose plastic, be sure that you select a UV-resistant plastic that will withstand rotting in the sun so you’ll get more than a couple years of use out of your wheelbarrow investment. Either material is fine but whichever you choose, select a model with a deeper tray so your load won’t bounce or slide out. A deeper tray will also allow you to put the heaviest portion of your load over the wheel, making it easier to move.
Test the handles before you purchase a wheelbarrow and make sure the grip is easy to hold. Our first wheelbarrow had sturdy handles but they were so thick they hurt my hands to grasp for any length of time. You also want the handles to rest close enough to the ground when the barrow is still that you can easily lift the wheelbarrow up for maneuvering around the yard.
Check the struts and braces to make sure they are made of strong metal that won’t bend under heavy loads. Any metal pieces should be made of rust-resistant metals or painted to avoid rusting. Clean any manure or debris out of the wheelbarrow tray, and off the metal struts, to avoid encouraging rust, and if you store the wheelbarrow outside don’t let rainwater collect inside.
STORING YOUR WHEELBARROW
Store your wheelbarrow upright so the metal stands, or braces, aren’t in contact with the wet ground to build up moisture and corrode. Be sure that water isn’t left to stand in the tray of the wheelbarrow, as this can rot the bolts in the bottom of the tray, even with plastic wheelbarrows. Plastic wheelbarrows should be stored out of direct sunlight to avoid warping and weathering. Space-saving hooks and braces are available so wheelbarrows can be hung on a shed or garage wall up and out of the way.
Your wheelbarrow is the single best way to move heavy or wet loads such as chopped wood, gravel, rocks, paving stones, compost, manure, bedding, or topsoil any distance in your backyard, so be sure you choose one that will hold up. It’s also good for giving the kids a fun ride on a lazy Saturday afternoon.
Other Must-Have Tools
Other basic tools that you’ll want to have handy are items you probably already have around the house. These are all tools we use on a weekly basis, for some project or another:
![]() Hammer
Hammer
![]() Screwdrivers (Phillips head and flathead)
Screwdrivers (Phillips head and flathead)
![]() Pliers
Pliers
![]() Safety goggles and face mask
Safety goggles and face mask
![]() Tape measures in different lengths (a 50-foot tape measure is handy for outdoors)
Tape measures in different lengths (a 50-foot tape measure is handy for outdoors)
![]() Sturdy stepladder
Sturdy stepladder
![]() File (for sharpening all those tools we talked about earlier)
File (for sharpening all those tools we talked about earlier)
![]() Cordless drill
Cordless drill
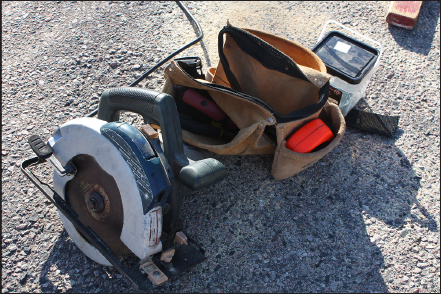
![]() Circular saw
Circular saw
![]() Sawhorses
Sawhorses
![]() Crowbar
Crowbar
![]() Square
Square
![]() Level
Level
![]() C-clamps
C-clamps
We’ve found that picking up quality tools, and taking care of those tools, has saved us a great deal of money in the long run. The cheapest tools are usually the hardest to work with and the quickest to break. The frustration factor alone makes it worth spending a little more money up front.
A variety of tools are needed for regular building jobs and tasks around the backyard farm.
Care for your tools by cleaning the blades after every use. Once a year give them a thorough treatment with a stiff wire brush, and sharpen the edges at this time. Check any bolts, pins, braces, or joints to make sure they are tight, not rusting, and clean from debris. When they are clean, spray with WD40 to prevent rust during the winter.
Treat hardwood handles once a year as part of your regular winterizing checklist by sanding them lightly, and then oiling the handles with linseed oil. Store your hand tools blade-down in a bucket of sand with enough motor oil added in to make the sand slightly wet. The linseed oil keeps the handles water resistant, and the sand/motor oil treatment keeps the blades rust resistant. Now your entire set of tools will last much longer and work better whenever you’re ready to head to the garden.
OVER THE GARDEN FENCE
The motor oil in the sand bucket doesn’t need to be new oil. Most people I know who use this trick will save their used motor oil from an oil change on their cars. Country repurposing at its finest!
I’ve tried to cover some of the how-to-use information when I was discussing the various tools for the backyard farm. And of course, more information about specific uses will be found in the chapter discussions where that information is most needed. But this section briefly touches on some of the basic building skills that are needed for keeping a backyard farm profitable. You can’t afford to hire out simple things like making a compost bin or brood box (see Appendix A for a simple plan to make your own brood box).
The best way to learn basic building skills is to work alongside someone who is more experienced than you are. I learned to use power tools in my theatre classes at the university where all students were expected to help build set pieces. I made it a point to learn each tool and find out the principles of building the various types of set pieces, and I’m grateful for that knowledge now. There’s not much difference between cutting a 2×4 to build a square set wall piece and building a compost bin, except where you place the lumber.
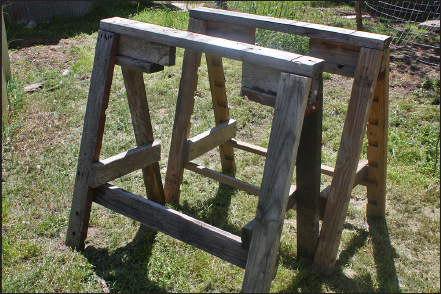
Cutting Lumber
A basic circular saw, mentioned earlier in the chapter as a must-have tool, can be used for a lot of the lumber-cutting needs on a backyard farm. Combined with a pair of sawhorses to elevate the lumber, you can cut lumber, posts, and plywood as needed to assemble any number of sheds, outbuildings, cold frames, or other structures.
These homemade sawhorses, made from scrap lumber, make it easier to cut your own lumber at home.
Sidney used to have an old hand-me-down circular saw that had been at his family’s place forever, I think. Once we had kids I insisted that we invest in a newer saw with all the modern safety features and guards in place. Look for a quality saw that has a finger guard to protect yourself from accidental cuts, and a safety lock feature that will prevent the saw from accidentally turning on. These functions provide greater safety when using your saw.
THORNY MATTERS
Always wear safety goggles to protect your eyes from flying sawdust and chips of wood. If you’re cutting sheetrock or painted lumber, wear a face mask as well to protect your lungs from inhaling particulates from the air. Watch out that you don’t accidentally cut the power cord and be sure the area where the cut lumber piece will fall is free from children, pets, or feet.
Mark your lumber for cuts carefully! Nothing is worse than the feeling you get when you place that board up and it’s the wrong size. It’s such a waste that could be avoided by carefully double-checking your measurements prior to making the actual cuts.
When you’re marking a cutline on a short piece of wood like a 2×4 or fence post, you can use a square or level and simply draw a straight line end-to-end in the appropriate place. For a long board like a sheet of plywood, the marks can be a little more complicated. Your square won’t be long enough to allow you to draw straight down the edge with a pencil.
To mark a board like this, measure one side and make an arrow or notch drawing with the point at the exact spot to cut. Then measure the other side of the board and make a similar mark. Use a chalk line stretched taut between the two marks, lift it up slightly, and let it go to “pop” it so a straight chalk line is created. This will be your straight cutline to follow when you are cutting your board. Sidney says if you don’t have a chalk line you can use a 2×4 but the line might not be as straight.
To actually make your cut, place the board securely on the sawhorses with the cutline in the empty space between the horses (you don’t want to accidentally cut your sawhorses!). Lift the guard out of the way, and place the exposed blade near the board but not touching. Then hold your saw firmly with two hands and turn the saw on.
Press it forward slowly as the blade cuts the board allowing you to advance the saw forward. Watch the line! Keep your mark in line with the saw blade so your cut will be accurate and straight.
When you reach the end of the board, the feel of resistance in the board and the sound will change—slow down and be prepared for the board to fall when the cut is completed. If you have a partner helping you, he or she can hold the piece of the board you’re cutting (if there’s room to safely hold the board without getting too close to the saw) and keep it from falling. Release the trigger as soon as the board is cut to stop the saw blade from spinning and prevent any accidental injuries.
Putting the Wood Together
We often use screws to join our wood pieces as it’s easier to assemble, and in the case of mistakes, disassemble, as compared to nails. In windy weather, or extreme heat that dries out the wood, nails can be prone to loosening and coming out of the wood. Screws are less likely to do so. Backyard farmers with an eye on the budget will find that nails are less expensive than screws, however, so it’s up to you which method you want to use and when.
If you are screwing two pieces of lumber together, you will find that a high-quality (a.k.a. not the cheapest) cordless drill makes your job a lot easier. Invest in a drill that allows you to reverse directions easily and has interchangeable heads for a variety of tasks.
OVER THE GARDEN FENCE
You should have more than one battery for your cordless drill, and always have a charged battery on hand. Nothing is more frustrating than getting halfway through a project and having to stop to charge your drill.
When fixing lumber together at a right angle to form the corner of a box or wall frame, use more than one screw or nail. Multiple screws will stabilize the boards. You can usually screw from the outside piece so that the points of the screws are not exposed where you can get cut. If in doubt, screw (or nail) from the thinnest piece of wood into the thickest piece of wood as when attaching a plywood siding piece to a 2×4 frame.
Line up the end of one board with the side of the other board to get a good idea of where you’ll be attaching the boards. Don’t finish tightening your screws, though, until you’ve used your level to make sure everything is as square and level as possible.
If you are screwing the boards together near the end of the board, or attaching thinner pieces as with framing or trim, you will probably want to create a hole in the wood with your drill first. These are called pilot holes or clearance holes, and they allow the screw to easily penetrate the wood without splitting, going off course, or leaving a gap between the two pieces of wood. Use a bit that’s slightly smaller than your screw when creating these pilot holes so your screw still has something to grab on to.
Always use the right bit for the job. Never use a bit that is worn or has nicks in it, because it won’t turn the screws properly. Sidney prefers star head screws as these won’t slip off the screw as easily. Phillips head screws tend to strip off more easily, and are more difficult to back out if needed. He also uses a magnetic bit holder, usually an extra purchase, but worth every cent because it helps prevent losing your bits.
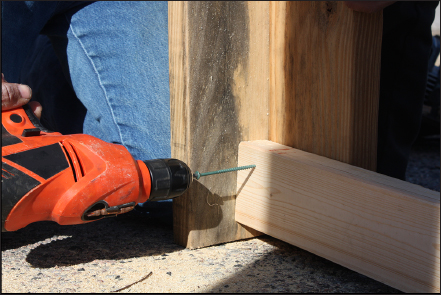
Hold your drill at a strong right angle and press firmly. If the screw doesn’t go in easily, you may need to drill a pilot hole first.
Hold your drill at a right angle, use firm pressure, and advance the screw evenly. If the screw goes all the way in, but the two pieces of wood haven’t tightened together, back the screw out of the second piece, press the two boards firmly together, and then screw it in again. When using small screws, especially brass or aluminum screws, change the clutch on your drill to the lowest setting to avoid snapping off the screw head.
Most building projects are an adaptation of basic building skills. It’s not any different to build a greenhouse than it is to build a shed or a chicken coop except that the materials used may be slightly different, and the measurements will change. You will find that investing in even the most basic building skills will pay huge dividends in what you save on the backyard farm.