THE POWER OF THE DESERT, OF THE PLANET, SURGES LIKE ELECTRICITY UP THROUGH MY BOOTS (VIETNAM-STYLE JUNGLE BOOTS, OLD AND WORN) TO HEART AND HEAD AND OUT THROUGH SONG INTO THE MOONY SKY, COMPLETING THE CIRCUIT.
—“A Walk in the Desert Hills” in Beyond the Wall, Edward Abbey
Feet are marvelously complex, both flexible and tough, but if they are to carry you and your load mile after mile through the wilderness in comfort, they need care and protection. More backpacking trips are ruined by sore feet than by all other causes combined. Pounded by the ground and bearing the weight of you and your pack, your feet receive harsher treatment than any other part of your body.
This chapter covers the generic styles of hiking boots and shoes, the critical process of fitting footwear, how and of what materials footwear is constructed, and finally models and brands. (A note on terminology: by shoes, I mean footwear that does not cover the ankles; anything that does is a boot.)

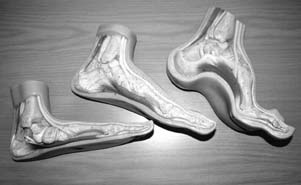
Feet come in different shapes as well as sizes.
A variety of accessories can make walking easier and safer—from staffs to socks and, for snow travel, ice axes, crampons, snowshoes, and skis. Though snowshoes and skis aren’t walking accessories per se, they make travel in deep snow much easier, especially with a heavy pack. The end of this chapter covers all these accessories.
The main purposes of backpacking footwear are to protect your feet against bruising and abrasion from rough wilderness terrain, to cushion your soles from the constant hammering of miles of walking, and to provide good traction on slippery, steep, and wet terrain.
Protection for the sole of the foot comes from layers of cushioning; these layers must be thick enough to prevent stones from bruising the feet but flexible enough to allow natural heel-to-toe movement. Thick soles also insulate against snow and cold ground and the heat of desert sand and rock. The tread of the outer sole offers grip; the best soles not only give security on rough terrain but also minimize damage to the ground.
Footwear should also support your foot and ankle, though this is less important than some people think. Support comes from a fit snug enough to keep the foot from slipping around inside the shoe but not so tight that it won’t allow the foot to swell. The ankle is supported by a stiff lower heel counter, or heel cup (see Heel Counters and Toe Boxes, page 56, and the illustrations on page 57), and not simply by a high-cut boot; some running shoes give more ankle support than some boots do.
Keeping your feet dry isn’t a major purpose of footwear. Top-quality leather is fairly water resistant, but only boots with waterproof-breathable membrane linings can be considered waterproof. How long they stay so is open to question, however, and they have other disadvantages. Plastic and rubber boots are waterproof, of course, but they make your feet hot and sweaty except in snow.
Once upon a time, virtually all boots were what we now call heavyweight—with leather inners and outers, leather midsoles, steel shanks, and heavily lugged rubber soles. A typical pair of size 9s weighed at least 4 pounds, and it took dozens, if not hundreds, of miles of walking to break them in. A few lighter boots were available, but they were neither very supportive nor very durable.
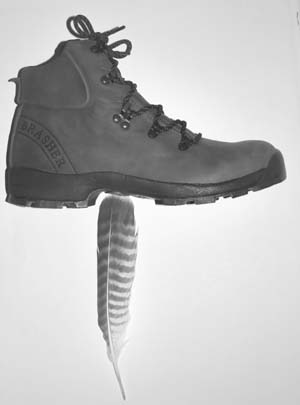
Lightweight boots mean less weight to lift with each step.
The introduction of lightweight leathers, synthetic fabrics, and running shoe features in the early 1980s revolutionized hiking footwear. Most backpackers were won over, though some stayed—and still stay—loyal to the old heavyweights, and the lightweight versus heavyweight debate has rumbled on ever since. I am firmly on the side of lightweight footwear. My conversion came during a Pacific Crest Trail through-hike in 1982. I set off from the Mexican border in heavy traditional boots that soon gave me hot, sore feet. After just a few days, I ended up carrying them and wearing running shoes (brought along for campwear) much of the time. The heavy boots were more comfortable on my back than on my feet. Only in the snow of the High Sierra did I need them. After 1,500 miles, when the running shoes were just about worn out, I replaced both boots and shoes with a pair of the then-new fabric-suede hiking shoes, Asolo Approaches. These weighed less than half as much as my boots. The staff in the store where I bought the shoes were horrified to hear that I intended to backpack more than a thousand miles in them. But my feet rejoiced at being released from their stiff leather prisons, and my daily mileage went up. Although they were full of holes by the end of the trip, the shoes gave me all the support and grip of my old boots and vastly increased my comfort. I have never since worn heavy traditional footwear for summer backpacking.
That lighter footwear is less tiring seems indisputable. The general estimate is that every pound on your feet equals 5 pounds on your back. If that’s correct, and it certainly feels like it, then wearing 2-pound rather than 4-pound boots is like removing 10 pounds from your pack. Boots weighing more than 3 pounds make my feet ache after about twelve miles, and after fifteen miles all I want to do is stop. Yet in shoes that weigh half as much, I can cover twice that distance before my feet complain. This isn’t surprising when you consider that I lift my feet about 2,500 times a mile (my hiking stride is about two feet long). That means I’m lifting 7,500 pounds per mile when I wear 3-pound boots but only 3,750 pounds when I wear shoes that weigh a pound and a half. Over fifteen miles that’s 112,500 pounds lifted with the boots versus 56,250 pounds with the shoes, an enormous difference.
Heavier boots usually also mean thicker materials and more padding. In all but winter conditions this can give you hot, sweaty feet, which swell and ache and are more apt to blister.
The ultimate in weight saving is to wear no shoes at all. This might seem like a good way to hurt your feet, but in warm weather walking barefoot is perfectly feasible. I occasionally walk short distances barefoot when my feet feel hot and sweaty in my shoes, and I often wander around camp barefoot. Wearing sandals (as I do for most summer hiking) is close to going barefoot. If you’re interested in this idea, Richard Frazine’s The Barefoot Hiker is worth reading (see also barefoot ers.org/hikers).
One of the main arguments for heavy, stiff footwear is that you need it for ankle support when carrying a heavy pack or hiking on rough terrain. This is not true.
To begin with, most walking boots offer little ankle support, since their soft cuffs give easily under pressure. (Try standing on the outer edge of the sole of a standard walking boot and you’ll feel the strain on your ankle.) Only boots with high, stiffened cuffs give real ankle support. My plastic telemark ski boots give good ankle support; I can balance on the edges without strain and traverse steep, icy slopes on my skis without my ankles’ aching. But the stiff ankle support restricts foot movement so much that when I walk in these boots I loosen the clips to let my ankles flex fairly normally. Stiff-ankled boots and natural foot movement do not go together.
What actually holds your ankle in place over the sole of a shoe is a rigid heel counter, or heel cup, found in good-quality running shoes as well as most hiking footwear (see Heel Counters and Toe Boxes later in this chapter, page 56). I once tested a pair of high-top leather boots without heel cups. On rough terrain they were worse than useless—my foot constantly slid off the insole, and my ankle kept twisting sideways. I ended up using them only on good paths between campsites. For mountain ascents, I wore the running shoes I’d brought along as campwear—their heel cups made them more stable than the boots.
Some of the greatest strain on your ankles occurs when you run over steep, rough ground. Yet mountain runners, who do this regularly (sometimes for days on end), never wear boots. Try running in boots and you’ll see why. For traversing steep, rugged terrain, you need strong, flexible ankles and lightweight, flexible footwear. Doing exercises to strengthen your ankles is better than splinting them in heavy, rigid boots.
The other argument in favor of heavy boots is that stiff soles protect your feet from rough terrain and help support heavy loads. I disagree. In my experience, restricting normal foot movement with stiff soles makes me feel unstable and insecure. Lateral stiffness—from side to side—is fine, though not required on most trails, since this stops the footwear from twisting under your feet when you traverse steep terrain. Heel-to-toe stiffness is what restricts natural foot movement.
Stiff soles can’t flex enough to accommodate to the terrain. I find they prevent me from placing my feet naturally, leading to a slow and clumsy gait, which could lead to injury, since your feet are repeatedly forced into the same unnatural position. Also, straining against the stiffness requires energy and is tiring.
What really protects against rough terrain is footwear that cushions your feet and stops stones and rocks from bruising them. The best way to do this is with a hard but flexible thin synthetic midsole plus a shock-absorbing layer. Most lightweight boots and shoes have soles like this.
In flexible footwear you can place your whole sole in contact with the ground, even on steep terrain, rather than digging in your heels or boot edges, which jars your legs, can make you unstable, and often gouges holes in the hillside.
Sole stiffness is required only on steep, hard-packed snow. Then a bit of stiffness makes it easier to kick the boot toes and edges into the snow.
Boots and shoes are complex constructions, and there are many ways of making them, using many different materials. You can buy and use footwear happily without knowing whether it has a “graded flex nylon midsole” or “EVA wedges” or is “Blake sewn.” (I’ll explore the more relevant terms in the Footwear Materials and Construction section later in this chapter.) What may be more important to you is whether the boots contain any recycled materials (many now do). The selection is enormous (a recent gear guide lists forty-two hiking footwear companies and more than four hundred models, and this isn’t comprehensive). Choosing footwear can be daunting. But if you go to a store that has a good selection and a knowledgeable, helpful staff trained to fit boots, you can’t go far wrong. Those who want to know more will find information about materials and construction below.
Shoes designed for trail running and adventure racing make ideal lightweight backpacking footwear, as do the hiking shoes made by many boot companies, often described as cross-trainers, trail shoes, or multisport shoes, suggesting that the makers are not sure what they’re actually for or whom to aim the marketing toward. Construction usually features suede-synthetic fabric uppers, often with large mesh areas for breathability, shock-absorbing midsoles, and strong heel counters. Because these shoes are not very warm, I wouldn’t recommend them for snow or very cold weather, but for summer trails, dry or wet, they’re a good choice. I wear them anytime I think sandals might be too cold or not quite protective enough.
Some trail shoes incorporate toe boxes, graded (for flex) nylon midsoles, and even half-length metal shanks (for explanations, see Footwear Materials and Construction later in this chapter). These weigh more than simpler designs but also give a little more protection.
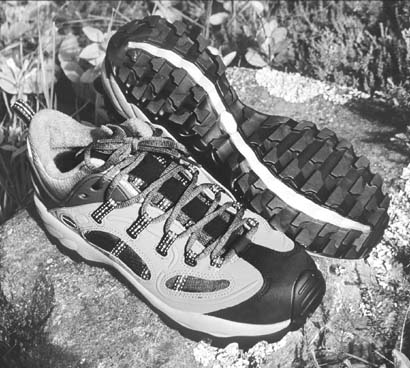
A trail shoe (Merrell Exotech).
Shoes weigh from 20 to 25 ounces a pair for the lightest running shoes to 40 ounces or so for the heaviest trail shoes. (Be wary of look-alike street shoes, which probably won’t stand up to back-country use for long, and of road-running shoes without enough tread for good grip on rough, wet ground. To avoid these, buy from a reputable backpacking gear retailer.)
Trail shoes are usually designated as suitable for easy to moderate trails with light loads. I think this does them a disservice. I’ve carried heavy loads—50 to 60 pounds—over rugged mountain terrain in trail shoes without trouble.
This is the most popular footwear category and has many names, including trekking, trail, off-trail, long-distance hiking, lightweight, and more. The designers hope one of these descriptions will catch your attention. Lightweight boots weigh from 2 to 3 pounds, the lighter end shading into the higher-cut trail shoes, the heavier end into midweight boots suitable for occasional crampon and snow use. The category includes most synthetic-suede boots and quite a few leather ones. The advantages of lightweights are comfort and weight. However, they are not usually waterproof because of the thin materials (except, for a while when new, those with waterproof-breathable linings), and some have many vulnerable seams. Lightweight boots reach the ankle or higher and have protective rands, or bumpers (either full or just at the toe and heel), cushioned linings, sewn-in tongues, graded flexible midsoles, and on some models, half-length shanks. When I wear boots they are usually light ones. They can cope with most terrain except steep, hard snow and ice. I wore a pair of 34-ounce leather lightweights for most of the Arizona Trail with a pack that weighed 70 pounds at one point (six days’ food and three gallons of water). They lasted the 800-mile hike and were very comfortable except on the hottest days, when I wore sandals.
Weighing from 3 to 4 pounds, medium-weight boots are good for mountain and winter backpacking where cold, wet weather is expected and crampons may be needed. The best models combine the durability and support of traditional boots with the comfort of lightweight designs. Although most have one-piece leather construction, a few models are fabric-leather combinations. Most medium-weight boots incorporate a sole stiffener—either stiff nylon midsoles or half-length shanks or both—and can be fitted with crampons for hard snow and ice. Generally these boots are designed to cope with rugged, off-trail terrain in any weather. The best ones are made on curved lasts and feature one-piece top-grain leather, padded sewn-in tongues, heel counters, toe boxes, and shock-absorbing midsoles or dual-density outsoles. Many also include waterproof-breathable sock liners.
The proper fitting of medium-weight boots is critical, and a short break-in period is advisable.
Heavy boots (4 pounds and up) are, in my opinion, too stiff and heavy for most backpacking, though some traditionalists prefer them. But they are good for easy mountaineering—trips that combine hiking with scrambling, easy rock climbing, or long periods of crampon use—the type carried out on easy alpine snow ascents in summer. Light- and medium-weight footwear may be too soft and flexible for these activities, especially crampon use. Even heavyweight designs have modern features, though, with synthetic cushioning midsoles, graded nylon midsoles, footbeds, synthetic linings, curved soles, and shock-absorbing heel inserts.
Heavyweights can require considerable breaking in. I find them uncomfortable and tiring to walk in and wear them rarely—only when prolonged crampon use and step kicking in snow are likely. I can accomplish most of the very easy snow and ice climbing I do when backpacking using medium-weight boots that accept flexible crampons and are far more comfortable on easier terrain; on steep, rocky terrain where scrambling and easy climbing may be required, I find lightweight footwear perfectly adequate. The latest heavy boots are more comfortable than traditional models, though, because of rocker soles and carefully shaped uppers.
Hiking or sports sandals are now my favorite footwear for summer hiking, and I’m using them earlier and later in the season too—whenever there’s no snow—with waterproof-breathable socks for wet cold and wool socks for dry cold. I long ago overcame my first reaction: that they might be fine for leaping out of rafts in the Colorado River but that their only use to the backpacker was as campwear and for river crossings. Once I tried a pair, I quickly became a convert. Not just any old sandals excel for hiking, of course. To be suitable for walking any distance, they have to support the feet, cushion against hard, rough, and hot surfaces, and grip adequately. The best of them do all of this very well.
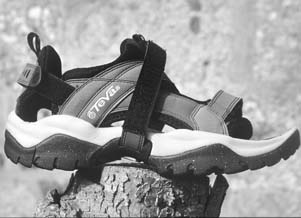
A hiking sandal (Teva Wraptor 2).
Essential features are thick, shock-absorbing soles with a shaped platform that supports the foot; a deep tread for grip; and a strapping system that holds the heel and forefoot firmly. Straps may be leather, synthetic leather, or nylon webbing. The last two materials absorb little moisture and dry quickly and would be my first choice for wet-weather use. They are usually fastened by hook-and-loop (e.g., Velcro) fabric, though some models use clip buckles.
A broad and fairly rigid heel strap is needed to keep the heel centered over the sole. Some models (Teva Wraptor, Chaco Z1) have instep straps that run over the foot, through the sole, and back over the foot. With these it’s easy to get a very snug fit. I also look for curved or rimmed edges that protect the feet—especially the toes—from bumping against rocks and stones.
Like other footwear, sandals need to fit properly. Your foot shouldn’t hang over the sole at the sides or at the toe or heel, and the straps should hold the foot snugly in place without rubbing. Try sandals on and walk around the store to see if they rub anywhere, just as you would with boots. If you’re going to wear them without socks, you may need a size smaller than your boot size. Stabilizing footbeds like Superfeet won’t stay put in most sandals, so if you need these, sandals may seem a poor choice. But footbeds will fit in Bite sandals such as the X-Trac and the Xtension. I tried the X-Tracs on a six-day, 115-mile hike with Superfeet fitted and found them comfortable, well cushioned, and supportive. Also many sandals have firm, shaped soles that mimic the effects of footbeds.
Although I haven’t had any problems with sandals, they obviously have limitations. They’re fine on trails and most rocky terrain but not so good in spiky vegetation. In deserts you need to take great care to avoid cacti; in forests, thorn bushes can be a problem. Though clearly best suited to warm or dry conditions, they can be worn with wool socks when it’s cool and dry and waterproof-breathable socks when it’s wet. I first learned just how superior sports sandals are to other footwear in hot weather on a trek in the Himalaya, when I wore a pair for more than 75 miles on rugged, steep, stony trails. My feet stayed dry and cool and never felt sore or swollen, nor did I suffer any blisters. Sweaty socks weren’t a problem—I wore socks only when it was cold and in camp. When streams crossed the trail, I sloshed straight through, unlike the others in the party, who had to stop to remove their boots and socks. Wearing sandals toughens your feet, too, as I found at the end of a Nepal trek, when I did a 2,000-foot scree run in them. The stones that slid between my feet and the sandals were irritating, but they didn’t bruise or cut my feet. Really sharp tiny stones, like the pumice found in the Devils Postpile region of the High Sierra, are quite painful, but they would be if they got in your boots, too. An advantage of sandals is that usually you just need to tap the toe on the ground to shake out debris—much quicker than removing boots or shoes.
Since that Nepal trek, I’ve worn sandals for a 500-mile, five-week hike in the High Sierra; two-week trips in the Colorado Rockies, the Grand Canyon, and the High Uinta Mountains in Utah; and innumerable day and weekend hikes. Whereas sandals used to be my backup footwear, now I sometimes carry lightweight shoes for cool evenings in camp or the occasional cold, stormy day. Mostly, though, I make do with socks.
Five weeks is my longest hike in sandals. Others have gone much farther. Scott Williamson walked the Florida Trail and the Appalachian Trail in sandals, plus the country in between, and Hamish Brown hiked the 900-mile crest of the Atlas Mountains in Morocco in sandals. Ray and Jenny Jardine wore sandals over a significant portion of the Pacific Crest Trail, though Ray reported that the soles of his feet dried out on this trip and developed painful, deep cracks that took a long time to heal. On my 500-mile High Sierra hike, I had the same problem, with splits appearing in the tips of my big toes. Sunscreen kept the cracks moist and helped them heal, but one got so bad I ended up covering it with 2nd Skin gel, taped into place. Under this dressing it healed in about a week. It’s wise to apply sunscreen to bare feet anyway. They don’t usually see much sunlight. In sandals they are exposed and, just like any other part of your body, can get burned. Straps can rub, too. If they do, you need a patch of moleskin, Compeed, 2nd Skin, or other hot-spot treatment, just as with boots.
Hiking sandals weigh from 20 to 35 ounces, comparable to hiking shoes. If you just want a pair for campwear, simpler sandals like flip-flops are much lighter.
Take your time when choosing footwear—if the fit isn’t right, you’ll suffer. Nothing is worse than footwear that hurts. You need to consider the types of boots and shoes available, construction methods, and materials, but the most modern, high-tech, waterproof, breathable, expensive boots are worse than useless if they don’t fit. Given the bewildering variety of foot shapes, good fit entails more than finding the right size. It’s unwise to set your heart on a particular model of boot or shoe before you go shopping, however seductive the advertising or the recommendation from a famous hiker, mountaineer, or even backpacking author. Since trying on footwear is essential, this is one item I wouldn’t buy on the Internet or from a mail-order catalog.
All footwear is built around a last, a rough approximation of the human foot that varies in shape according to the bootmaker’s view of what a foot looks like. Lasts sometimes are designated “American,” “European,” or “British,” but these descriptions don’t mean much in the real world and can be ignored.
Since women’s feet are generally narrower and lower volume (less volume relative to the length and width) than men’s, women’s boots are made on different-sized lasts. Men with small, narrow feet may find that women’s boots fit them best, just as women with larger, wider feet may prefer men’s boots.
Curved lasts, which produce a boot with a “rocker” sole, make a big difference, especially in stiff-soled, heavy boots. The curve of the sole rolls with your foot, mimicking the flex of the forefoot and allowing a more natural gait.

Boot size comparison chart.
Allow several hours for buying footwear, and try to visit a store at a quiet time, not on a busy Saturday afternoon. Feet swell during the day, so it’s best to try on new footwear later in the day. Take your hiking socks with you, but if you forget them, most stores provide suitable socks to wear while trying on footwear. Use your normal shoe size only as a starting point; sizes vary from maker to maker and, just to make matters more confusing, there are different sizing systems. A store may stock footwear made in the United States, Italy, Austria, South Korea, and more, so you can’t expect consistency.
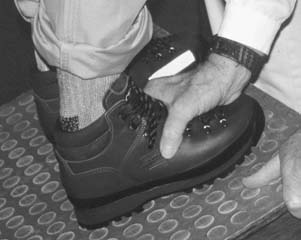
Phil Oren checking the fit on an incline board.
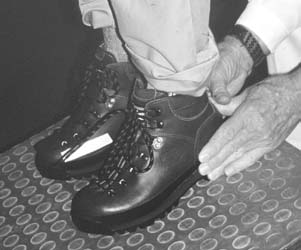
Phil Oren checking heel fit on an incline board.
Make sure you try on both shoes. One of your feet is almost certainly larger than the other, perhaps by as much as half a size. Make sure the larger foot has the best fit. An extra sock or a volume adjuster can pad a boot that’s slightly too large, but nothing can be done for one that’s too small.
Lightweight boots and shoes are fairly easy to fit because they are soft and mold to the feet quickly. Medium- and heavy-weight boots tend to be uncomfortable at first, which makes finding a good fit in the store more difficult. But because they are so unforgiving, a good fit is essential, even though they should eventually stretch a little (in width, not length) and adapt to your feet. Even more care is needed when fitting traditional heavy leather boots.
I used to recommend the standard fitting method—put your finger down the back with the boots unlaced, wiggle your toes, lace the boots, walk around the store, kick something. It was, I thought, good advice. It is in fact totally inadequate. However just like everyone else, I didn’t know any better. I do now. I know that with proper fitting you can get footwear that doesn’t hurt your feet. If you’re one of those lucky people—those lucky few—whose feet and legs don’t hurt, whose boots don’t rub, who don’t get blisters, then you can ignore the next section. For those whose feet may give the occasional twinge, to those for whom blisters and aching feet are major problems, the next few paragraphs could be the most important part of this book.
Proper fitting begins with the feet, not the footwear. The system that has revolutionized boot fitting was developed by Phil Oren after he had problems finding footwear that fit properly for a 750-mile hike on the Pacific Crest Trail. His feet had been damaged by ill-fitting footwear in the past, so standard boots wouldn’t fit him. After having his boots modified at a ski shop, he successfully completed his hike. Along the way he met many hikers with foot problems traceable to poorly fitting footwear, and he started searching for a better way to fit hiking footwear. Since then he has developed a sophisticated fitting system that really does work. Phil and his team train retail staff in boot fitting and run workshops for hikers (sponsored by Backpacker magazine and known as “Boot Camps”). He has also compiled a huge database of foot shapes and sizes and worked with manufacturers on producing better-fitting footwear. If you have any boot problems at all, I recommend finding a store with staff trained in Phil’s FitSystem. (For more on this, see fitsystembyphiloren.com.) I’ve had footwear fitted by Phil Oren and I’ve taken the standard and advanced training workshops. I’m convinced that the FitSystem is the best way to fit hiking footwear.
Everyone’s feet are different, so it’s hardly a surprise that mass-produced footwear is unlikely to fit well without modification. I certainly had problems finding footwear that fit well until I used the FitSystem. These problems increased over the years as my feet appeared to get bigger. I was faced with a choice between footwear that hurt my toes, especially when hiking downhill, and larger sizes that allowed my toes room but didn’t support my ankles or hold my heels in position, resulting in holes in the linings and in the heels of my socks. I went for the larger size, since this was less painful over a day’s hiking, but it certainly wasn’t ideal. Since having a proper fitting, I’ve gone back to my original size without sore toes, and I don’t wear holes in the linings or my socks. Following is a description of the FitSystem and what you should expect from a boot fitter.
A boot fitter should examine and measure your feet before you try on any footwear in order to find out whether you have any fitting problems and which footwear is likely to fit. Information from the examination should be entered on a foot chart, which you can do while being examined. This can be unnerving, as I discovered when Phil examined my feet and informed me I had (slight) hammertoes, Morton’s toe, chubby toe, toe drift, calluses, and the beginnings of bunions. Ouch! Would I ever walk again?
Next comes the toe test, which is done standing, so the feet are bearing weight. The fitter tries to lift your big toe off the ground with a finger placed under its tip. If your feet are aligned properly, the toe should move easily. If, like mine, it seems glued to the ground, your foot is overpronated. To check this, the fitter twists your knee outward, putting the foot into the neutral position. The big toe should now be flexible.
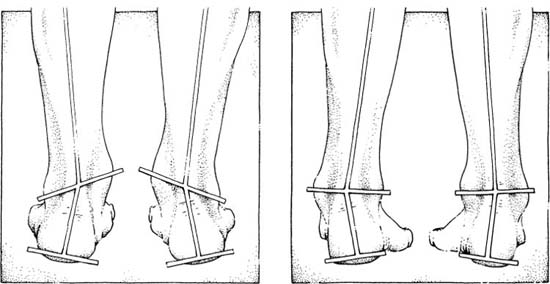
Overpronation (left) and oversupination (right).
The biomechanics of walking explains what the toe test tells us. As you walk, the shape of your foot changes constantly. All footwear interferes with this. When your foot is in midstride, with no weight on it, it’s in the neutral position. When your heel hits the ground, your foot rolls to the inside and the arch flattens slightly. This pronation allows the foot to adapt to rough, uneven surfaces; remember that our feet were designed for walking on soil, grass, stone, sand, and other natural terrain, not flat, smooth, man-made surfaces. As your foot flattens against the ground, it should go into neutral and stiffen for stability and forward movement. As your heel lifts off the ground, your foot becomes a rigid lever with a high arch and instep so you can spring forward off your big toe. This is called supination (oversupination can occur but is very rare). After years of wearing unsupportive footwear and walking on pavements and floors, instead of going into neutral and then becoming slightly supinated, the foot often just flattens out (overpronation). In this position your foot is locked to the ground with no spring in the toes (hence the toe test). To take your next step, you have to move from the inside of your foot rather than from your toes. When you do this the foot tends to turn slightly outward, which distorts the skeletal structure, twisting the ankle, knee, and hip when they should be aligned. This unstable posture can lead to joint problems. When your foot overpronates it also elongates, which makes boot fitting very difficult. Do you fit to the shorter, neutral position or the longer, overpronated one? That was my problem. This elongation can be shown by drawing around the foot while it is weighted and unweighted and comparing the two outlines. It’s then easy to see that the same boot can’t fit both shapes. Phil Oren’s data show that overpronation affects about 80 percent of us, so it’s a major bootfitting issue.
The toe test shows whether you overpronate. But that in itself doesn’t help much with boot fitting. Next you need to know what size your feet are and what difference overpronation makes. Each foot should be measured with the Brannock Device (an instrument for measuring foot length and width) for overall length (heel to toe) and for heel-to-ball length, which is important because boots should flex where your foot does. The measurements should be taken with the foot weighted and again with it unweighted and in the neutral position. The width of your feet should be measured too. Each of my feet varied by one size in total length and one and a half to two sizes from heel to ball. That explained why my feet appeared to be getting bigger. They weren’t; they were overpronating and elongating when weighted.
Foot volume is important too, but this has to be estimated; the Brannock Device cannot measure volume. My feet are low volume, and I have narrow heels and very narrow Achilles tendons. However, my feet are also quite wide, so I need footwear that is wide across the metatarsals (the base of the toes) but low in volume and narrow at the heel.
If your feet overpronate, and chances are they do, they need stabilizing if your footwear is to fit properly. This can be done with footbeds that support the foot and hold it in position, which means junking the soft foam inserts found in most boots and shoes. These “footbeds” provide no support and don’t stabilize the feet. Just try pushing your finger against the sides of the heel section while holding the center down with the other hand. With virtually all inserts that come in footwear, the sides collapse easily. They’ll do the same under your foot. (Montrail footwear has the only half-way decent boot inserts I’ve seen. They’re not as good as a proper footbed, but they’re far better than most.)
There are several types of stabilizing footbeds (Conform’able and Sole Custom are two) as well as prescription orthotics. The ones I use are Superfeet footbeds. They have a hard plastic and cork rear and midsection that holds the heel in place, minimizing foot movement and overpronation. There are two types: off-the-shelf footbeds, called Trim to Fit, and Custom Fit. Trim to Fit footbeds can stabilize the foot 40 to 75 percent, and Custom Fit ones stabilize it up to 95 percent. Due to my level of overpronation, I wear Custom Fit Superfeet. To make these, the fitter holds the foot in the neutral position (footbeds made with the feet weighted will fit the overpronated foot, which you don’t want). The footbeds, which are partially shaped already, are heated and then held under your feet in plastic bags. All the air is then sucked out of the bags—a slightly peculiar sensation—while the footbeds mold to your feet.
Since your feet are so firmly supported and no longer move in your footwear, stabilizing footbeds can feel strange and even uncomfortable at first. It may be a good idea to wear them for just a few hours at a time until you adjust, though I could wear them all day immediately. Once the footbeds are fitted they can be transferred from one pair of shoes or boots to another, and I now put them in all my footwear. I now take a smaller size because my feet no longer elongate much when weighted. I can stride off my toes too, rather than the insides of my feet, so I’ve lost that slightly splayed duck-footed walk I had. My feet ache less because the footbeds prevent the cushioning fat pad under the heel from flattening and spreading sideways when weighted, and my knees ache less on long descents because my ankles, knees, and hips are properly aligned.
To test your alignment, stand with your feet slightly apart and your hands held out in front of you, one over the other. Have a friend slowly press down on your hands. If you overpronate you’ll lose your balance quickly and feel very unstable. Next stand on a pair of stabilizing footbeds and repeat the test. With your joints properly aligned, you should be able to resist the downward pressure without much effort.
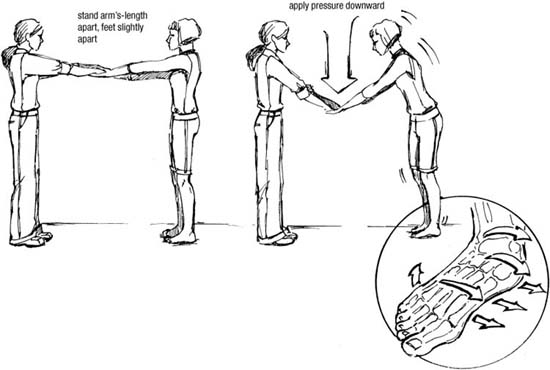
Testing proper alignment.
To demonstrate the fat pads, get a friend to push her fingers against the base of your unsupported heel. She should be able to feel the heel bone easily. Then have her squeeze the sides of the heel together with the other hand and press with her fingers again. This time the fat pad will prevent her from feeling the bone. Stabilizing footbeds do the same. If your feet don’t overpronate, these tests won’t show much difference, and you won’t need stabilizing footbeds.
Stabilizing footbeds will have an effect only if your footwear fit properly. If they are too roomy, the footbeds alone won’t stop your feet from moving in them. For that you’ll need to reduce the boots’ volume by wearing thicker socks; by putting a solid, noncompressible flat piece of neoprene, called a volume adjuster, under the footbed; or by placing a piece of soft rubber under the laces to push the tongue down on the foot when the laces are tightened (a tongue depressor). These methods can make boots and shoes with too high a volume fit better, but it’s best to have a good fit to start with. Luckily that is easier than it used to be. Since Phil Oren’s FitSystem came to prominence, some boot-makers have altered the shape of their lasts and reduced the volume of their footwear so they are more like most people’s feet. Certainly I more often find footwear that fits well.
Once your feet have been inspected and measured and the fitter has decided whether you need stabilizing footbeds or other accessories, it’s finally time to try on some footwear. It’s best to wear your hiking socks for this. Don’t, even now, expect to find a perfect fit: as close as possible is what you’re looking for, meaning a boot that approximates the shape of your foot in volume and width as well as length. Beware of boots that are too big. These tend to feel comfortable because they don’t press anywhere on your feet, but in use they’ll rub and be unsupportive. Boots should fit snugly around the heel, ankle, and instep but have room for you to wiggle your toes. They should flex at the same point as your feet do so you don’t have to fight them every time you take a step, which is tiring and may make your feet slip inside your footwear.
Once you’ve found a rough fit, you need to try the boots on a 20-degree ramp known as an incline board. Lace the boots firmly, then stand facing up the board while the fitter checks that the boot heels fit properly and sees whether there is any space or loose fabric around the instep and ankle, showing that the boot has too much volume. The fitter should also mark on the boots with chalk or a piece of tape the points where they flex and, by feeling for the first metatarsal head at the base of your toes, check whether your feet flex in the same place. Once this is done, you face down the incline board and jump up and down before the fitter again checks to see if your feet have moved much in the boots. If they have, the boots have too much volume. This can be solved as described earlier, but it is preferable to try lower-volume footwear instead.
The footwear that fits your feet best is still unlikely to fit exactly. A good fitter should be able to modify footwear to achieve a custom fit. Pressure points, often around the flex point, are the main problem. Boots can be stretched to remove them, using the blunt end of a bent metal rubbing bar to gradually ease out the leather or fabric. Just a tiny modification can have quite an effect on the fit. Since I test boots for a hiking magazine, I have my own rubbing bar at home so I can stretch boots that are too narrow for me. This has let me test many boots that would otherwise have hurt my feet. Occasionally there may be tiny bumps inside footwear due to manufacturing anomalies. With the boot on the rubbing bar, these can be flattened with a convex hammer.
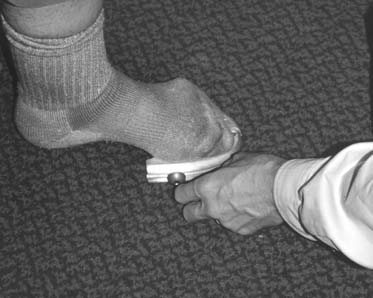
Adjusting a boot-stretching device to the correct foot shape.

Jeff Gray of Superfeet placing a boot (without the footbed) in hot water to soften it for modification.
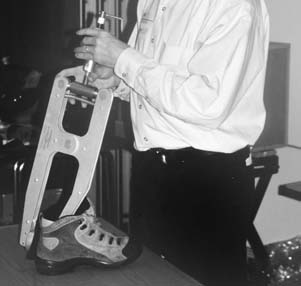
Jeff Gray stretching a boot.
Although leather can be stretched on the rubbing bar, you can’t stretch hard, synthetic toe boxes and heel counters or rubber rands (see under Footwear Materials and Construction below) without heating them first to soften the material. This can be done by sealing the boots in a plastic bag and dunking them in a large pot of boiling water. Various hydraulic devices can then be used along with the rubbing bar to stretch the boots.
For the fit that is closest to perfect, you can have casts made of the front or rear of your foot and then inserted into footwear to stretch it to the exact shape of your feet. Although initially expensive, the casts can be used for all your footwear.
A good boot fitter should make any required modifications when you buy footwear. If you already have footwear that doesn’t fit properly, you can take it to a store to be modified. Phil Oren believes that most footwear needs modification of some sort to get the best fit.
I suggest going through the fitting process every time you buy new hiking footwear even if it is the same model. Manufacturing processes can change, and new lasts may be used. I’ve found that models that once fitted me well didn’t do so a few years later. I discovered that a different factory was producing them and that the fit had indeed changed slightly. If you keep the details of your foot examination and measurements, this process doesn’t need to be done every time, though it’s worth an occasional check to see if anything has changed, especially if you have any foot problems. It’s advisable to always fit footwear using any accessories you expect to use with them, such as stabilizing footbeds.
When you get your new footwear home, wear them inside for a few hours or even a few days just to check that they really do fit. A store should exchange footwear that haven’t been worn outside. Once they’re muddy and scuffed, they’re yours.
There are two basic parts to a boot or shoe: the uppers, which are flexible and mold around the foot; and the sole, which is more rigid and lies under the foot. The sole is usually made up of a number of layers. The insole lies under the footbed and is usually quite thin. The midsole lies between the insole and the outsole and may itself consist of several layers of shock-absorbing and stiffening materials. The outsole contacts the ground and has a tread cut into it. The uppers and the sole are made separately and then attached via the construction method.
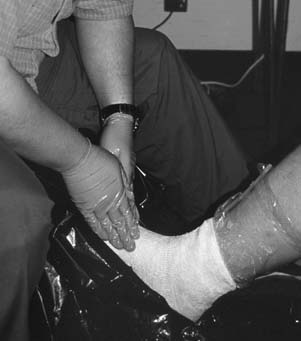
Making a foot cast.
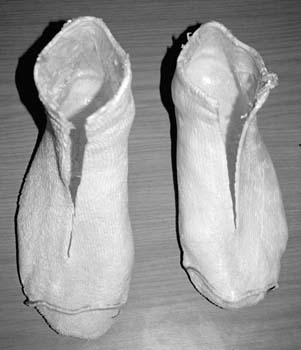
Foot casts can be used to ensure that footwear fits properly.
Leather is still the main material for uppers, though synthetics now dominate midsoles and linings and fabric-leather combinations are standard for running and trail shoes and common in the lightest boots. Leather lasts longer than other upper materials, keeps your feet dry longer, and absorbs and then disperses moisture (sweat) quickly and efficiently. It is also flexible and comfortable.
Although fancy names abound, there are two basic types of leather: top-grain and split-grain. Top-grain leather, made from the outer layer of the cow’s hide, is tougher and thicker and holds water-repellent treatment and its shape better than split-grain leather, which is the inner layer of the hide. Split-grain leather is often coated with polyurethane or polyvinyl chloride (PVC) to make it more water resistant and attractive. However this shiny layer soon cracks and allows the leather to soak up water like a sponge, while the remaining coating impedes drying. Full-grain leather is the full thickness of the hide. It’s very tough and water resistant but also thick and heavy, so it’s rarely used in boots, although the term is often used for top-grain leather. Nubuck (also spelled nubuc and nubuk) is top-grain leather that has been sanded and polished to give it a smooth finish somewhat similar to suede. It’s much tougher and more water resistant than suede, which is split leather with the inner surface turned outward and brushed. Nubuck is popular with bootmakers because it shows scuffs and scratches less than smooth leathers do and has a sensuous feel. Some top-grain leather boots have the rough inner surface of the leather facing out, though this is less common now that nubuck is available. Rough-out and nubuck leathers are easily distinguished from suede by their thickness and solidity. Suede is often used to strengthen the wear points of fabric footwear. Although it is not as durable, supportive, or water resistant as top-grain leather or the best split leathers, good-quality suede is still worth considering for lightweight footwear.
Leather comes in various thicknesses, always measured in millimeters—inches just aren’t precise enough. Heavyweight mountaineering boots usually have 3-millimeter leather, light hikers 2-millimeter or less.
To make it usable in footwear, all leather has to be tanned—treated with chemicals or oils. With some leathers a water-repellent substance—usually silicone—is chemically bonded to the fibers during tanning. This leather goes by various names, such as HS12, Prime WeatherTuff, and Pittards WR100. I’ve found that this leather performs as advertised, especially when new, and is nearly waterproof. In time, though, the waterproofing breaks down and waxing (for more on this, see Waterproofing and Sealing later in this chapter) is required.
Many lightweight boots and trail shoes copy the nylon-suede design of the running shoes they were based on. This works well in all but the coldest, snowiest conditions. Uppers are mostly fabric, often nylon mesh in shoes but usually textured nylon in boots (though sometimes polyester), reinforced with leather, suede, or synthetic leather. This design requires many seams, which are vulnerable to abrasion and thus may not be durable in rough, rocky terrain, where boot uppers take a hammering. (I found this out the hard way many years ago while scrambling and walking on the incredibly rough and sharp gabbroic rock of the Cuillin Ridge on Scotland’s Isle of Skye. After two weeks, my nylon-suede boots were in shreds, and virtually every seam had ripped open.)
Waterproofness is not a strong point of fabric-leather footwear either, unless they are lined with a waterproof-breathable membrane. This is again mostly because of the seams but also comes from the thinness of the materials. Grit and dirt can penetrate nylon much more easily than leather, however, so such membranes do not last as long in synthetic boots as in leather boots, whether they are lightweight nylon or the much tougher Cordura. I like synthetic leather for trail shoes, but for lightweight boots I prefer all leather since I wear boots only in terrain I feel is too rugged for shoes.
So why consider fabric-leather footwear at all? Because it’s cool in warm weather (as long as there’s no membrane), it needs little or no breaking in, it’s comfortable, and it dries more quickly than heavier footwear. It’s also used on many of the lightest, most flexible shoes.
Many sandals, some shoes, and a very few boots (such as the Garmont Vegan) use synthetic leather for the uppers, often in combination with nylon. Synthetic leather is flexible and mimics fairly well the performance of split-grain leather, though not top-grain. It has the advantage of being nonabsorbent and therefore quick drying, but it’s not very breathable.
Plastic is now the dominant material for mountaineering boots, alpine ski boots, and telemark ski boots because it’s better than leather at providing the rigidity, waterproofness, and warmth such pursuits require. But hiking boots need to be flexible and permeable to moisture so that sweat can escape. I’ve hiked in plastic telemark and climbing boots, and I’ve never had such sore and blistered heels or such aching feet. With their rigid soles and outer shells, such boots work against your feet rather than with them. Now when I hike to the snow in my plastic telemark boots, I undo the clips on the uppers to allow my feet to flex. This isn’t very stable, but it’s less painful than keeping the boots done up. Plastic hiking boots have appeared in the past but soon vanished, since they were too hot and sweaty.
Heels need to be held in place and prevented from twisting, and toes need room to move and protection from rocks and other natural protuberances. Heel counters, or heel cups, are stiff pieces of material—usually synthetic, though sometimes leather—built into the rear of boots or shoes to cup the heels and hold them in place. You usually can’t see them, although some makers put them on the outside of some footwear, but you can feel them under the leather of the heel. Heel counters are essential. A soft, sloppy heel without a counter won’t support your ankle, no matter how high the upper.
Toe boxes are usually made from similar material inserted in the front of a boot; some boots dispense with this construction in favor of a thick rubber rand around the boot toe.
Traditionally, linings were made from soft leather—as they still are in some boots—but lighter, less-absorbent, harder-wearing, quicker-drying, moisture-wicking, nonrotting synthetics are taking over. The main one is Cambrelle. I find these new linings superior to their leather counterparts (unless the boots have waterproof-breathable membrane linings, as discussed below, in which case leather protects the membrane better). Some wearers have found an odor problem with synthetic linings, but that hasn’t occurred in the footwear I’ve used.
Many boots have a thin layer of foam padding between the lining and the outside, usually around the ankle and the upper tongue, but occasionally throughout the boot. Such padding does provide more cushioning for the foot, but it also makes boots warmer, something to be avoided in hot weather. Foam also absorbs water and dries slowly. I prefer boots with minimum padding; I rely on socks for warmth.
Many boots now feature linings, sometimes called booties, made from vapor-permeable waterproof membranes such as Gore-Tex and Sympatex. These certainly make the boots waterproof when they are new, but once the membrane is torn or punctured, it will leak. How long they keep water out varies. The membrane itself is fragile, and if your feet move in your boots, the membranes can wear out very quickly. Some people swear by them, others swear at them. My experience suggests that such linings last longest and perform best in boots that have few seams and are made from leather rather than nylon and suede. Membranes laminated to leather are less likely to be cut by tiny specks of sharp grit than those laminated to more open-weave synthetic fabrics. The first membranes leaked fairly quickly, sometimes after only a few weeks’ use, but newer ones do last longer. I have a pair of trail shoes several years old that have had months of use and are still waterproof. Even so, good-quality footwear should long outlast a membrane lining.
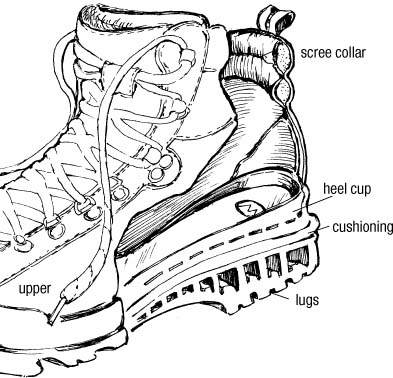
Cross section through a three-season boot.
Waterproof-breathable membranes have another big disadvantage. Although they let some water vapor out, they are far less breathable than footwear without them. Thus they are hot and sweaty in warm weather, especially if the uppers get saturated—which is why water-repellent leathers are best for the outside. And if you do get them wet inside (say, by stepping in a deep pool or creek), they are slow to dry, because although vapor can pass through the membrane, liquid cannot. There are better ways to keep your feet dry (see Waterproof Socks, pages 78–79).
A few boots have nonbreathable waterproof liners. These are suitable only for cold, wet conditions, and even then your feet can get quite wet from sweat. I’d avoid these boots.
Sewn-in, gusseted tongues with light padding inside are the most comfortable and water resistant, and they’re found on most footwear; the only disadvantage of gusseted tongues is that if you’re not wearing gaiters, snow can collect in the gussets and soak into the boots. Oxford construction is a better design for snow: two flaps of leather (basically extensions of the upper) fold over the inner tongue, which may or may not be sewn in, often held in place by small hook-and-loop tabs. Some heavier boots achieve the same purpose by a gusseted tongue with another tongue behind it, sewn in only at the base. On high-ankle and stiff leather boots, the tongue may be hinged so it flexes easily.
Boots may be laced up using D-rings, hooks, eyelets, webbing, miniature pulleys, and speed lacing (tiny metal tunnels through which the laces can be pulled quickly). D-rings may be plastic and sewn to the upper (the norm on shoes and ultralight boots) or metal and attached to a swivel clip riveted to the upper. The easiest system to use combines two or three rows of D-rings at the bottom of the laces with several rows of hooks or speed lacing at the top. With this system you can open the boot fully at the top yet tighten the laces quickly. This advantage is not trivial when you’re trying to don a stiff, half-frozen boot in a small tent while wearing gloves, with a blizzard outside. Boots with D-rings alone involve far more fiddling with the laces and are harder to tighten precisely. Some boots use tiny pulleys instead of D-rings. These make it very easy to adjust the fit evenly across the foot. Whatever the type of lacing, many boots have a locking hook offset at the ankle that holds the lace in place even when it’s undone. The offset position allows you to tighten the boot around the instep to stop your foot from slipping.
Old-style eyelets are rare on boots now, though they are still found on some shoes. Although they are the most awkward system to use, eyelets are the least susceptible to breakage. Shoes often have webbing loops for laces, and these are starting to appear on boots.
My current winter boots (5-pound high-topped leather monsters, but good with crampons) have four rows of speed lacing, one set of metal D-rings, one set of offset webbing loops, and two rows of hooks. My lightweight hikers (2 pounds, 2 ounces, leather) have two rows of speed lacing, offset locking hooks, and two rows of hooks. And my trail shoes (1 pound, 11 ounces, mostly mesh with synthetic leather reinforcements) have one speed-lacing tunnel, a pair of synthetic leather loops, and three rows of speed lacing. The single lacing tunnel allows the lower lacing to run asymmetrically across the foot, following the flex line, rather than straight across, a sensible innovation first introduced by Garmont. All these lacing methods work well, enabling me to lace the boots quickly and adjust the tension so the footwear fits snugly.
Laces are usually made from braided nylon, which rarely breaks, though it may wear through from abrasion after much use. Round laces seem to last longer than flat ones, though not by much. I used to carry spare laces, but I gave it up long ago; it’s been years since I had a lace snap, even on long walks. If one ever does, I’ll replace it with a length of the nylon cord I always carry.
Whatever the type of lacing system, footwear must be laced properly if it is to support your feet. The laces should hold the footwear snugly around the forefoot but not be too tight across the instep, which can hinder the forward flex of the ankle. Loose laces allow the feet to move in the footwear; too-tight laces are painful.
Many boots have one or more rolls of foampadded soft leather or synthetic material at the cuff to keep out stones, grass seeds, mud, and other debris, but for this to work well the boots have to be laced up so tightly that they restrict ankle movement. The collars themselves don’t seem to cause any problems, so their presence or absence can be ignored when choosing a boot.
Conventional wisdom says the fewer seams, the better, because seams may admit water and can abrade, allowing the boot to disintegrate; thus one-piece leather boots with seams only at the heel and around the tongue should prove the most durable and water resistant.
I agree. Having used quite a few pairs of shoes and boots made from several pieces of stitched fabric and leather, I’ve found their life expectancy limited by how long the seams remained intact. Side seams usually split first. (This can be postponed, but not prevented, by coating them heavily with a seam sealer or quick-setting flexible epoxy, which also decreases the likelihood of leaks.)
I don’t rely solely on one-piece leather construction for footwear, however, as it’s usually found only in medium to heavy footwear. But for long treks in cold, wet conditions, I still prefer one-piece leather boots. It’s a difficult trade-off. I learned this the hard way. Walking the length of the Canadian Rockies, I used two pairs of sectional leather boots from different makers; they both split at the side seams after about 750 miles. I guessed that only a one-piece leather boot would have lasted the whole walk, so two years later, when I set off on a thousand-mile walk across the Yukon Territory, I wore one-piece boots. They lasted the whole trip.
However, it’s debatable whether you should wear just one pair of boots or shoes for an entire long-distance hike. I now think you should change footwear after a while because the internal structure can begin to break down and the cushioning in the sole can compact. This is especially so with midsoles made from Evazote (EVA), a closed-cell foam, and similar materials. Heavier boots are generally more durable, but even they will change shape eventually and may no longer fit so well.
Most boots and shoes have a removable foam insert, sometimes incorrectly called a footbed or an insole. Some are made from dual-density foam or have pads of shock-absorbing material built into the heel and forefoot for cushioning. Thicker inserts made from shock-absorbing materials such as Sorbothane are said to improve cushioning. Some of these inserts are relatively heavy, adding up to 5 ounces to the weight of footwear, and they may also be hot in warm weather. I used to use such inserts but found they didn’t last. Since they don’t support your foot, the cushioning they give is mostly illusory, as your foot can still flatten out and overpronate. For real support, you need a stabilizing footbed (see Stabilization and Footbeds, pages 49–51).
If your feet tend to swell a lot (as is likely on long-distance walks and in hot weather), removing the inserts will make your footwear roomier. I’ve often done this toward the end of a long day. Inserts and footbeds get damp from sweat during the day, and moisture can accumulate beneath them, so taking them out each evening to let them and the boots dry is a good idea. Don’t put them near a fire or other heat source, though—they melt very easily.
The boot sole must support the foot, protect it from shock, and be flexible enough to allow a natural gait, but it doesn’t need to be stiff. Extensive hiking over rugged terrain in sandals and flexible trail shoes has convinced me that flexibility is more important.
The upper layer of the sole is the insole, or lasting board, a flat, foot-shaped piece of material. Shoes with this layer are described as being board-lasted because the board is fixed to the last and the shoe built around it. The stiffness of a shoe or boot is in part due to the material the board is made from. A flexible fiberboard insole (which may be made from pressed wood pulp or may be synthetic) is common in running and trail shoes and the lightest boots. In inexpensive footwear, the insoles may be cardboard. (There are reports of cardboard insoles breaking up when wet, though this hasn’t happened to any I’ve used.) Much hiking footwear now has torsionally stiff plastic or nylon insoles graded for flex according to the size of the boot. This means that small boots have the same relative flex as larger boots (other stiffening materials can make small boots too stiff and large ones too bendy). Many manufacturers vary the stiffness of the different insoles—the stiffest material is reserved for mountaineering boots, and the most flexible for what is usually described as “easy trail use” with a light load. You can judge flex by bending the boot: a stiff, hard-to-bend shoe is fine for kicking steps in snow but is tiring for most walking. A flexible shoe makes for easy hiking.
The lightest, most flexible shoes and boots may not have a lasting board at all. Instead, when the insole is removed, a line of stitching will be seen running round the edge of the sole or down the middle. This is known as sliplasting, in which the upper is sewn into a sock shape and then slipped onto the last. I prefer this construction for lightweight footwear, since it conforms to the natural shape of the foot and is very flexible. Sliplasted shoes are not usually as stiff as board-lasted ones, though there may be a flexible plate similar to a lasting board between the cushioning midsole and the outsole. Some shoes have combination lasting—the front is sliplasted, but there is a half-board in the heel. This gives a flexible forefoot but a more rigid heel.
The traditional sole stiffener is a half- or three-quarter-length steel shank, only half an inch or so wide, placed forward from the heel to give solidity to the rear of the foot as well as lateral stability and support to the arch while allowing the front of the foot to flex when walking. Full-length shanks are for rigid mountaineering boots, not for walking. Some boots combine a steel shank with a graded nylon insole.
Many boots incorporate a midsole of a shock-absorbing material. This is usually EVA in lightweight footwear and heavier but much harder-wearing polyurethane or microporous rubber in heavier boots. These midsoles are often tapered wedges, thickest under the heel. They absorb shock well, and I wouldn’t consider footwear without them—the difference they make in how your feet feel at the end of a long day is startling. They are designed to protect against the shock of heel strike—the impact when your heel hits the ground—which jars the knees and lower back as well as the feet. Cushioning also is needed at the ball of the foot, and the best shock-absorbing wedges are quite thick under the forefoot as well as the heel.
Some boots also have a stiffening and supportive synthetic plate under the cushioning midsole—this is a way to give some stiffness to a sliplasted shoe. Sometimes this plate—which is usually latticelike rather than solid—combines with the shock-absorbing midsole and the rand, cradling the foot and providing cushioning as well as good side-to-side support and stability. Even the heel counter and the toe box may be incorporated into these units.
This is the bit of the boot that determines whether you stay upright or skid all over the place. Once there were only a few outsole patterns, with the Vibram carbon-rubber Roccia and Montagna lug outsoles as the standard tread; now they are legion. Vibram has become a whole extended family of sole patterns in itself, and there are many others (Skywalk is one of the most common). Having tried a wide variety of these, I’ve concluded that any pattern of studs, bars, or other shapes seems to grip well on most terrain. The key is a pattern that bites into soft ground so that the shoe doesn’t slip and a sole made from soft enough rubber that when pressure is applied it grips rock and smooth surfaces by friction. I’ve had shoes with shiny outsoles that were just too hard to provide much friction; they were dangerous on wet pavement. Once the surface of the lugs had worn away, they gripped better. Note that no rubber sole, whatever the pattern or stickiness of the rubber, will grip on hard snow or ice. For that you need metal.
Some footwear uses the “sticky rubber” that revolutionized rock-climbing footwear. Soles with this material are ideal for scrambling and difficult rocky terrain, but the sticky, soft rubber that grips well on rock and other hard, fairly smooth surfaces doesn’t bite into soft ground so well. It’s also not very durable. Harder rubbers grip better on mud and wet vegetation and also last longer, so these are used for most boot soles. Some treads combine soft and hard rubber so that the edges grip well on soft ground while the center has good friction. Others are designed with different patterns and rubber densities for downhill braking and traction and uphill traction and push-off. I can’t say I can tell any difference between these and traditional soles, but they sound good.
The type of sole footwear has depends on its purpose. Soles with the deepest lugs are found on mountaineering boots, those with the shallowest on sandals and trail running shoes—though some sandals now have surprisingly deep lugs.
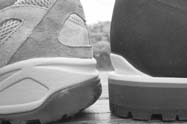
Boot heel designs. Rounded (left) and right-angled (right).
There has been some concern about the damage that heavily lugged soles do to soft ground, and some manufacturers have designed soles said to minimize this damage by not collecting debris in the tread. Studded soles seem to work best in this respect, but unless all your walking will be done on gentle trails, grip is the most important quality of outsoles. Grip should not be compromised, especially if you’re walking on steep, rugged terrain. Modern soles aren’t quite as damaging as traditional ones, since they tend not to have the 90-degree angles at the edges and heels that cut into the ground so deeply. Instead, the edges are rounded and canted.
Many soles are made from a dual-density rubber—a soft upper layer for shock absorption and a hard outer layer for durability—and combine grip with cushioning.
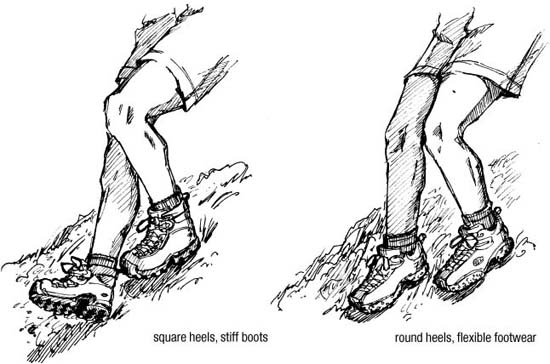
In stiff-soled boots you have to come down steep slopes on your heels, so square-cut heels are best. In flexible footwear you can put your feet flat on the ground so rounded heels are fine.
Heavier outsoles with deeper treads should outlast lighter soles, though it’s hard to predict tread life. Wear depends on the ground surface—pavement wears out soles fastest, followed by rocks and scree. On soft forest duff, soles last forever. I have found that on long walks, lightweight soles last 800 to 1,000 miles, while the traditional Vibram Montagna lasts at least 1,250 miles. However, soft EVA midsoles last only about 500 miles (polyurethane lasts longer), so the life of the sole depends on more than the wear of the lugs.
There is little controversy over outsole patterns, but the shape of the heel has generated heated discussions. Indeed, some designs have been blamed for fatal accidents. The debate is over the lack of a forward heel bar under the instep, together with a rounded heel (derived from running shoe outsoles) and how these features perform when descending steep slopes, especially wet, grassy ones. Traditional soles have a deep bar at the front of the heel and a right-angled rear edge, which their proponents say make descents safe. Rounded heel designs, they say, don’t allow you to dig in the back of the heel for grip or use the front bar to halt slips; instead, the sloping heel makes slipping more likely. To overcome these criticisms, some soles have deep serrations on the sloping heels and forward edges.
After experimenting with different outsoles and observing other hikers, I’ve concluded that it all depends on how you walk downhill. If you use the back or sides of the heel for support, you’re more likely to slip in a boot with a smooth, sloping heel than in one with a serrated or square-cut edge. If you descend as I do, however, with your feet flat on the ground, pointing downhill, and your weight over your feet, heel design is irrelevant. I’ve descended long, steep slopes covered with slippery vegetation in smooth, sloping-heel footwear without slipping or feeling insecure. I’ve noticed too that many people who slip while descending steep slopes keep their boots angled across the slope and descend using the edges of the sole, without much contact with the ground. For this a stiff boot with a right-angled heel works best. Of course, if you descend hills flat-footed, you need fairly flexible footwear.
Rounded heels are said to minimize heel strike, because they allow a gradual roll from the heel to the sole instead of the jarring impact when the edge of a square-cut heel hits the ground, but I haven’t noticed any difference in practice. A shock-absorbing midsole seems far more important for reducing heel-strike injury.
The most likely place for water to penetrate a boot is where the sole and the upper meet. Some boots have a rubber rand running around this joint, while others have just toe or toe and heel rands, or bumpers. Rands seal the joint against water and also protect the lower edge of the uppers from scuffs and scratches.
Joining the soles to the uppers is a critical part of footwear manufacture. If that connection fails, the shoe or boot will fall apart. Stitching used to be the only way of holding footwear together but is now used mainly in leather boots made for mountaineering or Nordic ski touring rather than for walking. The most common stitched construction is the Norwegian welt, sometimes called stitchdown construction, in which the upper is turned out from the boot, then sewn to a leather midsole with two or three rows of stitching. These stitches are visible and exposed, but they can be protected by daubing them with sealant.
Currently, on most footwear the uppers are heat bonded (glued at high temperatures) or cemented to the sole. (Some are also Blake or Littleway stitched, which means the uppers are turned in and stitched to a midsole, to which the outsole is cemented.) Unlike the Norwegian welt, the quality of these construction methods cannot be checked. A bonded sole has failed me only once, many years ago. On that occasion, the sole started to peel away from the boot at the toe after only 250 miles. I was on a long trek and far from a repair shop, so I patched the boots with glue from my repair kit almost every night and nursed them through another 500 miles. I wouldn’t like to repeat the experience.
Because fit is so crucial, I’m reluctant to recommend any specific models. I’m often asked to do so, though, so here are some hints. Over the years I’ve happily worn footwear from Adidas, Asolo, Bite, Brasher, Five Ten, Garmont, Hi-Tec, Lowa, Merrell, Montrail, Nike ACG, Raichle, Rockport, Salomon, Scarpa, Teva, The North Face, Vasque, and Zamberlan. That’s a lot of boots, shoes, and sandals. Most of the specific models I’ve used are no longer available. Well-recommended brands I’ve never tried include Alico, Birkenstock, Boreal, Chaco, Danner, Dunham, Gronell, Kayland, La Sportiva, Limmer, Technica, and Timberland.
Of the footwear I’ve tried most recently and that therefore hadn’t disappeared when I wrote this, here are my current favorites, described as examples rather than recommendations. Remember: my ideal shoe might be your worst nightmare.
I’ve almost worn out a pair of Merrell Onos, which have a synthetic leather upper lined with stretchy neoprene and Spandex. They fasten with adjustable clip buckles. The rear section is stiffened at each side for support. The molded EVA foot-frame is soft and cushioning and shaped to support the foot. It has an antimicrobial treatment too, which works well, as I found after a sweaty nine-day hike. The tread is reasonably deep and made from sticky rubber. They weigh 27 ounces (all weights are for a pair of men’s size 9½). I’ve hiked many miles in these sandals and found them supportive and comfortable, with a good grip on just about any terrain. But the Onos have been supplanted in my affections by Teva Wraptor 2s, the first sandal I’ve tried that holds the foot in place as well as the best lightweight shoes and boots. This is achieved by an ingenious design, a strap that runs across the instep, through the sole, and then back across the instep, completely encircling the foot. Tightening this strap pulls the sandal around the arch, heel, and instep for a very secure fit. Combined with the soft, deep foot-shaped top sole, this strap also helps prevent over-pronation. The straps are padded nubuck, fastened at the forefoot, instep, and heel with Velcro. There’s a dual-density EVA midsole and a deep tread on the outsole. They weigh 2 pounds, slightly on the heavy side for sandals but worth it for the support they give. Most recently I’ve been wearing Bite X-Tracs, which have a thick polyurethane footbed that can be replaced with Superfeet or other stabilizing footbeds. These have leather uppers with neoprene linings, a cushioning midsole, and an arch shank, and they weigh 29 ounces (without footbeds). The sole is torsionally flexible and quite wide, and the tread isn’t very deep, so while they’re fine on good trails, these sandals aren’t that good on rough and steep terrain. Being able to fit Superfeet into sandals is a great idea, though, and I hope that sandals more suited to rough terrain will appear with this feature.
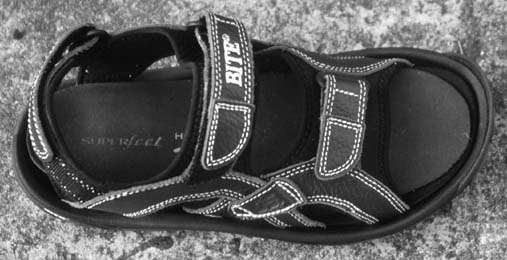
Bite sandal with Superfeet footbed fitted. The footbeds stabilize the feet and minimize overpronation.
For low-cut shoes I like the sliplasted Salomon XA Pros, which are quite light at 27 ounces yet stable and well cushioned. They look like standard running shoes rather than trail shoes. I first tried these on a short adventure race and was impressed that after three hours or so of running and cycling on rough, steep terrain in very hot weather, my feet felt fine. The shoes are made from mesh backed with thin foam (which makes them quick drying and very breathable, though not at all water resistant), with synthetic leather reinforcements. There’s a dual-density EVA midsole for shock absorption and an outsole made from three hardnesses of rubber. A synthetic plate between the midsole and the outsole gives lateral stiffness to the rear of the shoe while allowing the forefoot to flex easily. The laces are made of thin Kevlar with a cord lock at the top and speed-lacing hooks. One yank and they’re tight, no knots required. They can’t slip or come undone, either. The lower hooks are offset, so the shoes flex with the foot. I’d wear the XA Pros more often, except that in the weather for which they’re most appropriate, I tend to choose sandals.
I’ve also been impressed with the sliplasted Blaze Low from The North Face, a suede-fabric shoe with a molded EVA midsole and a plastic plate for torsional stiffness. The shoes breathe well and dry fast, but the mesh means they’re not very water resistant. The excellent tread has studs in the center, which help them grip on wet grass, and lugs round the edges. The cushioning is particularly good; thicker and softer than on most footwear. These shoes are excellent for long distances, and for hard terrain that pounds your feet. The heel counter is firm and the torsional stiffness means the shoes don’t twist sideways much on rough terrain. Soft forward flex makes them very comfortable. Lacing is with eyelets and webbing loops. They weigh 29 ounces.
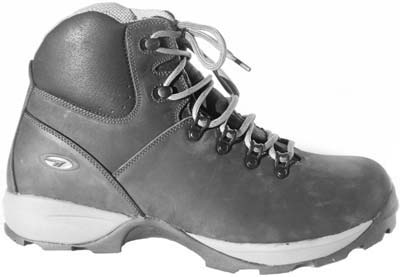
My favorite lightweight leather boot, the Hi-Tec Sierra V-Lite.
In theory, lightweight boots are my favorites, but I don’t seem to wear them much these days, preferring trail shoes or sandals when there’s no snow and slightly heavier boots when there is. Of the pairs I’ve tried in recent years, I like the Hi-Tec Sierra V-Lite Leather. These are made from nubuck leather with a synthetic CoolMax wicking lining. There’s a thermoplastic lasting board for torsional stiffness and an EVA midsole for good cushioning. Lacing is with four sets of tunnels and two sets of hooks. They weigh just 34 ounces, very light for leather boots. Heel to toe the boots are very flexible but on rough, steep terrain these boots give me good support due to the torsional stiffness. On one occasion I descended 3,000 feet off trail on frozen turf, rock, scree, tussocks, and wet grass with no problem. I was surprised at how good the water resistance was for such light boots. They do leak eventually but drying time is fast. Overall these feel more like trail shoes than heavier boots, with the addition of a high ankle.
Montrail’s 3-pound, 5-ounce Cristallo is a high-quality boot that does all that’s required without any bells and whistles. The Cristallo is made from nubuck with a synthetic lining. The boots have a graded nylon insole with a half-length steel shank, microporous rubber midsole, and Vibram outsole. Torsionally they are quite stiff because of the shank, but they flex well at the forefoot. They have a fairly low volume, like my feet. I did have to stretch them slightly at the toes, however. The 3-pound, 10-ounce Scarpa Delta M3 is a similar boot, again made from nubuck with a synthetic lining. The leather is treated with silicone and oil and has proved very water resistant. There’s a Vibram sole with an EVA shock-absorbing insert in the heel plus a polyurethane midsole. As with the Cristallos, I had to stretch them at the toes to get a good fit.
I wouldn’t choose either of these boots for trail hikes in summer. They’re too stiff, warm, and heavy. I wear them for mountain hiking when there’s snow and I think I may need to use crampons or for off-trail hiking in steep, rugged, rocky terrain where I want some protection for my feet.
This is my least favorite category; I rarely wear boots this stiff and heavy. But I have been pleasantly surprised by the relative comfort of Scarpa Mantas. These 4-pound, 6-ounce rigid-soled boots have a rocker sole, a rigid nylon midsole with a steel insert, polyurethane cushioning, speed lacing, and a well-fitting, padded upper that makes them quite bearable, though I wouldn’t want to do a long trail hike in them. However, if there’s much hard snow and ice around and crampons are needed most of the time, they’re my first choice. The uppers are made from rough-out water-resistant leather, and the sole is a deep-cleated Vibram M4 Tech with grooves at the toe and heel so clip crampons can be fitted. The polyurethane cushioning takes some of the sting out of rocks and hard surfaces, and the slight rocker in the sole makes walking on the flat easier than with a flat-soled boot. Although the ankles are held firmly in place, they can flex forward thanks to a cutaway section below the top two lace clips, which also makes walking on the flat relatively comfortable. The overall quality of the boots is superb.
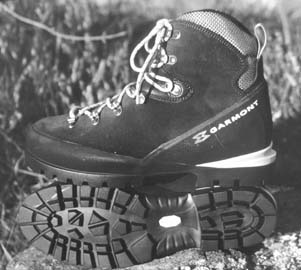
A winter-weight boot (Garmont Pinnacle).
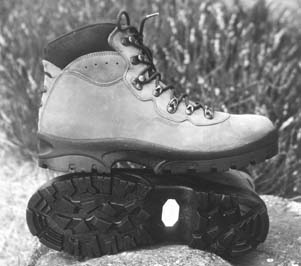
A midweight leather boot (Montrail Cristallo).
Although most footwear is fairly tough, it needs proper care to ensure a long life and good performance. This care can start before you wear the boots. Sealing any exposed stitching to protect it from abrasion will increase durability and make the seams waterproof. Urethane sealers like McNett Seam Grip work well, as do products specially designed for this use, like Aquaseal Stitch Guard. Some sealants come with an applicator; others are best applied with a syringe. Stitching should be sealed before you wear or wax the footwear so that the sealant has a clean, dry surface to stick to. I always used to seal the welts of my leather Nordic ski boots so that water didn’t wick in through the stitching when the boots flexed. My plastic telemark boots don’t have stitching, and I haven’t bothered sealing the seams of other footwear.
Muddy, dirty boots need washing; if mud dries on the uppers, especially if they’re leather, they can harden and crack. A soft brush (I use an old toothbrush) helps remove mud from seams, stitching, and tongue gussets, though you should be careful not to scratch leather. I find cold tap water adequate for cleaning hiking footwear, and I don’t use soap. I’m not bothered if footwear is stained or discolored; indeed, this can add character. But if ingrained dirt is particularly stubborn or you want to remove any stains, there are specific cleaning products—Nikwax Cleaning Gel, Granger’s New Technology Footwear Cleaner, and Aquaseal All Purpose Footwear Cleaner. The first two have easy-to-use sponge applicators. You just rub them over the boots, then rinse off the foam, scrubbing with a soft nylon brush if necessary. A sink is the best place to do this.
The insides of boots can get dirty too, making them smelly and less breathable, so sweaty socks are more likely. In boots with waterproof membranes, tiny specks of grit may work their way through the lining and cut the membrane so it leaks. Just a wipe with a clean, damp cloth may be enough cleaning—it’s all I ever do. However, Nikwax suggests filling boots with water and leaving them to soak overnight before emptying them out and rinsing them.
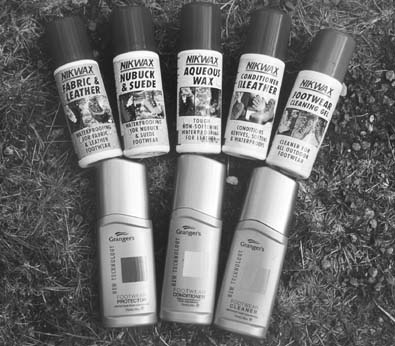
Water-based footwear products are easy to apply and produce no pollution, since they contain no solvents.
Excessive heat is very likely to make leather harden and split and may melt the glues that hold footwear together. Wet footwear should never be dried in a hot place such as next to a car heater, a house radiator, or a campfire. Leather should never become too hot to touch. Even midday sunshine can be too warm, and if you stay in a mountain hut or hostel with a drying room, you should keep your footwear out of there. Footwear should be left in a cool, dry place to dry slowly, with the insoles removed and the tongues fully open. If shoes are really soaked, stuffing them with newspaper will help them dry. Replace the paper when it gets really wet. Fabric-leather shoes without internal padding dry quickly, but foam-lined leather boots can take a long time—at least several days for medium-weight ones.
Drying footwear can be a problem on long hikes, when it is tempting to dry sodden boots by a fire. I’m occasionally guilty of this. The second half of a Canadian Rockies walk was mostly cross-country in wet terrain, and my lightweight leather boots were soaked by the end of most days. I often helped them dry out by standing them a little too close to my campfire. I had to wear boots with cracked uppers and peeling soles for the last few snowy weeks of the hike.
When wet footwear has dried, it needs to be treated to restore suppleness and water repellency. Bootmakers recommend various products for this, sometimes proprietary ones. It isn’t necessary to stick to the treatment specified. All footwear can be treated, including that with waterproof-breathable linings. Indeed, because such linings work well only if the outer of the boot is breathable, it is important that the water repellency of the outer is maintained. If it fails and the outer soaks up moisture, breathability will be impaired. Remove the laces and open the tongue fully so you don’t miss any areas. The base of the tongue is a key leak point, so make sure you treat this area.
Once it’s no longer part of a living animal, leather isn’t waterproof. It’s treated with water-proofing compounds during tanning, but this treatment will wear off after a few hikes, especially in wet conditions. Proper treatment increases water repellency and prolongs life by keeping leather footwear supple. What constitutes proper treatment depends in part on the type of leather. Virtually all leathers are now chemically treated rather than oil tanned, and they must be dressed with wax or the new water-based treatments rather than oil. Traditional dressings like neat’s-foot oil (made by boiling down cattle feet and shinbones) or mink oil can oversoften leather; I’d use them only for leather that has dried out and hardened. Even then I’d rather use a modern softening product like Nikwax Conditioner for Leather. Makers sometimes suggest not treating specially tanned waterproof leathers until they are scuffed, since they won’t absorb proofing before then. Others say all leather should be treated before the first use. I have found that new boots won’t absorb much treatment, so I don’t bother applying any until the leather loses the initial sheen or water starts to soak into it rather than bead up.
The traditional way to proof leather boots is to apply a soft wax with a cloth or your fingers. Granger’s G-Wax, Sno-Seal, and Biwell Classic are made from beeswax, while Nikwax Paste Wax is a synthetic mineral wax and Aquaseal Leather Waterproofing is silicone based. These waxes work best when applied to warm, dry leather and left to soak in overnight. Any residue visible on the surface should be wiped off. Several thin coats are more effective than one thick one. Too much can soften the leather anyway, so it’s best not to slop the stuff on in dollops. Also, a thick layer of wax can prevent your boots from breathing and lead to sweaty feet. There is a trade-off between the amount of wax you apply, the degree of water resistance obtained, and the breathability of your boots. Several layers of wax will mean better and longer-lasting water resistance but less breathability. In hot weather I’d go easy on the wax, or your feet will get wetter from sweat than from the occasional summer shower. Even for desert hiking I still treat leather, though, to prevent it from drying out and cracking.
There’s something sensuous about applying wax to warm leather with your fingers (I prefer fingers to a cloth because their heat helps soften the wax), but I rarely do this anymore because there are much better water-based products. It may seem odd that a waterproofing product’s main ingredient is water, but it does work. Water-based treatments were first developed by Nikwax, which makes the widest range, and you can now get them from Granger’s too. Others will follow, I’m sure. Nikwax water-based treatments consist of polymers made from EVA (the same material used for cushioning midsoles) and mineral wax. The active ingredients take the form of an emulsion—droplets of oil suspended in water. Nikwax treatments coat the fibers of leather and fabric with flexible water-repellent molecules. These molecules will stick only to fibers that aren’t already water repellent, so you can’t apply too much. The water soaks into areas that aren’t water repellent, taking the active ingredients with it. Water-based treatments can be applied to wet leather; indeed, Nikwax says it’s best to do so, since the active ingredients are then drawn into those areas that need them most. It’s certainly convenient not to have to dry footwear before treating it. Water-based treatments don’t block the spaces between the fibers, so footwear remains breathable. And because they can flex, they don’t wear off quickly. Water-based products have other advantages. Nikwax says its products can deliver up to five times as many active ingredients per fluid ounce as solvent-based treatments. Water-based products are also environmentally friendly; they contain no petroleum solvents or propellant gases, which contribute to global warming and to the thinning of the ozone layer. The absence of solvents also means water-based products are nonflammable and don’t give off noxious fumes, so they are safe to use indoors.
Nikwax Aqueous Wax, designed for use on smooth leather, has been my first choice for leather footwear for many years. It lasts longer than other treatments, doesn’t soften leather, and is quick and easy to use. The treatment comes in black and brown as well as neutral if you want to restore color to your scuffed boot toes. Aqueous Wax will work on nubuck or suede, but these will look like smooth leather afterward. If you want to keep the rough texture, use Nikwax Nubuck and Suede Waterproofing. Or you can use a brush to raise the surface of the leather and return it to its original look, though I’ve never done this.
Granger’s has developed its own water-based products, using fluorochemicals as the active ingredient, such as the New Technology (NT) Footwear Protector for all types of footwear and the NT Footwear Conditioner for smooth leather. My brief trials with these products suggest they work all right.
Fabric-leather footwear has poor water resistance unless there is a waterproof-breathable lining. It can be treated to keep the material supple and to prevent it from soaking up too much moisture, but no amount of proofing will make such footwear waterproof. The best treatment I’ve found is Nikwax Fabric and Leather Footwear Proofing, another water-based product. Another option is the silicone-based Biwell Trekking, which comes in a tube and can be applied with fingers or a cloth. On long walks I don’t treat such footwear and have found it dries fairly quickly in warm weather, even when it hasn’t been treated for weeks.
Most water-based treatments come with sponge applicators that make them very easy to use. They’re also fine to use on footwear with waterproof-breathable linings.
There are a number of aerosol footwear treatments. I don’t like them, though they seem effective when used correctly. I dislike the difficulty and hazards involved in using them, and the solvents usually used produce greenhouse gases. The propellants are flammable and poisonous too. As it says on one container: “Extremely flammable. Keep away from sources of ignition. Do not breathe spray. Avoid contact with skin and eyes. Use only in well-ventilated areas.” I’d rather not use products hedged about with such warnings when far less hazardous alternatives work at least as well. (An additional warning is “Do not use in the same vicinity as pet birds,” since birds are especially sensitive to airborne contaminants. I would not use them around other pets either.) Sprays are best used outside or somewhere with very good ventilation, which isn’t appealing when it’s cold and wet and may be very difficult when it’s windy. I can apply water-based treatments in the warmth of my kitchen.
Pump-bottle sprays like Tectron Outdoor Leather Guard and Liquid Aquaseal are better than aerosols, but I’d still rather use water-based rub-on treatments.
Whatever treatment you use, polishing or buffing the leather produces a hard finish or shine that is more water repellent than a matte finish.
On lightweight boots the uppers often wear out at about the same time as the soles, so resoling is hardly worthwhile. Top-quality lightweights in good condition can be worth repairing, however; I have had trail shoes successfully resoled. Mediumweight boots should last the life of at least two soles, heavyweights even more (I had a pair that were on their fourth soles when I retired them). The key is to have boots resoled before the midsole needs replacing, which can be very expensive. However, EVA midsoles usually need replacing along with the soles, since they compress rather quickly (after 500 miles or so in my experience). For your own safety, don’t let outsoles wear down too much.
Many outdoor stores accept boots for repair and send them to either a local cobbler or a footwear and wilderness travel national repair store. If you can’t find a repair service, ask the manufacturer for advice.
Small holes or severe abrasions can be patched with a urethane seam sealant or a product like McNett Freesole Urethane Formula Shoe Repair. The latter can also be used for reattaching soles that are peeling away, as can Barge Cement. In the backcountry this is not easy to do, since you need some way of holding the sole and boot tightly together while the adhesive dries. Wrapping them with duct tape is probably the easiest way to do this. Don’t expect such a repair to last long—just hope it gets you to the nearest trailhead. Duct tape and adhesive can also be used to patch torn seams, though again, such repairs don’t usually last long.
Keeping your feet in good condition is a prerequisite to pain-free hiking. Toenails should be cut short and square; long nails can bruise, cut into the toes on either side, and inflict pain during descents. When possible, dry wet feet to avoid softening the skin too much. Some people try to harden their skin both before and during a trip with rubbing alcohol. I’ve never tried this, but I do go barefoot around the house and outside whenever I can. By going barefoot and wearing sandals as often as possible, I usually manage to keep my feet reasonably tough.
Blisters are the bane of many hikers, but too few take preventive measures. The moment you feel a hot or sore spot, stop and attend to it, covering the affected area with a dressing to prevent further rubbing. This may prevent a blister from appearing. This is easy to preach but hard to practice. All too often I ignore warning signs, telling myself that I’ll have a look when I next stop. When I do, I invariably find a plump blister.
Blister remedies are legion. What is common to all is that the blister must be covered to prevent infection and cushioned against further rubbing. You can cover a blister with ordinary adhesive tape, moleskin, micropore tape, or even duct tape, but I have found the most effective to be cushioning and friction-resistant dressings such as Spenco 2nd Skin Blister Pads, Spyroflex, and Compeed. These are easier to use than the original 2nd Skin, which had to be taped in place; they come with a thin sticky backing and border and so can be applied just like an ordinary Band-Aid. I carry up to half a dozen of these dressings, depending on the length of the hike.
Some experts advise against lancing a blister before covering it, but if you continue to walk after a blister forms, as you probably will, you need to remove the fluid built up inside to minimize the pain. To do this I sterilize a needle in a match flame, pierce the blister at one edge, then roll the needle over the blister until all the fluid drains out. A piece of toilet tissue can be used to absorb the fluid and wipe the area dry. Large blisters may need several holes to expel all the fluid. I know from painful experience that, however long it takes, the blister must be fully drained before being dressed, or your first steps will hurt so much you’ll have to stop again. Antiseptic wipes can be used to clean the area, though gel dressings do this quite well.
Friction causes blisters, so try to find and remove the cause, which may be a tiny speck of grit, a rough sock seam, or more commonly, your foot moving in the boot and rubbing against it. Sometimes the cause isn’t obvious, and you just have to hope that covering the blister will solve the problem. Mysteriously, footwear that has never given problems before can cause a blister one day yet be fine again on future trips. However, I would suspect footwear that repeatedly causes sore spots. Either it doesn’t fit properly or something inside needs smoothing.
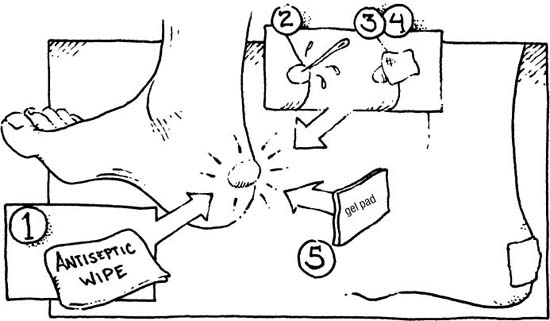
Treating blisters. Wash the area and treat it with antiseptic (1). Insert a sterile needle into the base or side of the blister (2). (If you don’t have a sterile needle in your first-aid kit, you can sterilize a sewing needle by holding it in a match or lighter flame.) Roll the needle over the blister so all the liquid is squeezed out, wiping it up with a piece of tissue (3). (Squeeze out every drop, or the blister will be very painful when you start walking again.) If the blister is very large or under hard skin, you might need several needle holes. Once you’ve drained the blister, treat it with antiseptic (4), being careful not to break or move the loose skin covering it, as this protects the area while new skin forms. Cover the blister with a gel that will cushion and help heal the blister, such as 2nd Skin Blister Pads or Compeed (5).
I like to remove my footwear and socks several times during the day, weather permitting, to let my feet cool down and air. Pouring cold water over them provides even more relief on really hot days. Some people also apply foot powder to help keep their feet dry, but I’ve never found that powder makes a difference.
Buying whatever socks the store has on hand or making do with whatever is in your sock drawer is not the best way to treat your feet. I used to do that until I realized that socks do affect how your feet feel and deserve more careful consideration. Socks cushion feet, reduce abrasion from your footwear, wick away moisture, and keep feet at the right temperature. Good socks should fit snugly and stay in place. Poorly fitting socks, or socks with rough seams, can rub and cause blisters. Socks that are too thick can make your feet sweat; socks that are too thin let them get cold. People are different. Some have cold, clammy feet that need plenty of insulation even in warm weather. Others, like me, have warm feet that overheat easily.
On a backpacking trip you may not be able to wash your socks every day (or want to even if you can); you may end up wearing one pair of socks for days, even weeks, at a time, with just an occasional quick rinse in cold water to freshen them up. After a few days’ constant wear, many socks mat down into a hard, sweaty mass, and rinsing them out in cold water doesn’t do much to restore their fluffiness. Even repeated machine washings won’t revive some types. Such socks provide little insulation or comfort underfoot—I relegate them to the spares box, which is crammed with dozens of pairs of test socks that may have had only two weeks or less of use.
For many years I wore traditional flat-knit ragg socks (ragg is a three-ply wool yarn); I found them vastly superior to the first terry-loop socks, which matted down very quickly. The more open structure of the ragg socks resisted matting better; when rinsed in cold water, they’re almost as good as new. However, new construction methods and improved materials mean that the best terry-loop socks don’t mat down fast and do fluff up when rinsed. Since they’re far more comfortable than ragg socks, they’re now my first choice. Ragg socks are very durable, though, and last longer than all but the best terry-loop socks. Companies like Fox River still make ragg wool socks.
Wool became the standard material for socks because wool socks cushion your feet, keep them warm in winter yet cool in summer, absorb and wick away sweat, and retain warmth when wet. Wool isn’t very abrasion-resistant, however, so nylon is often added as reinforcement at the heel and toe. Wool has a natural crimp that makes it very springy, trapping air in its millions of tiny coils, so it’s a good insulator. Because these coils stretch out when wool is stretched but spring back into shape once the pressure is off, wool holds its shape well.
Feet can give off a great deal of moisture, up to a pint in twelve hours when you’re hiking. This liquid has to go somewhere, and only some of it can escape through your footwear. Wool socks will absorb this moisture until it can pass through your footwear or go out at the ankles. Good-quality wool also keeps its shape when damp. Socks that sag and wrinkle when wet feel uncomfortable and can cause blisters.
Synthetic socks, made from acrylic (Lumiza, Duraspun, Ginny Microfiber), polyester (CoolMax, Capilene, Hollofil, Dacron, Thermolite), polypropylene, and nylon are supposed to wick moisture faster than wool and dry more quickly. Certainly if you take a synthetic sock and drip water on it, the water will rapidly pass through the fabric whereas wool would absorb it. This property is fine when the socks are worn with sandals or very breathable shoes, but with most footwear the moisture still can’t escape, so it stays on the sock’s surface, making it feel clammy and sticky. Whereas wool can absorb up to 30 percent of its own weight in moisture and still feel dry and warm, nonabsorbent synthetics feel damp when only a small amount of moisture is present. I find synthetic socks don’t feel as warm as wool when damp or keep my feet as comfortable over a wide range of temperatures. Synthetics mat down more quickly than wool, too, and don’t wash as well in cold water. They also stink quickly, though silver fibers like X-Static, found in many socks, do reduce this noticeably. Wool is naturally odor resistant. After a week or so of wear there is a faint smell of wet sheep, but that’s about it. I used to wear thin synthetic socks in hot weather because they seemed drier and cooler than thicker wool ones even though they needed rinsing out just about every day. But now I wear wool year-round—lighter socks in summer, heavier ones in winter.
The quality of the wool makes a huge difference, and the best is merino wool, used by just about all the major wool sock makers in their top-end models. Merino has longer, softer, and finer fibers than other wool, making it more comfortable and more durable. Wool with thicker and coarser fibers can feel prickly or itchy next to the skin; merino wool just feels luxurious. It also fluffs up well when washed in cold water and holds its shape longer than other wool. Its durability is good too. And finally, merino wool socks smell less than any other wool socks I’ve tried, something I first discovered when a companion threw a pair he’d been wearing for a week at me saying, “Smell those!” I did, and they didn’t, at least not much. Most merino wool comes from Australia and New Zealand, where merino sheep were brought from Spain in the late eighteenth century.
Blends of wool and various synthetics such as Isolwool, a fifty-fifty merino wool–polypropylene mix used by Fox River, are common and can work well. I find ones with at least 50 percent wool best. A few cold-weather socks are made with Outlast, an unusual material containing a substance that is supposed to regulate the temperature of your feet by absorbing heat when you are working hard and producing lots of it, then releasing it when you start to cool down. The theory sounds great, but I’ve tried socks with Outlast, and I can’t tell any difference from socks without it. To test this I several times wore an Outlast sock on one foot and an ordinary sock on the other. By the end of a hike I couldn’t tell which was which. However, others have reported that Outlast works for them.
Avoid cotton in socks; it soaks up sweat and then feels cold and clammy and takes a long time to dry. When wet it loses its shape and easily wrinkles and bunches up under the foot, which is uncomfortable and can cause blisters. Silk is a different matter. It absorbs moisture while staying warm and holds its shape pretty well. It’s found in thin liner socks and as a component of cold weather socks.
Whatever the material, sweat-soaked socks should be changed for dry ones or your feet will soften and are more likely to blister. If you have very sweaty feet you may need to change your socks once or twice a day, especially in hot weather. You can hang damp socks on your pack to dry.
How socks are made affects their comfort, performance, and durability. Densely knitted socks, with a high number of stitches per square inch, cushion better, feel more comfortable against the skin, and resist matting better than socks with fewer stitches per inch, which can feel rough against the skin. Terry loops on the inside, especially underfoot, are warmer and more comfortable than flat knits. The density of the terry loops makes a difference. Low-density loops will quickly collapse and become matted; high-density loops resist crushing, cushion more, and hold their shape better. For cold weather, terry loops throughout are worth having. In warmer weather, a flat knit over the foot and rib knit on the legs is cooler, with terry loops underfoot for cushioning. Some socks have different densities of material at different points for more cushioning or warmth. These look very complex and high-tech, but I haven’t found that they feel any different from socks without them. Some socks have an elasticized section over the instep, which helps with the fit, though it isn’t essential. Elastic fibers in the leg or at the top of the sock are more important, since they keep the legs from sagging and slipping down. Ribbed legs, with alternating thin and thick sections, also help socks stay up. Good socks are shaped at the heel for a good fit with no loose fabric. The best have stitching here in the shape of a Y rather than in a straight line, to conform better to the shape of your heel. Tube socks tend to have loose material around the heel that can slip and bunch up under your foot. They’re best avoided.
Rough and bulky seams can rub, especially at the toe. The seam should be flat and smooth and set back from the toes, making it more comfortable and more durable. When buying new socks, you can turn them inside out to check the seams. You can also wear them that way if a seam does rub.
For a while I was impressed with double-layer socks. These usually are made from synthetics, though some have a wool content. They’re actually two thin socks attached at the toe and ankle and can be awkward to put on if the layers become twisted, but once on they are comfortable, warm, and quick drying. I used to wear them in shoes and lightweight boots when it was too cool for really thin socks. They weigh about 2.5 ounces a pair. But I found that they didn’t remain as soft as terry-loop wool socks after repeated washings. Now that you can get lightweight terry-loop socks suitable for warm weather, I wear these rather than double-layer socks.
Thick wool socks go with boots and cool, wet weather. When wearing shoes rather than boots in warm weather, I prefer lighter, thinner, cooler socks, though still made from wool. Having tried dozens of different socks over the years, I’ve become a fan of SmartWool socks, since I find them very comfortable even after many days of wear. In warm weather—expected temperatures above 50°F (20°C)—with light trail shoes, I like the SmartWool Light Hikers, which are 71 percent merino wool, 28 percent nylon, and 1 percent elastic. They have a medium-density terry-loop sole, a flat-knit instep with an elastic section over the arch, and a rib-knit leg. A large pair weighs 3 ounces. In moderate weather—30 to 50°F (0 to 20°C)—the SmartWool Hiking socks are a little warmer. These have a terry-loop foot with medium density on top and high density underfoot separated by a narrow, flat-knit side panel and a rib-knit leg. They’re made from 70 percent merino wool, 29 percent nylon, and 1 percent elastic. A large pair weighs 3.5 ounces. I wear them with trail shoes or lightweight boots. If I’m wearing midweight or heavyweight boots, which means there is likely to be snow on the ground and below-freezing temperatures, I wear SmartWool Expedition Trekking socks, which are 77 percent merino wool, 22 percent nylon, and 1 percent elastic. These are terry loop throughout, high density underfoot, and medium density on the top and the leg, with a narrow flat-knit side panel and an elastic arch panel. They are very warm.
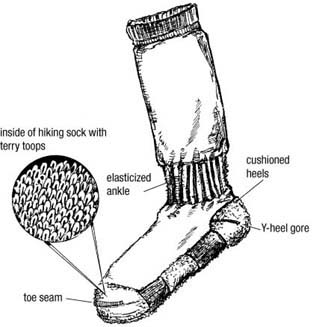
Terry-loop sock
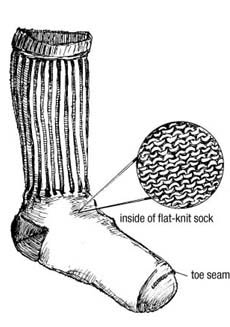
flat-knit sock.
I don’t wear liners with any of these socks. It seems a waste to me to put a barrier between the soft terry loops and my skin. I’ve also found that liners need rinsing every day if they are to stay comfortable—particularly synthetic liners. Silk is better and wool is best, but no liners can be worn for many days without being washed. The theory is that liners help reduce friction and remove sweat quickly, but I haven’t found any increase in comfort over a single pair of socks, probably because modern socks are soft next to the skin and are efficient at wicking moisture. When socks were made from rough, scratchy wool, liners may have been more necessary. I sometimes carry liners, which weigh 1 to 2 ounces a pair, to wear with sandals if it’s cool. More often I carry the SmartWool Light Hikers. All these socks are crew (midcalf) height. Longer socks are hard to find, as are the knickers they were meant to reach. Socks that reach to or just above the ankle, designed to be worn with sandals or low-cut shoes, are becoming more common. I’ve tried them but returned to higher ones, because I can turn the cuffs down when they’re not needed and pull them up if it gets chilly. They ensure a good overlap between long pants and sock tops, too, cutting out drafts around the ankles.
Although I prefer SmartWool, the company doesn’t have an exclusive on good-quality socks. There are many excellent socks today. Other brands I’ve tried and liked are Bridgedale, Wigwam, Fox River, Thorlo, Rohner, Patagonia, Dahlgren, and X-Socks.
Whatever type of socks you choose, make sure they fit well. This is difficult to determine in the store because most socks come prepackaged and can’t be tried on. Sock sizes bear no relation to shoe sizes, so you’ll need to check the chart on the package to find the size that should fit. Nor are sizes standardized between makes—a good reason for sticking to the same brand once you’ve found some you like that fit well. Sock sizes often cover three or four shoe sizes, so you may find yourself at the junction of two sizes. Most socks, particularly wool ones, tend to stretch over time, so the smaller size is usually the better choice. There are women’s socks, with narrower heels, slimmer ankles, and narrower feet than men’s or unisex socks, but don’t assume they’ll fit just because you’re female. My partner, Denise Thorn, found one brand’s women’s socks to be so broad at the toes that they bunched up uncomfortably inside her boots. Other women’s socks fit her well, however, though her favorite socks are unisex merino wool.
Before you wear the socks it’s worthwhile to check for loose threads, knots, harsh stitching, or bulky seams that might cause blisters and sore spots.
When putting on socks, make sure the heel pocket is in the right place and that the fabric is smooth and not too tight over the toes. There should be no loose fabric anywhere. If there is, the socks don’t fit properly. Socks need to fit your footwear as well as your feet. Cramming thick socks into close-fitting boots won’t make your feet warmer; they’ll just be uncomfortable. Since the insulation will be crushed, your feet could end up colder. Thin socks in a roomy boot will let your feet slide around. When you fit your footwear, you should be wearing the thickness of socks you will always wear with it.
Wet feet aren’t a problem when wearing sandals or for short periods in boots and shoes. Lightweight shoes and boots without waterproof-breathable linings dry quickly when wet as long as the air is dry. However, in prolonged wet weather and in damp areas, your footwear can stay wet for days on end. This is unpleasant, especially when it’s cold, and can lead to blisters and sore spots as the skin of your feet gets softer and softer. Boots and shoes with waterproof-breathable linings are one answer to this. I’ve already explained why I don’t think it’s a good one (see pages 56 and 58). Plastic bags are an emergency solution. I’ve used these at times, pulling one bag over my bare foot or a liner sock to act as a vapor barrier, then another over a thick sock. It works after a fashion, though it’s not particularly comfortable, your feet can get sweaty, and the bags don’t last long. Companies like GoLite, Stephenson’s Warm-lite, and RBH Designs sell vapor-barrier socks that should last far longer, but except in extreme cold, these can be very hot and sweaty.
Waterproof-breathable socks are much better than waterproof lined boots because you need wear them only when it’s wet. They give more protection than boots because they are much higher, some reaching to just below the knee. They’re not sweaty either, except in warm weather.
Back in the mid-1990s, seven companies offered these socks in three materials. Now there are just three companies, each using a different material. Gore-Tex is found in Rocky Stretch Gore-Tex Socks, the Triad membrane in Cannondale’s Ov’r’sox, and the SealSkinz membrane in the socks of that name. In all of these socks, a waterproof-breathable membrane is sandwiched between thin synthetic layers. (See Chapter 5 for fabric details.)
Years ago I tried some of the early Gore-Tex socks and wasn’t impressed with any of them, since they lasted only a couple of weeks and weren’t very comfortable. The Rocky socks are an advance on these and should last longer, though I haven’t used them myself. I was more impressed with the first SealSkinz socks, and I have continued to use them. The latest ones are much more comfortable than the originals. There are three styles, all with nylon-Lycra outers and CoolMax inners. The All Season Socks and Over-the-Calf Socks are the same except for the height—11 inches for the first, 15 inches for the second. The Waterblocker Socks have a close-fitting seal at the top so, the maker claims, water won’t enter even when you wade a stream. The socks are stretchy and quite comfortable against the skin. They’re not as soft as wool socks and haven’t got the same temperature range (they can be sweaty in hot weather), though they are quite breathable. Although I mostly wear them for only a few hours at a time, I did once wear a pair for four days on a cold, wet fall hike in the White Mountains of New Hampshire. I was wearing trail shoes that were soaked the whole time, and I was in snow at higher elevations, but the SealSkinz kept my feet warm and dry. They work better than waterproof linings too, since they’re closer to the skin, which keeps them warmer, so they transport moisture more efficiently. And if you don’t need the socks or your feet start to overheat, you can swap them for an ordinary pair.
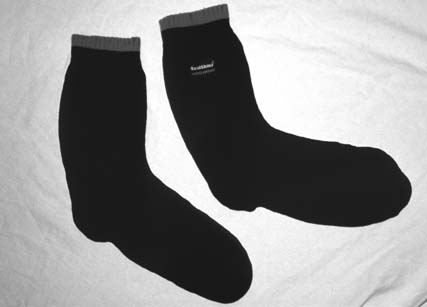
SealSkinz waterproof-breathable socks.
I often switch to my SealSkinz socks when I encounter wet ground or it starts to rain hard, then go back to wool ones as soon as it’s dry again. If my feet get soaked during a stream crossing or in a swamp, I change the wet socks for waterproof ones and continue with dry feet even though my footwear is soaked. Doing this means I can wear trail shoes and ultralight boots all year round, since I don’t have to worry about cold feet because of wet footwear. These socks dramatically extend the range of sandals, too; I find my feet are warmer in sandals and SealSkinz than in wet socks and boots. I now carry SealSkinz socks on any trip where wet weather or wet terrain is likely. Mine weigh 3 ounces. The closest of the current models are the All Season Socks. When I replace mine, it will be with the Waterblockers, so I can don them before fording a stream that would come over their tops.
On most trips I carry two or three pairs of socks. Usually I change them every couple of days, though on long trips I have worn a pair for as long as ten days. I like to keep one pair dry for campwear unless I’m carrying booties or fleece socks for that. Clean socks are warmer and more comfortable and wick moisture better than dirty ones. Whenever possible, I rinse socks in water taken from a stream or lake, using a cooking pot as a washbowl (and making sure to rinse it out well afterward). If using a cooking pot doesn’t seem attractive, you can put socks in a plastic bag full of water and wash them by shaking the bag. Turning them inside out helps ensure that sweat is removed from the inside so the socks can fluff up again. I don’t use soap for washing socks in the backcountry. If you do, make sure you dump the dirty water well away from water sources and rinse the socks well. Washed socks can be hung on a line in camp or just draped over a rock or branch to dry (don’t forget them when you break camp, though—something I’ve done more than once). Thick wool socks take time to dry, so you often need to hang them on the back of your pack the next day to finish drying.
At home, socks should be either hand washed or put through the washing machine’s delicate cycle (inside out), then line-dried. Pure soap and plant-based washing products such as those from Ecover and Gaiam’s Seventh Generation are less harsh on fabrics than soaps derived from petrochemicals. They’re also kinder to the environment. Fabric softeners are good for synthetic socks—you want them as soft as possible. I use them on wool only if the socks have become very matted and don’t fluff up after washing. However, the wicking properties of some socks can be affected by fabric softeners, so check the washing instructions before you throw the packaging away. Too much heat can cause socks to shrink, especially those containing polypropylene. Most socks shouldn’t be tumbledried on a hot setting or draped over a hot radiator or near a fire—again, check the instructions.
In deep snow, neither waterproof-breathable lined boots nor waterproof-breathable socks will keep your boots and feet dry and, most important, warm for long. The waterproof socks may keep your feet dry, but your boots will fill with snow and your feet will be cold. Gaiters are a necessity. Some people like them for keeping out dust and dirt as well. The lightest and simplest of these coverings for the lower leg are short (6 to 8 inches high) and are sometimes called stop tous (stop everything) or anklets. These are fine for keeping stones and bits of grass out of your boots and for snow that’s only a few inches deep. I’ve tried a few pairs over the years but have always found even the ones made from uncoated fabric too warm. The most interesting I’ve seen, though I haven’t tried them, are from Outdoor Research. The 4-ounce Flex-Tex Low Gaiters are made from uncoated Spandura (stretch Cordura), while the Terra Gaiters, made from uncoated Supplex nylon, weigh 3 ounces and will fit trail shoes. If I were to wear gaiters in warm weather, this is the type I’d choose.
Gaiters that come to just below the knee are the best choice for deep snow. They come in two types: those that cover only the upper part of the boot, and supergaiters that cover the entire boot. Gaiters may have zippers on the back, side, or front. Those with front zippers are easier to put on and let you adjust your laces without removing the gaiters. Those with zippers at the back are hardest to use—I avoid these. Zippers aren’t waterproof, so a hook-and-loop (Velcro) flap is needed to keep out moisture. Some models dispense with the zipper and just use Velcro, which makes them very easy to get on and off as long as the Velcro doesn’t become clogged with ice or mud. The lower edge of a gaiter may be elasticized or randed so it grips the boot. There may also be an elasticized section around the ankle. A drawcord tightens the gaiter below the knee.
In spite of their benefits, I don’t like gaiters and wear them only when the alternative is wet, cold feet, which I like even less. However, when the snow lies deep, I often wear gaiters all day. I used to prefer supergaiters, which grip the lower edge of the boot with a tight-fitting rubber rand, sealing out snow and water. They keep boots dry and unscuffed for days on end. No other gaiters come close in terms of performance. They seem to be disappearing, though, probably because they are heavy and hard to fit and the rands are fragile and expensive to replace. The rise of plastic ski touring and mountaineering boots has probably hastened their demise. Without any conscious decision, I stopped wearing supergaiters and went back to lighter, easier-to-fit standard gaiters, and I guess many others did the same. The supergaiters that do remain tend to be insulated ones designed for extreme cold, like Outdoor Research’s X-Gaiters, made from Gore-Tex with foam insulation and weighing 17 ounces a pair. Climb High does make the uninsulated Glacier supergaiters, which weigh 20 ounces.
Standard gaiters come in waterproof-breathable and uncoated fabrics. They have an adjustable cord, strap, or wire that fits under the instep. These straps fray and eventually break, so gaiters with attachment points for replacements are best. I’d avoid gaiters with fancy buckles that work only with the original straps. Gaiters range from 5 to 12 ounces a pair. The heaviest ones, made from fabrics such as Cordura, are the most durable. Since I abandoned supergaiters I’ve used two types of standard gaiters. Páramo gaiters are made from lined polyester and are extremely breathable (see Chapter 5 for fabric details). They have a front zipper, a stud-closed flap, a replaceable underfoot strap, and a front hook (which fastens to the boot laces to hold the gaiters down) that can be folded out of the way if not needed. I find them very comfortable and warm. They weigh 12 ounces a pair, as do the Mountain Hardwear Ascent Ventigaiters, made from waterproof-breathable coated nylon with a Velcro-closed side flap and a zipped roll-back panel with mesh beneath it for ventilation. The vent works well, and these are good gaiters for spring conditions. There are plenty of other good gaiters available from companies like Outdoor Research and Black Diamond.
Overboots are an alternative to gaiters if you want total protection for your boots and shoes. Basically they are gaiters with lug soles. Most overboots are insulated and are designed for high-altitude mountaineering and polar expeditions, but NEOS makes a few uninsulated pairs that are useful for backpackers. I have a pair of the Surveyors, which are knee high and have a thick sole with a good grip. They’re made from nylon with a front zipper and a strap over the instep. You can wear them over running shoes and tramp around in snow without getting wet or cold feet. They’re quite bulky and heavy, though, at 2.6 pounds, so I wouldn’t want to carry them in my pack. The sole is soft, too, and wide and bulky to accommodate boots, so they’re not very stable or precise on steep or rough terrain. I mostly use them for short hikes around home, but they could be an alternative to mukluks for long trips in the snow or mud.
On most trips I don’t bother with spare footwear. In the long-ago days when I hiked in heavy boots, I always carried spare footwear to relieve my hot, sore feet in camp. My morale got such a boost when I donned light, cool sandals or running shoes after a long day that it was well worth the weight of the spare footwear. However, I’m happy to forgo that pleasure in return for not having the initial pain that the heavy boots caused. Now I carry spare footwear only occasionally, usually on trips longer than a few weeks, when a change of hiking footwear can ease leg or foot pains. Light sandals or running shoes make good spare footwear for both hiking and camp use. If you do carry spare footwear for campwear in warm weather, simple sandals are the lightest choice. Basic flip-flops—no more than a slab of foam and a thin strap—weigh only about 3 or 4 ounces. You can make even lighter ones from pieces of closed-cell foam or old footbeds and bits of cord. It’s easy; even I can do this. There’s a description of how to make a pair on the Trail Quest Web site (trailquest.net), where they are called one ounce camp sandals or, more interesting, gram weenie sandals.
If the weather during a trip is apt to be very cold and snowy and I’m with a group and don’t want to spend all evening in the tent, or if I plan to use huts or shelters, I carry insulated booties. These are very warm, and the mere thought of them is comforting when your feet are cold and wet, but many are useless on anything except flat ground because of their smooth soles—climbing down a bank to fetch water can seem like a major expedition. Booties come with down and synthetic fill and fleece linings. Although the synthetic and fleece ones are slightly heavier, I prefer them, since I don’t have to worry about getting them wet in the snow. There isn’t a wide selection, but features vary. If you’re going to wander around camp, your booties need a closed-cell foam insole, preferably sewn in, to insulate your feet from the ground. For many years I’ve used REI Polarguard Booties, which weigh 11.25 ounces in the large size and have pack-cloth soles, closed-cell insoles, nylon outers, a warm polyester-cotton-nylon lining, and a front drawcord. These have been unavailable for quite a few years, but there are several similar ones, such as Campmor’s fleece-lined Warm and Cozy Booties with “heavy-duty insulation,” water-repellent outers, padded insoles, and no-slip soles, and the Parbat High Mountaineering Polarguard Booties with fleece lining and nonskid patches on the Cordura soles. No weights are given for these, but they must be similar to the REI booties. Rather more robust and complex are the Mountain Hardwear Chugach Booties with Polarguard fill, a protective rand, a front zipper, and a ridged EVA traction sole. The weight is 15 ounces. Mountain Hardwear says they are for high-altitude mountaineering, but I’m sure they’ll keep your feet warm on backpacking trips. Mountain Hardwear makes a similar bootie with a down fill, called the Sub Zero SL Bootie. This has a waterproof-breathable outer and also weighs 15 ounces.
There are lighter-weight down-filled models, such as Sierra Designs Hot Shooties, with a 2-ounce down fill, closed-cell foam insoles, nonskid nylon outsoles, and Velcro closures (9 ounces), Climb High Down Booties with reinforced soles (8 ounces), and Feathered Friends Down Booties (9 ounces), which have removable EPIC shell booties, removable foam insoles, and 4 ounces of 800-fill power down. I particularly like the idea of the last ones, since you could wear them outdoors, then remove the shells and the insoles and wear them in a tent and in your sleeping bag. The shells could be used just over socks too.
On solo cold-weather trips when I’m likely to spend most if not all of my camp time in the tent (probably in a sleeping bag), I often carry pile or fleece socks, since they’re much warmer for their weight than wool socks. For years I’ve used Helly Hansen fiber-pile boot liners, which just reach my ankle and weigh 3.5 ounces. The name suggests they could be worn in boots, but I wouldn’t do this except around camp, because pile and fleece are nonabsorbent and don’t wick moisture quickly, so they get sticky with sweat quite quickly, though you could wear them with sandals. They are, however, wonderful to pull on over cold, wet feet at the end of the day; great for sleeping in; and nice for wearing in the tent when you aren’t in the sleeping bag. My Helly socks are no longer sold, but there are plenty of similar socks, usually made from 200-weight fleece and often promoted for wearing with sports sandals. Wyoming Wear is a major brand.
If you want to wear socks outside without putting your boots back on, a pair of mukluks (soft, weatherproof overboots that can be worn over pile socks, wool socks, or even insulated booties) are a good idea. Outdoor Research’s Modular Mukluks are a lightweight example; they’re made from Cordura—coated on the foot, uncoated on the legs—have removable closed-cell insoles, reach up to the knee, and weigh just 8 ounces. They come with removable 8-ounce pile socks, which makes them an alternative to insulated booties. Of course, for short excursions outside the tent, you could just pull stuff sacks or plastic bags over your socks.
When I started hiking, it never occurred to me to use a staff or trekking pole, and these aids were rarely used by anyone else. Using two poles was unheard of. When I started Nordic skiing, however, I discovered that when I had to carry the skis on my pack, using the poles improved my balance. After a while, I realized I didn’t need skis on my pack for a staff to be useful, and I began picking up stout sticks to help me on steep slopes and when fording streams. Staff in hand, I found I could negotiate steep scree slopes, boulder fields, and tussocky tundra with much more confidence and less worry that my unwieldy burden would tip me over.
I soon found that a staff has even more uses. On level ground and good trails, it helps me maintain a walking rhythm. When crossing soft boggy ground or snow, it can probe for hidden rocks and deep spots as well as provide support. It can hold back bushes, barbed wire, stinging plants, and other trail obstructions and even fend off aggressive dogs. Perhaps most important, it takes some weight off my feet, particularly when I lean heavily on it as I climb steep slopes. Experts claim that using trekking poles can take between 10 and 18 pounds off the lower body with each stride, which adds up to a lot of weight over a day. Of course it’s not a free ride—the strain is just moved to your arms and upper body, and you have to carry the weight of the poles. But sharing the effort does mean that my legs get less tired while my upper body and arms maintain their strength between ski seasons.
Most experts recommend using two poles, and this is what I now mostly do. All the advantages of a staff are more than doubled when you use two. Walking with two poles uses the upper body muscles and takes much of the strain off the legs and hips. Using one pole takes the strain off only some of the time and can make you feel unbalanced. If I don’t swap the pole from hand to hand occasionally, I find that my shoulder starts to ache. On steep terrain, especially direct descents, you can always have three points of contact with the ground if you carry two poles, which gives much greater stability. When using two poles I can walk faster and farther before I begin to feel tired, and I no longer have aching knees at the end of days with long, steep descents. On long ascents, I can go faster with poles.
My poles have other uses. During rest stops, they turn my pack into a backrest. In camp they can turn a fly-sheet door into an awning, support a wash line or tarp, and retrieve bear-bagged food.
When I began using a pole, it made me an oddity and other hikers used to stare at me; when I began using two, some people avoided me altogether and others asked where my skis were. Now poles are more common, and you get fewer strange looks and odd comments. Some people really dislike them, though, and can get quite worked up about them, which baffles me, since they hardly intrude on anyone else. For most hikers they’re not essential, but if you suffer from sore knees, hips, or back, they can make a huge difference. They can also be useful if you hike infrequently. Demetri “Coup” Coupounas, president of GoLite, says, “[I find] dual poles very useful in allowing me to take on big-mileage days and weekends when I hike infrequently—the poles add so much stability in motion that I am not restricted to short, easy hikes when my ankles are not strengthened from frequent hiking on rough trails—i.e., gym fitness translates into trail fitness much more readily with dual poles than with none.”
I also think a pole is a useful emergency item. If you injure a foot or leg, having a pole could make the difference between limping out of the back-country and having to be rescued. And of course, having a pole makes injuries less likely anyway, since it can prevent stumbles from turning into falls. There are a few disadvantages to poles; for instance, your hands aren’t free. But it’s easy to dangle the poles from your wrists by their straps if necessary.
The obvious material for a staff is wood, and it’s easy to find a suitable piece in any forest. As long as it’s reasonably straight, solid, and at least elbow height (so you can hold it with the lower arm at a right angle to the body, the most comfortable position), any strong stick will do. Many tourist stores in popular mountain areas sell wooden staffs, usually inexpensive. But you can’t always buy or find a staff when you reach an area, and wooden staffs aren’t easy to transport. You can’t put them in your pack, and they’re awkward to take on trains, buses, and planes.
The answer to this problem is the adjustable metal staff. Derived from (and sometimes identical to) adjustable ski touring poles, these staffs are lighter than wooden sticks yet stronger and can be carried in or on a pack when not in use. Many alpine ski pole manufacturers began to make them once they noted that mountaineers and hikers in the Alps often used ski poles. Indeed, a ski pole makes a perfectly functional staff if you don’t need an adjustable one, and old ones are usually easy to find at any ski resort. Most poles are made from light aluminum; the lightest (and most expensive) are carbon fiber.
Trekking poles, designed to be used in pairs, are far more common than staffs meant to be used singly. One of the few staff makers is Tracks (part of Cascade Designs, more noted for its sleeping mats), which makes several models. I’ve used its Sherlock staff for many years. This two-piece staff adjusts from 42.5 to 57.5 inches by means of a locking button that clips into holes in the shaft. The upper shaft is covered with soft foam topped by a wooden knob that you can remove to reveal a camera monopod mount. Rather than a sharp carbide tip, the Sherlock has a blunter steel point. It comes with a removable rubber tip too. Mine weighs 17.5 ounces; current models are 16.5 ounces. The Sherlite staff is the same model without the foam sheath, which cuts the weight to 15 ounces. I find the sheath, which is warm and soft, well worth 1.5 ounces.
The Sherlock is fine when I use a staff, as I sometimes do with light loads and on day hikes, and when I don’t expect to have to carry it on my pack, as it’s a bit long for that. With heavier loads I usually use two trekking poles. These come in many models, and having tested quite a few, I can say confidently that there’s not much difference between most of them. The ones I’ve used most are Komperdell Guides (20 ounces a pair, packed length 25 inches), because of the foam handles and the camera mounts on the top. Unfortunately these now come only with antishock springs, which I dislike (see page 86), though you can turn these off. Leki, Masters, Komperdell, Life-Link, Black Diamond, Garmont, Gabel, Tracks, MSR, and more all make a wide range of good models, and there are store-brand poles from places like REI, often made by Komperdell. Weights range from 14 to 32 ounces for a pair. Packed lengths range from 20 to 30 inches. The differences lie mostly in the handles and grips and the locking mechanisms. There are two-piece poles, but the packed length is quite long, so I prefer three-section ones, of which there are far more. Of course the more sections, the weaker the pole, at least in theory, but I’ve never broken a three-section pole.
What can fail, though, is the locking mechanism. Most poles have a twist-lock adjustment with an internal adjustable, expanding section that locks and unlocks depending on the direction you twist the shaft. This is fine when it works, but it can slip or jam. To help minimize the chance of its happening, dismantle the poles after use and make sure they are dry before you reassemble them to prevent corrosion. Some expanders are all plastic, some are plastic and metal. The expanding section can be replaced if it starts to slip repeatedly, as can happen. I haven’t had serious failures with any of the poles I’ve used, but the most secure and strongest expanders look to be those from Masters and Leki. Most poles are circular. Life-Link poles, however, have oval sections, which are said to be more secure, since an oval can’t twist inside another oval the way two circles can. I use Life-Link Variant Carbon Fiber ski touring poles and have found them very secure. There are two alternatives to internal expanders. As I described previously, Tracks poles have locking buttons that can’t slip. Black Diamond poles have external adjustable cam locks called Flicklocks that have large levers that are easy to use when wearing gloves. All of these methods work, and I haven’t found any one to be superior to the others.
For grips, cork, soft foam, or soft rubber is more comfortable than hard rubber or plastic, though there’s not a huge difference. I like poles with a long foam grip that I can hold lower down when I want a shorter length. I also like poles with a camera mount under a knob on the top, since poles make excellent monopods. Some poles have forward-angled grips that are meant to give a more relaxed wrist position.
This design is taken to radical extremes in British-made Pacerpoles, which have molded thermoplastic-rubber grips, acutely angled, that are shaped for each hand. These enable you to transmit far more power through the poles, since the angle is “calculated for optimum range of arm leverage.” The grips are very comfortable, and the poles are a leap forward in design. They are the ones I use most now; they really do give me more power and take more weight off my legs than standard poles, especially on long climbs. They have only a short piece of cord as a security loop rather than a proper strap, which isn’t needed—you hold the poles loosely in your hands rather than letting the loops take the weight. The poles come in three sections with an internal locking mechanism. There is a soft neoprene sleeve on the upper section, and Pacerpoles is developing a camera mount that will fit on the grip. A pair of Pacerpoles weighs 23 ounces. For more information, see pacer poles.com. Pacerpoles are distributed in the United States by Ultralight Adventure Equipment (ula-equipment.com).
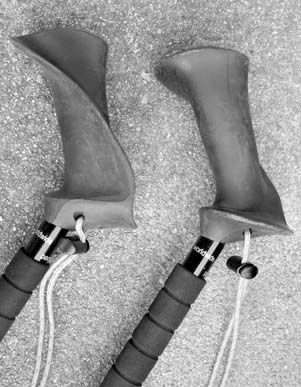
The unique Pacerpoles handles.
Many poles have an antishock device, a spring built into the handle or the shaft that gives slightly when weight is applied. Antishock mechanisms add weight, increase packed length, and raise the price, all to no advantage in my experience. I’ve tried hiking with an antishock pole in one hand and a regular pole in the other, and I’ve noticed no difference. Antishock is supposed to absorb the shock of pole placements so your arm doesn’t feel them, but my arms don’t ache or feel any more tired whether I use them or not. On many poles, antishock can be turned off. I’d rather not have it at all.
Most poles come with small solid baskets. These are a hangover from skiing origins and aren’t really necessary. If you’re going to use your poles on snow, whether skiing or not, you do need to be able to fit large baskets to stop the poles from sinking in. Tip shafts are often synthetic and designed to break before the main shaft if they get caught in rocks, since they are cheaper and easier to replace. Some poles have blunt steel or alloy points, which are fine on everything except ice, but most have sharp carbide points. Poles can poke holes in trails and scratch rocks. I don’t think this is a big problem, but you can put rubber or plastic covers over the tips. These covers are quite durable; one set lasted me for a five-week hike on the hard, rocky terrain of the High Sierra.
To gain the most benefit from hiking poles, you need to use them properly. I’ve seen many people letting poles dangle limply from their hands, ineffectually waving them around, rendering them just about useless, or else gripping them tightly and stabbing the ground, which is a good way to tire your arms and doesn’t reap much benefit from the poles. Except with Pacerpoles, the straps should be used to support your hands and take the weight. To use the straps, put your hand up through the strap from below, then bring it down so the strap runs between the thumb and fingers and over the back of the hand. With the poles held like this, you can flick them back and forth without having to jerk your arms around or grasp them tightly. Place the poles by swinging one in front, placing the tip on the ground, pressing down on it, then walking past it while swinging the other pole forward. On even terrain you can get a good rhythm. You should feel the poles pushing you forward as you push down on them. On ascents you won’t get as much of a forward swing, but you can really push down on the poles to help propel you upward.
To get the maximum benefit from poles, they need to be the right length. Many people use a pole that’s too long, which requires more effort and can make your arms and shoulders ache. For hiking on the flat and gentle slopes, poles should touch the ground when held pointing straight down with your elbow bent at a right angle. On steep ascents a shorter pole is better. You can slip your hands out of the loops and grasp the shaft lower down or adjust the poles to a shorter length. When descending steep ground, you can plant a longer pole below you for greater support. On long descents, adjusting the pole length might be worthwhile; otherwise you can lengthen a pole by placing your hand over the top of the grip. When traversing steep slopes, you can slip your hand out of the strap on the upper pole and grasp it lower down on the shaft so it doesn’t push you away from the slope. To make changing pole length quicker, you can adjust the lower section to its full length and then just alter the middle section when you want to change the length. Overall, though, it’s better to alter each section by the same amount, so that one section isn’t overloaded.
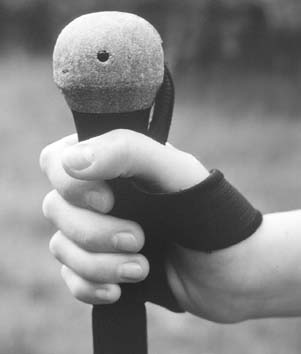
How to hold a trekking pole. Put your hand up through the loop so you can pull down on the strap. You don’t need to grip the pole tightly.
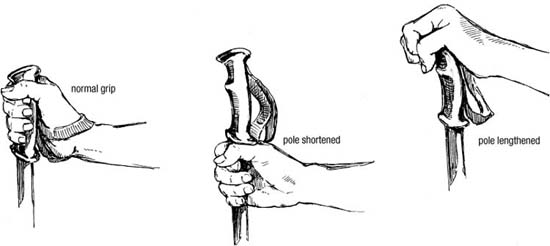
Holding the pole.
Whenever you’re likely to encounter slopes of hard snow and ice, you need an ice ax. Winter might seem the obvious time to expect such terrain, but the snow then is often deep and soft. It’s in spring and early summer, after the surface of the snow has melted and refrozen, perhaps several times, that ice axes are most often needed. An ax may be needed well into July for hikes above the timberline in some areas, and I’ve had to seek out an alternative route as late as September when a steel-hard bank of old snow blocked the trail to a high pass.
A trekking pole, very useful for balance in soft snow, is inadequate when crossing steep, hard-packed snow or ice. On such surfaces, a slip can easily become a rapidly accelerating slide. The only way to stop such a fall is by a method known as self-arrest, which requires an ice ax. For instruction, take a course in snow and ice skills at an outdoor center or learn from a competent friend. Cox and Fulsaas’s Mountaineering: The Freedom of the Hills is a useful source for all aspects of snow travel other than skiing, but I’m not convinced that self-arrest can be learned from a written description. Practice is essential; in a real fall you have to react immediately and automatically, and you must be able to stop yourself whether you fall on your front or your back and with your head uphill or downhill. On slopes where you may have to self-arrest, carry your ice ax with the pick pointing backward so it’s in position. On easier slopes I prefer to walk with the pick pointing forward so that if I stumble I won’t impale myself.
Using ice axes to safeguard a steep descent on hard snow.
Ice axes also can be used to cut steps in ice and snow too hard to kick your boots into (though wearing crampons makes this unnecessary) and can replace a staff for balance on snow. If you do slip, thrusting the ax shaft into the snow will often prevent you from sliding down the slope. Other things I’ve found an ice ax useful for include pulling stakes out of frozen ground or hardpacked snow, chopping holes in frozen streams or ponds to get water, chipping ice off rocks so you can stand on them without slipping when fording streams, and digging toilet holes.
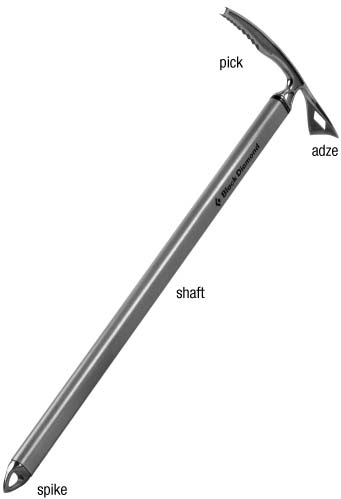
An ice ax. Always carry an ice ax and crampons if you’re likely to encounter steep, snowy areas or ice.
Ice axes come in many complicated and even bizarre styles; most are specialty designs for climbing frozen waterfalls and iced-up vertical cliffs. All a backpacker needs is a simple, traditional ice ax, usually described as a “walking” or “general mountaineering” ax. The head should have a wide adze, useful for cutting steps and possibly for self-arrest in soft snow, and a gently curved pick with a few teeth at the end. Two-piece heads are perfectly adequate for walking use. They may be made from steel (strong but quite heavy), titanium (strong and light but expensive), or aluminum (light but not so strong and easily blunted). Shafts are normally aluminum, which is strong enough for most uses. Titanium shafts, found on a few axes, are stronger but expensive. Metal shafts are cold to touch and slippery when damp. Some form of tape or a rubberized sheath makes the shaft warmer and gives you a better grip. It shouldn’t be very thick, though, or it can impede the shaft when you thrust it into the snow. A wrist loop is useful and worth attaching if your ax doesn’t come with one. Length is a matter of debate; I like an ax whose spike is a half-inch or so off the ground when I hold the ax by my side with my arm hanging down. An ax this length will touch the snow on gentle slopes, which is good for security. On steeper slopes the shaft can be pushed into the snow, also good for security. On descents, it’s easier to place a longer ax down the slope ahead of you without crouching or leaning forward. Climbers, who are used to being on very steep, icy slopes, often prefer shorter axes.
Axes weigh from 7 to 28 ounces. The lightest models are adequate for backpacking. Makes to look for include Climb High, Cassin, Salewa, Stubai, SMC, Mountain Technology, Petzl Moser, Omega Pacific, Camp, Stanley Alpine, Grivel, and Black Diamond. Since I don’t do any alpine mountaineering or technical climbing, I don’t need an ax designed for these pursuits; and since my ax spends most of its time strapped to my pack, weight is more important than technical design. For many years now I have used a 70-centimeter Camp HL250 ax that weighs just 12 ounces. It has a head made from alloy rather than steel and isn’t suitable for serious climbing—it even has “not for ice climbing” stamped on the pick—but for backpacking it’s fine.
Ice axes are potentially dangerous implements and require care both in use and when being carried. Rubber head and spike protectors are useful when transporting the ax to and from the mountains—a wine bottle cork will do to cover the spike, and cardboard or foam can be wrapped around the head if necessary. On planes, trains, and buses I pack the ax inside my pack or duffel bag with the head and spike covered (on planes, the ax must be in your checked baggage).
If conditions warrant carrying an ice ax, crampons will probably be useful as well. These metal spikes strap or clamp onto the soles of your boots so you can cross ice and hard snow without slipping. I rarely use them, but when I do they are essential, so I carry them on any trips where ice or hard snow is likely. Flexible crampons—ones with a hinge or a sprung bar in the middle—can be fitted to most hiking boots, and some will fit trail shoes. Rigid crampons are strictly for climbers and rigid-soled boots.
The number of points on a crampon doesn’t matter much for walkers; there are eight-, nine-, ten-, and twelve-point models. Points that angle out from the front of the boot are useful for climbing steep slopes because you can use your boot toes. I prefer crampons with angled front points to those with vertical points.
Crampons are usually made from steel, which is strong and stays sharp, though the lightest models are made from an aluminum alloy, which blunts quickly but is all right for occasional hiking use, and titanium, which holds an edge better but is expensive. For most backpacking use, aluminum is fine. Weights for crampons range from 16 ounces to more than 2 pounds.
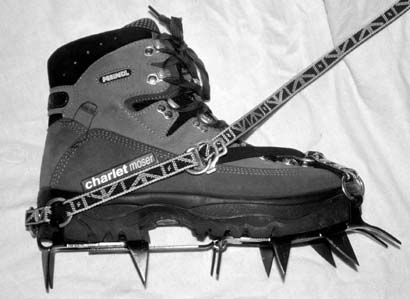
Crampons are needed for hiking on ice and hard snow. They need to be fitted properly. Charlet Moser (now Petzl Charlet) articulated 12-point crampon.
Fitting crampons to boots is a complicated business the first time, and finding the right size can be difficult. First-time buyers should take their boots to the store and have the salesperson demonstrate how to fit them. A properly fitted crampon shouldn’t fall off when you pick up the boot and shake it with the crampon straps unfastened.
Crampons attach to boots by various methods; some are much easier to use than others, especially with cold fingers. Awkward systems may mean you don’t bother to put the crampons on when you should or that you don’t fit them properly, both of which can be dangerous. Practice attaching crampons until you can do it quickly. A blizzard isn’t the place to work out what goes where.
The easiest system is the step-in with a wire bail at the front and a heel lever at the back. Unfortunately, these require boots with a pronounced lip at the heel and toe, which few hiking boots have anymore. Old-fashioned leather boots with external stitched seams and modern plastic climbing boots will take these crampons. To minimize the chance of the front bail’s coming off, these crampons should have a strap linking the toe and heel pieces.
Almost as easy to fit are crampons with flexible plastic cradles at the front and back that wrap around the boot when tensioned with a single strap that runs from the heel to the front cradle and then back to a buckle at the rear. This is the system I prefer, since it will fit most hiking boots. Traditional systems use sets of straps. There are many variations of these. A common one has an O-ring linked by straps to the front of the crampons and a long strap at the heel that runs through this ring and then back to the heel. There are also mixtures of systems with O-rings and straps at the front and heel levers or cradles at the back.
The companies that make ice axes usually make crampons as well. For several years, when I’ve expected to need crampons for long periods I’ve used Grivel G10s, flexible ten-point steel crampons with plastic cradles that make them easy to attach to hiking boots. They’re somewhat heavy at 29 ounces, though, and since I got them, Grivel has introduced an alloy version, the G10 Light, that weighs 23.7 ounces. However, for occasional use, which is most of the time, I use 21-ounce, twelve-point Salewa Alunal crampons with plastic cradles. If you want more strength and sharpness, the same design at the same weight in titanium is sold under the name Titan Ultra Walk. Some alloy crampons are even lighter than the Alunals, such as the 17-ounce, twelve-point Camp LCs, which unfortunately come only with step-in bindings, and the 20-ounce, twelve-point Stubai Ultralights, which have nylon cradles.
Like ice axes, crampons can be dangerous, so if you strap them to the outside of your pack, you should cover the spikes with rubber protectors. The tangled rubber strands of these protectors can be a big nuisance, however; I long ago abandoned them and instead carry crampons inside the pack in a tough Cordura nylon pouch. The pouch I use hasn’t been sold for years, but Outdoor Research makes a very similar one, the 11-ounce Crampon Pouch, which can be attached to the pack or carried inside. You can also wrap crampons in a length of tough cloth such as heavy-duty canvas, neoprene, or PVC. Some packs come with a pocket on the front designed to hold crampons.
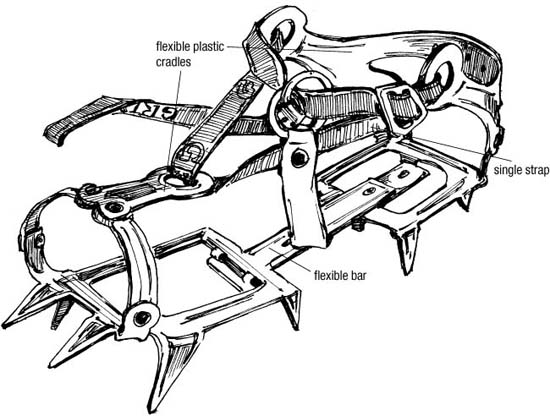
A ten-point flexible crampon.
Walking in crampons involves a change in gait and special techniques on steep slopes. You must take care not to catch the points on your pants or gaiters or the other crampon, so you need to spread your legs slightly wider than usual. On gentle slopes you need to keep your feet flat on the snow or ice so that all the points bite. On steep slopes you can kick just the front points into the snow and walk up on your toes, though this is tiring and difficult in flexible boots. I find the least tiring way to climb moderately steep ground is to front-point with one foot while keeping the other flat on the ground, alternating feet as they start to ache. If you’re going to venture onto really steep terrain, I suggest you take a mountaineering course.
Walking through snow more than ankle deep can be very difficult; once you sink up to your shins and deeper, it becomes an exhausting and slow process, aptly known as postholing. The Scandinavians answered the problem some four thousand years ago: strap something to your feet that spreads your weight and allows you to ride on the snow’s surface. After years of slogging through soft, wet snow, I discovered this for myself when I traveled with three hikers who used snowshoes in the San Bernardino Mountains on the Pacific Crest Trail in California. I bought a pair to use in the snowbound High Sierra, but then I watched enviously as two in our party swapped snowshoes for Nordic skis, swooped down snowfields, and slid through the forest, leaving the two of us on snowshoes to plod along in their wake. I became determined to learn to ski.
Snowshoes have their uses, though. They are more maneuverable than skis in thick forest, and the largest ones will keep you on the surface of deep, powdery snow, which the widest skis will sink into. You also can use them with ordinary walking boots. And it’s much easier to learn to snowshoe than to ski. You can still get traditional wooden snowshoes, but they’re heavy and need careful maintenance. Better and far more common are the more durable aluminum-framed ones with synthetic decking and pivoting bindings. The ones I used in the Sierra were Sherpa Featherweight Sno-Claw models that weighed a little more than 3 pounds with straps. The Sno-Claw, a serrated edge that fits under the boot for grip on icy slopes, worked well on moderate slopes, but I changed to crampons for the steep slopes. Since I learned to ski a year later, I didn’t use snowshoes again for many years. However, a few years ago I did get a new pair, which I’ve been using in the local woods where skis would be awkward to handle. My current shoes are the Baldas Matterhorn Treks, which have a metal frame with polypropylene decking, a pivoting binding with spikes, and an optional extension called a spatula. They measure 9 by 20.5 inches, weigh 4.5 pounds, and are designed to support more than 240 pounds. I’ve used them in moderate terrain with light loads, and for this they are fine. If I’d had them instead of the Sherpas for the hike through the High Sierra, I imagine they would have performed just as well.
Walking in snowshoes is slow work compared with skiing but far easier than walking in deep snow without them. Snowshoes have become popular for winter recreation, and there are now several good models with weights from 2 pounds upward. Besides Baldas and Sherpa, well-regarded brands include Atlas, Tubbs, Northern Lites, Red-feather, and Yuba. There are several books on the subject, of which the classic is Snowshoeing, by Gene Prater, now in its fifth edition.
I abandoned snowshoes for many years because skiing looked like more fun. Snowshoeing seemed functional but tedious by comparison. Crossing the High Sierra in May with a 100-pound pack was not the time to learn to ski, however. The next winter I took a Nordic ski course and have since been on ski backpacking trips most years in places as far afield as the High Sierra, Greenland, Spits-bergen (which lies in the Arctic Ocean north of Norway), the Yukon, the Alps, Lapland (in Arctic Scandinavia), the Norwegian mountains, and the Canadian Rockies. For nine seasons I worked as a ski touring leader, based in Norway.
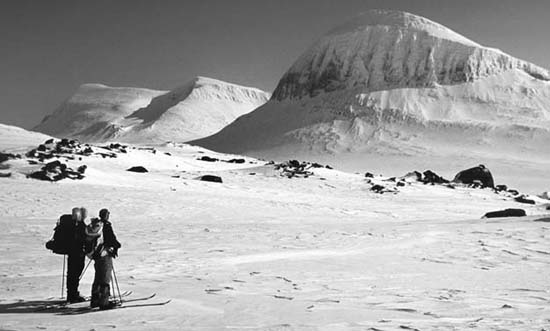
Ski backpacking is the ideal way to explore the wilderness in winter and spring. Sarek National Park, Arctic Lapland, Sweden.
Skiing is a complex subject. Alpine (downhill) skis are strictly for lift-served skiing and ultrasteep mountain descents. Even with alpine ski mountaineering bindings and boots, progress on the flat and uphill is painfully slow, and the weight of the gear is tiring. These skis are worth considering only if your aim is a long, steep descent. For most snow backpacking, they are unsuitable. The same applies to the heaviest telemark gear, which is again designed for resort skiing and steep descents. The lightest telemark gear is suitable for touring, however, especially in mountainous terrain. At the other extreme, light, skinny cross-country skis are designed for cut tracks and don’t have much flotation or stability in untracked snow.
The best skis for ski backpacking are variously called Nordic, backcountry, or mountain touring skis. For carrying a heavy load and breaking trail in snow that ranges from deep powder to breakable crust, skis with metal edges are best. All skis are narrower at the waist than at the tip and tail. The difference between the waist and the tip is called the sidecut. More sidecut means a ski that is easier to turn going downhill, which is good for mountain skiing. I used to look for about 8 to 10 millimeters of sidecut, but this is now very little, since there has been a revolution in ski design and there are now many wide touring skis with plenty of sidecut. My current mountain touring skis, Tua Hydrogens, have 30 millimeters of sidecut and measure 102-72-92 millimeters, tip to tail yet, at 5.5 pounds, weigh no more than my old narrow skis, which measured 62-54-58 millimeters. The advantage of wide skis is in soft snow, where they have better flotation than narrow ones.
Whatever the skis, you need strong bindings, either cables or bindings with three pins that fit into the toe of your boots, since they’ll have to undergo the stress caused by your body weight plus a heavy pack. Touring bindings haven’t changed much over the past few decades; they’ve just become stronger. Boots have changed, however, and plastic has taken over. At first this was just for lift telemark skiing and steep mountain descents, and the boots were too stiff and heavy for ski backpacking, but now you can get excellent plastic touring boots from Scarpa, Garmont, and Crispi. I use Garmont Xcursions, which weigh 6 pounds. The plastic shell keeps my feet dry in wet spring snow while the inners make good hut and tent boots.
Poles are essential with skis (and a great help with snowshoes). Since lightweight fiberglass poles break easily (my first pair of poles shattered within a week), I use a metal pair. I like adjustable ones (long for the flat, shorter for uphill, shortest for downhill). There are many models—see the discussion of hiking poles earlier in this chapter (pages 83–88).
Climbing skins are long strips of “grippy” fabric that attach to the bottom of your skis. They make ascents much easier and are a worthwhile investment for mountain ski tours.
You need only moderate skill to travel the wilderness on skis, and the enjoyment of ski touring far outweighs the effort required. Beginners will benefit from a course at a ski school; I did. For more specifics on wilderness touring there are several good books, including Allen O’Bannon and Mike Clelland’s entertaining Allen and Mike’s Really Cool Backcountry Ski Book. For skiing skills I also like their Really Cool Telemark Tips. The classic book on skills is Paul Parker’s superb Free-Heel Skiing.