FREESTYLE POMPEIAN FRESCO
JEANNINE DOSTAL
Fresco painting is my favorite technique to create. I use special plaster mixes that allow the glaze colors to melt in the surface, creating an authentic fresco look. I don’t follow any rules. I don’t worry about being the best artist because I can hide things behind the distressing. I don’t worry if stencil designs and motifs are from different eras and styles as long as they look good together. This lets me use up all the leftover paint, glazes and stencils in my inventory. And I get to be free! I usually create as I go, living in the moment and enjoying every minute of it.
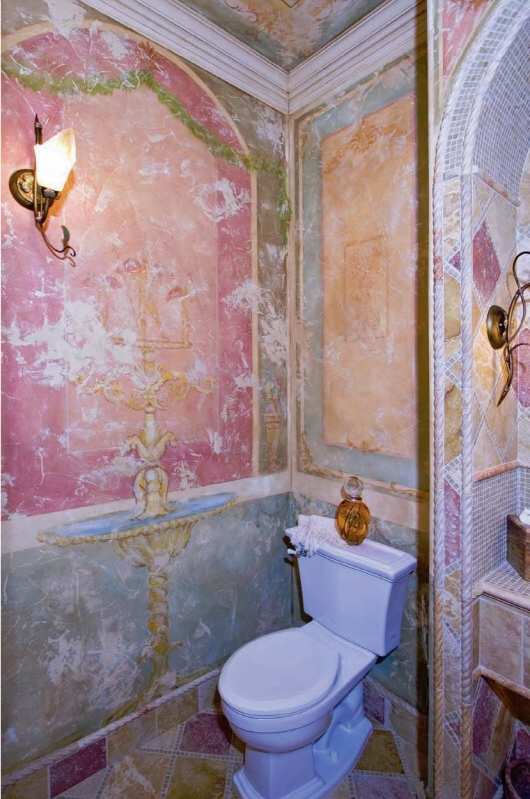
Photograph on this page by Exposures Unlimited Ron Kolb. Photos by Jeannine Dostal.
MATERIALS
Brushes
3-inch (76mm) chip brush
Artist brushes in various sizes
Porter Flat Latex Paint
Burr Oak, Cedarbark, Deep Peacock, Prairie Sumac, Rawhide, Red Earth, White Amber
Folk Art Acrylics
Coffee Bean, Olive Green, Raw Sienna, Titanium White, Yellow Citron, Yellow Ochre
Faux Effects AquaColors
Brown, Gold
Additional Materials
AquaCreme by Faux Effects
AquaGlaze by Faux Effects
5-gallon (19l) bucket
Chalk/pencils
Craft knife
Drill mixer
Level
Melanie Royals Stencils:
#713 Decorative Cording
#827 Large Fluted Vase
Other stencils from local art store
Painter’s tape in widths from ¼ inch (6mm) to 2 inches (51mm)
Plastic card or styrene for burnishing
Projector if needed
Rapid-Bond Joint Compound 90 set (drywall powder)
Small trowels for tight spaces
Spray bottle full of water
Tape measure
Terrycloth towels
Tracing paper
Venetian trowel
BEFORE SHE PAINTED

Jeannine Dostal has a Bachelor of Arts in fashion design from the University of Cincinnati. Her first job took her to India, where she designed beaded and sequin gowns for the haute couture industry. From there, she went on to swimsuit and water ski graphic design and then to sports wear design. She started in the decorative painting market after she and her husband purchased a house that needed a lot of TLC. Jeannine did all of the decorative painting work herself because it was fun and free. Little by little, friends saw her work and wanted her to paint something for them. Then their friends saw Jeannine’s work and soon she was painting for people she did not know. She finally met a designer who was seeking a new faux finisher to work with, and the pair have been creating award-winning finishes for the last fifteen years.

1. BASECOAT AND TEXTURE. Prepare the room for painting with drop cloths and painter’s tape. Whether you are a professional decorative painter with access to professional products, or an artist who uses everyday products, you can achieve this fresco technique by choosing the texture coat that best serves your work. Both are wonderful. If you are using professional products: Basecoat your walls with Faux Effects Neutral White Setcoat and let dry. Trowel a thin but textured layer of Faux Effects UN-tinted Ovilla Finishing Plaster and let dry. Follow the rest of the instructions listed using Faux Effects FauxCrème colors. Make sure you have enough UN-tinted plaster left over for the distressing layer.
If you are not using professional products: Basecoat your walls with two coats of White Amber. Let dry 24 hours. Pour White Amber paint into a 5-gallon (19l) bucket. For every gallon (3.8l) of paint, add 7 to 8 cups (1.5 to 1.8 kg) of drywall powder, mixing in small amounts at a time using a drill mixer to stir the paint. This formula will vary in different climates, and, of course, to your own preference. Mix to a creamy, cake batter consistency. Make enough plaster for the job. You need enough to place a thin texture coat over the entire wall surface as well as the distressing layer.
Trowel a thin texture coat over the entire wall surface. Thicker areas will crack, which is nice for glaze to collect in and holidays are okay. Let dry 24 hours.
Set aside the remaining mixture for the distressing step. Store the plaster mix in an air-tight container. For extra protection, place a piece of clear plastic directly over the entire surface of the plaster.
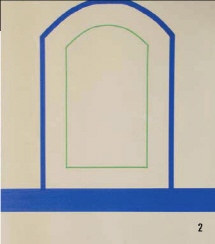
2. PANEL PLAN. I always begin planning panels by taping off a chair rail. This divides the room nicely and creates consistency. Determine where the panels would naturally fall. Begin with those areas and build from there. For example, if there is a window, tape matching panels on each side. Create frames by taping off panels within panels. Don’t square off every panel; add an arch here and there. To save time, I use the width of my tape as my tool. If I want a 2-inch (51mm) space between my frame and panel, I use 2-inch (51mm) tape to tape it off.
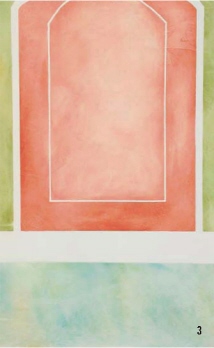
3. PANELS. Mix all the glaze colors ahead of time. Because the surface to be glazed is porous, the glaze colors need to be mixed in a ratio of 3:1, AquaGlaze to color. Darker colors are achieved by applying more layers of glaze color after each coat has dried. I typically use a few compatible colors and blend them together on the wall to create depth and movement of color.
Work each panel as a separate section, and use chip brushes to apply each glaze color in a random, splotchy pattern. Grip a 3-inch (76mm) chip brush just below the bristles and scrub the colors around into the texture’s surface, misting with water as needed to allow the glaze to move. Use a terrycloth towel to blend and soften the colors together. Use a damp towel to feather out the edges. Create fluffy cloud shapes that connect and overlap into each other.
The easiest place to begin is below the chair rail. This anchors the room and helps with future color placement. Below the chair rail are random amounts of Deep Peacock (keep in mind that this is the strongest tint), Rawhide, Prairie Sumac, and Burr Oak. The top green side panels are equal amounts of Burr Oak, Prairie Sumac, and Folk Art Olive Green. The center arched panel and frame are random amounts of Cedarbark and Red Earth. The very center color was achieved by removing most of the color with a wet terry towel.
The colors will travel over the edges in the neighboring panel, creating a beauty of its own. Make sure to blend them into the existing panel. When the panels are complete, remove the tape and clean up any edges with a damp terry towel.
4. STENCILING AND HAND PAINTING. All my frescos are created with a combination of stencils and hand painting. (Continued on page 89.)
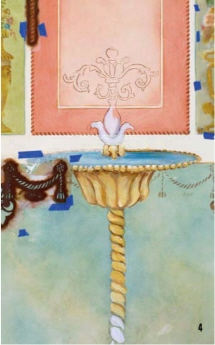
(Continued from page 88.) Draw the fountain onto the wall by tracing a reference picture on to tracing paper and projecting it onto the surface. Prime the fountain with Titanium White and let dry. Then paint the fountain Yellow Ochre with shades of Coffee Bean and Rawhide and highlights of Titanium White mixed with Yellow Ochre. The water is Deep Peacock and Titanium White brushed on and blended at the same time.
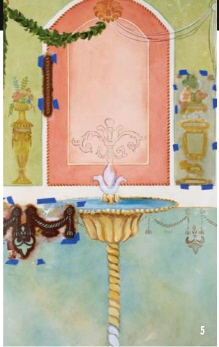
5. STENCILING. With only one overlay, stencil Melanie Royals Decorative Cording with Rawhide around the outside edge of the middle panel. Panels that do not have a rope border are edged softly, using an artist brush with a contrasting color.
At the top center of the arch, I stenciled Rawhide in a small section of a stencil that I purchased at a local art supply store. This design holds up a swag shape I drew in with chalk. Paint the swag foliage with all the greens listed, including Yellow Ochre + a touch of Deep Peacock. When creating your own room, look for places where you can add a bird or two, or a ledge where a bowl of fruit can sit or a place where a statue can stand. Don’t be afraid to go for it! More is better! I work all around the room, jumping from panel to panel. This helps keep a balance throughout.
I stenciled my handmade Fleur-de-lis and rope swag along the chair rail with Coffee Bean. You can easily find an appropriate ready-made stencil that will look nice here.
The Melanie Royals Large Fluted Vase stencils flanking the fountain are painted with shades of Rawhide with Coffee Bean accents. The flowers are a combination of the blues, greens and corals named in the materials list with a few hand-painted brushstrokes on top of the flowers to add softness.

6. DISTRESSING. Take a small amount of the leftover paint-drywall plaster mixture from step 1 and “butter” the entire bottom of a Venetian trowel with a thin layer of the mixture. Hold the trowel parallel with the wall and lightly drag it along the surface depositing the mud in random places. Cover the places that you don’t like with more mixture, and leave more open spaces to reveal the places you love. Make sure you have a balance, being careful not to be too splotchy or too even. If you cover up too much, just wipe it off with a wet terrycloth towel. Let dry.

7. TONING. To create the glaze color, mix AquaColor Gold + Brown (1:2) and stir thoroughly. To create the glaze, mix the glaze color with AquaCreme (1:3). Using the same glazing technique as explained in step 4, tone the entire surface, starting in the top corner and working your way across the wall. The color goes on dark but is wiped around, misted with water and feathered out to create a sheer, soft color that melts into the surface and softens the fresco.
EXPERT ADVICE
Tip 1: This textured basecoat formula, called “American Plaster,” can be found of my book Spectacular Walls, and glazing instructions can be found.
Tip 2: Paint quickly and don’t worry about fine detail and perfection because everything gets distressed.
Tip 3: Remember, the base color will remain wherever you place tape. Make sure you use your level, and keep your corners crisp by using a craft knife or razor blade to cut the tape edges. While taping your panels, use your plastic card to burnish the tape down so it will stick to the texture and keep the paint from seeping under.