ART CONCRETE
DAVE AND PAM SCHMIDT
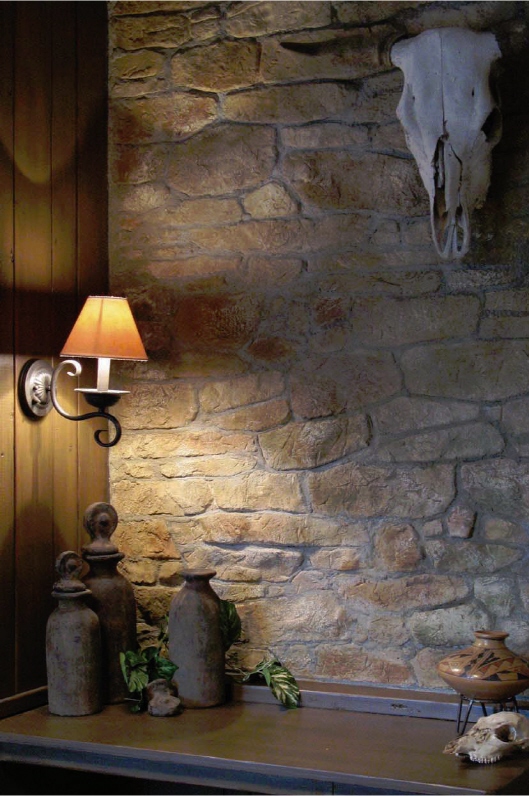
Mixing up a 5-gallon (19l) container of Flex-C-Ment Concrete may seem a little unusual for a decorative painter, but its popularity is growing, and although the effort is greater than a lot of other decorative treatments, the end result is really quite rewarding.
When we first introduced this at a local home show as something new we had to offer, the feedback was tremendous. The material we used, called Flex-C-Ment manufactured by Yoder and Son, is a lightweight concrete designed to be applied over drywall as well as other surfaces. When applied over a concrete primer, this material can be carved, sculpted, stamped and even sprayed with a hopper gun to create numerous effects. The stone and brick we created looked so realistic it fooled almost everyone at the home show in Indianapolis.
Combining the skills of a mason and the artistic skills of the decorative artist makes this new avenue a great way to get your work to stand out in the ever growing field of decorative painting.
MATERIALS
Brushes
2-inch (51mm) and 4-inch (10cm) chip brushes
Coarse brush (old wallpaper brush)
Leon Neon
Benjamin Moore Flat Latex Paints
HC-99, HC-73, 2152-40, 2163-10, HC-75, HC-95
Faux Effects AquaColors
Burnt Umber, Dark Brown, Earth Brown, Earth Green, White
Additional Materials
Assorted concrete trowels
5-gallon (19l) bucket
Bubble Gum Release Agent by Flex-C-Ment
Concrete carving tools
Concrete mixing blade
Drill, suitable to mix Flex-C-Ment Concrete
Fiberglass mesh
Flex-C-Ment Concrete Primer
Flex-C-Ment wall mix
Goggles
Grout bag
Grout blade
Hawk
Latex gloves
2-inch (51mm) painter’s tape for walls
Paint tray
Plastic floor cover
Rag or sea sponge
Respirator
9-inch (23cm) roller with a ½-inch (13mm) nap
Stone texture stamps for walls
Water
Water Bottle
BEFORE THEY PAINTED

Husband-and-wife team Pam and Dave Schmidt have more than thirty years combined experience in the decorative painting and mural field. They have taught nationally and internationally as guest instructors with Prismatic Painting Studio. Dave was a partner with Gary Lord at Prismatic Painting Studios and co-authored Marvelous Murals You Can Paint with him before moving to the Indianapolis area.
Pam recently received her Certificate of Interior Decorating. This combined with her strong color sense, high energy and artistic abilities makes this duo very popular with the designers and builders in their market.
Both Pam and Dave attribute the success of their business to their varied backgrounds and interests, which allow a broader range of ideas and approaches to a project.
Preparation
Flex-C-Ment can be messy to work with. Cover the floor with heavy plastic taped to the edges of the room. If you are working with a baseboard, use a taping gun to cover and protect it.
Trace around the outlets and switch plate covers, remove the plates, then tape on the inside of your pencil marks. Before your second coat of concrete is dry, remove the tape. This will allow the plates to sit flush against the wall. Mix the Flex-C-Ment Concrete in a garage or outdoors to greatly reduce dust in the home, and wear a respirator when mixing the material. We mix about half a bag of the material in a 5-gallon (19l) container, making it easier to handle when carrying it from room to room. Wear gloves as the material will dry and crack your hands.
The drill you use to mix the Flex-C-Ment Concrete should have high torque and be capable of handling the concrete mixing blade. If in doubt, check with a hardware store. Prior to investing, you might want to try renting the supplies needed. This is a strong drill; make sure you have a firm grip before you start to mix your material.
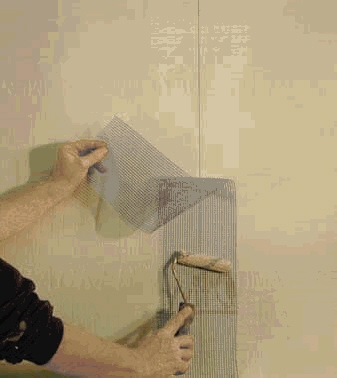
1. PRIMER. Apply Flex-C-Ment Concrete primer to all inside and outside corners as well as any exposed drywall seams.While the primer is still wet, apply fiberglass mesh allowing 3 inches (76mm) on both sides of the corners and seams, then roll back over the applied mesh so that the mesh is flat and adheres to the work surface. This helps reduce the possibility of small cracks later on. Allow to dry.
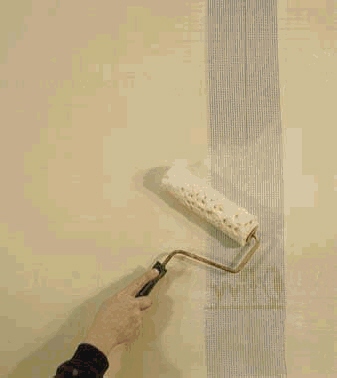
2. PRIME. Apply Flex-C-Ment Concrete primer using a 9-inch (23cm) roller with a ½-inch (13mm) nap to a 5' × 5' (1.5m × 1.5m) section of the wall.
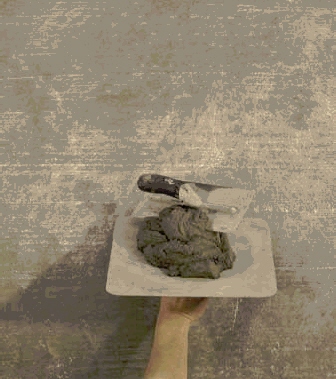
3. FIRST LAYER. Mix Flex-C-Ment according to manufacturer’s directions. After it is mixed, you might find it helpful to load a hawk with a small triangular trowel.
While the primer is still wet or tacky, apply a thin coat [about  -inches (10mm) thick] of Flex-C-Ment Concrete using your skimming trowel. Start at the bottom of your section with the skim trowel and pull up with one fluid motion.
Do not over work Flex-C-Ment Concrete with your trowel. Excessive trow-eling can create bubble pockets in the concrete and weaken the bond. Also do not trowel beyond the bounds of the concrete primer.
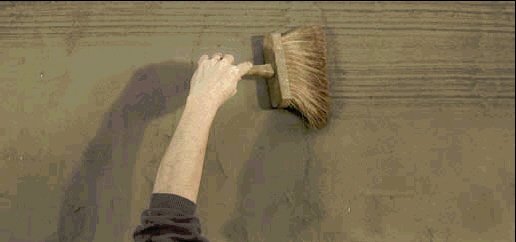
4. ADDING TOOTH. Using a coarse brush (here an old wallpaper brush was used), brush across the surface horizontally before the Flex-C-Ment Concrete hardens too much. This creates a tooth in the surface for the next layer of Flex-C-Ment Concrete. Continue until the entire work area is covered with the skim coat. Let dry overnight.
EXPERT ADVICE
Tip 1: Beginners should run sample boards before attempting to use this product on a wall. For the samples, mix small batches of Flex-C-Ment Concrete. Always add Flex-C-Ment Concrete to water, but keep in mind that with this product, a little water goes a long way. When mixing, test for proper consistency by running your finger through the material; the material should sag inward ever so slightly.
Tip 2: If Flex-C-Ment Concrete starts to set in the bucket while you are working, freshen it up by mixing in a little water. You can do this once, maybe twice at the most, after that you are weakening the mix by adding too much water.
Tip 3: Gather a few rocks for color reference and use flat latex paint for your rock colors. Always thin your paints by approximately 30–40 percent. Diluted paint color can change considerably as it dries on all porous surfaces. Always test your colors; you may need to add more or less water to achieve the desired color.
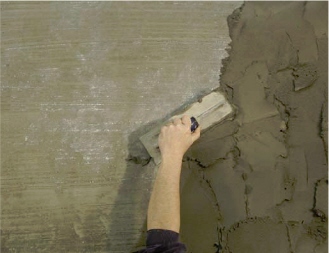
5. TEXTURE COAT. When laying up the texture coat to be carved on the job, keep in mind it can be several hours before you can start carving. Allow time! Before applying the texture coat, apply another coat of concrete primer as described in step 2. While the primer is still tacky, apply Flex-C-Ment Concrete with your hawk and trowel. Vary the thickness of the material anywhere from ¼- to ¾-inch (6mm–19mm) or even thicker. Troweling the Flex-C-Ment Concrete onto a vertical surface takes practice, but remember not to overwork the material.
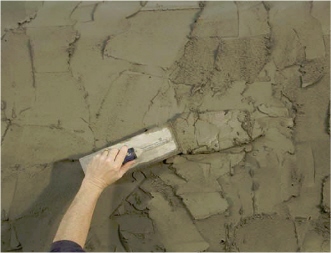
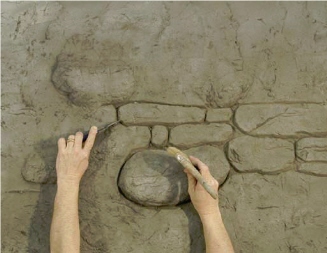
6. TEXTURE COAT. You may choose to have some rocks stick out slightly further than others. To do this, build up the concrete material in the selected areas. Once the texture coat is applied and the material is still soft, you are ready to texture the surface.
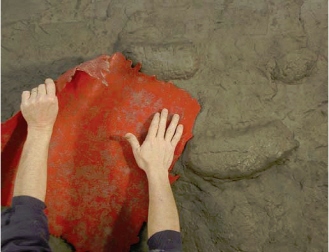
7. STAMPING. Apply Flex-C-Ment’s Bubble Gum Release agent to both the Flex-C-Ment Concrete and the surface of the stone-texture stamps for walls, using a water bottle filled with the release. This prevents the Flex-C-Ment Concrete from sticking to the stamp.
Gently apply and then push the stamp into the surface of the Flex-C-Ment Concrete, and carefully remove it. Rotate the stamp so the pattern direction varies. Look for thin areas on your stamp’s edges and gently cup the protruding rock to add texture. Too much pressure while stamping will flatten the highs and lows of the Flex-C-Ment Concrete and take away from the final look. Repeat the spray release when necessary. Continue working until the entire wall is complete.
8. CARVING. Let the Flex-C-Ment Concrete dry to a crumbly state (this may take several hours). Then, using the concrete carving tool or grout blade, begin carving into the Flex-C-Ment Concrete to create your stones. Try using your tools to detail some of the stone faces, or just knock out or dig out a few chunks on some stones. A 4-inch (10cm) chip brush makes a good dusting brush to clean out the grout lines.
As you carve, you can use an overhead projector to project a tracing of a stone or block pattern from a magazine or photo. Move the projector back and fourth for the desired size or scale of the pattern.
Let dry overnight.

9. BASECOAT. Basecoat the wall with Benjamin Moore color HC-99. Let dry. Spraying on the base color will considerably speed up the process.
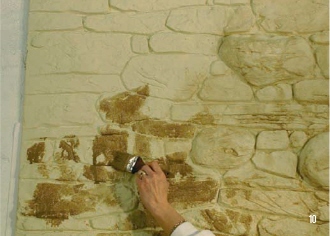
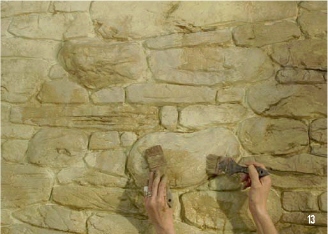
10. FIRST COLOR. Mist the surface lightly with water using a water bottle. Thin Benjamin Moore color HC-73 about 60 percent with water and quickly brush on a broken pattern of color working in small areas at a time using a 2-inch (51mm) or 4-inch (10cm) chip brush.
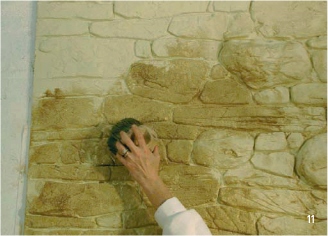
11. FIRST COLOR. Use a Leon Neon or large pounce brush to work the color into the stone.
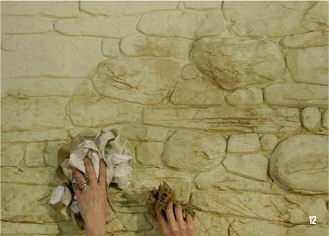
12. SOFTEN COLOR. While your color is still wet, use a rag and a sea sponge to blot the surface and vary your highs and lows of color to create a soft and subtle pattern. Step back often and look at your colors making sure the colors come and go.
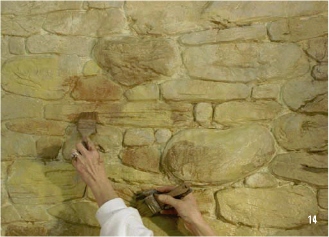
13. ADDITIONAL COLOR. Repeat the process described in steps 10–12, this time using two colors, Benjamin Moore 2152-40 and Benjamin Moore 2163-10, also thinned. Try not to overblend the two colors. Bounce around the surface varying the color on different stones. These steps should be done very quickly. Don’t over think it, just run with it. Let dry.
14. ADDITIONAL COLOR. Repeat steps 10–12 a third time using Benjamin Moore HC-75 and HC-95. Let dry.
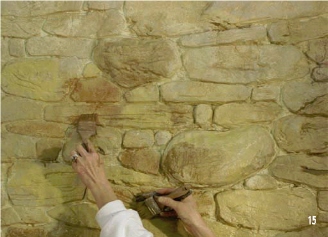
15. AGING. To create a mossy, aged feel, brush or sponge on AquaColor Earth Brown and Earth Green thinned with water. Then soften the colors with a Leon Neon and let dry.

16. GROUT LINES. Mix a thinned batch of Flex-C-Ment by adding just enough water that it will flow through a grout bag. Fill the bag about halfway then twist the end to prevent the material from flowing out the back. Squeeze the Flex-C-Ment Concrete into the grout line areas.
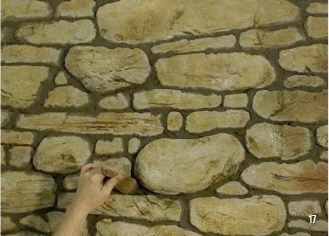
17. GROUT LINES. Stop from time to time as you are grouting to lightly pounce the grout material into the lines using a chip brush. Do not overwork it and make it too perfect; give the wall some character. Let dry. (Notice how dark the grout appears when wet. This will dry much lighter.)
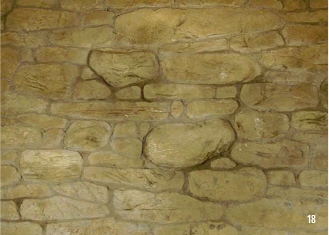
18. FINAL DETAILS. Mix AquaColor Burnt Umber, Dark Brown and White together then thin approximately 70–80 percent with water and brush onto the grout at random. This stains the grout color and warms it up a bit. It will appear dark at first, but then lighten considerably. Finish the surface by spraying a mix of Earth Brown and Dark Brown diluted approximately 70 percent with water around the ceiling lines, your corners and baseboard areas to create an aged, worn appearance. Soften using your Leon Neon.