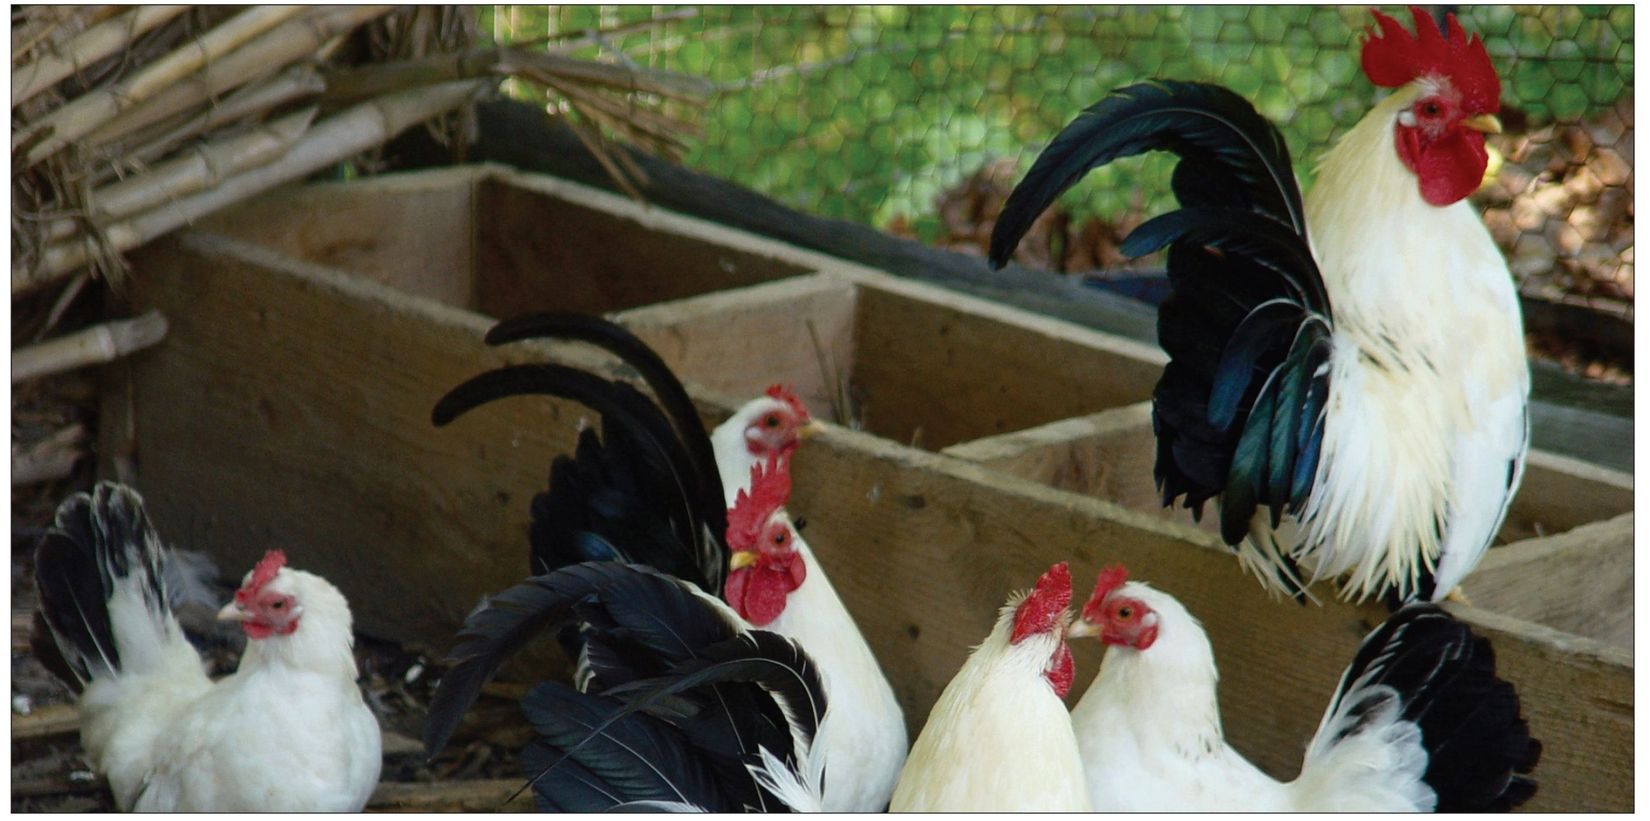
Houses, Runs, and Coops for Poultry
Hen Coop with Chicken Run
The coop shown by Figure 149 is intended for use in rearing early chickens. The front has a hinged flat which may rest on the top of the run as shown to shelter it partially during the daytime, or it may be lifted higher and secured with a hook and staple. At night you can remove the run and let the flap down to keep the brood warm and ward off cats and rats. It the latter are troublesome, the holes over the flap may be covered with wire netting The construction is more clearly shown in the longitudinal section (Figure 150), and in the view of the front of coop with the run removed (Figure 151). To make the coop, first prepare the boards to fold the sides; put them together and nail to ledges of 1½ inches by ¾ inch boards, as shown at the top and bottom of Figure 150. Sound ¾ inch deal should be used throughout, and the joints of the boards should be tongued and grooved for the sheeting. Nail on the boards to form the back, putting a strip up the corners if needed, and get out a rail A (Figure 150), 2 inches by ¾ inch, notching it for the front rails to fit in at the bottom, and secure it at the sides. Fit another rail across the top as shown, then put on the roof. Next fit up the front (Figure 151), mortising the middle rail A through the roof to allow of its being lifted to release the hen. Make the hinged flap for the front by cutting three or four boards to length and cross-battening them with a couple of ledges; then prepare a rail 2 feet long by 1½ inches by ¾ inch, and secure the flap to this with a pair of butt or tee hinges. This rail should be secured to the front of the coop with screws, so that it can be removed easily with the flap with not required. You can make the run by cutting two 9-inch or 10-inch boards 3 feet or more long to form the sides, and a piece 1 foot, 10½ inches by 9 inches wide for the front. Upright pieces may be nailed on to strengthen the corners B (Figure 150), and a cross rail c must be used at the side against the front of the coop to carry the wire netting. A hinged flap at the front end of the run will be found useful when supplying soft food and water for the chickens, and the top of the run may be covered with ¾-inch or 1-inch mesh wire netting, secured to the sides and ends with small staples. A few center-bit holes may be bored in the coop through the top of the sides to ensure thorough ventilation.

Figure 149—Hen Coop with Run

Figure 150—Longitudinal Section of Coop and Run

Figure 151—Front of Coop

Figure 152—Portable House and Run
Portable Fowl-House and Run
The house and run illustrated by Figure 152 occupies but a small space while forming the cheapest possible pen in which fowls may be kept in health and comfort. The house and run are made separately, so that they are easily removable to fresh ground when the current space becomes foul, and the run is covered with wire netting, which is omitted in Figure 152 to prevent confusion. For the house illustrated, the run is 8 feet or 9 feet long by 5 feet wide, with a height of 2 feet, 9 inches. At the end farther from the house the run is roofed over for a couple of feet, to provide shelter in case of rain at times when it is not desirable for the birds to crowd into the house. Frame the run together with 1½ inches of square deal scantling, with 7 inches by ¾ inch boarding round the bottom, and the joints between the uprights and rails may be either half-lapped or mortised and tenoned. In the center of the back end, four or more bars may be framed as shown, to give the birds access to a trough of soft food or clean water, and enable them to take the one or the other without upsetting or fouling it. You can have the two center bars be moveable for feeding purposes. For a pen of seven or eight birds the dimensions of the house may be 5 feet long, 3 feet, 6 inches wide, 3 feet, 8 inches high in front, and 2 feet, 10 inches at the back. It may be built throughout with ¾ inch matchboarding, strengthened with framing pieces of 2-inch by 1-inch deal. Figure 153 is an elevation of the front of the house, the run being removed, and shows the doorway by which the fowls have access and is fitted with a sliding shutter, which may be closed at night and be held open in the daytime by means of a cord and pulley, or a hole and iron pinches In the top portion a hinged flap is provided for the ventilation, and this may be opened and closed by means of a common iron stay as used for greenhouse ventilation.

Figure 153—Front of Portable House

Figure 154—Fowl-house Ventilator
Interior Arrangements of Fowl-house
Figure 155 is a longitudinal section of the house, showing the arrangement of the perches, floor, and nesting boxes. The perches are made by sawing a 2½-inch or 3-inch round pole through the center, or instead a couple of 2½-inch by 1½-inch rails may have the corners rounded off on one side. For carrying the perches a couple of notched fillets A (Figure 156) are nailed to the front of the nesting boxes at one end, and a similar pair may be nailed inside the opposite end of the house; these should be arranged at a height to keep the perches about 1 foot above the ground. The floor is made by nailing 1-inch boards to three or four 1½-inch square ledges, and it should be well coated with a mixture of hot tar and quicklime sprinkled with as much sand as will lie on it. The floor is simply a platform quite separate from the house, and will fall away when the house is lifted up. Care must be taken that there is not sufficient space between the sides of the house and the floor for the birds to get their feet caught and jammed. At one end, as shown on the left of Figure 155, a shelf is fixed across and secured to the sides by means of fillets at about 16 inches or 18 inches above the floor, according to the breed of the birds, and the space under the shelf is divided into three compartments, as shown in Figure 156, to serve as nesting boxes. A strip about 2½ inches or 3 inches wide is nailed across the front at the bottom, as shown in Figures 155 and 156, to keep the nesting material in position, and pieces 2 inches wide are nailed up the sides on the outside, pieces 5 inches wide being put on the divisions between the boxes to separate the nests from the rest of the house. For removing the eggs, fit the end of the house behind the nesting boxes with a ledged door, the outside of which is shown in Figure 157. This is hung at the top by a couple of cross-garnet hinges, and secured with a turn-button at the bottom, or if necessary by a more secure fastening. For a larger house it may be advisable to have a couple of doors over the boxes. For the purpose of lifting the house, handles are screwed to the top rails, back and front. The roof should be made watertight by nailing strips over the joints or covering with felt, and the house can be painted or tarred outside and well limewashed inside. The woodwork of the run should also have three coats of paint or a coat of tar. Four ventilation holes are shown at the top of Figure 157; these should be bored with a 1-inch center-bit at each side.

Figures 155 and Figures 156—Sections of Portable House

Figure 157—End of Portable House
Sitting Box for Broody Hens
For rearing chickens under a hen, it is necessary to provide a quiet nest where the mother bird will not be disturbed by the other fowls; and when a special shed would be too expensive, the sitting-box illustrated by Figure 158 will be useful. It may be made of ¾-inch deal boarding, or if some sound packing cases can be obtained, they may be used without much alteration, an inch or so in the dimensions either way not being of much importance. To make the box, first prepare the sides A (Figure 158), cutting the boards 1 foot, 4 inches long and making up the width to 1 foot, 4 inches, the strips B (Figure 159) being nailed at the top and bottom to hold the sides together. These strips or ledges may be 1½ inches wide by ¾ inch thick. On the front edges, notch out a piece at c (Figure 159) 1½ inches by ¾ inch, and 1½ inches from the top, and a piece at the bottom D, 2½ inches by ¾ inch, and on the inside nail a ledge F (Figure 160), 1½ inches by ¾-inch mesh wire netting a little larger than the inside of the box, and secure it to the ledges round the bottom of the box with wire staples, so that it will sag in the middle and nearly touch the ground. Make a door for the front by nailing ledges G and H (Figure 160) across a couple of boards fitted into the opening, the top ledge G being kept a little longer than the width of the door to form a stop. The door may be hung with a pair of butt hinges, or with a couple of pieces of leather fixed to the bottom rail, and secured at the top with a turn-button. To complete the box ¾-inch holes should be bored through the sides and back, just below the top ledge, and either a leather strap, as shown, or a common iron handle secured on the top in the center for carrying the box. Figure 158 shows the box with the lid let down to allow the fowl to walk out of the nest; Figure 159 is a front view of the box with a portion of the right-hand side in section; and Figure 160 is a section of the box from the front to the back, showing the wire netting at the bottom.
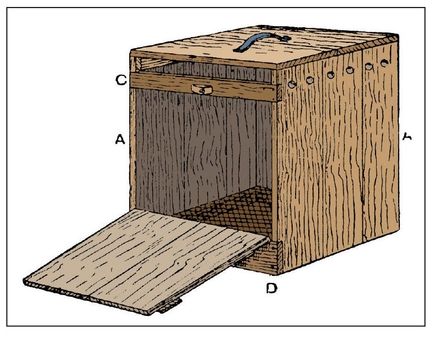
Figure 158—Sitting Box for Broody Hen

Figure 159—Part Elevation and Section of Box

Figure 160—Cross Section of Sitting Box
Lean-to Poultry House and Run
Figure 161 is a general view of a poultry house and run, Figure 162 being a sectional plan. Front and end elevations are given by Figures 163 and 164 respectively. The run is continued under the roosting shed, which is an advantage where space is a consideration. The run can be made to any extra length desired, in which case it may be necessary to provide one or more intermediate uprights to the front and cross pieces to the roof to carry the wire netting. Timber about 3 inches by 3 inches will be most suitable for the general framework, and ¾-inch matchboarding for the roof. As most of the leading dimensions are given on the accompanying illustrations, the sizes and number of the pieces required can be readily seen. The quantity of wood required will be like so:
- Framework, about 80 feet of 3 inches by 3 inches
- Matchboarding for sides and roof, 130 feet of 6 inches by ¾ inch
- Floor boarding, 40 feet of 6 inches by ⅞ inch grooved and tongued
- Door to run, 10 feet of 3 inches by 1½ inches, and 2 feet of 4 ½ inches by 1½ inches
Roosting Shed of Lean-to House
After the pieces for the framework of the roosting shed have been cut, plan them up and set out the four posts. Mortises are made for the tenons of the bottom rails and the floor, at the same time making mortises for the rails of the run in two of the vertical posts. At this point, the three rails at the bottom, and the four making the floor support, should be set out, and the tenons and shoulders should be cut in the usual way. Cut the mortises in the posts carrying the bottom rails about 2 inches from the bottom, which lets a part of the posts go in the ground, and makes the structure more rigid. The two top rails A B are planed on the top edge to the slope of the roof. A simple but suitable form of joint for the top of the posts and the top rail of the front, and top rail of the back. Next, fit the frame and nail the joints together; a little paint applied to the parts making the joints before fastening will add to their durability and appearance. For the floor, tongued and grooved floor boards (or even thick matchlining) is fitting. The floor P R should be nailed to the front and sides, some strips or fillets, about 1¼ inches by 1 inch, being nailed to the inside of the posts as shown, care being taken to keep their outer edges flush with those on the floorboard. The matchboarding to the front and sides can then be nailed in position, keeping the frame true while fixing. The door is best made afterwards by nailing the top of the boards and cutting along the line E F (Figure 163). Start the cut at L before the boards are placed in position. The two ledges for the back are of the same thickness, and 3½ inches wide, and are secured to the back of the boards by nailing through the front side and clinging the nails on the back of the ledges (See Figure 161). You can hinge the door with two 15-inch cross-garnets, shown in Figure 163. To keep out the draught, and also to form stops for the door and support the pieces of board over the top of the door, three strips of wood, about 2 inches wide and ¾ inch thick, should be nailed round the inside of the opening, and should project about ½ inch, so that the door shuts against them. Before constructing the roof it will be best to fit up the nests; ¾-inch boarding will do for this purpose. The best means of fixing the shelves and divisions will be to nail fillets to the sides and floor, to which the boarding can be nailed. Matchboarding will be best for the roof, since rafters will not be required, one bearer, going from side to side c, being enough to support the roof. The boards in this case run from front to back. The entrance holes for the fowls can now be cut out, and two rebated slides and a sliding door made. A hinged flap is fixed on the outside of the slide, covering the holes of the nests, so that eggs can be removed without opening the door of the roost shed. Cut out a hole in the roof for ventilation, and fix a ventilator as illustrated. The flap D is hinged to the roof, and can be opened or closed to regulate ventilation. You should cover the roof with felt to make it watertight in case of rain.
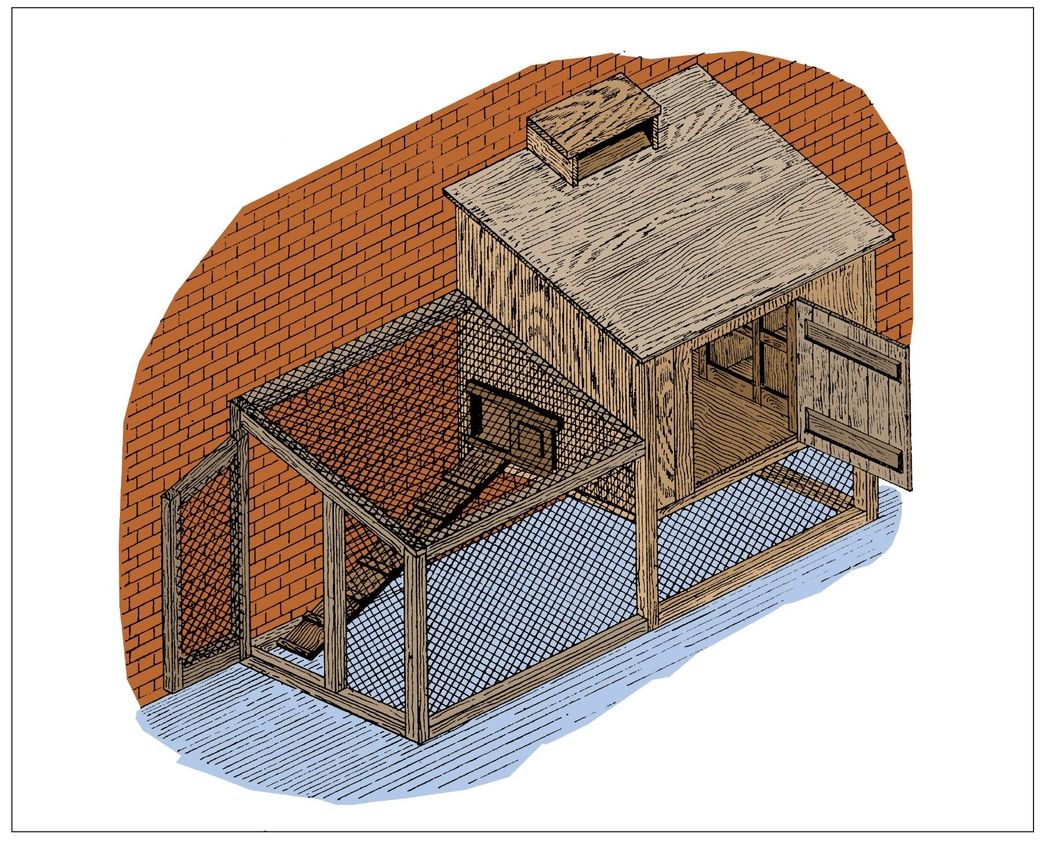
Figure 161—Poultry House and Run

Figure 162—Sectional Plan of Poultry House and Run
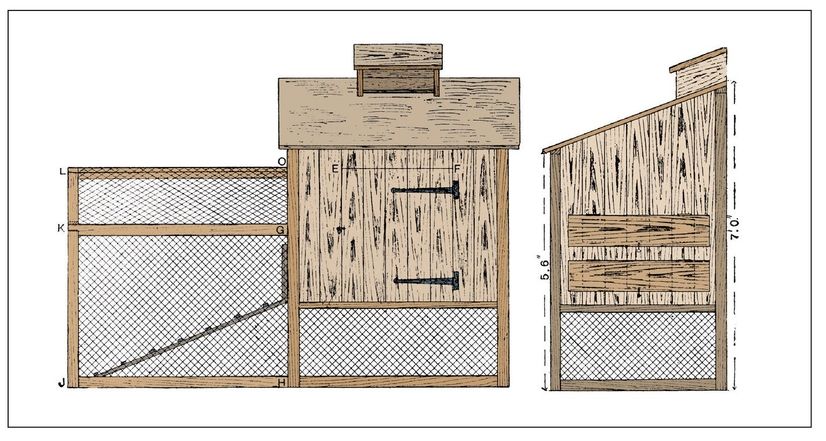
Figure 163 and Figure 164—Elevations of Poultry House and Run


Build a treehouse!
Building a treehouse requires a lot of work and some good planning. Be sure to build the house in trees that are large and sturdy. If you do not have such old trees in your yard, you can always modify these plans to build treetop havens on wooden platforms raised above ground.
Low Two-tree Treehouse
This treehouse can be constructed out of ordinary boards and timber. It does not sit up quite as high in the trees but is still elevated above the ground to give a good view of the yard and surrounding area.
Directions
- Select a location between two trees that are roughly 6 to 8 feet apart. The trees should have fairly straight trunks and should be at least 15 inches in diameter. Make sure they are healthy and sturdy—not decaying in any way.
- Using an axe, clear off the brush and small branches up to 20 feet on the tree trunks (or to the height of where the treehouse will be located).
- Take four or five pieces of spruce (from a lumberyard or home center) that are 2 inches thick, 8 inches wide, and 16 feet long. Saw off and nail two of the pieces to the trunks of the trees 8 feet above the ground. First cut away some of the bark and wood to make a flat surface on the trunk. You will need 16-inch steel-wire nails to anchor the boards to the trees.
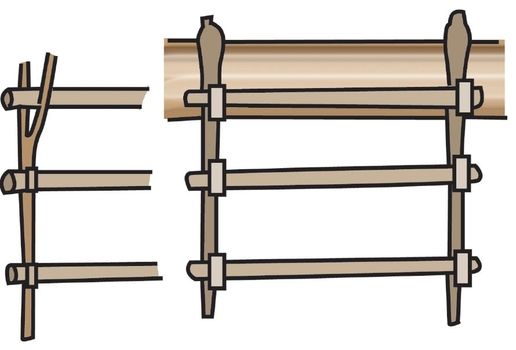
- Cut two timbers 6 feet long and the other two the length of distance between the tree trunks. In the 6-foot pieces, cut notches on the underside. The ends of the bracket timbers will fit into these notches.
- Cut the ends of the timbers to form a square frame so that they dovetail. Spike in 6-foot timbers to the tree trunks so that they will rest on
the first two timbers that were nailed to the trees (see image on top right).
THE JUNIOR HOMESTEADER
- Place the remaining two timbers in position so that the ends fit into those fastened to the trees. Nail them well.
- Support the first timbers that are spiked to the tree trunks with 15-inch blocks nailed below them. The cross timbers and last ones form the frame. Place the frame into the dovetailed joints at the ends.
- Cut two more timbers and lay them across the supporting timbers, nailed to the trees, so they will fit inside the front and back timbers, and secure them with long nails. The floor frame is now complete.
- Construct a frame 7 feet high at the front and 6 feet high in the back out of 2 x 3-inch spruce. Spike the side timbers, forming the top, to the insides of the tree trunks (see bottom right image). Mount the bottoms of the uprights on the corners of the floor frame and use four long nails to hold them into place.
- Now, cut two timbers and arrange them in an upright position at the front 30 inches apart. The door will be here. Halfway between the floor and the top of the framework, construct timber all around except between the door timbers. This will add strength and will allow the sheathing boards to be nailed. It will also make one more anchoring beam between the tree trunks.
- Then nail the side rails into the tree trunks in a corresponding way to the top (roof) strips.
- Make the floor from lumber 4, 6, or 10 inches wide. The boards should be planed on both sides.
- Construct the roof of the same boards. You can lay tarred paper over them and fasten it to the edges with nails. This will help waterproof the roof at least for one year. To make the roof last longer, you can shingle it.
- Windows can also be made in the side and back walls. These should be about 24 inches square. The door can be constructed out of boards held together with battens. A lock can also be furnished to keep out unwanted visitors.
The treehouse will need a ladder in order to access it. This can either be purchased from a yard sale or can be made out of hickory poles and cross-sticks 20 inches wide. To keep the ladder from slipping while ascending and descending, affix loops to the top of the ladder; these will fit over large, sturdy nails driven into the doorsill, and the ladder will be relatively stable.
A flexible ladder can also be made out of ropes and hung much the same way as the wooden ladder. This type of ladder, though not as sturdy, can be drawn up when people are in the treehouse so no one else can enter.
Inside the treehouse, small chairs and other seats can be constructed and used for relaxing. Narrow shelving can be made and fastened over the windows with brackets. Small things can then be housed on these shelves. A small table may also be housed in the treetop shelter.
High Treehouse in One Tree
If you have a tree large and strong enough (oaks are very good for this), a treehouse can be successfully built in its branches. For this plan, the treehouse will be 25 feet above the ground, and below it is a landing from which a rope ladder can be dropped to the ground. A more solid, wooden ladder connects the landing with the deck of the treehouse and it can be situated through a hole in the deck of the house.
Since every tree is different, it is difficult to give exact dimensions of the frame of this treehouse and how many floorboards should be used. But the construction of a single-tree treehouse is, in many ways, similar to that of the low two-tree treehouse. The trunk of the tree will have to project up through the treehouse and the out-spreading branches will need to support the lower parts of the floor frame. This treehouse can have either a peaked or a flat roof, depending on the structure of the treehouse and the space allowed for a roof within the treetop.
Brace the floorboards well to the main trunk of the tree with long and short brackets or props. These will help make the house secure in the tree. Drive large spikes into the tree where the lower ends attach to the trunk. Nailing cleats or blocks under these will help to support and strengthen the structure.

« Refer to these illustrations when constructing the low two-tree treehouse.

A treehouse can also be built on two trees, as shown here.
You can even build a deck for your treehouse, as long as you’re building on a very sturdy tree.

Plans for building a high treehouse in one tree.
Outdoor Chicken Rearer
Figure 165 shows an outdoor rearer for accommodating fifty chickens. The house or sleeping compartment A is 2 feet square, made of ¾-inch floor boards, and is 24 inches high at the front and 18 inches at the back, thus giving a good slope to the roof. Two fillets of wood E (Figure 166), 1 inch by ¾ inch, are nailed at a distance of 2 inches from the ground, and on this fillet the bottom is fixed. The two sides are shaped at the bottom as shown to allow for air to get to the lamp. In the center of the bottom a 6-inch circular hole is cut to accommodate the lamp reservoir. Nail two more fillets as shown at a distance of 10 inches from the inside of the bottom. On these rest the inner lid, made of ¾-inch material. it fits easily inside the case, and has handles for convenience in lifting out, and a 3-inch hole should be cut in the middle to allow the waste heat to escape. The four corners should be blocked up with pieces of wood 5 inches wide, to keep the chicks from overcrowding there, and the rearer bottom will have a hexagonal shape. The outside lid overlaps all round by about 1½ inches, and should be hinged at the side. On the front of the house fillets measuring 1½ inches by 1 inch are fixed; they should be 9 inches from the bottom at the ends, and should have a rise of 9 inches at the middle. These support one end of the glass run. Cut a small hole in the front of the house for the doorway and attach a ladder here. Another hole D (Figure 165), 5 inches by 3 inches, should be cut in one of the sides midway between the inner lid and the bottom. Fill this hole with glass, so that the lamp can be inspected without opening the rearer. Bore four 1-inches holes in the front of the house at the top. This completes the woodwork for the sleeping compartment.
Figure 165—Outdoor Chicken Rearer


Runs for Chicken Rearer
The runs are made to fold up for convenience in packing when the rearer is not in use. For the sides of the runs, you will need four pieces, two pieces for the glass run B (Figure 165) 2 feet 8 inches long by 9 inches wide by ⅝ inch thick, and for the wire run c two pieces 3 feet, 6 inches by 9 inches by ⅝ inch ; one piece for the end of wire run 2 feet by 9 inches by ⅝ inch; and one middle partition made of ¾-inch floor board, which should be cut to the same eave as the fillets on the front of the house. In making the whole up, hinge together the sides of the glass and wire runs, leaving a ¾-inch space between the two. This space is to support the middle partition, which just slips in. Two pieces of material 9 inches by 1½ inches by 1½ inches are nailed at the ends of the wire runs, and to these pieces the end is fixed using screw-eyes. The sides of the glass run overlap the house by 2 inches, and are again fastened with screw-eyes to the house. One side of the glass lights is fastened to the house using brass plates which are screwed to the frame, one at the top and one at the lower end of the frame. A frame of wood should be made to fit flush on the sides of the wire run, and four pieces of iron 2 inches long by ½ inch wide should be screwed to the sides of this frame to keep it from slipping off. To the under-side of this frame a piece of wire netting, 1 inch mesh, is fixed.
Figure 166—Section of Sleeping Compartment of Rearer

Figures 167 and Figures 168—Side and End Elevations of Fowl House with Semicircular Roof

Figure 169—Sectional Plan of Fowl House
Fowl House with Semicircular Roof
Figure 167 shows a side elevation, Figure 168 an end elevation, and Figure 169 a plan and part section of a simple fowl house with a semicircular roof. Figure 169, showing a section on A B (Figure 168), makes clear that the house is divided into two compartments, with a passage along the back. The compartments are for the poultry, and could house two separate types. Each is complete with nests, roost, and trap, as shown at N, K, T (Figure 169). Any suitable boxes will do for nests, and some may be nailed to the sides at convenient heights, instead of being all on the floor. The passage is for attendance, and the fowls should not have access to it. Plain ledged doors are put in the partition between the passage and compartments; there is also a plain ledged door on the passage, the front of which is shown in Figure 167. The back of one of the inside doors is shown in Figure 170. These inside doors are not boarded close, a space of 1½ inches or so being left between for light and ventilation. Install a small glazed window in the front of each compartment, and another in the back of the passage. A covered run stretches along the front, lined up on the side and ends with wire netting. A semicircular-headed hole at the base of each compartment gives ingress and egress to the run. The roof is, as shown in Figures 167 and 171, semicircular in outline; its boards are ⅝ inch thick, and are covered with felt-cloth tarred. The run is also boarded and similarly covered. The roof ribs or spars will do at 2 feet centers, one of course to be at each end; 1½ inches thick will be enough. The framing is put together with butt joints nailed diagonally. The boarding is rough and laid horizontally, overlapping as shown in Figure 172. The windowframes are square arrised, but may be dressed and mortised and tenoned at the joints. The timber may be red or white pine. Corner posts should be 3 inches by 3 inches, the rest of the framing 3 inches by 2 inches. The posts may be let into the ground, but it is best to cut them on the bottom sill, which should be leveled up a few inches. The floor may be simply the ground leveled; but to keep out vermin the floor should be asphalt or concrete, and the netting on the run continued all round.

Figure 170—Inside Door of Fowl House

Figure 171—Semicircular Roof

Figure 172—Boarding on Fowl House Framing