Constructing the Background
Drawing the Design
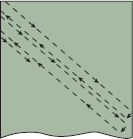
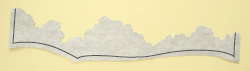
After you have worked through the design process and guidelines as outlined in Designing Your Quilt (pages 8–21), it is time to make a full-size drawing of the background. At this stage, concentrate on simplifying the background into the main areas, keeping in mind perspective and the position of the horizon line. Sometimes it can be helpful to try to visualize the scene in three to five big shapes, looking past the detail that you add later.

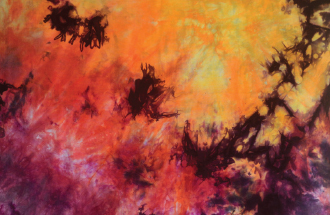
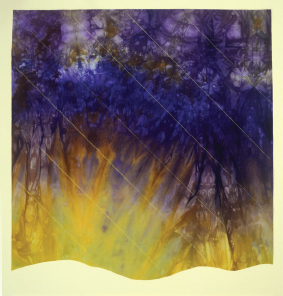
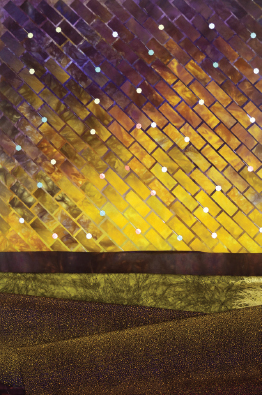
Initial photo taken in Namibia
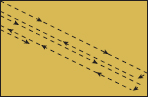
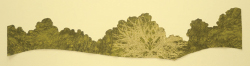
1. Draw the background and then number the segments from the back of the scene to the front. If there are areas to be fused in place on the background, mark these also—these will be areas that are very small or have an irregular edge. It is preferable to turn under the top edge on the larger pieces, as this technique gives more perspective.
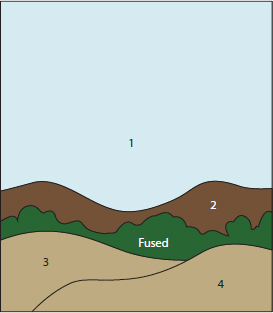
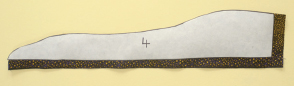
Background pattern drawn with lowered horizon line
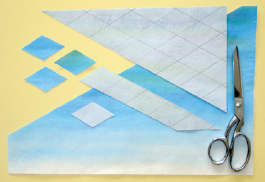
2. Place a sheet of freezer paper, shiny side down, onto the pattern. Trace the background segments onto the dull side of the freezer paper. Make sure to include the number of each segment. Cut out each freezer-paper segment separately. Trace Segment 2 to include the fused area.
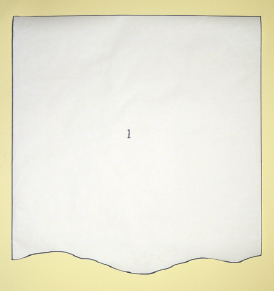
Freezer-paper pattern for sky segment
Choosing Segments to Tile
Now it is time to choose the segment to be tiled. Generally this is one large area, but multiple areas can be tiled, as discussed in Using Tiles in Other Areas (pages 75–84).
After reading the information on tile shapes (pages 20
and
page 21), choose the shape and size of the background tiles. Squares, rectangles, and diamonds are good options to get you started. Select the fabrics for the mosaic tile shapes. The selection can include a number of different fabrics or one fabric with interesting changes in color.
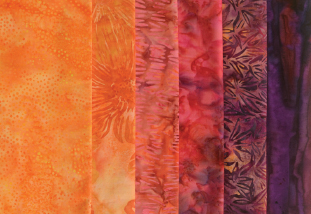
Group of fabrics for sky
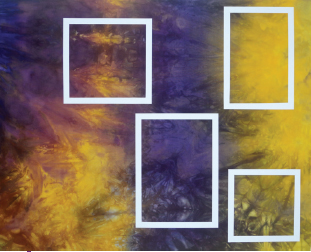
Select different areas of color for tiles.
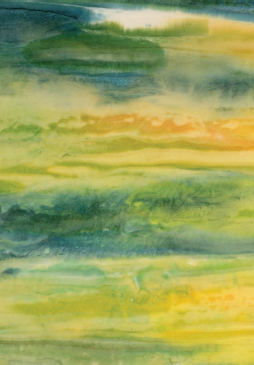
Single piece of fabric with variation in color
Making the Tiles
If you are using multiple fabrics, iron a piece of fusible web to the back of each one, following the manufacturer’s instructions. If you are using a multicolored fabric, you need to decide which areas you will use for the tiles and iron fusible web to those portions. You will need to feature the different colors, but you will also need areas that show the change from one color to another. These areas become the bridges that allow you to make a smooth transition from one color to the next.
When choosing fusible web, Lite Steam-A-Seam 2, which allows the mosaic pieces to adhere to the background before ironing, is a good choice (see Tip below).
TIP
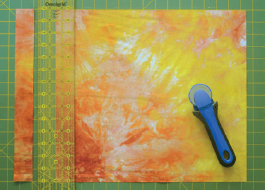
Lite Steam-A-Seam 2 is often sold on a roll, so your first step is to cut it into manageable rectangles approximately 6″ × 8″ (15cm × 20cm). This product is also available precut to this size. It has lining paper on both sides, so the roll doesn’t stick together. You need to remove the lining paper from one side and then iron the glue side to the back of your fabric. You can use this product with or without steam, and you should set your iron temperature according to the type of fabric you are using, following the manufacturer’s instructions. Leaving the backing paper still attached, rotary cut the fabric backed with fusible web into the selected shapes.
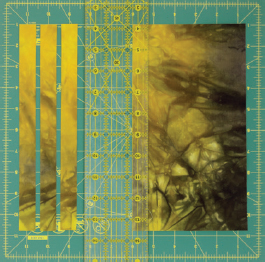
CUTTING RECTANGULAR TILES
Rectangular tiles can be cut to any size, but a suggestion is to rotary cut fabric backed with fusible web into strips ¾″ (2cm) wide and then cut across the strips every 2″ (5cm) to form ¾″ × 2″ (2cm × 5cm) rectangles. The size of the tiles will depend on the size of the quilt and the area to be tiled. For small quilts, the tile size can be reduced, but take care you don’t make them too small, as arranging them symmetrically can be very time consuming.
Cut strips.
Crosscut to form rectangles.

Arrange rectangles in piles according to color.
If there is a defined line in your fabric, you will need to make a decision as to which way you cut the fabric. You will get very different effects depending on your decision. Generally, it works well to run the line along the length of the rectangles rather than the width.
Fabric with defined line

Strips cut along length of pattern
Strips cut across pattern
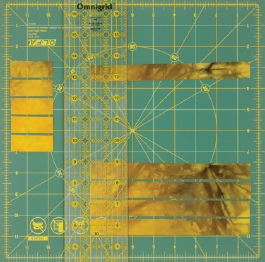
CUTTING SQUARE TILES
Square tiles can also be cut to any size, but I would suggest that 1½″ × 1½″ (3.8cm × 3.8cm) to 2″ × 2″ (5cm × 5cm) is a good size to work with, as the colors and fabrics blend well when the tiles are not too large. Follow the manufacturer’s instructions to add fusible web to the selected fabric back. Then rotary cut the fabric into strips of your chosen width. Crosscut at the same width to make squares.
Cut strips.

Crosscut to form squares.
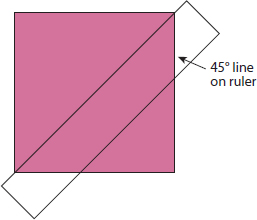
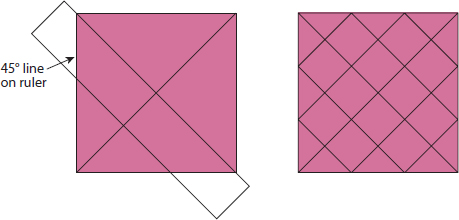
If the fabric has a horizontal pattern, you will need to cut the squares on the bias so that you don’t have lines heading off in all directions in the mosaic background.
Line up 45° line of ruler with straight edge of fabric and cut along edge of ruler.
Rotary cut parallel strips at selected width.
Crosscut to form squares with consistent lines.
TIP
A cutting mat that rotates can be very useful for cutting squares and rectangles. You don’t need to move your fabric to cut in the other direction—you just rotate the board.
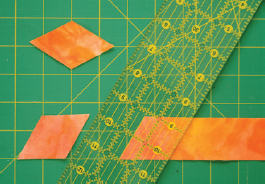
CUTTING DIAMOND TILES
For some, cutting accurate diamond tiles can be a challenge. I have found the following technique a helpful one for my students to follow.
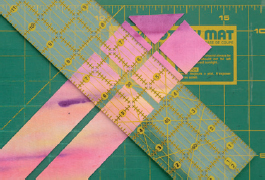
1. Cut a sheet of fusible web and check to see which side of the lining paper has the web attached. You can do this by peeling apart a corner. Leaving both pieces of the paper liner in position, draw a straight line ½″ (1.3cm) in from the bottom edge, making sure you draw on the side that has the web attached. Position a ruler so the 30° line is on the drawn line. Draw a second line along the edge of the ruler.
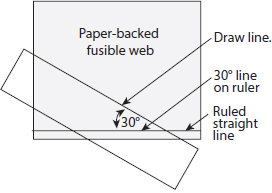
Draw 30° line on fusible web.
2. Turn over the ruler to the back and position the same 30° line along the initial dawn line. Draw a third line along the edge of the ruler.
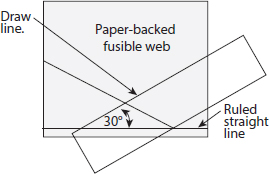
Turn ruler over and draw another 30° line.
3. Choose the width of the tiles, considering 1″–2″ (2.5cm–5cm) as a suitable size. Most of the diamond tiles featured in the quilts in this book have been cut at 1½″ (3.8cm). Draw lines at a chosen width, parallel to the second and third lines, until the whole grid is filled in.
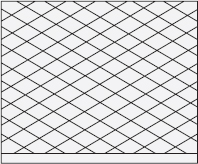
Draw parallel lines at chosen width until grid is covered.
4. Follow the manufacturer’s instructions to iron the fusible web to the back of the selected fabric or fabrics. Following the grid, cut out the diamond shapes with a rotary cutter or scissors.
Cut diamonds using grid as guide.
If you are using multiple fabrics, the grid can be cut up and sections ironed to the back of different fabrics.

Cut grid into sections and fuse to back of different fabrics.
This technique allows you to position the fusible web grid so that any lines in the fabric can be aligned with the longest part of the diamond.
Position diamonds along linear pattern on fabric.
Alternative Techniques for Cutting Diamond Tiles
An alternative to drawing the grid on fusible web is to trace around individual diamond stencils, which are available in multiple sizes. These are very useful if you are just cutting one or two shapes from many different fabrics. Trace the diamonds onto fusible web and cut out the shape with a ¼″ (6mm) margin. Follow the manufacturer’s instructions to fuse these diamonds to the back of the fabrics and cut out along the drawn lines. For this process you can use scissors or a small rotary cutter.

Trace around diamond shape on fusible web.
Cut out with ¼″ (6mm) margin, fuse to back of fabric, and cut out.
The following is another alternative that works well for those who are not “spatially challenged.”
1. Apply the fusible web to the back of the fabrics, following the manufacturer’s instructions.
2. Choose the width of the diamond, for example, 1½″ (3.8cm), and cut multiple strips this width.
Cut strips.
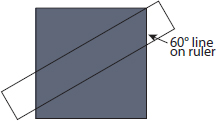
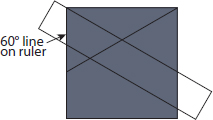
3. Find the 60° line on the ruler and position this on the top edge of the strip. Rotary cut at a 60° angle across the end of the strip.
Position 60° line on top edge of fabric strip and cut 60° angle at strip end.
4. Now from each strip, move the ruler to cut multiple diamonds that measure 1½″ (3.8cm).
Cut across at 1½″ (3.8cm).
TIP
Be careful when cutting fabric with a linear pattern if you are using this technique. You don’t want lines heading off in all directions.
Choosing the Base Fabric
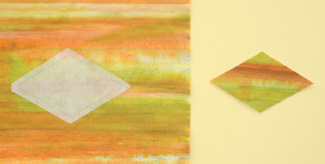
The next step is to choose a base fabric to go under the tiles. A fabric that blends and is of a middle value is often the best choice. To select this fabric, look at your color range and choose a color that is in the middle. Then look at the value. You don’t want a fabric that is too light or dark; one that has a middle value, taking into consideration your other fabrics, should work well. Try placing some tiles on a number of different base fabrics to see the effect.
Base color that blends and is of middle value
Base that is similar color but lighter value
Alternatively, a contrasting fabric can work well, depending on your design. On occasion I have used the same multicolored fabric for the tiles and the base, which allows for contrast in some areas and more harmony in others.

Tiles on contrasting base
Tiles on same multicolored fabric
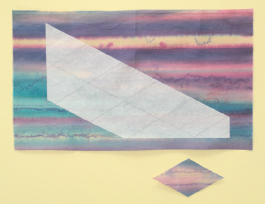
Don’t rush this part of the process. Try as many options as you can. Stand back and squint to see which one you like best and which one gives you the desired effect. After you have selected the base fabric, iron the freezer-paper pattern for the tiled segment onto the right side of the selected background fabric. Cut out the fabric with a generous 1″ (2.5cm) seam allowance around the outside of the freezer paper. Then remove the freezer paper.
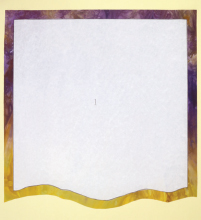
Base fabric cut out and ready for tiling
TIP
If the freezer paper is too narrow, you can join sheets by overlapping the sides and ironing them together. Or you can tape them together using masking tape on the dull side of the freezer paper.
Placing the Tiles
It is now time to position the tiles on the background. Have fun! It feels like painting by numbers!
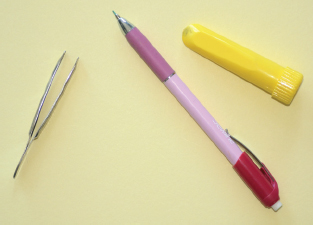
Handy tools: chalk markers and tweezers
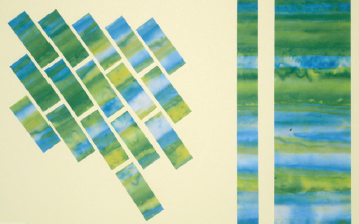
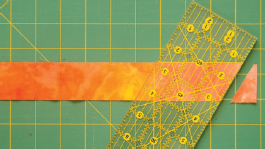
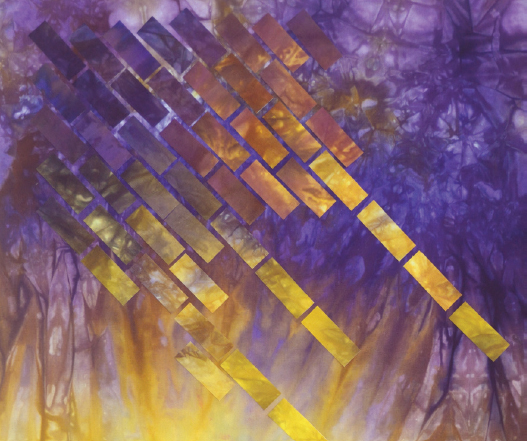
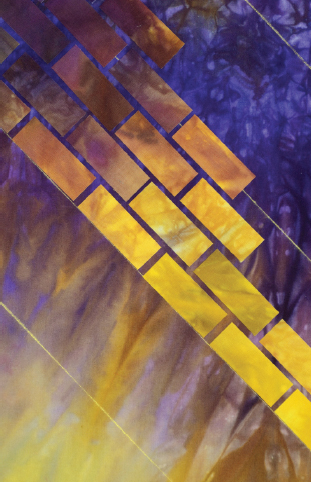
RECTANGULAR TILES IN THE SKY
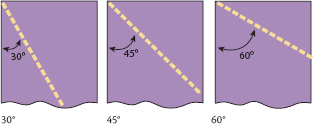
1. Your first decision is to determine the angle that you will use for the placement of the rectangles. It can be quite steep or a much gentler slope. A 45° angle is a popular choice, but it depends on your design. It can be a slope, as illustrated below, or any other angle you choose.
2. Position a rotary cutting ruler at your chosen angle and draw a line in chalk or marking pencil along the edge. Draw additional guidelines parallel to the first line and about 3″ (8cm) apart.
Base fabric with guidelines
3. With the lining paper of the fusible web still attached to the tiles, arrange the tiles along the edge of the line. Start ½″ (1.3cm) from the edge and leave a small space, approximately  ″ (5mm), between the tiles. Keeping in mind your color selection, try to incorporate gradual color changes. Continue placing the tiles down to ½″ (1.3cm) from the bottom edge of the segment.

Place tiles using chalk guidelines.
TIP
To help you estimate the gap between the tiles, keep in mind that 3⁄16″ (5mm) is just bigger than 1⁄8″ (3mm) but smaller than ¼″ (6mm).
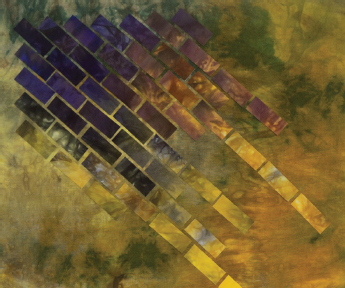
4. Continue adding rows of tiles parallel to the first, but position each tile as if you were building a brick wall, with the rows approximately ″ (5mm) apart. Alternatively, place each additional row of tiles a third of the way down the previous tile row to disguise the brick wall effect.

Brick wall placement
Tiles positioned one-third down
TIP
Don’t be too fussy about accuracy at this stage, as you will have the chance to line up the tiles accurately in Step 5.
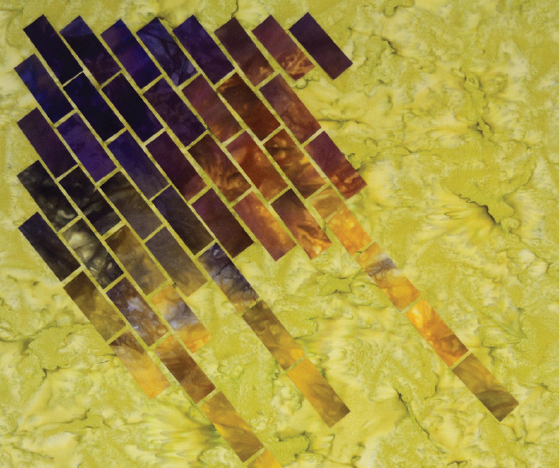
5. Continue placing tiles until the sky background segment is covered. Peel the lining paper from each rectangle and carefully and accurately position the tiles until you are happy with the arrangement. The adhesive on the fusible web will allow each tile to adhere in place, but if on reflection you change your mind, it can be carefully lifted and replaced by another tile. Tweezers are very useful for this part of the process.
6. Pin the sky to your design wall and stand back. If you are happy with the positioning of the colors, the value changes, and the accuracy of the placement, iron to fuse the tiles permanently to their base.
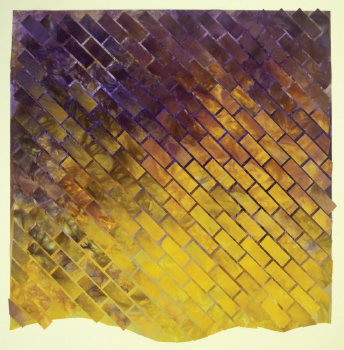
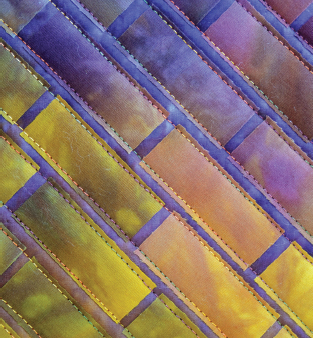
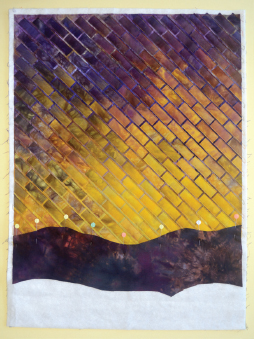
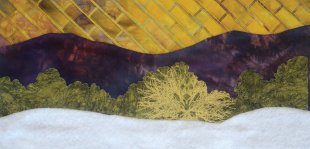
Finished tiled base
TIP
Use a pressing sheet over the tiles when ironing them to the base. Press for 6–15 seconds with a hot iron for cotton fabric. Repeat the process, overlapping pressed areas.
SQUARE TILES IN THE SKY
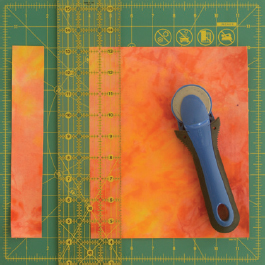
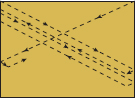
1. Choose the base fabric for the sky. Position a rotary cutting ruler with the 45° line along the right side edge of the base fabric. Draw a line on the base fabric in chalk or marking pen. Draw a series of lines approximately 3″ (8cm) apart parallel to this line.
Place 45° line on ruler along right edge.
Reposition the ruler at 45° to the left side of the base fabric and draw a line. Draw more parallel lines, as outlined as in Step 3 (top of
page 61).
Place 45° line on ruler along left edge.
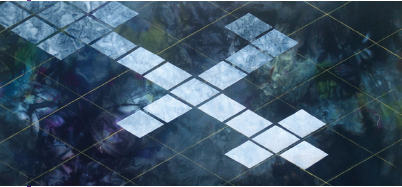
2. Position the tiles along the edge of the line, starting ½″ (1.3cm) from the top corner. Leave a small space, approximately ″ (5mm), between the tiles. Keep in mind your color selection and try to create gradual color changes. Continue placing the tiles down to the bottom edge of the segment.
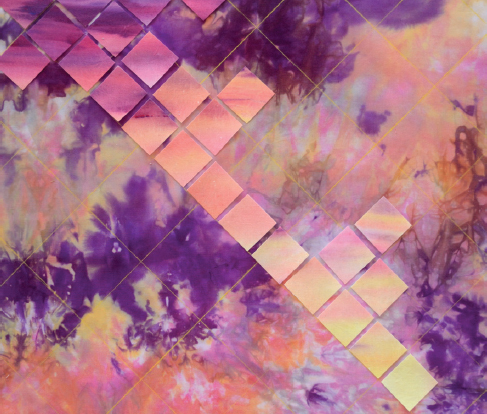
Begin placing tiles in position using marked guidelines.
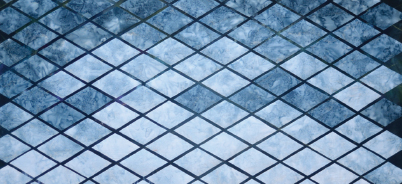
3. Continue to add more tiles, keeping the spaces even between the squares, until the base fabric is covered.
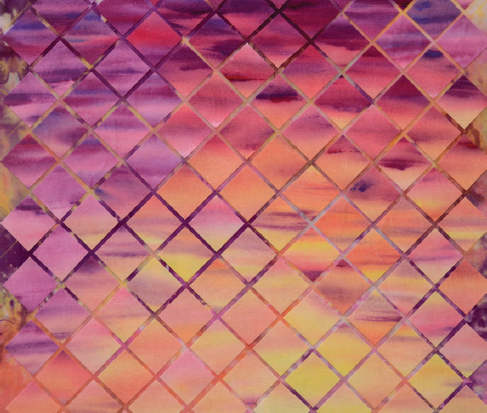
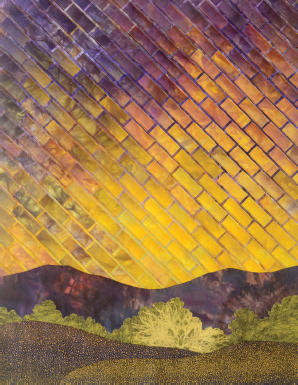
Base covered in tiles
4. When you are happy with the placement, peel the lining paper from each square and place the tiles carefully and accurately in position. The adhesive on the fusible web will allow each tile to adhere in place. But if on reflection you change your mind, it can be carefully lifted with tweezers and replaced by another tile.
Pin the sky to your design wall and stand back. If you are happy with the placement of the tiles, iron to fuse the tiles permanently to their base.
DIAMONDS IN THE SKY
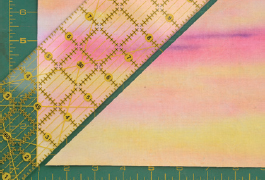
1. Position a rotary cutting ruler with the 60° line along the right side edge of the sky base fabric. Draw a line on the base fabric in chalk or marking pen.
Place 60° line on ruler along right edge.
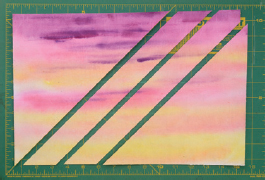
Reposition the ruler at 60° to the left side of the base fabric and draw a line. Draw a series of lines approximately 3″ apart and parallel to these lines to create a grid.
Place 60° line on ruler along left edge.
Draw additional parallel lines.
2. Position the tiles along the edge of the line, starting ½″ (1.3cm) from the top corner. Leave a small space, approximately ″ (5mm), between the tiles. Keep in mind your color selection and try to create gradual changes. Continue placing the tiles down to the bottom edge of the segment.
Begin placing tiles in position using marked guidelines.
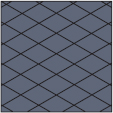
3. Continue to add more tiles, keeping the spaces even between the diamonds, until the background is covered.
Continue adding tiles until base is covered.
4. When you are satisfied with the placement, peel the lining paper from each diamond and position the tiles in place. The adhesive on the fusible web will allow each tile to adhere in place. But if on reflection you change your mind, it can still be carefully lifted with tweezers and replaced by another tile.
5. Pin the base to your design wall to check the placement of the tiles. If you are happy with the placement, iron to fuse the tiles permanently to their base.
Stitching Down the Tiles
Before the tiles are stitched down, the base is placed in position on the batting and quilt backing fabric. The stitching is part of the quilting process, as you will stitch through several layers.
BATTING
There are a number of excellent battings on the market today, including wool, cotton, bamboo, polyester, rayon, and silk. Any of these products would be suitable as long as the batting is not too thick and bulky.
QUILT BACKING
The choice of backing fabric for the quilt is up to you, but there are a few things to keep in mind. Use a commercial or hand-dyed fabric that does not have a high thread count, as this will be easier for quilting. Fabrics such as batiks do have a very high thread count and can make the quilting process more difficult. Even with a walking foot, batiks, when used as backings, tend to drag, creating tucks. The needle struggles sometimes to stitch cleanly through all the layers (keep in mind that the top layer is a tile backed with fusible web).
The color of the backing fabric is also a personal choice, but I do like to match the backing fabric to the color of the quilt top.
MAKING THE QUILT SANDWICH
The size for the quilt backing and batting will be determined by the way you want to finish your quilt. The Finishing Techniques section (page 99) discusses three different techniques to complete your quilt. The technique that you will use will determine the size to cut the backing and batting. For example, if you want to use the Making a Faced edge technique, you would cut the backing and batting at least 2″ (5cm) larger than the dimensions of the quilt top. If your quilt top is 12″ × 18″ (31cm × 46cm), then cut the backing and batting at least 14″ × 20″ (36cm × 51cm). However, if you want to add borders to the quilt center, you will need to cut the backing and batting larger still, taking into account the desired size of the borders. For example, to add a 4″ (10cm) border, add an extra 9″ (23cm). The batting is cut the same size as the backing, so align the batting with the backing. Then position the sky section on top of the batting in at least 4″ from the top and both sides to allow for the planned 4″ border. Pin the layers together using safety pins or straight pins.

Cut batting and backing fabric larger than quilt top.
THREADS FOR STITCHING TILES
The choice of the color and type of thread for stitching down the tiles is crucial. Unwind some thread and place it across the tiles to see which works best. Generally, you are looking for the thread that is the least obvious or evident. For most designs, you don’t want the stitching on the tiles to be a distraction in the background.
Choosing Thread Type
For the top thread, I have found that rayon, silk, or polyester thread works well. This appears to create a softer, subtler line across the tiles, compared to the bolder and at times harsh line created by cotton thread. The thread should be a 40-weight or finer.
I generally match the weight of the bobbin thread to the top thread and choose a color that blends. I match the bobbin thread color to the top thread rather than matching it to the color of the backing fabric.
Choosing Thread Color
I have found that variegated threads generally give better results than plain colors. In the past, variegated threads were quite difficult to use, as the run of each color seemed endless and the color combination left a bit to be desired. Now many of the variegated threads change color every inch and the color combinations are superb. If the background tiles range from violet to red to orange, then a variegated thread in these colors will work well. Even though there will be touches of violet thread on the orange tiles and vice versa, the traces of these colors provide gentle highlights and harmony across the surface. If you can’t find a variegated thread that blends with your tiles, a plain thread in the middle color and value is your best option. When searching for this thread, keep in mind that it may be a very similar color to your base fabric.
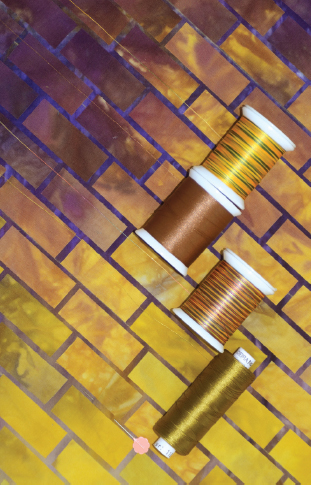
Match thread to tile color.
NEEDLES
The choice of sewing machine needle is also important. Match the needle size to the top thread size. If your thread is 40-weight, then a size 12/80 needle would be a good choice. A 50-weight thread would require a 10/70 needle. I use top-stitch needles for quilting, as they allow the thread to pass through the layers easily, without breaking. Check your thread manufacturer’s website for a guide to needle sizes, as there are some variations.
STITCHING
As you are stitching down the tiles, you are actually quilting through the sandwich, stitching through many layers. If you have a walking foot, it will make the job much easier.
TIP
If your walking foot allows you an open-toe view, then you can be even more accurate. Check to see whether this option is available.
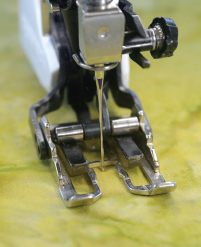
Open-toe walking foot
Top Tension
Make up a practice sandwich so that you can check your machine’s tension before you start quilting the tiled area. If you can see the bobbin thread coming through to the top, you need to loosen the top tension. If you usually sew with a tension of 4, you would need to lower this to 3 or 2. Keep lowering the tension until you can’t see the bobbin thread on the top. If you find that the bobbin thread is too tight underneath and the top thread is loose, you need to tighten the top tension. Move it from 4 to 5 and then check to see whether you have complete, properly formed stitches on the top and the bottom.
Quilt top—top tension too high in top rows
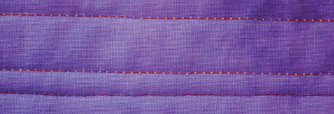
Quilt back—top tension too low in top row
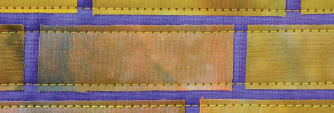
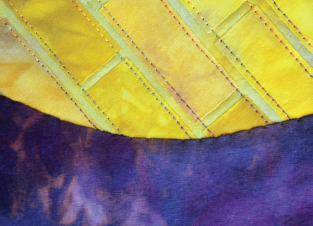
STITCHING RECTANGLES
Begin at the top corner, stitching approximately  ″ (3mm) in from the edges of the tiles, and continue down to the bottom of each row. Pass along the bottom and then stitch back up along the other side of the tiles. You don’t need to stitch across the narrow end of the tiles. Continue until all the tiles are stitched down.
Direction of stitching
Match thread to tile color
STITCHING SQUARES AND DIAMONDS
1. Begin at the top corner, stitching approximately ″ (3mm) in from the edges of the tiles, and continue down to the bottom of each row. Turn and come back up on the opposite side of the tile. Continue until all the tiles are stitched on 2 sides.
Direction of stitching
2. After you have stitched down 2 sides, begin the process again from the opposite top corner. Continue until all 4 sides are stitched.
Repeat process on opposite side.
Stitching Down the Rest of the Background
After you have quilted the top section, it is time to add the other background segments.
These segments may be appliquéd or fused in position.
First audition the foreground fabrics. Fold fabrics in position and stand back to see whether the colors are in harmony with the tiled sky and provide some perspective (see Color and Perspective,
pages 43
and
page 44).
Audition foreground fabrics
APPLIQUÉD SEGMENTS
1. After you have selected the fabrics, press the appropriate freezer-paper segments to the right side of your chosen fabrics. Cut out the fabric sections with a ½″ (1.3cm) seam allowance around each segment.

Cut out with ½″ (1.3cm) seam allowance.
2. Trim the top edge of each fabric segment to ¼″ (6mm) and clip the curves. Press the seam allowance to the back. It is easier to do this with the freezer paper still in position.
Trim top edge and press to back.
3. Remove the freezer paper and position the segment in place on the quilt sandwich. Pin the segment in position, pinning at right angles to the seam.
Segment 2 pinned in position.
4. Stitch down the segments using the invisible appliqué stitch on your sewing machine.
Invisible Appliqué
Because you will be stitching through the segment, the batting, and the backing, use your walking foot. Thread the top of your machine with a good-quality invisible thread such as Monopoly, made by Superior Threads, or Wonder Thread, made by YLI. Fill the bobbin with a thread that matches the backing fabric color. Insert a fine needle, such as the size 8/60 microtex/sharp, and attach the walking foot. Select the blind hem or appliqué stitch from the stitch menu.

Blind hem stitch

Appliqué stitch
The settings for the invisible blind hem stitch will vary depending on the brand of your machine. For Bernina, most Pfaff, and Janome machines, reduce the stitch width to a little narrower than 1. It should be just wide enough to barely catch two or three threads of the top fabric. Also adjust the stitch length to a little under 1. The zigzag stitches should be ″–¼″ (3mm–6mm) apart. The setting for most Viking/Husqvarna machines is stitch length 0.3 and stitch width 1.0. When considering your options, the stitch that is the most invisible is your first choice.
The tension will probably need to be adjusted because of the very short stitch length being used. Begin by reducing the top tension slightly—that is, turning the top tension dial to one number lower than normal. On a Bernina, thread the bobbin thread through the finger on the bobbin casing to tighten up the bobbin tension.
Check your settings on a sample placed on tear-away stabilizer. Only the zigzag stitch will bite into the top layer. If you see any of the bobbin thread coming through to the top, you need to decrease the top tension further. If you have reduced the top tension all the way down and can still see the bobbin thread on the top, then it is time to take out the bobbin case and tighten the tiny screw on the side. Turn the screw to the right the equivalent distance of 10 minutes on the clock. Replace it in your machine and try again. If you are using a finer bobbin thread than normal, it is a good idea to tighten the bobbin case at the beginning.

Adjusting bobbin tension
Appliqué stitch is virtually invisible even on closer view.
APPLIQUÉING SEGMENTS
1. When you are happy with the invisible appliqué stitches on a practice sample, sew along the pressed-under edge of Segment 2, with the zigzag stitch just catching the edge of the Segment 2 fabric and the straight stitches sitting on Segment 1. Because these segments are pinned to the batting and backing, you are stitching through this base as well.
2. Once a segment is stitched in position, if a segment is to be fused, do this before adding subsequent segments. Change the bobbin thread to match the background fabric as necessary to ensure that the stitches are invisible.
FUSED SEGMENTS
If some of the background segments are to be fused in position, they will need to be added in order.
1. Follow the manufacturer’s instructions to trace the segments from the back of your pattern. Tracing from the back avoids a mirror image of the pattern. If you have a lightbox available, this will make the process much easier.
2. Cut out each segment of fusible web with a generous ¼″ (6mm) margin around the outside.
3. Iron the fusible web to the back of the selected fabric. Cut out along the top drawn line, but leave the extra margin in place on the side and bottom edges. This will become a seam allowance that will be covered by the next segment or border.
Back of segment with seam allowance
Front of segment
4. Press the fused segment in position.
Press fused segment in position.
5. Continue to add the additional fused and appliquéd segments in order until all the background areas are covered as planned in your pattern.
Add segments in order.
Quilting the Landscape Details
After you have all the background segments in position, it is time to quilt the rest of the background, since the tiled sky area is already quilted.
Stitch close to the edge of any fused sections in a matching thread. Add quilting lines to other areas, following the contours of the land or creating your own textures in thread. Free-motion quilting with a darning foot will give more texture to the fabric surface. Think about the textures of tree bark, rippling water, rolling hills, and leaf details. Put those lines into your landscape as you scribble or doodle in thread.