 2 2
2 2 Foams are fun. Marshmallows, meringues, cakes, whipped cream, cookies, ice cream—all of these are foams.
Foams are formed by several different processes. In many foams, such as whipped cream and beaten egg whites, an interesting thing happens at the interface between water and air. In both of these foams, proteins in the foam are first denatured, which, as the name implies, means that they are changed from their natural state.
Proteins are made up of building blocks called amino acids. Some of these building blocks are attracted to water but avoid oils and fats. Others are attracted to oils and fats but are repelled by water. In the natural state of the protein, the water-loving parts are on the outside of the protein, next to the water, and the water-avoiding parts are tucked inside, away from the water.
Proteins are big molecules, formed of strands and sheets of amino acids, all tangled up into a shape that is important for their natural function. When we beat the cream or the egg whites, the protein unfolds, like a carefully folded origami animal would if you beat it hard with a whisk.
As the protein unfolds, it encounters oils and fats in the cream, as well as air. The water-loving parts of the protein still stay in the water. The water-avoiding parts unfold so they can stick into the fats or into the air, to avoid the water. Eventually, the air bubbles become smaller and smaller as they are beaten, and they become surrounded by a film made of protein, to which some water is still attached. The proteins can now link together to form a tough film that holds the bubbles in shape and prevents them from merging together again.
In whipped egg whites, you get bubbles with a protein film. The water-loving parts stick into the water, and the water-avoiding parts stick into the air bubble.
In whipped cream, you get big bubbles of air surrounded by a film of protein, surrounded by tiny globules of fat stuck to the fat-loving parts of the protein, connected to another film of protein that forms the wall of the next bubble. In between the bubbles of air and the globules of fat, the water-loving parts of the proteins extend into the water.
You can make an egg white foam more stable by increasing the number of places where the proteins bond together. Beating the egg whites in a copper bowl causes the amino acids that have sulfur in them to bond together where the sulfur atoms are. Linking two sulfur atoms in this way forms a disulfide bridge, a very strong chemical bond that helps keep the protein stuck in the new position.

Cystine is an example of a disulfide bridge
Adding an acid such as lemon juice or cream of tartar can also help form more bonds between the proteins and stabilize the foam, because the acid unravels the protein a bit, allowing the proteins to tangle and bond together.
 Chemistry Lesson
Chemists use some simplifying conventions to show how a molecule is shaped without cluttering up the picture.
Since carbon atoms are so common, they are not labeled with a “C.” Instead, they are assumed to be anywhere on a formula where two lines join. And since hydrogens attached to carbons are also very common, and carbon always has four bonds, any place on a formula where fewer than four lines join, it is assumed that hydrogens fill the carbon’s remaining bonds, and so they are not labeled.
If a line looks more like a dark wedge, it means that portion of the molecule comes out of the page toward the reader. If the wedge is lighter in color, it goes into the page, away from the reader.
Two lines mean a double bond, and three means a triple bond.
You probably know that whipped cream forms a foam but whipped milk does not (unless it is heated with steam). The reason lies in the nature of the proteins in milk and cream, and the nature of butterfat. But mostly it lies in the amount of solid fat compared to the amount of water.
Butterfat is a liquid at body temperature—anything above about 90°F (32°C)—but it solidifies when chilled. This is why butter melts in your mouth. To whip cream, you need chilled, solid butterfat. As you beat the cream, it forms bubbles and the proteins denature, with some parts staying in the water and some parts staying in the fat, until you end up with a film of solid fat and protein that traps the air inside, with the water in between the bubbles.
If you beat the cream too much, you can turn the whole thing inside out, with the water trapped inside films of fat and protein, and the air gets out. This is butter. Where cream was tiny bits of fat in liquid water, butter is tiny drops of water in solid fat. One is a liquid and the other is a solid, but both are made of the same stuff.
To keep whipped cream stable, you need to keep the temperature low enough that the fat stays quite solid. You can also stabilize it by adding more protein, such as gelatin or some vegetable gums. Both help to link the proteins together and hold the fat in place.
If cream does not contain at least 30 percent fat, it will be difficult to whip. Most whipping cream is about 36 percent fat. Reduced fat whipping creams need the help of stabilizers. Most common are cellulose-based ingredients called hydrocolloids, or food gums.
As you whip cream, it gradually becomes stiffer. Maximum stiffness happens when the cream just starts to become butter. It will be slightly yellow in appearance, and the volume will have dropped a bit. The stiffness comes from the firm butterfat that has formed larger and larger particles on its way to becoming butter.
If your recipe uses whipped cream as a structural element, such as in cake icing or rosettes on a cream pie, you will want a nice stiff cream. For toppings on strawberry shortcake or other desserts, stopping the whipping when the foam is at peak volume will make it stretch further.
If you want to make a foam out of milk, you must use steam, as in a cappuccino machine. The steam denatures the proteins and links them together and at the same time incorporates air into the foam. When the steam cools, it becomes water again. The foam is full of air, not steam.
Wheat flour contains a protein called gluten, which is formed when enzymes in the flour react with precursor proteins as water is added. Gluten is gluey, and as you mix the batter or knead the dough, the little bits of gluten that form stick together and form rubberlike sheets.
Stirring and folding incorporate air to form little bubbles in the sheets of protein. Yeast or other leavening agents add gas inside the bubbles and make them expand. Heating the dough further changes the protein, denaturing it into a solid.
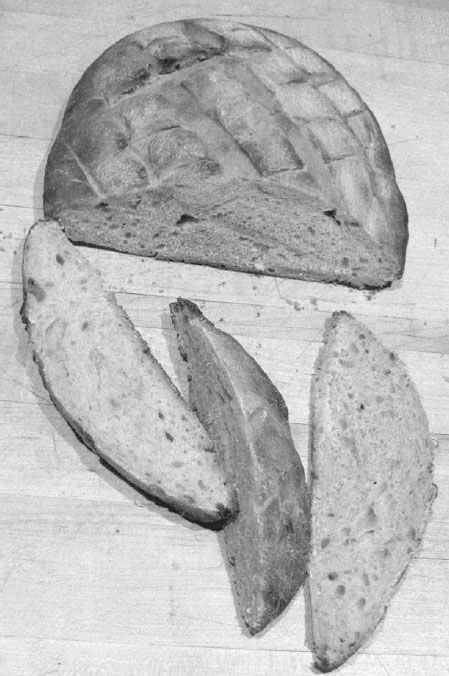
Basic bread is fairly simple. You need some flour, some water, some yeast, and optionally some sugar or honey, salt, and/or oil, butter, or some other fat.
What do those ingredients do, and how much of each do you need? The flour provides the gluten precursors, starch, flavor, and bulk of the bread. Water is necessary to make the gluten and allow the yeast to multiply and produce carbon dioxide gas. The yeast is there to make the carbon dioxide gas so you get a foam instead of a brick.
All the other ingredients are optional. The salt is not there just as a seasoning; it’s there to slow down the yeast. (There really isn’t a lot of it in most breads.) If the yeast produces too much gas too fast, faster than the gluten forms, the gas will simply escape as the bubbles pop. But many recipes omit the salt. Some of the gas will escape, but these recipes usually call for the size of the bread to double, which will eventually happen with or without the salt.
Sugar or honey is often added to feed the yeast. But the yeast will find enough food in the flour without it. It will just grow a little more slowly, which (as we saw with adding salt) can be a good thing. But if you are making a lot of bread, and start with a small amount of yeast, you can grow the yeast you need in a little sugar water. The amount of sugar or honey is generally so small that it makes little difference to the taste of the bread.
Adding fat—oil, butter, margarine, shortening, lard, etc.—will prevent the gluten from forming large sheets. The fat gets in the way of the small sheets joining up; it “shortens” the strands and sheets of gluten, hence the word shortening. Adding shortening makes the result more cakelike and less breadlike. Some recipes have you oil the outside of the dough to keep it from sticking to pans, fingers, and breadboards. Others have you paint melted butter on top of a baked loaf to keep the crust from getting dry and hard. Neither of these uses has much or any effect on the interior of the loaf.
Bread flour is flour grown and processed to contain a lot of gluten. Cake flour is designed to have less gluten. All-purpose flour is a mix that has an intermediate amount of gluten. If you are using all-purpose flour, you probably won’t have much use for shortening in bread dough, but shortening will make your cakes more tender and cakelike, though less breadlike.
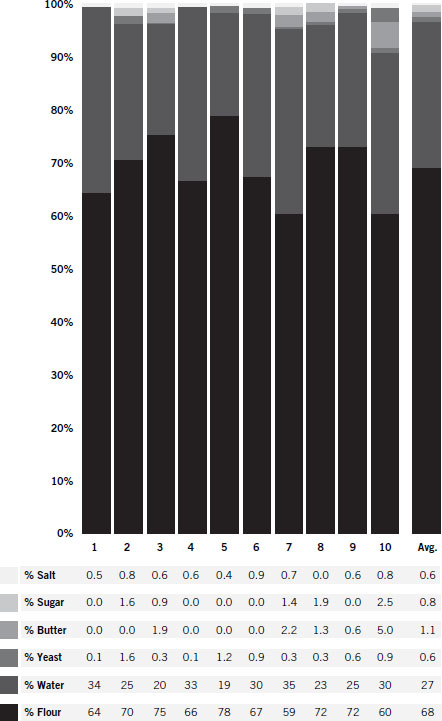
The chart on the next page shows 10 simple bread recipes collected from different sources, with the ingredient amounts converted into percentages to make it easy to see how variable a basic bread recipe can be and still end up producing very similar results. The last column in the chart is the average recipe.
Converting the average recipe into a one-loaf batch by assuming 2 teaspoons is 1 percent and rounding the numbers, you have:
Saving the butter for painting on the top of the loaf when the bread has baked, mix all the other ingredients in a bowl until they are well blended.
The next step is to help to process the gluten. There are some recipes that do not call for kneading the bread. These recipes let time do the work for you. You simply let the dough work all by itself overnight and most of the next day, all alone in its bowl, covered by a damp towel.
Most recipes, however, assume you want your bread the same day. To speed up the formation of the sheets of rubbery gluten, set the dough onto a floured board (so it doesn’t stick to the board). Fold it over and press it flat repeatedly, for something like 8 to 10 minutes, adding flour as needed to prevent it from sticking.
This gluten-forming process has the unfortunate side effect of removing many of the bubbles that may already have been in the dough. To get back the bubbles you need, let the bread sit in a place where it won’t dry out, usually a greased bowl covered with a damp towel.
Let the dough rise for 15 minutes, or until it has doubled in size. The actual length of time here is not very important. Recipes vary quite a bit. Some have you let the dough double, then punch it down and let it double again to form more gluten. How much you play with the dough will depend on how much gluten the flour has and how much gluten you want to develop. But the result, whether it is a soft, light, cakelike loaf or a rugged, firm, hearty loaf, will still be recognized as bread.
Now it’s time to bake the loaf. It can be placed in a loaf pan or just on a greased cookie sheet. You can decorate the top by scoring it with a knife or form the dough into ropes and braid them together. All of these are just decorative variations.
The oven for bread is generally hot, about 400°F (200°C) or even hotter. The time it takes to bake is 40 to 50 minutes, or until you like the color of the crust.
When the baking is done, brush the top with the melted butter. If you like a soft crust, you can let the loaf cool in a plastic bag. For a dry, hard crust, just let it cool on the countertop.
Some recipes call for placing a pan of water in the oven along with the loaf, to keep the crust thicker and crisper. This also speeds the baking (moist air conducts heat faster than dry air). This is optional. The steam condenses on the cold dough at first, which slows the formation of the crust. Some of the sugars in the dough dissolve in this condensed water layer, which contributes to browning. A lot of steam will make the crust thicker, shinier, and a darker brown.
Now that you know why the ingredients are there, and why the processing steps are needed, you can throw away your measuring equipment and do the whole thing by eye.
Dump some flour into a bowl. Add some yeast. Add some water gradually, stirring until the dough is about the consistency you remember from the times you made bread from a recipe. Knead the dough for a while on the floured cutting board. Let it double in a greased bowl with a damp cloth cover. Form a loaf on a baking sheet, preheat the oven to 400°F (204°C), and bake until you like the color.
That’s how bread was made for centuries before the invention of measuring cups and ovens that kept a steady temperature. Usually the yeast was just a bit of bread dough saved from the last batch. Add a little water and sugar, and your “starter” will grow plenty of yeast for the next bread-baking session.
Yeast is a convenient leavening agent (something that makes bubbles of gas in a dough). Yeast spores float in the air and form white films on grapes and plums and other fruits with thin skins that allow sugars to get to the surface. You can make yeast starter for your own wine, beer, or bread by culturing the white film from grapes in a little sugar water.
Some breads, however, just use steam and hot air for leavening. Popovers are an example of steam-leavened bread. But the prize for steam leavening goes to popcorn. We go to all the trouble to grind wheat, add yeast, knead, and bake just to get a foam made from seeds, while popcorn does it fine with just some heat. Puffed wheat and puffed rice are made by heating the seeds under steam pressure (in a big pressure cooker called a “gun”) and then suddenly releasing the pressure (called “firing the gun”). This whole process takes less than a minute.
So-called quick breads (because you don’t have to wait for the yeast to grow or the gluten to develop) use baking soda and an acid, such as buttermilk, to form bubbles of carbon dioxide gas. Since these breads are not kneaded or left to themselves overnight, they have little gluten and are more like cake than a sturdy loaf.
Baking soda is sodium bicarbonate:
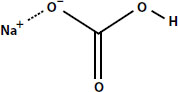
There is a carbon atom in the middle, with three oxygen atoms, a hydrogen atom, and a sodium atom. When sodium bicarbonate is added to water, it breaks apart into three ions. These are a positively charged sodium ion, Na+, a negatively charged hydroxide ion, OH-, and carbonic acid, which is what we call soda water (carbon dioxide dissolved in water).
If you add an acid, such as vinegar (acetic acid), a reaction occurs and you get sodium acetate and water as products when the acid reacts with the sodium and hydroxide ions. What is left is carbonic acid. Carbonic acid (carbonated water) fizzes, releasing bubbles, just like in soda.
Any common acid will react with baking soda this way, so the lactic acid in buttermilk, the citric acid in lemon juice, or the acetic acid in vinegar can be used, too.
But bubble formation is only half of what happens in the bread. As you bake the bread, the heat causes the gas to expand. The heat also denatures the proteins and starches, allowing them to link up into solid webs, holding the shape of the bubble even after the gas has cooled. Air from the room slowly fills the spaces where the steam and hot expanded gas used to be, as the bread slowly cools.
If the baking has not completed, and the proteins are not yet firm, then allowing the temperature to drop can cause the bubbles to all shrink back down, and we say that your soufflé has “fallen.” This can happen with breads and cakes as well as fluffy egg dishes.
Chemistry LessonIn this book we will be dealing with three types of chemical bonds—ionic, covalent, and hydrogen bonds.
An ion is an atom that has a charge, because it has either gained or lost one or more electrons.
Ionic bonds form when a metal like sodium loses an electron to an atom of something such as oxygen or chlorine, because oxygen and chlorine have a higher affinity for electrons than sodium does. This makes the oxygen or chlorine atom end up with a negative charge, leaving the sodium atom with a positive charge.
Since opposite charges attract, the sodium atom hangs around near the atom that took its electron, and this attraction is called an ionic bond.
But firm protein networks are not the whole story. During baking, what started out as a foam (a collection of closed bubbles) becomes a sponge (where all the bubbles have broken to form an open network that air and water can flow through). The heat has not just firmed the proteins and made them bond together, but it has also expanded the gas in the bubbles to the point that the bubble walls have broken, letting the gas escape. This is important, because otherwise the gas would cool and contract, and the resulting vacuum would crush the bubbles back into a dense mass of dough.
To understand this better, put a little bit of water into an empty aluminum soda can and heat it on the stove until it is full of steam and no more water is left inside. Using a hot pad or tongs so you don’t get burned, quickly invert the can into a saucer of water so that the opening is underwater. The steam will cool and contract, which draws the water into the can. This cools the can so quickly that the water can’t get into the can fast enough to prevent the weight of the miles of air above it from crushing the aluminum can.
If a bubble of aluminum can’t withstand the weight of the air, neither can a simple bubble made of starch and gluten. However, the open network of a sponge, where all the bubbles have been broken, lets the air in, and nothing gets crushed.
Other proteins can also make foams. One simple protein is gelatin, which is used to make marshmallows.
Marshmallows are made by cooking a sugar syrup to the firm ball stage (240°F, 116°C) and then beating that into gelatin that has softened in cold water.
As with other protein foams, the gelatin will denature as the hot syrup and whisking cause it to form links with itself, forming a sturdy net. The syrup attracts the water-loving parts of the protein, leaving the oil-loving parts facing the air in the bubbles.
You can divide a marshmallow recipe into steps, then look at why each step is there. The first step is to sprinkle gelatin powder into cold water. This is done to soften the gelatin without changing the shape of the protein molecules. You only want them changing shape when you beat in the syrup.
The next step in the recipe is to make the syrup. Most candy recipes are primarily about controlling the crystallization of sugar. This is done by controlling the concentration of sugar in the water, making sure there are no seed crystals falling into the syrup to prematurely begin crystallization, and providing simple sugars in addition to the sucrose (a complex sugar made up of the two simple sugars glucose and fructose).
Simple sugars bind more tightly to water than sucrose does, and so they don’t crystallize as easily. There are two basic ways to get simple sugars into a syrup. The first is to simply add them. A candy recipe that calls for corn syrup in addition to sugar is doing just that; corn syrup is mostly simple sugars.
The second way is to break up the sucrose into its two simple sugars. You do this by heating it in the presence of an acid. A candy recipe that calls for cream of tartar (tartaric acid) is doing that. Other recipes might call for vinegar, lemon juice, or other acids to cook with the sugar.
The third step in a marshmallow recipe is when the foam is actually made. Generally, syrup is slowly added to the gelatin mixture while the beaters are running at medium speed (to prevent splashing), and then the speed is turned up to high for a good 15 minutes or so, to denature the proteins and form a stable foam. The foam is then turned out into a greased pan to sit for half a day—8 to 12 hours—to let the protein net complete bonding.
Chemistry LessonElectrons in an atom can’t all share the same space. Close to the nucleus, there is room for two electrons. If those two places are filled, a third electron will have to start filling the next shell out from the nucleus. That second shell is bigger and can hold eight electrons.
A hydrogen atom has only one electron, so there is room for another electron in its innermost shell. When a second hydrogen atom gets very close to the first, an electron from each atom can fall into the space in the other atom’s shell, so that each atom has two electrons filling its innermost shell.
Like a domino that has fallen over, electrons that have fallen into an inner shell will stay there unless energy is added to pull them back out. The hydrogen atoms have joined (bonded) to make a hydrogen molecule, and they will stay stuck together until enough energy has been added to pull them apart.
When electrons are shared between two atoms in this way, it is called a covalent bond. Covalent bonds can occur anywhere there is an unfilled shell that electrons can fall into. Carbon has four empty spaces in its outer shell, so it can form four covalent bonds with other atoms. When it does this with four hydrogen atoms, the molecule is called methane, or CH4.
Often the bulk of the recipe deals with controlling the stickiness of the whole mess. Pans are greased, lined, or lined and greased. A mixture of cornstarch and powdered sugar is spread out over a cutting board and the cooled foam is dumped out of the greased pan onto it, and the powder is generously applied to the cut surfaces after the candy is divided into bite-sized pieces. The knife used for the cutting is coated with vegetable oil for the first cut, and then coated with powdered sugar and cornstarch for subsequent cuts.
Marshmallows were originally a way of making the cough suppressant in the root of the marshmallow plant palatable. The starch in the root was mixed with egg white as the protein, and the syrup was beaten in. Some recipes still mix in beaten egg whites with the gelatin foam.
You can make foam without protein. The suds in dishwater are made of just water and detergent. The molecule in detergent, like protein, has a part that loves water and a part that avoids water in favor of air or fats. It is used to clean up greasy dishes because the fat-loving ends attach to the fat, while the water-loving ends prevent fat globules from coalescing together by making a protective coat around them. But soapsuds are not a stable foam. Eventually, all the bubbles pop, and you are left with plain dishwater again.
But if you make a foam out of something that hardens when it cools, then you don’t need a protein to make the foam stable. A kind of candy called honeycomb is just that sort of foam. You start by cooking a sugar syrup (sucrose and simple sugars) to 300°F (150°C), the so-called hard-crack stage. This is the stage just before the sugar burns (caramelizes) and turns brown. When this syrup cools, the result is hard candy, like a lollipop.
As in any candy cooking, you must be careful not to let any sugar crystals fall into the syrup from the side of the pan. This will cause premature crystallization, resulting in a grainy texture instead of a glassy one.
When the syrup has reached 300°F, you add baking soda and quickly beat the syrup. The high heat causes the baking soda to decompose into sodium carbonate and carbon dioxide bubbles. Note that this happens with heat alone, and unlike earlier, in the discussion about quick bread (page 21), no acid is needed. The syrup will foam up and triple in volume as you whisk it.
The last step is to pour the foam out into a pan prepared (as with the marshmallows) with grease, lining, or both, to prevent sticking.
This kind of candy will absorb moisture from the air easily and become a soggy mess, unless it is coated in chocolate or kept in a sealed container. Of course, you could always just eat it right away.
 Recipe
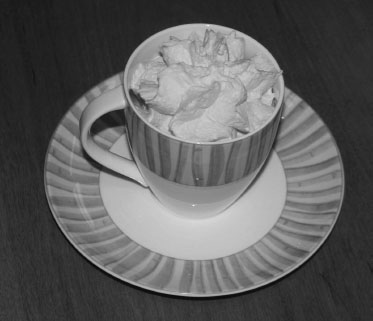
Did you love Creamsicles when you were a kid? Vanilla ice cream and orange popsicle together in the same bar, like an orange cream soda on a stick. With ice cream!
Whipped cream is great fun all by itself. But sometimes you just want to surprise your dinner guests with something out of the ordinary. Whipped cream that tastes like an orange Creamsicle goes great with pumpkin pie or ice cream.
You can do a couple of interesting things to make whipped cream a little different from what you might be used to. Add a tiny amount of xanthan gum to make the foam stiff and long lasting. And make it in a neat whipping gadget so you can make it up days before you need it, and keep it in the fridge until you need it. Who wants to be whipping cream when you could be talking with your guests after dinner?
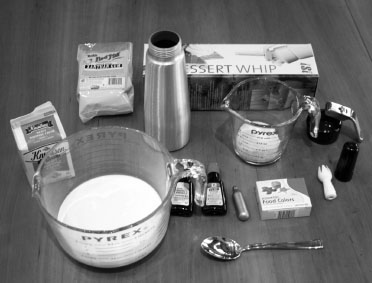
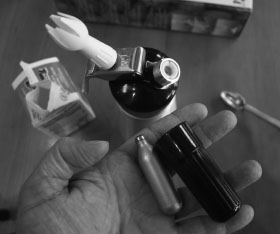
The dessert whipper shown was purchased at Amazon.com. There are one-cup sizes and one-pint sizes. This recipe uses the one-pint size.
Ingredients:
Supplies:
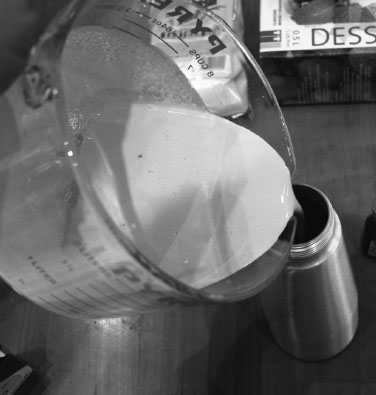
Start by pouring the whipping cream into a quart bowl. Add the vanilla and orange flavoring first, since they will change the color of the cream a bit.

Add the food coloring after the flavorings to get the color just the way you want it. I like twice as much yellow as red, 16 drops of yellow and 8 drops of red, but make it whatever color looks best to you.
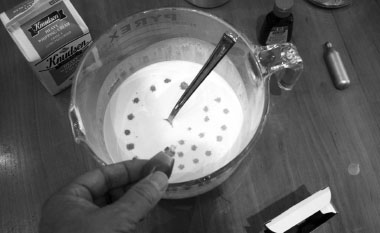
Next, add the xanthan gum to the sugar, not to the cream. Stir it well into the sugar to ensure that it will dissolve well in the cream and not clump up.
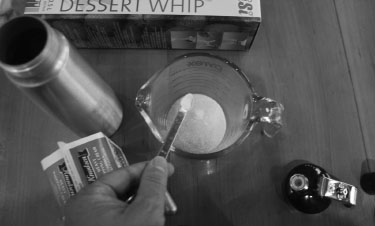
When the xanthan gum is mixed well with the sugar, stir the sugar into the cream. Stir the cream well, until all the sugar has dissolved. When there are no longer any grainy bits of sugar in the cream, pour it into the dessert whipper.
The whipper is charged with small cylinders of nitrous oxide gas called whippits. Buy them when you buy the dessert whipper, since the two are sold separately. One whip-pit is good for one cup, so you will need two for the larger dessert whipper. Charge the whipper with one cylinder, and shake 10 to 12 times. Then remove the whippit and replace it with a fresh one.
Let the nitrous oxide dissolve in the cream for a few minutes in the refrigerator before trying to dispense it. You can keep it in the dessert whipper in the refrigerator for a week past the “sell-by” date on the carton of cream.
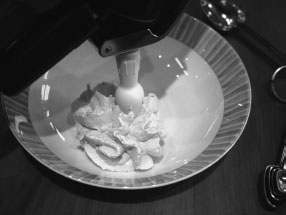
While creating this recipe, I tried several ratios for xanthan gum to cream. The recipe works well for amounts as little as 1/8 of a teaspoon to about %. When I used a full teaspoon of xanthan gum, the mixture was very thick and hard to stir, and it whipped up into the most delicious foam rubber I had ever tasted. Most of the mix remained inside the dessert whipper and had to be spooned out.
Whole Foods sells xanthan gum, and many gourmet cooking stores, such as Sur La Table, sell the dessert whippers.
Of course you can just whip the cream using a whisk or a kitchen mixer, but then you wouldn’t have an excuse to buy the fun toy!
Whippits are filled with nitrous oxide (N2O). This is also known as laughing gas, the anesthetic used by dentists to put you to sleep. It is used in whipping cream because it dissolves easily in butterfat, it does not allow the fat to oxidize and get rancid as compressed air would, and it does not curdle the milk proteins as carbon dioxide would.