This section describes how to go about assembling forces, setting up the battlefield, choosing a scenario, deploying for battle, and beginning a game.
Before the battle can begin it is necessary that the players agree how big a game they are going to play. Begin by agreeing the number of requisition points available for the game.
Requisition points are a measure of how powerful a force is; the more points the bigger and more powerful the army. For example, the players might agree to play a ‘1,000-points game’ meaning that each side fields up to a maximum of 1,000 requisition points. The Konflikt ‘47 rulebook contains basic Army Lists for four of the major powers of the conflict: Britain and Commonwealth, Germany, the Soviet Union, and the United States of America. Supplementary books will add to this choice, expanding the basic four lists themselves and providing new lists for the armies such as Japan, China, and many other nations fighting in this global conflict.
For practical purposes, we recommend 1,000 requisition points per side for a standard sized game. Later on, the rules for different scenarios take it as read that games are being fought to this standard size. Of course, that does not mean games cannot be played with more or fewer points, only that some adjustment may be required when calculating which side has won as noted later.
Each player selects models from his chosen list to make up a force for the game. Every model chosen has a requisition point value. For example a regular rifleman costs 10 points, while a heavy tank typically costs several hundred points.
Each player selects units from his list, adding together the cost in requisition points, up to the agreed total. Don’t worry if it is not possible to spend every single point – just make sure the force’s total value does not exceed the agreed value. See here for more about how to choose forces from the lists.
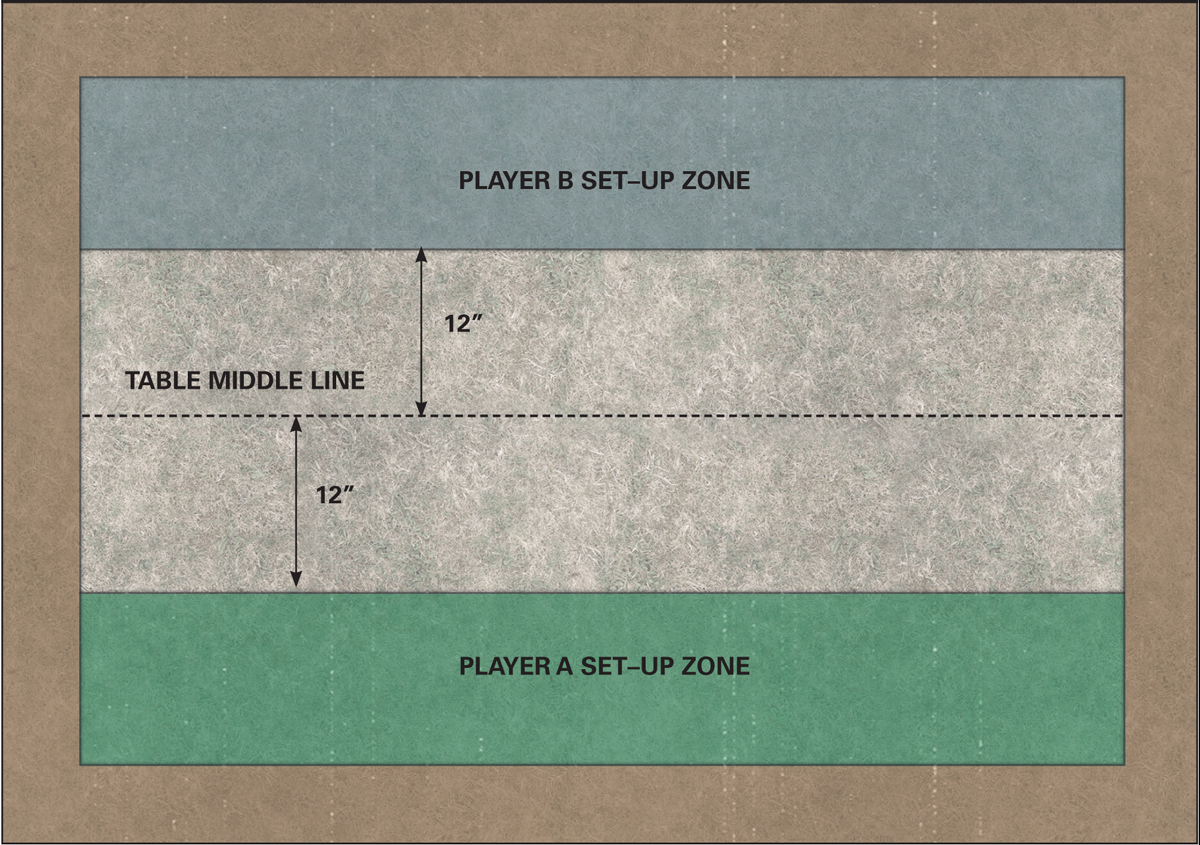
The more space you have to fight your battle the better, whether you have a dedicated tabletop for gaming, whether you press the kitchen or dining table into service, or even if you are forced to make do with the floor or patio. Ideally, the gaming surface should be at least four feet wide and six feet long, but if you are obliged to use a smaller area don’t worry. If you really have only a small space – say three feet wide or less – then we’d suggest either reducing all distances proportionately, or deploying the opposing sides from the table edges as described for a Maximum Attrition game. Either way, it is usual to play from the opposing long edges – each player sitting behind his own table edge facing his opponent.
It is entirely up to the players what kind of a scene they wish to represent on the battlefield. For example, the battlefield could be a densely packed urban area, an open rural landscape, a mix of marshes and woodlands, or a rolling sand desert lacking cover. On the whole a better game will be had where there is a good quantity of terrain on the table, with hedgerows, wreckage or trenches for troops to shelter behind; hills and escarpments to conceal the movement of vehicles; and woodlands, houses, or tumbled ruins where troops can lie in ambush. If you don’t have much terrain to block line of sight and reduce movement, the poor old infantry will find themselves cut down by long-ranged weapons and rapidly moving walkers. Of course, if the tabletop is very crowded it may become virtually impassable for armoured vehicles. Clearly a good mix is what is needed. We would suggest the battlefield includes at least four sizeable terrain pieces such as buildings, thick woods, or a rocky escarpment, large enough to block line of sight over most of the table. In addition, we recommend the battlefield includes other, lower terrain features to provide plenty of cover for infantry, for example hedges, dry-stone walls, sparse woodland and individual trees, craters, areas of rubble, wreckage, and similar rough ground.
When the players set up the scene of battle it is important to try and make sure no great advantage is conferred to either side. Many will take their inspiration from actual battle sites, or perhaps from war movies or TV, when recreating scenes and landscapes on the tabletop.
US M2 Mudskipper Jump Walker
Once the players have prepared their armies and set up the terrain, the next thing to do is decide what kind of battle is to be fought. This is the story behind the battle, the events that have brought our opposing forces into conflict. Perhaps one side is trying to break out from a pincer movement that threatens to cut off and surround it, maybe one side is attempting a reconnaissance in force to expose enemy positions, and maybe both sides are racing towards some common objective that they will fight over. This backstory to the game is the scenario, and players are at liberty to invent scenarios for themselves, or to adapt historical encounters, or to use any of the scenarios described below. These scenarios have been worked out to provide a fair but varied challenge to both sides, and they don’t require any particular scenery or table set-up – they can be played with any forces or terrain.
Players can simply pick a scenario to play, or roll a die at the start of the game and consult the chart as follows:
| BATTLE SCENARIOS CHART | |
| Die Roll | Scenario |
| 1 | Envelopment |
| 2 | Maximum Attrition |
| 3 | Point Defence |
| 4 | Hold Until Relieved |
| 5 | Top Secret |
| 6 | Demolition |
An enemy pocket of resistance is to be engaged and pinned in place by a portion of your force, while the rest will make their way around the enemy position to surround them and isolate them from their supply chain.
Both players roll a die. The highest scorer decides whether to be the attacker or the defender.
The defender picks a side of the table and sets up at least half of his units in his set-up area (see opposite). These units can use the hidden set-up rules (see Hidden Set-up).
Units that are not set up to start with are left in reserve (see Reserves).
The attacker’s units are not set up on the table at the start of the game. The attacker must nominate at least half of his force to form his first wave. This can be his entire army if he wishes. Any units not included in the first wave are left in reserve.
The attacker must try to move as many of his units as he can into the defender’s set-up zone or off the opposing side’s table edge. The defender must try and stop him.
Note that in this scenario, attacking units are allowed to deliberately move off the table from the defender’s table edge to reach their objective.
The attacker rolls a die: on a 2+, a preparatory bombardment strikes the enemy positions (see Preparatory Bombardment). On a result of 1, the barrage fails to materialise, but you have your orders and the attack must go ahead as planned.
The battle begins. During turn 1, the attacker must move his entire first wave onto the table. These units can enter the table from any point on the attacker’s table edge, and must be given either a Run or Advance order. Note that no order test is required to move units onto the table as part of the first wave.
Keep a count of how many turns have elapsed as the game is played. At the end of turn 6, roll a die. On a result of 1, 2, or 3 the game ends, on a roll of 4, 5, or 6 play one further turn.
At the end of the game calculate which side has won by adding up victory points as follows. If one side scores at least 2 more victory points than the other then that side has won a clear victory. Otherwise the result is deemed too close to call and honours are shared – a draw!
The attacker scores 1 victory point for every enemy unit destroyed. He also scores 2 victory points for each of his own units that is inside the defender’s set-up area (even if only partially), and 3 victory points for each of his own units that has moved off the enemy table edge before the end of the game.
The defender scores 2 victory points for every enemy unit destroyed.

Your orders are brutally simple – locate and engage the enemy forces, and inflict maximum damage.
Both players roll a die. The highest scorer picks a table side. No units are set up on the table at the start of the game. Both sides must nominate at least half of their force to form their first wave. This can be the entire army if desired. Any units not included in the first wave are left in reserve (see Reserves).
The objective is simple – both sides must attempt to destroy the other whilst preserving their own forces.
The battle begins. During turn 1 both players must bring their first wave onto the table. These units can enter the table from any point on their side’s table edge, and must be given either a Run or Advance order. Note that no order test is required to move units onto the table as part of the first wave.
Keep a count of how many turns have elapsed as the game is played. At the end of turn 6, roll a die. On a result of 1, 2, or 3 the game ends, on a roll of 4, 5, or 6 play one further turn.
At the end of the game calculate which side has won by adding up victory points as follows. If one side scores at least 2 more victory points than the other then that side has won a clear victory. Otherwise the result is deemed too close to call and honours are shared – a draw! Players score 1 victory point for every enemy unit destroyed.
The enemy positions are strategically vital for the continuation of the campaign and must be seized at all costs.
Both players roll a die. The highest scorer decides whether to be the attacker or the defender. The defender picks a side of the table and sets up at least half of his units in his set-up area (see opposite). These units can use the hidden set-up rules (see Hidden Set-up). Units that are not set-up to start with are left in reserve (see Reserves).
As he sets up his force, the defender must nominate three separate objectives in his set-up zone. All objectives must be at least 6” from the defender’s table edge. In addition, all the objectives must be at least 24” from each other. These objectives could be tactically important positions such as a building or hilltop, or supplies such as an ammo dump or fuel reserve, or maybe a command post, a vehicle repair shop, or an emplacement for long-range artillery or rocket launchers.
Objectives can be simple markers or tokens if the players prefer, or can be represented by scenic pieces along the lines described. The important thing is that both players clearly identify the three objectives before the battle begins. The attacker’s units are not set up on the table at the start of the game. The attacker must nominate at least half of his force to form his first wave. This can be his entire army if he wishes. Any units not included in the first wave are left in reserve.
German Heavy Infantry
The attacker must try to capture the three objectives – the defender must try and stop him.
The attacker rolls a die: on a 2+, a preparatory bombardment strikes the enemy positions (see Preparatory Bombardment). On a result of 1, the barrage fails to materialise, but you have your orders and the attack must go ahead as planned.
The battle begins. During turn 1, the attacker must move his first wave onto the table. These units can enter the table from any point on the attacker’s table edge, and must be given either a Run or Advance order. Note that no order test is required to move units onto the table as part of the first wave.
Keep a count of how many turns have elapsed as the game is played. At the end of turn 6, roll a die. On a result of 1, 2, or 3 the game ends, on a roll of 4, 5, or 6 play one further turn.
At the end of the game calculate which side has won as follows.
If the attacker holds two or three objectives the attacker wins. If the attacker holds one objective the game is a draw. If the attacker holds no objectives then the defender wins.
All objectives are held by the defender at the start of the game regardless of where his troops are positioned. If an objective changes hands during the game then it remains under the control of that side until it is taken back.
To capture an objective there must be a model from one of your infantry or artillery units within 3” of the objective at the end of the turn, and there must be no enemy infantry or field artillery models within 3” of it.
Your force has been sent on a very dangerous mission to capture a key strategic objective. Your men have reached the immediate vicinity of the objective during the night and at first light you’ll attempt to seize the position. You will then dig in for the inevitable counter-attacks and hold until relieved.
The objective could be a bridge, an ammo or fuel dump, an airstrip, a command bunker, a V2 launch site, or anything comparable. First set up the objective in the centre of the table. Ideally, this should be no larger than 12” x 12”. You can place the objective up to 12” to the left or right of the exact centre of the table, but make sure that it is equidistant from the opposing players’ starting edges.
Both players roll a die. The highest scorer decides whether to be the attacker or the defender. The defender picks a side of the table and sets up one infantry squad and one other unit (this unit can be anything with a Damage value of 7+ or less) within 6” of the objective. Then he nominates half of the remaining units (rounding down) to form his first wave. Any units not included in the first wave are left in reserve (see Reserves)
The attacker can then set up any and all of his infantry anywhere on the table so long as they are more than 18” from the objective or either enemy unit that is already deployed. These units can use the hidden set-up rules (see Hidden Set-up). All other units are left in reserve (see Reserves).
The aim is to control the objective at the end of the game. To do so there must be a model from one of your infantry or artillery units within 3” of the objective and there must be no enemy infantry or artillery models within 3” of the objective.
The battle begins. During turn 1 the defender must bring his first wave onto the table. These units can enter the table from any point on the defender’s table edge, and must be given either a Run or Advance order. Note that no order test is required to move units onto the table as part of the first wave.
Keep a count of how many turns have elapsed as the game is played. At the end of turn 6, roll a die. On a result of 1, 2, or 3 the game ends, on a roll of 4, 5, or 6 play one further turn.
If one side controls the objective at the end of the game it is the winner. If neither side can claim control of the objective the game is a draw.

Enemy fighters have shot down one of our light transport aircraft. Your men must locate the crash site and retrieve the briefcase of the high-ranking staff officer who was on board. This briefcase contains secret Rift-tech documents and it is imperative that you get to it before the enemy. Whatever happens, these documents must not fall into enemy hands.
First set up the objective marker in the centre of the table. This could be a wrecked light aircraft or perhaps a fallen parachute, or any suitable officer model or simply a marker or token if preferred. You can place the objective up to 12” to the left or right of the exact centre of the table, but make sure that it is equidistant from the opposing players’ table edge. Ensure that the objective is not reachable by roads from either players starting edge.
Both players roll a die. The highest scorer picks a side of the table.
No units are set up on the table at the start of the game. All units on both sides are left in reserve (see Reserves).
Both sides must seize the objective marker and carry it off their own edge of the table. See below for rules about transporting the objective marker.
During turn 1, you can attempt to bring in your reserves as if it was turn 2 as described in the rules for reserves. Play then continues as normal.
Keep a count of how many turns have elapsed as the game is played. At the end of turn 6, roll a die. On a result of 1, 2, or 3 the game ends, on a roll of 4, 5, or 6 play one further turn.
The side that carries the objective marker off the table before the end of the game wins. Otherwise the result is a draw. To seize the marker, an infantry unit must advance or run and end its move with one model touching the objective. From the following turn, that model will carry the marker as its unit moves. If the model carrying the marker ends its move to within 1” of a model belonging to a friendly infantry unit (or indeed a friendly infantry unit ends its move so that one of its models is within 1” of the model carrying the marker), the marker can immediately be handed over from one model to the other. This handing over of the objective marker can be done only once per turn, to stop an unrealistic ‘chain effect’. If the model carrying the marker is killed, the marker can be transferred to any other model in the unit. If the entire unit is killed/removed from play, the marker is left on the ground for someone else to pick up later.
If the unit carrying the marker is destroyed in an assault, the enemy unit that destroyed it can immediately claim the marker and place it next to one of their models before they make their regroup move.
Stand to! A US M8 Grizzly responds to an alert.
Our scout planes have pinpointed the enemy company HQ. Your objective is to reach the enemy position and destroy it with the explosives your men have been issued with. Strong enemy resistance is to be expected, so you must attack in force, but leave a portion of your force behind in order to defend our own artillery emplacements.
Both players roll a die. The highest scorer picks a side of the table and places his base in his set-up zone at least 6” from the table edge. The other player then places his base in his set up zone at least 6” from his table edge, in the same way. Ideally these ‘bases’ are represented by a model command post (tent, dug-out, command vehicle), but could be anything that looks like a tactically important position such as a building or hilltop, an ammunition or fuel dump, a radio or radar mast, an artillery or missile battery, etc. A base can simply be a marker if you wish – nothing more than a token – it’s entirely up to the players. The important thing is that both players clearly identify their bases at the start of the game.
The first player deploys half of the units in his army (rounding down) in his deployment zone.
These units can use the hidden set-up rules (see Hidden Set-up). All other units are left in reserve (see Reserves).
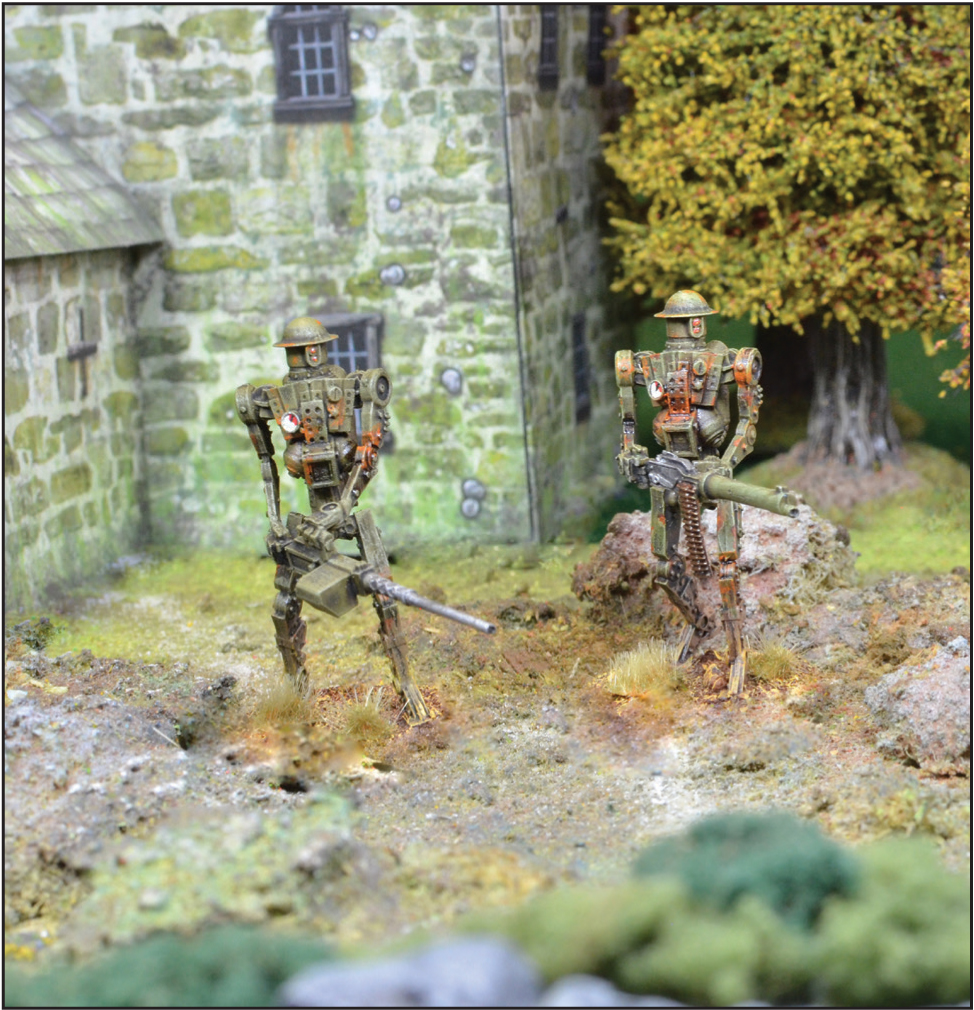
British Automatons advance relentlessly into enemy territory.
Once the first player has deployed as described, his opponent does the same with his own force.
Both sides must destroy the enemy base. A base is destroyed if, at the end of any turn, any enemy unit other than an empty transport vehicle is touching the base. Empty transports cannot be used to destroy a base although a transport vehicle carrying troops can.
The battle begins. Note there is no first wave in this scenario. All units not held in reserve are deployed at the start of the game.
Keep a count of how many turns have elapsed as the game is played. At the end of turn 6, roll a die. On a result of 1, 2, or 3 the game ends, on a roll of 4, 5, or 6 play one further turn.
If one player has destroyed his opponent’s base while his own still stands then that player is the winner. Otherwise the game is a draw.
The following rules are common to all or most of the scenarios and are gathered together here to save repeating them throughout the scenario descriptions.
Where indicated in the scenario, units can be hidden at the start of the game. These units must be deployed in such a way that they are either entirely in cover to all enemies that can see them, or else out of sight of enemy altogether. These units are still placed on the table in the usual way, and must be marked in some fashion to show that they are hidden – any distinct token or marker will do.
Enemy are still allowed to target hidden units where they normally could do so, but, because shooters cannot be certain where the enemy are, the chances of scoring a hit are very much reduced. If a unit is hidden, any cover penalties that would normally apply when it is shot at are increased to –4 for soft cover and –5 for hard cover. If shot at by indirect fire, a 6+ is required to hit, even where shooter and target remain stationary from turn to turn. In addition, hidden units can never be chosen as targets for air strikes or artillery barrages from forward observers. They can still be struck by a preparatory bombardment as noted below and derive no benefit from being hidden in this case. Hidden units remain hidden until one of the following happens:
•The hidden unit is ordered to Fire, Advance, or Run.
•An enemy unit scores a hit on the hidden unit (other than preparatory bombardment).
•An enemy infantry or artillery unit moves to (or is set up) within 12”.
•An enemy recce vehicle moves to (or is set up) within 12”.
•Any other enemy moves to within 6”.
Unless players wish to agree otherwise, spotters, forward air observers, forward artillery observers, and snipers, together with any vehicles required to carry them, can be set up anywhere within the player’s own half of the table at the start of the game, so long as they are more than 12” from any enemy unit that is already deployed including enemy spotters, observers and snipers.
In an attacker/defender scenario the defender sets up his spotters, observers and snipers first. Otherwise the players alternate setting up one unit at a time – roll a dice to determine which side places first. Any observer and sniper units can also be set up hidden as noted above.
When about to attack enemy defensive positions, it makes sense to ‘soften them up’ first with a bombardment from heavy artillery, rocket batteries, or bombers. Such a bombardment often caused relatively few casualties to well dug-in troops, but it certainly encouraged the enemy to keep their heads down, unnerving them and sapping their fighting spirit.
The scenario played specifies when a preparatory bombardment is allowed. To see how effective the bombardment is, roll a die for each unit in the enemy set-up zone at the start of the game and consult the chart below. Targets that are in bunkers or comparable fortifications deduct –1 from the die roll, and cannot therefore score worse than a 5 or suffer more than 2 pin markers. However, note that hidden units derive no benefit from being hidden when working out preparatory bombardments.
Reserves are troops that are neither deployed onto the table at the start of the game nor held back to form a first wave. Reserve units cannot do anything in the first turn of the battle (except during the Top Secret scenario as noted).
Even though reserves cannot do anything in the first turn, they must still be given orders, as their order dice will be included in the dice cup. The only order they can be given in turn 1 is Down to show that the reserves are awaiting a command. Even vehicles are given a Down order when in reserve, indicating that they are immobile that turn.
From turn 2 onwards (turn 1 in the Top Secret scenario) any units in reserve can be ordered on to the table with an Advance or Run order. Note that troops are not allowed to make an assault when they enter the table at a Run – troops are only allowed to make an assault if they are already on the table at the start of their move. A player is not obliged to move troops from reserve: a unit can be left in reserve by giving it a Down order.
When units move from reserve onto the table they always require an order check with a –1 penalty. So, a veteran unit with morale of 10 will require a 2D6 roll of 9 or less to pass its order check and move on to the table. Because an order test is required to move from reserve it is not completely certain when these units will arrive. If a unit fails to enter the battle before the end of the game it counts as destroyed – missing in action.
Infantry or artillery units that are in reserve can be mounted in transport vehicles or tows. The player should indicate this is the case during set-up.
A player can send any of his reserves on an outflanking manoeuvre either to his left or right. During set-up the player must indicate to his opponent any reserve units that are attempting an outflanking manoeuvre. The player secretly writes down which of his outflanking units is going left and which is going right. He can send all of his units one way or the other, or he can divide them if preferred; it is entirely up to the player. The player must reveal his written instructions only when the first outflanking force arrives on the table.
Meanwhile, the other player will be aware that the enemy is moving round his flanks, but cannot be certain where they have been directed.
Units attempting an outflanking manoeuvre must be given Down orders on turns 1 and 2. These units are, of course, manoeuvring beyond the confines of the tabletop, and the Down order merely serves to indicate they are as yet unable to enter the battlefield.
From turn 3 onwards, outflanking units can be ordered onto the tabletop with an Advance or Run order in the same way as other reserves. An order test with a –1 penalty will be required as already described. Units outflanking on the left hand side can enter from the left hand table edge, those entering from the right hand side can enter from the right hand table edge. If moving onto the table in turn 3, outflanking units can enter along a side edge but not more than 24” from the player’s own edge. So, if the tabletop is four feet wide they will be able to enter up to half way across. If entering in a subsequent turn, add a further 6” per additional turn, so up to 30” from the player’s edge in turn 4, 36”in turn 5, and so on for battlefields of greater width.
The system described for working out which side has won is practical to apply and serves perfectly well for most kinds of game. However, there will be occasions when players want to calculate scores in a more precise manner. Attrition allow us to calculate a player’s exact score and will prove useful where games are played as part of a tournament or formal competition.
Instead of being worth only 1 or 2 points irrespective of their requisition points value, in the attrition system units have a value equal to the number of victory points specified by the scenario multiplied by their requisition points value. For more about requisition points see here.
For example, if a unit leaves the battlefield from the enemy table edge in an Envelopment scenario it is worth 3 victory points. If such a unit cost 100 requisition points, it would be worth (3 x 100) = 300 attrition. If the same unit were destroyed in a Maximum Attrition scenario, it would be worth 1 victory point and therefore (1 x 100) = 100 attrition.
In a game where victory is determined by taking or holding objectives, first work out which side has won, drawn, or lost the scenario as described. The attrition value of a destroyed enemy unit equals its requisition points multiplied by two in the case of the winning side. Losers and drawing sides just score the requisition points. If the scenario is lost, the maximum attrition value that can be scored is 10 less than that of the winner. For example, if the winner scores 460 attrition the loser’s total score is capped at 450.
For example, in a Demolition scenario the side that destroys the enemy base whilst preserving its own base intact is the winner – in this case the winner scores attrition equal to the requisition value of enemy units destroyed multiplied by two. An enemy unit with a requisition value of 75 points would therefore be worth (2 x 75) = 150 attrition.
Regardless of how attrition is calculated, to win an outright victory one side must score at least 200 attrition more than the enemy. If neither sides scores at least 200 attrition more than the other, the result is not decisive and the battle is a draw even though one side may have scored more attrition than the other.
This value for outright victory assumes you are playing with standard forces of 1,000 requisition points as noted earlier. If you play with considerably larger or smaller forces, it is a good idea to increase or decrease this value in proportion with the size of the forces – keeping the attrition required for outright victory at 20 per cent of the forces’ requisition value.
We do not normally allow troops to hide during the course of a game, but if players agree troops can be allowed to go hidden during a game if they would otherwise qualify as described in Hidden Set-up, and are given a Down order. Because this can slow down the game and makes some scenarios harder for one side to win, we present it as an optional rule for experienced players rather than as a general rule of play.