
How many packages of prefab bread products would you guesstimate that you’ve purchased in your lifetime? Got it? Okay, now double it. Yeah, that’s probably about right. Though a handful of us yeast geeks might take a Saturday afternoon to lovingly craft a loaf or two of the crustiest bread that our cool home ovens will allow, few of us think about practical baking in the long term: stocking the freezer with the morning carbs (bagels or English muffins) to sustain us Monday through Friday, or putting forth the effort to whip up the buns for summer barbecues, or making our own pizza dough and having it at the ready in the freezer.
A bag of flour and a handful of your effort are the bulk of what’s needed to add your stamp to some of the best and most versatile kitchen baked goods at a fraction of the cost of the store-bought stuff. No twist-tie required: the recipes that follow are all you “knead” to strut your yeasty stuff.
Chewy, dense, and round (duh!), these are not mammoth bagels-on-steroids, but they are flavor giants to be reckoned with. The best thing about making your own? Poppy seeds and salt on both sides! (But, of course, you can stud them with whatever you desire.) Bagels must be boiled, and you simply can’t skip that step. And don’t hate me for making you hunt down malt powder; find it at beer brewing stores, health food stores, or online (for example, at Amazon.com or KingArthurFlour.com). In a total pinch, you can substitute brown sugar, but it’s just not the same.
Makes 12 bagels
TIME COMMITMENT less than 3 hours
5 cups (1 pound, 11 ounces) all-purpose flour, plus more as needed
1 tablespoon kosher salt
1 packet (2½ teaspoons) active dry yeast
1 tablespoon nondiastatic malt powder
1¾ cups water
BOILING BATH
9 cups water
2 tablespoons nondiastatic malt powder
1 teaspoon baking soda
1 egg white
Flaky finishing salt, poppy seeds, or sesame seeds
INSTRUCTIONS In a food processor or stand mixer fitted with the dough blade, combine the flour, salt, yeast, and malt powder. With the machine running, slowly stream in the 1¾ cups of water. The dough will come together in
a solid mass. Allow the machine to knead the dough for 2 to 4 minutes, until a stiff and cohesive dough forms.
Transfer the dough to a countertop lightly dusted with flour and continue to knead, pushing the ball in from the sides and then over the top from the bottom. Add more flour as needed, a tablespoon at a time, if the dough is wet and sticky. After 5 to 8 minutes of kneading, the cracks in the dough should smooth out and it should become as pliant as an earlobe.
Place the dough in a lightly oiled bowl and cover the bowl with a clean, damp kitchen towel. Heat a cup of water in the microwave for 1 minute and remove. Place the covered dough bowl in the warm, moist microwave and let sit for 1 hour. (Or let the dough rise in another warm, moist place.)
About 15 minutes before the hour is up, make the boiling bath. Combine the water, malt powder, and baking soda in a wide, heavy Dutch oven or stockpot. Cover the pot and bring to a vigorous boil over high heat.
Preheat the oven to 425°F and line 2 large baking sheets with parchment paper.
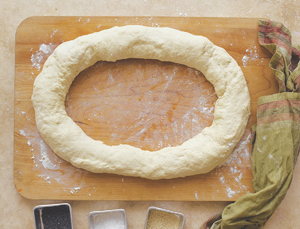
Lightly flour the countertop again and put the dough on it. Roll the dough into a ball with your hands. Stick your finger directly into the center to make a small hole. Use your fingers to widen the hole and work the dough, hand over hand as if you’re pulling on a rope, into a large O-shape about 2 inches thick. Look! A giant bagel!

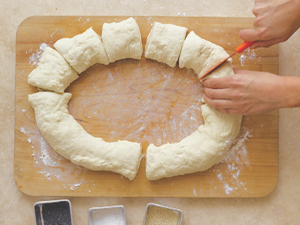
Cut the rope in half, then cut each half in half again; you will have 4 equal parts. Cut each piece into thirds, resulting in 12 dough pieces total.

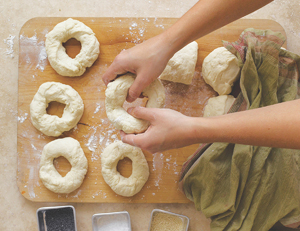
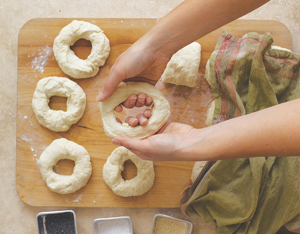
Work with one dough ball at a time, leaving the others covered with the damp towel. Roll the dough ball into a sphere, flatten it slightly, and then stick your finger through the center. Widen the hole with your fingers until the bagel reaches about 4 inches across (it will puff up a bit more after being boiled). Try to ensure that the dough has the same thickness all the way around the hole; this allows for even cooking. Put the shaped bagel on one of the prepared baking sheets and shape 5 more, for a total of 6. (Leave the remaining dough pieces under the towel.)


Once your boiling bath is boiling rapidly, have two utensils, such as a slotted spoon and a wooden spoon, at the ready to help get your bagels into and out of the bath quickly. Place 3 bagels into the bath and boil for 1 minute. Use your utensils to turn them over, and boil for 1 minute more. Remove the bagels one at a time, holding them over the bath to drain them well, and transfer them back to the baking sheet. Repeat with the other 3 bagels.
Beat the egg white with 1 teaspoon of water and brush each boiled bagel with the egg white mixture, and then top with as little or as much as you like of the salt and seeds. If you desire, flip the bagels over, brush with more egg mixture, and add more toppings.
Move the sheet of bagels into the oven and bake for 12 minutes. Take the bagels from the oven, flip them over, and then bake for 6 minutes more, until they are lightly browned and shiny all over. Transfer them to a rack and allow them to cool completely, at least 30 minutes.
While the first batch of 6 bagels is in the oven, shape, boil, and salt/seed the remaining 6 bagels, using the other prepared baking sheet.
The bagels’ full texture does not develop until they have fully cooled. These are best if eaten the same day, but they are still delicious split and toasted the next day.
HOW TO STORE IT Put the bagels in a zip-top bag, force out as much air as you can, seal, and freeze for up to 6 months. Thaw at room temperature for about 4 hours before slicing and toasting.
Next time you come over for brunch, I’ll make eggs, squeeze some juice, thaw out some homemade bacon, and, uh-huh, that’s right: I’ll make English muffins. And when I come to your house, you can, too. These are dense, chewy canvases ready to accept your butter, jam, hollandaise, and so on. Their flavor is top-notch, and they freeze like a dream.
Makes 12 muffins
TIME COMMITMENT About 2 hours
1 packet (2½ teaspoons) active dry yeast
3½ cups (1 pound, 4 ounces) bread flour, plus more as needed
1 tablespoon sugar
1 teaspoon kosher salt
1 teaspoon white distilled vinegar
¾ cup milk
1 tablespoon butter, softened
¾ cup water
INSTRUCTIONS In a food processor fitted with the dough blade, pulse together the yeast, flour, sugar, and salt. In a cup or small bowl, mix together the vinegar and milk. With the machine running, slowly pour in the milk mixture, and drop in the butter. Pour the water through the tube slowly as the dough forms. Allow the machine to knead the dough for 5 to 8 minutes, until the dough pulls cleanly away from the sides of the work bowl. If the dough is too sticky, add more flour, 1 tablespoon at a time. Transfer the dough to a lightly floured countertop, roll it into a ball, and put it in a large, lightly oiled bowl. Cover the bowl with a clean, damp kitchen towel. Warm one cup of water in the microwave for 1 minute, then remove. Place the covered dough bowl in the warm, moist microwave and let sit for 1 hour. (Or let the dough rise in another warm, moist place.)
Lightly flour your work surface again and put the dough on it. Roll the dough into a ball with your hands. Stick your finger directly into the center to make a small hole. Use your fingers to widen the hole and work the dough, hand over hand as if you’re pulling on a rope, into a large O-shape about 2 inches thick. Cut the circle and shape it into a rope about 36 inches long. Cut the rope in half, then cut each half in half again; you will have 4 equal parts. Cut each piece into thirds, resulting in 12 dough pieces total. Roll each piece of dough into a ball and cover with a damp towel.
Heat a griddle or a heavy skillet over medium to medium-low heat. Once it’s hot, lightly oil the pan. Pick up a ball of dough and slap it between your hands to form a patty ½ to ¾ inch thick, place on the griddle, and cook for 3 minutes per side, until the muffin puffs and turns brown (not black!). Add as many muffins to your pan as you can without crowding—about 3 for a standard skillet, or up to 8 at a time on a griddle. Remove the muffin from the griddle and transfer to a plate or cooling rack. Let the muffins rest for at least 15 minutes; this is critical for achieving the proper texture. For the ultimate “nook and cranny” experience, don’t slice the muffin open. Instead, perforate the perimeter of the muffin with the tines of a fork and split it by hand.
HOW TO STORE IT These are best if eaten fresh, but they are also delicious split and toasted the next day. Beyond that, put in a zip-top bag, force out as much air as you can, seal, and freeze: they will remain cryogenically delicious for up to 1 year.
If you’re going to go to all the trouble of making your own ’gers and dogs, and you’re striving to be teacher’s pet by rustling up your own ketchup, mustard, and mayo, doesn’t that DIY BBQ deserve this final capstone in the food geek pyramid? These soft, white, tiny loaves are the perfect vessels to receive your best grilled meats, lobster salads, or cold-cut extravaganzas: in short, they’re ready for any sort of oddly shaped sandwich situation.
Makes 12 buns
TIME COMMITMENT About 2 hours
5 cups (1 pound, 11 ounces) all-purpose flour, plus more for dusting
2 packets (5 teaspoons) active dry yeast
2 tablespoons sugar
1 tablespoon kosher salt
2 tablespoons butter, softened
1 cup milk, plus more for brushing
1 cup water
INSTRUCTIONS In a food processor fitted with the plastic dough blade, pulse together the flour, yeast, sugar, and salt until combined. Add the butter and process until it’s thoroughly incorporated. With the machine running, stream in the milk and the water. Once the dough forms into a ball, turn it onto a lightly floured countertop and knead for about 1 minute, just until it comes together and the outside is no longer sticky. Transfer the dough to a lightly oiled large bowl and cover the bowl with a damp, clean kitchen towel. Heat a cup of water in the microwave for 1 minute and remove. Place the covered dough bowl in the warm, moist microwave and let sit for 1 hour. Lightly oil 2 baking sheets.
Lightly flour your countertop again and put the dough on it. Roll the dough into a ball with your hands. Stick your finger directly into the center to make a small hole. Use your fingers to widen the hole and work the dough, hand over hand as if you’re pulling on a rope, into a large O-shape about 2 inches thick. Cut the rope in half, then cut each half in half again; you will have 4 equal parts. Cut each piece into thirds, resulting in 12 dough pieces total.
Keep the dough pieces covered under a moist towel to keep them from drying out while you work. One at a time, roll each piece into a ball. For burger buns, press down on the dough ball to flatten its bottom. For hot dog buns, pinch, stretch, and shape the dough into 7-inch-long rolls. Transfer the buns to the baking sheets as you form them, evenly spacing 6 buns per sheet. Let the dough rest on the baking sheets for 30 minutes.
Preheat the oven to 400°F. Brush the tops of the buns with milk, place both sheets in the oven, and bake for 10 minutes. Rotate each baking sheet 90 degrees and switch racks (so that the topmost baking sheet moves to the bottom rack and vice versa). Bake for 10 minutes more, or until the tops are golden brown (take care not to let the bottoms get too dark). Let cool slightly before serving.
HOW TO STORE IT These are best if eaten the same day, or you can serve them toasted for up to 2 days after baking. Or wrap tightly in plastic wrap, place in a zip-top bag, force out as much air as you can, and seal: these can be frozen for up to 6 months.
Let’s be honest. Unless you’re fortunate enough to have a snazzy oven that can crank to nearly 1,000 degrees, the pizza you make at home will not replicate the pies from your favorite pizzaiolo. That said, you can certainly roll out something that’s still entirely worth the effort. The trick is to let the dough sit overnight, which vastly improves the texture and chew.
Makes enough dough for four 8-inch pizzas
TIME COMMITMENT About 1 day
1 packet (2½ teaspoons) active dry yeast
3¼ cups (1 pound, 2 ounces) all-purpose flour, plus more for dusting
1 tablespoon plus 2 teaspoons kosher salt
1 tablespoon dried rosemary
1 tablespoon olive oil
1½ cups water
INSTRUCTIONS In a food processor fitted with the dough blade (or a stand mixer fitted with the dough hook), whirl together the yeast, flour, salt, and rosemary. With the motor running (at medium speed for a stand mixer), drizzle in the oil, then the water, until a dough forms. Keep the machine running for 2 to 3 minutes to knead the dough—it will slap around the sides of the bowl, so hang onto your machine and enjoy the ride. The dough will be warm when you take it from the machine.
To make the dough by hand, mix together the dry ingredients in a large bowl. Mix in the oil and water, starting with a spoon and then using your hands. Turn the dough out onto a floured work surface and knead for about 10 minutes, until the dough is slightly shiny, and smooth and firm like an earlobe.
Lightly oil a large bowl. Roll the dough into a ball, place it in the bowl, and turn it once to coat with the oil. Cover the bowl with a damp, clean kitchen towel (don’t allow the towel to touch the dough). Heat a cup of water in the microwave for 1 minute and remove. Place the covered dough bowl in the warm, moist microwave and let sit for at least 8 and up to 24 hours. (Or let the dough rise in another warm, moist place.)
When the dough has risen, pull it away from the sides of the bowl and transfer it to a floured work surface, rolling it into a ball. Cut the dough into 4 equal pieces. Roll each piece into a ball, and use or store.
HOW TO STORE IT The dough can be refrigerated for up to 1 week or frozen, wrapped twice in plastic wrap and stored in an airtight container, for up to 6 months. Thaw in the refrigerator for 24 hours before using.
Makes four 8-inch pizzas
Don’t be trepidatious about toppings. Ditch the sauce and cheese in favor of ricotta and olives, corn relish and salami, pesto and vegetables—or fruit slices and sugar.
Olive oil, for brushing
¾ cup marinara sauce
6 ounces mozzarella cheese, shredded or cut into strips
Finishing salt
INSTRUCTIONS Position an oven rack in the center of the oven and preheat to 500°F. Lightly oil 2 rimmed baking sheets.
Work with 1 ball of dough at a time, keeping the others covered with a damp kitchen towel. Dust a work surface with flour and, using a rolling pin (or a wine bottle), roll out a ball of dough to a 9-inch round. Gently transfer the dough round to one side of one of the baking sheets and crimp the edges with your fingers, lightly twisting as you go, to make an 8-inch pizza with crust. Roll out the remaining 3 balls of dough and move them to the baking sheets as well, so that you end up with 2 rounds per sheet.
Brush each pizza with olive oil. Spoon on 3 tablespoons of sauce, smoothing it evenly to the crust’s edge. Sprinkle on ¼ of the cheese and finishing salt to taste.
Bake 1 sheet of pizzas at a time for 9 minutes. Rotate the sheet and bake for about 9 minutes more, until the crust is golden brown and very dark brown in spots. Bake the second tray of pizzas in the same way. Serve immediately.
If you can boil canning jars and use them for drinking lemonade, why not use them as a vessel for the cutest single-serving cake/pudding thing ever? Simply screw on the lid and you have a portable picnic food at the ready. Hurray! I devised this concoction in summer; hence the summer fruit. But I encourage you to use 2½ cups total of whatever fruit is in right now. This is also a good use for less-than-perfect fruit.
Makes 4 cakes
TIME COMMITMENT less than 2 hours
1½ cups pitted cherries
1 cup sliced strawberries
½ cup all-purpose flour
½ cup sugar
½ teaspoon salt
4 tablespoons butter
¾ cup heavy whipping cream
INSTRUCTIONS Preheat the oven to 350°F.
In a small bowl, combine the cherries and strawberries and divide the fruit evenly among 4 half-pint canning jars. In another bowl, whisk together the flour, sugar, and salt and divide the mixture among the jars (¼ cup per jar), tapping and shaking well to distribute the dry ingredients around the fruit. Top each jar with 1 tablespoon of butter. Note that the jars will not be filled all the way.
Fill the bottom of an 8-inch square or round baking dish with dried beans in at least a double layer. Nestle each jar flat on its bottom in the pan; the jars should not be touching one another. (The beans will help keep the jars steady while you’re moving them in and out of the oven.)
Bake for 1 hour, until the tops are brown and bubbly and the cakes have set. Allow the cakes to cool on a rack for 20 minutes.
Whip the cream in a stand mixer or using a hand mixer until soft peaks form. Dollop whipped cream on each of the cakes and serve. Eat straight out of the jars.
HOW TO STORE IT These can be made ahead; stored (with a proper lid and sans whipped cream) in the refrigerator for up to 1 week; and, need I say, gifted.