
Roasting just about anything is probably the best way I can think of to perfume the entire house. The art of roasting is not limited to chicken and potatoes. It’s also the basis for dozens of quirky culinary projects—coffee beans, cacao nibs, nuts, and chestnuts, to name a few.
The trick with some of the projects in this chapter is often just in finding the raw materials to work with: I’ll give you tips on procurement when necessary. Once your materials are in hand, however, you’ll find the process of home roasting to be meditative and entirely enjoyable. And, of course, the results of your thoughtful labor will be roasty-toasty pleasure.
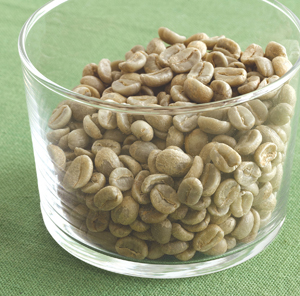
If you are serious about/obsessed with roasting your own coffee, numerous manufacturers are standing by to take your money for hardcore roasting machinery. Also—much like bong building—coffee roasting seems to lend itself to home hardware hobbyists: look no further than your local laptop to find people hacking popcorn makers and more (“Dude, let me show you my new vacuum cleaner–powered coffee roaster. It’s AWESOME!”). For those of you who just want to test the waters and keep it simple, I am happy to report that you need nothing more than a heavy pan, green coffee beans, and a wooden spoon. Oh, and an exhaust fan: coffee is a spitting, steam-producing dragon in the kitchen, and good ventilation is an absolute must. If you can’t find green beans at your local health food store, buy them online from SweetMarias.com, CoffeeStoreHouse.com, or a host of other retailers.
Makes 7 ounces
TIME COMMITMENT About 20 minutes
8 ounces green coffee beans
INSTRUCTIONS Place a large metal bowl in the freezer to chill. Activate your kitchen’s best ventilation: open windows and doors, turn on fans—whatever you have. This is a must!
I recommend using an uncovered Dutch oven with a heavy bottom for roasting your beans: the high sides will help reduce the mess from the popping coffee hulls. However, if you don’t have one, a cast-iron or other heavy skillet will suffice.
Place the beans in the cold pan, put the pan over medium heat, and start stirring with a sturdy wooden spoon. You will need to stir constantly throughout the entire roasting process: you are trying to keep the heat as even as possible among all of the beans throughout the roast.
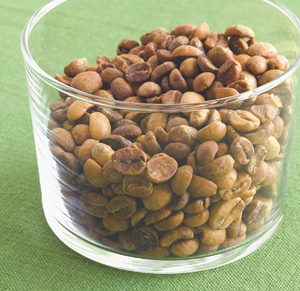
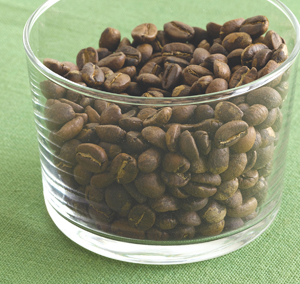
After about 5 minutes, the beans will begin to crack and smoke. About 10 minutes more, and the beans will be turning chestnut in color: a very light roast. Ten to fifteen minutes beyond that (30 minutes total), and you’ll have a dark, nearly black roast. If you like a medium roast, you’ll stop somewhere in the middle. Note that you need to take the beans off the heat a little bit before they turn the color you like: they will continue to roast a little after you stop the cooking process.
Once the beans are just a shade lighter than the color you desire, take them off the heat. They will continue to color slightly until you pour them into the chilled bowl and stir constantly for about 3 minutes. Rotate the bowl to cool down the beans quickly and evenly. Then pour the beans into a colander, place the colander over the bowl, and stir for another minute or so to sift out the flyaway hulls.
Your coffee is ready to be ground and brewed as usual, though it will be much better if you wait until the next day to grind it.
HOW TO STORE IT The roasted, cooled whole beans can be stored in an airtight container at room temperature, and the coffee will be at its best, for up to 2 weeks.


Snackmasters, prepare to feed your food hole. These addictive nuts have every taste sensation you’re craving: from heat to sweet to salt to fat. And since they’re nuts, you can sort of pretend that they’re actually kind of good for you. Needless to say, a gift of these in a fancy stenciled vessel or served to your cocktail-drinking guests by the handful will be most appreciated. This is also a good way to breathe new life into older nuts that may be on their way to staleness.
Makes about 2 cups
TIME COMMITMENT About 1 hour
1 tablespoon butter
1 tablespoon neutral vegetable oil
½ teaspoon cayenne pepper
3 tablespoons brown sugar
1 teaspoon dried rosemary
1 teaspoon kosher salt
2 cups almonds, cashews, pecans, walnuts, or peanuts, or a combination
INSTRUCTIONS Line a baking sheet with parchment paper and set aside. Melt the butter and the oil in a skillet over medium heat. Add the cayenne, sugar, rosemary, and salt and stir for 30 seconds. Add the nuts to the pan and toss to coat. Toast for about 8 minutes, until the nuts brown, stirring constantly to keep them from burning.
Transfer the nuts to the prepared baking sheet and let them cool completely.
HOW TO STORE IT Stored in an airtight container at room temperature, these will keep for up to 1 month.
Chocolate chips, you’ve been kicked to the curb. Just get yourselves out of my cookies right now. There’s a new sheriff in town named cacao nibs, and they are my preferred baking companions across the board. These precursors to chocolate are chocolaty without being sweet, packed with toothsome texture and übernuttiness. They are roasted similarly to coffee, but prepped the way you would fava beans—peeling one bean at a time. (I can get it done in a single one-hour episode of Top Chef.) If you can’t find raw cacao beans in your health food store’s bulk foods section, you can order them online.
Makes about 6 ounces (about 2 cups)
TIME COMMITMENT less than 2 hours
8 ounces (about 1¾ cups) raw cacao beans
INSTRUCTIONS Place a large metal bowl in the freezer to chill.
Place the beans in a cold, heavy skillet or Dutch oven, put the pan over medium heat, and start stirring with a sturdy wooden spoon. You will need to stir constantly throughout the entire roasting process: you are trying to keep the heat even. Roast for about 10 minutes for a medium roast, and 13 minutes for a darker roast. You will hear some very loud cracks and pops from your beans: this is a normal—if alarming—part of the process. Note that there won’t be a lot of visual change to the beans, but they will become fragrant as they cook.
Once the beans are roasted to your satisfaction, take the bowl from the freezer and pour in the beans quickly to stop the roasting. Stir constantly, rotating the bowl, for about 3 minutes, to help the beans cool quickly.
Once they’re cool enough to handle, each bean must be peeled to remove the thin bark from the outside. Rub the bean between your fingers, and its papery husk will slide off easily, but be careful not to crush the bean. Discard the husks: the dark shiny interior bean is your cacao.
Once all beans have been shelled, a quick pulse in the food processor (or a gentle hammering in a plastic bag) will chop them to small pieces (nibs). Use them in baking whenever you would chocolate chips.
HOW TO STORE IT Kept airtight at room temperature, cacao nibs will last for up to 4 months.
Want to enjoy your nibs immediately? Try this brittle.
INSTRUCTIONS Line a rimmed baking sheet with parchment paper and set aside. In a small saucepan, combine 1 cup water, ½ cup sugar, and ½ cup chopped cacao nibs and bring to a boil over high heat, uncovered. Stir often until the nibs begin to melt and turn the liquid chocolate brown, about 12 minutes. Pour the hot liquid onto the prepared baking sheet and let cool completely, about 25 minutes. Once the brittle is cool, shatter it into small pieces. Wrapped in wax paper or parchment paper in an airtight container, this will last for 1 week.
If you’ve never had the pleasure of picking apart a freshly roasted chestnut hot from the oven on a chilly day, then you owe your fingers an apology. Peel back the hard outer shell and slough off the inner papery husk, and within is a tender, delicate, chewy, flavorful nutmeat that’s entirely worth your effort. In my house, these are devoured fresh from the oven while we’re standing at the kitchen counter. If you can restrain yourself, use them for a classic Thanksgiving chestnut stuffing or soup.
Makes about 12 ounces (about 2 cups)
TIME COMMITMENT About 3 hours
1 pound fresh chestnuts
INSTRUCTIONS Lay one chestnut down on its flat side on a cutting board. Using a sharp serrated knife, cut a deep X into the rounded side of the nut. Note that you should not cut all the way through the chestnut, but your cut should be just deep enough to pierce both the outer shell and the husk underneath it. Follow suit with the remainder of the chestnuts.
Transfer the chestnuts to a bowl and cover with water by 1 inch. Let them sit for 1 hour. Approximately 15 minutes before that hour is up, preheat the oven to 400°F.
Drain the chestnuts and arrange them on a rimmed baking sheet in a single layer, X-cut side up. Roast for 25 minutes, until the cut corners of the shells begin to curl up and the exposed nut beneath is beginning to turn brown.
As soon as the chestnuts are cool enough to handle, they are ready to be peeled and eaten.
HOW TO STORE IT Once they are completely cool, they will keep, stored airtight at room temperature, for up to 5 days.