The aim of this chapter is to set you up with the information you will need in order to work comfortably and effectively through the exercises and meditation practices in the rest of the book.
Firstly, you will discover the value of setting a regular time and space for your Yoga Meditation, as well as the importance of maintaining the right mental attitude to work toward your goals.
Secondly, you will discover the value of being able to sit still in a comfortable and steady posture, so that you can remain relaxed and alert for a considerable length of time without distraction. To achieve this effect, you will be offered instruction on a range of different seated postures, from which you can choose when it comes to doing your own meditation.
And finally you will be given an explanation of a range of yogic hand gestures called mudras, and internal yogic body “seals” or “locks” called bandhas. These can help to increase the power of your energy, retaining it and directing it upward through the energy centres (chakras), which will deepen your Yoga Meditation practice.
To reap the greatest benefits from the Yoga Meditation techniques in this book, first set the intention to want to get in touch with your deep, innermost joyful self. Then, make a genuine commitment to yourself to work steadily toward that goal. Below are several other critical factors to take into account.
Traditionally, yogis meditate around sunrise and sunset, as the mind naturally becomes more calm and serene at these times. This is optimal. However, if these times are difficult for you, simply decide on the times that best suit you and commit yourself to setting these aside each day.
The key to success in meditation is to develop and maintain a regular practice – daily if possible (as often as possible if not), and at the same time each day, for approximately the same length of time. This way, your body and mind will get accustomed to the regularity, and it will be much easier to get into the right state of mind for meditation each day.
The journey to a calmer, more contented self is a long, gradual process, so you will need to be patient and persevere. There is no instant success in spiritual life. It’s therefore important to keep your Yoga Meditation practice high on your list of daily priorities and to practise with enthusiasm each time. Only by doing this will you feel like you are making progress and start to realize that the benefits of meditation – calmness, contentment and increased energy levels – are actually your natural state of being; you have just temporarily lost touch with it. You should also keep in mind the yamas and niyamas outlined on pages 18–21.
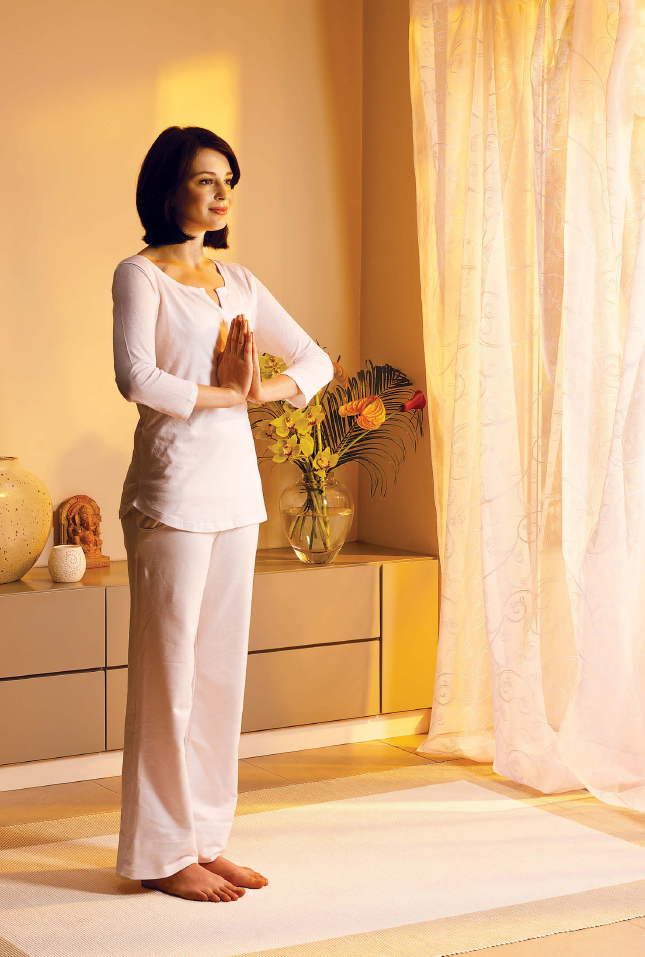
Do your Yoga Meditation practice in a clean, tidy, quiet place, where you are unlikely to be disturbed. For comfort, it’s best to wear loose, unrestrictive clothing, with all belts, jewellery, glasses and shoes removed. If you want to create a mood suitable for meditation, feel free to burn an incense stick or light a candle somewhere safe. As for props, there’s just a couple of things you will need: a yoga mat on which to practise your asanas and a firm cushion on which to sit while you meditate. By sitting in the same place each time, you will build an aura of purity and peace there.
The stomach should be at least half empty when you practise Yoga Meditation, so always allow at least two hours after a meal before you start. Do not practise if you are feeling ill or tired, or if you are feeling very upset, as the mind will not be able to concentrate.
For effective Yoga Meditation practice, the body needs to be seated in a comfortable and steady posture – a position in which the natural curves of the spine can be maintained. The head, neck and spine should be upright and in alignment to allow energy to flow freely up to the higher chakras. You should be seated in such a way that you are able to remain still in that position for a significant amount of time. When such a position can be held without effort, the body can become relaxed, the breath steady and quiet, and the focused mind will be able to enter a deep state of stillness.
The pages that follow contain a range of seated positions to choose from, depending not only on your overall flexibility and comfort levels but also on what feels appropriate on any given day. The only way to discover which one is best for you is to try all of them, but be sure to go easy on yourself – never force a position and slowly alter your position if at any point you experience pain.

Sitting on a chair
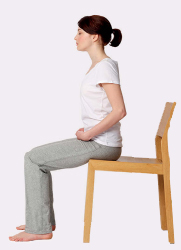
If you are unable to sit comfortably on the floor, the best option is to sit on an upright chair that has no armrests. Sit forward slightly to avoid leaning against the back rest. Keep your spine upright and place your feet hip-width apart on the ground. If they do not reach the floor, support them with folded blankets. Your lower legs should be perpendicular to the floor and your hips slightly higher than your knees.

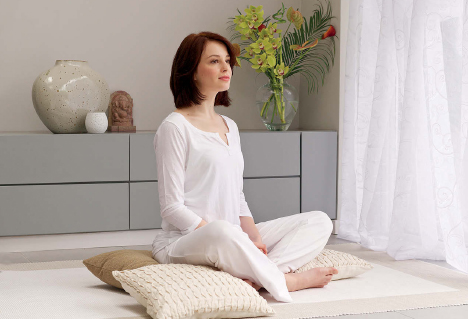
As the English name implies, this is the “easiest” or gentlest of the seated meditation postures, involving simply sitting cross-legged on the floor. However, it is not suitable for everyone so try it and see how you feel.
1 Sit on the floor on the edge of a firm cushion or folded blanket, bend in both legs and cross one leg on top of the other in front of you, so that your knees relax down to the sides. If you are more experienced, you may not need a cushion.
2 Ensure the cushion or blanket is an appropriate height to make the posture comfortable for you. Ideally, your knees should be slightly lower than your hips, or at least at the same level. This allows your thighs to relax downward, reducing tension in the hips and freeing the spine to lengthen upward.
3 Sit upright with the weight of your body in the front edges of your sitting bones. Align the upper body directly over the base of the spine. Lengthen the spine, open your chest and draw your shoulders back.
4 Rest your hands, palms upward, in Chin Mudra (see page 58) on your knees or thighs, depending on your preference.

This kneeling meditation pose is a slight variation on the standard sitting theme and is one that is regularly used by Muslims and Zen Buddhists in prayer and meditation. Kneeling in Vajrasana calms and harmonizes the body and mind, activates prana in the sushumna nadi and redirects sexual energy to the brain for spiritual purposes.
1 Kneel on a yoga mat or cushion with your knees together and sit your buttocks on your heels.
2 Bring your big toes together and separate your heels, so that your buttocks are seated on the inside surface of your feet with your heels touching the sides of your hips.
3 Keep your body upright, with your head, neck and spine naturally aligned and relaxed.
4 Rest your hands, palms upward, in Chin Mudra (see page 58) on your knees or thighs.
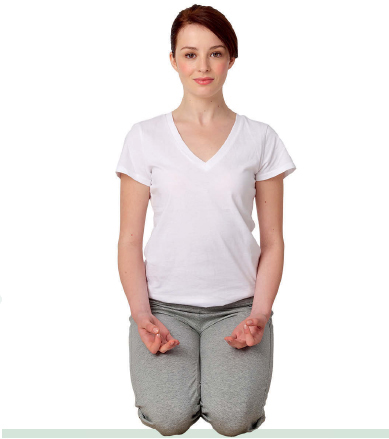
CAUTION: Be particularly careful with this pose if you have any issues with your knees, and, if you experience any pain in your thighs, separate your knees slightly.

The Sanskrit term siddha means “perfected” or “accomplished”. As such, it is no great surprise that Siddhasana is considered an ideal meditation posture among adept yogis. This is because it quietens the mind, has a balancing effect on the nadis and activates the spiritual energy of the chakras due to the pressure applied by the position of the feet.
1 Sit on the floor on the edge of a firm cushion or folded blanket. If you are more experienced, you may not need a cushion or blanket. Bend your left leg and place the sole of your foot flat against your inner right thigh with your heel pressing against the groin, so that you are essentially sitting on your left heel.
2 Then bend your right leg and place the right foot directly in front of the left foot so that the ankle bones are touching. Your left heel might press the pubic bone, directly above the genitals.
3 As an alternative, push the outer edge of the left foot and the toes between the right calf and thigh muscles. Grasp the right toes and pull them up in between the left calf and thigh.
4 Rest your hands, palms upward, on your knees in Chin Mudra (see page 58).
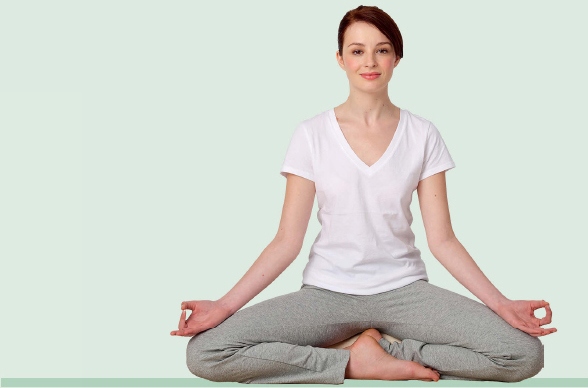

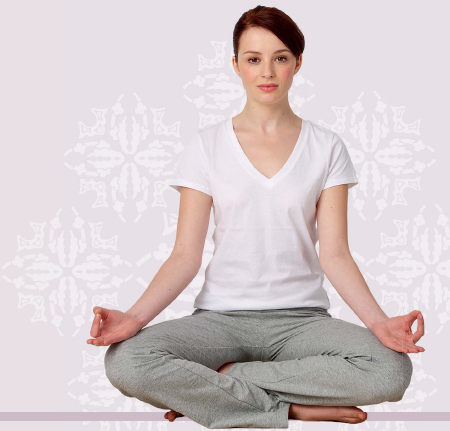
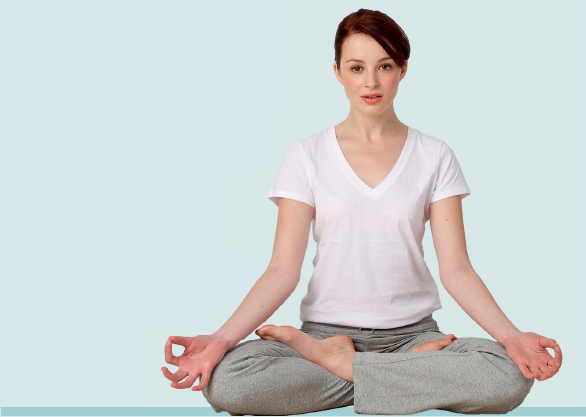
Padmasana, meaning “lotus seat”, is the classic sitting pose for Yoga Meditation, in which the feet are placed on opposing thighs. As the legs are in a bound position, the blood flow to them is reduced, resulting in an increase of blood flow to the brain, which purifies the nervous system. This posture has a balancing influence on all the chakras and brings an incomparable feeling of calm to the mind.
1 Sit on the floor with your legs extended in front of you. Then, slowly and carefully bend in your right leg, holding your right foot with both of your hands.
2 Turn the foot around so that the sole is facing you and place the instep up high on your left thigh as you lower your right knee to the floor. Your right heel should be close to your pubic bone.
3 Then bend in your left leg and, holding your left foot with your hands, place the instep up high on your right thigh. Find a point of comfort here.
4 Rest your hands, palms facing upward, on your knees in Chin Mudra (see page 58).
Adapted Lotus with Support
This adapted version of the difficult-to-accomplish Lotus Pose is a good alternative for anyone who finds the seated floor positions uncomfortable for any reason (for example, stiff knees or sore back) but who doesn’t want to sit on a chair. You will need five or six soft blankets to try it.
1 Sit on four or five folded blankets, with your back upright against a wall if your back muscles don’t feel up to supporting themselves.
2 Bend your legs, crossing one over the other so that your shins contact each other, and each foot rests on the floor under the opposite knee.
3 Adjust the height of your knees until the kneecaps are pointing directly outward.
4 Place a long, rolled blanket around the front of your shins and over the tops of both feet and tuck it in firmly so that it supports your legs.
5 Tilt your pelvis forward and sit upright. Roll the tops of your shoulders back and lean your head gently against the wall.
6 With your head, neck and spine in alignment, keep your chest lifted and relax your abdomen and diaphragm muscles as you breathe slowly and rhythmically.
7 Rest your hands, palms facing upward, on your thighs, in Chin Mudra (see page 58).

A useful tool to get acquainted with are yogic gestures called mudras; mudra is a Sanskrit word meaning “gesture” or “attitude”. Mudras can be applied to the hands, head or body, with the intention of awakening the prana to bring deepened awareness and concentration. Here we look at hand mudras. However, you will come across a range of other mudras in the exercises on the pages that follow, which are specific techniques relevant to specific practices; each is explained in its own section.
Your hands are essentially an energy map of consciousness. Each finger contains numerous nerve terminals and represents a certain quality. When fingers and parts of the palms connect in a particular hand mudra, it’s like flicking a switch that activates prana along specific nadis in the hands, into the body, through the chakras and to the brain. This loop of energy between the brain and the hand mudra means that the pranic energy is unable to escape from the body and is therefore heightened, strengthening the body–mind connection. The four mudras that follow are the key hand positions for Yoga Meditation, and can be used interchangeably depending on the effect you would like to achieve.
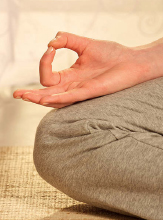
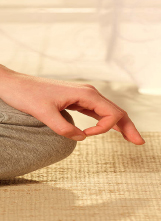
Rest your hands, palms up, on your knees or thighs, and lightly join the tips of your thumbs and index fingers. Extend the other fingers. The word chin comes from the Sanskrit word chit or chitta meaning “consciousness”. The closed circuit of the index finger and thumb symbolizes the union of the individual soul with supreme consciousness, making you feel calm and connected.
Rest your hands, palms down, on your knees or thighs, and lightly join the tips of your thumbs and index fingers. Relax the other fingers. Jnana (pronounced “gyana”) Mudra gives stability, balances the five vital elements of the body, inspires creativity, develops the intellect, sharpens memory and increases concentration.
Rest your hands, palms upward, in your lap. Place the left hand on the right one, so that you cradle the back of your left hand in your right palm. Bring the tips of your thumbs together. The two hands represent the ida (left nadi) and pingala (right nadi), so their union symbolizes drawing the two energies together in the sushumna (central nadi), which has a deeply calming effect.

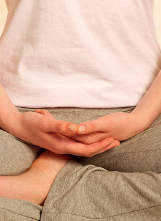
Rest your hands, palms upward, in your lap. Interlock your fingers so that the fingers of each hand lie against the back of the opposite hand. Rest one thumb on top of the other. This is a symbol of mind and body in harmonious unity; the mind symbolized by the left thumb and the body by the right. Use this mudra to go deeper into meditative calm.
Another useful yogic tool for Yoga Meditation is an understanding of internal energetic seals or locks known as bandhas. The Sanskrit word bandha means “to lock” or “to hold”.
When a bandha is practised by applying a physical contraction to a specific body part, the energy flow is temporarily blocked, and controlled. When the bandha is released, the energy flows more strongly in that area, with increased pressure. This redirection of the flow of prana has a calming effect on the mind, strengthens our inner focus, and also directs our awareness toward higher consciousness. As such, using the bandhas can be likened to the temporary damming of a river for it to be redirected more usefully.
The three major bandhas to be used in conjunction with certain yoga asana and pranayama are as follows.
The Sanskrit words mula and bandha mean “root” and “lock” so Mula Bandha refers to the energetic “lock” near muladhara chakra, at the base of the spine. Also called the “perineum lock”, this involves gently contracting the muscles of the pelvic floor, which lifts and tones the organs of the pelvis. Think of the squeezing action that you would take to stop urinating mid-stream and you have a good idea of the feeling you are trying to achieve. There is no external sign when you are applying this bandha so no photograph can illustrate it.
The Sanskrit term uddiyana means to “fly upward” – an appropriate notion for this lock which, when applied by contracting the upper abdominal muscles, causes the diaphragm to “fly upward”, or rise, toward the chest. It helps to direct prana into the sushumna nadi (the central energy pathway in the spine) so that it flows upward to sahasrara chakra, thus helping you on your journey toward self-realization. To apply this lock, think of gently sucking your stomach in and up as much as possible.
CAUTION: Practise only on an empty stomach. Pregnant women and those suffering from high blood pressure, heart problems and stomach ulcers should avoid it.
This lock is achieved by lowering and pressing the chin to the sternum, while the chest is raised with the inhaling breath toward the chin. The Sanskrit terms jalan and dhara mean “net” and “stream” so this lock seals off the network of nadis in the neck, preventing the “stream” of prana between the chakras, and instead directing it into the sushumna nadi. This promotes an increased sense of calm.
CAUTION: Those with high blood pressure, heart problems, mental stress and migraine should only practise this under the guidance of an experienced yoga teacher.