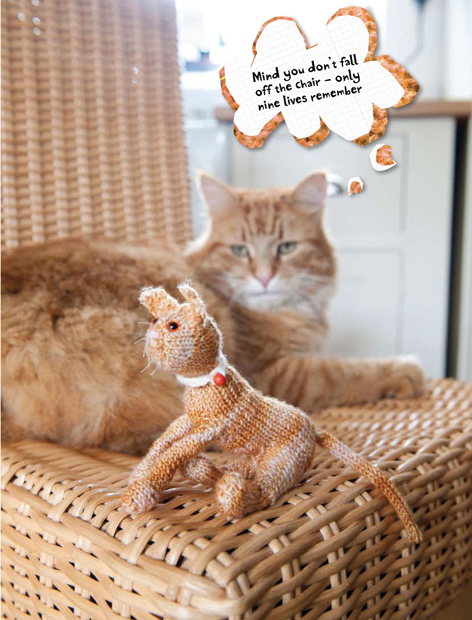
biscuit the cat
Biscuit comines working in the round, i-cord and self-patterning yarn.
RATING

yarn
Fingering-weight (4-ply) yarn
 ½ × 1¾oz (50g) ball in ginger (MC)
needles
4 × size 3 (3mm) double-pointed knitting needles
Crochet hook (optional)
notions
2 × ¼in- (6mm-) diameter toy safety eyes (or black yarn)
Pink yarn for nose
Beige machine sewing thread for whiskers
Oddment of yarn and 1 bead for collar (optional)
gauge
13 sts and 16 rows to 2in (5cm) of st st, using MC and size 3 (3mm) needles
Don't worry if the gauge is not exact – it doesn't matter if the cat is a little bigger or smaller than shown.
finished size
Approx. 5in (13cm) long (not including the tail) × 4½in (11.5cm) tall (including the ears)
How do you fancy a teeny tiny biscuit – a ginger one naturally – but a ginger cat, not a real biscuit! This Biscuit is a stayat – home kind of cat, who likes nothing better than dozing in his very own knitted basket. He'll only condescend to wake up if there's a whiff of fish in the air.
Use a tiny bead or tinkling bell for Biscuit's collar.
CAT PATTERN
knitting notes
The main part of the cat is worked in one piece from the nose to the tail.
The cat is worked on double-pointed knitting needles using the techniques i-cord and working in the round.
Do not use even safety eyes on toys for an infant, as they can be a potential choking hazard. Instead, embroider the eyes in place with thread.
You can knit any yarn with needles one size smaller than the size recommended on the ball band to give a tight fabric that doesn't allow the stuffing to show through.
HEAD, BODY, LEGS AND TAIL
Cast on 4 sts, using MC and size 3 (3mm) needles.
Row 1 (RS) *Kfb, rep from * to end. 8 sts.
Row 2 P.
Rep last 2 rows once more. 16 sts.
Shape front of head
Row 5 K7, [M1, k1] twice, k7. 18 sts.
Row 6 P.
Row 7 Divide sts: k7 onto n1, k3 onto n2, k8 onto n3.
With RS facing, keeping gauge fairly tight on first rnd, work in the rnd as follows:
Rnd 8 K18.
Rnd 9 [M1, k3] 6 times. 24 sts.
Rnd 10 K24.
Rnd 11 K6, [M1, k1] 12 times, k6. 36 sts.
Rnd 12 K36.
Place marker at beg of next rnd.
Rep last 2 rows.
Divide for ears
Rnd 15 K10, sl next 6 sts onto a safety pin, kfb 4 times, sl next 6 sts onto a safety pin, k10. 28 sts. (Keep tension tight to avoid gaps as you knit under the sts on safety pins.)
Shape side of head
Rnd 16 K3, bind off next 7 sts, k7, bind off next 7 sts, k2.
K next 3 sts so there are 6 sts for the neck on one needle.
Cut yarn. Leave sts on needle.
Work head back
Slip 8 sts for the head back off the safety pin onto size 3 (3mm) needle.
Row 17 (RS) MC K. turn.
Work 9 rows in st st.
Join head back to neck
Row 27 (RS) K8, k across 6 sts from the neck. 14 sts.
Row 28 P.
Work neck
Row 29 Divide sts: k8 onto n1, k3 onto n2, k3 onto n3.
With RS facing, keeping gauge fairly tight on first rnd, work in the rnd as follows:
Rnd 30 K14.
Rep last rnd once more.
Rnd 32 K4, M1, k5, kfb 4 times, k1. 19 sts.
Rnd 33 K19.
Rnd 34 K4, M1, k1, M1, k8, kfb twice, k4. 23 sts.
Rnd 35 K23.
Rnd 36 K16, kfb twice, k5. 25 sts.
Rnd 37 K25.
Divide for front
Rnd 38 K22, sl last 8 sts onto a safety pin. K17, turn.
With WS facing, back and forth on 2 needles as follows:
Shape front legs
With WS facing, cast on 18 sts at beg of next 2 rows.
53 sts.
Shape feet
Row 41 (WS) P5, turn.
Row 42 Sl 1, k3, turn.
Row 43 Sl 1, p2, turn.
Row 44 Sl 1, k1, turn.
Row 45 Sl 1, p to end.
Row 46 K5, turn.
Row 47 Sl 1, p3, turn.
Row 48 Sl 1, k2, turn.
Row 49 Sl 1, p1, turn.
Row 50 Sl 1, k to end.
Work 3 rows in st st.
Work inside front left leg
Row 54 (RS) K18, turn.
Work 3 rows in st st on these 18 sts for the inside left leg.
Shape inside left foot
Row 58 (RS) K5, turn.
Row 59 Sl 1, p3, turn.
Row 60 Sl 1, k2, turn.
Row 61 Sl 1, p1, turn.
Row 62 Sl 1, k15 to the end of the leg, turn.
Bind off 18 sts.
With WS facing, rejoin yarn to foot end of right leg.
Work inside front right leg
Row 63 (WS) P18, turn.
Row 64 K.
Shape inside right foot
Row 65 (WS) p5, turn.
Row 66 Sl 1, k3, turn.
Row 67 Sl 1, p2, turn.
Row 68 Sl 1, k1, turn.
Row 69 Sl 1, p15 to the end of the leg, turn.
Bind off 18 sts.
Leave 17 sts from the back on the needle and return to the front as follows:
Work front
Sl 8 sts at the neck off the safety pin onto size 3 (3mm) needles.
Row 70 (RS) MC K.
Work 7 rows in st st, so ending with a WS row.
Join front to back
Row 78 (RS) K8, k8 from the back onto n2, k9 from the back onto n3.
With RS facing, keeping gauge tight across junctions, work in the rnd as follows:
Rnd 79 K25.
Shape back
Rnd 80 K16, M1, k1, M1, k8. 27 sts.
Rnd 81 K27.
Rnd 82 K17, M1, k1, M1, k9. 29 sts.
Rnd 83 K29.
Place marker and rep last rnd 3 times more.
Divide for back legs
Rnd 87 K8, sl last 8 sts onto a safety pin, cast on 3 sts, k to end. 24 sts.
Cont to work in st st, shaping the back as follows:
Row 88 (WS) Cast on 3 sts, p to end. 27 sts.
Row 89 Cast on 3 sts, k16, M1, k1, M1, k to end. 32 sts.
Row 90 Cast on 3 sts, p to end. 35 sts.
Row 91 Cast on 2 sts, k19, M1, k1, M1, k to end. 39 sts.
Row 92 Cast on 2 sts, p to end. 41 sts.
Work 4 rows in st st.
Row 97 (RS) K19, k3tog, k to end. 39 sts.
Row 98 P.
Divide for tail
Row 99 (RS) K17, sl next 5 sts onto a safety pin, k17 sts under the tail to end. 34 sts. (Keep tension tight to avoid gaps as you knit under the sts on safety pins.)
Row 100 P16, p2tog, p to end. 33 sts.
Row 101 K15, k3tog, k to end. 31 sts.
Row 102 P9, p2tog 3 times, p1, p3tog 3 times, p to end. 25 sts.
Shape inside back left leg
Row 103 (RS) Bind off 2 sts, k6, turn.
Row 104 P7.
Row 105 Bind off 3 sts, k3, turn.
Bind off 4 sts.
With WS facing, rejoin MC to the foot end of the right leg.
Shape inside back right leg
Row 106 (WS) Bind off 2 sts, p6, turn.
Row 107 K7.
Row 108 Bind off 3 sts, p3, turn.
Bind off 4 sts.
Row 109 (WS) Rejoin MC to rem 7 sts and k to end.
Work st st for 15 rows, so ending with a WS row.
Cut yarn, leaving about 12in (30cm) tail.
Join seam under back legs
Sl 8 sts from the under body off the safety pin onto size 3 (3mm) needles.
With WS tog, hold needles parallel. Work Kitchener st to close the seam, taking off last st p-wise. Weave in end.
Work lower left back leg
Row 125 *With RS facing, pick up and k8 along the row end at the end of the upper leg.
Row 126 (W) P.
Divide all 8 sts evenly over 2 needles. With RS facing, work in the rnd as follows:
Rnd 127 K8.
Rep last rnd 9 times more.
Shape foot
Rnd 137 M1, k1, M1, k5, [M1, k1] twice. 12 sts.
Rnd 138 K12.
Rnd 139 M1, k1, M1, k9, [M1, k1] twice. 16 sts.
Rnd 140 K16.
Bind off. **
Work the lower right back leg from * to **.
EARS (MAKE 2)
Sl 6 sts for one ear off the safety pin onto size 3 (3mm) needle. With RS facing, rejoin MC and cont in st st.
Row 1 K across.
Row 2 (WS) P2tog, p to last 2 sts, p2tog. 4 sts.
Row 3 k2tog twice. 2 sts.
Row 4 P2tog. 1 st.
Fasten off.
TAIL
Sl 7 sts for the tail off the safety pin onto size 3 (3mm) needle.
Work as i-cord until the tail measures 3½ in (9cm).
Cut yarn and thread end through rem sts. Pull up tight and secure.
MAKING UP
HEAD
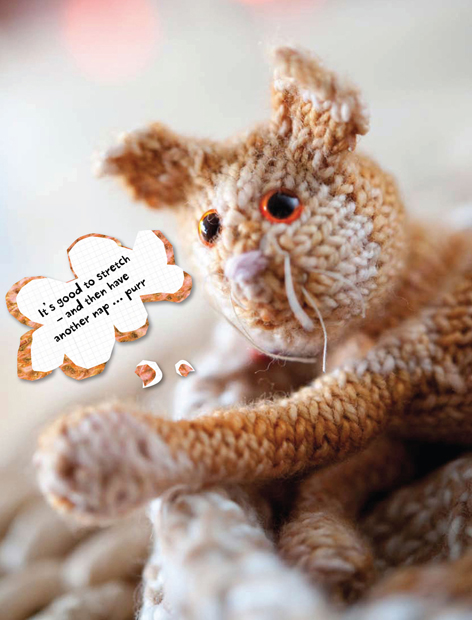
Carefully turn the work to the wrong side. Backstitch the row ends at the side of the head. To join the nose, bring its tip (the bind-off end) down to the point where you began to work in the round. Join along the row ends, along two sides of the triangle you have created. Carefully turn right side out. Push out the shaping at the nose.
EYES
Following the manufacturer's instructions, snap the eyes in place on each side of the nose. Alternatively, embroider the eyes with yarn.
Stuff the head and neck fairly firmly.
NOSE AND WHISKERS
Embroider the tip of the nose, working a couple of stitches in pink yarn.
Cut short lengths of thread for the whiskers. Thread one length into a darning needle and pass it through a knitted stitch in the nose, so both ends are the same length. Make another stitch to secure.
Work other strands into other knitted sts to create more whiskers. Trim.
EARS
Weave in the tail of yarn at the tip of the ear. Oversew the opening behind the ear closed, joining the back base of the ear to the head. Repeat for the other ear.
If your want to make the ears stand up, dampen them and gently press flat, using a pressing cloth. Alternatively, use the sugar solution method.
FRONT LEGS
With wrong side facing, fold the front leg in half, joining the row ends and matching the foot shaping. Leaving the tops (bind-off edges) of the legs unsewn, mattress stitch the row ends to join the inside leg to the outer leg. Work a running stitch around the bind-off end at the foot, pull it up tight to gather and secure.
Using tweezers, stuff the leg fairly firmly and shape the foot. Weave in the end. Stuff and shape the other foot to match.
BACK LEGS
Stuff the feet. Attach the feet to the back legs, using mattress stitch and matching the front seam of the leg with the front of the foot.
BODY
Beginning at the tail end, join the seam along the sides of the body and around the tops of the legs, leaving an opening for stuffing.
Stuff the body quite lightly – the cat should be able to stand, but not be too stiff to sit down. Sew the opening closed. Manipulate the stuffing in the legs and feet and along the neck and body to get a good shape.
COLLAR
Crochet a chain of yarn and attaching a bead to create a collar and bell.