 Two-Minute Drill
This chapter is focused on what happens from the moment a system is powered up to the time a login prompt is available. This is called the boot process. When RHEL 7 is properly installed, the BIOS/UEFI points to a specific media device. Assuming it’s a local hard drive, the GUID Partition Table (GPT) or Master Boot Record (MBR) of that device points to the GRUB 2 bootloader. Once an option to boot RHEL 7 is selected in GRUB 2, the associated commands point to and initialize the Linux kernel, which then starts systemd, the first Linux process. The systemd process then initializes the system and activates appropriate system units. When Linux boots into a specific target, it starts a series of units, including the client associated with the Network Time Protocol (NTP). You can customize this process.
Understanding the Boot Process
Objectives related to the boot process have been consolidated into the RHCSA exam. Perhaps the most basic skill related to the boot process is an understanding of the commands that start and stop the boot process, such as systemctl poweroff and systemctl reboot:
 Boot, reboot, and shut down a system normally
Of course, that starts with the way a system is powered up. In this chapter, you’ll be introduced to systemd targets, which replace the traditional runlevels in RHEL 6 and other older Linux distributions. From the standard RHEL 7 boot menu, you need to know how to
Boot systems into different targets manually
Closely related to this objective is this one:
Interrupt the boot process in order to gain access to a system
If you are already familiar with single-user mode in RHEL 6, you should understand that “access” in single-user mode is password-free access to the root administrative account in a limited environment. You should be able to achieve the same objective in RHEL 7 and gain access to a system to recover a lost root password or to troubleshoot issues during the boot process.
Also closely related is this objective, focused on the configuration of different targets:
Configure systems to boot into a specific target automatically
As Linux is a network operating system, and as most users can’t do much without networking, it’s important to know how to
Configure network services to start automatically at boot
The following RHCSA objective is strictly related to the previous one:
Start and stop services and configure services to start automatically at boot
With the focus on the boot process, you’ll also learn how to
Modify the system bootloader
Closely related to these objectives, and part of the boot process, are objectives related to how filesystems are mounted, as covered in Chapter 6.
The Network Time Service
This chapter covers the configuration of NTP, based on the following objective:
Configure a system to use time services
Although not officially a Red Hat exam prerequisite or requirement, a basic understanding of the BIOS and the UEFI is a fundamental skill for all serious computer users. The UEFI has replaced the BIOS on many modern systems and can do so much more. But as the UEFI supports changes to boot media in similar ways, the functionality for our purposes is the same.
Because of the variety of BIOS/UEFI software available, this discussion is general. It’s not possible to provide any sort of step-by-step instructions for modifying the wide array of available BIOS/UEFI menus. In any case, such instructions are not directly relevant either to the administration of Linux or to any of the Red Hat exams. However, these skills can help you boot from different Linux installation media, access default virtualization settings, and more.
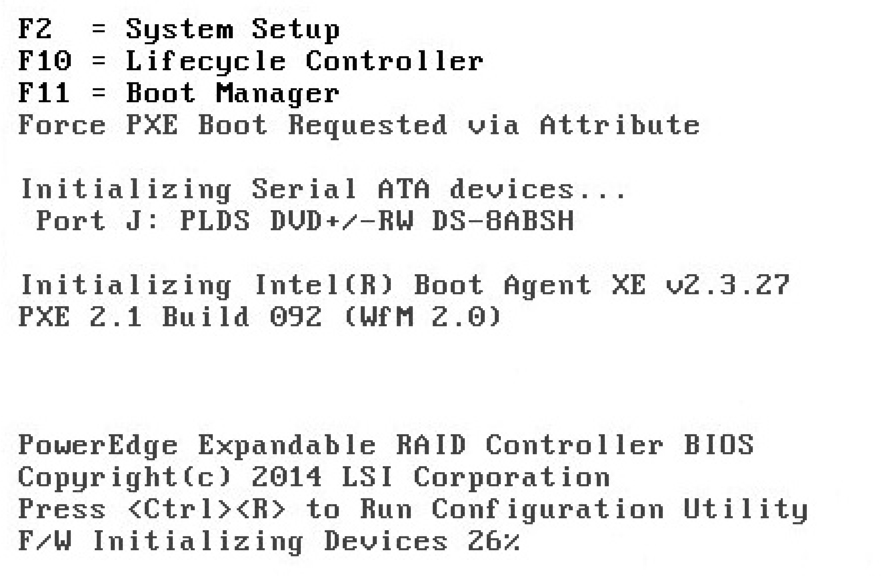
When a computer is powered up, the first thing that starts is the BIOS/UEFI. Based on settings stored in stable, read-only memory, the BIOS/UEFI system performs a series of diagnostics to detect and connect the CPU and key controllers. This is known as the Power On Self Test (POST). If you hear beeps during this process, there may be a hardware problem such as an improperly connected hard drive controller. The BIOS/UEFI system then looks for attached devices such as the graphics card. After the graphics hardware is detected, you may see a screen similar to Figure 5-1, which displays other hardware as detected, tested, and verified.
If your system has an UEFI menu, it may include a Trusted Platform Module (TPM). Although it’s built to enhance security on a system, it has caused controversy within the open-source community due to privacy and vendor lock-in issues. Many open-source professionals are working to minimize any such problems through the Open Trusted Computing (OpenTC) group of the European Union. RHEL 7 takes advantage of TPM hardware features to enhance system security.
FIGURE 5-1 The BIOS Initialization menu
Once complete, the BIOS/UEFI passes control to the boot device, typically the first hard drive. The first stage of the GRUB 2 bootloader is normally copied to the MBR or GUID Partition Table (GPT). It serves as a pointer to the other information from the GRUB 2 menu. At that point, you should see a bootloader screen.
Generally, the only reason to access the BIOS/UEFI menu during the Red Hat exams is to boot from different media, such as a CD, floppy, or USB key. In many cases, you can bypass this process.
Sometimes, all you see after POST is a blank screen. The BIOS/UEFI is often configured in this way. In that case, you’ll need to do some guessing based on your experience on how to access the boot or BIOS menu.
In many cases, boot menus are directly accessible by pressing a key such as ESC, DEL, F1, F2, or F12. Such boot menus may have entries similar to the following:
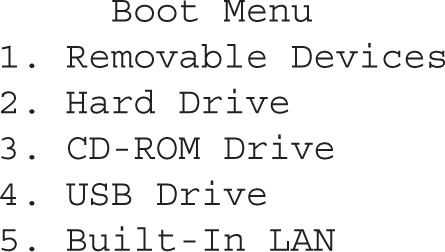
From that or similar menus, you should be able to select the desired boot device using the ARROW and ENTER keys. If that doesn’t work, you’ll have to use the BIOS/UEFI menu to boot from the desired drive.
As noted in Chapter 2, the default bootloader is GRUB 2, and the first part of it (known as stage 1) is installed in the MBR or GUID table of the default drive. Normally, the BIOS should automatically start the bootloader, with a message similar to

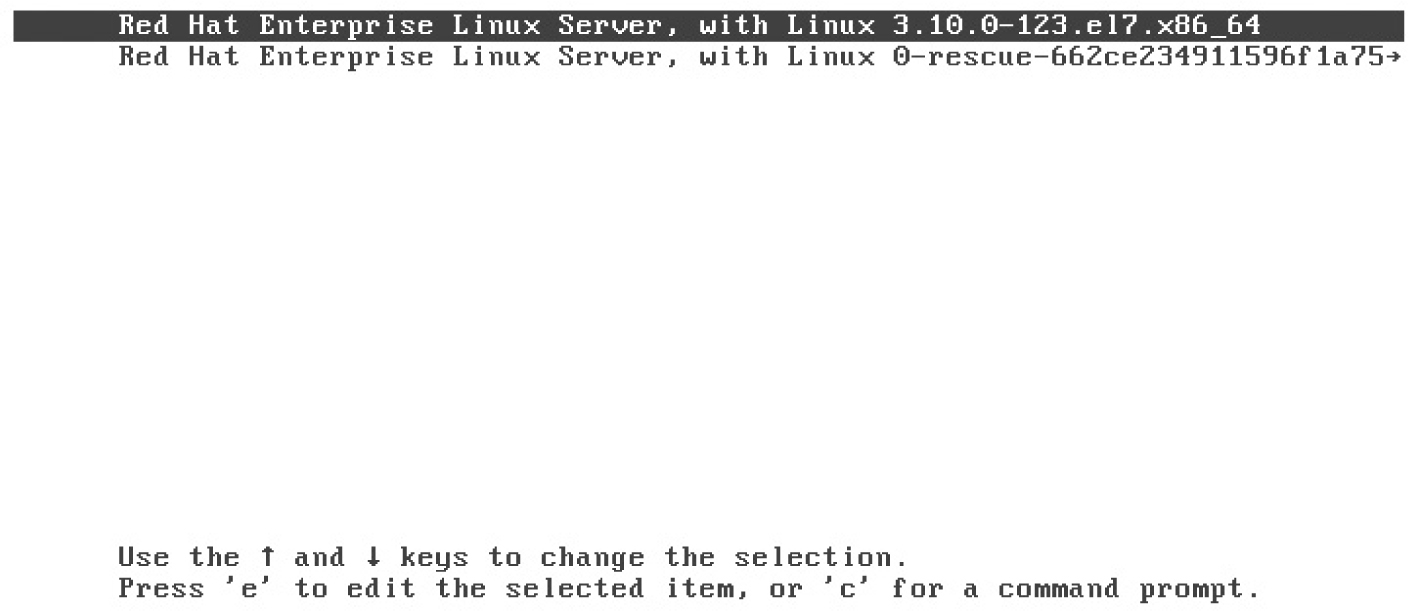
Alternatively, if you press a key before those five seconds are complete, GRUB will present a menu similar to that shown in Figure 5-2.
If the system includes more than one Linux kernel, or more than one operating system, there may be multiple choices available, which you can highlight with the UP ARROW and DOWN ARROW keys. To boot Linux from the highlighted option, press ENTER.
On old PCs (pre-21st century), some BIOSes could not find your bootloader unless it was located within the first 1024 cylinders of the hard disk. For that reason, the partition where the /boot directory is configured is normally the first available primary partition.
RHEL 7 supports the traditional MBR partitioning layout and the newer GUID Partition Table (GPT) format. Whereas the MBR partitioning scheme supports a maximum size of 2TB per disk, GPT does not have such limitation. However, to boot RHEL from a disk with a GPT partition layout, you need a system with the UEFI firmware interface, rather than a traditional BIOS firmware. You should check with your hardware vendor if UEFI is supported by your system.
CERTIFICATION OBJECTIVE 5.02
The standard bootloader associated with Red Hat Enterprise Linux (RHEL) is GRUB 2, the GRand Unified Bootloader version 2. As suggested by the Red Hat exam requirements, for the RHCSA exam you need to know how to use the GRUB 2 menu to boot into different targets and diagnose and correct boot failures arising from bootloader errors. In GRUB version 1, which was the default in RHEL 6, the associated configuration file was relatively easy to understand and customize. However, although the GRUB 2.0 menu is similar to what’s seen on RHEL 6, the steps required to configure that bootloader are quite different, as you’ll see later in this chapter.
Red Hat has implemented GRUB 2 as the only bootloader for its Linux distributions. It’s normally configured to boot into a configured default kernel. GRUB 2 finds the configuration in the /boot directory and displays a menu, which will look similar to Figure 5-2. You can use the GRUB 2 menu to boot any operating system detected during the Linux installation process, or any other operating system added to appropriate configuration files.
GRUB 2 is flexible. Not only can the configuration be easily generated from the CLI, but also it can be edited directly from the GRUB 2 menu. From the menu shown in Figure 5-2, you can press E to temporarily edit the file, or press C to open a GRUB 2 command prompt. This section is focused on booting into different systemd targets.
To pass a parameter to the kernel through GRUB 2, press E at the first GRUB menu. This allows you to edit the boot parameters sent to the kernel. Locate the line that starts with the directive linux16. Scroll down with the DOWN ARROW key if necessary. You might then see a line of commands similar to the following:

Yeah, that’s a lot of stuff that will be explained shortly. What matters for the RHCSA is that you can add more kernel parameters to the end of this line. For example, if you add the string systemd.unit=emergency.target to the end of this line and press CTRL-X, Linux starts in a mode of operation called emergency target, which runs a rescue shell.
From the emergency target, type exit. The system will go into the default target, which normally is either the multiuser or graphical target. If you have made changes or repairs to any partitions, the next step is to reboot the computer with the systemctl reboot command. At some point, changes made during a Red Hat exam should be tested with a reboot.

On RHEL 7, the shutdown, reboot, and halt commands are symbolic links to systemctl. They have the same effect as the systemctl poweroff, systemctl reboot, and systemctl halt commands, respectively.

Changes must survive a reboot during the RHCSA exam, so you’ll want to restart your system at least once to verify each of the requirements is met even after a reboot.
To a certain extent, the concept of the systemd targets is similar to that of runlevels in RHEL 6, and is detailed later in this chapter. For now, all you need to know is that when RHEL 7 is configured to boot into a GUI, it’s configured to boot into the graphical target by default. That target can be changed by appending a systemd.unit=name.target string to the end of the kernel command line.
If you encounter a problem with a system booting into the GUI, the first thing to try is to add a systemd.unit=multi-user.target at the end of the kernel command line. If successful, it will boot RHEL 7 into text mode with a command-line console-based login.
If you need direct access into a recovery shell, add the string systemd.unit=rescue.target to the end of the kernel command line. In rare cases, some systems are so troubled, they don’t boot into the rescue target. In that case, two other options are available:
systemd.unit=emergency.target No filesystem is mounted, apart from the root filesystem in read-only mode.
init=/sysroot/bin/sh Starts a shell and mounts the root filesystem in read-only mode; does not require a password.
The emergency and rescue targets require the root password to log in and get full root administrative privileges. If you have lost the root password, you will need to add the string init=/sysroot/bin/sh or rd.break to the end of the kernel command line and follow the procedure illustrated in Exercise 5-2. As that supports full administrative privileges, including changes to the root administrative password, it’s important to password-protect the GRUB 2 menu. Somebody who can change the boot order can achieve the same thing with a bootable USB drive, so it is also important to protect your BIOS or UEFI to ensure the system only boots the local disk without a password.
Now you should understand how to boot into different targets during the boot process. As defined in the Red Hat Exam Prep guide, this is explicitly described as a RHCSA requirement:
Boot systems into different targets manually
Red Hat exams are “closed book.” Although you are allowed to use all documentation that can be found on your RHEL installation, during recovery or emergency procedures you may not have access to man pages or other documentation resources. Therefore, it is extremely important that you practice the exercises in this chapter without the help of any documentation. You should memorize the steps to boot into an emergency shell or to recover a root password; otherwise, you may be in trouble, not just during the RHCSA exam, but also in real life when performing your job duties as a Linux sysadmin.
EXERCISE 5-1
One key skill is knowing how to boot into a different systemd target. This exercise assumes you’ve configured RHEL 7 per Chapter 2, which sets the graphical target as the default. Run the ls -l /etc/systemd/system/default.target command to verify. If the current system reflects the defaults, this file should be a symbolic link to the graphical.target file within the directory /usr/lib/systemd/system. As an alternative, run the following command:

It should return the string “graphical.target.” Now you can start the exercise.
1. Reboot your system using the reboot command.
2. When you see the following message, make sure to press any key to access the GRUB menu:

3. Press E to edit the current menu entry.
4. Scroll down with the DOWN ARROW key to locate the line starting with linux16. First, delete the kernel options rhgb quiet. Then, at the end of the line, type systemd.unit=multi-user.target and press CTRL-X to boot this kernel.
5. Watch the boot messages. What kind of login screen do you see?
6. Log in to this system. You can use any existing user account.
7. Run the reboot command to restart this system.
8. Repeat Steps 2 through 4, but boot this system into the rescue target by passing the option systemd.unit=rescue.target to the kernel.
9. Watch the boot messages. What kind of login screen do you see? Which filesystems are mounted?
10. Repeat Steps 2 through 4, but boot this system into the emergency target by passing the option systemd.unit=emergency.target to the kernel.
11. Watch the boot messages. What kind of login screen do you see? Do you have to log in at all? Which filesystems are mounted?
12. Repeat Steps 2 through 4, but this time append rd.break to the kernel line.
13. Watch the boot messages. What kind of login screen do you see? Do you have to log in at all? Is the root filesystem mounted from the hard drive?
14. Run exit to continue the boot sequence.
15. Repeat Steps 2 through 4, but boot this system into an emergency shell by passing the string init=/sysroot/bin/sh.
16. Watch the boot messages. What kind of login screen do you see?
17. Type reboot to log out and restart the system.
EXERCISE 5-2
If you boot a RHEL 7 system into the rescue or emergency target, you are prompted for the root password. But what if you have forgotten the password? This exercise shows the steps required to reset a lost password for the root user. During the password-recovery process, you probably won’t have access to documentation. Hence, you should practice the following procedure until you can use it in a crisis:
1. Use the following command to change the root password to a random string. This command hides the random password from you:

2. Log out from your session. Try to log in again as the root user. You shouldn't be able to log in to the system with the old known root password.
3. Reboot the server.
4. When you see the following message, press a key to access the GRUB menu:

5. Press E to edit the current menu entry.
6. Scroll down with the DOWN ARROW key to locate the line starting with linux16. Press CTRL-E or END to move to the end of the line, and then type the string rd.break.
7. Press CTRL-X to boot the system.
8. The rd.break directive interrupts the boot sequence before the root filesystem is properly mounted. Confirm this by running ls /sysroot. If you know the contents of the root filesystem, the output should look familiar.
9. Remount the root /sysroot filesystem as read-write and change the root directory to /sysroot:

10. Change the root password:

11. Because SELinux is not running, the passwd command does not preserve the context of the /etc/passwd file. To ensure that the /etc/passwd file is labeled with the correct SELinux context, instruct Linux to relabel all files at the next boot with the following command:

12. Type exit to close the chroot jail, and then type exit again to reboot the system.
13. It may take a few minutes for SELinux to relabel all files. Once you get a login prompt, confirm that you are able to log in as the root user.
The RHCSA specifically requires that you need to know how to “modify the system bootloader.” That means you need to know how to configure GRUB 2 in detail. The configuration is available in the file /etc/grub2.cfg, which is a symbolic link that points to /boot/grub2/grub.cfg on systems configured in BIOS mode, or /boot/efi/EFI/redhat/grub.cfg for servers that use an UEFI boot manager. In the rest of this chapter, we will assume that you run a traditional BIOS-based system or a UEFI-capable system in BIOS mode. We’ll refer to /boot/grub2/grub.cfg as the standard path of the configuration file.
The grub.cfg file is organized into a header section and different menuentry stanzas, one for each kernel installed on the system. An excerpt of the file is shown in Figure 5-3. Each menuentry block contains two lines starting with the linux16 and initrd16 directives. These specify the path of the kernel and of the RAM disk filesystem to be loaded during the boot process. As you saw in the previous section, the linux16 line is especially important. This is the entry that you can edit interactively during the boot process to pass additional kernel parameters or to boot into a non default systemd target.
FIGURE 5-3 An excerpt of the grub.cfg file

Although the number of options and directives in the grub.cfg file may seem overwhelming, don’t panic. You never need to touch this file directly. The right approach is to generate a new version of this file with the grub2-mkconfig tool, based on the /etc/default/grub configuration file and on the scripts in the /etc/grub.d/ directory. The /etc/default/grub file is much simpler to understand, safer, and more convenient to edit than grub.cfg. Once you have made a modification to /etc/default/grub, generate the new GRUB configuration file by running

Do not manually edit the /etc/grub2/grub.cfg file. This file is automatically generated when a kernel is installed or updated, and as a result any direct customizations to this file would be lost. Use grub2-mkconfig and the /etc/default/grub file to make modifications to grub.cfg.
The following is a detailed analysis of a typical version of the /etc/default/grub file:
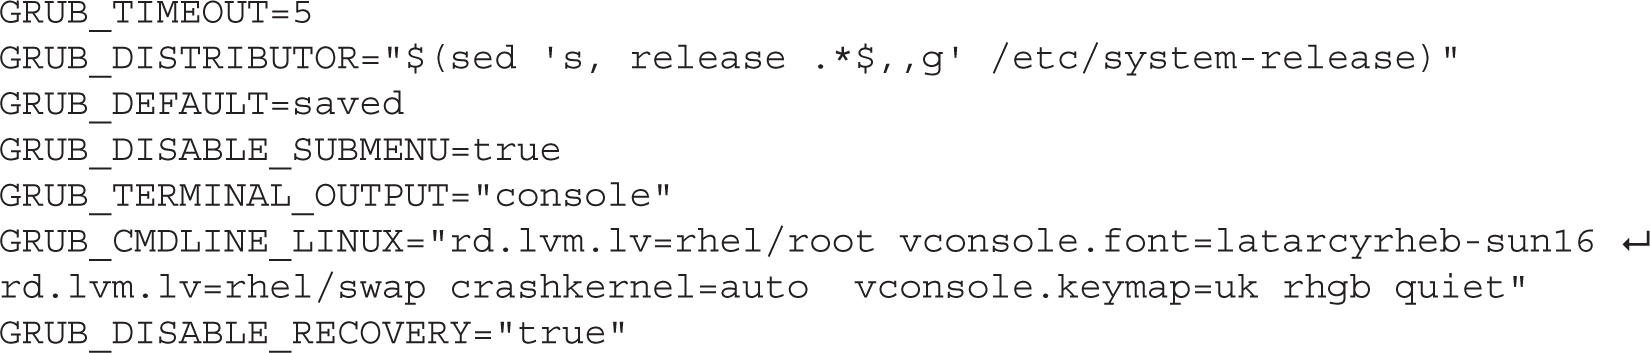
In the first line, the GRUB_TIMEOUT variable specifies the time in seconds before GRUB 2 automatically boots the default operating system. You can interrupt the countdown by pressing any key on the keyboard. If this variable is set to 0, GRUB 2 will not display a list of bootable kernels, unless you press and hold an alphanumeric key during the BIOS initial screen.
The value of the GRUB_DISTRIBUTOR variable returns “Red Hat Enterprise Linux Server” on a standard RHEL installation, and is displayed before each kernel-bootable entry. You can modify this entry to any string of your choice if you wish.
The next directive is GRUB_DEFAULT and is related to the default kernel that GRUB 2 loads at boot. The value “saved” instructs GRUB 2 to look at the saved_entry variable in the file /boot/grub2/grubenv. This variable is updated with the name of the latest kernel every time that a new kernel is installed.
You can update the saved_entry variable and instruct GRUB 2 to boot a different default kernel via the grub2-set-default command. As an example,

sets the second menu entry in /etc/grub2.cfg as the default kernel. This may be slightly confusing because GRUB 2 starts counting from 0. Hence, grub2-set-default 0 points to the first available menu entry in /etc/grub2.cfg. Similarly, the command grub2-set-default 1 points to the second kernel entry, and so on, if included in the configuration file.
The next configuration line in /etc/default/grub defines the variable GRUB_DISABLE_SUBMENU. This is set to “true” by default to disable any submenu entries at boot. Then follows the directive GRUB_TERMINAL_OUTPUT, which tells GRUB 2 to use a text console as the default output terminal. The last variable defined in the file is GRUB_DISABLE_RECOVERY, which disables the generation of recovery menu entries.
The directive GRUB_CMDLINE_LINUX is more interesting. It specifies the options to pass to the Linux kernel. For example, rd.lvm.lv tells the name of the logical volumes where the root filesystem and swap partition are located. The next options, vconsole.font and vconsole.keymap, list the default font and keyboard map, respectively. The crashkernel option is used to reserve some memory for kdump, which is invoked to capture a kernel core dump if the system crashes. Finally, at the end of the line, the rhgb quiet directives enable the Red Hat graphical boot and hide the boot messages by default. If you want to enable verbose boot messages, remove the quiet option from this line.
If you’ve previously installed a different bootloader to the MBR, such as Microsoft’s NTLDR or BOOTMGR, just run the grub2-install command. If it doesn’t automatically write the GRUB 2 pointer to the MBR, or if multiple hard drives are available, you may need to include the hard drive device, such as /dev/sdb. It’s also possible to set up GRUB 2 on a portable drive; just specify the device with the command.
When the GRUB 2 configuration file is generated using grub2-mkconfig, no additional commands are required. The pointer from the MBR automatically reads the current version of the /boot/grub2/grub.cfg file.
An error in grub.cfg can result in an unbootable system. For example, if GRUB 2 identifies the wrong volume as the root partition (/), Linux will hang during the boot process. Other configuration errors in /boot/grub2/grub.cfg can lead to a kernel panic during the boot process.
Now that you’ve analyzed the GRUB 2 configuration file, you can probably visualize some of the effects of errors in this file. If some of the filenames or partitions are wrong, GRUB 2 won’t be able to find critical files such as the Linux kernel. If the GRUB 2 configuration file is completely missing, you’ll see a prompt similar to this:

You can access a GRUB 2 command line by pressing the C key when the menu is displayed. To see a list of available commands, press the TAB key at the grub> prompt, or type the help command.
Command completion is also available. For example, if you don’t remember the name of the kernel file, type linux / and then press the TAB key to review the available files in the /boot directory.
You should be able to find all detected hard drives on a standard PC from the BIOS/UEFI menus with the ls command. As an example, let’s find the /boot partition and grub.cfg file on this particular system. By default, the /boot directory is mounted on a separate partition. First, run ls at the grub> command line:

The string hd0 denotes the first hard drive, whereas msdos1 is the first partition, created with the MBR format (msdos). If a server was partitioned using the newer GPT partition format, GRUB 2 would identify the first partition as gpt1 rather than msdos1. Similarly, hd0,msdos2 denotes the second partition on the first hard drive.
Next, use that information to find the grub.cfg file:

If the file is not on the noted partition, you’ll see an “error: file '/grub2/grub.cfg' not found” error message. You may also see “error: unknown filesystem” if the noted partition does not contain a valid filesystem.
We know that the /boot directory is on (hd0,msdos1). To confirm the location of grub.cfg, run the following command:

You should see the contents of the grub.cfg file in the output. Press a key to scroll through the content of the file until you are back to the GRUB 2 command line.
There’s one more way to identify the partition with the /boot directory. Run the search.file command to find grub.cfg:

GRUB 2 should return the partition with the /boot directory. In this case, it’s the first partition on the first hard drive:

Now you can use these commands from the GRUB 2 configuration file to boot Linux from the grub> prompt. If the top-level root directory is normally mounted on a partition, you may even confirm the contents of the /etc/fstab file with a command like the following:

If the root file system resides on an LVM volume, the preceding command would return an “error: unknown filesystem” message. To solve this problem, load the LVM module using the following command:

Now, the ls command should also include logical volumes in its output:

Finally, to print the content of /etc/fstab, run the following command:

In this exercise, you’ll boot RHEL 7 manually. Look at the contents of /etc/grub2.cfg and identify the desired commands in the stanza. Now follow these steps:
1. Boot the system. When you see the following line at the top of the screen, press any key to access the GRUB 2 menu:

2. Press C for a GRUB-based command-line interface. You should see the grub> prompt.
3. Load the LVM module by typing the following command:

4. List all partitions and logical volumes:

5. Identify the root partition. This may be named something like (lvm/rhel-root). You may need to use some trial and error to find out (for example, by trying to display the /etc/fstab file from all the devices names previously listed by GRUB 2).

6. Set the root variable to the device that you have identified as that containing the root file system:

7. Enter the linux command, which specifies the kernel and root directory partition. Yes, this is a long line; however, you can use command completion (press the TAB key) to make it faster. In addition, the only important parts of the line are the kernel file and the location of the top-level root directory.

8. Enter the initrd command, which specifies the initial RAM disk command and file location. Again, you can use the TAB key for filename completion.

9. Now enter the boot command. If this command is successful, Linux should now boot the selected kernel and initial RAM disk just as if you selected that option from the GRUB 2 configuration menu.
In some situations, you may need to reinstall GRUB 2 from scratch. This may occur if grub2-mkconfig does not work, or if the configuration file that it generates contains errors due to a corrupt or incorrect script file. In this case, you need to reinstall the grub2-tools RPM package. Before proceeding with this operation, list and remove all GRUB 2 configuration and script files. This can be done using the following commands:

Then, reinstall GRUB 2 by running the following command:

(You will find a full introduction to the rpm and yum commands in Chapter 7.)
Finally, regenerate the grub.cfg configuration file. On machines that run traditional BIOS firmware, the grub2-mkconfig command would look like this:

Of course, if the GRUB 2 configuration file is missing and you weren’t able to boot the system to even display the GRUB 2 menu, you might need to resort to an option known as rescue mode.
The troubleshooting objectives associated with a previous version of the RHCE exam prep guide suggested that you needed to be able to recover from a complete boot failure, such as if the GRUB 2 configuration file were corrupt or missing. In other words, if you’ve tried to boot directly from the grub> prompt described earlier and failed, you might need to resort to the option known as rescue mode. That requires access to the installation DVD or the network boot disk.
The RHCSA and RHCE objectives no longer include a requirement associated with rescue mode. However, because the rescue of unbootable systems is an important skill, it may be included in future versions of one of these exams.
To that end, boot from one of those media options. You should see the installation screen with the following options:

Select the Troubleshooting option and press ENTER. You will see a second screen with the following options:

Select the Rescue a Red Hat Enterprise Linux system option and press ENTER. Rescue mode runs a stable minimal version of the RHEL 7 operating system on the local machine. It’s in essence a text-only version of the “Live DVD” media available on other Linux distributions such as Knoppix, Ubuntu, and, yes, even the Scientific Linux rebuild distribution.
For RHEL 7, it’s best to use RHEL 7 rescue media. Such media uses a kernel compiled by Red Hat, customized for supported software. Nevertheless, options such as Knoppix are excellent.
You can use the rescue environment to recover unbootable systems. If you’ve used rescue mode in RHEL 6, you should feel comfortable here. In most cases, the next step you see is shown in Figure 5-4.
The Continue option, as suggested in Figure 5-5, mounts all detected volumes as subdirectories of the /mnt/sysimage directory. The Read-Only option mounts detected volumes in read-only mode. The Skip option moves straight to a command-line interface. Select Continue. After confirmation, you’ll be presented with a shell prompt, as shown in Figure 5-6.
FIGURE 5-4 Options for the rescue environment
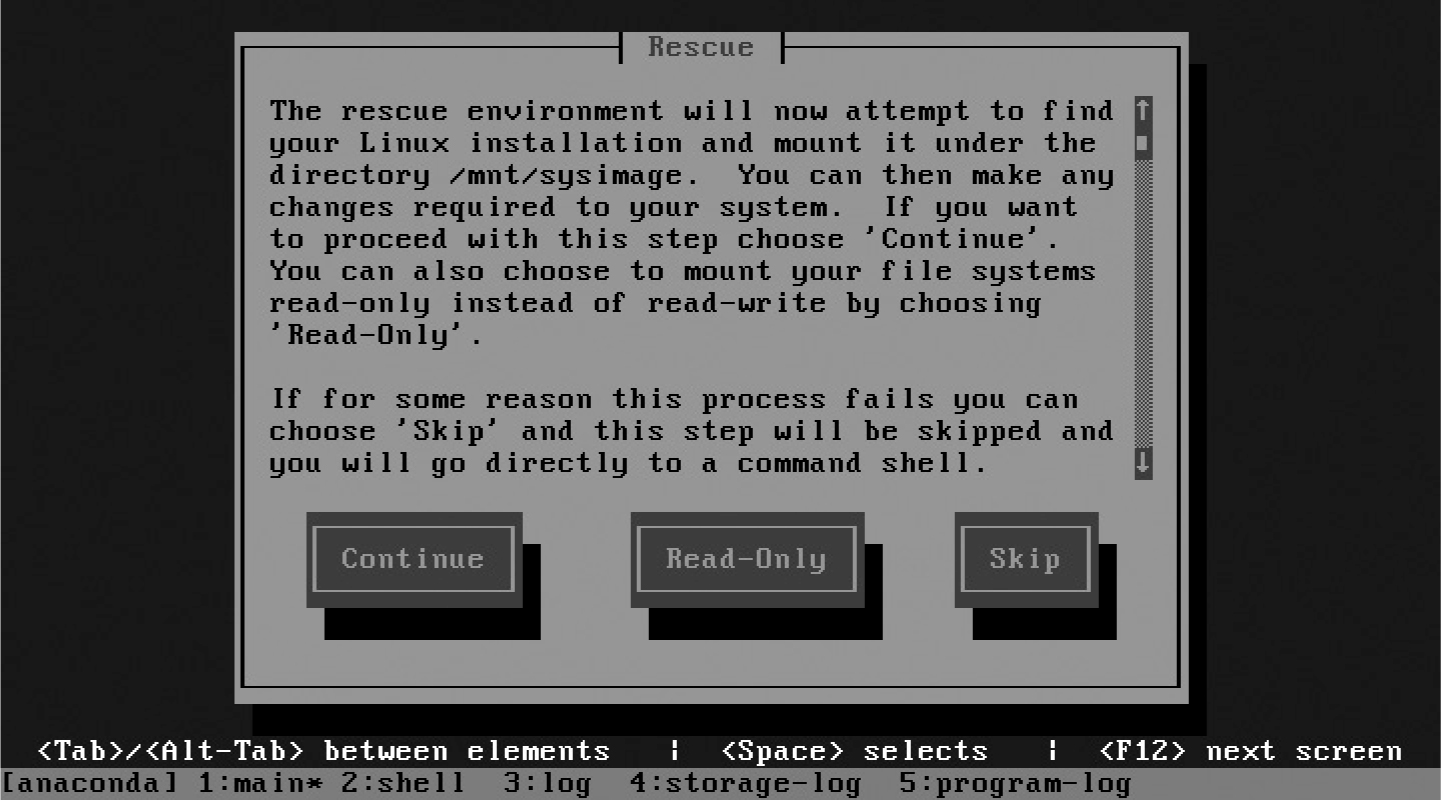
FIGURE 5-5 Mounting the root filesystem in the rescue environment

FIGURE 5-6 Rescue environment shell
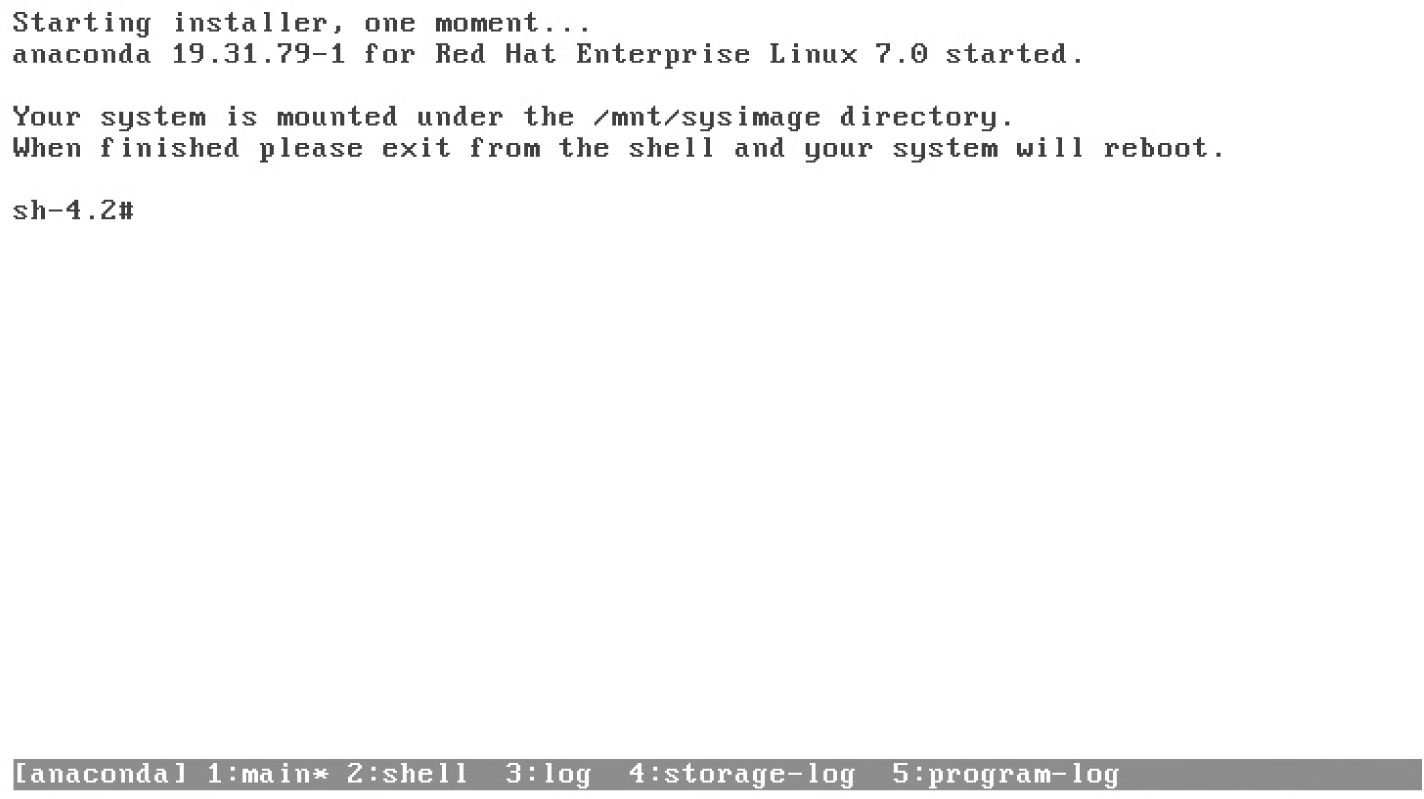
From the shell prompt, enter the chroot /mnt/sysimage command. As the regular top-level root directory for the system is mounted on the /mnt/sysimage directory, the chroot command changes the root directory, as if the /mnt/sysimage filesystem was mounted under /.
Do practice what you’ve learned about GRUB 2 in this section. It could help you recover from a real-world problem—and Red Hat does say that their exams are filled with “real-world tasks.” However, don’t assume that you have access to a CD or a DVD during a Red Hat exam. If a rescue media is not available, that should mean that there’s at least one alternative method you can use to address the problem.
CERTIFICATION OBJECTIVE 5.03
This section provides a basic overview of the boot process after the GRUB 2 bootloader finds the kernel. If you understand this process, you can diagnose a wide variety of boot problems. The messages associated with the kernel provide a step-by-step view of the process.
The loading of Linux depends on a temporary filesystem, known as the initial RAM disk. Once the boot process is complete, control is given to systemd, known as the first process. This section will describe the contents of systemd in detail, through the configuration of units and targets.
Most Linux distributions, including RHEL 7, have replaced Upstart and SysVinit with the new systemd service manager.
In this section, you’ll also review the commands that allow you to reboot and shut down a system normally.
In systemd, the Unix philosophy that “everything is a file” can be paraphrased as “everything is a unit.” Units are the basic building blocks of systemd.
After you select a kernel from the GRUB 2 configuration menu, Linux hands over boot responsibilities to the kernel with the help of the initial RAM disk, also known by its filename in the /boot directory, initramfs. As suggested by its name, it is actually a filesystem.
During the boot process, Linux loads that temporary filesystem into your RAM. Linux then loads hardware drivers and starts the first process, systemd.
Next, systemd activates all the system units for the initrd.target and mounts the root filesystem under /sysroot. Finally, systemd restarts itself in the new root directory and activates all units for the default target (we will look in more detail at units and targets in the next section).
To learn more, disable the quiet directive for the desired kernel in the GRUB configuration file. Boot your system. Watch as the messages pass quickly through the screen. After logging in, you can review these messages in the /var/log/dmesg file or by running the dmesg command.
You can find more log information in the systemd journal. Display its contents with the journalctl command. What you see depends on the hardware and configuration of the local system. Key messages include the following:
The version of the kernel.
SELinux status, if active. By default, SELinux first starts in permissive mode, until the configured policy (enforcing) is loaded near the end of the boot process.
The amount of recognized RAM (which does not necessarily match the actual amount of installed RAM).
CPUs.
Kernel command line, specifying the logical volume or root filesystem.
Freeing of memory associated with the initial RAM disk (initramfs).
Hard drives and partitions (as defined by their device filenames, such as /dev/sda or /dev/vda1).
Active filesystems.
Swap partitions.
The log file is filled with excellent information. If the system is loading the wrong kernel, you’ll see evidence of that here. If Linux isn’t using a partition that you’ve configured, you’ll also see it here (indirectly). If SELinux isn’t loading properly, you’ll see it in messages toward the end of the file.

Remember that the Red Hat exams are not hardware exams. If you identify a problem with a key hardware component, such as a network card (which cannot be solved by some Linux command), inform your instructor/exam proctor. Don’t be surprised, however, if she responds that it’s not a hardware problem.
The Linux kernel continues the boot process by calling the first process, systemd. In RHEL 7, the legacy init process is configured with a symbolic link to systemd.
Units are the basic building blocks of systemd. The most common are service units, which have a .service extension and activate a system service. To show a list of all service units, type the following command:

The --all flag includes all units, not just the active ones. There are other types of units, such as mount and automount units, which manage mount points; path units, which activate a service when there is a change on a filesystem path (such as a spool directory); socket units, which start a service only when a client connection is made (if you have used the xinetd daemon, this is similar to how xinetd starts services on demand); and many, many more.
A special type of unit is a target unit, which is used to group together other system units and to transition the system into a different state. To list all target units, type the following command:

The most important target units are described in Table 5-1.
TABLE 5-1 The systemd Target Units

In systemd, targets serve the same function as runlevels in previous RHEL distributions. In RHEL 6, seven runlevels, 0 through 6, were available. Linux services were organized by runlevel. Each runlevel was associated with a level of functionality.
For example, in runlevel 1, only one user was allowed to log in to that Linux system. X11 mode, also known as runlevel 5, was used to start Linux with a GUI login screen, if appropriate packages were installed. Table 5-2 compares systemd targets and the runlevels defined in RHEL 6.
Run the following command:

Note the symbolic links in the output. See how files such as runlevel0.target, runlevel1.target, and so on are linked to systemd targets such as poweroff.target and rescue.target. These links provide backward compatibility with the old SysV runlevels. You can even refer to graphical.target as runlevel5.target and multi-user.target as runlevel3.target.
Targets are controlled by units, organized in unit files. Although the default target is defined in /etc/systemd/system, you can override the default during the boot process from the GRUB 2 menu.
TABLE 5-2 RHEL 6 Runlevels and RHEL 7 systemd Targets

Each target may be associated with several systemd units. Each unit can start or stop Linux services such as printing (cupsd), scheduling (crond), the Apache web server (httpd), the Samba file server (smbd), and more. When configured, the boot process starts and stops the systemd units of your choice. These units are known as dependencies. To list all dependencies of the default graphical.target unit, run the following command:

The default target is specified as a symbolic link from the /etc/systemd/system/default.target file to either multi-user.target or graphical.target. You can also use the systemctl command to retrieve the current default target or to change the current settings, as shown here:

As you can see from this output, the systemctl set-default multi-user.target command creates a symbolic link from /etc/systemd/system/default.target.
Now that you’ve examined the different targets available on RHEL 7, it’s time to explore how to switch between targets. On earlier versions of RHEL, this is functionally equivalent to switching runlevels. First, establish the default target with the following command:

RHEL 7 normally boots to either graphical.target or multi-user.target. After logging in as the administrative user, you can move to a different target with the systemctl isolate command. For example, the following command moves the system to the multi-user target:

After that command is complete, rerun the systemctl get-default command. The output confirms that the default target has not changed:

Now try something else. What do you think happens when the following command is executed?

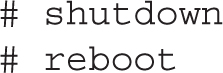
The commands required to reboot and shut down a system are straightforward. As just suggested in the previous section, the following commands provide one way to shut down and reboot a system, respectively:

For legacy purposes, Red Hat has created symbolic links from the following commands to systemctl. These commands work just as they did in earlier versions of RHEL.
The systemd process is the first process started at boot. It takes charge of activating all services. It replaces the traditional init daemon and the Upstart system, which is also a substitute for init and was the default init daemon on RHEL 6. The design and philosophy of Upstart are very similar to the old SysVinit system, which relies on init scripts to activate services, and on the concept of runlevels, which was introduced in the previous sections.
In contrast, systemd introduces a lot of new tools and can do much more, while maintaining compatibility with SysVinit. The design of systemd is based on optimal efficiency. First, at boot, systemd activates only the services that are strictly required, whereas others are started on demand. As an example, systemd starts the CUPS printing service only when a print job is sent to the /var/spool/cups queue. In addition, systemd parallelizes the initialization of services.
As a result, the boot process under systemd is faster. To display the time required to boot your system, run the following command:

This output shows the time required to initialize the kernel, plus the time to load the initial RAM disk (initrd) and the time to activate systemd units (userspace). The total time is 8.092 seconds. But there’s more. You can display a detailed account of the time required to activate each systemd unit by running systemd-analyze blame. An example is shown in Figure 5-7.
The numbers in Figure 5-7 don’t equal the total userspace time reported by systemd-analyze time. That happens because systemd starts multiple services simultaneously.
FIGURE 5-7 Initialization time of systemd units

But there’s even more. Although an in-depth knowledge of all the features of systemd is outside of the scope of the RHCSA exam, systems administrators can take advantage of some of its capabilities.
Some Linux developers have argued that systemd does too much and breaks the Unix philosophy of writing programs that “do one thing and do it well.” However, as of today, systemd has been adopted by most of the major Linux distributions.
The systemd process includes a powerful logging system. You can display all collected logs with the journalctl command. By default, the journal log files are temporarily stored in RAM in a ring buffer in the /run/log/journal directory. To get Linux to write journal log files persistently on disk, run the following commands:

Once persistent logging is enabled, you can show log messages from a specific boot with the -b switch: journalctl -b 0 displays the log messages since the last boot, journalctl -b 1 from the boot before the last one, and so on. You don’t have to switch through different log files because journactl automatically aggregates available data from the current and all rotated log files.
You can also filter log messages based on their priority using the -p command option. As an example, journalctl -p warning displays all messages with a priority level of “warning” or higher. Log messages of a “warning” priority level are displayed in a bold font character, whereas messages with priority levels of “err” and higher are shown in red.
Control groups (or cgroups) are a feature of the Linux kernel to group processes together and control or limit their resource usage (such as CPU, memory, and so on). In systemd, cgroups are primarily used to track processes and to ensure that all processes that belong to a service are terminated when a service is stopped.
Under the traditional SysVinit system, it is difficult to identify the service associated with a process. In fact, services often start multiple processes. When you stop a SysVinit service, that service may not be able to terminate all dependent (child) processes. You’re stuck with either stopping all dependent processes manually (with the ps and kill commands) or accepting a system with orphaned processes in an unknown state until the next reboot.
To address this limitation, systemd labels processes associated with a service using cgroups. In this way, systemd uses cgroups to kill all processes in a group, if required.
The command systemd-cgls displays the cgroup hierarchy in a tree format, as shown in Figure 5-8. From the excerpt in Figure 5-8, you can identify cgroups such as rsyslog.service and avahi-daemon.service, along with the processes they have spawned. Note the one-to-one correspondence between cgroups and systemd service units.
FIGURE 5-8 The cgroup hierarchy

FIGURE 5-9 Dependencies between systemd units

The traditional SysVinit system starts services sequentially. In contrast, systemd can activate services in parallel by keeping track of all dependencies between units. The systemctl list-dependencies command displays a tree with all dependencies between units. An excerpt of the output is shown in Figure 5-9.
You can show the dependencies for any available unit. Dependent units must be started first. For example, the following command shows the units that must be started before the rsyslog service:

The first process is systemd. The systemd process uses various configuration files to start other processes. You can find these configuration files in the following directories: /etc/systemd/system and /usr/lib/systemd/system.
The default configuration files are stored in /usr/lib/systemd/system. Custom files, stored in /etc/systemd/system, supersede these files. Don’t change files in the /usr/lib/systemd/system directory. Any software updates may overwrite those files.
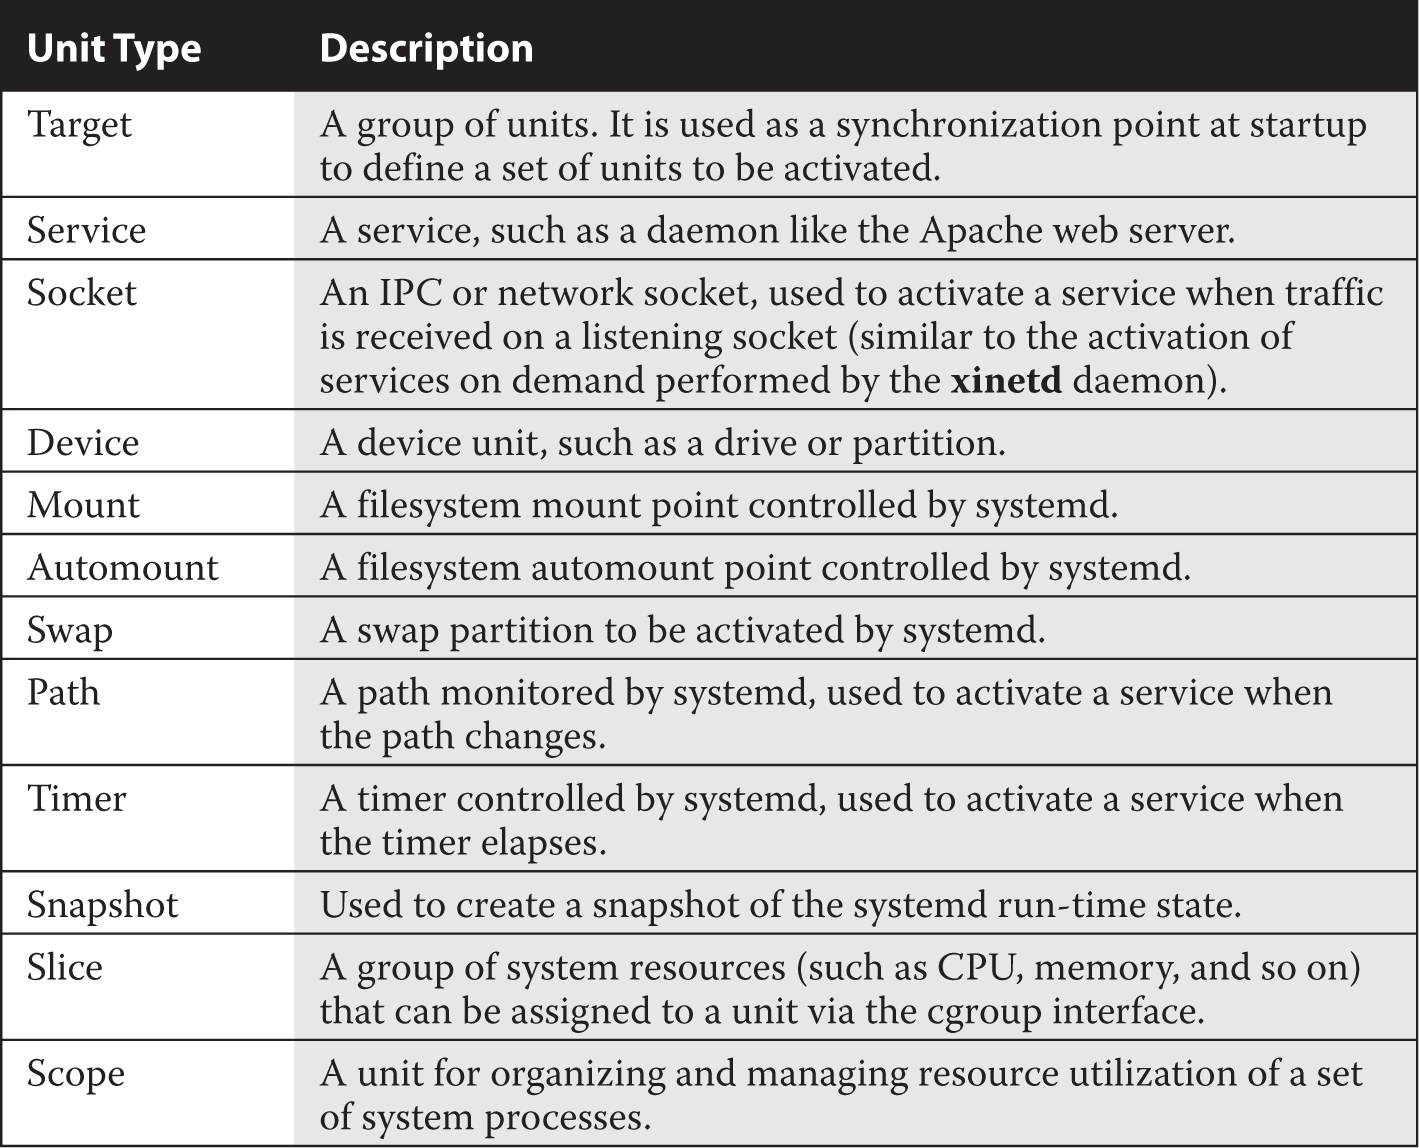
We have already discussed service and target units, but there are more. Table 5-3 gives a brief description of all available unit types.
Examine the contents of the /usr/lib/systemd/system directory. Each file contains the configuration of a systemd unit whose type matches the filename extension. As an example, the file graphical.target defines the configuration for the graphical login target unit, whereas the file rsyslog.service includes the configuration for the rsyslog service unit.
TABLE 5-3 The systemd Unit Types
You can list all active systemd units using the following command:

The list-units keyword is optional because it is the default. If you want to include inactive, maintenance, and failed units, add the --all command switch. An excerpt of the output of the command is shown in Figure 5-10.
In the output, the first column lists the unit name, and the second column tells whether or not the unit was properly loaded. The third column displays the state of the unit: active, inactive, failed, or maintenance. The next column includes more detail. Finally, the last column shows a brief description of the unit.
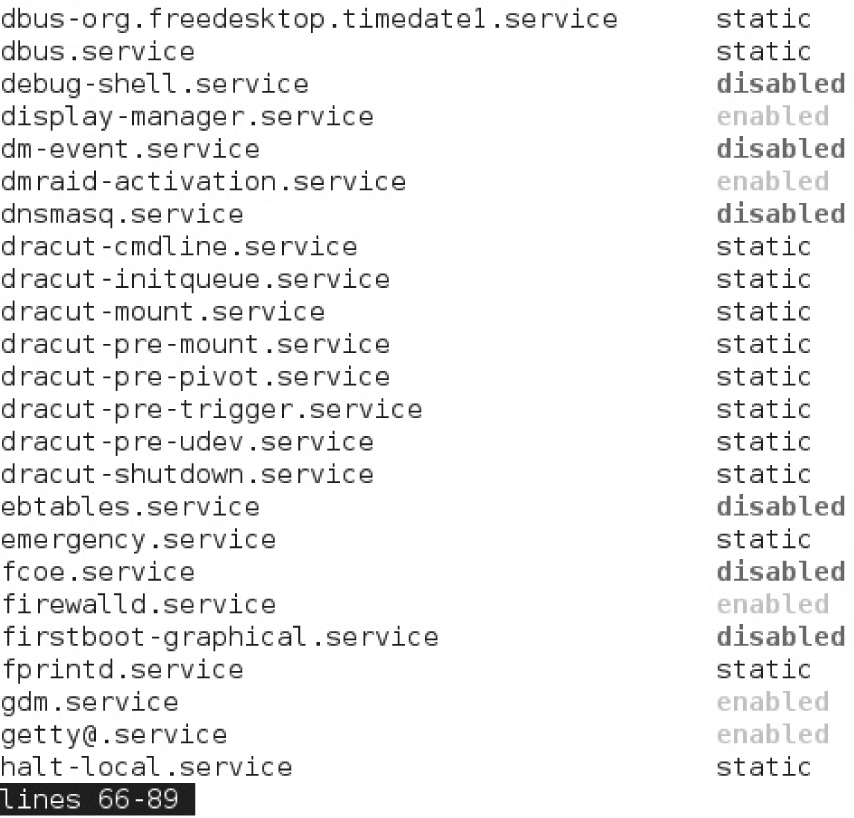
Whereas the systemctl list-units command gives a run-time snapshot of the state of each unit, the following command shows whether a unit is enabled or disabled at startup:

An example of the output is shown in Figure 5-11. As you can see, units can be “enabled” or “disabled.” There is also another state, named “static,” which means that a unit is enabled and it cannot be manually disabled.
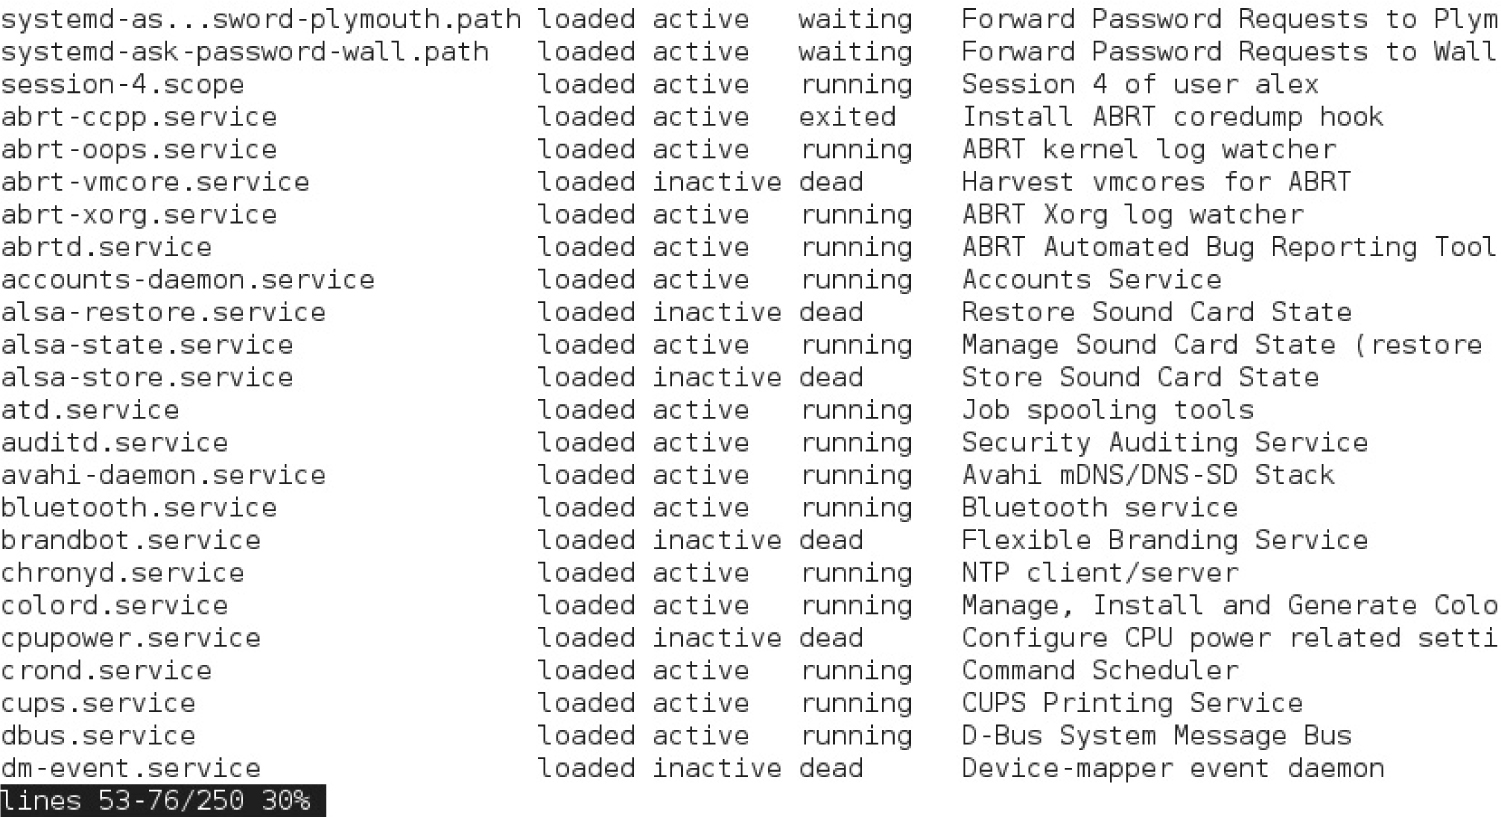
FIGURE 5-11 Installed unit files
The login terminals in Linux are virtual terminals. Most Linux systems, including RHEL 7, are configured with six standard command-line virtual terminals. These consoles are numbered from 1 to 6. When configured with a GUI and a login manager, RHEL 7 substitutes the graphical login screen for the first virtual terminal.
What does that all mean? In Linux, you can switch between virtual terminals with an ALT-function key combination. For example, ALT-F2 brings you to the second virtual terminal. You can switch between adjacent virtual terminals by pressing ALT-RIGHT ARROW or ALT-LEFT ARROW. For example, to move from virtual terminal 2 to virtual terminal 3, press ALT-RIGHT ARROW. If you’re in a GUI virtual terminal, add the CTRL key. So in RHEL 7, if the GUI is installed and you’re in the first virtual terminal, you’d press CTRL-ALT-F2 to get to the second virtual terminal.
When you log in to a regular virtual terminal, Linux returns a command-line shell. The default shell for a user is defined in the /etc/passwd file described in Chapter 6. When you log in to a GUI virtual terminal, Linux returns the configured GUI desktop. For more information on the Linux GUI, see Chapter 8.
Through RHEL 6, virtual terminals were configured in files in /etc/sysconfig/init and the /etc/init directory. Now that systemd has replaced Upstart, they are defined by the logind.conf file in the /etc/systemd directory.
Virtual terminals bring the multiuser capabilities of Linux to life. At work (or during a Red Hat exam), you might review a man page on one terminal, compile a program in another, and edit a configuration file in a third virtual terminal. Other users who are connected can do the same thing at the same time.
CERTIFICATION OBJECTIVE 5.04
With systemd, Red Hat Enterprise Linux service management is customized by target. Since systemd includes links to runlevels for backward compatibility with SysVinit, you can still refer to the runlevels listed in Table 5-2 with commands such as init and telinit. However, you should get familiar with targets because this is the standard method of activating services at boot.
Linux is highly customizable. Therefore, it makes sense that the systemd units that start in each target can be customized. Although GUI tools are available to customize systemd units, configuring them from the command-line interface is generally a lot faster.
As described earlier, the basic functionality of each target is listed in the configuration files in the directories /etc/systemd/systemd and /usr/lib/systemd/system. For example, let’s start with the default target, which in a RHEL 7 system with graphical login is

The system knows that graphical.target is the default thanks to a symbolic link from the /etc/systemd/system/default.target file to the graphical.target file in /usr/lib/system/system. Take a look at one of those files. An excerpt is shown here:
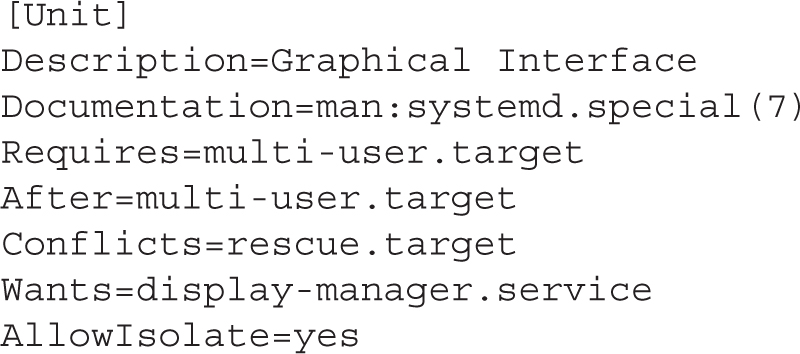
This means that a target can include another target. In this case, graphical.target is a superset of multi-user.target. After all systemd units in multi-user.target have started, graphical.target activates display-manager.service, as indicated by the Wants directive in the graphical.target configuration file.
Other services started by graphical.target may be listed in the graphical.target.wants subdirectory in /etc/systemd/system or /usr/lib/systemd/system. In a default RHEL 7 installation, we see the following files:

These are symbolic links to the unit configuration files of the Accounts and RealtimeKit services.
The systemd units are activated whenever a system moves to a different target. Therefore, the units associated with the default target are executed during the boot process. Appropriate units are also started when you change targets; for example, when you run the systemctl isolate multi-user.target command from the graphical.target, Linux stops all service units that were started by the graphical target.
But you can control systemd units directly. For example, examine the content of the file rsyslog.service from the /usr/lib/systemd/system directory, as shown in Figure 5-12.
FIGURE 5-12 The configuration file of the rsyslog service unit
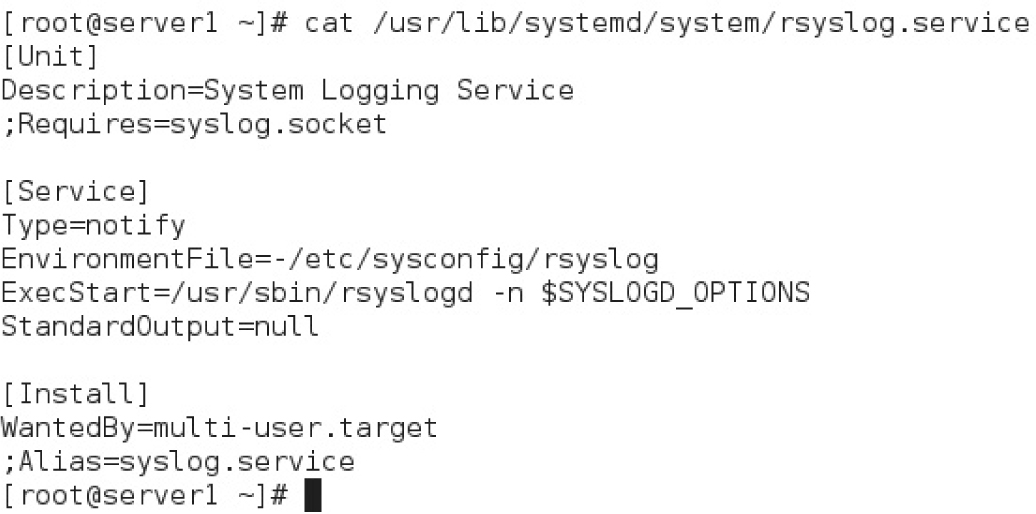
The configuration starts with the Unit section, which contains a description of the service. Then comes the service configuration, which includes the type of the service, a pointer to a file with some environment variables that configure the service behavior, the main executable to run to activate the service, and a directive that sends all standard output from the service to /dev/null.
Finally, the WantedBy directive tells us that this service will be activated at boot when the system enters into the multi-user target.
Now, run the following command:

If you specify a unit name without an extension, by default systemd assumes that it is a service unit. Hence, a short version of the previous command is

This command should return an output similar to that shown in Figure 5-13, including the status of the service unit, its main process ID, and up to the 10 most recent log lines. If some of the log lines are truncated, use the -l switch to display them in full.
You can stop a service by running a command such as this:

FIGURE 5-13 Displaying the status of a service

TABLE 5-4 systemctl Service Control Commands

Alternatively, the systemctl command can be used with the options shown in Table 5-4; for example, the following command reloads the SSH configuration file without stopping or starting the service:

The systemctl command gives you a simple way to enable a service for the default target. First, try the following command:

This gives an output similar to Figure 5-11, but limited to service units. You’ll see the whole list of installed services in the system, along with their activation status at boot.
The systemctl command can do more. With that command, you can change the boot state of a particular service. For example, the following command checks if the Postfix service is configured to start at boot:

An equivalent command is

This indicates that the Postfix e-mail server is configured to start in the default target. If you want to make sure the Postfix service does not start in the default target, execute the following command:

Run the systemctl list-unit-files command again to confirm the change. To turn it back on for the default target, run the same command, substituting enable for disable, as shown here:

When you enable a service, the systemctl enable command creates a symbolic link in the directory /etc/systemd/system/multi-user.target.wants that points to the corresponding unit configuration file in /usr/lib/systemd/system. If you wish, you can enable or disable services manually by creating symbolic links in the appropriate systemd directories. However, using systemctl is the preferred way because it is less error-prone.
When a service is disabled, you can still start and stop it manually via the systemctl start and stop commands. This means that the systemctl disable command does not prevent a user from accidentally starting a service by mistake. If you want to disable a service unit at boot and ensure that it cannot be started anymore, you should use the mask command, as illustrated here:

As shown, this command creates a symbolic link in /etc/systemd/system named postfix.service, which points to /dev/null. A configuration file in /etc/systemd/system always takes precedence over a corresponding file in /usr/lib/systemd/system. Hence, the result is that the default postfix.service file in /usr/lib/systemd/system is “masked” by the symbolic link in /etc/systemd/system to /dev/null.
CERTIFICATION OBJECTIVE 5.05
The configuration of a Network Time Protocol (NTP) client is straightforward. Therefore, this section provides an overview of the configuration files and the associated command tools.
There are good reasons to keep different systems running on the same clock. For example, a web server and a client logging in different times would make troubleshooting extremely difficult. Several services rely on accurate timestamps. As an example, a time drift of more than five minutes would cause a Kerberos client to fail authentication.
RHEL 7 includes RPMs for two NTP daemons: ntpd and chronyd. Don’t install both. Typically, ntpd is recommended for systems that are always connected to the network, such as servers, whereas chronyd is the preferred choice for virtual and mobile systems. We will describe the configuration of the default time synchronization service, chronyd. But first, we will explain how to configure the time zone.
Every system, real or virtual, starts with a hardware clock. The time on that clock may depend on the power in a battery; over time, batteries lose power, and many hardware clocks end up losing time. The installation process on RHEL 7 normally sets the hardware clock to local time, rather than UTC. However, UTC (which is essentially identical to Greenwich Mean Time, or GMT) is usually the best setting for servers to avoid issues when switching to daylight saving time.
Every RHEL 7 system includes a time zone configured in the /etc/localtime file. This is a symbolic link that points to one of the time zones files in /usr/share/zoneinfo. As an example, /etc/localtime should point to /usr/share/zoneinfo/America/Los_Angeles if you are based in California.
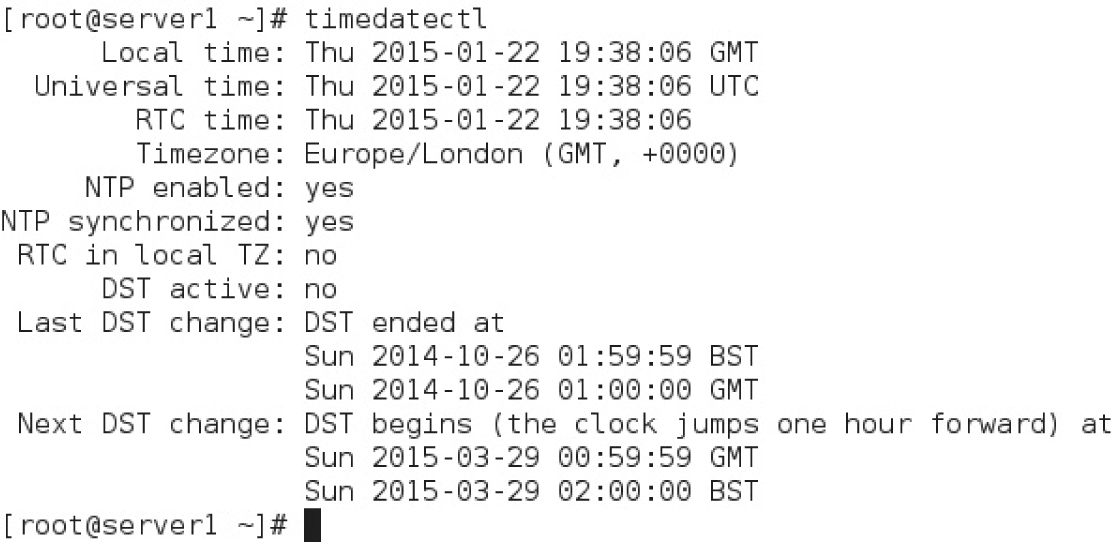
Rather than manually setting a symbolic link to a time zone file, you can use the timedatectl utility. If you run the command alone with no arguments, it will show a summary of the current time settings, including the current time, time zone, and NTP status. Some sample output is shown in Figure 5-14.
You can display a list of the available time zones by running the following command:

Then, to switch to a different time zone, run timedatectl with the set-timezone command. Here’s an example:

FIGURE 5-14 Date and time settings
The default chronyd configuration file, /etc/chrony.conf, is set up to connect to multiple public servers from the NTP pool project. When used collectively, the chronyd daemon minimizes time errors.
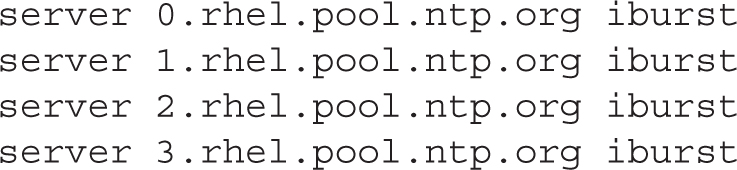
Users of rebuild distributions such as CentOS will see different hostnames, such as 0.centos.pool.ntp.org. The iburst configuration option shown here speeds the initial synchronization when the chronyd service is started.
To configure chronyd to synchronize with a different NTP server, just modify the server directives in /etc/chrony.conf and restart chronyd:

You can display information about the current time sources using the chronyc sources -v command. An example is shown in Figure 5-15.
A basic configuration of the ntpd daemon is straightforward. First, you should ensure that chronyd is stopped and disabled at boot because you cannot have both chronyd and ntpd running on the same machine:

FIGURE 5-15 NTP server statistics

Then, install the ntp RPM package:

The default ntpd configuration file is /etc/ntp.conf. It is similar to the /etc/chronyd.conf file and contains four server directives, pointing to public servers that are part of the NTP pool project. You can customize the configuration or run ntpd with the default settings. Once you have made your changes to the file, start and enable ntpd:

To display information about the NTP sources, run the ntpq -p command.
This chapter covered the basic boot process of a RHEL system. It starts with the hardware POST and continues with the BIOS or UEFI system. Once boot media is found, the process moves to the first stage of the GRUB 2 bootloader. The GRUB 2 menu allows you to select and customize the kernel to be booted.
Once you’ve selected an option, GRUB 2 hands control to the kernel. The kernel loads a temporary filesystem known as the initial RAM disk. Once essential drivers and filesystems are loaded, you can review the systemd journal with the journalctl command. Then the kernel executes the first process, also known as systemd.
Linux services are controlled by systemd targets, which group together other systemd units. The default target is configured as a symbolic link in the directory /etc/systemd/system, and the unit configuration files are stored in this directory and in /usr/lib/systemd/system. The status of those systemd units can be configured and queried using the systemctl command. The systemd targets are linked to other targets and to unit configuration files. systemctl can also be used to start, stop, restart, reload systemd units, and more.
You may need to set up local systems as NTP clients. The default NTP service in RHEL 7 is chronyd.
 TWO-MINUTE DRILL
Here are some of the key points from the certification objectives in Chapter 5.
 Although not strictly a part of the exam, it’s important to know the basics of the BIOS and the UEFI.
You can change the boot sequence from the BIOS/UEFI menu.
Once the BIOS/UEFI detects the designated boot drive(s), it hands control to GRUB 2 via the Master Boot Record (MBR) or GUID Partition Table (GPT) of the appropriate drive.
RHEL 7 uses GRUB 2.
The GRUB 2 configuration file is organized into sections.
From the GRUB 2 menu, you can boot into a systemd target other than the default.
You can even boot from a GRUB 2 menu into a rescue shell that provides root administrative access without an account password.
The GRUB 2 configuration file specifies a kernel, a root directory volume, and an initial RAM disk for each operating system.
If the GRUB 2 configuration file is missing, you may be able to boot from the grub> prompt with information on the /boot directory partition, the Linux kernel file, the top-level root directory, and the initial RAM disk file.
You can analyze boot messages through the journalctl command.
Default system targets are configured as a symbolic link from the /etc/systemd/system directory.
The systemd process has replaced Upstart and SysVinit as the first process. It has configuration files in the /etc/systemd/system and /usr/lib/systemd/system directories.
Once the kernel boots, it hands control to systemd, also known as the first process.
The default target configured in /etc/systemd/system activates systemd units in the /usr/lib/systemd/system directory.
Target units can include other targets and units to be activated.
You can use systemctl to control a service with the start, stop, restart, reload, and other commands.
The services that start in each target can also be controlled with systemctl and the enable/disable commands.
The timedatectl tool can be used to check the current time, date, time zone, and NTP service status.
The default NTP service in RHEL 7 is chronyd. It keeps time in sync with servers configured in the /etc/chrony.conf file.
An alternative to chronyd is ntpd, which keeps its configuration settings in the /etc/ntp.conf file.
Do not run both chronyd and ntpd at the same time.

The following questions will help measure your understanding of the material presented in this chapter. As no multiple choice questions appear on the Red Hat exams, no multiple choice questions appear in this book. These questions exclusively test your understanding of the chapter. It is okay if you have another way of performing a task. Getting results, not memorizing trivia, is what counts on the Red Hat exams. There may be more than one answer for many of these questions.
1. On what part of the boot hard drive is the first stage of the GRUB 2 bootloader typically located?

2. When you see the GRUB 2 configuration menu, what command would you use to modify the configuration?
3. What string would you add to the linux16 command line to boot into the emergency target?
4. If you see the set root='hd0,msdos1' directive in the GRUB 2 configuration file, on what partition is the /boot directory? Assume the GRUB 2 configuration file is properly configured.
5. What temporary file system is loaded directly from the GRUB 2 menu?
6. What one-word command can you use to read systemd log messages?
7. In what directories can you find the configuration files associated with the first process?
8. How do you switch from the graphical target to the multi-user target?
9. What command lists the default target?
10. Name three commands that can be typically run from systemctl to control the status of systemd units.
11. What command lists the state of all systemd units currently available on the local system, including those that are not active?
12. What command lists the current time, time zone, and status of the NTP service?
13. Which configuration file is used by chronyd?
Several of these labs involve installation exercises. You should do these exercises on test machines only. The second lab of Chapter 1 sets up KVM for this purpose.
Red Hat presents its exams electronically. For that reason, the labs in this and future chapters are available from the media that accompanies the book. Look in the Chapter5/ subdirectory for this chapter’s labs. They’re available in .doc, .html, and .txt formats. In case you haven’t yet set up RHEL 7 on a system, refer to the first lab of Chapter 2 for installation instructions. The answers for each lab follow the Self Test answers for the fill-in-the-blank questions.

1. For the BIOS/UEFI to hand control over to Linux, it needs to identify the Master Boot Record (MBR) or the GUID Partition Table (GPT) of the boot hard drive.
2. From the GRUB 2 menu, the command that modifies the configuration is e.
3. To boot into the emergency target from the GRUB 2 linux16 command line, you’d append the string systemd.unit=emergency.target.
4. The set root='hd0,msdos1' directive documents the /boot directory on the first partition on the first hard drive.
5. The temporary filesystem loaded from the GRUB 2 menu is the initial RAM disk filesystem, also known by its filename, initramfs.
6. The one-word command that you can use to read systemd log messages is journalctl.
7. The configuration files associated with the first process are located in the /etc/systemd/system and /usr/lib/systemd/system directories.
8. The command to switch from the graphical target to the multi-user target is systemctl isolate multi-user.target.
9. The command that lists the default target is systemctl get-default.
10. Typical commands that can be run from systemctl include start, stop, restart, reload, enable, disable, and more.
11. The systemctl list-units --all command (or just systemctl --all) lists the state of all units, including inactive ones.
12. The timedatectl command lists the current time, time zone, and the status of the NTP service.
13. The chronyd configuration file is /etc/chrony.conf.
Yes, there are many Linux systems that run for years at a time without a reboot. But reboots are sometimes required, such as when newer kernels are installed. So when configuring a Linux system, make sure any changes survive a reboot. On a Red Hat exam, you won’t get credit unless your changes survive a reboot.
If successful, this lab will show you how to change the default target, along with the relative importance of the options in the GRUB bootloader. Remember, you can modify the default target via the systemctl command
or manually by modifying the /etc/systemd/system/default.target symbolic link:

This lab is the same as Exercise 5-2. Practice with the root password recovery procedure until you are familiar with all the steps and you don’t need to rely on the documentation. Remember, Red Hat exams are “closed book.”
After completing this lab, you should have modified the variables GRUB_TIMEOUT and GRUB_CMDLINE_LINUX in /etc/default/grub, as shown here:

Note that the “quiet” keyword has been removed from GRUB_CMDLINE_LINUX, to enable verbose messages at boot.
Then, run the grub2-mkconfig command to generate a new GRUB configuration file:

To really test the result, reboot the system. What happens? Finally, revert back your changes.
The script executed in this lab moved the grub.cfg configuration file to the /root/backup directory. If you understand GRUB 2 well, you should have been able to boot the system from the grub> prompt.
Otherwise, you can recover the grub.cfg file by booting into the rescue target described in this chapter. From the rescue mode command-line prompt, you should be able to restore the original configuration with the following commands:

Alternatively, generate a new grub.cfg configuration file with the grub2-mkconfig command.
It’s possible to configure up to 12 virtual terminals, which match the number of function keys available on most keyboards. If you want to set up 12 virtual terminals (and that would be an interesting problem for the RHCSA exam), look at the /etc/securetty file and related man pages with the man -k securetty command. One way to accomplish the tasks in this lab is with the following steps:
1. Open the /etc/systemd/logind.conf file. Change the following directive to limit the active consoles to terminals 1 and 2:

2. To test the result, reboot the system.
3. What happens? Can you still log in to terminals 3, 4, 5, and 6?
4. When complete, just remember to restore the original version of the /etc/systemd/logind.conf file.
