Way back in Chapter 1, you were shown how to connect to IRC using a variety of clients. This chapter aims to show you a multitude of alternative ways to connect to IRC, or at least make the process a bit easier.
To make it easier for other people to connect to your IRC network and join your IRC channel, you can place convenient links on your web pages. If a user has an IRC client installed, he can just click on such a link to be transported into your channel. If he doesn’t have an IRC client installed, that’s not a problem—Java Applets embedded in a web page, or even a pure HTTP client, can also be used to connect to IRC.
You don’t have to be near a computer to use IRC. This chapter also contains hacks relevant to those who wish to access IRC from their mobile phones or Pocket PC devices.
For those of you who are concerned about missing out on the action while you’re away, you can also explore the possibility of setting up an IRC proxy, which will let you access IRC from anywhere in the world without missing any messages that were sent while you were disconnected.
Looking for an easy way to get people to join your channel? Add IRC hyperlinks to your web pages.
One way of making your IRC channel easily accessible is to increase the number of ways people can join it. Creating an HTML hyperlink that points to your IRC channel is a convenient way of letting people know the server details and channel name.
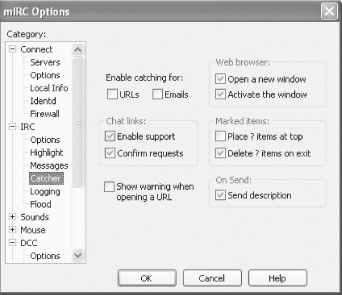
To be able to use these links, you must have an IRC client installed that has chat link support enabled. If you have the ChatZilla IRC client installed, you can expect to be able to just click on IRC links to connect to the server and join the specified channel. In some other clients, such as mIRC, you will need to enable support for chat links, as shown in Figure 14-1.
IRC links are specified like any other
hyperlink, but with irc as the protocol. Valid IRC
links look like this:
<a href="irc://irc-server:port/channel?key>Click to join</a>
Each IRC URL can be broken up into four parts:
-
irc-server The IRC server to connect to.
-
port The port number to connect to. This is optional and must be preceded by a colon character if you use it. If you do not specify a port number, the default of 6667 will be used.
-
channel When your IRC client connects to the server, it will automatically join this channel. Note that you must not include the
#character.-
key If the channel is password protected, you can specify the key. This is also optional and must be preceded by a question mark character.
If you just want people to be able to connect to your IRC network in a hurry, you needn’t bother specifying a channel to join:
<a href="irc://irc.your-irc-server.com">Connect to my IRC server</a>
If you have a channel on the freenode IRC network (irc.freenode.net) called #mychan and it has a key of “password”, you could let web users visit your channel by providing the following link:
<a href="irc://irc.freenode.net/mychan?password">Join my private channel</a>
The most typical example you will see in use on the Web would be a link that points at a public channel, such as:
<a href="irc://irc.freenode.net/irchacks">IRC Hacks Channel</a>
Clicking on this hyperlink will launch your IRC client and join the #irchacks channel on the freenode IRC network.
—Alex North
Get out from behind the desk, and IRC from your mobile phone. Everywhere you go, you can take the channels with you.
Why restrict yourself to being able to IRC only from your PC or laptop? If you’ve got a smart mobile phone, you can IRC from pretty much anywhere you can get a signal. Here are a few tips on how to use IRC with a Symbian- or J2ME-equipped mobile phone.
At the top of the evolutionary tree for mobile phones right now are those with the Symbian operating system. This includes the SonyEricsson P800 and P900; the Nokia 7700, 6600, 3650, and N-Gage; and a handful of more eclectic phones shipped by another four or five phone manufacturers. Symbian phones that are currently shipping can be split into two families: Series 60 (6600, 3650, N-Gage) and UIQ (P800, P900); apps written for one family of devices will usually not run on the other.
Series 60 has a number of IRC apps, my favorite being WirelessIRC (http://mobileways.de/M/1/4/0), which has almost all the capabilities of a desktop IRC client: private messages, multiple channels, DCC, and so forth. UIQ users also have many choices, with SymIRC being one of the more popular options (http://sulaco.mureakuha.com/symirc). This application also has the advantage of being licensed under the free GNU General Public License (GPL), meaning that if you’ve got the programming skills, you can take the existing source code and add extra features and functionality.
IRC on a Symbian phone can be a great experience; you can still use the phone as usual for voice calls, SMS, calendar lookup, address book checking, playing games, listening to the radio or MP3s, and so on. It’s a multitasking networked computer, so IRC is just another application within it.
If you haven’t got a Symbian phone, there’s still hope if your phone can run Sun’s Java applications. The bare-bones but powerful Virca (GPL-licensed) J2ME app offers good functionality (http://www.vidarholen.net/contents/virca).
The one fly in the Java soup is that many phones have poor compatibility with the J2ME specifications, and the sockets-based networking functions are often broken; the popular Nokia 3650 and SonyEricsson T610 are just two phones in this category. Phones like these won’t run applications like Virca, but can generally run HTTP-based IRC applications like WLIrc (http://wirelessirc.sourceforge.net), which is also licensed under the GPL. These rely on connecting via an external HTTP gateway running elsewhere for connectivity to an IRC server.
Of course, to get one of these applications working, you need connectivity. On a GSM network, GPRS is generally the best option. With GPRS, most operators charge a traffic-based rather than time-based fee for usage, and a slow-paced hour of IRC will often use only 30-40 KB; with U.K. pricing around £2 per MB, this can be cheaper than a single SMS and certainly cheaper than an hour-long voice call. If you have an unlimited GPRS usage tariff as offered by some of the U.S. operators, mobile IRC looks even more attractive. A word of warning though—some operators charge a flat fee for any GPRS connection, and the default GPRS pricing on some networks can be very high, so make sure you understand your tariff before running up huge bills! Many of the IRC clients display a traffic counter so that you can keep track of your usage.
—Jim Hughes
Mobile IRC has different limitations than the normal experience. Meet eight enemies of mobile IRC, and learn how to defeat them.
I’m the first to admit there are downsides to the mobile IRC experience; some of the things that make a mobile phone so much easier to carry than a PC or laptop can also be a slight hindrance in usage. However, judicious application of Sun Tzu’s dictum, “Know your enemy and know yourself and you can fight a hundred battles without disaster,” should help you to IRC on the move without disaster.
Unless you have a device like the Treo 600 or the Nokia 6800, you are unlikely to have a full QWERTY keyboard on your phone, and even with these devices, the constrained dimensions means that full touch typing is unlikely. One or two thumbs on a phone keypad will never approach the speed of 10 fingers on a QWERTY. Accept this fact and use this knowledge to your advantage.
Slow text entry has benefits. It makes you think about what you’re writing, and it can improve your writing skills; being able to convey a message concisely and coherently is a skill worth attaining in “real” life as well as on IRC. Be aware that slow entry has its hazards, avoid using words like “it” or “that” because the conversation may have moved on, and the “it” or “that” that you appear to be talking about may now be something completely different. For example, the conversation:
<Joe> did you see the game last night on TV?
<You> yeah, it was rubbish
could easily turn into the following if you’re a bit too slow:
<Joe> did you see the game last night on TV?
<Steve> no I was hacking some code together, incidentally did you try my new app?
<You> yeah, it was rubbish
Some mobile IRC apps like Virca allow you to pre-enter common phrases (it calls these favorites), which you can select and reuse time after time. This is very useful for common actions like talking to bots or for giving a quick disclaimer like, “Sorry, I can’t type very quickly because I’m using IRC on a mobile phone.”
If your phone has predictive text entry like the T9 system, one can enter the word “horse” by pressing 4-6-7-7-3 rather than the multitap approach in which one presses 44-666-777-7777-33. This has an obvious benefit in reducing the number of keystrokes required, but predictive text entry is not without its foibles. Sometimes the word you intend to enter is not in the dictionary, or it is not the first- or even the second-choice word for a particular sequence of keystrokes. For example, the name Russ is the ninth choice for the 7-8-7-7 combination of key presses, so at 12 keystrokes—4 for the letters, plus 8 steps through the dictionary—this word is only barely quicker than using the multitap solution of 777-88-7777-7777.
Many words are not in the dictionary of your predictive text entry software. There are at least three ways around this problem. You could add the words to the dictionary so that they’re remembered for future use. If you do not want to enter a word into your dictionary, you could enter it in a composite form (i.e., you could enter the words comp-o-site for composite), or you could even turn off predictive text entry for that word. Good words to add to your dictionary are common words that you use frequently; I’ve added unusual nicknames, technical acronyms, and swear words.
One thing that predictive text entry doesn’t help with is bad spelling; if you can’t spell, you’re going to be hunting for words quite frequently, so think about your spelling.
Numeric entry is simple once you know the tricks. You can either switch from text entry to numeric, or you can usually hold down the intended digit key for about half a second and the numeral will appear instead of a letter. One big benefit of predictive text entry is that “l33t sp34k” is even more tedious to enter than it is read, so even if you are a 14-year-old script kiddy, predictive text entry will at least make you appear more like an intelligent human being on IRC.
Get used to it—no one is going to produce a megapixel resolution phone display in the near future, so this isn’t a battle you’re going to win, but you can mitigate the damage. On a 128x128-sized display, things can start scrolling past very swiftly. If this happens, you’re going to have to stick to lurking for a while until the conversation calms down. If a channel gets too fast for you to follow consistently, it’s probably worth leaving it. Keep your channel count low, to keep your stress levels down.
Maybe this should be enemy number 1 if you’re the sort of person who tries to walk and IRC. It certainly requires a skill level far above simultaneous walking and gum chewing. Be careful out there. If a conversation gets fast moving, heated, or involved, slow down or even stop walking. Let’s face it, IRC has rarely been called a time-saver, so a few extra seconds on your journey is far less serious a problem than your walking in front of a truck. Also, if you are that involved in looking at your phone, you are not going to notice someone running up behind you to steal it until it’s far too late.
If you’re moving around with a mobile phone, you’re going to find areas with limited coverage. If you’re using GPRS, this can be interesting as the “connection” can appear to stay up for quite an extended period of no coverage (more than 30 seconds is not unusual). One way to kill your GPRS session is trying to send a message when you are in an area without coverage, so check the signal strength before you hit the Enter key!
This can be a problem, as other users will sometimes ask you to send them an email, or they will try to DCC you a huge file or just ask you to check a web page. Some simple J2ME phones will even kill the Java session when you receive an incoming phone call. With some clients and phones, you will be limited in whether you can do these actions as well as use IRC. Your best bet is to let people know you are using a limited client. You could do this by changing your nick from, say, “Steve” to “Steve_3650,” or by having a prewritten disclaimer—like a Virca favorite.
This will be a shock to those used to using a screen and having channel logs going back for years, but with most mobile IRC clients, you’ll be able to see what’s gone on in only the current session. Get used to it; it’s not such a big disadvantage. Maybe you will have to lurk for a minute or so to find out what’s going on when you join a channel, but it’s no big deal. If you can’t cope with this, use channels with public logs, or run another IRC session elsewhere, logging the channel for later perusal. The mobibot that runs in #mobitopia on the freenode IRC network has been modified to include a recap function that replays the last 10 items of traffic via private message. Sure, it’s not extensive, but it’s very useful to catch up on the last snippets of a conversation without having to ask someone.
Modern mobile phones get their impressive standby durations by being very miserly with power consumption when they’re not active. The clock speed of the main processor is reduced, the screen backlight is turned off, and all nonessential hardware is powered down. However, when you’re tapping away on the keypad, your phone is using as much power as if you were making a voice call or maybe even more. Suddenly, instead of 200 hours between charges, you may be looking at 5 hours or less. You can either accept this as inevitable and ensure that you recharge frequently, or you can mitigate this effect by thinking about your IRC usage.
There are (at least) eight enemies—none serious though. If you’re aware of these enemies and their workarounds, mobile IRC isn’t going to be a disaster for you.
—Jim Hughes
If you’re constantly on the move, whether it be roaming around your home or trekking in the mountains, IRC is only a few taps away on your Pocket PC.
Owners of Pocket PCs are not left in the dark when it comes to IRC connectivity. Pocket IRC (http://www.pocketirc.com) is a great little IRC client that lets you use IRC from your handheld device. It is available for free download, and you currently can register your trial version for $14.95.
There are a variety of methods for connecting to an IRC server from your Pocket PC. The simplest is to plug it into its docking station and piggyback your computer’s Internet connection. This does seem rather limiting, as you are unable to wander around with your Pocket PC. But nonetheless, this can still be quite useful, as you can use your Pocket PC to keep an eye on IRC while you’re playing a full-screen game on your computer.
As you get more adventurous, you can start moving away from your computer. Most Pocket PCs will allow you to connect to a remote device via infrared or Bluetooth. If you have a suitable receiver plugged into your computer, you can use it to gain a bit of IRC freedom as you wander around your office or part of your home.
Going one step further, you can even use the infrared or Bluetooth to get your mobile phone to establish a dialup or GPRS connection to the Internet. This will let you use IRC from anywhere you can receive a signal on your phone: on the bus, on the train, even while walking home if you have a steady pair of hands!
An even better solution is to use something like the O2 XDA II, which is essentially a full-fledged Pocket PC with a built-in mobile phone. With just one device, you can access IRC from anywhere. See it in action in Figure 14-2.

Pocket IRC
provides a convenient and usable way of interacting with IRC on a
Pocket PC. When you start using it, you will immediately notice that
it has been designed to save on the amount of typing you have to do.
For example, instead of typing /join
#foo, you can join the channel just by
typing #foo and then tapping IRC
→ Server → Join....
In fact, all
/command
commands
have been removed and replaced by either a single tap or a
tap-and-hold to bring up a menu. It takes only a few minutes to get
used to this new style of input, but it is worth it in the long run,
as typing on a Pocket PC without a keyboard is not the fastest thing
in the world. If you want to type a word that is already visible in
the large text area, you simply have to tap that word, and it will be
automagically entered into the input box for you.
To save screen space, the input box is embedded directly into the standard menu bar at the bottom of the display. Pocket IRC even gives you a full-screen option, which removes the navigation bar from the top of the display.
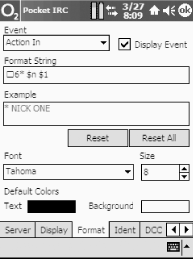
If you need to fit even more text on the display, you can delve into the vast number of options provided by Pocket IRC, as shown in Figure 14-3. Lowering the font size will help out here, but making it too small will obviously make it unreadable.
Tip
ClearType is a technology that makes smaller text more readable by smoothing the edges of screen fonts. You can enable this on your Pocket PC device by going into Settings → System → Screen. Check the Enable ClearType box, and you’ll notice the difference next time you perform a soft reset.
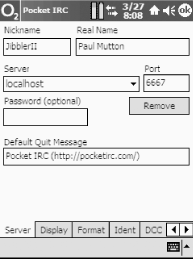
Getting Pocket IRC to connect to a server
takes just two taps (IRC → Connect), but first, you must
visit the Server tab in the Options section and tell it which server
you want to connect to, as shown in Figure 14-4.
Notice that the server has been set to localhost
so it can use an SSH tunnel to
connect to a private IRC server (see
[Hack #27]
), but you can also
connect directly to a public IRC network such as irc.freenode.net.
If you have trouble connecting to a server because it wants an Ident response, you can go back into Options and enable the Ident server from the Ident tab. You can tell it to use whatever username you want. Another nice feature is that Pocket IRC even lets you send and receive files over DCC, so if you’re stuck on the train and suddenly realize you’ve forgotten an important file, you can hop onto IRC and ask your colleagues if they can send it to you.
Even if visitors to your web site don’t have an IRC client installed, you can still try to persuade them to join your IRC channel by using a Java Applet client.
PJIRC (http://www.pjirc.com) is an IRC client that can be run as a Java Applet. This means you can embed it on web pages and most people will be able to run it through their web browser without having to install a standalone IRC client.
Before you upload PJIRC to your web server, you should edit the HTML
in SimpleApplet.html to tell it to join the
server that you want. The only line that you have to change is the
one specifying the host:
<param name="host" value="irc.freenode.net">Now you can run it by pointing your web browser at http://yourserver.com/pjirc-installation/SimpleApplet.html.
This will cause the PJIRC client to connect you to the freenode IRC
network. You will need to join channels manually (for example,
/join #irchacks). At this point, you can do
anything you like: join channels, message people, notice people, and
even change to a different server. You can see PJIRC running in Figure 14-5.

If you want people to be able to connect to your server and join a channel automatically, a little customization is needed. This is done by passing parameters to the Applet in SimpleApplet.html.
When somebody uses PJIRC to connect to the chosen IRC network, the
nick parameter specifies which nickname to use. On
web-based IRC clients, it is common to use the nickname
“Guest” to indicate the temporary
nature of the IRC client—more regular users of IRC tend to
install their own standalone IRC clients.
<param name="nick" value="Guest">
Because all nicknames used on an IRC network must be unique, you must
specify an alternative nickname in case
“Guest” is already in use. The
alternativenick parameter is used to specify this.
Using ? in the name will allow PJIRC to replace
this with a random number so that a name can be found that is not in
use, for example:
<param name="alternatenick" value="Guest???">
If you want to make the PJIRC client connect to a different server,
just change the host parameter as shown earlier:
<param name="host" value="irc.darkmyst.org">If the IRC server could not be found, you can specify a list of additional servers to try. These must be numbered in ascending order, for example:
<param name="alternateserver1" value="irc.us.freenode.net 6667">
<param name="alternateserver2" value="irc.eu.freenode.net 6667">
You can tell the PJIRC client to automatically execute a list of commands when it successfully connects to an IRC server. These must be numbered in ascending order. This is a useful way of making the client automatically join a channel, for example:
<param name="command1" value="/join #irchacks">Use IRC from any browser—even mobile devices that don’t support Java!
Many reasons may stop you from using a normal IRC client—maybe you can’t install one on the computer or device you’re using, or maybe a firewall blocks your access to IRC. Alternatively, you may want to provide an easy way for web page visitors to get to your IRC channel.
CGI:IRC provides a nearly full featured IRC client in a web browser. It makes use of JavaScript and DHTML features if they are available. The main omissions are support for scripting, DCC chat, and file transfers, but that’s not the end of the world.
You will need a web server that can run Perl CGI scripts and, more importantly, supports Unix domain sockets. This rules out Windows, but Linux, any BSD, and even Mac OS X should work fine. The web server will also need to be able to connect to IRC.
The following instructions assume you are using Apache, as it is the most common web server in use. However, CGI:IRC should work on any web server that supports CGI.
Tip
How does it work?
CGI:IRC makes use of a streaming connection to the web server. This is a special HTTP request that never ends and sends data as it becomes available. This means the bandwidth usage is kept to a minimum because the page is not constantly being refreshed. This doesn’t work with all browsers and proxies—two of the most common programs that currently have problems with streaming are the Novell BorderManager proxy and Apple’s Safari browser. It is also possible the server will not support streaming. For example, mod_gzip on Apache will not work unless the CGI script is excluded from compression.
Download CGI:IRC from its web site at http://cgiirc.sourceforge.net, and extract the files to somewhere convenient. The two main steps to installing CGI:IRC are setting up the configuration and uploading the files to the web server.
Two configuration files are supplied with CGI:IRC. One is limited to
a single channel and server and has fewer options. The other will
allow users to connect to any server and contains a greater number of
options. If you want to use the full configuration file, copy
cgiirc.config.full over
cgiirc.config. You can also copy and paste lines
from the full configuration into the smaller one to make the
configuration easier to manage. The file format follows fairly
standard conventions. A line beginning with a # is
a comment, while other lines set various options to specific values.
The main settings to configure are the server, the channel, and where
the images are stored. The default_server and
default_channel options should be set to the
server you want to connect to and the channel you want to join. If
you want to join multiple channels, you can specify a comma-separated
list of channel names.
If Apache is configured to use the ExecCGI option (so you can run CGI
scripts from anywhere), the default setup will work fine with the
images. However, if it is configured with ScriptAlias (where you have
a separate cgi-bin directory), the images will
have to be put elsewhere. The place they are put must be able to
display static files, and image_path in the
CGI:IRC configuration file will need to be updated to point to this
location. For example, if you put the images directory at the root of
a virtual host, image_path would be
/images. The key thing to remember is that
image_path is what is sent to the browser, so this
should not contain a full local filesystem path.
Apart from the images, all the files should be uploaded into the same directory. It is recommended that you put them inside a directory called cgiirc, as this makes it easier to see which files belong to CGI:IRC. If you use a local server, you just need to move the files into the correct location rather than uploading them. How you upload the files does not matter—you can use FTP/SFTP to the server or any other method that is convenient. You should upload all of the text files in ASCII mode; otherwise, they may not run correctly on the server. Conversely, make sure you upload the images in binary mode.
Once you have uploaded the files, it is a good idea to check the
permissions on the .cgi files:
irc.cgi, nph-irc.cgi, and
client-perl.cgi. They need to have at least read
and execute permissions for user, group, and other, that is,
r-xr-xr-x. If you aren’t sure
what the current permissions are, you can either use your FTP client
to change the permissions of the files to
r-xr-xr-x or log in to the web server and type the
following into the shell:
% chmod 755 *.cgiHopefully, all the necessary files will now be on the server and have
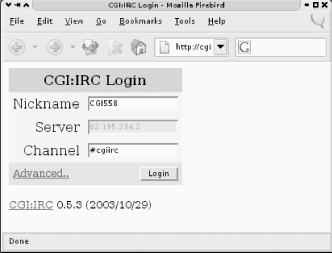
the correct permissions. If all has gone well, when you visit the
location of irc.cgi (for example, http://localhost/cgi-bin/cgiirc/irc.cgi), you
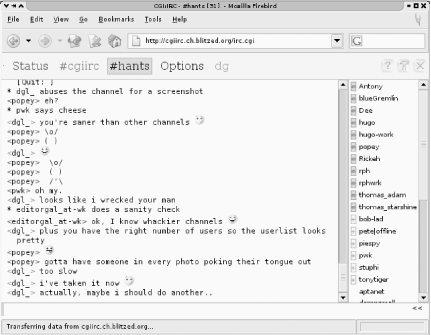
will see the login page shown in Figure 14-6.
Once you have logged in, you’ll see something
similar to the screenshot in Figure 14-7. The layout
is similar to most graphical IRC clients. Along the top is a list of
the channels you are in, with the text color indicating the activity
in the window. The buttons on the right will access the online help,
open the options, and close the current window. On the right you see
the user list. Double-clicking on a name will open a query to let you
send private messages. The rest of the screen should be fairly
obvious; the only other thing that needs explaining is the
<< symbol, which causes CGI:IRC to display
some extra buttons to allow the input of colors and formatting
characters.
There are some limitations in CGI:IRC. Because CGI:IRC acts as a client, connections from it appear to be coming from the web server’s address. This allows it to get past firewalls, but, unfortunately, if several clients are connecting from the same address, some IRC servers will refuse to accept additional connections beyond a certain limit. The other main limitation is that it is written in Perl and uses CGI, so quite a lot of memory is used per user. This isn’t too much of an issue for single users using it to get past firewalls, but for a web site with lots of users, it isn’t ideal.
—David Leadbeater
If you’re regularly on the move, you need a way to keep track of IRC while away from your computer. Run a console-based IRC client in screen as a simple yet powerful solution.
If you’re running a text mode (console) IRC client on a remote system, it can be annoying having to reconnect if your connection drops or if you have to move to another machine. When you reconnect, you will no longer see the messages that were sent when you were last connected.
GNU screen provides a neat solution to this problem. It allows you to disconnect from a terminal session without quitting your running programs. You can then log in and resume the screen session at a later time, giving the appearance that you never disconnected.
screen is provided as a package on most Unix-based systems. If it isn’t already installed, install the screen package or download and install it from source at http://www.gnu.org/software/screen/screen.html.
Starting screen is amazingly simple, yet many people overlook the usefulness of it. At a shell prompt, simply type:
% screenIf you get a startup message, just press Enter. You should then see a
shell prompt. This is just like any other shell, but with one
difference—every time you press Ctrl-A, it will be intercepted
by screen. All of
screen’s commands are accessed
by typing a different letter after this key.
screen provides a short summary of the commands
if you press Ctrl-A followed by the ? key. These combinations are
often abbreviated to the form ^A ?.
Probably the most useful command is the one that lets you
“detach” from a
screen session. Typing ^A d will detach your session, leaving the programs running
inside the screen just as they were. To reattach
to the session, just type:
% screen -rYou should now see the screen as you left it. You can also log out
completely, and later log back in and reattach. By default,
screen will also detach sessions when the
terminal is closed, so screen sessions survive
network connections dying and closing the terminal window. If for
some reason your connection dies and the screen
isn’t detached, screen -r is not
enough to reattach. You will need to run the command screen -r
-d to detach and then reattach. Also,
if you are running more than one screen, you
need to give the pid (process ID) or name of the
screen process that you want to reattach to
after the -r parameter.
Tip
If you are using the BitchX IRC client, detaching is even easier.
Simply type /detach to detach your client,
then run the scr-bx command to bring your session
back again. However, this feature is nowhere near as powerful as
screen and won’t detach
automatically.
screen’s other great strength
is that it lets you run more than one program inside one terminal
window. This makes it easy to leave several programs running and
access all of them from another location, even if you are restricted
to a very slow connection. This is achieved by supporting virtual
windows inside the screen session. You can
create a new window by pressing ^A c. Once you
have more than one window, you can use ^A n or
^A <space> to go to the next window, and
^A p to go to the previous window. This
feature is made even more flexible because
screen allows windows to be split. This means
you can see more than one window on the screen at a time. To split
the screen, type ^A S. This one is case
sensitive, so you will need to hold down the Shift key as well. This
splits the window into two, and you should see a new blank window in
the bottom half of the screen. Pressing ^A <tab> will change to this new window, and you can
either change to another existing window by pressing ^A n, or you can create a new window. If you want to get rid
of the split windows, ^A Q will hide all the
inactive windows.
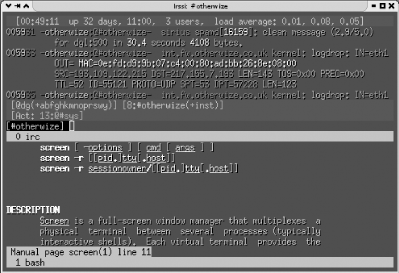
The screenshot in Figure 14-8 shows screen with a split window, displaying irssi in a channel where system logs are sent to IRC, and the screen manual page in the bottom half.
If you have played with the split-window feature, you may have
noticed you can have a window visible in several split windows at the
same time. This is actually a very useful feature because
screen allows you to attach to a
screen session more than once. This is called
multiple display mode, and you can use it to display the same window
on multiple terminals, or you can display a different window on
different terminals. To use it, simply add the -x
option to the reattach command, so it becomes:
% screen -r -x
screen also has support for copy and paste from
one window to another. Type ^A [ to start the
copy, move the cursor with the arrow keys, and press Enter to start
copying; then move the cursor to the end of the text you want to copy
and press Enter again. The text that you have copied will be stored
in memory until you use ^A ] to paste it. When
you are selecting the text, there are some other keys that you can
use. For example, pressing / will allow you to
search within the text buffer, and Page Up and Page Down will scroll
a full screen.
More relevant to IRC is a script that checks that your IRC client is running so you don’t even have to manually restart if it crashes or if the system you’re running it on is rebooted.
This makes use of the cron facility found on most
Unix systems, along with a little bit of Bourne shell scripting.
To edit your user’s crontab, run this command:
% crontab -eYou can then create a new line in your crontab:
*/5 * * * * IRC=`screen -ls | grep -v Dead | grep "\\.irc"`;
    if [ "x$IRC" = "x" ]; then screen -dmS irc irssi;fi
This causes the script to be run every five minutes. When it runs, it
checks the output of screen -ls for a session
called irc. If it doesn’t find
it, it starts screen in detached mode (with the
options -dm) and names the session
irc (option -S).
screen will run the command irssi once it has
started. If you want to use a different IRC client, you could replace
the irssi with whatever you use to start your IRC
client.
screen also has a command line as well as key
shortcuts. You can access the command line via ^A :. For example, to change the title of a window (this is
useful when you’re using split screens), you would
type ^A :title
new-title.
If you are paranoid about security, you can password-protect
reattaching to your screen by running the password
command on the screen command line. You can do
this by typing ^A :
password and following the
prompts. If you want to make this permanent after setting the
password, edit the file ~/.screenrc (create it
if it doesn’t exist) and type
password followed by ^A ] (this pastes the contents of the paste buffer). Your
line should look something like password NSQuRKGNxIEbw. Whenever someone runs
screen
-r from now on, they
will be prompted for the password. The security provided by this is
in addition to that provided by your login password, but it
won’t deter someone who is determined to get past if
they have access to your system account.
There isn’t enough room to cover all of
screen’s features here;
however, screen has a very good manual page so
man screen will tell you lots more, such as
how to remap keys to suit your tastes and how to allow multiple users
to share a screen session. With
screen, it’s easy to run
multiple IRC clients and access them from anywhere in the world.
Quick key reference:
-
^A c Create window.
-
^A d Detach.
-
^A nor^A <space> Next window.
-
^A por^A <backspace> Previous window.
-
^A <number key> Change to that window number.
-
^A [or^A <escape> Start a copy.
-
^A ] Paste copy buffer.
-
^A S Split window.
-
^A Q Hide inactive windows.
-
^A: Enter a screen command.
To get a quick list of all of
screen’s key bindings, press
^A? at
any time.
—David Leadbeater
IRC everywhere and never miss anything with an IRC proxy/bouncer.
First of all, you might wonder what a bouncer actually is. The word “proxy” is probably a more accurate description. A bouncer, like a proxy, is a program that connects you to a service (it’s IRC in this context, but there are proxies for many different services) and acts as some sort of buffer. Also, like many web proxies, most bouncers cache data. Sometimes they also allow you to hide your real location, particularly if the proxy runs in a completely different place from where you are. People will see that your connection comes from the proxy host and will not be able to see where you are connecting to the proxy from.
CtrlProxy is a good example of an IRC proxy. It connects to your IRC servers and channels and accepts connections from you. Although CtrlProxy is not the only IRC bouncer available, it is one of the more advanced. Like most bouncers, it caches all your received messages while you’re away, and, as soon as you connect to CtrlProxy, you’ll get them sent to you. Another interesting feature is that CtrlProxy allows you to connect from multiple places. So when you leave home, you can keep your IRC client running on your desktop machine. At work, you can connect to CtrlProxy, and you’ll get exactly the same session you left at home. Or if you have multiple machines at home, you can run your IRC client on all of them without being in the channel with three clones. And of course, if you fear the mess when you have your chat logs on lots of separate machines, CtrlProxy can keep them on your server too.
CtrlProxy is supported on Unix platforms only. With some work, it’s possible to get it working on Windows machines, but you’re on your own then.
There are two ways to get hold of CtrlProxy. You can either use the
package manager for your operating system, or you can compile it from
source. A ctrlproxy package is available for most
Linux distributions and the BSD port collections. You can get the
source from http://ctrlproxy.vernstok.nl. After unpacking
the tarball contents, run ./Configure and then run
make
install. Before you run
CtrlProxy, you will have to create a configuration file. At the
moment, there are two ways to do this.
The first way to configure CtrlProxy is to take the example file
ctrlproxyrc.example from the source tree and adapt
it to your setup. It’s an XML-formatted file, so it
is quite logical to read and understand.
The example contains a list of modules to load. It’s usually a good idea to leave those as they are, unless you know exactly what the modules do. Then there is the list of the IRC networks you’re on. For every network, you have to specify things like a nickname, an IRC name, and some other details that don’t really require any further explanation. In the configuration, you must also set up a listener. A listener is something that allows you to connect to CtrlProxy with your IRC client. When creating multiple IRC networks, make sure each listener listens on a different port. Then you get a list of servers and the channels you want to join. If you want to, you can specify more than one server. CtrlProxy will switch to the next server when a server connection fails. When you start CtrlProxy, it will join each channel automatically. Of course, if you want to join other channels, you can do so with your IRC client when it is connected to the listener.
If the XML configuration file confuses you, there’s
always the second option. There’s a little
configuration wizard, called ctrlproxy-setup,
inside the CtrlProxy source tree. This generates a ready-to-use
configuration file after asking a few questions.
Here’s a little sample configuration file, which connects you to the freenode IRC network (and two channels: #ctrlproxy and #irchacks) and a public BitlBee server:
<?xml version="1.0"?>
<ctrlproxy>
    <plugins>
        <plugin autoload="1" file="libsocket"/>
        <plugin autoload="1" file="librepl_memory"/>
        <plugin autoload="1" file="libadmin"/>
        <plugin autoload="1" file="liblog_irssi">
            <logfile>/home/wilmer/irclogs/</logfile>
        </plugin>
        <plugin autoload="1" file="libctcp"/>
        <plugin autoload="1" file="libstrip"/>
        <plugin autoload="1" file="libnickserv"/>
        <plugin autoload="1" file="libantiflood"/>
        <plugin autoload="1" file="libauto-away">
            <message time="300">I'm currently away, sorry!</message>
        </plugin>
    </plugins>
    <networks>
        <network autoconnect="1" client_pass="secret" name="FREENODE"
            nick="wilmer" username="wilmer" fullname="Wilmer van der Gaast">
            <listen>
                <ipv4 port="6667"/>
            </listen>
            <servers>
                <ipv4 host="irc.freenode.net"/>
                <ipv4 host="sterling.freenode.net"/>
                <ipv6 host="gerrold.freenode.net"/>
            </servers>
            <channel name="#ctrlproxy" autojoin="1"/>
            <channel name="#irchacks" autojoin="1"/>
        </network>
        <network autoconnect="1" client_pass="secret" name="BEE">
            <listen>
                <ipv4 port="6668"/>
            </listen>
            <servers>
                <ipv4 host="im.bitlbee.org"/>
            </servers>
        </network>
    </networks>
</ctrlproxy>By default, CtrlProxy reads its configuration from a file called .ctrlproxyrc in your home directory. If you want to put the configuration somewhere else, you have to specify the location when you start CtrlProxy. You will probably also want to run CtrlProxy in daemon mode so it will continue running when you log out. To start CtrlProxy in daemon mode using the configuration file ~/.ctrlproxy/ctrlproxyrc, type this:
% ctrlproxy -D -r ~/.ctrlproxy/ctrlproxyCtrlProxy will start, and now you can connect to it by pointing your
favorite IRC client at the CtrlProxy listeners. Connect to port 6668
on the host running CtrlProxy (you can use
localhost if you are running your client on the
same machine), and you’ll see the BitlBee session.
Connect to port 6667 on the CtrlProxy host, and
you’ll notice you appear to have been in the two
channels for some time already. Don’t forget to
specify the server password if you put one in the configuration file.
If anybody said anything between the moment you started CtrlProxy and
the moment you connected to the listener, you’ll get
those messages too.
Now you can try to make two connections to one listener. As if by magic, you’ll find that it just works, and you’ll get all the messages on both machines. Of course, when you say something, you’ll see that on your other clients too. To some extent, this may depend on how your IRC client behaves—some clients get very confused when they receive messages from their own nick!
CtrlProxy has some other quite interesting features. Automatic identification to NickServ is one particularly useful feature. It can also be used to generate pisg-like statistics [Hack #14] automatically. By the time you read this hack, several other new features will probably be available. If you want to get more information about them, it’s a good idea to read the documentation that comes with CtrlProxy. You can do a lot with this program. Explaining all of it is beyond the scope of this book, but hopefully this is enough to give you some idea of what it can do.
—Wilmer van der Gaast
irssi is a highly configurable and scriptable IRC client for Unix. Its proxy feature can open the doors to more advanced use.
This hack
shows you how to configure the irssi IRC client
and set up its proxy features so you can resume your IRC session
while on the move. irssi can be compiled and
installed from source code or it can be installed from a package.
There are source and package downloads available from the
irssi web site at http://www.irssi.org. If you do compile from
source, make sure you add the --with-proxy option
to configure, as the final part of this hack needs
it. On Debian systems, the package is named
irssi-text. This is because there is an older
version of irssi, which has a graphical
frontend, but it hasn’t been maintained for a few
years.
When you start irssi by running the command
irssi, it will print a message telling you to read
some of the documentation. You’ll find the
startup-HOWTO on the irssi
web site, although it is also provided in the
docs directory with the
irssi source. You can skip reading it if you
like, as this hack will summarize the important points and walk you
through the process of using the proxy.
irssi supports multiple servers and deals with
connecting to them automatically, but to get the best support, you
really need to define the servers. To do this, you must use the
ircnet and the server commands.
As an example, we’ll set up the IRC network freenode
with one server, irc.freenode.net:
/ircnet addfreenode/server add -auto -ircnetfreenode irc.freenode.net
ircnet is the friendly name by which the
connection will be referred to in irssi, but the
server could be one of many. It’s possible to add
several servers, so the alternative ones can be tried if there is a
problem connecting to the first. The -auto
parameter to /server means to automatically
connect to this server, and the -ircnet associates
it with the correct IRC network. If you want to add extra information
such as a password for connecting to a server, /help server will tell you the syntax. The Page Up key should
allow you to scroll up when you are viewing this documentation. The
ircnet command can also accept some options, for
example:
/ircnet add -autosendcmd "/^msg NickServ identify password;wait -freenode2000" freenode
This command will automatically message NickServ with your password
and then wait two seconds before trying to join a channel. The
^ character before msg means to
hide the sending of the message so your password
won’t be seen by anyone else who happens to be
looking at your screen.
Next you need to decide which channels you want to join. This is very
much the same as with servers, the only real difference being that
the -ircnet parameter has changed:
/channel add -auto#irchacks freenode
This means irssi will automatically join #irchacks when it connects to freenode.
Before you connect, you might like to change your nickname and real
name that are sent to IRC—by default, these will be your login
details. They can be changed via the /set command:
/set nickNickname/set real_nameReal Name
It’s worth noting at this point that the
/set command has a useful feature: if you write
only part of a setting name, it will show all possible settings that
match. The documentation of settings in irssi
isn’t brilliant, so this method is a good way to
find undocumented settings. For example, try /set nick and you will see lots of settings related to
nicknames.
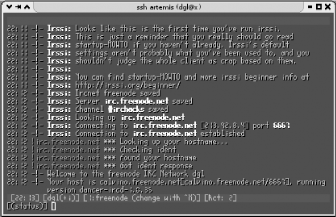
There are two ways you can connect with
irssi. The first is to quit from
irssi (/quit) and start it
again. Because the server is set to automatically connect, it will do
so upon startup. The second way is to type /connect freenode. Figure 14-9 shows
irssi connected to the freenode IRC network.
Once you have connected and automatically joined a channel,
irssi will have created a new
“window” for the channel. Along the
bottom on the status bar you will see [Act: 2].
This means there is activity in window number 2. You can change
between windows using various keyboard combinations: Alt-number will
change to that window number, Alt-A will change to a window with
activity, and Alt-left arrow and Alt-right arrow will go to the
window to the left and right. If the Alt combination
doesn’t work, you will need to change the keyboard
mapping of your terminal. startup-HOWTO has
details about this.
By now, you may have started chatting with the people in the channel
you joined. If you want to ask someone a question or you want to
write something directed at someone, you can type part of her
nickname and press the Tab key. irssi should
complete the nickname and add a colon on the end. Tab completion
doesn’t end there though; /
commands will also tab-complete, as will their parameters and even
channel and server names.
If you have joined several channels, you may want to keep them in a
particular order. You can move the current window to the second
location with the /window command:
/window move2
Once you have the windows in an order you like, you should run the command:
/layout saveThis will save them and remember the order next time you start irssi. Another useful feature is split windows. This means you can display more than one channel at the same time within the same terminal session. For example, in a channel window, you can type:
1This will show the Status window along the top. You can change to it with Alt-1 as usual or with Alt-Up.
Connecting to multiple servers with irssi is
very easy. You simply need to define another
ircnet and another set of servers and channel, as
demonstrated by the freenode example earlier.
irssi will then automatically connect to all the
servers on startup. Each server connection is given a tag. This tag
is usually the same as the ircnet, but if you
connect to a server manually or have multiple connections to one
ircnet, it will be different. If you want to
execute a command on a specific server connection, you can add the
-tag parameter to most commands. For example, to
join the channel #foo on the server with the tag private, you would
type:
#fooYou can also use Ctrl-X to change between servers in a window that does not have any items, such as the Status window.
The /bind command allows you to change what the
keys do. You can assign them to any command or a few special commands
(see /help bind). By default, the keys Alt-q to
Alt-o (along the top line of a QWERTY keyboard) jump to the windows
11 to 19, but if you have a different keyboard layout, you may want
to change this.
irssi supports embedded Perl scripting. Perl scripts can control nearly all the aspects of irssi, so there are lots of possibilities here if you fancy getting into it. The irssi script archive at http://irssi.org/scripts has a lot of scripts available for download. One script will even automatically install scripts for you from the script archive. To use this, simply type:
scriptassistIf there is a problem loading the script, you may not have the LWP
Perl modules installed. They should be available as a package for
most distributions; the name will be something like
libwww-perl or LWP.
Once scriptassist is loaded, you will see several new script
commands. Typing /script help will give you a
list of all of these.
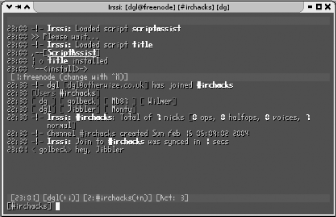
As an example, if you want to install the title script that sets the window title in a graphical terminal, type:
titleTo run it automatically whenever you start irssi, type:
titleIt’s also a good idea to do this for scriptassist to ensure that it is always loaded.
The title script also adds some settings. You can see these by typing:
/set titleFigure 14-10 shows irssi running in a graphical terminal with the title script. Note that the window title displays the nickname, network, and current channel.
The status bar at the bottom of the window contains a lot of
information, including your current nickname, channel, or server, as
well as the modes set on them. As mentioned previously, there is an
item that contains the activity in all the windows you have joined.
The window number will change color to white if there are messages in
the channel, or it will turn red if someone has mentioned your
nickname. You can add extra highlight words with the
/hilight command.
It is also possible to script status bar items. For example,
irssi comes with a script called
usercount that will display the number of users
in a channel. To load it, run /script load usercount. To get the status bar item, you need to use the
/statusbar command. The syntax is a little
confusing, and you need to remember that the first parameter is
always the name of the status bar. You can add the user count to the
right of the status bar on the bottom (the window status bar) with
the following command:
/statusbar window add -alignment right usercountIf you’re frequently on the move and end up connecting to IRC from different places, it’s nice to be able to access it from the same client every time. This not only ensures that you remain permanently connected to the IRC network, but you will be able to keep all your log files in one place. irssi allows you achieve this feat by providing a proxy, which lets you use another IRC client to connect to your irssi instance.
For those familiar with bouncers (if not, see [Hack #93] ), this is very similar. The only real difference here is this all happens inside an IRC client, so if you use irssi inside screen [Hack #92] , you don’t always need an IRC client to connect (although you can use one if you want to).
To load the proxy module, type:
/load proxyIf you want to load the proxy every time you start
irssi, edit the file
~/.irssi/startup, creating it if it
doesn’t already exist. You can then add the line
/load
proxy to the file, and
this command will be executed automatically every time you start up
irssi.
The proxy module will tell you to set a password when you load it. To set your password to “password”, you must type:
passwordYou will now need to set a port number for each IRC network. These are the port numbers that you will connect to from another IRC client. Valid port numbers range from 1024-65535. It’s a good idea to avoid the normal IRC port (6667), as other people may accidentally connect to you and think you’re running an IRC server.
For example, you may have two IRC networks you want to proxy:
freenode on port 4050 and blitzed on port 4051. Assuming both of
these have been set up correctly with the ircnet
command, you can type:
freenode=4050 blitzed=4051This will enable access to these networks via the proxy.
Now you should be able to use another IRC client to connect to port 4050 of the host where irssi is running. If you use the correct password, you will appear to join the channels the irssi client is in. This connection can now be treated as if you were actually connected to the server, with one minor difference—you will see yourself speaking in the other IRC client when you speak in one.
—David Leadbeater