Chapter 24. Continuous Integration (CI)
As our site grows, it takes longer and longer to run all of our functional tests. If this continues, the danger is that we’re going to stop bothering.
Rather than let that happen, we can automate the running of functional tests by setting up a “Continuous Integration” or CI server. That way, in day-to-day development, we can just run the FT that we’re working on at that time, and rely on the CI server to run all the tests automatically and let us know if we’ve broken anything accidentally. The unit tests should stay fast enough that we can keep running them every few seconds.
The CI server of choice these days is called Jenkins. It’s a bit Java, a bit crashy, a bit ugly, but it’s what everyone uses, and it has a great plugin ecosystem, so let’s get it up and running.
Installing Jenkins
There are several hosted-CI services out there that essentially provide you with a Jenkins server, ready to go. I’ve come across Sauce Labs, Travis, Circle-CI, ShiningPanda, and there are probably lots more. But I’m going to assume we’re installing everything on a server we control.
Note
It’s not a good idea to install Jenkins on the same server as our staging or production servers. Apart from anything else, we may want Jenkins to be able to reboot the staging server!
We’ll install the latest version from the official Jenkins apt repo, because the Ubuntu default still has a few annoying bugs with locale/unicode support, and it also doesn’t set itself up to listen on the public internet by default:
root@server:$ wget -q -O - https://pkg.jenkins.io/debian/jenkins-ci.org.key |\
     apt-key add -
root@server:$ echo deb http://pkg.jenkins.io/debian-stable binary/ | tee \
    /etc/apt/sources.list.d/jenkins.list
root@server:$ apt-get update
root@server:$ apt-get install jenkins
(Instructions lifted from the Jenkins site.)
While we’re at it, we’ll install a few other dependencies:
root@server:$ apt-get install firefox python3-venv xvfb
# and, to build fabric3:
root@server:$ apt-get install build-essential libssl-dev libffi-dev
And we’ll download, unzip, and install geckodriver too (it was v0.17 at the time of writing, but substitute the latest version as you read this):
root@server:$ wget https://github.com/mozilla/geckodriver/releases\
/download/v0.17.0/geckodriver-v0.17.0-linux64.tar.gz
root@server:$ tar -xvzf geckodriver-v0.17.0-linux64.tar.gz
root@server:$ mv geckodriver /usr/local/bin
root@server:$ geckodriver --version
geckodriver 0.17.0
Configuring Jenkins
You should now be able to visit Jenkins at the URL/IP for your server on port
8080, and see something like Figure 24-1.
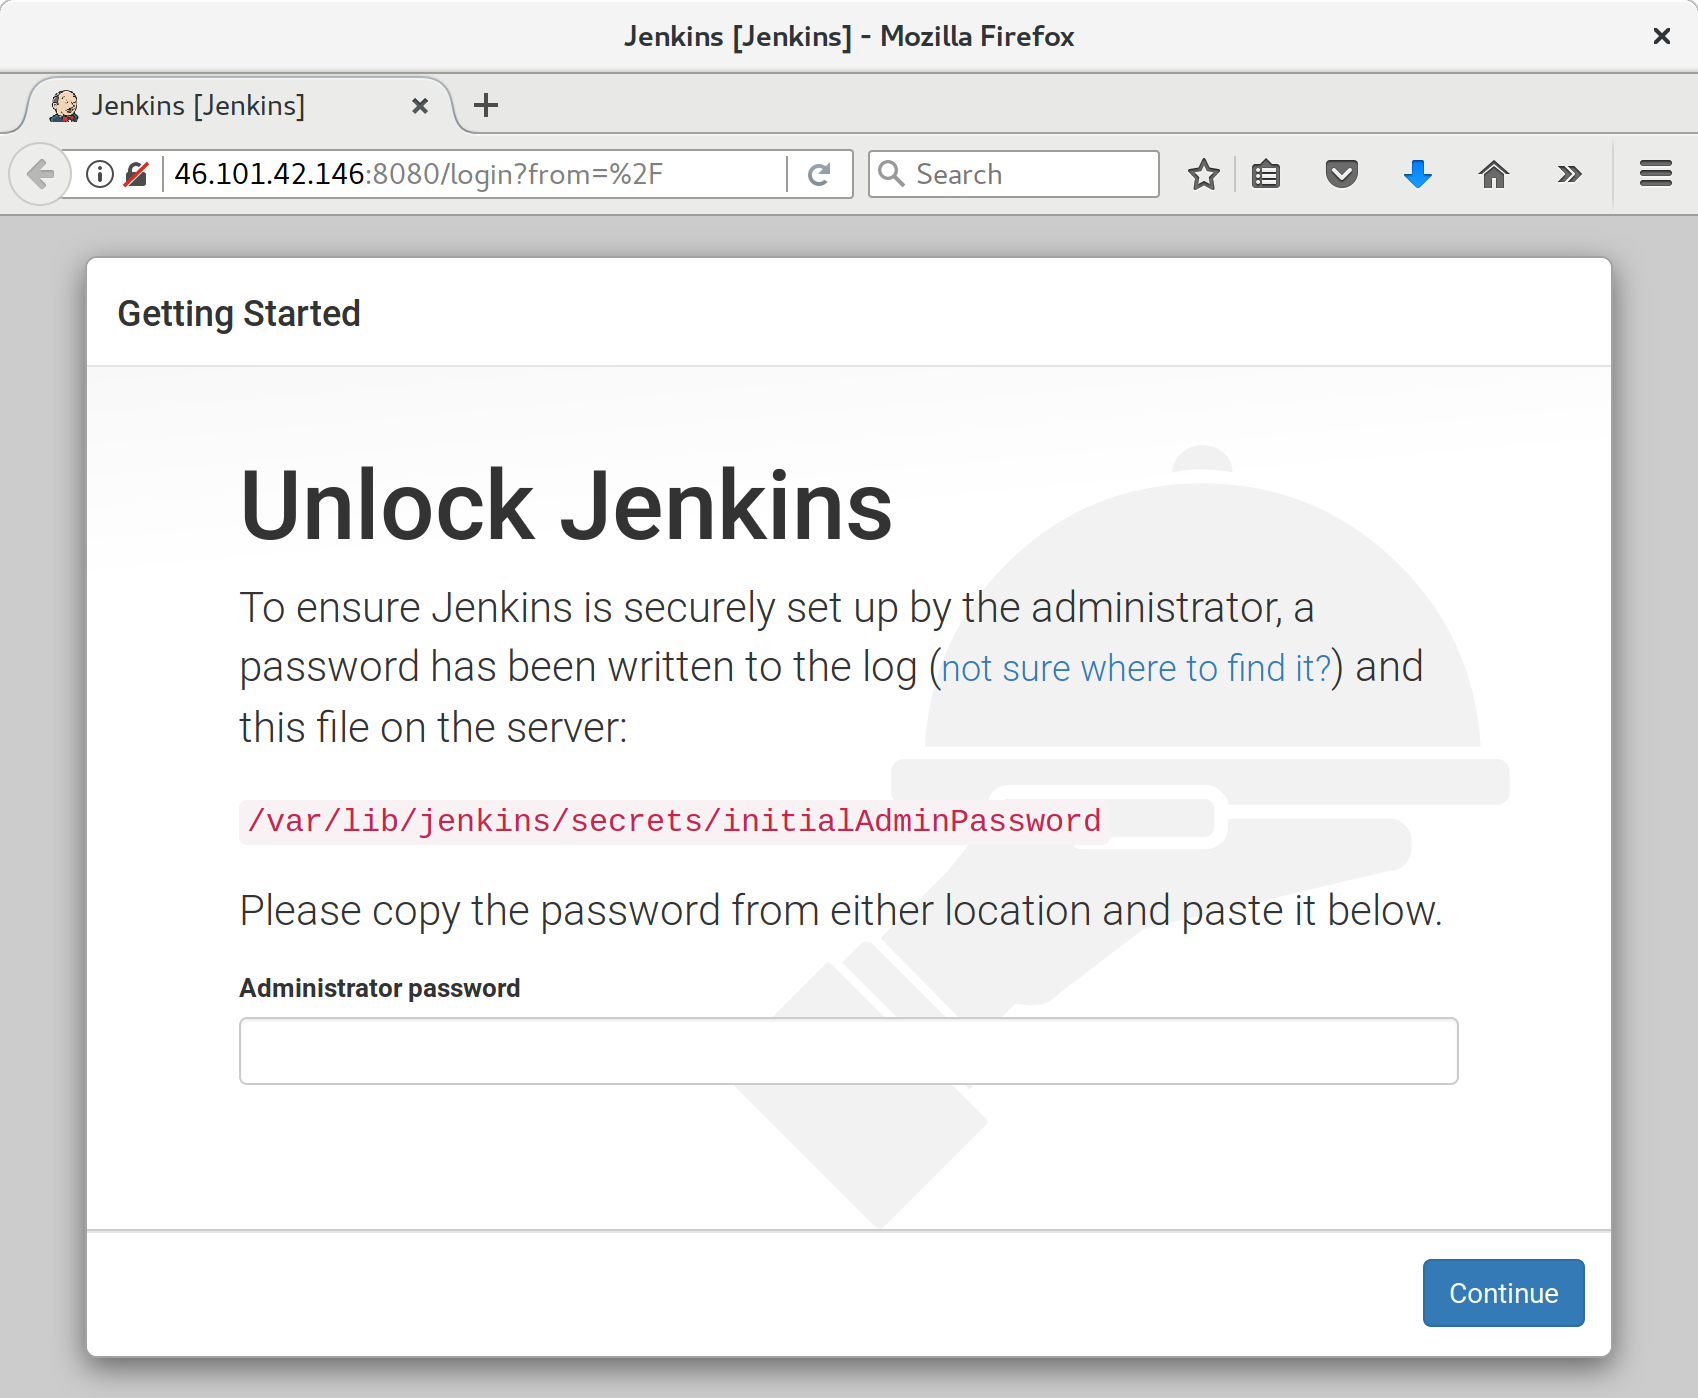
Figure 24-1. Jenkins unlock screen
Initial Unlock
The unlock screen is telling us to read a file from disk to unlock the server for first-time use. I jumped over to a terminal and printed it like this:
root@server$ cat /var/lib/jenkins/secrets/initialAdminPassword
Suggested Plugins for Now
Next we’re offered the choice to choose “suggested” plugins. Suggested ones are fine for now. (As a self-respecting nerd, our instinct is to hit “customize” immediately, and that’s what I did first time round, but it turns out that screen won’t give us what we want. Don’t worry, we’ll add some more plugins later.)
Configuring the Admin User
Next we set up a username and password to log in to Jenkins with; see Figure 24-2.
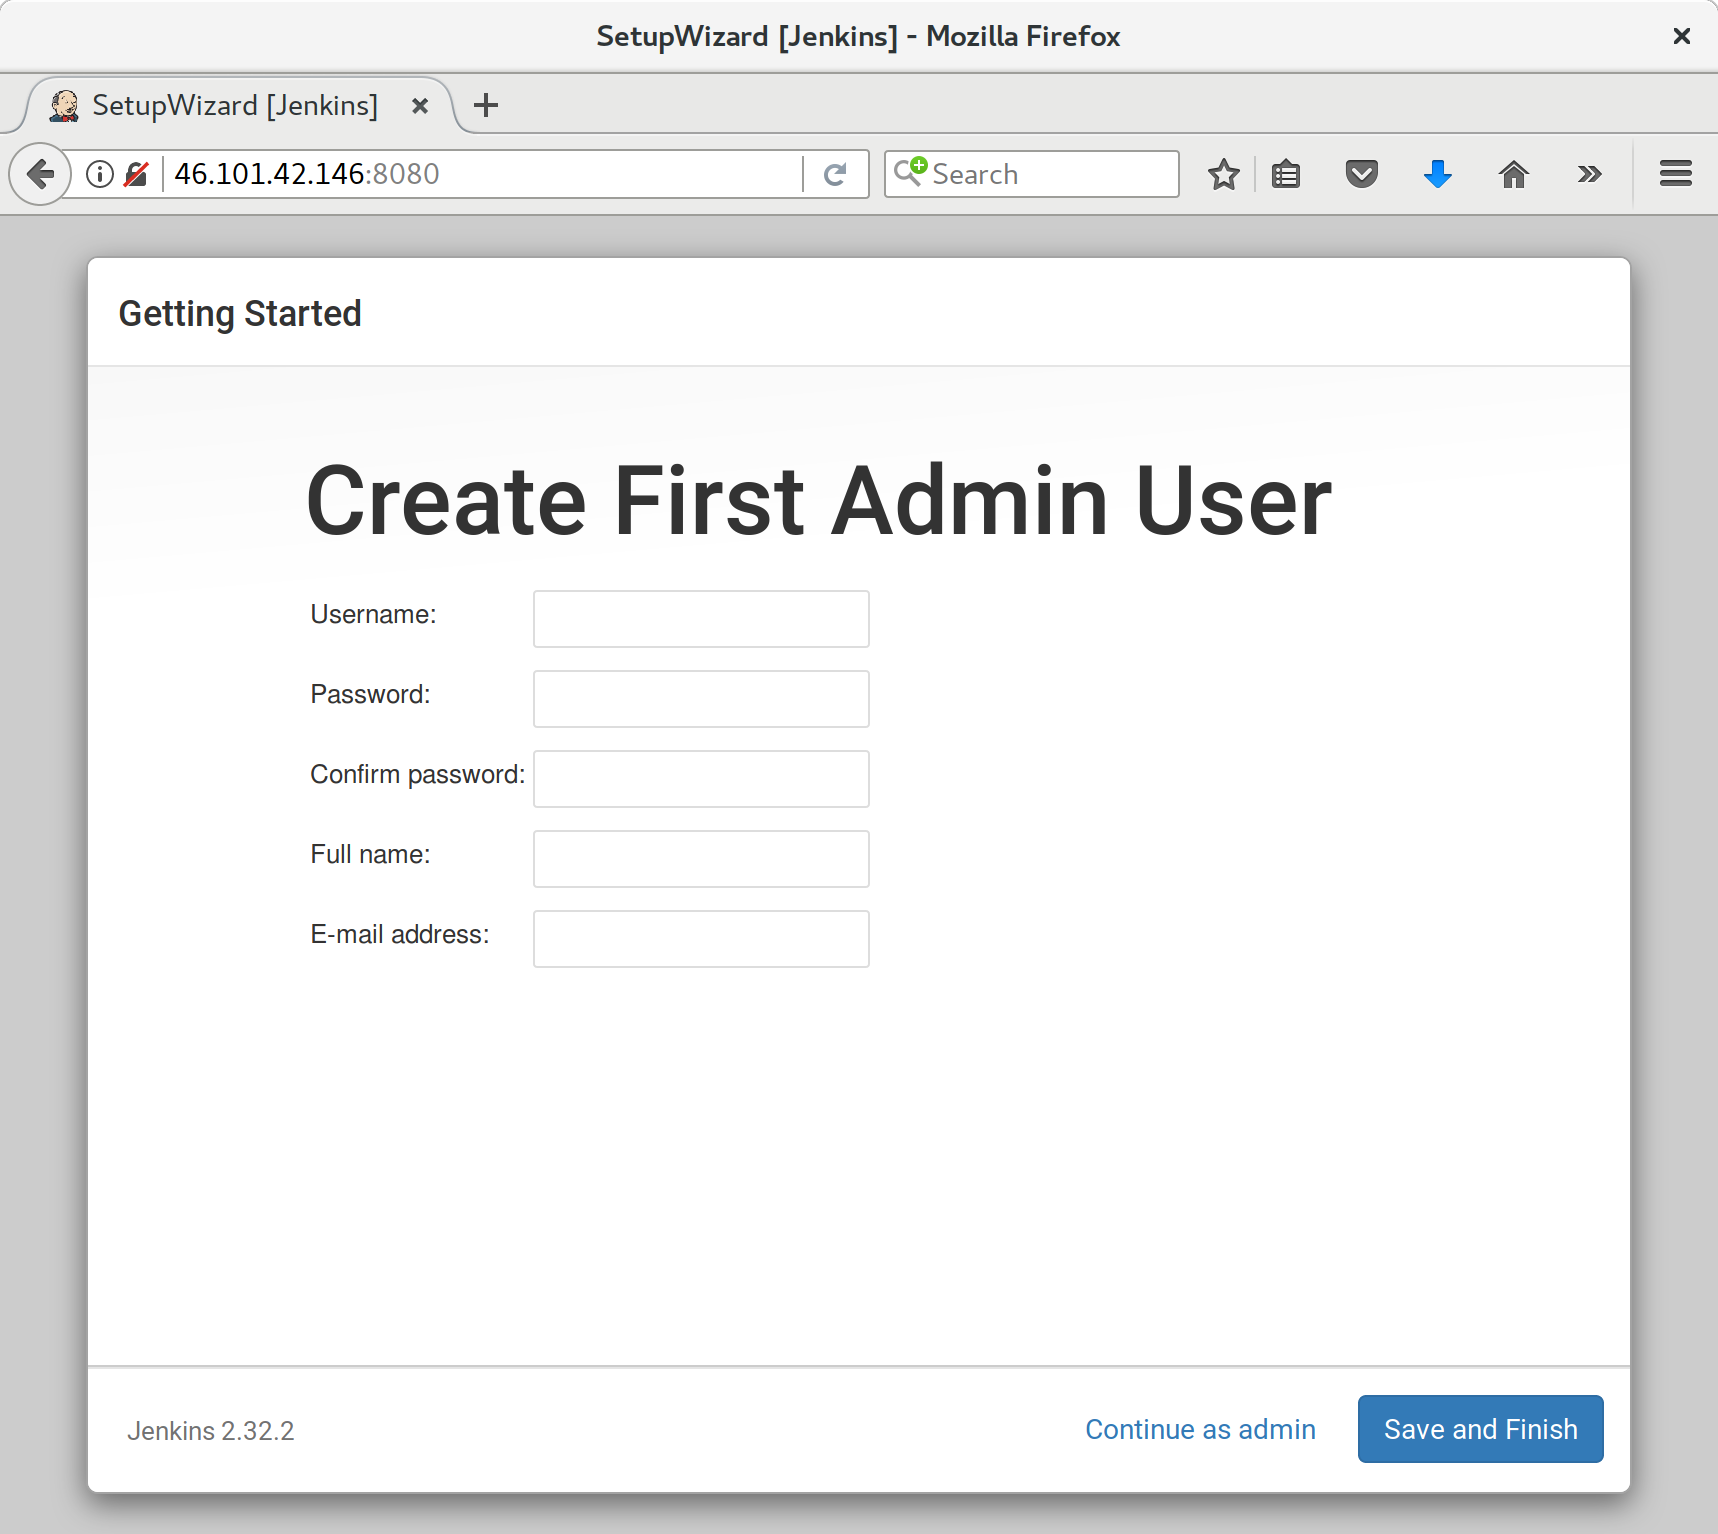
Figure 24-2. Jenkins admin user config
And once we log in, we should see a welcome screen (Figure 24-3).

Figure 24-3. A butler—how quaint
Adding Plugins
Follow the links for Manage Jenkins → Manage Plugins → Available.
We’ll want the plugins for:
-
ShiningPanda
-
Xvfb
And hit install (Figure 24-4).
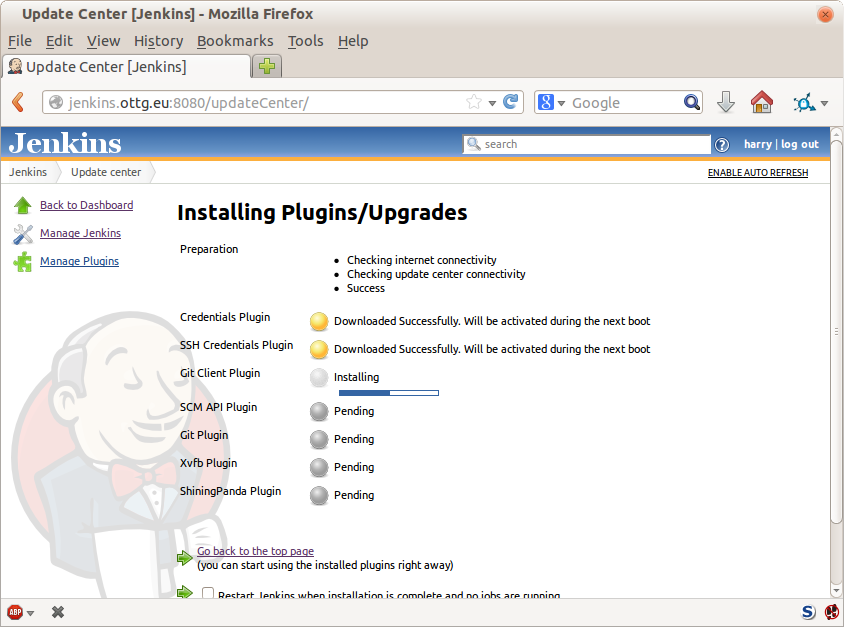
Figure 24-4. Installing plugins…
Telling Jenkins Where to Find Python 3 and Xvfb
We need to tell the ShiningPanda plugin where Python 3 is installed
(usually /usr/bin/python3, but you can check with a which python3):
-
Manage Jenkins → Global Tool Configuration
-
Python → Python installations → Add Python (see Figure 24-5; it’s safe to ignore the warning message)
-
Xvfb installation → Add Xvfb installation; enter
/usr/binas the installation directory
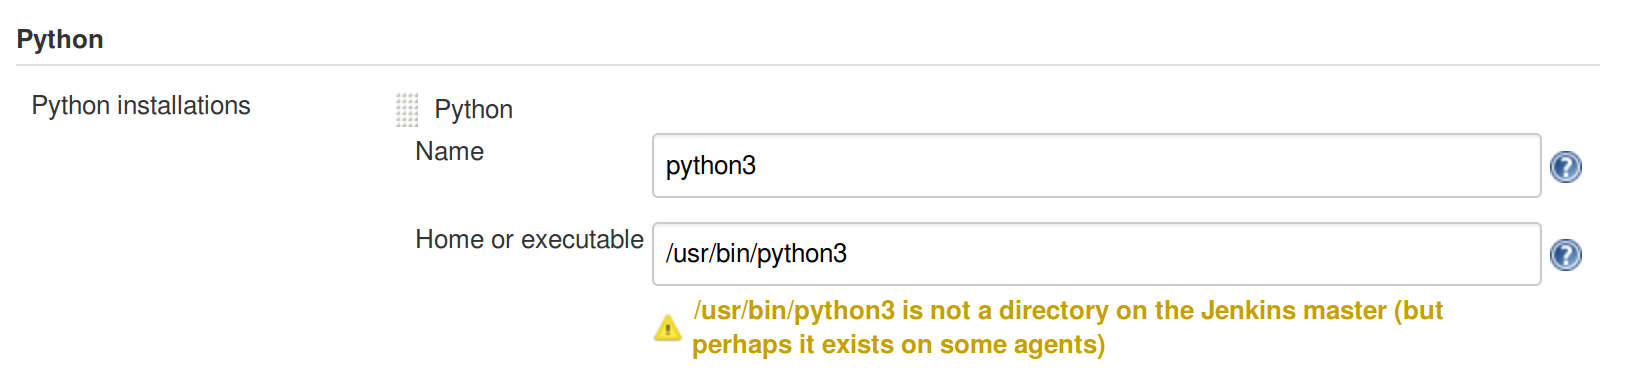
Figure 24-5. Where did I leave that Python?
Finishing Off with HTTPS
To finish off securing your Jenkins instance, you’ll want to set up HTTPS, by getting nginx HTTPS to use a self-signed cert, and proxy requests from port 443 to port 8080. Then you can even block port 8080 on the firewall. I won’t go into detail on that now, but here are a few links to instructions which I found useful:
Setting Up Our Project
Now we’ve got the basic Jenkins configured, let’s set up our project:
-
Hit the New Item button.
-
Enter Superlists as the name, and then choose “Freestyle project”, and hit OK.
-
Add the Git repo, as in Figure 24-6.
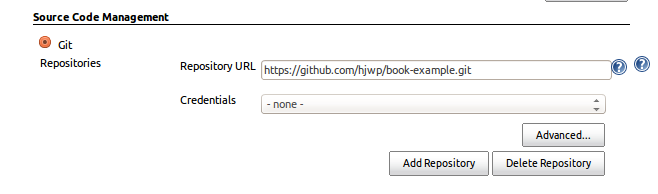
Figure 24-6. Get it from Git
-
Set it to poll every hour (Figure 24-7; check out the help text here—there are many other options for ways of triggering builds).
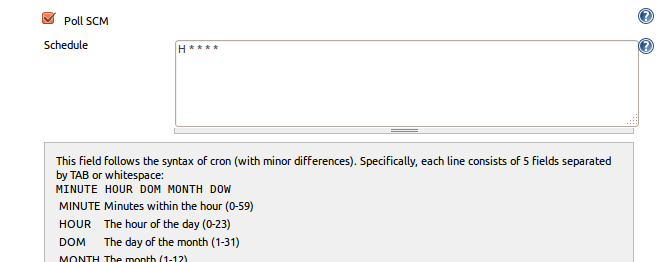
Figure 24-7. Poll GitHub for changes
-
Run the tests inside a Python 3 virtualenv.
-
Run the unit tests and functional tests separately. See Figure 24-8.
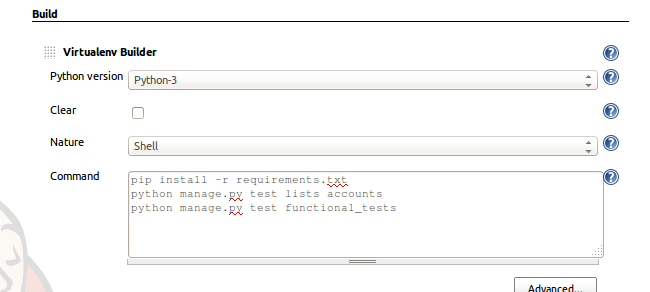
Figure 24-8. Virtualenv build steps
First Build!
Hit “Build Now”, then go and take a look at the “Console Output”. You should see something like this:
Started by user harry
Building in workspace /var/lib/jenkins/jobs/Superlists/workspace
Fetching changes from the remote Git repository
Fetching upstream changes from https://github.com/hjwp/book-example.git
Checking out Revision d515acebf7e173f165ce713b30295a4a6ee17c07 (origin/master)
[workspace] $ /bin/sh -xe /tmp/shiningpanda7260707941304155464.sh
+ pip install -r requirements.txt
Requirement already satisfied (use --upgrade to upgrade): Django==1.11 in
/var/lib/jenkins/shiningpanda/jobs/ddc1aed1/virtualenvs/d41d8cd9/lib/python3.3/site-packages
(from -r requirements.txt (line 1))

Requirement already satisfied (use --upgrade to upgrade): gunicorn==17.5 in
/var/lib/jenkins/shiningpanda/jobs/ddc1aed1/virtualenvs/d41d8cd9/lib/python3.3/site-packages
(from -r requirements.txt (line 3))
Downloading/unpacking requests==2.0.0 (from -r requirements.txt (line 4))
  Running setup.py egg_info for package requests

Installing collected packages: requests
  Running setup.py install for requests

Successfully installed requests
Cleaning up...
+ python manage.py test lists accounts
...................................................................
 ---------------------------------------------------------------------
Ran 67 tests in 0.429s

OK
Creating test database for alias 'default'...
Destroying test database for alias 'default'...
+ python manage.py test functional_tests
EEEEEE
======================================================================
ERROR: functional_tests.test_layout_and_styling (unittest.loader._FailedTest)
 ---------------------------------------------------------------------
ImportError: Failed to import test module: functional_tests.test_layout_and_styling
[...]
ImportError: No module named 'selenium'

Ran 6 tests in 0.001s

FAILED (errors=6)

Build step 'Virtualenv Builder' marked build as failure
Ah. We need Selenium in our virtualenv.
Let’s add a manual installation of Selenium to our build steps:
    pip install -r requirements.txt
    python manage.py test accounts lists
    pip install selenium
    python manage.py test functional_tests
Tip
Some people like to use a file called test-requirements.txt to specify packages that are needed for the tests, but not the main app.
And hit “Build Now” again.
Next one of two things will happen. Either you’ll see some error messages like this in your console output:
    self.browser = webdriver.Firefox()
[...]
selenium.common.exceptions.WebDriverException: Message: 'The browser appears to
have exited before we could connect. The output was: b"\\n(process:19757):
GLib-CRITICAL **: g_slice_set_config: assertion \'sys_page_size == 0\'
failed\\nError: no display specified\\n"'
[...]
selenium.common.exceptions.WebDriverException: Message: connection refused
Or possibly your build will just hang altogether (that happened to me at least once). The reason is that Firefox can’t start, because it doesn’t have a display to run on.
Setting Up a Virtual Display So the FTs Can Run Headless
As you can see from the traceback, Firefox is unable to start because the server doesn’t have a display.
There are two ways to deal with this problem. The first is to switch to using a headless browser, like PhantomJS or SlimerJS. Those tools definitely have their place—they’re faster, for one thing—but they also have disadvantages. The first is that they’re not “real” web browsers, so you can’t be sure you’re going to catch all the strange quirks and behaviours of the actual browsers your users use. The second is that they can behave quite differently inside Selenium, and often require some rewriting of FT code.
Tip
I would look into using headless browsers as a “dev-only” tool, to speed up the running of FTs on the developer’s machine, while the tests on the CI server use actual browsers.
The alternative is to set up a virtual display: we get the server to pretend it has a screen attached to it, so Firefox runs happily. There are a few tools out there to do this; we’ll use one called “Xvfb” (X Virtual Framebuffer)1 because it’s easy to install and use, and because it has a convenient Jenkins plugin (now you know why we installed it earlier).
We go back to our project and hit “Configure” again, then find the section called “Build Environment”. Using the virtual display is as simple as ticking the box marked “Start Xvfb before the build, and shut it down after”, as in Figure 24-9.
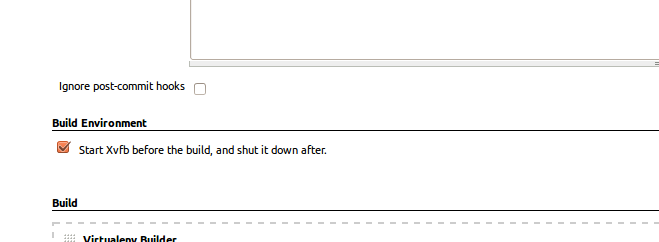
Figure 24-9. Sometimes config is easy
The build does much better now:
[...]
Xvfb starting$ /usr/bin/Xvfb :2 -screen 0 1024x768x24 -fbdir
/var/lib/jenkins/2013-11-04_03-27-221510012427739470928xvfb
[...]
+ python manage.py test lists accounts
...............................................................
 ---------------------------------------------------------------------
Ran 63 tests in 0.410s

OK
Creating test database for alias 'default'...
Destroying test database for alias 'default'...

+ pip install selenium
Requirement already satisfied (use --upgrade to upgrade): selenium in
/var/lib/jenkins/shiningpanda/jobs/ddc1aed1/virtualenvs/d41d8cd9/lib/python3.5/site-packages
Cleaning up...
+ python manage.py test functional_tests
......F.
======================================================================
FAIL: test_can_start_a_list_for_one_user
(functional_tests.test_simple_list_creation.NewVisitorTest)
 ---------------------------------------------------------------------
Traceback (most recent call last):
  File "/.../superlists/functional_tests/test_simple_list_creation.py", line
43, in test_can_start_a_list_for_one_user
    self.wait_for_row_in_list_table('2: Use peacock feathers to make a fly')
  File "/.../superlists/functional_tests/base.py", line 51, in
wait_for_row_in_list_table
    raise e
  File "/.../superlists/functional_tests/base.py", line 47, in
wait_for_row_in_list_table
    self.assertIn(row_text, [row.text for row in rows])
AssertionError: '2: Use peacock feathers to make a fly' not found in ['1: Buy
peacock feathers']
 ---------------------------------------------------------------------
Ran 8 tests in 89.275s

FAILED (errors=1)
Creating test database for alias 'default'...
[{'secure': False, 'domain': 'localhost', 'name': 'sessionid', 'expiry':
1920011311, 'path': '/', 'value': 'a8d8bbde33nreq6gihw8a7r1cc8bf02k'}]
Destroying test database for alias 'default'...
Build step 'Virtualenv Builder' marked build as failure
Xvfb stopping
Finished: FAILURE
Pretty close! To debug that failure, we’ll need screenshots though.
Note
This error was due to the performance of my Jenkins instance—you may see a different error, or none at all. In any case, the following tools for taking screenshots and dealing with race conditions will come in useful. Read on!
Taking Screenshots
To be able to debug unexpected failures that happen on a remote PC, it
would be good to see a picture of the screen at the moment of the failure,
and maybe also a dump of the HTML of the page. We can do that using some
custom logic in our FT class tearDown. We have to do a bit of introspection of
unittest internals, a private attribute called _outcomeForDoCleanups, but
this will work:
functional_tests/base.py (ch21l006)
importosfromdatetimeimportdatetime[...]SCREEN_DUMP_LOCATION=os.path.join(os.path.dirname(os.path.abspath(__file__)),'screendumps')[...]deftearDown(self):ifself._test_has_failed():ifnotos.path.exists(SCREEN_DUMP_LOCATION):os.makedirs(SCREEN_DUMP_LOCATION)forix,handleinenumerate(self.browser.window_handles):self._windowid=ixself.browser.switch_to_window(handle)self.take_screenshot()self.dump_html()self.browser.quit()super().tearDown()def_test_has_failed(self):# slightly obscure but couldn't find a better way!returnany(errorfor(method,error)inself._outcome.errors)
We first create a directory for our screenshots if necessary. Then we
iterate through all the open browser tabs and pages, and use some Selenium
methods, get_screenshot_as_file and browser.page_source, for our image and
HTML dumps:
functional_tests/base.py (ch21l007)
deftake_screenshot(self):filename=self._get_filename()+'.png'('screenshotting to',filename)self.browser.get_screenshot_as_file(filename)defdump_html(self):filename=self._get_filename()+'.html'('dumping page HTML to',filename)withopen(filename,'w')asf:f.write(self.browser.page_source)
And finally here’s a way of generating a unique filename identifier, which includes the name of the test and its class, as well as a timestamp:
functional_tests/base.py (ch21l008)
def_get_filename(self):timestamp=datetime.now().isoformat().replace(':','.')[:19]return'{folder}/{classname}.{method}-window{windowid}-{timestamp}'.format(folder=SCREEN_DUMP_LOCATION,classname=self.__class__.__name__,method=self._testMethodName,windowid=self._windowid,timestamp=timestamp)
You can test this first locally by deliberately breaking one of the tests, with
a self.fail() for example, and you’ll see something like this:
[...]
screenshotting to /.../superlists/functional_tests/screendumps/MyListsTest.test
_logged_in_users_lists_are_saved_as_my_lists-window0-2014-03-09T11.19.12.png
dumping page HTML to /.../superlists/functional_tests/screendumps/MyListsTest.t
est_logged_in_users_lists_are_saved_as_my_lists-window0-[...]
Revert the self.fail(), then commit and push:
$ git diff  # changes in base.py
$ echo "functional_tests/screendumps" >> .gitignore
$ git commit -am "add screenshot on failure to FT runner"
$ git push
And when we rerun the build on Jenkins, we see something like this:
screenshotting to /var/lib/jenkins/jobs/Superlists/.../functional_tests/
screendumps/LoginTest.test_login_with_persona-window0-2014-01-22T17.45.12.png
dumping page HTML to /var/lib/jenkins/jobs/Superlists/.../functional_tests/
screendumps/LoginTest.test_login_with_persona-window0-2014-01-22T17.45.12.html
We can go and visit these in the “workspace”, which is the folder Jenkins uses to store our source code and run the tests in, as in Figure 24-10.
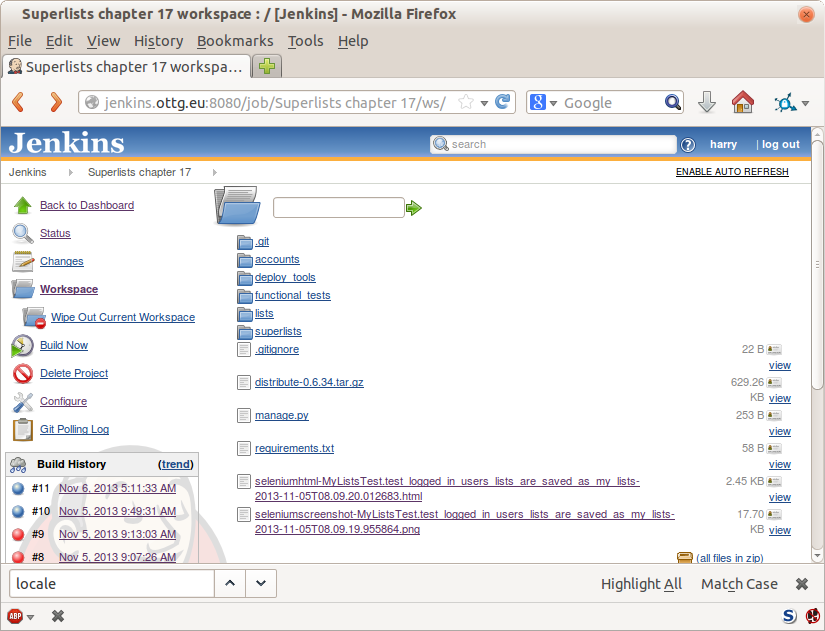
Figure 24-10. Visiting the project workspace
And then we look at the screenshot, as shown in Figure 24-11.

Figure 24-11. Screenshot looking normal
If in Doubt, Try Bumping the Timeout!
Hm. No obvious clues there. Well, when in doubt, bump the timeout, as the old adage goes:
functional_tests/base.py
MAX_WAIT=20
Then we can rerun the build on Jenkins using “Build Now”, and confirm it now works, as in Figure 24-12.
Figure 24-12. The outlook is brighter
Jenkins uses blue to indicate passing builds rather than green, which is a bit disappointing, but look at the sun peeking through the clouds: that’s cheery! It’s an indicator of a moving average ratio of passing builds to failing builds. Things are looking up!
Running Our QUnit JavaScript Tests in Jenkins with PhantomJS
There’s a set of tests we almost forgot—the JavaScript tests. Currently our “test runner” is an actual web browser. To get Jenkins to run them, we need a command-line test runner. Here’s a chance to use PhantomJS.
Installing node
It’s time to stop pretending we’re not in the JavaScript game. We’re doing web development. That means we do JavaScript. That means we’re going to end up with node.js on our computers. It’s just the way it has to be.
Follow the instructions on the node.js download page. There are installers for Windows and Mac, and repositories for popular Linux distros.2
Once we have node, we can install phantom:
root@server $ npm install -g phantomjs # the -g means "system-wide".
Next we pull down a QUnit/PhantomJS test runner. There are several out there (I even wrote a basic one to be able to test the QUnit listings in this book), but the best one to get is probably the one that’s linked from the QUnit plugins page. At the time of writing, its repo was at https://github.com/jonkemp/qunit-phantomjs-runner. The only file you need is runner.js.
You should end up with this:
$ tree lists/static/tests/
lists/static/tests/
├── qunit-2.0.1.css
├── qunit-2.0.1.js
├── runner.js
└── tests.html

0 directories, 4 files
Let’s try it out:
$ phantomjs lists/static/tests/runner.js lists/static/tests/tests.html
Took 24ms to run 2 tests. 2 passed, 0 failed.
Just to be sure, let’s deliberately break something:
lists/static/list.js (ch21l019)
$('input[name="text"]').on('keypress',function(){// $('.has-error').hide();});
Sure enough:
$ phantomjs lists/static/tests/runner.js lists/static/tests/tests.html

Test failed: errors should be hidden on keypress
    Failed assertion: expected: false, but was: true
file:///.../superlists/lists/static/tests/tests.html:27:15

Took 27ms to run 2 tests. 1 passed, 1 failed.
All right! Let’s unbreak that, commit and push the runner, and then add it to our Jenkins build:
$ git checkout lists/static/list.js
$ git add lists/static/tests/runner.js
$ git commit -m "Add phantomjs test runner for javascript tests"
$ git push
Adding the Build Steps to Jenkins
Edit the project configuration again, and add a step for each set of JavaScript tests, as per Figure 24-13.

Figure 24-13. Add a build step for our JavaScript unit tests
You’ll also need to install PhantomJS on the server:
root@server:$ add-apt-repository -y ppa:chris-lea/node.js
root@server:$ apt-get update
root@server:$ apt-get install nodejs
root@server:$ npm install -g phantomjs
And there we are! A complete CI build featuring all of our tests!
Started by user harry
Building in workspace /var/lib/jenkins/jobs/Superlists/workspace
Fetching changes from the remote Git repository
Fetching upstream changes from https://github.com/hjwp/book-example.git
Checking out Revision 936a484038194b289312ff62f10d24e6a054fb29 (origin/chapter_1
Xvfb starting$ /usr/bin/Xvfb :1 -screen 0 1024x768x24 -fbdir /var/lib/jenkins/20
[workspace] $ /bin/sh -xe /tmp/shiningpanda7092102504259037999.sh

+ pip install -r requirements.txt
[...]

+ python manage.py test lists
.................................
 ---------------------------------------------------------------------
Ran 43 tests in 0.229s

OK
Creating test database for alias 'default'...
Destroying test database for alias 'default'...

+ python manage.py test accounts
..................
 ---------------------------------------------------------------------
Ran 18 tests in 0.078s

OK
Creating test database for alias 'default'...
Destroying test database for alias 'default'...

[workspace] $ /bin/sh -xe /tmp/hudson2967478575201471277.sh
+ phantomjs lists/static/tests/runner.js lists/static/tests/tests.html
Took 32ms to run 2 tests. 2 passed, 0 failed.
+ phantomjs lists/static/tests/runner.js accounts/static/tests/tests.html
Took 47ms to run 11 tests. 11 passed, 0 failed.

[workspace] $ /bin/sh -xe /tmp/shiningpanda7526089957247195819.sh
+ pip install selenium
Requirement already satisfied (use --upgrade to upgrade): selenium in /var/lib/

Cleaning up...
[workspace] $ /bin/sh -xe /tmp/shiningpanda2420240268202055029.sh
+ python manage.py test functional_tests
........
 ---------------------------------------------------------------------
Ran 8 tests in 76.804s

OK
Nice to know that, no matter how lazy I get about running the full test suite on my own machine, the CI server will catch me. Another one of the Testing Goat’s agents in cyberspace, watching over us…
More Things to Do with a CI Server
I’ve only scratched the surface of what you can do with Jenkins and CI servers. For example, you can make it much smarter about how it monitors your repo for new commits.
Perhaps more interestingly, you can use your CI server to automate your staging tests as well as your normal functional tests. If all the FTs pass, you can add a build step that deploys the code to staging, and then reruns the FTs against that—automating one more step of the process, and ensuring that your staging server is automatically kept up to date with the latest code.
Some people even use a CI server as the way of deploying their production releases!
1 Check out pyvirtualdisplay as a way of controlling virtual displays from Python.
2 Make sure you get the latest version. On Ubuntu, use the PPA rather than the default package.