CHAPTER 3
Content ApprovalConcept
In the previous chapter, we discussed site contents and settings to manage the site content. In this chapter, we will discuss a specific setting related to site content, which we call content approval. This setting related to content is present under list or library settings, but we have not discussed it at that moment since we have planned to discuss that separately. It is an essential feature and mostly used, which needs special attention.
Structure
In this chapter, we will discuss:
- Content approval overview
- Enable content approval process
- How content approval works
- Approval workflow in the content approval process
- Approval workflow using Power Automate
Objective
During the end of the chapter, you will get a clear understanding of:
- Settings responsible for content approval.
- How content approval works?
- How can we automate content approval and its benefits over the manual approval process?
Content approval overview
Most of the cases, we need business documents or contents to be reviewed and approved by managers or dedicated users before making it available to intranet users to finalize content. It is when the content approval process comes into the picture. Secure documents like policy, budget, finance, legal documents pass through either single-level approval or multiple levels of approval process before finalizing. So, it’s a good practice to keep documents pass through approval to keep under, monitor, updated. Content approval can be applied to content types, library, and lists which carry actual content.
Enable content approval process first
Once you are ready to use the Content Approval feature, then the first step to proceed in the content approval process is to activate one sitting from the library or list settings. Let us perform the following steps to enable the content approval process in a library:
- Navigate to the Library settings (
https://<site url>/_layouts/15/listedit.aspx?List=**) in site. - Click on Versioning settings (
https://<site url>/_layouts/15/LstSetng.aspx?List=**) present under category General settings. - You will find an option Content Approval (Require content approval for submitted items?), where you need to choose Yes or No. Change the selection to Yes from the default selection No as seen in the following screenshot:

Figure 3.1: Enable Content Approval
- Changing the above setting will enable additional security in the library. You will notice option Draft Item Security (Who should see draft items in this document library?) is enabled for library and default selected option is Only users who can approve items (and the author of the item), which means documents or items uploaded or added are visible to only approvers and the user who submitted the document or item. Although other users have permission in the library, they cannot see the documents or items till it’s not approved (Document in draft), which enables additional security to the user to make the content visible once finalized and approved. You can change the settings to make it visible if required as seen in the following screenshot:
- Any user who can read items: All users having permission to the library can see library items.
- Only users who can edit items: Users having Edit permission can see the documents.
- Only users who can approve items (and the author of the item): Approver of the document and user who submitted the item (Author) only can see the documents submitted:

Figure 3.2: Draft Item Security Setting
- Click on OK to apply the changes.
- Additionally, you can change the Document Version History to Create major and minor (draft) versions from the default selected option Create major versions as seen in the following screenshot:
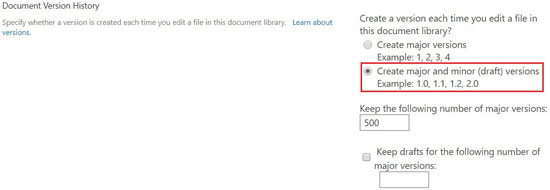
Figure 3.3: Major and minor version
- The same steps are applicable to enable the content approval process for the list as well.
How Content Approval works
Once settings are applied, you can start using the feature. Let’s perform the following steps to check and understand how content approval works in the library.
- Open the Document library in which you enabled content approval.
- You will notice one additional column Approval Status added to the library view.
- Once you open Views from library settings or open Switch View Options from command bar, you will see two additional views named Approve/reject Items and My submissions as seen in the following screenshot:

Figure 3.4: Impact of the feature on Views
- Upload one document in the library, you will notice the status of the document under the newly added column Approval Status as Pending means, the document already submitted for approval, when option Document Version History is selected as default Create major versions.
- If you configured the option Document Version History to Create major and minor (draft) versions from the default selected option Create major versions, you will notice the status of the column Approval Status as Draft and need an additional step to submit for approval.
- Select the file; you will see a newly added option Submit for approval in the command bar. You can click on this option else; you can click on Ellipses button
 present side to document, then click on More, then click on Publish to send the document for approval, as seen in the following screenshot:
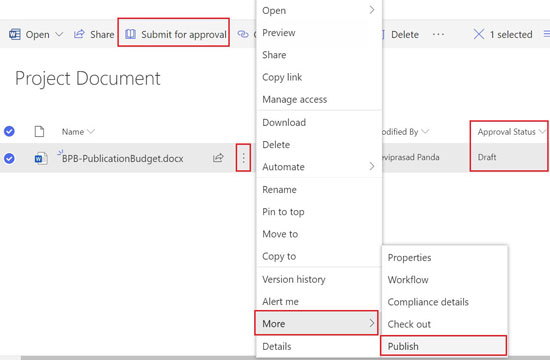
Figure 3.5: Document Approval Status
- Once the document submitted for approval, the status of the column Approval Status will change to Pending.
- The submitted document needs to be approved by the approver (user having full control in the library). The Approver needs to navigate to the library.
- Select the document that needs to be approved, click on Ellipses button
 present side to document, then click on More, then click on Approve/Reject.
 - Alternatively, this can be approved by clicking the Ellipses button
 from the command bar and then select Approve/Reject from the drop-down option, as seen in the following screenshot.
 - Bulk files/multiple files approval at a time is supported. Approver might require approving multiple documents as per their suitable time. In that case, the approver can select the newly created view Approve/reject items from Switch view options present in the command bar. Documents that need approval will only be displayed in the library. Select all files and click on Approve/reject items as seen in the following screenshot:
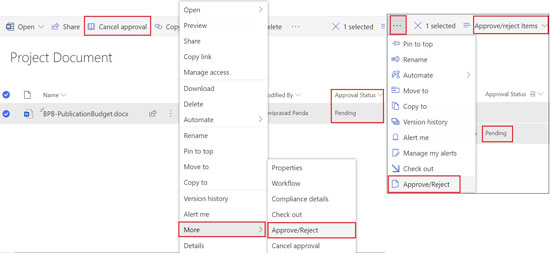
Figure 3.6: Approve or reject
- One dialog window will open with options like Approved, Rejected, Pending so to take appropriate action on the same as seen in the following screenshot:

Figure 3.7: Approve or reject the request
- Select Approved, enter a comment, and click on OK.
- Once approved, the status of the document under the column Approval Status is changed to Approved from Pending, as seen in the following screenshot. Now the document is available for all users having permission in the library.
- We discussed the manual process of approval, where approver needs to open the library and follow the process of approval. But how approvers will know if anyone uploaded document and its pending for approval. For this, approver needs to set an alert on the library so that approver will receive alert mail if the document is added and then need to access the library manually for approval. It is tough to manage, time taking also, so its not a good process for approval.
Approval Workflow in the content approval process
The approval process can be made simple and easy by implementing workflow in the library or list that ultimately saves time and drive people to do productive work. When we are automating a series of the task then it’s called workflow. Let’s perform the following steps to create and apply a workflow to see how it is helpful in the content approval process.
Activate a feature first
You need to activate a feature first to enable the approval workflow. Let’s perform the following steps to activate the feature:
- Navigate to Site settings (
https://<site url>/_layouts/15/settings.aspx) as seen in the following screenshot:
Figure 3.8: Site settings
- Click on Site collection features (https://<site url>/_layouts/15/Manage Features.aspx?Scope=Site) present under Site Collection Administration as seen in the following screenshot:

Figure 3.9: Site collection features
- Identify the feature Workflows at the bottom and click on Active then the feature will change to state Active as seen in the following screenshot:

Figure 3.10: Activate feature Workflows
- It will make the workflow templates Approval – SharePoint 2010 available under Select a workflow template as seen in the following screenshot:

Figure 3.11: Approval – SharePoint 2010 template
- You will find more features related to workflow other than Workflows like Disposition Approval Workflow, Publishing Approval Workflow, Sample Proposal, SharePoint 2007 Workflows, Three-state workflow under site collection feature as seen in the following screenshot:

Figure 3.12: Workflow features in Site Collection
- You can activate those feature to get more templates like Disposition Approval, Publishing Approval as seen in the screenshot below and create another type of workflows:

Figure 3.13: Workflow templates
Create Approval Workflow
Once the feature is active, you can start proceeding to create a workflow. Let’s perform the following steps to create a workflow.
- Navigate to Site contents (
https://<site url>/_layouts/15/viewlsts.aspx), open one document library (for example, BudgetReport), click on the Gear Button present at top right corner, you will find Library settings from the drop-down options. In another way, open site contents from the site. Navigate to
 Site contents, right click your mouse on any one library or click on Ellipses button present side to document library and click on Settings from the drop-down options, will open the library settings (
https://<site url>/_layouts/15/listedit.aspx?List=**) as seen in the following screenshot:
Figure 3.14: Library settings
- Click on Workflow Settings (https://<site url>/_layouts/15/WrkSetng.aspx?List=**) present under Permissions and Management as seen in the following screenshot:
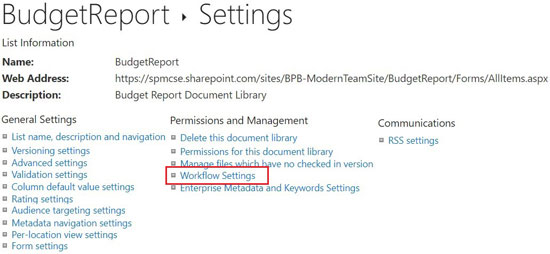
Figure 3.15: Workflow settings
- Click on Add a workflow (https://<site url>/AddWrkfl.aspx?List={**}) under Workflow Settings as seen in the following screenshot:
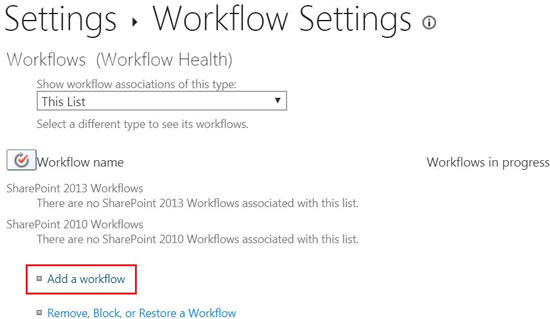
Figure 3.16: Add a workflow
- Select template Approval – SharePoint 2010 from Select a workflow template.
- Enter Name (Enter a unique name for this workflow) as Budget Approval Workflow.
- The next option you will find is Start Options, which defines the workflow triggering settings. You see the option selected by default as Allow this workflow to be manually started by an authenticated user with Edit Item permissions, which means the user needs to start the workflow manually. This setting is selected because when there is an error in workflow triggering, it may require running the workflow manually. We can still restrict the manual running workflow by selecting the setting Require Manage Lists Permissions to start the workflow, which means users who have permission to manage the list can only start this workflow manually, no other users can.
- Select the checkbox Creating a new item will start this workflow present under Start Options at the bottom so that when a new item is created, or document is added to the library, then the workflow will be triggered automatically.
- Keep rest options as it is and click Next as seen in the following screenshot:

Figure 3.17: Approval workflow template
- Enter Approvers ID under the filed Approvers, which can be one user or multiple users.
- Describe the message that should go to the approver in the mail once a request is created under the field Request.
- Enter a due date for the request for approval under the field Due Date for All Tasks.
- Under Duration Per Task, you can enter 1 or 2 or 3, and so on, and under Duration Units select unit as Day(s), Week, Month, which mean duration is 1 month or 1 week or 1 month. No need to select anything at this moment. Keep as default.
- In option CC, you can enter any user ID who needs to be updated regarding the start and end of the approval process without being part of the approver list.
- If you select the option End on First Rejection, then the approval request will be rejected if any one of the approvers rejects the request.
- If you select the option End on Document Change, then workflow requests will be rejected if there is any modification done in between the workflow under the approval process.
- Select the box present under Enable Content Approval to Update the approval status after the workflow is completed and click Save as seen in the following screenshot:

Figure 3.18: Approval workflow saved
- Workflow is created now. You will find the workflow name Budget Approval Workflow and Workflows in progress status (0 workflows running now) under Workflow Settings as seen in the following screenshot:

Figure 3.19: Workflow created
How the approval workflow works
The approval workflow is created now. Let’s see how it works and how it is different from the manual approval process. Let’s perform the following steps to check what happens precisely:
- Now upload one document in library BudgetReport where we created the workflow.
- You will notice one additional column Budget Approval Workflow is added in library, and reflecting the current status of the document as In Progress as seen in the following screenshot:

Figure 3.20: Upload document in the library
- Approver will receive one mail with subject as Approval has started on <uploaded file name>. Click on the File Name with link for a review of the document. Once the review of the document is done, click on the link View the status of this workflow present at the bottom as seen in the following screenshot:

Figure 3.21: Approval Started Mail to Approver
- Workflow Status page will open where we can see the current status of the workflow. It holds information about the Initiator, Started date and time, Document name, Status of the document, Workflow Visualization, as seen in the following screenshot:
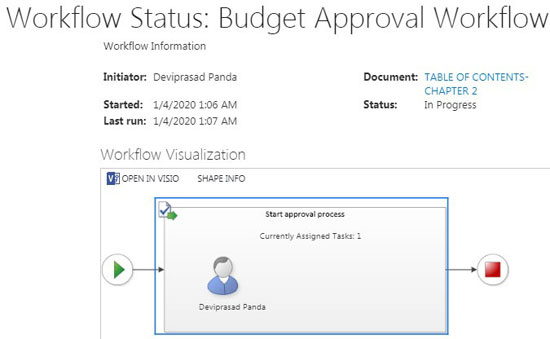
Figure 3.22: Workflow information
- The approver can see the Workflow History at the bottom. Under Event Type can see as Workflow Initiated and Task Created. Under Description can see Task created for Deviprasad Panda. Due by: 1/7/2020 12:00:00 AM.
- Approver needs to click on the Link with file name (Please approve TABLE OF CONTENTS-CHAPTER 2) present under field Title and category Tasks as seen in the following screenshot:
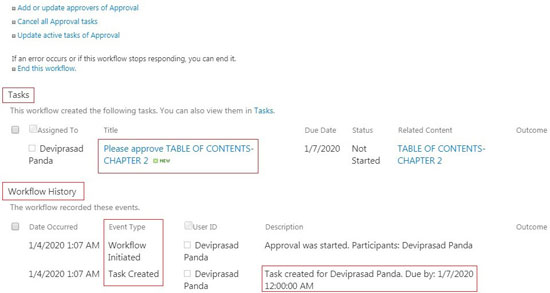
Figure 3.23: Workflow Tasks needs approver action
- Another window will open from where approver need do the needful. Enter comment under the field Comments and click Approve as seen in the following screenshot:
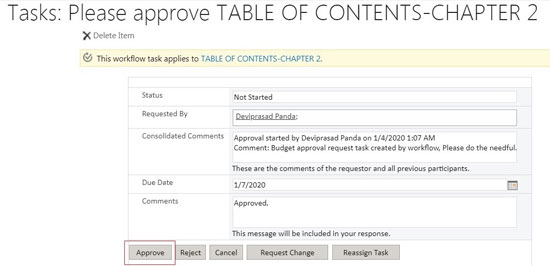
Figure 3.24: Workflow Task action window
- Now go back to the library and you will notice the status of document as Approved. Click on the status Approved that will redirect you to the Workflow Status page as seen in the following screenshot:

Figure 3.25: Workflow completed and Status updated
- Now you see the Status field under Tasks is updated as Completed, and the Outcome field is updated as Approved.
- Under Workflow History you see under Event Type status updated as Task Completed and Workflow Completed. Description its showing task is assigned to whom and approved by whom with the comment put by the approver. The Outcome is updated that Approval was completed as seen in the following screenshot:
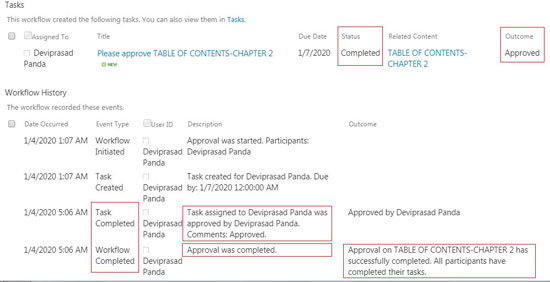
Figure 3.26: Workflow history after approval
Benefits of Approval Workflow
You must have noticed the process of workflow compared to the manual process. The benefits of the workflow, as mentioned below:
- There is a reduction in the manual effort that, in turn, saves time and improves productivity.
- The user gets a mail with all details and links. Gets task reminders as well.
- The link to the document is there in the mail. Users can download that file directly from the link instead of opening manually from the library.
- Link to check the status of the workflow directly is there, and the user can do needful.
- Every event type is tracked, and so that from workflow history, you can get all specific actions taken on that document.
Approval flow using Power Automate
We can create a flow to automate the approval process using Power Automate, which is going to be the future to automate task. In the future, the workflow will be replaced by power automate. Let’s perform the following steps to create a basic approval flow:
- Access the library and click on Automate from the command bar, then click on Power Automate from the drop-down and select Create a flow.
- You will get flow templates to select. Scroll down and click on See more templates as seen in the following screenshot:
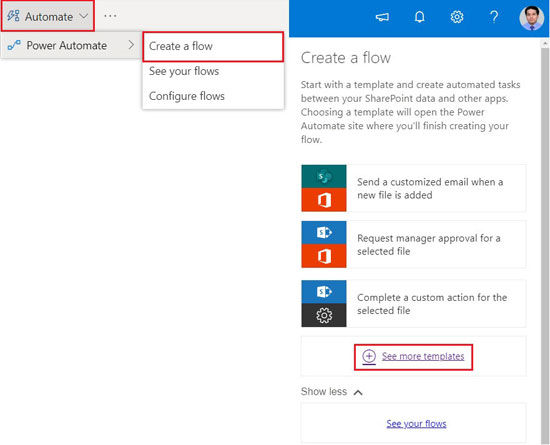
Figure 3.27: Command bar option to select Flow
- You will be redirected to the Power Automate page where you can see more templates in for of categories like Featured, Shared with me, Approval, Button, Data collection, Visio, Email, Events, and calendar, Mobile, Notifications, Productivity, Social Media, Sync. Click on category Approval and select the template Start approval when a new item is added as seen in the following screenshot:

Figure 3.28: Template Start approval when a new item is added
- Another window will appear where you can see the services (Office 365 Outlook, SharePoint, Approvals, Office 365 Users) involved in approval flow. Click on Continue:
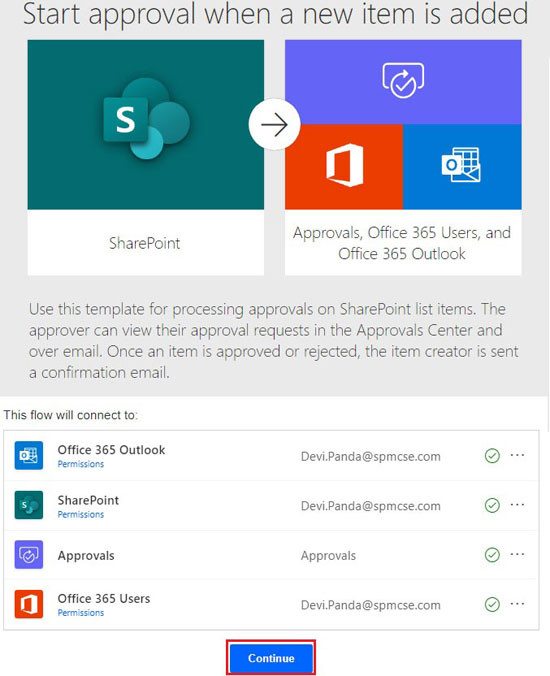
Figure 3.29: Services involved in Approval Flow
- You will be redirected to the flow page wherein the first block named When a new item is created, you need to select Site Address and List Name. Under Site Address select site from the drop down option or can enter a custom value, selecting the option Enter custom value at the bottom, if site id not found under the drop-down as seen in the following screenshot:

Figure 3.30: Enter Site Address and List Name
- The next block underflow is Start an approval, which configures settings for the approval mail to the approver. Keep it as it is for the moment, as seen in the following screenshot:

Figure 3.31: Start an Approval
- The approval mail that approver will receive as seen in the following screenshot below. You can compare both above Figure 3.28 and Figure 3.29 you will get a clear idea:

Figure 3.32: Approval mail to Approver
- Another block for configuration is Condition where we need to configure the Response as seen in the following screenshot:

Figure 3.33: Condition
- If the Response is Yes the configuration for Approved mail of format as below under the block If yes as seen in the following screenshot:
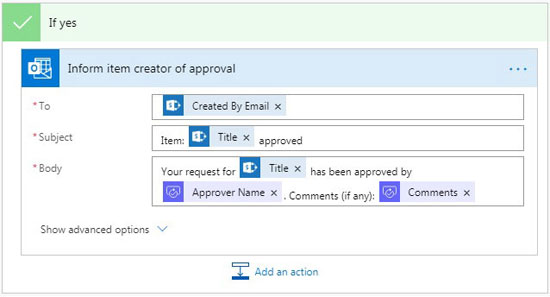
Figure 3.34: Action on condition satisfied
- The example of the approved mail is as seen in the following screenshot:

Figure 3.35: Task Approved
- If the Response is No the configuration for Rejected mail of format as below under the block If no as seen in the following screenshot:

Figure 3.36: Action on condition not satisfied
- Other blocks represent the error configuration which keeps as it is for the moment as seen in the following screenshot below, but it can be customized at any moment:

Figure 3.37: Action on error
- Finally, click on the Save button present at the bottom.
- Now when any document is added in library, the approver will receive mail to do the needful as seen in the following screenshot:

Figure 3.38: Approval mail to Approver
- Approver needs to do the needful. Approver needs to click in Approve the request with Comment and click Submit, as seen in the following screenshot.

Figure 3.39: Approve or Reject from mail
- After the request is approved, the requestor will receive mail finally, as seen in the following screenshot:

Figure 3.40: Task Approved
- You can check the history on flow completed and can check the steps completed for the item. Under My flows click on the flow Start approval when a new item is added as seen in the following screenshot:

Figure 3.41: History of My flows
- You will see under Runs flow showing status as Succeeded. Click on the link (Jan 6, 10:32 AM (21 min ago)) present under Start as seen in the following screenshot:

Figure 3.42: Flow status
- Then opening in each block will show you the series of actions taken under that block. If you open the block Start an approval, then you will see the details as seen in the screenshot below. The green mark at top right corner indicated in executed blocks as seen in the following screenshot:

Figure 3.43: History of Start an approval
- Similarly, expanding other blocks, you can see the series of actions taken under that. Block marked cross are skipped (Block If no), as seen in the following screenshot:

Figure 3.44: Condition Satisfied and Block "If yes"executed
Conclusion
In this chapter, we had a glance atthe content approval concept. We discussed the steps to enable the content approval process in the library or list. Understood how manually approve content and how it works. Then we discussed step by step how to automate the content approval process by applying workflow and automate. We understood how automating the approval process works and how it's different from the manual process with all benefits. Next, in Chapter 4, Configure Information Management Policy, we will discuss information management policy and how to apply it in SharePoint.
Points to Remember
- The focus is to share the approval concept instead of mentioning multiple examples.
- Workflow and Power Automate can be used to automate tasks to a new level.
- Content can be approved by a single user or multiple users. We can add additional users' same way the first user is added.
- Bulk Approval can be made possible for approvers.
- Approvers can be users having Full Control permission or Design permission or any Custom Permission group having Approve Items permission.
- In this chapter, wherever its mentioned like this format _layouts/15/****.aspx, means this section is added after the site
URL http://<site url>/_layouts/15/****.aspx. - Regular changes are applied in Office 365 and SharePoint Online by which there may be changes happening in the template or some other features.