CHAPTER 4
Configure Information Management Policy
In the previous chapter, we discussed content approval and how to automate the content approval process using workflow or power automate. It’s essential to maintain security and compliance with information, regulations, and business process internal to the organization. We can track the content access for employees, duration of access, apply specific actions for unused contents like delete, move to a location, and so on, by applying policies. So, in this chapter, we will discuss how to configure and apply information management policies to complete specific actions like retention, audit events related to the content present in the site, apply security by implementing barcodes and labels.
Structure
In this chapter, we will discuss the following topics:
- Introduction to Information Management Policies
- Activate Dependent Feature
- Apply Site Policies
- Content Type Policy Templates Creation
- Enable Retention, Auditing, Barcodes, Labels Policies
- Applying Policy in Content Types, Library, Folder, List
- Timer Job Action
Objective
During the end of the chapter, you will get a clear understanding of:
- Information Management Policy overview
- Dependent Features for Information Management Policies
- How to create and apply Site Policies
- How to create a Content Type Policy Template
- How to enable and setup Retention, Auditing, Barcodes, Labels Policies
- How to apply policies in Content Types, Library, Folder, List
- Responsible Timer Jobs for retention action
Activate Feature First
To apply policies, we need to activate one dependent site collection feature that will enable Information Management Policy and allow retention schedules applicable for site, contents. Let’s perform the following steps to activate the feature:
- Navigate to
Site settings(https://<site url>/_layouts/15/settings.aspx) as seen in the following screenshot:
Figure 4.1: Site settings
- Click on
Site collection features(https://<site url>/_layouts/15/Manage Features.aspx?Scope=Site) present underSite Collection Administrationas seen in the following screenshot.
Figure 4.2: Site collection features
- Identify the site collection feature Site Policy at the bottom and click on Active, as seen in the following screenshot:

Figure 4.3: Activate feature Site Policy
Apply Site Policies
We can apply site policies for deletion from option Site Closure and Deletion. Let’s perform the following steps to create site policy.
- Navigate to Site settings (
https://<site url>/_layouts/15/settings.aspx). - Click on
Site Policies(https://<site url>/_layouts/15/ProjectPolicies. aspx) present underSite Collection Administrationas seen in the following screenshot:
Figure 4.4: Site Policies
- Click on
Create(https://<site url>/_layouts/15/projectpolicy config.aspx) underSite Policiessettings as seen in the following screenshot:
Figure 4.5: Create Site Policies
- Enter Name and Description for the
new Site Policy(For example,Delete BPB-ModernTeamSite Policy). - Next, under Site Closure and Deletion, you will find three options like Do not close or delete site automatically, Delete sites automatically, Close and delete sites automatically. Select the second option Delete sites automatically, as seen in the following screenshot:

Figure 4.6: New Site Policy
- You can set Deletion Event as either Site closed date or Site created date. Select Site closed date. We also need to mention after how many days or months (3 months) or year from the closed date, the site will be deleted automatically.
- Select checkbox Send an email notification to site owners this far in advance of deletion and set one value (2 months) so that owners will start receiving mail before (2 months) that date of site deletion.
- Select checkbox Send follow-up notifications every and set one value (14 days) so that owners will get follow up mail in that frequency (14 days).
- Select the checkbox Owners can postpone imminent deletion for: and enter one value (1 months) so the site will not be deleted automatically for that duration and will be on hold.
- Finally, click on OK to apply the changes.
- Since we have chosen Delete sites automatically and Deletion Event as Site closed date, the policy will be applied when the site is manually marked, Close this site now.
- Let’s perform the following steps to mark the site as Close this site now.
- Navigate to Site Settings (
<_layouts/15/settings.aspx>). - Click on Site Closure and Deletion (
https://<site url>/_layouts/15/Project PolicyAndLifecycle.aspx) present under Site Administration as seen in the following screenshot:
Figure 4.7: Site Closure and Deletion
- You will notice the option Close this site now options under Site Closure is greyed out. Click on the drop-down option from Site Policy, select the policy Delete BPB-ModernTeamSite Policy that we created below and click on OK as seen in the following screenshot:

Figure 4.8: Apply Site Policy
- Now again, open Site Closure and Deletion present under Site Administration. This time you will find Close this site now is enabled, so click on that. Then click on, OK.
- You notice the status of Site Closure changed to Open this site with the site closed date This site was closed on: 1/8/2020 12:16 AM, and field Site Deletion changed to Postpone deletion of this site for 1 month. The site owner can postpone deleting if feel to extend 1 month following this option.
- At the top of the site above the banner, you will find a message like This site will be deleted on Wednesday, April 8, 2020. Also, This site is read only at the site collection administrator’s request as seen in the following screenshot so that no contents can be added to keep the latest data and migrate user to other site or location as per business requirement:
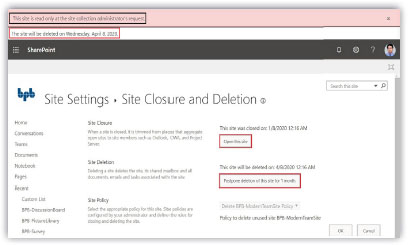
Figure 4.9: Site Deletion Policy Applied
- If you are selecting the option Close and delete sites automatically, there is no requirement of manually setting the option Close this site now, since you are setting here directly. Enter a value (1 years) for Site created date. Enter value (3 months) for Site closed date. It means after a 1-year, the site will be marked as closed, and after 3 months site will be deleted automatically. Settings Send an email notification to site owners this far in advance of deletion and Send follow-up notifications every will send notifications and follow up emails the same way as we discussed before, as seen in the following screenshot. Rest all steps same, the site will be deleted automatically as scheduled, and the user can message above the banner:

Figure 4.10: Close and Delete sites automatically
Content Type Policy Templates Creation
Let’s perform the following steps to create a content type policy template:
- Navigate to Site Settings (
<_layouts/15/settings.aspx>). - Click on Content Type Policy Templates (
https://<site url>/_layouts/15/Policylist.aspx) present under Site Collection Administration as seen in the following screenshot: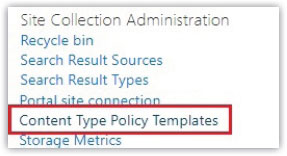
Figure 4.11: Content Type Policy Templates
- Enter Name and Administrative Description; as seen in the following screenshot:

Figure 4.12: Content Type Policy Templates Name and Administrative Description
- You will find four categories of Information policy named Enable Retention, Enable Auditing, Enable Barcodes, Enable Labels, as seen in the following screenshot:

Figure 4.13: Information policy categories
- Click on OK for the moment; you will see the Content Type Policy Templates is created as seen in the following screenshot, but there is no policy applied in this template. We will discuss each category separately in the next section:

Figure 4.14: Content Type Policy Template created
Enable Retention
Let’s perform the following steps to configure retention policy in the Content Type Policy Templates that we created above:
- Click on the policy Project Document that we just created.
- Click on the checkbox Enable Retention; you will see another option Add a retention stage… enabled, as seen in the following screenshot. Click on Add a retention stage… as seen in the following screenshot:

Figure 4.15: Enable Retention
- Another dialog box will open where you will find three categories, Event, Action, Recurrence.
- From the Event category, select Time Period as Last Modified with the number of days (14 days) present under This stage is based off a date property on the item, as seen in the following screenshot.
Under Time Period we can find three options to choose as below:
-
Created date Last ModifiedDeclared Record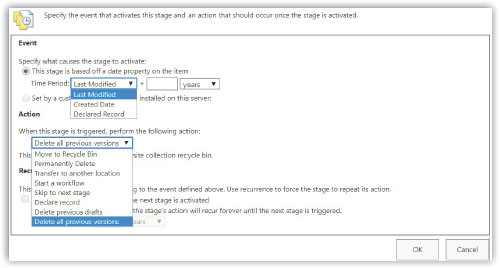
Figure 4.16: Event types and Action types
-
- From Action, select Delete all previous versions and finally click on OK, as seen in the following screenshot.
Different options under Action to choose as below:
Move to Recycle BinPermanently DeleteTransfer to another locationStart a workflowSkip to next stageDeclare recordDelete previous draftsDelete all previous versions
Figure 4.17: Events and Actions selected
- You will see the retention policy is applied in the Content Type Policy Templates, which is ready to apply now, as seen in the following screenshot. Click on OK from Edit Policy again to save the template:

Figure 4.18: Retention policy created
- Applying this policy will delete all previous versions of the document, after 14 days of the last modified date of that document, automatically.
Enable Auditing
The next category under information policy is Auditing that captures events like Editing items, Checking out or checking in items, Moving or copying items to another location in the site, Deleting or restoring items. Click on the checkbox Enable Auditing and select the events that you want to log for audit and click OK finally to apply changes as seen in the following screenshot:
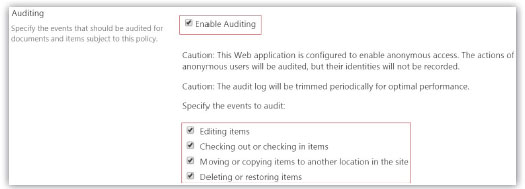
Figure 4.19: Enable Auditing
The events log due to this setting can be found in Audit log reports present under Site Collection Administration, as seen in the following screenshot:

Figure 4.20: Audit log Reports
Enable Barcodes
The next category under information policy is Barcodes. Click on the checkbox Enable Barcodes to enable barcodes. Next, you will get another option Prompt users to insert a barcode before saving or printing enabled which you can select for additional security as seen in the following screenshot:

Figure 4.21: Enable Barcodes
After enabling this and applying the policy template in the library, upload one document library that will generate Barcode, as seen in the following screenshot:

Figure 4.22: Enable Barcode
Enable Labels
Like Barcode, you can insert Labels in office documents by enabling the feature. Select the checkbox Enable Labels and Prompt users to insert a label before saving or printing. Enter document property, for example, {Version} the field Label format and click OK finally to apply changes as seen in the following screenshot:

Figure 4.23: Enable Levels
Applying Information Management Policy
We discussed how to create and apply site policies. Also, I discussed how to configure different policies and created a custom content type policy template. Now, will discuss how to apply those Information Management policies. We can apply policies in the library, list, and content types, which will be discussed next.
Applying Policy in Content Types
Let’s perform the following steps to apply Information Management policies in content types:
- Navigate to Site contents (
<_layouts/15/viewlsts.aspx>), right click your mouse on any one library or click on Ellipses button present side to document library and click on Settings from the drop-down options, will open the Library Settings (
<_layouts/15/listedit.aspx?List=****>) as seen in the following screenshot:
Figure 4.24: Library Settings
- Click on Information management policy settings (
https://<site url>/_layouts/15/policycts.aspx?List={**}) present under Permissions and Management from Library Settings as seen in the following screenshot: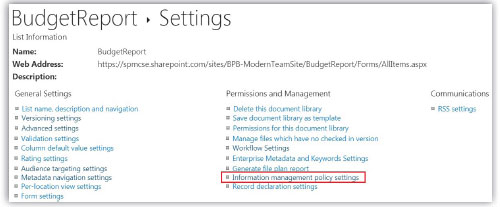
Figure 4.25: Library Settings
- Policy settings page (
<_layouts/15/policycts.aspx?List={*****}>) will open where you can see the source Source of retention for this library is selected as Content Type. Click on thecontent typeDocument as seen in the following screenshot:
Figure 4.26: Information management policy settings
- Select Define a policy from Information Management Policy Settings: Document and click on OK, as seen in the following screenshot:

Figure 4.27: Define a policy
- You will be redirected to the Edit Policy (
<_layouts/15/policyconfig.aspx?ctype=*>) the page where you can apply Enable Retention, Enable Auditing, Enable Barcodes, Enable Labels, as discussed before under the section Content Type Policy Templates Creation in this chapter above. Follow the process to apply policies to apply any policies from 4 categories and click OK. - Now you will see in Information Management Policy Settings (
<_layouts/15/policycts.aspx?List={***}>) under Content Type Document, Policy is showing as Custom Policy and Retention Policy Defined is showing Yes as seen in the following screenshot. So the custom policy is applied to document content type:
Figure 4.28: Custom Policy applied
- If you select Use a site collection policy from Information Management Policy Settings: Document instead of Define a policy as mentioned in Step 4 above, you will get an option to select a custom policy template Project Document that we created under Content Type Policy Templates (
https://<site url>/_layouts/15/Policylist.aspxpresent under Site Collection Administration as seen in the following screenshot. Policies configured in that custom policy template will be applied to the library: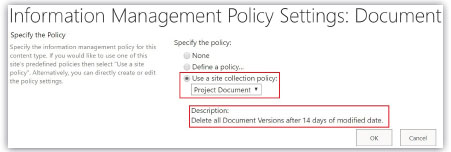
Figure 4.29: Use a site collection policy
- Now you will see in Information Management Policy Settings (
<_layouts/15/policycts.aspx?List={*****}>) under Content Type Document, Policy is showing as Project Document and Retention Policy Defined is showing Yes as seen in the following screenshot. So, policies under the custom content type policy template are applied to document content type:
Figure 4.30: Custom content type policy template applied
- We can apply policies in content type present in Site content types also so that when these content types are added in the library, policies are applied automatically. Since site content types are reusable, applying policies at site content level makes policies also reusable once the content type is added. Let’s perform the following steps to apply policies in the content type.
- Navigate to Site Settings (
<_layouts/15/settings.aspx>). - Click on Site content types (
https://<site url>/_layouts/15/mngctype.aspx) present under Web Designer Galleries as seen in the following screenshot:
Figure 4.31: Site content types
- Click on Picture present under Document Content Types, as seen in the following screenshot:

Figure 4.32: Document Content Types
- You will be redirected to the content type settings page. Click on Information management policy settings (
https://<site url>/_layouts/15/policy.aspx?ctype=0x0**) present under that as seen in the following screenshot: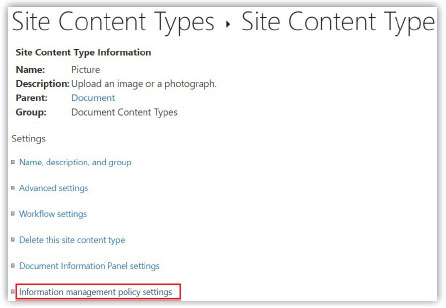
Figure 4.33: Content Type information management policy settings
- Select Use a site collection policy from Information Management Policy Settings and select the custom policy template Project Document that we created before. Click on OK, as seen in the following screenshot:

Figure 4.34: Use a site collection policy
- Now open Library Settings (
https://<site url>/_layouts/15/listedit.aspx?List=**). Click on Add from existing site content types (https://<site url>/_layouts/15/AddContentTypeToList.aspx?List=**) present under Content Type as seen in the following screenshot:
Figure 4.35: Add from existing site content types
- Under Select Content Types, select Picture from Available Site Content Types, click on Add > and click OK as seen in the following screenshot:

Figure 4.36: Add content types
- If you now open the Information Management Policy Settings (
https://<site url>/_layouts/15/policycts.aspx?List={**}) from Library Settings, you will see policy applied to the content type can be reused in the library as seen in the following screenshot:
Figure 4.37: Custom Content Type Policy Template Reusable
- When you apply the content type Picture, this policy is applied to that library.
Applying Policy in Library
Let’s perform the following steps to apply Information Management policies in the Library:
- Navigate to Library Settings and click on Information management policy settings (
https://<site url>/_layouts/15/policycts.aspx?List={**}) present under Permissions and Management. - The source type is selected as Content Types. Click on Change source (
https://<site url>/_layouts/15/expirationconfig.aspx?List=***) as seen in the following screenshot:
Figure 4.38: Change Source
- From the next window, click on Library and Folders. One message dialog box will open, click on OK as seen in the following screenshot:
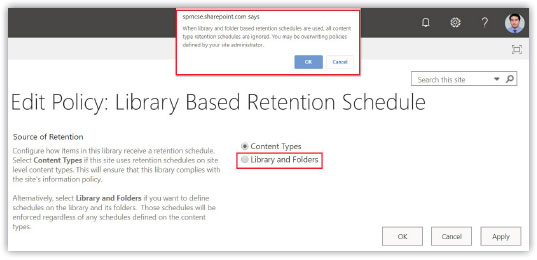
Figure 4.39: Select Library and Folders
- Now Library and Folders option is selected, and Add a retention stage… is enabled as seen in the following screenshot. You apply the retention policy as discuss before and click on Apply finally:

Figure 4.40: Add a retention stage
- After applying, you will see a Note like Since this library is using library and folder retention, all documents will use those schedules. Content type retention policies are ignored, as seen in the following screenshot. So, policies applied at the library and folder will override policies applied to content type:

Figure 4.41: Library and Folder policy applied
Applying Policy in Folder
Folders present in the library inherits the policy applied in library level policy. You can apply policy at the Folder level, which will override the policy applied at the library level.
Let’s perform the following steps to apply Information Management policies in Folder:
- Follow the same Step 1 to Step 3, as discussed under the section Applying Policy in Library.
- Next, you select the folder present at the left navigation and then select Define retention stages. It will enable another option, Add a retention stage…, to apply. You can apply the same policy way we discussed before and click OK finally to apply changes, as seen in the following screenshot:

Figure 4.42: Folder Level policy applied
Applying Policy in List
You can follow the same process as described under the section Applying Policy in Library.
Timer Job Action
We discussed retention policies and how it works. But let me share; you might feel like the policy is not active or showing any result for a few days. You need to understand; all retention policy depends on the timer jobs Information Management Policy and Expiration Policy that are scheduled weekly by default that cannot be modified. So, although you scheduled policy for someday, that action will not complete or effective unless the time jobs are running successfully weekly. For the on-premises environment, it can be changed manually, but for SharePoint Online, the schedule for the timer job cannot be modified; you may contact the SharePoint support team for help.
Conclusion
In this chapter, we had a glance at the Information Management Policy. What are these policies, where to apply it, what is the dependent feature related to policy to make the options available related to information management policy? Discussed step by step how to create and apply site policy, content type policy template. Understood how to enable and setup retention, auditing, barcodes, labels policies also its application in content types, library, folder, list. Also, we covered the timer job responsible for this retention policy, and it’s useful to complete the action. Next, in Chapter 5, Configure Document ID Service will discuss document id service in SharePoint.
Points to remember
- Activate the feature Site Policy makes the option Information Management Policy available.
- All retention policy depends on the timer jobs Information Management Policy and Expiration Policy that are scheduled weekly by default that cannot be modified. So, although you configure a retention policy for a particular date, action will be executed as per the scheduled timer jobs.
- In this chapter wherever its mentioned like this format
_layouts/15/****.aspx, means this section is added after the site URLhttp:// <site url> /_layouts/15/****.aspx. - Regular changes are applied in Office 365 and SharePoint Online by which there may be changes happening in the template or some other features.