CHAPTER 5
Configure Document ID Service
Introduction
In the previous chapter, we discussed all information policy. In this chapter, we will discuss the document id service. The Document ID is a system-generated unique ID assigned to each document once uploaded in the library. There is a unique Document ID URL link associated with each document ID that is in the format https://<Site URL>/_layouts/15/DocIdRedir.aspx?<Document ID>. Benefits of document ID are like; it’s very helpful to manage record or document. Documents can also be easily tracked irrespective of the location where it is stored. Let’s discuss in detail and see its application in the site and its behavior.
Structure
In this chapter, we will discuss:
- Introduction to the Document ID
- Activate Dependent Feature
- Edit Document Library View
- Document ID Settings Configuration
- Testing Scenarios
Objective
During the end of the chapter, you will get a clear understanding of:
- Document ID overview
- Dependent feature for Document ID service
- How to add dependent column to the library
- Modify Document ID Settings
- Document ID Service Test Case
Activate feature first
To apply document ID service, we need to activate one dependent site collection feature first that will enable this service and will apply system-generated document ID to contents. Let’s perform the following steps to activate the site collection feature.
- Navigate to Site settings (
https://<site url>/_layouts/15/settings.aspx) as seen in the following screenshot:
Figure 5.1: Site Settings
- Click on Site collection features (
<_layouts/15/ManageFeatures.aspx?Scope =Site>) present under Site Collection Administration as seen in the following screenshot: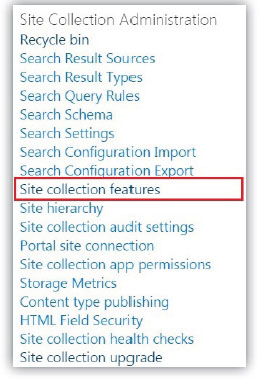
Figure 5.2: Site Collection Feature
- Identify the feature Document ID Service at the bottom and click on Active then the feature will change to state Active as seen in the following screenshot:

Figure 5.3: Document ID Service Feature
Edit View to Add Column
Once the feature is activated, there will be few changes in the site collection. You will find an additional column in view Document ID (linked to document), which needs to be added in the document library default view. Let’s perform the following steps to edit the view and add a column to the library:
- Navigate to Library Settings (
https://<site url>/_layouts/15/listedit.aspx?List=**) and click on the default view All Documents present under category Views as seen in the following screenshot:
Figure 5.4: Document Library Views
- Identify the column Document ID (linked to document) presently under option Columns from the Edit View page and select the checkbox as seen in the following screenshot:

Figure 5.5: Add Column To View
- Now upload one document in the library; you will find a Document ID linked to the document, as seen in the following screenshot:

Figure 5.6: Document ID
Document ID settings configuration
You notice the document id generated stars with 6Y7KEMFAESR6, which we call as Prefix of Document ID. We can set a customized prefix as per our requirement. Let’s perform the following steps to create a customized prefix for Document ID:
- Navigate to Site Settings (
<_layouts/15/settings.aspx>). - Click on Document ID settings (
https://<site url>/_layouts/15/DocIdSettings.aspx) present under Site Collection Administration as seen in the following screenshot: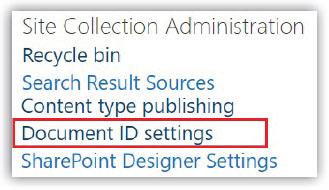
Figure 5.7: Document ID Settings.
- On the Document ID Settings page, you will notice the option Assign Document IDs is selected by default, under the option Begin IDs with the following characters; you will find the default prefix ID (6Y7KEMFAESR6) as seen in the following screenshot:

Figure 5.8: Default Prefix Document ID
- Under the option Begin IDs with the following characters, enter a customized ID (SPMCSE) of your choice and click on OK.
- If you have documents already uploaded in the library and then configuring this option, then you can select the checkbox Reset all Document IDs in this Site Collection to begin with these characters that will reset the default prefix ID to this customized one SPMCSE. Once you click OK, you will see a message Configuration of the Document ID feature is scheduled to be completed by an automated process, as seen in the following screenshot.

Figure 5.9: Customized Document ID
- If you upload any document now, you will not see any change in Document ID immediately. There are two timer jobs Document ID assignment job, Document ID enable/disable job, scheduled Daily. Once these jobs run, then only this change will be effective. After that, you will see the document ID of the uploaded document, as seen in the following screenshot:

Figure 5.10: Customized Document ID applied
Different testing scenarios
Let’s check different testing scenarios and will see the changes in document ID once the file is moved or copied to a different location within a site collection or outside site collection. We will check the four scenarios as below and will see Document ID Changes or not:
- Move the file to a folder present in the same library
- Move the file to a different library in the same site collection
- Move the file to different Site Collection
- Copy file to a folder
Move file to folder in the same library
In this section, we will discuss the change in document ID when the file is moved to a folder present in the same library. Create one file in the library and move this file to a folder present in the same document library and observe the Document ID. Let’s perform the following steps to check:
- Create one folder in the same library first.
- Now select one file present in the same library.
- Click on Details Pane, right click on Document ID, and click on Copy link address.
- You see, the link address has the Document ID at the end. Now click on Move to from the command bar, as seen in the following screenshot:

Figure 5.11: Move the file in the same folder
- Choose the destination as the Current Library. Select the folder present in the same library. And click on Move here as seen in the following screenshot:
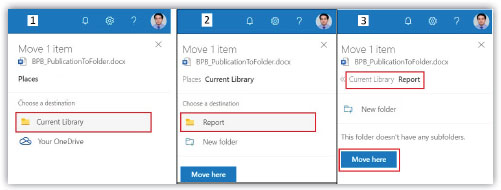
Figure 5.12: Move the file to the folder step by step
- The file will be moved to a new folder. You will see the Document ID as it was in the source location. There is no change in Document ID, as seen in the following screenshot. Now select the file moved to the folder. Click on Details Pane, right click on Document ID, and click on Copy link address. If you compare both source and destination URL, you see there is no change in Document ID URL link; both are same:

Figure 5.13: Document ID of the file after file moved
Move the file to a different library in the same site collection
Now you upload documents in two different libraries and move the document from one library to another library following the same process as we did before except the destination location as a different library in the same site collection. If you notice, there is no change in Document ID and Document ID URL link after file moved, as seen in the following screenshot:

Figure 5.14: Move the file to a different library in same site collection
Move the file to a different site collection
Now move one document from one site collection to another site collection. Considering the situation with destination site collection, the Document ID feature not activated. Let’s perform the following steps to check:
- Follow the same steps for moving the file in a different site collection. You will get a message like The file or folder contains properties that will be lost at the new destination, as seen in the following screenshot. If you click on the button Move anyway, the document ID properties present at the source site will be lost at the destination site collection:

Figure 5.15: Move the file to different site collection without activating the feature
- Now follow the same process as discussed in the above sections Activate feature first, Edit View to Add Column, Document ID Settings Configuration one by one to set custom Document ID Prefix in another site collection as seen in the following screenshot:
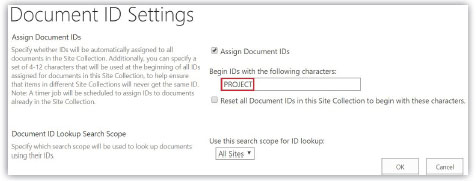
Figure 5.16: Custom Document ID prefix
- Now upload one document in a library present in the destination site collection, you will see Document ID starting with the new prefix PROJECT.
- Now try to move the document again to this site collection as a destination. Since the Document ID feature is activated in this site collection. You will notice after the file is moved to this new site collection, there is no change in Document ID and Document ID URL link as seen in the following screenshot:

Figure 5.17: Move the file to different site collection after activating the feature
- If you select the checkbox Reset all Document IDs in this Site Collection, to begin with these characters present in Document ID Settings and apply changes, the Document ID of all documents will be updated as per the current prefix (SPMCSE to PROJECT) of the site collection. Changes will be reflected once these two timer jobs, Document ID assignment job, Document ID enable/disable job scheduled Daily will run successfully.
Copy to folder or library
We see the Document ID properties while moving to a different location within one site collection or outside side collection. Let’s see the behavior while copying a file within one site collection or outside side collection:
- Now copy the file selecting the option Copy To from the command bar in the library and select destination one folder in the same library. You see, both Document ID and Document ID URL link changed.
- Now copy a file to different library present in the same site collection, you see both Document ID and Document ID URL link changed as seen in the following screenshot:

Figure 5.18: Copy to folder or library
Copy to a different site collection
Now copy the file selecting the option Copy To from the command bar in the library and select destination library present in another site collection. After copied, you see both Document ID and Document ID URL link changed. Document ID Prefix also changed as per the configuration of that site collection, as seen in the following screenshot:

Figure 5.19: Copy to a different site collection
Find by Document ID Webpart
Since Document ID is not changing, we can find the document directly by entering document id in the search bar, irrespective of the document location. In the Classic SharePoint site, we can add one webpart Find by Document ID to search documents specific based on Document ID, as seen in the following screenshot. We will discuss how to add a webpart latter chapter but showing the webpart available related to this for understanding:
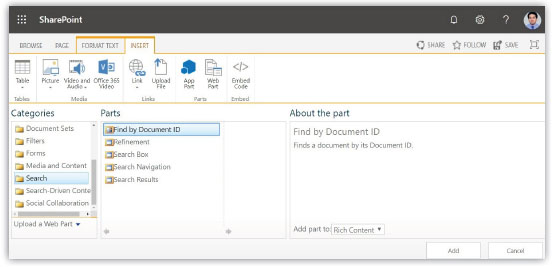
Figure 5.20: Find by Document ID Webpart
Once you added this webpart in the SharePoint site, you will see an option of search, as seen in the following screenshot:

Figure 5.21: Find by Document ID Webpart added
You can enter the Document ID; pressing Enter will open the document directly.
Document ID Value Document property
You can add Document ID Value to document present in the library, which would be helpful to share and identify during need. by following the process as mentioned below:
- Open the document present in the library in a desktop application.
- Click in Insert from the ribbon. Click on Quick Parts under the section Text.
- Under the dropdown, select Document Property and under that select Document ID Value. You will notice the Document ID property will be added in the document, as seen in the following screenshot:

Figure 5.22: Document ID Value Document property
Conclusion
In this chapter, we had a glance at document id all about, why it’s used, what is the purpose of using this? Understood the dependent features for document ID. Discussed step by step to edit library view and configuration of document ID settings for custom documents ID prefix. Did testing and understood the behavior of document ID in different scenarios of moving the document to a different location. Next, Chapter 6, Document Sets Feature, will discuss the document set feature and its application.
Points to remember
- Document ID Service Site Collection Feature activation is a must.
- There are two timer jobs Document ID assignment job, Document ID enable/disable job scheduled Daily. Once these jobs run successfully, then only change in Documents ID Prefix and Reset all Document IDs in this Site Collection, to begin with these characters will be effective.
- In this chapter, wherever its mentioned like this format
_layouts/15/****.aspx, means this section is added after the site URLhttp:// <site url> /_layouts/15/****.aspx. - Regular changes are applied in Office 365 and SharePoint Online by which there may be changes happenings in the template or some other features.