
WHEN I WAS FIRST LEARNING TO WALK, MY MOM and her best friend held a ceremony of sorts for my newly mobile self. They laid out a circle of objects. Paint brushes, musical instruments, a toy stethoscope, anything that could represent a future career. They then set me in the middle of the circle to let me explore. The hope was to discern a little about what I would become when I grew up. I grabbed a felt tip pen and a particularly well-worn wooden spoon and settled down to gnaw on my newly gotten treasures. They cheered and announced that I’d become a food writer someday. Much to everyone’s delight, thirty-plus years later, that’s exactly what I’ve become.
I grew up in a household that occasionally canned. Living in California and Oregon meant that during the summer, there was always an abundance of berries, plums, and apples. Two or three times a year, we’d go picking, gather windfall apples, or benefit from the benevolence of a friend with more fruit than time. My mom would pull out her largest stockpot and we’d pit, chop, mash, and simmer our way to half a dozen glowing jars of jam or fruit butter.
It wasn’t until I was twenty-six that I started canning on my own. I was living in Philadelphia by then and one summer day, a friend and I went blueberry picking. When I got home, I did what felt natural. I made some jam. (Of course, I called my mom ten times during the process to consult.) With that single batch, I was well and truly bitten by the canning bug and had to do more. When I decided to start my own food blog, writing about canning and preserving just seemed like the right thing to do. I had no idea I was creating a career for myself as a canning teacher, writer, and all-around evangelist.
These days, I can because I love the process and the results. Once you start, there’s really no going back flavor-wise to commercially made jams, chutneys, and pickles. It’s also something of a deal. I like to compare it to the stock market practice of buying low and selling high: You get your produce at the peak of its season, when it’s cheap, ripe, and delicious (that’s the buying low part), invest a bit of time, and then enjoy the fruits of your labor all year round (sell high). In addition to the economic benefits, there’s a great deal of joy and satisfaction to be had in knowing what goes into the food that you and your family eat.
This isn’t to say that I’m encouraging people to go crazy and start preserving everything they eat. I certainly don’t do that and it’s not a reasonable expectation these days. However, I do suggest that you find one or two things that you love to eat and make those the items you focus your energies on. Specialize. Make a yearly habit of cooking up some strawberry jam, peach salsa, or a dozen pints of dilly beans. It’s really all about what brings you joy.
Most people believe that you need a ton of special equipment in order to get canning. Truth is, provided your kitchen is stocked with some basics (I’m talking pots, bowls, and measuring cups here, not Viking stoves) you can do a wide variety of canning with what you’ve already got.
The first is a nice roomy pot for cooking your jam or bringing brine to a boil. I like to use either enameled cast iron or stainless steel (All-Clad makes an 8-quart stock pot that is perfection for jams, jellies and fruit butters, but any pot 6 to 10 quarts/5.7 to 9.5 liters in capacity will work). Make sure that you choose a nonreactive pot (no bare cast iron or untreated aluminum); otherwise, your finished product could end up with a metallic flavor. Know also that when it comes to the shape of your pot, wider is better. It increases the surface area of the jam and makes for shorter cooking times.
The second pot you want to have on hand is a small saucepan, for simmering the lids. Standard canning jars in the United States are three-part contraptions. You’ve got a jar, a ring (also known as a band), and the flat metal lid. There’s a strip of sealing compound embedded in each and every lid that must be softened prior to use. To soften that compound, you simply simmer (try not to boil them if you can manage it) the lids in a small pan of water for ten or so minutes. Do remember that lids can only be used once for canning (if you soften a couple too many during canning prep, they can be used again. They just can’t be sealed to a jar and then reused).
The last pot is your canning pot. A lot of people think they need to spend some bucks here and get themselves one of those speckly enameled pots with the specialized rack. Except I’ve found that after a couple of seasons, they start to rust and break down. Plus, who’s got space for a huge pot that only serves one purpose?
I like to use my standard stock pot (it’s made by Cuisinart and sells for about $60) with a small round cake cooling rack dropped in the bottom as my canning rig. Any large pot will work as a canning pot, as long as it’s deep enough so that the jars are fully submerged with an inch of water covering them and you’ve still got a bit of room for the water to boil.
If you do choose to set up your own canning pot, don’t skip the rack. It allows the boiling water to fully circulate and protects the jars from the direct heat of the burner, which in turn helps to prevent breakage.
In addition to your pots, it’s helpful to have several measuring cups on hand. I like having a few larger-capacity heat-resistant (such as Pyrex) measuring cups around, as well as a stainless-steel 1-cup/250 ml measure (so handy for filling 1-pint/500 ml and half-pint/250 ml) jars.
As far as specialized canning tools go, there are two that I find particularly useful. The first is a wide-mouth funnel and the second is a jar lifter. While you don’t have to have either of these tools, they will make your canning life significantly easier. The magnetic lid lift that comes in most canning tool kits is also nifty, but by no means essential.
Beyond that, there are a few tools that are nice to have that I will reference on occasion in these recipes. Included in that list are a sharp paring knife, a serrated-edge peeler, a Microplane zester, a candy thermometer, a splatter shield, a fine-mesh strainer, and an immersion blender.
The bulk of the recipes included in this book are designed for boiling water bath canning. This is the process in which filled jars are submerged in a pot of boiling water and simmered for a prescribed amount of time. This is also the step that scares most people off from canning, as they think it is messy, time-consuming, or dangerous. But as with so many kitchen tasks, after you’ve done it once or twice, it will lose its intimidation factor.
It is important not to skip the boiling-water process, as it performs two tasks and does both exceedingly well. First, boiling the filled jars ensures than any contaminants that might have landed in your jars are killed (keep in mind that this processing method only works with high-acid foods. More about that in a minute). Second, it guarantees that there will be enough heat inside the jars that when you remove them from the water, the heat will rapidly escape, pulling any remaining air out of the jars and creating a solid, airtight seal. This is what keeps your jams, butters, and pickles fresh.

1.If you’re starting with brand-new jars, remove their lids and rings. If you’re using older jars, check the rims to make sure there are no chips or cracks.
2.Put the rack into the canning pot and put the jars on top.
3.Fill the pot (and jars) with water to cover and bring to a boil. I have found that this is the very easiest way to heat up the jars in preparation for canning because you’re going to have to heat up the canning pot anyway. Why not use that energy to heat up the jars as well?
4.Put the lids in a small saucepan, cover with water, and bring them to the barest simmer on the back of the stove.
5.While the canning pot comes to a boil, prepare your product.
6.When your recipe is complete, remove the jars from the canning pot (pouring the water back into the pot as you remove the jars) and set them on a clean towel on the counter. There’s no need to invert them; the jars will be so hot that any remaining water will rapidly evaporate. Remove the lids with tongs or a magnetic lid wand and lay them out on the clean towel.

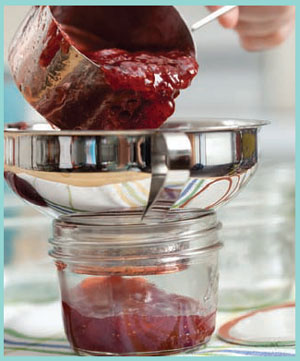
7.Carefully fill the jars with your product. Depending on the recipe, you’ll need to leave between ¼ and ½ inch/6 mm and 12 mm of headspace (that’s the room between the surface of the product and the top of the jar). Jams and jellies typically get ¼ inch/6 mm, while thicker products and pickles get ½ inch/12 mm.
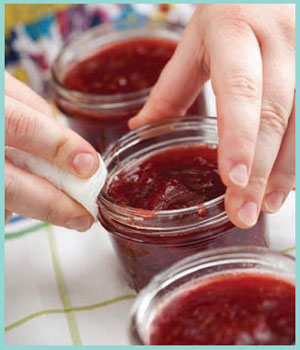
8.Wipe the rims of the jar with a clean, damp paper towel or the edge of a clean kitchen towel. If the product you’re working with is very sticky, you can dip the edge of the cloth in distilled white vinegar for a bit of a cleaning boost.
9.Apply the lids and screw the bands on the jars to hold the lids down during processing. Tighten the bands with the tips of your fingers to ensure that they aren’t overly tight. This is known as “fingertip tight.”
10.Carefully lower the filled jars into the canning pot. You may need to remove some water as you put the jars in the pot. A heat-resistant measuring cup is the best tool for this job, as it won’t transfer heat to your hand.
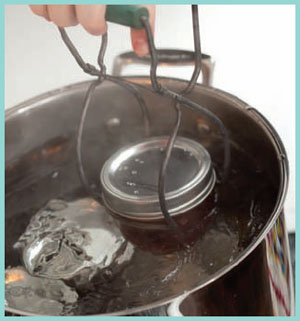
11.Once the pot has returned to a rolling boil, start your timer. The length of the processing time will vary from recipe to recipe.
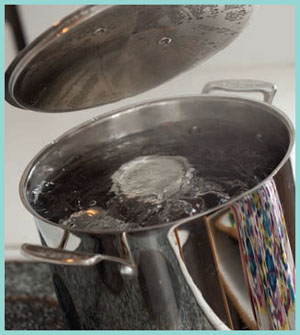
12.When your timer goes off, promptly remove the jars from the water bath. Gently place them back on the towel-lined countertop and let them cool.
13.The jar lids should begin to ping soon after they’ve been removed from the pot. The pinging is the sound of the seals forming; the center of the lids will become concave as the vacuum seal takes hold.
14.After the jars have cooled for 24 hours, remove the bands and check the seals. You do this by grasping the jar by the edges of the lid and gently lifting it an inch or two off the countertop. The lid should hold fast.
15.Once you’ve determined that your seals are good, you can store your jars in a cool, dark place (with the rings off, please) for up to a year. Any jars with bad seals can still be used—just store them in the refrigerator and use within 2 weeks.
Your first few jamming forays may feel like guesswork, but after the first few batches you’ll start to see the signs of doneness more clearly.

1.When jam starts to cook, it just looks like bits of fruit bobbing around in thin syrup. The bubbles will be foamy and the boil easy to stir down.
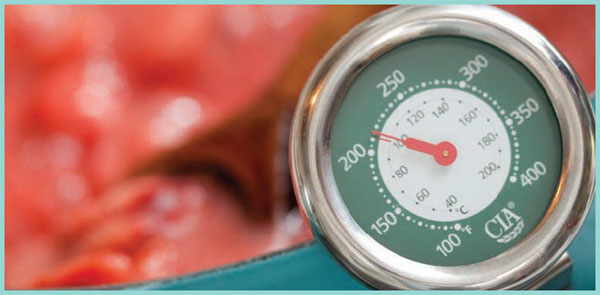
2.Monitoring the temperature is a helpful way to track the progress of your cooking: jam sets at 220°F/105°C.

3.One of my favorite ways to check for doneness is by using the sheet test. Watch the jam as it drips off the back of a spoon. If the drips are thin and quick-moving, the jam still has a way to go (see the photo on the left, above). If they run together and form a sheet as they drip down the spoon, set has been achieved (right, above).

4.If you’re feeling uncertain about your set after you’ve filled all your jars, take a peek at the remnants of jam in your canning pot. If it sticks and sets to the side of the pan, take heart! The jam should eventually set in the jars as well: give it about 2 weeks.
In the course of learning to can and then sharing my excitement about it, I’ve heard so many people confess their canning fears. Mostly, they’re terrified that they are going to kill their families. Hear me now. If you stick to the high-acid foods—like most jams, jellies, and pickles—you are not going to kill anyone.
Botulism is the singular killer when it comes to canned goods, but it cannot grow in high-acid environments. This means that you’ll never hear of a case of botulism having grown in a jar of strawberry jam or dill pickles. If something goes wrong with your high-acid foods, you will be able to tell immediately upon opening the jar. There will be a foul smell, colorful growth, or bubbling where there ought not be (and these things happen very rarely if you’re following proper canning procedure).
There are a few varieties of fruit that exist in the very narrow gray area between high acid and low. These items need to be acidified to be canned safely and should be treated with care. This list includes figs, white peaches, Asian pears, bananas, mangoes, watermelon, and tomatoes (we’ll get more in depth about how to safely can tomatoes in that section of the book). Take care when working with these fruits and always consult trusted recipe sources like the Ball Blue Book and the National Center for Home Food Preservation.
Most low-acid foods can be preserved safely at home with the help of a pressure canner (page 228).
In most of these recipes, I’ve included suggested cooking times. However, these are just ranges and are not ironclad, particularly when it comes to jams, jellies, and marmalades. Cooking times can vary depending on the humidity in the air, the moisture level in the fruit, the width of your pot and the intensity of your stove’s heat. It’s important to use your judgment when cooking up these sweet preserves and not just depend solely on the suggested cooking times. Monitoring temperature (see page 13) or using the saucer test (see page 77) are two good ways to know when the jam is really ready to come off the heat.
Just like cooking times, the yields on these recipes can vary. I have tested and retested the recipes to ensure that they work, but there are a number of factors that can nudge the final amount up or down a few ounces. One particular culprit is a rainy growing season. Lots of precipitation can cause fruits to take on more water while on the plant. This means that during cooking, there will be more liquid that has to be evaporated out of the fruit, leading to smaller yields. Conversely, during hotter, dryer years, the fruit can become intense with sugar (this is why dry-farmed tomatoes and strawberries are so magically delicious) and can yield slightly more product.
One of the quirks of life on earth is that as you increase your elevation, the temperature at which water boils decreases. With every reduction in degree, you lose a bit of bacteria-killing power. If you live between sea level and 1,000 feet, you don’t have to make any adjustments and can use the recipes as written. However, for additional altitude, you must add time to the processing step.
|
1,001 to 3,000 feet 3,001 to 6,000 feet 6,001 to 8,000 feet 8,001 to 10,000 feet |
add 5 minutes add 10 minutes add 15 minutes add 20 minutes |
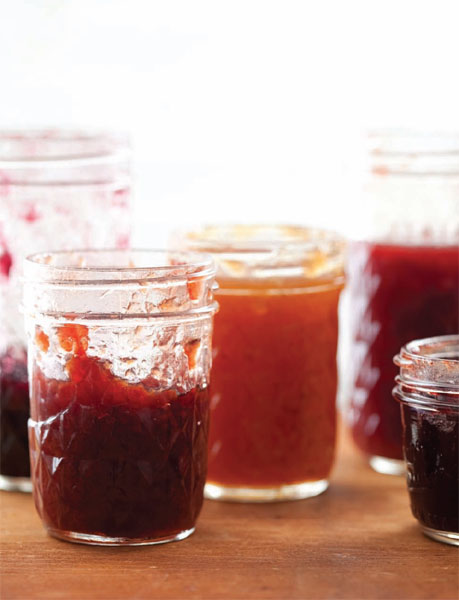
From left to right: Blackberry, Apple-Cranberry, Cantaloupe Vanilla, Sour Cherry, Damson Plum