People often ask me how I came to develop baptiste power vinyasa yoga. I never really “developed” it; it was more an evolution, a natural progression of studying, researching, practicing, teaching, and just living my life. For many years I was a student of the traditional forms—Iyengar, Ashtanga, Bikram, Krishnamacharya, Raja yoga. I’ve also studied traditional forms of fitness, martial arts, and have trained hundreds of professional athletes for peak performance. Over the years, I combined what I thought was the best of the best from the East and West and left out everything else. I wove it all together into one powerful, all-inclusive practice.
My style of yoga is called Baptiste Power Vinyasa Yoga, “power yoga” for short. It is just what the name implies: vigorous and powerful. Strength is a pillar of my style. The word vinyasa means “flow,” or the linking of one movement into the next, one breath into the next, the presence of mind from one moment to the next, and that is another pillar. When you combine these factors along with heat, you get what I believe is one of the most dynamic, life-changing forms of physical and spiritual fitness. It is the perfect blend of sweat and serenity.
If I had to describe Baptiste Power Vinyasa Yoga in two words, I would call it free style. It contains fifty-three poses (or “asanas”) that are linked together by connective momentum. I’m not attached to any one tradition that sets any rigid rules. I have come to understand that there is a perfect process for each individual, no matter what age, weight, or fitness level, and honoring that is more important than adhering to one narrow and rigid path. I follow the natural laws of the body, which dictate balance and counterbalance, control and surrender, pose and repose, modification and acceleration. You will get all the benefits of the more traditional methods while still leaving room for creativity and fun.
What Power Yoga Is Not
Power yoga is different from most typical forms of yoga. We don’t try to bend you into a pretzel or force you to chant. I’m less interested in burning incense than in burning away the excess baggage that weighs down your mind and body.
I know from my experience that many people are intimidated by yoga, and I think the traditional yoga world does a lot to perpetuate that. I have spent my whole life researching and refining a style of yoga that is real-life practical without losing the essence of yoga’s transformational power. You don’t need to be open-minded to do my style of yoga. You just need to do it; the results will speak for themselves.
My style of yoga is not just for those seeking cosmic consciousness. I’ve taught all types, from politicians to professional football players. The people who come to my Bootcamps and studios range from Harvard MBAs and stay-at-home moms to celebrities and rock stars. Power yoga is for everyone, whatever they are seeking. It’s my mission to bring this five-thousand-year-old practice down off the mountain and make it accessible to anyone, from any background, looking for total physical, mental, and emotional transformation. A lot of people assume yoga is gentle and passive, and definitely not a workout that creates physical transformation. But this is anything but sedate. Power Yoga is a dynamic, energizing form of exercise that sculpts, hones, and tones every muscle in the body. It will kick your butt, but no matter what physical shape you are in or what limitations you believe you have, you can definitely do this! It is purposefully challenging and active so that it can catapult you from wherever you are right now to whole new thresholds of physical and mental power.
You don’t need to be some superflexible version of Gumby in order to do power yoga. Any dimwit can wrap their legs around their head; it has nothing to do with health. There is a lot of showmanship that goes on in the yoga world, in which people get hung up on displaying how much they can contort their bodies. But there is no research that shows that wrapping your legs behind your head will give you better health, and frankly, I don’t think it will make you a better person. There is no proven health benefit to being overly flexible. In fact, hyperflexibility can be a sign of weakness. Over time it can lead to overstretched ligaments and tendons, which create imbalance and instability in the body.
I don’t care about contortions. My focus is on creating real-life flexible strength, stabilization, and full-body integration. There is nothing wrong with taking pride in your body and what it can do—a little vanity can even be healthy. Where I make the distinction is between practicing for the sake of ego and self-image and practicing for inspiration and practical usefulness.
I’m not a guru, nor do I want to be. I don’t believe you need to follow a guru to do yoga “right.” Yoga is a path that is shared by many, but each person experiences his or her own growth in his or her own way. I want to give you the tools to learn to follow your own wisdom, your own intuition, your own heart. I want you ultimately to be your own teacher, to have a connection and a perception about your own body and what’s right for you. Yoga is about discovering your essential and authentic self, not someone else’s. Everyone can do power yoga. Everyone. No matter what level of fitness you are, how much you weigh, or what your genetic makeup may be, you can do this. Everybody is different, and every pose can be made to fit every body. As I have said thousands of times to students, you just start where you are with whatever level of ability you have, and from there, the sky’s the limit. Strength and suppleness come with time, as long as the spirit of willingness is there.
Why Power Yoga Works
I love power yoga because it works magic. But you don’t need to take my word for it—in fact, please don’t! You can easily prove to yourself how effective power yoga is in creating transformation. The best way to demonstrate the value of something—anything—is to see it work for yourself.
Power yoga works for so many reasons. It works because it is simple and right in line with how your body is designed to move and operate. It builds functional intrinsic strength rather than superficial strength. It empowers you to purposefully use and train your body the way you do in real life—bending, stretching, lifting, reaching, twisting—so you can move through your everyday motions with more ease, more agility, more power, more grace. How often do you use the motion of a bicep curl or a boxing kick in your everyday life?
In traditional fitness we tend to break up the components of strength, flexibility, stamina, and cardiovascular training into their own levels of importance based on our goals, and put relaxation, meditation, and our psychology in some other category with the stuff in our lives that we would do if we had time. I liken this approach to baking a cake: You have all the ingredients you need—flour, sugar, eggs, milk, and so on—yet you never mix them. If you were a guest at my home I wouldn’t serve you just a cup of flour! In power yoga we blend all the key ingredients into what I call global training, which means to train the whole person. It embodies strength, flexibility, stabilization, stamina, cardio, and mind power all in one session.
The health benefits are multilayered, going beyond just the external. All the internal bodily systems are activated and improved as well. Your nervous system is soothed or energized as needed (through deep rhythmic breathing); your glandular system is balanced, creating hormonal harmony (from inversions); your cardiovascular and circulatory systems are invigorated (as a result of the flow); your digestive and metabolic systems are stimulated (from the heat of the ignited fire within); and your elimination system is activated and regulated (from sweating and from the movement of lymph, the body’s sewage system). Every single cell in your body benefits.
Power yoga works for so many people where other fitness and therapeutic methods have failed because the results from yoga are immediate, fueling your motivation to continue. You don’t need to wait weeks before seeing and feeling positive results. From your very first practice session, you experience shifts energetically, muscularly, mentally, and emotionally. Your muscles tingle from head to toe, your blood is flowing, your mind is clear, your spirit is revived, you are full of stamina and breath; you feel alive! Once you get even the smallest taste of these results, you have all the motivation you need to keep going.
Power yoga is effective on deeper levels because it gives you a new awareness of your body. It brings breath and consciousness to all your muscles and tissue and you really make the connection between your mind and body. From there, you start to get more in tune with what your body needs, on and off your mat. You start to make new habits, and then those habits make you! You begin to see that your body requires your love, compassion, attention, and care. Whenever you give anything positive attention—a flower, a child, your body—it blossoms.
Sometimes waking up to your body can be like waking up in the middle of the night with your house on fire. You suddenly see the danger all around you: all the damage you do to yourself, the conditions your lifestyle has created, all the negative energy that is weighing you down, all the unkind and unhealthy ways you treat your body. Once you awaken to the truth of what’s happening inside you, it is not so easy to go back to sleep. You naturally and easily start making choices that cleanse, heal, and free your body and soul.
The Pillars of Power Yoga
There are five foundational pillars of my power yoga: breath, heat, flow, gaze, and the abdominal lock. All are essential pieces of a dynamic and healthy power yoga practice. Each one of these enables you to have the deepest experience every time you get on your mat. When integrated together, they launch you into new dimensions.
Breath
Your breath is the key to unlocking your body’s potential. Maintaining steady, rhythmic breathing is the single most important element of yoga practice. Your breath is what links your mind to your body, and you to the present moment. As you become skillful at matching your breath to your movements, the two will no longer feel separate, but rather one thread that carries you through the fabric of your practice.
Your breath is pure, raw energy that sweeps through you like a cleansing wind. It carries prana, or life force, to every molecule in your being. With every inhalation you literally bring new life into your body, with every exhalation you clean house.
Through matching and mirroring your movements with your breath, you peel away the layers of resistance. Your breath is what sustains you at your edge and allows you to move past it into new mental, emotional, and physical frontiers. In this way you are meeting inner resistance with a neutralizing force. If you can stay calm and breathe through your pose, that layer of resistance dissolves.
The breath we use for asana practice is called ujjayi breathing (ooh-jy-yee). The ujjayi breath is an audible breath that has a soothing, rhythmic, oceanic quality. It is done by contracting the whispering muscles in your throat to create a long, hairline thin breath. You do not breathe all the way down into your abdomen, but rather into your chest, lungs, and back. In fact, if you breathe into your belly, your power is lost.
Here is a step-by-step breakdown of how to do it:
This is the ujjayi breath. In, out, in, out . . . deep and free, rhythmic and steady. The volume of your breath both on the inhale and the exhale should be equal to each other. In general, you inhale as you reach up and open in poses, and exhale as you fold down or close.
If you’re getting dizzy, you’re probably forcing it too much. Just relax and let it be effortless—not taking in too much or too little air. It’s like a woodburning stove: too much oxygen and you burn up the fuel too quickly, not enough and the fire goes out. A steady flow keeps the internal flame burning.
Throughout your practice, keep remembering to breathe . . . deep and free!
Heat
If you try to reshape cold glass, it will shatter. Heat it and you can form it, bend it, and shape it any way you want. Your body is just the same: Heat it and it becomes pliable. Muscular motion creates heat that softens your tissue and makes you malleable.
The strong flow of power yoga fuels the inner furnace, and the breath fans that fire throughout your practice. The combination of motion and breath builds what I call healing heat—the kind of heat that melts away tension and accomplishes decades of growth and release within days. Tension, after all, is just stuck energy, and when you start the internal heat moving, all that does not belong gets burned away. All the resistance is consumed by the intensity of your internal flame.
A hot room can boost the purifying fire, so at my studios we heat the room to 90 degrees to help students build and maintain a liquid quality to their movements. The heat also helps you sweat. Sweating is one of the most important mechanisms of natural healing, since it enables the body to release toxins, metabolic debris, and excess fluids. It also gives the liver and kidneys some much-needed rest, because their usual burden of detoxifying and purifying the blood is lessened. The skin is the largest elimination organ of the human body, and the more you sweat, the more toxins you release. Besides, it feels so good to just let the sweat pour out of you!
American Indians consider purification of the body inseparable from purification of the spirit. They have used the sweat lodge as a powerful process of physical and spiritual regeneration for thousands of years. I have experienced firsthand the transformative power of this ritual. A Great Lakota elder leads our Bootcamp participants through a powerful prayer sweat in the mountains of Montana, during which many of them receive profound insights and have life-changing experiences.
At first you may not like the heat. It may feel uncomfortable. But pretty soon the purifying power of it hits you. It feels so good, you wonder how you could ever practice without it. When I do workshops at places where I cannot heat the room, longtime students who are used to the heat always remark that their movements are so much less fluid in the cold room. They feel stiffer and less able to move deeply into the poses. They suddenly realize how the heat softens their muscles and how much more they get out of the practice that way. The heat heals; the heat protects your body from injuries; the heat sets you free.
When you do your practice at home, try to do it in the warmest room you have. Of course, it’s ideal if you have a room in which you can raise the temperature, but if you can’t, at least turn off the air conditioner or close the windows. Maintain the flow of the practice to sustain your inner heat, which will help avoid injury and allow you to go further into your poses.
Flow
In my style of power yoga, each pose flows right into the next. You are synergistically taking your body through multiple motions, angles, and planes, and channeling all of your energy into one synchronized symphony. It is a beautiful melding of fluid and flexible strength, mental focus, deep breathing, and stability in motion.
Flow is the absence of resistance. When you bring flow into your practice, you let go into the movements and create a liquid quality that inspires deep release. It allows you to build magnificent momentum and heat and move through your practice in an effortless, seamless manner. Flow encourages meditation in motion: When you ride the flow like a wave, it moves you out of your head and into your body and the present moment.
On the most basic level, flow creates dynamic energy that keeps your internal heat up and your heart pumping steadily. This brings the cardiovascular element into your practice, which facilitates weight loss and an overall increase in health.
Drishti
Drishti means “gaze.” In yoga practice, it means fusing your eyes to one point. This focus sends soothing messages to the nervous system and brings the mind from distraction to direction. The eyes are the lens of the mind, and with drishti you are focusing your consciousness. Drishti allows you to slow your mind and engage more deeply in your practice.
It’s very simple to do: At the beginning of every pose, relax your eyes and set them on a fixed point. It can be anything—a spot on your mat or the wall. Your eyes should be soft and tender. Hold your gaze steady for the duration of the pose. That’s all there is to it.
Part of drishti is samadhi, which embodies “neutral vision.” Sama means “even” or “neutral,” dhi means “vision” or “seeing.” Neutral vision means to see without judgment, without ego, without impatience. Samadhi is to see through a clear lens, rather than viewing your experience through the rearview mirror of your past perceptions. Cultivating samadhi on your mat will’ help you bring that quality of mind into your everyday life.
Drishti is key to all balancing poses. Balance comes from a calm, nonreactive mind, and I always remind my students that we set our mind beginning with our eyes. If our gaze is steady and focused, our mind will be, too, and we can better maintain our equanimity. Wandering eyes equal a wandering mind; focused eyes equal a focused mind.
Uddiyana: Core Stabilization
In every pose, we activate what is called the uddiyana bandha, or “upward lifting lock.” A “bandha” is a lock that anchors you into your stability and strength. This bandha is a static muscular contraction used to focus attention, stimulate heat, and control the life force within us. Uddiyana is a gentle lifting of the pit of the abdomen toward the spine. Through uddiyana, you draw attention to the core of your body, the epicenter of all movements. Making this core the focal point causes you to move, breathe, and have your being from your center. Thus grounded, your body roots and can then lift into a state of weightlessness.
Uddiyana tones the internal organs and also plays a vital role in protecting your lower back. By drawing your belly into your spine, you stabilize and support your lower back and torso in your poses. In the bigger picture, a lot of people experience dramatic relief from chronic back pain by building this core strength and removing the stress on their lower back. A strong core—your torso, which includes your back and abdominal muscles—is the foundation to true, real-life body strength. In the same way that a chain is only as strong as its weakest link, you are only as strong as your core. In this practice we focus on building core power and torso stability, and uddiyana is a master key.
Uddiyana is simple in explanation but takes some exploration to understand. Basically, you contract your belly and lift it up gently toward your spine. As you draw the navel inward, the abdominal muscles follow, creating a hollowness under the rib cage and driving the breath into the upper torso and chest. Remember, you will be engaging uddiyana in every pose, hence the need to be gentle so that you can maintain it throughout your entire practice.
Why Daily?
When I first opened my studio in Cambridge, we put up signs that said, “For good results, three times a week. For life-changing results, five to six.” If you want decent results, three times a week will do. But if you’re really looking to transform your body, your spirit, and your life, do power yoga every day—you’ll be amazed by what happens.
A regular practice keeps us on track. Practicing daily is a way to check in with your body on a consistent basis. Your body communicates in the language of sensation; listen to it. What is your body feeling today? Where are you stiff, tense, stuck . . . and what does that mean? Are you off-balance? Do you feel strong or drained? Is your breathing smooth and free or ragged and congested? As the connection between your body and mind becomes clearer, you start to really see what’s going on for you each day, and you see how your habits or actions manifest in your system.
When you get on your mat, the results of how you treated your body the previous day are right there for you to witness. Your mat is a mirror; when you step onto it, your actions are reflected back at you. You directly experience cause and effect, both good and bad. You feel how heavy food creates heavy energy, and eating lightly creates vitality. Maybe you feel the effects of that second glass of wine, the chocolate bar, or your third cup of coffee, and realize that you don’t really need it. Or maybe you start to see how many hours of sleep you must have to be able to function at optimum levels. All the feedback you need about your body’s requirements and tolerances becomes available to you. Never again will you have to turn to “experts” to know what you need. You are cultivating an awareness of your own well-being, learning to listen to your body and honor your intuition.
Practicing three times a week helps, but you live your life all the time, so why get your energy flowing only three out of seven days? You can’t really awaken if you only plug in three times a week. Since yoga creates new wiring in you, it’s much harder to start and stop because you lose the momentum and the cumulative effects of practicing consistently. Yoga is all about moving energy, and when you don’t do it, the energy becomes stagnated. You then have to expend more energy to get it moving again. It’s like a car: You use less fuel if you keep it running than if you turn the ignition on and off The more you practice, the easier the asanas become and the more benefits you get. You get longer, stronger, and more supple every time you get on your mat, and eventually, you astound yourself and flow right into poses that once seemed impossible. It’s a simple but crucial rule that for any level of transformational success you must develop the spirit of repetition and consistency. Repetition is the mother of skill, and skill is the mother of mastery.
Even if you are a beginner, I recommend doing power yoga daily. It’s not like other forms of exercise, so there is no danger of overtraining as long as your practice is balanced. The more you do, the better you’ll look and feel, the stronger you’ll become, and the brighter you’ll shine.
How Long Should I Practice Each Day?
It’s better to do a little bit of yoga a lot than a lot of yoga once in a while. So rather than doing two hours once a week, you’d be better off doing twenty minutes every day. Ideally, you should do an hour and a half of power yoga each day, but if that’s not possible, do whatever you can. Some days I’ll do a long hour and a half practice in the morning; other days I’ll do forty-five minutes in the morning and forty-five minutes late in the day. Sometimes I’ll just do twenty minutes in the morning.
The practice session outlined in this book is the equivalent of a ninety-minute class. At the end of this section, I have also given you a formula to help you tailor your daily practice to fit into your schedule. It’s important that you follow one of these programs rather than skipping around and designing a session on your own. Nothing about the power yoga routines is haphazard; the sequence of postures is laid out in such a way so that each posture prepares you for the one that follows. Jumping right into the backbending series, for example (which comes sequentially toward the end of the practice), could have the unfortunate effect of shocking a muscle, pulling a ligament, or straining a joint.
The best time of day to practice is first thing each morning before doing anything else. It will prepare you, center you, and give you fortitude and clarity for the day. If mornings are not possible, choose a time of day when your office or home is as quiet as possible and free from distraction. That’s important. If evening is best, then do it at a reasonable hour rather than after the late news. The tired mind does not absorb well, and the tired body does not move well. In addition, you tend to be less aware late at night, and injury could result. You want sufficient energy—both mental and physical—sustaining you when practicing these postures.
Find the timing and pattern that works for you, but I encourage you to get on your mat at least once a day even in the beginning, even if it’s just for twenty minutes. Consistency is the key to sparking power in your practice. Then, as you get more in tune with your body, you’ll know how often and how much you need.
Building Healthy Poses—The Master Principles of Alignment
The Pillars of Power Yoga—breath, heat, flow, drishti, uddiyana—give you the tools to create a graceful and strong practice that integrates the whole body and the mind. You will use all of these foundations to build a healthy practice, and you specifically want your individual poses to be sound. The building blocks of safe poses are what I call the Master Principles of Alignment.
The Master Principles of Alignment help with the how-to element of your practice. It’s the “what goes where, what rotates which way, which muscles and joints do what” part. Your poses don’t need to be perfect, but they do need to be healthy, and these principles will help you understand the mechanics of what you are striving for when you get on your mat.
The Master Principles of Alignment bring you back to your natural and ideal alignment, which over the course of your life, due to various stresses (like the pull of gravity), has been thrown out of balance. By incorporating these principles into your practice, you will learn how to master the biomechanics of healthy movement.
Eventually you won’t need to focus individually on these principles because they will become a part of you and your unconscious competence. Just as in mastering a musical instrument, where you spend hours practicing scales and chords, over time they become second nature and just flow out of you naturally, creatively, and spontaneously.
Principle I: Build Your House on a Rock
The New Testament says a foolish man builds his house on sand. If you build it on sand, it cannot withstand the weathers of life: hurricanes, storms—even the slightest breeze could cause it to crumble. If you build your house on sand, it will wash away at the first sign of turmoil. The same is true for your body in yoga postures.
Building your asanas on a rock means first creating a strong physical foundation. The foundation of almost every pose is the base, the part of your body that is rooted to the earth. Whatever is touching your mat is your foundation. In standing poses, your feet are the foundation. In inversions, the palms of your hands, your shoulders, your forearms, or the top of your head are the foundation. If you are lying on the mat, your back or belly is the foundation.
Once you have a stable foundation, you can begin to work the rest of the pose, from the ground up. If you build a pose on shaky footing, there is a good chance you will lose your balance and find the pose frustrating. If you take the time to get really secure and stable in your foundation, however, you set yourself up for success.
Power in all standing poses comes from the feet. It’s drawn up through the legs, triggered through the hips, and projected out through the torso into the arms and hands. In a standing pose, take the time to feel your feet firmly planted to establish rapport with the floor. Then go deep into your legs, feel your strength, square your hips, elongate your torso as life goes up and awakens your arms and fingers. For inversions, like Shoulder Stand (page 142), it’s the opposite: stabilize your shoulders and upper arms on the ground, then align your chest, hips, and legs. If you fall out of a pose, don’t race back into it haphazardly. Start over from the foundation and take the time to rebuild it from there.
The width of your foundation (the space between your feet) plays a role in the stability of standing poses. The wider your base, the more you are able to activate spinal extension, but you lose general stability. If you feel unbalanced in a standing pose, shorten your stance. Eventually, as you develop more strength, you can widen your base.
Principle 2: Establish Neutral Alignment
Neutral alignment involves bringing your body into a balanced relationship to gravity. It is, in essence, the ideal of each pose: a natural, stable posture in which you create even lines in your body.
If your car is out of alignment, you can still drive it, but eventually the tires wear unevenly, putting stress on other parts of the vehicle. It becomes an accident waiting to happen. The human body is the same. If your hips are uneven or a knee is collapsing in or splaying out, the entire structure is unstable, thus creating imbalances, aches, and pains throughout the entire body, potentially leading to long-term damage. Yoga practice is repetitive training, so keep in mind that repetition of your movements can result in either mastery or misery.
Neutral and symmetrical alignment of all body parts is the first element of injury-free movement. The whole is the goal, and the integration of each piece to the other—legs, pelvis, torso, arms, head, and neck—creates a foundation of true power and stability from which all the poses begin and end. When you integrate the various parts of your body in neutral alignment, you create a sense of naturalness in poses. You fight less and breathe more. You don’t struggle to stay in balance or to hold the pose. You line up the energy patterns in your body properly, and suddenly you achieve a weightless state. You feel free, tall, uninhibited.
You’ll know when you’ve achieved neutral alignment in a pose when suddenly it ceases to be a struggle. You fall into a perfect relationship with gravity and you feel a sense of strength, stability, and overall balance. In that moment, you make the pose yours. Every body is different; no two people have the exact same formula to reach neutral alignment in any pose. The tips and cues I will give you for each posture will help lead you toward this, but you’ll need to play with your alignment to find what gets you there.
This yoga practice will teach you to notice the imbalances, the postural habits, the compensations, and the negative physical adaptations that have developed over your lifetime. After all, you are a walking autobiography. If you have spent your whole life drawing your shoulders up to your ears, or tilting your pelvis a certain way, or caving your chest in, over time you’ll become aware of these unconscious holding patterns. The daily repetition and systematic diversity of the poses in this practice allows you to scan your entire body. You will see that one side of your body is stronger than the other. The strong side is tighter, the weaker side more flexible. One side can do more, one side can do less.
When you see these imbalances, be compassionate with yourself. It has taken you a lifetime to accumulate them, but with daily power yoga practice it will take far less time to neutralize them. The postures demand that you work equally on the right and left sides of the body, the front and the back sides of the body, the lower and upper parts of the body, and here is where the corrective element comes into play. The postures give you the opportunity to draft the ideal blueprint of a balanced and coordinated body.
Principle 3: Stack Your Joints
Though stacking your joints is part of what is needed to achieve neutral alignment, it is not all that goes into it, which is why I teach it as a separate principle. Stacking your joints means lining up your joints along one track, as in “ankles in line with the knees, which are in line with the hips.” The three weakest links in the human body are the knees, the lower back, and the neck, and protecting those in your yoga practice is essential to avoiding injury or long-term damage. Stacking your joints in line and creating right angles keeps all the hinges going in the direction they were meant to go and protects the joints, ligaments, and tendons.
An example of stacking your joints is in Warrior II pose (page 94), in which it is imperative that your knee is stacked directly above your ankle, making your shin-bone and thigh into a perfect right angle. This protects the knee from strain. Your shoulders should be stacked directly above your hips, so that your spine is one straight, neutral line. This keeps your pelvis and core centered.
Almost every posture requires that you stack your joints in some way, and I’ll show you how to do it for each one so that your poses are healthy and aligned.
Principle 4: Balance, Control, and Surrender
There are strength and surrender elements in every posture. We always hold one part of the body strong, which allows another part of the body to release. Certain muscles are held firm, and others relax into the pose. Some muscles are supporting and some are supported. This balance between the two actions is what makes yoga such a unique and powerful form of fitness: It accentuates strength and grace, stability and flexibility, hard and soft, so that your entire body is engaged in a balanced way. In yoga we say we use everything but overuse nothing.
You may feel strong in one pose while others feel impossible. Since yoga exposes weaknesses, you can’t just muscle through the practice. If you have strong, bulging biceps, they will only get you so far. It is not about developing one set of muscles in your body, but rather about developing your entire body and remembering that many parts make up the whole. Everything—cells, muscles, joints, and spirit—works together to provide support as well as exert strength, whether they are leading or following. This is how your whole body comes into balance and every muscle is ultimately engaged and toned.
Balancing control and surrender is central to traction within poses. When anchoring one part of the body and pulling through another, you create a natural length, space, and extension. For instance, in Bow pose (page 129), the legs resist and are active and the spine and torso are passive (lower body controls, upper body surrenders). The legs work strength, the spine works length. This creates space between the vertebrae and a natural traction through the torso.
Ultimately, yoga is about creating space: space within your spine; space within those secret pockets of tightness; space between your muscle fibers, bones, and joints; space between your doubts and beliefs; space between your emotions and reactions; and most important, space between your ears. With new space we become an open vessel to receive new insights and inspiration.
I’ll tell you which muscles to control and which ones to surrender in each pose, but as you start a regular practice, you’ll just start to know. Your body is already wired to understand this, so over time it will just come naturally to you.
Principle 5: Work from the Bones
When you move with consciousness from your bones, all the muscles, tendons, ligaments, organs, and connective tissue will naturally follow. “Bones leading, muscles following” is a good mantra to remember.
What does it mean to work from the bones? It means moving from deep within each body part, stretching as though you were pulling yourself apart at the seams. If I told you to lift your arm, chances are you would raise it automatically and not think much about it. But if I tell you to raise your arm leading with the bones, it feels different, doesn’t it? It’s deeper, more powerful, and ultimately more graceful when you use your internal infrastructure rather than mindlessly flapping your limbs around.
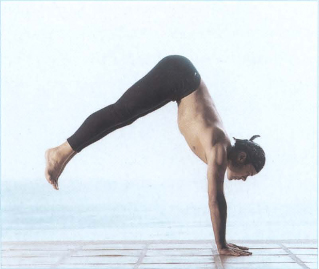
Working from the bones is the key to all the rotations we do within poses. Most poses contain some element of rotation, for example: in Downward Facing Dog (page 76), you spread your shoulder blades away from each other and then slide them down your back; in Warrior II (page 94), you rotate both thighbones outward from the hip socket—the right one goes clockwise, the left one counterclockwise; in Namaste Forward Bend (page 125), you rotate both thighbones counterclockwise (if your left leg is forward)—this naturally helps you turn your hips like a steering wheel to center your pelvis.
This may all sound a bit complicated at first, but don’t worry, it’s really not. It will all come naturally once you get flowing. For each pose, I’ll highlight clearly the alignment principles that are in effect, so you’ll know all the subtle techniques to focus on.
Coming Out of a Pose
Out of the corner of my eye I was watching Bob take the Wheel pose (page 134). I knew he’d been struggling with this, so I was happy to see him let go of his resistance and press up into a full backbend. The muscles in his arms and shoulders were quaking from the effort, but he held it for the full five breaths. When it was time to come out of the pose, he just collapsed down onto his mat. I was certain he had jammed his neck. How could he not, crashing down on the crown of his head like that? Bob was lucky and didn’t injure himself that time, but I reminded him and the rest of the class that any fool can get into a pose, but only a wise person can come out of it with conscious grace.
Never, ever snap-release out of a pose! The most common way people injure themselves in yoga practice is when they are coming out of poses. They think, “Great. . . I’m done . . . let me out. . . ,” then twist and yank their bodies out of the pose they were holding rather than easing out. The momentary relief you feel from quickly releasing a difficult pose isn’t worth anything if you wrench your neck, or your knee, or your lower back.
Vinyasa flow is an unbroken stream in which one movement leads into the next, breath leads into breath, pose leads into pose, transition leads into transition. The poses between poses are poses! Take your time to ease back out of a pose the same way you got into it. Do the exact steps you took in reverse, working from the top down to your foundation. Injuries can come in any physical activity, but many of those sustained in yoga practice can be avoided if you pay attention and transition with awareness.
The Seven Most Common Mental Mistakes in Yoga Practice—and How to Avoid Them
Almost every person new to yoga practice is subject to seven major mental mistakes. I’m including myself here. When I was a beginner I made most of these mistakes, too. Sometimes I still make them, but many years of experience have taught me to recognize when I have done so. With time, you’ll be able to see these patterns in yourself and get back on track more quickly.
As a teacher, I am here to help correct these errors—gradually and sometimes immediately—in order to help you improve your awareness and overcome these pitfalls on your path to mind/body mastery. Eliminating just one or two of these seven common mental errors can catapult your yoga practice and your life beyond what you thought or allowed yourself to think was possible. Eliminate all of them and anything and everything is possible.
Mistake 1: Believing Your Doubts
No matter who you are, I promise that you can do more than you think you can do—not because you were born double-jointed, or because you were blessed with strong and pliable muscles, but because when you believe you can, you’ve already moved half the mountain. Everyone has the capability to shine. Everyone! All it requires is an unbending faith in yourself Just start where you are and do what you can do, and there will be no stopping you.
Believing your doubts is one of the most insidious mind tricks that your ego can play on you. Doubts are not real; they are just illusions created to keep ourselves from taking risks because we are so afraid of failing. Your yoga practice will reveal the real limits that you confront in your body, but it may astound you to discover that many of the limitations you perceive as physical are actually mental. When you believe that you can’t, you can’t. I see this form of self-sabotage almost every day in my classes.
There was a woman at one Bootcamp who refused to try Tree pose (page 117). It is relatively simple, but it does require balance (which comes from the mind). She insisted she would fall if she lifted one foot off the ground. She was frozen. I offered to assist her, but she refused. I never push anyone if they aren’t ready, so I just let her be, but the other participants tried to help her.
“Just try it,” someone said. “It’s really not hard, I swear.”
Nope. She wouldn’t budge.
“It’s all mind, really,” another said. “You just think you’ll fall, but you won’t.”
No amount of convincing worked. She wouldn’t lift that foot for anything, completely convinced she would topple over if she did. When we came out of Tree pose, she went right on with her practice along with the rest of us, but to my mind, something was lost. She’d hit the edge of how far she believed she could go and backed away from an opportunity to grow. She let her doubt take over and never gave herself a chance.
We are like clay. We can reshape ourselves and transform if we are willing to. There’s nothing static here. We may believe our limitations and tell ourselves that “this is just how I am,” but that’s not true. As the saying goes, fight for your limitations and the prize is that you get to keep them. We have the capacity to move beyond where we are right now. All we need to do is have faith.
Faith comes from knowing that there is so much more beyond just you. There is an unlimited power that wants to come up and surface in your body and your life right now. When you say yes to it, it can flow through you and take you into realms you may have thought impossible to reach.
Just doubt your doubts—that is true faith.
Mistake 2: Despising the Days of Small Beginnings
There is a verse in the Old Testament that asks, “For who hath despised the day of small things?” Any creative person knows not to despise the days of small beginnings—the first brushstroke, the first word on a blank sheet of paper, the first note played. Those fragile beginnings are precious, for no masterpiece could ever come into being without them.
In all of life, yoga practice included, there are sequential stages of growth and development. A child learns first to roll over, then sit up, then crawl, and eventually walk and run. Each step is important and each one takes time. No one step can be skipped. If you observe the first three years of a human being’s life, you can see it truly defines the days of small beginnings. Those first wobbly steps lay an essential foundation.
Occasionally a person will come into my class not knowing a thing about yoga and yet three months later look as if she’s been doing it for years, simply because she didn’t expect perfection. For her, yoga is a joy to discover and she takes it one day at a time. On the other hand, there are people who come to a yoga class once but never return. They arrive with their achievement brains in full force and effect, and when met with imbalance, awkwardness, or weakness in their bodies, they experience frustration, embarrassment, fear, and doubt. They are driven by the unconscious attitude that if they can’t do it perfectly, they won’t do it at all.
The fact is, an open-minded beginning yoga student is like an infant learning to take his first steps. You won’t see him give up just because he lands on his butt a few dozen times! On a ten-point scale, if you are at level two coming into class or starting your own practice at home, and you desire to move to level eight, you must first go through levels three, four, five, six, and seven. The edge you’ll hit can only be moved through if you stop hating the fact that you are a beginner at every new step and start embracing it.
The awkwardness and fear in the early days of your practice will fade soon enough, and you’ll forget very quickly the things you weren’t able to do. It’s a funny thing about yoga; over time you tend to forget the physical struggles you experienced along the way. So do not despise the days of small beginnings, for it is in those moments that you open new doors to discovery through which all things are possible.
Mistake 3: Embracing Tradition Over Intuition
No one person can tell you what is right for you. Not in a pose, not in a diet, not in your life. Every single body is unique, and only you can ever really know what is right for you. You can hear advice, seek out guidance, and even ask for help, but ultimately, it is you and you alone who knows what is best for you.
Enlightenment about your body, your mind, and your life is a very individual process. Teaching becomes problematic when we prescribe that there is only one way of doing something. It is said that the path to enlightenment is like a bird flying in the sky: It leaves no footprints behind. That is why traditions that claim theirs is the only way are absurd. Tradition is valuable for what it can teach us, but the minute it becomes absolute, it negates the most precious human resource there is: our intuition.
One of the singular appeals of yoga is that it promises a definite technique by which we can make ourselves independent of preceptors, teachers, or gurus. But so often we are not shown that side of yoga in the West. We are given teachers, or “gurus,” who establish themselves as divine intermediaries and claim to hold in their hands the key to our enlightenment. Traditional yoga often sends students the message that they must follow teachers or tradition to the letter, that they know nothing in comparison to the guru, that it’s the teacher’s way or the highway. Believe me, I’ve been around the yoga world my whole life, and I’ve seen every angle of intimidation, humiliation, and blind devotion. Since I was a boy, I have witnessed many soul-searching people get swallowed up into the unthinking atmosphere that surrounds popular gurus. To this day, I’m stunned to see educated men and women blindly following a master. Regardless of what inconsistencies arise, they make excuses for the master, as though they have forfeited their powers of discernment and common sense.
Many gurus control their followers through the brilliant process of contradiction. Do what they say, and they promise you will achieve enlightenment. The catch is that the tasks or problems they present you with are altogether unsolvable. You become emotionally and spiritually absorbed in the problem, then are taught that you need the guru to guide you through such a big and confusing process. You doubt yourself and come to rely more on the guru, believing that he is the one with the answers.
At one point in time, my life was guided in this fashion. I could not break away, because at that time I believed my guru possessed the only key to personal power. Whatever he said was right. If I didn’t understand something, it was because of some defect in me, not the master. I did the long hours of meditation, chores, asana practice, and endless study, all with small amounts of sleep. I was the true brainwashed yogi disciple.
Eventually, I woke up and saw that I was only regurgitating what my teachers had told me. Without personal common sense and intuition, I realized, self-actualization was impossible. I could never really find the wisdom in myself if I only listened to what others were telling me.
I later came to realize that the stakes in this kind of game are very high, and that people will do things in that state of mind they would normally not do: bending their bodies into positions that are ridiculous for their body type; memorizing sutras until their heads spin; or following diets, rules, vows, and techniques that make absolutely zero sense for who they are.
If I sound a bit critical of gurus, I should clarify that the target of my criticism is the ignorance, hypocrisy, and downright spiritual dishonesty of many who profess to be gurus and masters in this ancient practice. The honest teachers are the ones who are willing to kick themselves off the pedestal and be real.
People bow to an orange-robed master, and then find out one day he’s not wearing any underwear. He may have amazing and wonderful things to teach us. But when you start thinking of him as holier than thou, you are falling into a trap. My father told me, “Don’t be so fast to trust, but don’t automatically distrust,” and I think that’s the best advice anyone can give.
Your intuition is always right. ALWAYS. It is never wrong. And it is important that we get that. To the degree that I remember that, and listen to my intuition, my life flows and abundance pours in: the right people, the right guidance, the right circumstances. But when I ignore my intuition, I create a mess.
The question is, when are you going to start trusting your intuitive power?
Here on your yoga mat, start practicing intuition in action. Don’t follow me, or anyone else; follow yourself. If I tell you to do something and it doesn’t work for you, question it, modify it, play with it to make it work for you. I will push you, poke you, prod you, guide you, but it’s up to you to tune in and flow from what’s right for you.
Mistake 4: Not Recognizing That the Prize Is in the Process
There are no prizes for perfect poses, no ultimate goal here. Yoga practice is a journey with no end. You’ll grow and even transform along the way, but ultimately there is no arriving. When that moment of revelation hits you, it is one of the most important internal shifts. A sincere yoga practice is just that: a practice. It’s a daily practice to help you gain a completely different and improved perception of everything within and around you. This kind of transformation requires a radical surrender and a radical commitment to the process of growth. There is a reason this book is called Journey into Power; it’s not Arriving into Power!
I remember realizing early on that there were no limits as to how far I could go in a pose; I knew I’d never get bored, because there was always another depth to reach. So perhaps I got into it initially because of the challenge. But I stayed with yoga and made it my focus because of the beauty of the process that yoga continues to take me through. One of the reasons I teach yoga is that I want to share in that shift from being goal-oriented to being process-oriented. The more I teach, the more I learn that both teaching and learning are an unending process of refinement.
There are two basic mind-sets. One involves viewing a posture as something to be achieved, a goal to complete; how far you get in the posture is what counts in your mind. This is a typical mistake many beginners or Type A personalities make, and it often leads to frustration or injury. Focusing on a goal means trying to get your body to do something you want it to do, rather than surrendering to the process. Because we are so focused on performing, we potentially miss out on something magnificent.
The other mind-set views the posture as a tool to explore and open the body. Instead of using the body to get an ego boost, you use the posture to get to know and gain understanding of your body and mental patterns. The poses then become experiments to reveal and work through the resistances that block you, so you can ultimately move through them. Approaching the postures as goals makes you less sensitive to the messages your body is sending you.
It is so common at first to push too hard and fast instead of allowing the body to open at its own pace. It is always best to trust the natural order of things—the progressive development through time. A rose has timing. So do trees, and seasons. Only humans are in a hurry. If you try to open a rose before its time of blossoming, you break off the petals. So, too, if you rush your own unfolding you will cause greater harm than good.
Once you’ve been doing your practice for a while, you’ll probably notice that it has cycles. You’re into it, then out of it, then into it again, and so on. Even now, after practicing seriously for over twenty years, I go through these cycles. And if you’re like me, the challenge comes when you start to plateau. I have discovered that yoga is the art of dealing with plateaus. Part of the process is sometimes taking three steps back in order to go six steps forward and vice versa. Sometimes you’ll even feel as if your practice is getting worse, but really that is all part of getting better. Sometimes you feel as if you are completely stuck, and then suddenly it seems as though a door opens and you break through.
In China, farmers begin the process of growing bamboo by burying the root four feet under the earth. For a couple of years they water it, fertilize it, and nurture it without seeing it or even knowing if it’s still alive. Then suddenly, after two years of patience and love, it shoots ninety feet into the sky within sixty days!
The point is that sometimes results are barely visible, but every fraction of an inch of progress is meaningful. Don’t seek better poses, a perfect body, or immediate inner peace. Let go of the ambition and embrace the practice of peeling back your layers. Just be where you are, play your edge, and the prizes will be revealed along the way. Transformation is an endless process to be lived. It cannot be captured or possessed; you can only participate in it.
Mistake 5: Falling into the Trap of Competition and Comparison
Yoga is usually presented as being noncompetitive. At its heart that is true, but your ego may pull you into the trap of trying to keep up with the proverbial Joneses. So just in case you didn’t know, let me tell you: The Joneses are very messed-up people!
It is very common to start feeling competitive as you come to your mat. You look around the class and see someone in a fierce-looking Warrior pose and judge your pose pathetic in comparison. Or maybe you’re struggling with Downward Facing Dog while your friend holds it effortlessly. But if you watch two dogs stretching, you won’t see them peeking over at each other to see who’s doing it better! The action is instinctual, natural, and without ego.
In a yoga class, you may view the strengths of others as proof of how weak you are, and spend your time feeling sorry for yourself, making excuses for yourself, beating yourself up, and using this to confirm your self-doubts. Or worse, you ignore your real weaknesses and push yourself to catch up with people who are “better” than you. You only feel good as long as you keep up or, better yet, outdo.
Or maybe your ujjayi breathing is deep and rhythmic in comparison to the person next to you, who sounds like a lion with asthma. Perhaps you can go into a full Wheel pose and your friend needs to take the modified version. Instead of paying attention to where you are in your process, you focus on people who are worse off than you, making you feel superior.
Competition is identity-based, but the real path to power is spiritually based. As you get more experienced in your practice, you must look more deeply into your competitive instinct, for if you don’t explore it, it will continue to rise up automatically and unconsciously. It takes you over without you noticing it, and the next thing you know, all you can focus on is how much “better” or “worse” you are than those around you. You’ve lost sight of what really matters.
What’s needed is an understanding and appreciation for where you are. When you are secure in yourself, you can appreciate the strengths and successes of others without feeling challenged or threatened by them. You can even learn from them.
Comparison in and of itself isn’t a bad thing. Comparison is a basic mode of thought, the very notion of which is wrapped around progress. How can you know how far you’ve come if you don’t compare it to where you’ve been? How can you gain insight on ways to improve and grow without learning the difference between you and those around you? Competition is right if it feeds your soul and growth; it’s harmful if you use it to put you above or beneath others.
Don’t be intimidated by other people’s pretty poses, or gloat in feelings of superiority when those around you are struggling. Just watch the feelings of competition and comparison as they come up, then detach and let them go. Don’t feed them by fighting them. Don’t get caught up in struggling with them. Don’t kick yourself for feeling them. And don’t deny them. Just accept, appreciate, relax, breathe, and focus on peace. That’s the way to grow out of unhealthy comparison in yoga . . . and in life.
Mistake 6: Not Recognizing That Sometimes Less Is More
In yoga practice, sometimes less is more. Not always—sometimes more is still more—but there are moments to push and moments to surrender. You learn to distinguish by trusting yourself and honestly gauging where you are and what is needed. You can struggle to get into the ideal of a pose, but you may gain more by lessening, backing off, or modifying the posture. It takes a long time for ambitious overachievers to get this concept, especially if they are accustomed to succeeding in life through hard work. They excel because of intellect, daring, effort, and guts, and suddenly they unroll their yoga mats and discover all these qualities actually impede their progress. For these people, less is usually more, and their wiring prevents them from accepting that as anything but weakness.
The root of all misery is attachment. We are obsessed and attached to our outer appearances and physical capabilities. We have an image of ourselves, and when we can’t maintain it, our identity as we know it begins to crumble. Power yoga tends to challenge that image, forcing one to experience unexpected limitations and boundaries. That coming apart, of course, is the breakdown that precedes a breakthrough.
Karen was a typical Type A personality when she started coming to my classes. At thirty-five she was a vice president at a large international bank, and by outward appearances in excellent physical shape. She loved what power yoga was doing for her body and thrived on the challenge, but still struggled with certain poses. Karen’s nemesis was Revolving Crescent Lunge (page 98). Every time she tried the pose, she would lose her balance and fall out of it. She knew the modification was to drop her back knee, but to Karen, modifying meant defeat. Intellectually, she could hear me saying that there was a pose for every body and that everyone should do what they can, but her deeper mental wiring dictated that that didn’t apply to her. The pose was hard for her because her hamstrings were tight from years of running, and eventually, as you might have already guessed, Karen pushed it too far and hurt herself
If you recognize yourself in this description (in any way!), less may be more for you. The edge for you to learn from might not be how far you can go in a pose, but rather what you need to do in order to make your pose healthy. Remember, there is no such thing as a perfect pose per se, only perfect presence and equanimity. In yoga we make inner peace our only goal and the rest of the benefits just kind of happen along the way. By searching for equanimity rather than perfection, we lay the foundation for emotional stability no matter what happens.
How do you know if less is more for you? First and most obviously, if you are injured. If you have a chronic problem like a bad shoulder or knee, you’ll need to take care not to aggravate it. Yoga isn’t about barreling through pain, but finding modifications so you can work with and through it. Will, who has been coming to my studio in Cambridge ever since the day it opened, has a bad shoulder from an injury that occurred years ago. He comes to practice five days a week and simply does what he can while still protecting his shoulder. Some days he does only two Sun Salutations instead of six, or he drops his knees in Downward Facing Dog, and some days he just does the poses that engage only the lower body and stands in Ragdoll (page 78) while we do the others. He’s not doing a “perfect” practice, but he is certainly doing a more authentic one than some of the people around him, who are huffing and puffing and straining past their edge.
Experiencing what I call “bad pain” on any level is another signal that less is more. There is a difference between “good pain” and “bad pain,” and making that distinction can mean the difference between gently moving the boundary of your edge and pushing yourself to injury. Bad pain will be clear to you. It is usually sharp and electric; the message your body is sending you is a deep “uh-oh . . . back off.” It’s crucial that you obey your body in those moments. Physical pain is real feedback—it’s a warning sign that could mean you’re going too far. Ignoring genuine pain almost certainly invites injury. Good pain, on the other hand, feels more like a deep sensation in your muscles. Good pain might be soreness, or a deep stretch, or intense holding in a pose. It’s that place of comfortable discomfort.
Last, you’ll know it’s time to pull back a little if you start to panic in a pose. If you cannot maintain equanimity and steady, rhythmic breathing, it is a signal that you are going into overwhelm. When you panic, you lose your ability to intuit your body, and you move into survival mode, in which your only focus is making it to the end. As soon as this happens, you know you’ve gone into your head! Slam on your mental brakes, relax, and come into your body, into your breath, and into the present moment. Observe your body’s reactions and sensations to find the edge between comfortable discomfort and overwhelm. The key to mastering that edge is to keep your breathing deep and free and to maintain serenity during strong sensations.
If you are fearful in a posture, it’s wise not to try to override it in order to be courageous. You have nothing to prove to yourself or anyone else, and pushing yourself to that extreme negates what you are trying to do in your practice. You want to exceed yourself, not damage yourself.
By the way, Karen did eventually come back to her yoga practice, but she was in many ways a different person as a result of her injury. She saw how pushing herself relentlessly could cause her not only physical injury on the mat, but emotional damage in her everyday life. She admits that she is a work in progress; every day she now tries to live the lesson of “less is more” in one way or another.
Mistake 7: Not Understanding Your Resistance
Along with any growth process comes resistance. The two are as intertwined as the moon and the tides.
As a person who has been involved with yoga and personal growth for years, I wish I could tell you that I have conquered resistance. But I have not. Sometimes I still have to drag myself to my mat. The first five minutes are pure resistance, but then it starts to melt and I get into the flow. Ironically, the days that start with the most resistance usually turn out to be the best practices.
Resistance can be a great teacher. It exposes your state of mind and being—your fears, attachments, and limiting beliefs. Then it’s up to you to choose whether to continue protecting your existing patterns or to expose them to the light.
The postures are designed to open up and reveal every pocket of resistance in the body. They give us the opportunity to dissolve this resistance and break through to the other side. Facing the resistance without fighting it is the only way to grow out of it. Ignoring your resistance ensures you’ll stay stuck in it. You can try as hard as you like and find ways to move around the blocks in your path, but the thing that blocks your path is your path. The resistance that surfaces is the next place you need to look, the next edge you need to play.
We all know that the mind and body affect each other. Emotional tensions live in the musculature (your muscles and joints can actually hold on to memories of past trauma and tension) and through years of accumulated tensions and dis-ease, the body becomes a storage house for unconscious holding patterns.
Have you ever noticed the posture of someone who is really depressed and down? His chest caves in, his shoulders slump downward, and his head falls forward. His physical body actually starts to mold itself around his heartaches. His compressed chest protects him by literally making it harder to experience and express deep-seated emotions. If he were to do a chest-opening pose like Camel (page 131), the force of the emotions that might come from opening his chest could make him uncomfortable.
He then has a choice. He can either start complaining about what an uncomfortable form of exercise yoga is and vow never to do it again, or he can look objectively at his resistance, stay with the pose, and observe what emotions it brings up. If he chooses to remain closed off, what will limit his ability to move to the next level is not his body but rather his fear of seeing the truth that can set him free. If he sticks with it, though, he’ll become aware of how the opening of his body is facilitating an opening of his mind. His mental resistance will subside and his posture will change.
The key to working through your resistance is always a radical inner surrender, a calm determination, and a commitment to letting go!
In yoga, you encounter all kinds of resistance—resistance in the tissue, resistance in the mind, resistance to doing your daily yoga, and resistance to changing the habits and lifestyles that impede growth. Anytime you feel stuck, look for what it is that is blocking you—your blind spots—and the path you need to take will reveal itself.
It’s time to unroll your mat and begin! This is where your Journey into Power goes from concept to reality. We can talk about it, explain it, dissect it, and debate potential mistakes you may make, but it all comes down to unrolling your mat and just doing it.
What to Expect
If you are a beginner to this style of practice, you may feel awkward and frustrated at first. But I assure you, nearly everyone starts this way. Just remember that all our bodies are meant for yoga! Make it your own.
The spirit of flexibility gives you physical malleability; the attitude of strength gives you real muscle. I have watched three-hundred-pound people come to my class as beginners and tap into their personal power and unique process of transformation simply because the spirit of willingness was there. I’ve had guys walk into class with bulging muscles from weight training and within a few poses their arms are shaking. Eventually they thrive on the flexible strength that comes from using your own body weight as resistance, but they need to experience their own evolutionary process like everyone else. Be gentle and patient with yourself, and you will be great.
The beginning will be challenging, but beginnings usually are. Once you get going though, it gets easier and will start to come together in an effortless series of breaththroughs.
You’ll experience ups and downs and the inevitable plateaus as you go through your practice. Each day will be unique. Sometimes the energy and drive is there, other times it’s a struggle. Your body is just like your mind in that it has moods. The moment you step onto your mat you’ll know the mood. Work with it. After all these years of practicing I still have days where I’m right on, and other days where I’m struggling. Some days your practice will flow like a clear, cascading river; other days it will feel like swimming through glue. Just do it anyway! Modify, dilute, and discover what modifications you need in order to make the poses healthy and workable for you, but don’t overreact and give up. Remember, breakthroughs come at the moments of perceived failure. If your ego says no, let your spirit say yes! Willingness, repetition, and consistency will lay the groundwork for true transformation.
You might be sore after your first practices. This is completely normal—you’re conditioning deep muscles. You may even discover muscles you didn’t know you had! I actually love the feeling of being sore, because soreness is heightened awareness and a part of positive change. If you are really sore, keep practicing. A good hot practice will wring out the metabolic acids and flush your muscles with fresh nutrient- and oxygen-rich blood, and the ache of soreness will disappear.
When we do our Bootcamps in Mexico or Hawaii, I encourage students to float in the seawater as much as possible. The saltwater is rich with minerals that draw the toxins out of the muscles. If you don’t live near the sea, you can try adding natural mineral salts to a hot bath to get the same effect. If you have the time and resources to get a massage, I recommend that as well; it will help drain the lymph and metabolic debris from your tissue.
Random aches and pains that have plagued you may vanish, but new ones may surface to be healed. A very fulfilling aspect of teaching yoga is hearing the unending number of students who tell me how longtime aches, pains, and ailments had suddenly disappeared after only a few practice sessions. Just recently, a student told me about a neck injury she had sustained years ago. She had suffered residual pain and stiffness that prevented her from being able to turn her head all the way to the right. After a month of practicing power yoga, she regained full mobility in her neck. She laughingly credits power yoga for giving her the entire right side of her world back.
Your longtime back problem may disappear, but you may now experience other small healing crises, like soreness in your hamstrings. This is all natural; these new aches and pains are a part of the healing and strengthening process. Your body is going through a metamorphosis, a deep and true reconstruction. You may at times even feel as if you’re getting worse before getting better. Sometimes healing, strengthening, and opening in one area exposes a hidden weakness in another. Don’t worry; just relax and stay the course.
Intense emotions may surface when you first start your practice. They can come out of nowhere and hit you with depth and intensity. This is also natural. Let them come up (and maybe even have a healthy gut-level cry if you need to), and just allow that energy to move through you so you can release it. Don’t react; just relax and sit with it. Keep breathing and know that maybe, for the first time in your life, you are cleaning house and waking up.
What You Will Need
The one thing you must have to begin is a yoga mat. A mat prevents slipping and provides a little padding. You can find yoga mats at almost any sporting goods store, a yoga studio that sells equipment, or on-line. The kind I recommend is a thin, nonslip, washable mat that I import from Germany. I sell these mats (along with other yoga supplies) on my website, www.baronbaptiste.com. Many students keep a towel spread over their mats to prevent their sweaty hands and feet from slipping. Props like yoga blocks, blankets, and straps can help you modify poses in your beginning stages.
Congratulations! You are about to take the powerful stride toward mastery in body and soul! What follows are the fifty-three postures that will comprise a well-rounded and dynamic power yoga practice, all in ninety minutes. The poses are grouped into eleven series, each with a distinct purpose that plays a potent role in the overall practice. For example, the first series, Integration, brings you into your body, into your breath, and into the present moment. The third, the Warrior Series, creates vitality and energizes your whole body; later in the practice, the Inversion Series creates hormonal harmony and brings everything back into balance.
For each pose I give detailed instructions on how to get into it, the corresponding breath, alignment tips, and the vinyasa to connect you to the next pose, just as if I were teaching a live class. As it applies to each pose, I’ll include the external and internal benefits, the risk factors to watch out for, modifications to make if you are a beginner or have an injury, and a spiritual focus to weave into your practice. Every pose is accompanied by a photograph so you can see the ideal to work toward. Some have additional photos showing modifications that can make it easier or more challenging as needed. My goal is to demystify this process and make it work for you in your life, right now, so the more you know, the healthier and more powerful your practice will be for both your body and soul.
As mentioned earlier, the series are done in a specific order that is designed to work globally and systematically through all the dimensions of the body. At the end of this section I will show you how to create practices that can fit into your schedule. I will give you the formula to use to create a healthy and effective practice if you have only fifteen minutes, half an hour, or an hour, so you can fit a practice in every day.
1. Integration Series: Presence
The Integration Series is where it all begins. This is where you step out of the world and into yourself, where you come out of your head and into your body. Here you activate your ujjayi breathing, the deep life-changing breath that will unite your mind and body and ignite your internal fire throughout your entire practice.
The Integration poses bring you into the present moment, quieting the everyday chatter of your mind and focusing your energy toward rejuvenating, rinsing, and healing. Here is where you get calm and come to center, establishing your rapport with the floor and getting a sense of your body’s mood in the moment. You set your intention and put a prayer to your practice. It all starts here, with these three initial poses that unite your body, breath, and mind.
The moment you step onto your mat, make a commitment to shelve the problems and worries of your life. Just put them on ice for now; you can pick them up again later, when you’re done, if you’re really attached to them. Our goal, of course, is to have you let go of all the useless baggage and energy you bring with you to your mat, to shift you into a different space, so that when you return to your everyday life you have a whole new perspective. You can look at the same issues and see them from an entirely new vantage point.
Our bodies have constantly changing moods, just like our minds, and these poses allow you to key into what’s going on in it today. What is your body feeling? Are you stiff and sore, full of knots? Or are you pretty relaxed? Where is your mind? Are you present on the mat or are the lights on with nobody home? Are you stuck in your head? Maybe you feel energized, or maybe yoga is the last thing you feel like doing and you want to just run out of the room. But you’ve taken the first step and gotten yourself onto the mat, and that was the hardest thing you’ll have to do. Now simply let go. The degree to which you let go is the degree to which you allow the flow to begin.
If you are struggling, then on some level you are holding on. To what? Your anxieties. Your worries. Your tensions. Let go! If not now, when? Dissolve the walls, let go of your rope, and flow.
Remember, the answer to how is always be in the now. Follow your breath as it guides you into the present moment, and everything else will melt away like ice cubes in hot water. Just breathe and come into the present moment—the open doorway to that transformative space where all growing and healing happens.
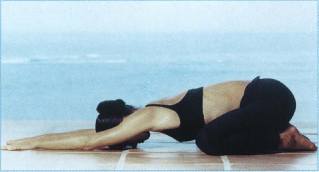
Pose 1: Child’s Pose (Balasana)
We open our practice by taking Child’s Pose. As part of Integration, Child’s Pose awakens the connection between your breath and your body and releases and relaxes all the muscles. But Child’s Pose can also be home base for the duration of your practice. It is a resting pose that slows down the heart rate and provides full-body rest, allowing for deep restoration. Come to Child’s Pose as often as you need during your practice. Beginning students may have to come here ten, twenty, a hundred times during their practice, and that’s perfectly OK. Give yourself permission to do that, to take care of yourself If you need to rest, just be true to yourself. No worries, no hurry—you’ll get stronger in increments and build more stamina over time.
While Child’s Pose is a resting pose, it is not the same as just flopping down on your mat to catch your breath. If you just abruptly stop practicing and start looking all around the room, you scatter your energy. The whole alignment of the pose is geared toward internalizing and restoring your energy and keeping your focus inward.
Set the pace of your practice right here by relaxing your face, dropping your mask. Soften the muscles of your face—the muscles of your personality. Commit to coming out from behind your mask into an honest, relaxed, joyful state of presence.
Building Blocks: From a standing position, come to your hands and knees. Point your toes so the tops of your feet are flat on the floor. Shift the weight of your hips back so your butt rests on your heels. Keep your big toes together and widen your knees to the outer edges of your mat, about two feet apart. Extend your arms straight out in front of you, palms facing down on your mat. Bring your forehead to the floor and just take deep, deep rest. Breathe deep and free to soothe and center yourself. Just come into the now and love your body!
Modification: If it is uncomfortable for you to stretch your arms out in front of you, rest them alongside your body with your palms facing up to the sky.
Spiritual Focus: Sometimes the storms of life can literally bring us to our knees. This pose gives the opportunity for spiritual surrender, to realize that “of myself, I can do nothing, but there is a power in me that can.” We spend our whole lives resisting the idea of surrender; we see it as weakness, as giving up. Then suddenly we hit a point where we realize that the moment of “letting go” is not when life is over. It is when life really begins.
Pose 2: Downward Facing Dog (Adho Mukha Svanasana)
Downward Facing Dog is a quintessential power yoga pose in that it engages your whole being. It calms your nervous system and works on overall flexible strength. It decompresses your spine, tones and strengthens your arms, opens the arches of your feet, sculpts and lengthens your thighs, and is an amazing shoulder-opener. The entire backside of your body is awakened, engaged, and set free. It has an inversion element to it, so you turn your world upside down, shifting your biochemistry. I will often use Downward Facing Dog as a more active home base during my classes and in my own personal practice, because it is both dynamic and restful at the same time.

Building Blocks: From Child’s Pose, stretch your arms out in front of you, palms flat on the floor. Curl your toes under and press your tail high to the sky, straightening your legs. Walk your feet toward the back of your mat and your hands forward. Your hands should be shoulder-width apart, palms flat, fingers evenly spread; your feet should be hip-width apart and parallel. You should look like an inverted “V” from the side. You want a nice long base, so walk your feet back and your hands forward a few extra inches. Tilt your tailbone up and create length in your spine.
If you can place your heels flat on the ground, great. If not, don’t worry about it. They may not get there now, or ever; it makes no difference to the benefits of the pose. Flexibility is not the focus, conditioning is. It’s about activating and stimulating your entire body, bringing space and sunshine into your spine and poking and prodding your tissues to life.
Lift your chin, take a peek at your hands and then check your feet—they should be hip-width apart, fingers and toes facing forward. Roll your shoulder blades down your back and spread them apart, rotating your arms so the pits of your elbows face each other. Imagine you have two pickle jars, one beneath each of your palms: open the right one in a clockwise direction, the left counterclockwise, without moving your hands. The rotation comes from deep in your shoulder joints. This broadens your upper back and moves the scapulae away from each other; it will also take some of the pressure off your wrists. Dial the knuckles of your index fingers into the floor and press down through them to properly distribute your weight and stabilize your wrists.
Try bending your knees and tilting your tailbone up to smooth any roundness out of your back and create a beautiful straight lifeline of energy through your spine. On the in breath, press your mat forward with your hands and arms and create space in your shoulders by lengthening through the bones in your arms. On the out breath, press your chest back toward your thighs, lifting your hips higher and pressing your sitting bones up to the sky. Your leg bones are pressing back toward the wall behind you and your heels are driving down toward the floor. If all this sounds complicated, don’t worry; soon most of it will come naturally.
Play with the pose: research it, make it your own. Make whatever adjustments you need until it feels right. Play the edge, but make it healthy; challenge yourself sensitively so that you are not in pain. You should be dynamically engaged but not strained.
Drop your head, drop your brain, and breathe—-just being and breathing deep and free. Your ujjayi breath should be rhythmic, with an oceanic power. Let the layers of tension fall away one by one. Starting in this moment, let go!
Risk Factor: Thrusting all your torso weight downward can jam your wrists and shoulders. Lift your chest and torso a few inches upward toward the ceiling to avoid this. Also, your wrists can strain if you are pushing them into the floor rather than pressing evenly into your hands and knuckles.
Modification: To relieve pressure on your wrists, triple-fold your mat and set it under the base of your palms. This will shift the weight into the knuckles and fingers and out of your wrists. Continue to rotate outward from your shoulder joints and press through the space between the thumb and index finger. Some beginners experience wrist pain until the muscles in their forearms, shoulders, and back are stronger, so have patience with yourself. You will get stronger very quickly if you practice daily.
Spiritual Focus: Small children aren’t posing or posturing. They are just being. You can always tell when someone is posturing in a yoga pose. Just let yourself be natural. Naturalness starts with a willingness to come out from behind the mask: posturing less, letting go more, and just letting the light shine through us. This light is an invisible force that reaps visible results, ultimately allowing us to shine.
Pose 3: Ragdoll (Uttanasana)
Ragdoll, the final pose in the Integration series, continues to deeply release the back of your body as it awakens your biochemistry. Like Downward Facing Dog, it has an inversion element to it, which flushes your brain with fresh oxygen-rich blood and soothes and revitalizes the nervous system.
Building Blocks: From Downward Facing Dog, walk your feet up to your hands. Your feet should be hip-width apart and parallel. Hinging at the hips, relax forward over your legs. Bring opposite hand to opposite bicep. Let your weight roll into the balls of your feet. Drop your head and let go of your neck. Spread your sitting bones away from each other as you hang forward. Your legs are strong, your upper body long, creating traction through your torso. Soften your eyes and set them on one point behind you.
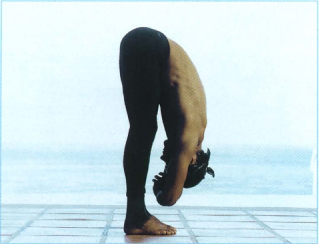
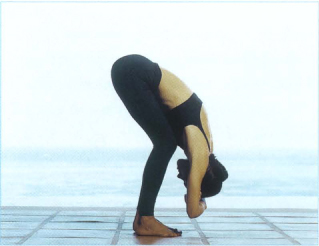
Ragdoll, modification
Gently fan your toes and press the soles of your feet into your mat, creating that perfect rapport with the floor. Soften from the foundation of your feet upward. Walk the fingers of your mind up your calves, your knees, your hamstrings, your hips, all the way up your spine, adjusting your pose as needed along the way. If your lower back is stiff and asleep, breathe life into it. Nurture the opening of your entire body. Let your mask melt. Soften the contents of your skull.
Relax your neck and let the nectar flow to your brain. Shake your head “yes” and “no” a few times to make sure you’re really relaxing. As you release the muscles in your neck, the artery that carries oxygen-rich blood to your brain dilates and the oxygen can flow freely to your brain. Your brain loves oxygen! It’s so healthy to just hang upside down once in a while and give your brain a bath. Inverting your world clears the way for new viewpoints and insights. Wash away the old stuff, the limiting thoughts, the limiting beliefs, and come into your body with more compassion, more acceptance, more love and light. Be an open vessel and let the healing flow begin.
Hang down and just breathe!
Risk Factor: If you feel strain in your lower back, take the modification below. If your legs are straight, be careful not to hyperextend the knees; keep them soft.
Modification: Bend your knees as much as you need to. There is no prize for straight legs!
Spiritual Focus: Sometimes by relaxing and doing nothing, great things can happen. At a certain point in his life, Gandhi didn’t speak, he didn’t really eat, he hardly wore any clothes. He refined his life to great simplicity, and through his powerful intention he changed the world.
2. Sun Salutations: Awakening
Sun Salutations are the full-body warmups that build heat and set the pace, breathing rhythms, and flow of your yoga practice. They bring your focus further inward and ignite the healing heat inside.
There are two Sun Salutation series: Sun Salutation A and Sun Salutation B, both of which are done with momentum in flowing sequence. They mobilize the musculature of the body, get the heart pumping, boost circulation, and prepare the body for the entire practice by taking each joint through its full range of motion.
Very often the first fifteen minutes of Sun Salutations will be filled with resistance. They may feel hard and uncomfortable. But if you keep moving through the poses and breathing in a conscious way, something will suddenly shift and you will enter a flow, a zone. At certain times you just don’t feel “into it,” but if you do it anyway, the energy shifts. You move to a new place and space, and suddenly you forget all the reasons why it was so hard at first and just start flowing. You come out of your head, dissolve resistance, and turn the faucet on. If you get an attack of doubt, just remember: You don’t have to like it right in this moment, you just need to do it. Yoga practice is not always easy, but it is always necessary!
The Sun Salutations build purifying fire, but they also serve another important purpose. These two series play a key role in the flow of your entire practice. To maintain the flow, we often need connectors, or joining poses, that will lead us from one pose into the next. And that’s where the Sun Salutations come in. They clean the slate between postures so you can start the next one neutralized and fresh. You’ll come back to the Sun Salutation series again and again to keep the internal fire burning and to keep your practice flowing.
I’ll break the poses down one by one, and then you can do the sequences as a flow.
Pose 4: Samasthiti
There are several poses that we refer to only by their Sanskrit names, Samasthiti being one of them. This pose, which literally means “standing at attention,” cultivates body awareness and develops new patterns of posture and personal stature. The alignment of Samasthiti is important because it is the blueprint for so many other poses; the rest are really just torso, arm, and leg variations of this central stature. Samasthiti is like the first note of a symphony—it all builds from there. The more conscious attention you give to this pose, the sweeter the music you will make.
Building Blocks: From Ragdoll, toe/heel your feet all the way together. With soft knees, slowly roll up to standing, one vertebra at a time. As you come up, sweep your arms up sideways and take a deep inhalation. Exhale and bring your hands to your heart center, in the middle of your chest, pressing your palms together. Release your hands and let them hang by your side.
Stand up straight with the inside edges of your feet touching. In this and in all poses, start with your attention at your feet. Work from a strong base and move upward. Keep rooting your feet firmly into the floor. Your feet should be wide awake, as if you were standing in a pan of espresso. Drive your legs down into the earth and lift your sternum to the sky, creating traction between the souls of your feet and the top of your head. Root down, and your upper body automatically rebounds up. Bring some sunshine into your spine!
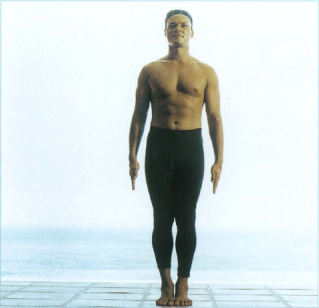
Pose 4: Samasthiti
Gently contract your abdominal lock (uddiyana). Tip your tailbone down and under very slightly, centering your pelvis as though you are holding a bowl of water on the pelvic floor and do not want a single drop to spill over the front edge. Spin your inner thighs toward the wall behind you.
Pull the tops of your shoulders back and relax them. Your arms are alive and energized, palms facing inward. Beam energy down to the core of the earth through your fingertips. Keep your head centered and your neck neutral. Work the breath, stretching the exhalation. Be sound in wind and limb.
Stand tall with a natural integrity. Align your mind to your spine and just stand in that beautiful center line of gravity. Open your heart center. This pose begins with the inner posture of your mind, so lift your mind and your spine will follow. Consciously increase your personal stature. Let your body mold itself around your calm inner power.
Risk Factor: Pushing your chest out like a drill sergeant puts strain on your spine and crunches the kidneys. Focus on keeping your ribs, spine, and hips in a natural and neutral alignment. Avoid hyperextending your knees.
Spiritual Focus: Your light shines most brightly when you drop your guard and dissolve the walls. The walls we put up to keep others out also keep us hidden within. Life is so short, why hide? Take up lots of space, relax your body, be open, and just doubt your doubts!
Pose 5: Mountain Pose (Tadasana)
Mountain pose reverses and relieves the constant gravitational stress on the body. It lengthens and creates openness in the front of the torso, neck, chest, and shoulders. We tend to compact our bodies as we go through the daily motions of life—sitting at the computer, carrying heavy packages and even kids, worrying and stressing our shoulders right up into our ears. There have been studies done that prove we are actually an average of one inch shorter at the end of each day due to compression in the spine. Cartilage reabsorbs water when we lie down at night and counteracts the day’s shrinkage, but over time, the compression adds up. In life we compress, but in yoga we expand and release. This is why I focus so much on the elongation of the spine, pulling the torso up out of the pelvis, reaching toward the sky rather than giving in to gravity.
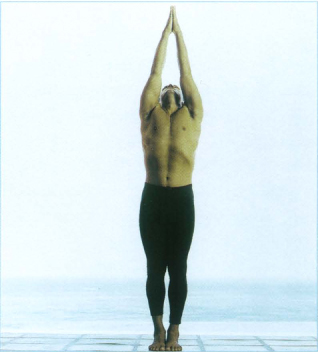
Pose 5: Mountain Pose
Your entire nervous system gets a wake-up call in this pose. All our nerves are in some way linked either directly or indirectly to the spinal column. It’s the six degrees of separation as played out in the human body. As the spine naturally extends, the nerves are released from any pinching or compression and you can feel them lighting up like a Christmas tree.
Building Blocks: From Samasthiti, spin your palms outward. Inhale, lift your chin slightly, and sweep your hands up sideways, stopping when they are shoulder-width apart above your head. Your palms should be facing each other or pressed together. Gaze at a point directly above you on the ceiling. Tuck your tailbone under slightly and drop your front ribs downward. Be careful not to blow your rib cage out and up. Keep your arms straight and your palms facing each other.
Root into the ground through the soles of your feet and reach up to the sky through your fingertips. Engage the same traction as in Samasthiti. Be of heaven and earth, as grounded and soaring as a mountain!
Alignment:
Same as for Samasthiti, plus:
Risk Factor: Watch out for an excessive arch in your back. Keep your spine neutral. When lifting your chin, do not strain your neck.
Spiritual Focus: You don’t need people’s permission or approval to act on what you know in your heart is right. Being in a state of grace means simply knowing what is right in the present moment and acting on it.
Pose 6: Standing Forward Bend (Uttanasana)
The forward-bending motion of Uttanasana stretches the lower back and hamstrings. Internally, it stimulates and rinses the organs in the belly, including the digestive system, and it ignites the metabolic fire. As with all forward bends, it harmonizes the brain chemistry.
Building Blocks: From Mountain pose, exhale and swan dive forward with a straight spine, hinging at your hips. Your arms sweep down sideways, stopping when your fingers reach the floor on either side of your feet. Press your chest down into your legs; Crazy Glue your nipples to your thighs. Ideally, your palms should be flat on the floor alongside the outsides of your feet, but touching your fingertips to your mat is also fine (if you need to bend your knees, do so). Your head hangs down, your neck free, eyes soft.
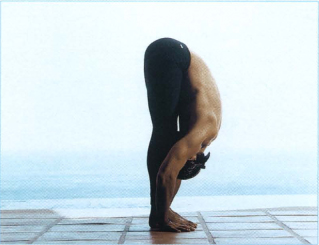
Pose 6: Standing Forward Bend
Really focus on drawing the crown of your head down toward the mat, using your hands around your ankles as extra leverage if you want. Stretch the back of your legs to the sky and pull your trunk downward to the earth. Squeeze your legs and extend your spine. You should feel a good healthy stretch in your hamstrings and lower back. Increase the intensity smoothly, sensitively, and with total awareness.
If you are tight in your lower spine and hamstrings, this stretch may be intense at first, so bend your knees and focus on hinging at your hips. Just concentrate on breathing directly into any tightness and resistance you feel, allowing those areas to open up and release the tension stored there. This is a great diagnostic pose to determine the mood of your lower back on any given day.
Risk Factor: You can strain the lower back or hamstrings if you are tight in that area and bend too far.
Modification: As you bend forward, you can experiment with softening your knees to stabilize your lower back. Give emphasis to hinging at your hips and your abdominal lock. Once in the pose, bend your knees as much as you need to. If you are stiff, work with your feet slightly apart but still parallel.
Spiritual Focus: Resenting our present condition can cause us to try to “grab the bull by the horns” and struggle to get to success quickly. But just being in the present moment and playing your own edge is enough and allows you to grow naturally. It’s like the story of the tortoise and the hare: The tortoise took slow and steady steps, and he achieved his goal before the pushy and fast-footed hare.
Pose 7: Halfway Lift (Urdhva Mukha Uttanasana)
The Halfway Lift continues to stretch the hamstrings and lower back, and it also elongates the spine and tones the abdominal obliques (the muscles that wrap around the sides of the abdominal wall).
Building Blocks: From Standing Forward Bend, keep your feet together and place your fingertips on the floor to the outer edges of your feet, in line with your toes. Inhale as you lift your torso halfway up to a flat back.
Each time you come into this position, you want to smooth out the lumps and bumps and iron out your spine. To do that, you need to work forward and backward, pressing your butt back and pulling your chest plate forward, creating traction from the crown of your head to your tailbone. The goal here is to create a beautiful lifeline through your spine, so bend your knees as much as you need in order to make this happen. Don’t forget uddiyana: Pull your belly in and up.
Drop your shoulder blades down your back, away from your ears, and keep your chin tucked down. Focus your gaze at a spot on the floor six inches in front of your toes.
Risk Factor: Beware of jamming your chin up and crunching your neck. Your neck is a fragile creature, so keep it neutral and treat it with love. Focus on pulling your shoulders away from your ears. Also, be sure to engage your abdominal lock (uddiyana) to protect your lower back.
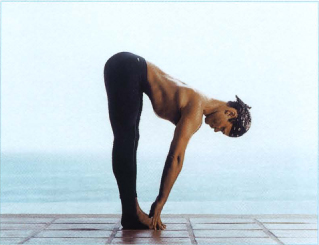
Pose 7: Halfway Lift
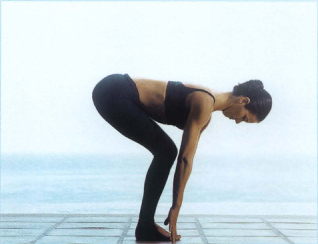
Halfway Lift, modification
Modification: Bend your knees if you are stiff, are rounding through your spine, or if this hurts your lower back.
Spiritual Focus: As a plant thrives in the warmth of the sun, so are you meant to be a creature of your intuitive light. Through that inner illumination, the power of the universe wordlessly suggests the way to go and grow. But through self-doubt your soul is cut off from that source and darkness whispers the way. Let your breath guide you back to your intuitive light, moment by moment.
Pose 8: Plank/High Push-Up (Dandasana)
High Push-Up builds upper and lower body integration. It strongly engages your biceps, triceps, shoulder, and chest muscles, as well as your abdominal obliques.
Building Blocks: From the Halfway Lift, bend your knees and, as you exhale, jump or walk your legs back to the top of a push-up position. Now set up your base. First things first: your eyes. Set the eyes at a spot between your hands. Bring your hands directly under your shoulders, stacking your shoulders, elbows, and wrists in one vertical line. Tuck your toes under and come onto the balls of your feet. Engage your quads and lift the front of your thighs, simultaneously pressing back through your heels. Lift your belly to your spine. Use your core power and your legs to help you hold this pose. Be strong. Be powerful!
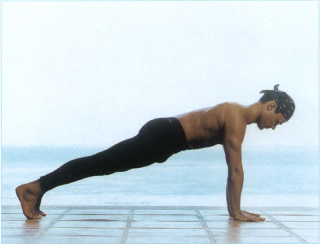
Pose 8: Plank/High Push-Up
There are two essential rotations happening at once in this pose: Your shoulder blades are spiraling down your back, away from your ears, and your tailbone is scooping down toward your heels, tilting your pelvis under slightly. These rotations will help stabilize your body instead of its collapsing against the force of gravity.
This can be a challenging pose, especially if you don’t have a lot of upper body strength yet. But what you want to do is integrate as much of your musculature into this movement as possible, especially your quadriceps and abdominal muscles. If all the muscles in your body worked together, they would collectively have twenty-five tons of pulling power. Think of it! If your muscle power could conceivably pull ten gigantic trucks, it can certainly support however many pounds of you there are.
Even if it’s hard, what is more challenging than this pose is what’s going on inside your head. Are you calm, or are you resisting? Are you relaxed, or are you clenched? To stay calm in the face of adversity—to breathe more and struggle less, to be nonreactive—that’s what is most challenging. It is also what is most essential to your success in the pose.
Risk Factor: Don’t let your shoulder blades collapse in toward each other and/or sink the lower back/belly down toward the floor. Keep your arms straight and your body lifted.
Modification: If you don’t have enough upper body strength to hold this pose, drop your knees to the floor, but keep everything else the same. In time you will get stronger and be able to support your full body weight.
Spiritual Focus: When personal growth becomes the most important thing in our lives, we become committed to giving up our excuses and limiting thoughts like “I can’t” and begin to find a way. Each moment of our practice is an opportunity to consciously rewire our belief system from doubt to faith, from confusion to knowing what is needed, both on and off the mat.
Pose 9: Low Push-Up (Chaturanga Dandasana)
Next in the Sun Salutation vinyasa is Chaturanga, or what I call “low push-up” position. Chaturanga Dandasana translates to “four-limbed staff,” which is exactly what you want to look like in this pose: strong and straight. It should appear effortless, yet packed with power. Chaturanga encourages full-body stabilization and coordinated force.
Building Blocks: From High Push-Up, exhale and bend your elbows. Move forward as you lower your torso until you are hovering about five inches from the floor. Your elbows should form perfect 90-degree angles. Keep your elbows tucked into your sides and stacked directly over your wrists. Again, engage your belly and quads so you distribute the burden of weight more evenly. As in High Push-Up, tuck your tailbone down toward your heels. Keep your chin slightly raised.
A lot of students try to sneak their way past Low Push-Up and move directly from High Push-Up to the next pose, which is Upward Facing Dog, but I strongly encourage you not to do this. Find ways to work within the pose. Modify, dilute, research, but don’t run or avoid the work. Challenge yourself sensitively and your weakness will soon turn to strength. Each time you try it you will be able to go a little farther, or hover a little bit longer, but remember not to despise the days of small beginnings!
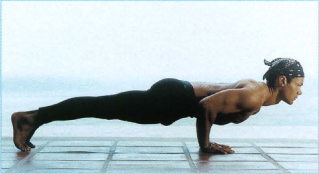
Pose 9: Low Push-Up

Low Push-Up, modification
Risk Factor: You can strain your shoulders by letting your elbows fall out to the sides. Keep your arms tucked in close to your body. You can also put excessive strain on your elbow joints by dipping your shoulders lower than elbow height. Many people crunch the neck and upper back (as well as strain their wrists) by allowing their mid-torso to sag. Keep as straight as a staff!
Modification: As in High Push-Up, drop your knees until you build more upper body strength. If you need further modification, drop your chest down to the floor.
Spiritual Focus: The staff is symbolic of great power, strength, and leadership. When Moses led the Jews out of Egypt, the Pharoah’s army had trapped them at the Red Sea. But Moses raised his staff and parted the Red Sea so his people could walk through and escape. When you find yourself stuck or stagnant, raise the staff of your spirit and watch as that which blocked your path becomes the path.
Pose 10: Upward Facing Dog (Urdhva Mukha Svanasana)
Upward Facing Dog stretches the entire front of your torso and continues to strengthen the muscles in your arms, shoulders, and back. It also opens the chest, which expands your ability to breathe more deeply twenty-four hours a day.
Building Blocks: From Low Push-Up, inhale and press down on your hands, scooping your chest and belly up. Your hands should be flat, like pancakes. Move your torso forward and through your arms, which will cause you to roll over the tops of your toes so your feet are pointed with the tops pressing into your mat. Point all ten toes backward as if each one had a tiny pin of light on the tip and you wanted to shine ten spotlights on the wall behind you. Pull your shoulders back, your chest high. Enthusiasm through your thighs! Press down through the palms of your hands and the tops of your feet. Squeeze your butt and legs so your upper thighs are lifted off the mat. Your inner thighs spin upward and your baby toes touch the floor.
Drop your shoulders down your back, away from your ears. The shoulder blades are like hands pushing your chest forward from behind. Lift and open your chest plate—breathe deep and free into the bottom of your lungs. Pull your heart muscle away from your heels. Create length and space in your spine; drive down through your arms and feet, really arching up. Pull your mat back with your hands as you lift your chest higher. It should feel so good to stretch out and expand the whole front side of your hips and upper body.
Gaze forward and shine!
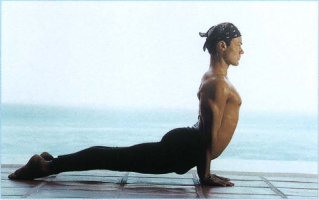
Pose 10: Upward Facing Dog
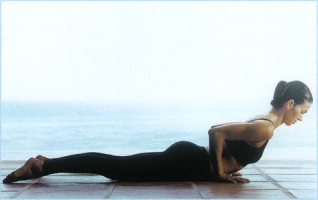
Upward Facing Dog, modification
Risk Factor: Beware of collapsing into your low back. Maintain the stabilization and action of your arms, legs, glutes, and belly to prevent this.
Modification: Bend your elbows, tuck them into your sides, and let your navel and thighs come down to the mat until you build more upper body strength and suppleness.
Spiritual Focus: Goal-driven creation stifles our true brilliance and ability. The gift of great geniuses is their ability to access and express the deep creative potential that speaks to all of us. As we access this inner energy daily, we can express it outwardly in the same way that da Vinci, Mozart, or Shakespeare radiated their genius throughout the world.
Repeat Pose 2: Downward Facing Dog (Adho Mukha Svanasana)
You already know how to set up the alignment within Downward Facing Dog from the Integration Series. However, Downward Facing Dog is also an integral part of the Sun Salutations vinyasa. To move into Downward Facing Dog from Upward Facing Dog, exhale, and in one fluid motion let the power of your thighs pull you back into your inverted “V” Adjust your hands and feet as necessary.
In Sun Salutations, hold Downward Facing Dog for five full breaths.
Pose 11: Jump Forward
The Jump Forward is a link between one pose and another. Remember, the poses between poses are poses! This creates a mobile flexibility and strength and helps to keep building heat.
Building Blocks: On the fifth exhalation in Downward Facing Dog, empty your lungs completely and press your thighs back even farther. Pull your belly up to your spine. Look at your hands, bend your knees, and, using your abdominal stability and upper body force, jump your feet forward between your hands. The objective is to be light and easy, not to plunk forward like an elephant. Don’t use momentum; just float!
The Jump Forward is a combination of moving strength, fluid flexibility, equal balance, and arm and torso stabilization. The weightless quality of floating forward is something that comes through practice and progress. Just keep practicing, keep practicing, and then one day you’ll just levitate forward effortlessly and say, “Wow, where did that come from?!”
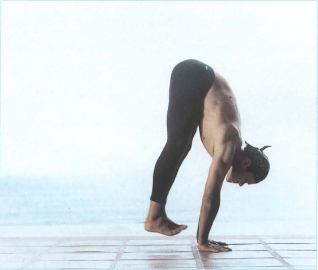
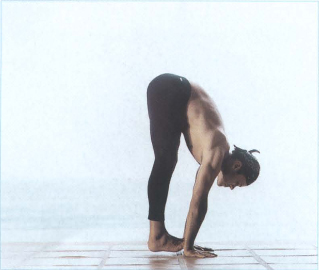
Pose 11 : Jump Forward
Modification: Walk your feet forward one foot at a time until you are more comfortable with the jump.
Spiritual Focus: This movement helps you discover what I call your “midair mind.” Remember what it was like to jump over a puddle when you were a kid? There was a split second between when you left one side and before you landed on the other when you were suspended in midair. Spiritually, that is the moment of pure freedom—of just being.
To Finish the Sun Salutation Vinyasa A:
Once you Jump Forward, come into Halfway Lift (pose 7), then fold down into Standing Forward Bend (6). From there, sweep your arms up sideways and then into Mountain Pose (5). Be sure to engage your abdominal lock as you sweep up to the sky. Then drop your arms and come back to Samasthiti (4).
Overview of Sun Salutation/Vinyasa A:
From here forward, we will refer to the Sun Salutation A series as “Vinyasa A.” Repeat the entire Vinyasa A series three to five times before moving on to the next series, Sun Salutation B.
Sun Salutation B
Now that you’ve started to warm up, we move to Sun Salutation B, which turns the internal heat up a little higher. Much of this vinyasa is the same as Sun Salutation A, with a few new poses included.
Pose 12: Thunderbolt (Utkatasana)
Utkatasana translates to “powerful” or “mighty”—-just like a thunderbolt. The dynamic quality of this pose increases the heart rate and stimulates the circulatory and metabolic systems. It is a great toner for the back, butt, hips, and thighs, and also stretches the Achilles tendons and shins.
Building Blocks: From Samasthiti, inhale as you bend your knees down deep to 90 degrees and bring your hands up over your head, arms alongside your ears. Squat down as if you were sitting in a chair, bringing your hips/tail slightly back. Lift your toes off the floor and shift the majority of your body weight (80 percent) back to your heels. You want to create lower body strength, upper body length, and space. Hips low, heart high. Squeeze your sitting muscles in toward each other and lengthen your spine, reaching your arms up like a thunderbolt.
Spread your shoulder blades apart. Pull your fingers up out of their knuckles. Spin your pinky fingers in toward each other, rotating your thumbs outward. Gently lift your chin and look up through your hands.
It may feel a little stressful to hold this for the full five breaths, but as I’ve said, sometimes your stress reduction program is going to be a little bit stressful! In moments of stress in life, we tend to tense up and breathe less. But when in the middle of stress—in life or in this pose—you have the perfect opportunity to reverse that pattern and rewire your nervous system. Rather than breathing less in stress, breathe more.
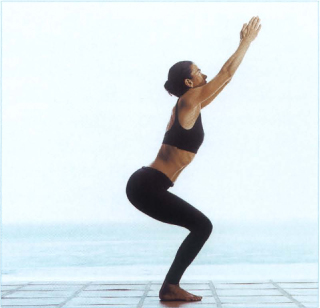
Pose 12: Thunderbolt
Risk Factor: Shifting your weight forward toward your toes stresses the knees.
Modification: The lower your hips, the more intense the pose, so bend or straighten your knees to whatever degree is comfortable for you.
Spiritual Focus: Calm determination is the difference between being stuck and being struck with a lighting power from within. Willing your way toward success in this pose or in anything in life will almost always create suffering. Stay with the moment-by-moment calm determination and you will signal the unseen and mysterious forces that you are serious about growth. Like a magnet you will attract them.
Connecting Vinyasa
After the fifth breath of Thunderbolt, lower your hips two more inches for one additional breath, then exhale and hinge forward. Go through steps six through ten of Vinyasa A (Standing Forward Bend, Halfway Lift, High Push-Up, Low Push-Up, Upward Facing Dog) and end in Downward Facing Dog (2).
Pose 13: Warrior I (Virabhadrasana I)
Warrior I creates a powerful integration of leg strength with fluid flexibility of the hips. It also prepares the body for backbends later in the practice.
Building Blocks: From Downward Facing Dog, exhale and lunge your right foot forward between your hands, bending your front knee to 90 degrees. Spin your back foot flat to a 60-degree angle, with your heels in one line. Take a moment to build your house on a rock. Check that your heels are in one line to create a stable foundation. On the in breath, sweep your hands up over your head, again on either side of your ears. Face your palms toward each other with the little fingers spinning in, the thumbs spinning out.
Continue to square your hips, pulling your right hip back and your left hip forward. Both thighbones rotate in a clockwise direction. Dip your hips down until your thigh is parallel to the floor—you should be able to balance an orange on the top of your front thigh. The back leg should be strong, like steel! Keep your right knee stacked over your right ankle; the right knee moves right, pressing toward your right baby toe. Press down through the outer edge of your back foot.
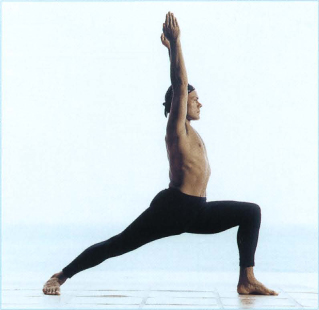
Pose 13: Warrior I
Pull your sternum upward, as though the point two inches below the soft spot between your collarbones was attached to a string suspended from the ceiling. Lift your heart without blowing your ribs up and out. Soften the front ribs downward and your whole spine will lengthen. Your shoulders are relaxed, they lift up, and your arms reach high. Take aim and set your eyes straight ahead.
Risk Factor: Pushing your chest and ribs forward compresses the mid-spine and the kidneys.
Modification: If this pose is too intense, lessen the width of your stance and straighten your front knee to a comfortable degree.
Spiritual Focus: Your presence in this pose can be as empty or as soulful as you make it. You can get all caught up in the mechanics and stay in your head, or you can drop your brain, follow your breath into the “now moment,” and rise above the battlefield of your mind. Be a warrior, not a worrier!
Connecting Vinyasa
From Warrior I, place your hands down on your mat and step back into High Push-Up (8) position. Go through Vinyasa A (High Push-Up, Low Push-Up, Upward Facing Dog, Downward Facing Dog). From Downward Facing Dog, step your left foot forward and spin your right foot flat into Warrior I, following all the same instructions as above, except in reverse.
Go through the Vinyasa A again (High to Low Push-Up, Upward Facing Dog to Downward Facing Dog). Take five deep breaths in Downward Facing Dog. On the last breath, exhale completely and Jump Forward (11). Inhale and Halfway Lift (7), then Forward Bend (6), bend your knees and sweep back up again into Thunderbolt (12). Hold Thunderbolt for five breaths, then fold forward into Standing Forward Bend (6) and begin another Sun Salutation B from there.
Repeat Sun Salutation B (Vinyasa B) two times. For the third round, add in the next pose, Warrior II.
Overview of Sun Salutation/Vinyasa B:
Pose 14: Warrior II (Virabhadrasana II)
Warrior II is an amazing hip-opening pose. It isometrically sculpts the muscles in the buttocks and thighs. Beyond that, though, it hones your power of concentration. Through your focused gaze, this pose teaches you how to streamline your power into a single ray of energy.
On the third round of Vinyasa B, we add in Warrior II. Follow the entire sequence until you reach Warrior I (right foot forward), then instead of coming down into High Push-Up, come into Warrior II as follows:
Building Blocks: From Warrior I, square your hips and chest to the side wall (the left wall if your right foot is forward, and vice versa) and float your arms down to shoulder height until your arms are parallel with the floor. Your front arm should be aligned directly above the front thigh, the back arm in line with the back leg. Create a tug-of-war between your arms, as if you were being pulled apart at your wrists.
Check your heels—they should still be in one line. Give yourself a wide base. Dip your hips down, stacking the right knee over the ankle and moving it toward the right baby toe. As in Warrior I, the shin is vertical. Rotate your inner thighs away from each other. Create a center line by stacking your shoulders over your hips. Work maximum power through your arms and legs. Your front and back limbs should be opposing each other.
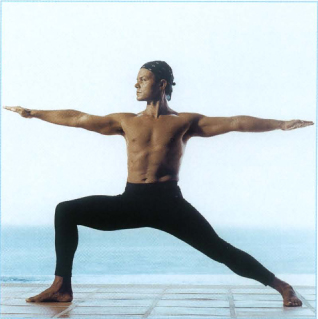
Pose 14: waerrior II
Drop your brain. Drop your shoulders. Lift and open your heart center. Focus your concentrated gaze on your front middle fingernail and breathe deep and free.
Risk Factor: Letting the front leg cave inward strains the knee. Keep your knee moving out toward the baby toe. Bending the back knee is also risky for the joint.
Modification: As in Warrior I, shorten your stance and straighten your knee to a comfortable degree.
Spiritual Focus: Beam your attention to a single focal point and you will feel your whole body glow with a life force. Concentrate and you will radiate!
Connecting Vinyasa
After five breaths in Warrior II, helicopter your back arm around to the floor and step back to High Push-Up (8) position. Go through Vinyasa B again (Low Push-Up, Upward Facing Dog, Downward Facing Dog) until you come into Warrior I with your left foot forward, and repeat Warrior II on the left side. Then follow the remaining steps of Vinyasa B (High Push-Up, Low Push-Up, Upward Facing Dog, Downward Facing Dog, Jump Forward, Thunderbolt). Finish by coming to Samasthiti.
3. Warrior Series: Vitality
Now that you’re warmed up we start fanning the internal purifying flame. The Warrior series consists of seven very dynamic poses, all of which bring your heart rate up and get the energy flowing more vigorously.
For the first four poses in this series—Crescent Lunge, Revolving Crescent Lunge, Extended Side Angle, and Side Plank—we do just the right side only, one time through as a flow. Then we go through a connecting vinyasa and flow through all four poses again, this time on the left side. The next three poses of this series—Prayer Twist, Gorilla, and Crow—are done individually with connecting steps in between.
Pose 15: Crescent Lunge (Anjaneyasana)
Crescent Lunge is a full-body pose that trains all the muscles to work as a team. It creates a flexible strength and tone through the lower body, stability in the front and back of the torso, and length through the upper body.
Building Blocks:
Part one: Go through Vinyasa A until you are in Downward Facing Dog. From here, bring your right leg up to the sky. Roll your hip open and reach your right foot high, as though you were going to bring it over and around to reach your left shoulder. Reach through your foot, fan your toes, drop your head, and hold for five breaths.
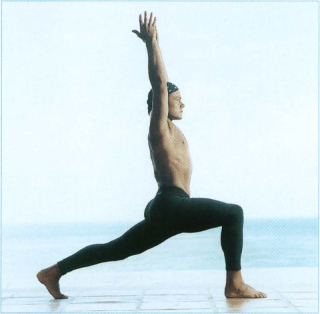
Pose 15: Crescent Lunge
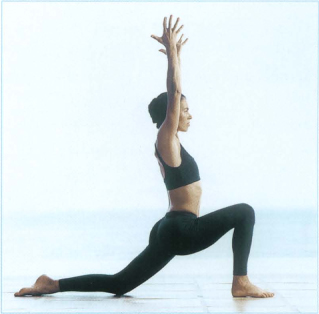
Crescent Lunge, modification
Part two: After the fifth exhalation, square your hips back to center, look up, and step your right foot forward between your hands and bend your right knee to 90 degrees (as though you were going into Warrior I). Lunge deep! Leave your back heel up so you are standing on the ball of the back foot. Both feet are now facing forward. You want your feet about four inches apart in width. If your feet are in one line, you’ll be on a tightrope and it will be difficult to balance. Tuck your tail under. Inhale and sweep your arms up over your head with your palms facing each other, again as in Warrior I. Reach up through your fingertips, pinkies turning in, thumbs turning out.
Set your foundation by pressing through the balls of both feet, stretching the mat apart between them. As in Warrior I, keep the front knee moving out toward the right baby toe. Lift the back quadricep and knee to the ceiling to straighten your back leg. Your back leg is the anchor here; keep it strong!
Gently lift and contract your abdomen to stabilize your core. There is a balance element to this pose, so get a sense of your center. Pull your right hip back, your left hip forward, squaring your hips so that they face the wall in front of you. Align your mind to your spine so you move and breathe from your center of balance.
The entire upper half of your body should mimic Mountain pose: Pull your shoulders down and away from your ears. Reach your spine, sternum, arms, and fingertips up. Find the traction of lower body strength and upper body length.
Full body expression here: All four limbs are alive and active. Your whole body should be animated with breath and energy!
Risk Factor: Be mindful not to let the front knee fall in, which will put strain on it; keep it moving toward the baby toe. Don’t thrust your ribs forward; this will crunch your mid-back.
Modification: Drop your back knee to your mat to reduce the intensity of this movement.
Spiritual Focus: Stress can be challenging, but stress can give life. A flower grows because of the sun, the wind, and the rain. The flower draws its life from these vital elements, but also draws its strengths from these same elements, which can beat cruelly upon it. It draws energy from the stress of the sun, wind, and rain. The flower grows not only because of these elements, but also in spite of them!
Pose 16: Revolving Crescent Lunge (Parivrtta Alanasana)
Twisting or spiraling the torso is one of the most powerful actions that you can do to transform the health of your internal organs, glands, circulatory system, muscles, and connective tissue. A deep twist squeezes and rinses out the organ or specific body part like a wet facecloth. After you finish a twisting action, the body part is flushed with fresh oxygen-rich blood, which washes away toxins and tensions.
This pose is like a tremendous massage. It rings out the lower back and the digestive and vital organs of the mid-body (liver, spleen, kidneys). Plus, this opens the chest and stretches the pectoral minor muscles, which are typically the tightest muscles in the body.
Building Blocks:
Part one: From Crescent Lunge, reach up a little farther through your hands, and as you exhale bring your hands together at your heart center in a prayerlike position (this is called Namaste). Exhale and spin your left arm to the outside of the right thigh. Keep your back heel lifted, your back leg straight and contracted, and the front knee stacked over the ankle. Leave some space between your torso and your front thigh. Press your palms together flat.
This is a twisting motion, and all twisting motions are done actively, meaning we extend the spine on the inhalation and twist open a little more on the exhalation. Press your lower arm against your outer thigh to leverage the twist. Pull your belly in as you spin. Pull the upper lung and shoulder blade back and press your lower shoulder forward. Be mindful of creating space in your middle and lower back here. Pull your shoulders down and away from your ears. Stretch your chest toward your chin. Look up toward the ceiling (or down at the floor, if that feels better on your neck). Hold for five breaths.
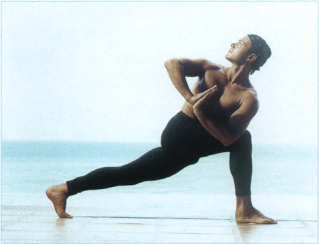
Pose 16: Revolving Crescent Lunge

Revolving Crescent Lunge, arms extended
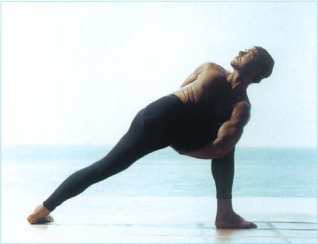
Revolving Crescent Lunge, arms bound
Part two: Straighten your arms, bringing your lower hand to the floor on the outside of your front foot and your upper hand to the sky. Everything else stays the same. Upper shoulder blade pulls toward the spine, upper lung pulls back. Set your eyes on the upper thumbnail. Open the chest wide and breathe in all that life-giving oxygen! To make the pose more challenging, see if you can bind your arms by bringing your right hand behind your back and reaching through your legs with your left. Try to hook your hands or grab a wrist.
Alignment:
Same as for Crescent Lunge, plus:
Risk Factor: Same as for Crescent Lunge, plus wrenching your middle/lower back by twisting past a healthy point. Stay alert and aware of that part of your body and don’t push too far past your edge.
Modification: As in Crescent Lunge, drop the back knee to make this movement easier. If you cannot bring your hand to the outside of your front foot, place it on the floor to the inside of the front foot, directly under your shoulder, or place your hand on a block.
Spiritual Focus: A baby chick develops the strength and vigor it needs to survive in the world by the very act of pecking, pushing, and twisting its way out of its protective shell. If you broke the shell open for the baby chick, it would not survive, because it did not go through its own process of struggle and freedom. Remember, the prize is in the process!
Pose 17: Extended Side Angle (Utthita Parsvakonasana)
Extended Side Angle is another full-body pose that opens, stretches, and strengthens the whole body and integrates it as one unit. It cultivates balance and coordination. Specifically, it strengthens the muscles that stabilize the knees, sculpts the legs, and opens the chest.
Building Blocks: From Revolving Crescent Lunge, exhale as you place both hands on the floor to the inside of the front foot. Turn your back foot flat (as in Warrior I), heels in one line. Keep your right palm flat on your mat in line with your ankle and exhale as you twist your torso and extend your left arm up to the sky. Use your lower elbow to nudge the knee to the right, and pull your right hip in and under so you can stack your torso on top of your right thigh. Press your lower shoulder forward and your upper shoulder back. Create traction from the palm of your lower hand to the extended fingertips of your raised arm. Set your gaze on your upper thumbnail.
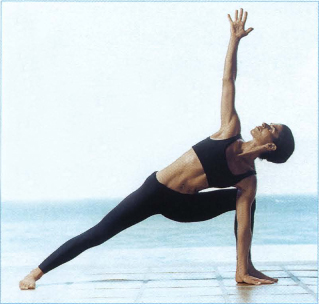
Pose 17: Extended Side Angle
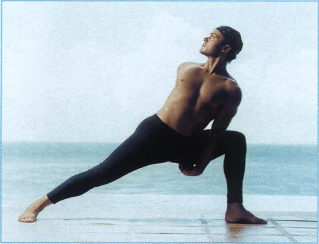
Extended Side Angle, arms bound
This is another twisting movement, so on the in breath reach and extend your spine, on the out breath rinse and spin. It’s very important that you keep your tailbone tucked under and your chest lifting up. A common mistake many students will make is to thrust their butt backward and let their torso drop forward, which puts a lot of strain on the lower back and front knee. Try to keep your heels, hips, and head all on one plane. Your hips and your nipples are like headlights shining on the side wall. To make the pose more challenging, see if you can bind your arms by bringing your left hand behind your back and reaching through your legs with your right. Try to hook your hands or grab a wrist.
Risk Factor: You can strain the lower back by allowing the butt to move back and the chest forward and down. Also, be mindful not to let the front knee fall inward.
Modification: If it is difficult to keep your torso stacked over your thigh, set your front forearm on the top of your front thigh or place your lower hand on a block.
Spiritual Focus: You can reach and fight and strain your way through a pose if you so choose. Muscling through it might work for a while, but eventually it will catch up to you and tire you. At a certain point in your practice you get that there is an easier way—that exceeding yourself isn’t about reaching or grasping but about melting into a new realm, a dimension of power that can do for us what we cannot do for ourselves.
Connecting Vinyasa
From the Extended Side Angle, bring your upper arm back down and place both palms on the floor, hands directly under your shoulders. Step back into High Push-Up (8). You are now set in position for the next pose, Side Plank.
Pose 18: Side Plank (Vasisthasana)
By using your own body weight as resistance in this pose, you tone and strengthen your arms and the front and back of your torso. Side Plank integrates the upper and lower body and further trains all the muscles in the body to work as one coordinated force.
Building Blocks: From High Push-Up, bring your feet all the way together so your inner thighs are touching. Spin your heels to the right and bring your left hand up to the sky. Your lower hand should be directly under your shoulder. Keep your upper hand active.
Proper alignment is essential to keeping your balance in this pose. You want to imagine your body is pressed between two panes of glass, one against the front and one against the back. Stack your upper hip directly over the lower one, and keep your heels, hips, and heart all in one line. Align your upper arm above your lower, stacking all the joints along one plane.
Don’t just thrust all your weight onto your one little wrist; enlist all the muscles in your body. Flex your feet, contract your legs, and activate your abdominal lock (uddiyana) to stabilize the pose. There are two lines of traction happening at the same time: from the crown of your head to the soles of your feet, and from the palm pressing into your mat through your raised fingertips. Pull the front of your pelvis up toward your chest, and pull your heart muscle up toward your chin. Move your shoulders away from your ears to create more length and space. Reach your upper arm high to create lift and traction away from the bottom hand.
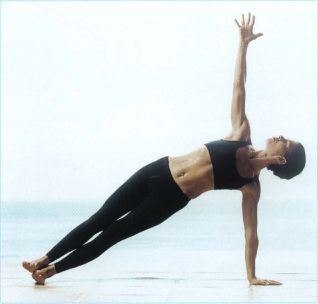
Pose 18: Side Plank
Turn your gaze to the thumbnail of your upper hand (or to your lower thumbnail if that feels better on your neck). Breathe deep and free through your whole body.
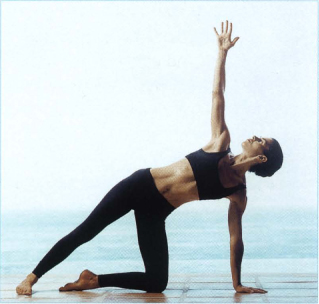
Side Plank, modification
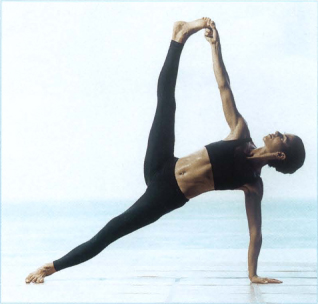
Side Plank, modification
Risk Factor: Letting your upper body and pelvis sink down puts undo pressure on your wrist, shoulder, and neck. Don’t press your chest too far forward in an attempt to open it; this will create an arch in your back and prevent your body from staying on one plane.
Modification: If this is difficult, drop your lower knee to the floor directly underneath the hip and spin your upper foot flat on the floor. If your knee is dropped, your right hand, knee, and back foot should all be in one line.
Spiritual Focus: Yoga practice is an unlearning process. We have to unlearn all that we’ve believed and been told about ourselves. Start believing what you know in your heart to be right; start trusting the teacher within. Start trusting what you see, know, and feel.
Connecting Vinyasa
Roll open a little more and then gently come back down to High Push-Up (8) and go through the movements of Vinyasa A until you come into Downward Facing Dog. Hold Downward Facing Dog for five breaths, then extend your left leg to the sky. Roll the hip open and bend the upper knee, reaching the left foot toward the right shoulder for five breaths. Then square your hips and lunge your left foot forward and go through the left-side sequence of Crescent Lunge (15), Revolving Crescent Lunge (16), Extended Side Angle (17), and Side Plank (18). After the second Side Plank, come back to High Push-Up and go through Vinyasa A once again, ending in Standing Forward Bend (6). From here bend your knees, dip your hips down, and lift your arms up to Thunderbolt (12). This sets you up for the next pose, which is the Prayer Twist.
Pose 10: Prayer Twist (Parivrtta Utkatasana)
This pose creates flexible strength in the mid- and lower back. It squeezes and rinses the organs and muscles of the mid-section of the body like a sponge, including the kidneys and digestive organs. Like all twisting poses, Prayer Twist is a powerful way to detoxify organs and glands, which boosts your overall health. Isometrically, it sculpts your buttocks, thighs, and back muscles.
Building Blocks: From Thunderbolt, reach up through your hands, and as you exhale bring them down into a prayerlike position at your heart. Inhale and spin your left elbow to the outside of your right thigh. Keep your feet and knees together and dip your hips low. Pull your butt back and your chest plate forward, lengthening your spine. Pull your sitting bones in toward each other.
Now straighten your arms. Ideally the lower hand comes to the floor with your five fingertips set into the floor, like a claw. You can use a block if you need to or, if you are more flexible, set your palm flat on the floor. Bring your right hand straight up to the sky, stacking it directly above your right shoulder. Bring your lower shoulder blade forward and pull your upper shoulder blade back. Look up and start to work your twist.
Match your breath to each micromovement. On the inhalation, lengthen the spine; on the exhalation, twist your torso open. Revolve on the out breath and rinse and massage your internal organs. On the in breath relax and feel the organs being flushed and bathed with fresh blood. Every two or three breaths, see if you can spin just a little bit more. Be sure to twist from your torso, not from your arms.
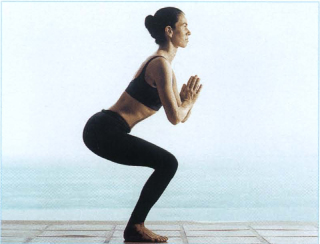
Pose 19: Prayer Twist, preparation
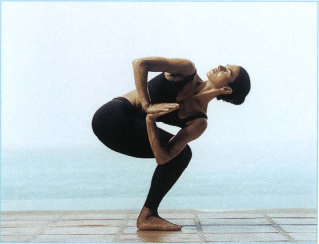
Pose 19: Prayer Twist
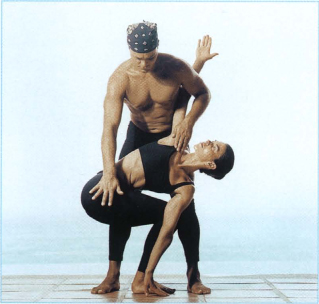
Prayer Twist, arms extended (assisted)
Modification: Set your lower hand on a block. Also, look down if gazing high strains your neck.
Spiritual Focus: Putting actions to your intentions is the same as putting postures to your prayers. Let your intention for growth flow through your movements. Relax and ask for guidance and support and you will receive it.
Connecting Vinyasa
Hold this pose for a full five breaths, then relax into Ragdoll (3). Toe/heel your feet till hip-width apart and just hang forward for a few breaths. Then toe/heel your feet back together, sweep up to Thunderbolt (12) once again and do the same steps for Prayer Twist, except in reverse (bringing your right arm to the outside of your left thigh). After five breaths, again relax to Ragdoll, which puts you in position for the next pose, which is Gorilla.
Pose 20: Gorilla Pose (Padahastasana)
This deep forward bend releases the lower back and the backs of the legs. It is a potent counterpose that restores balance to your biochemistry, unclutters your mind, and allows you to slip into a calm state of concentration.
Building Blocks: From Ragdoll, place your hands all the way under your feet, palms up. Walk your toes up to your wrists, bending your knees as needed. Inhale and lift halfway up, working your way toward a flat back, then exhale and fold down, hinging from your hips. Straighten the knees inch by inch into a deep stretch.
Now, move your hips slightly forward, bringing your hips over your heels. Breathe into your hamstrings. Play your edge—explore how far forward you can shift your weight to increase the intensity.
Relax your head and let gravity do its work. Just let go and breathe.
Modification: Bend your knees as much as you need to.
Spiritual Focus: There once was a great magician who lived at the top of a cliff. One day, a couple who had been searching far and wide for peace and happiness climbed to where the magician lived, hoping he could provide them with what they were seeking. When they reached the top, they saw him standing on the edge of the cliff looking over and called to him.
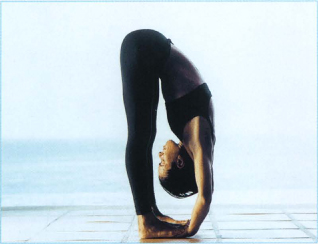
Pose 20: Gorilla

Gorilla, modification
“You must come to the edge,” he said.
“No,” they replied. “We are afraid. We will pay you to come to us and tell us what you know.”
“You must come to the edge,” the magician repeated. “It is the only way.”
Trembling with fear, they stepped up to the edge. The magician put his hands on their shoulders. They believed he was trying to comfort them, but instead he pushed them off the edge . . . and they flew!
“All you needed was already within you,” the magician said with a knowing smile.
Connecting Vinyasa
After five breaths, inhale and lift halfway up. As you exhale, release your hands and place them flat on the floor for the next pose, Crow.
Pose 21: Crow (Bakasana)
Crow is the pose I am doing on the cover of this book. It is a vigorous pose that we do early in the practice because it requires a lot of strength and builds tremendous fire. I also throw this pose in throughout a class as a way for students to reignite waning energy or heat.
Physically, Crow is based on upper body strength and core power, and learning to balance and be light. But emotionally, it is based on moving through resistance. Crow brings up a lot for people. Some people are afraid of tipping forward onto their heads (which is actually not so bad, since you would only fall a few inches), others come up against extreme frustration because they don’t yet have the balance or strength to get into it. For many, it stirs up feelings of competition or perfectionism.
This can be a challenging pose for beginning students, but remember not to get caught up in whether it’s hard or easy for you. It doesn’t matter. It doesn’t matter whether you can do it right away, or whether you are just a baby crow learning to find your wings. What matters is that your spirit is willing and that you are continually working the farthest edge that’s healthy for you.
Building Blocks: Setting up the pose correctly is the key to learning Crow. Bring your feet together. Place your hands in front of your feet, flat on the floor, shoulder-width apart. Squat down so your butt hovers a few inches over your heels. Let your elbows and knees drop out laterally, creating a small shelf out of your upper arms. Lean forward and lower your head and chest down a bit. Lift your heels and come up onto your tippy toes, lift your tail high, and rest your knees (or shins) on your upper arms/triceps, near your armpits. Engage a strong abdominal contraction for stability. From there, squeeze your elbows into your torso, press your knees into your arms, and tip your weight forward, bringing one foot up off the floor. Gaze at a spot on the floor slightly in front of your hands or, if you can, straight ahead. Take your time to find your balance and then bring the other foot off the floor. If both feet are off the floor, touch your big toes to each other and try to straighten your arms. Remember, equanimity, calm determination, and breathing!
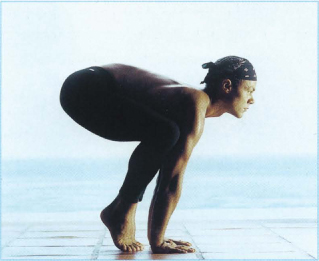
Pose 21: Crow, prepartion
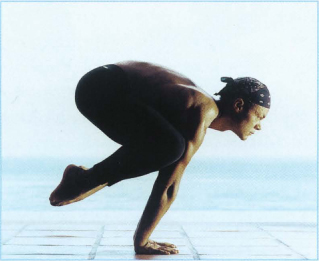
Crow (side)
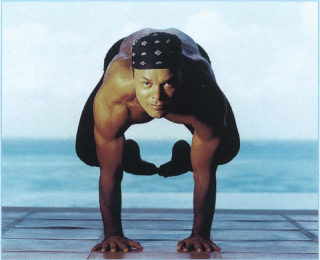
Crow (front)
For beginning students, you may only be able to get one foot off the floor, and that’s fine. If you can get one foot up, you’re a baby crow. Just keep trying and eventually you will take flight!
Modification: If you can only bring one foot off the floor, do that. If a fear of falling forward is holding you back, place a pillow or folded blanket on the floor in front of you until you get more comfortable.
Spiritual Focus: Letting go means giving up attachment to results. When you understand that you don’t have to try hard, you can give up the fight for results, because you know that ultimately things will work out as they should. Desiring a certain goal in a pose and working to achieve it is different from trying to control the outcome. Just be willing to relax and let go. Know that if one door closes, five new doors will open up. That is true faith: trusting the natural ebb and flow of life.
Connecting Vinyasa
Using your core power, shoot your legs straight back or walk them back to High Push-Up (8) position. Go through Vinyasa A, finishing with Jump Forward (11). Roll up through your spine, sweeping your arms over your head and reaching high, into Mountain pose (5). This sets you up for the next pose, which is Eagle pose.
4. Balancing Series: Equanimity
Balancing poses command our presence. They make us come to center and let go of everything else but the present moment. You don’t need to “have good balance” to do these poses. We are all born with a natural sense of balance. All you need is to quiet your mind, focus, and relax. The more you struggle, the more tension you create in your mind and your muscles and the harder it is. The more you relax into these poses, the more things settle in. From there you intuitively create neutral alignment and discover your own weightlessness. You discover that you can stand calm in the eye of any storm.
The two key elements to all balancing postures are breath and focused gaze (drishti). As you already know, your breath brings you into the here and now. It facilitates balance because it lets you tune out the distractions and tune in to your body. A concentrated gaze steadies and centers you, streamlining your attention to a single bright beam of energy. This added dimension of a laserlike mind makes every balancing pose a meditation in motion.
Balancing poses tone your lower body, but they also do much more. They balance the left and right sides of your brain, and restore and stabilize your equilibrium.
There are five poses in the balancing series, the first of which (Eagle pose) we do on both the right and left sides. Then we do the next three poses (Standing Leg Raise, Front; Standing Leg Raise, Side; and Airplane) in a flow, first the right side all the way through, then the left side. The fifth, Dancer’s Pose, we do on its own four times (right leg, left leg, and repeat).
Pose 22: Eagle Pose (Garudasana)
By standing on one leg, as you do in Eagle pose, you isometrically chisel and tone every muscle in the standing leg and buttock cheek. Eagle pose also opens the hips and shoulders and stretches the upper back. This pose demands your presence and cultivates balance, strength, and serenity.
Building Blocks: With your arms high, exhale and wrap your right arm under the left arm like soft rope, bringing your elbows up to shoulder height. Press your palms together and extend your fingers straight up. Bend your knees to a 45-degree angle and in one fluid motion sweep your right leg up and over the left. If you can, hook your right foot around the bottom of the left calf Square your hips and chest to the front wall. Your pelvis is tucked under you and your shoulders are stacked directly above your hips. From the side your spine is one straight line. Relax into a center line of gravity. Pull the tops of your shoulders back and down. Set your eyes on a point directly in front of you and breathe through your whole body.
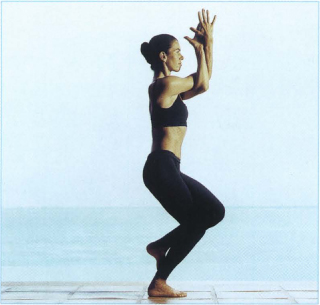
Pose 22: Eagle (side)
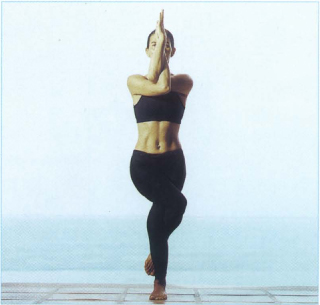
Eagle (front)
There are three actions at work in Eagle pose: centering your hips and shoulders, opening your chest, and creating spinal length and space. To square your hips, imagine holding a bowl of water on your pelvic floor. Try not to let a single drop spill out over the front edge of your pelvis! Scoop your tailbone in and slightly under and pull the front of your pelvis up toward your abdomen. Draw the pit of the belly in and up. You also want to align your hips horizontally; concentrate on keeping both hip bones level and pointing straight ahead.
It’s common to see students wobble, do a little dance on one leg, and then fall out of this pose in the beginning. But the problem isn’t that they can’t balance, it’s that they are struggling rather than surrendering. Use your breath to find your center line of gravity and relax into it. Let go of the strain and struggle. Your body wants to balance. It is coded for this kind of movement if you’ll just get your brain out of the way and allow your body to be free.
As with all balancing poses, your gaze is essential. Balance comes from a calm, centered mind. Remember, we set our mind beginning with our eyes. Fix your eyes to one point and take aim. Bring your mind from distraction to direction. Hone in on one point of concentration and you’ll become more deeply aware of all points. Suddenly you really start to see, to hear, to feel like never before.
Hold for five breaths; on the fifth exhalation, dip down a little deeper. Inhale and come sweeping up to standing. Repeat the same instructions in reverse for the left side. We take this pose two times on each side—right, left, right, left—then finish in Samasthiti.
Risk Factor: Be careful not to let the standing knee turn inward. Keep the knee facing forward.
Modification: Set the toes of the raised foot on the floor, to the outside of the standing foot.
Spiritual Focus: Nobility requires no great deed, only relaxed awareness, openness to receive wisdom, and an unwavering alignment to what you feel is right. We learn to soar not through effort but through faith.
Pose 23: Standing Leg Raise, Front (Utthita Hasta Padangusthasana A)
This powerful weight-bearing pose tones and hones the entire standing leg. It also stretches the back side of the raised leg and the muscles between the shoulder blades.
Building Blocks: From Samasthiti, bring your hands together at Namaste and gaze down at your fingertips. Take a moment to find your breath and to access that calm space of serenity within you. When you are ready, bring your gaze forward, taking aim at a fixed spot ahead of you, and place your left hand on your left hip. Then very, very slowly, with as little movement as possible, inhale and squeeze your right knee into your chest with your right hand, keeping your standing leg and spine straight. If you are new to this or your balance is challenged, then stay right here holding your knee. Otherwise, with your left hand still on your left hip, grab your right big toe with the first two fingers of the right hand. Inhale, lengthen the spine, and unhinge your knee to whatever degree you can while still maintaining a straight spine. More important than a straight leg is a straight spine, so if you start to round your back, you know you’ve gone too far.
Keep your standing leg straight and strong. Engaging your abdominal lock (uddiyana) is very important to stabilize this pose and create weightlessness. Drop your right hip down so it is even with the left—the tendency is to let it roll up. Drop your right inner thigh in and down, toward the perineum (the muscle between the anus and genitals). Keep your torso square, your shoulders aligned. Press your shoulders down, away from your ears. Establish your core of gravity and hold for five breaths.
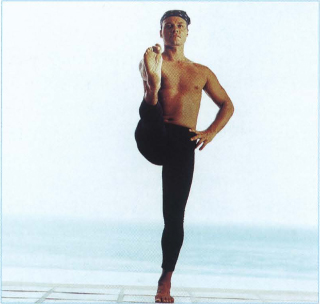
Pose 23: Standing Leg Raise (front)
It’s OK if you fall, because falling is learning. Your ego hates falling, because it means you’ve “failed.” But your spirit loves falling, because it is a chance to grow and learn as a result. As Lao-tzu taught, success is not found in never falling, but rather in getting up every time we fall.
Hold for five breaths, then flow right into the next pose, which is Standing Leg Raise, Side.
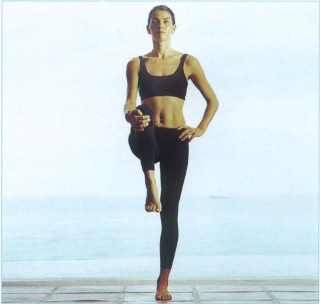
Standing Leg Raise (front), modification
Risk Factor: Rounding your back to straighten the leg strains the lower and middle back.
Modification: Keep your upper knee bent. You can also lean against a wall.
Spiritual Focus: When we come out of our head stuff—the mental systems and thought patterns that say we can’t or won’t—we suddenly realize the ways we are limiting ourselves. Just for the moment, forget what you believe you can’t do. The on-the-mat truth is that very often our body is stronger and more flexible than our faith.
Pose 24: Standing Leg Raise, Side (Utthita Hasta Padangusthasana B)
This pose is similar to Standing Leg Raise, Front, and has much of the same transformational effects. In addition, it is a powerful force in opening and strengthening the hip and pelvic muscles.
Building Blocks: From Standing Leg Raise, Front, open your right leg (if you are holding your toe) or your knee (if you are holding your knee) out to the right side. Then turn your head so your gaze is to the left wall. Drop your right hip down in line with the left. Keep that straight line in your spine; bend your knee slightly if necessary to maintain spinal integrity. Everything else stays the same as the previous pose.

Pose 24: Standing Leg Raise (side)
The tendency is to try to bring the leg way up, but it’s really more about bringing it out to the side than up. Flexibility and vertical lift will come in time; what you want to work here is the centering and opening of the right hip. Keep your hips level; don’t let the right hip come up. Again, rotate the inner thigh of the raised leg up, toward the ceiling.
Alignment:
Same as for Standing Leg Raise, Front, plus:
Risk Factor: Pulling the leg up too high takes your hips off line and disrupts your balance.
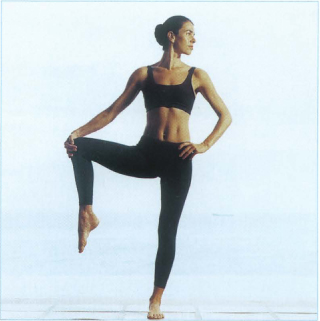
Standing Leg Raise (side), modification
Modification: Work with the upper knee bent or use a belt to catch the foot. If you need help with balance you can extend your free arm straight out to the left, like a wing.
Spiritual Focus: One of the principles of yoga is not to seek the fruits of your actions. Practice for its own sake, without regard to success or failure. This is the way to equanimity.
Connecting Vinyasa
Bring the extended leg and gaze back to center. Release the toe (or knee) and place your hands on your hips. Extend the leg out straight and take five full breaths. Then bend your right knee. This will lead you right into the next posture, Airplane pose.
Pose 25: Airplane Pose (Dekasana)
Airplane is another one-leg balancing pose that tones the entire standing leg and cultivates overall flexible strength and lightness. Using every muscle of the body, it stabilizes and integrates the torso, hips, and legs by hovering on a new plane of gravity. As with all the poses in this series, the balance comes from a quiet, centered mind. You may feel a little unstable at first, but if you stay calm you will find the confidence you need. Know, without a shadow of a doubt, that you can do this. Believe it. Just be light and fly above it all.
Building Blocks: Standing upright, still balancing on one leg, bring your hands to your hips and your right knee in to your chest. In one liquid motion, exhale, hinge forward and extend your right leg out behind you. Your torso and upper leg should be parallel to the floor. Drop your right hip down, then spiral your right inner thigh up to the sky. Open your arms out behind you like wings, with your palms facing down. Draw your shoulder blades down your back and together. Your torso is hovering forward, but your chest is slightly higher than your hips. Arch your back very slightly, as though you were bringing a little Upward Facing Dog into this movement. Lower your chin so your neck is in a neutral position and gaze at the floor about two feet in front of your standing foot. Be light and free in mind and body.
There are five active lines of energy in the Airplane pose, each radiating like a five-point star: two arms, two legs, and the torso. The standing leg presses down into the floor, the inner wall of your chest pulls forward and away from the pelvis, and your arms and raised leg extend back and away from the epicenter of your body. Be aware of all five points at all times and continually work full expression through them.
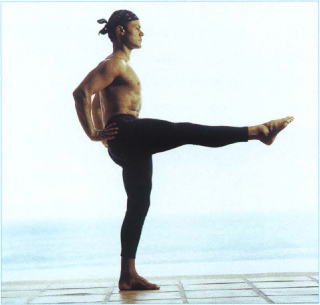
Pose 25: Airplane, preparation

Airplane
Risk Factor: Beware of hyperextending the standing knee. Keep the leg straight but not locked. Don’t round your back forward—this strains the spine. Also, do not wobble on the standing ankle; keep it stable.
Modification: Bring your torso forward to an angle that is comfortable for you. You can also soften the standing knee slightly.
Spiritual Focus: Mental surrender combined with calm determination makes us open and receptive to change. Through surrender we suddenly tap a supportive inner force and life-giving energy that sustains us and propels us forward and upward. Let go, fasten your spiritual seat belt, and take flight!
Connecting Vinyasa
From Airplane pose, lower the raised leg and very slowly come rolling back up to standing with a strong sense of torso stabilization. Bring your hands up to Namaste at your heart center on the exhale and once again repeat the sequence of these three poses (Standing Leg Raise, Front; Standing Leg Raise, Side; and Airplane), this time on the left side. End in Samasthiti.
Pose 26: Dancer’s Pose (Natarajasana)
Dancer’s Pose shows you how to ground and stabilize the legs and gain a greater degree of balance and poise. It ultimately teaches you that the real stretch is always spiritual.
Pose 26: Dancer’s Pose, preparation
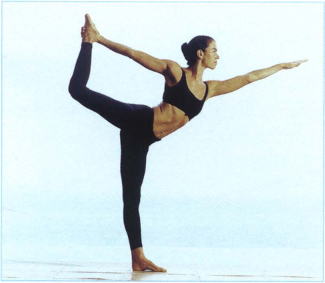
Dancer’s Pose
Building Blocks: From standing, bring your left arm up to the sky and roll your right hand open so your palm is facing forward. Bend your right knee and bring your right foot up from behind. Reach your right hand back and grab the inside of your right foot with your thumb pointing up like a hitchhiker. Bring your knees together. Set your gaze and take a moment to establish your balance and dial into your center line of gravity. When your foundation feels stable, inhale, lift your heart center high, and then stretch forward. Keep your chest up a little higher than your hips. Reach your left shoulder forward and right leg back. Extend and straighten the back leg as much as you can.
This pose translates to “standing bow.” You want to create a strong tension between your back leg and your upper body, as if your legs are the bow and your torso the arrow. The back leg is resisting the torso’s pull forward. You should feel as if you are hanging from the back leg. The back leg is active, the torso free and suspended. Be conscious not to let your raised hip roll up to an extreme; the upper hip does lift, but only to a healthy degree.
Never stop breathing! Hold for five breaths, then release and helicopter your arms so your right arm is up. Repeat these steps for the left side. Do the pose once more on the right and once more on the left, ending in Samasthiti (4).
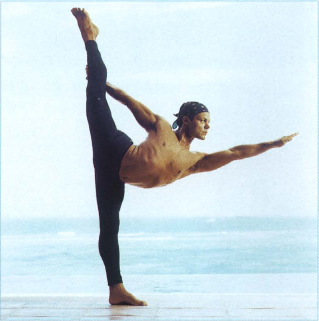
Dancer’s Pose, full extension
Risk Factor: Beware of hyperextending the standing knee. You need to work with your leg straight but not locked. Don’t jam your neck upward or force the stretch into your lower back.
Spiritual Focus: The goal of this practice is to find a pace and intensity that is most appropriate for us “Try easy” is a reminder that, in terms of our growth, it is not a good idea for us to move ahead too quickly. As we become gentler with ourselves, it becomes natural for us to have a deeper compassion for others and to live with true grace.
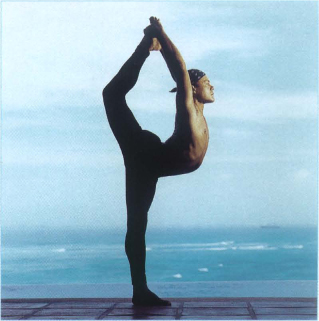
Full Bow
Pose 27: Tree Pose (Vrksasana)
After all the heat and strength built up through the vinyasa up to this point, this pose brings you into a natural state of stillness in both mind and body. This pose is an extension of a seated meditation. It has an eternal quality because once you lock into the position, it holds itself and you feel as if you could stay there effortlessly forever. That is the meditative state.
However peaceful Tree pose may be, it is definitely not a resting pose. In fact, it uses all the elements we have built up until now. It elevates your healing heat, balance, and lower body strength to a whole other level.
Building Blocks:
Step one: From Samasthiti, lift your left heel high and place the sole of your left foot onto your inner right thigh. Be mindful of your knee—never wrench! Press down through the sole of your right foot, really taking the time to establish your balance on your standing leg. Drop your left hip down in line with the right. Use your breath and focused gaze to steady yourself Bring your hands to Namaste at your heart center and gaze forward (to deepen your focus, gaze at your fingertips). Pressing your palms together will help stabilize you. Hold for five breaths.
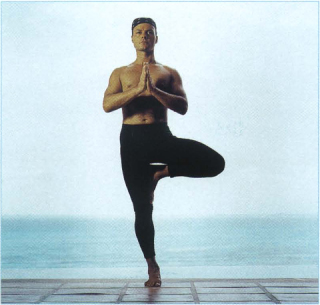
Pose 27: Tree
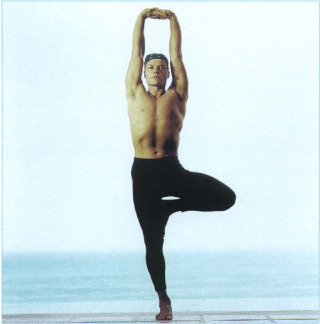
Tree, arms extended
Step two: Release your hands and sweep your arms up over your head, palms facing each other. Interlace your fingers and spin your wrists so your palms face up. Move your elbows in toward each other. Extend your spine and reach up. Be of heaven and earth. Like a tree, extend your roots down and blossom your arms up toward the sun. The stronger the roots, the taller the tree.
Your standing leg needs to be powerfully engaged to support you in this pose. Squeeze your left buttock and lift and contract your quadricep. Your hips should be even, even if that means bringing your raised leg forward a bit. Conjure up the image of your pelvis as a water bowl and do not let the water flow over the front edge.
Breathe free and easy. Stand tall and relax into a standing meditation. Let go of your thoughts and just come into your breath and your body. On the fifth exhalation, release your hands and return to Samasthiti. Repeat on the right side, ending in Samasthiti.
Risk Factor: Be mindful not to lock and/or hyperextend the standing knee joint. Do not arch your back or push your rib cage forward.
Modification: If it is difficult to balance, lower your foot to a point on the standing leg that is comfortable.
Spiritual Focus: The only trees that survive hurricanes are the ones that have deep roots and the supple strength to bend with the storm winds. Equanimity allows you to stand tall and secure no matter what storms life brings your way.
Connecting Vinyasa
Release your hands and foot and come back to Samasthiti. Repeat Tree pose on the other side. Release, ending in Samasthiti. Then go through Vinyasa B to Warrior I (13), then into Warrior II (14). This sets you in position for the next pose, Triangle.
5. Triangle Series: Grounding
The poses in the Triangle Series work your whole body into a beautiful symmetrical stability and poise. They increase strength in the legs, hips, and back, which gives you a sense of overall balance, body confidence, and courage. Your lower body is your ground of being and your connection to the earth. Strengthening from the waist down enables you to create deep, penetrating roots from which you can blossom and open your body straight up to the sun.
There are four poses in the Triangle Series: Triangle, Twisting Triangle, Standing Straddle Bend, and Namaste Forward Bend. The first two are done as a flow, right side first the whole way through, then left side the whole way through. The third and fourth poses are done in completion on their own, with connecting vinyasa in between.
Pose 28: Triangle Pose (Trikonasana)
Triangle is a beautiful pose that sends life through your whole body. It gives you the opportunity to seek out and fill any deflated or compressed kinks in your body. Here you can work your breath and lines of energy to fill out the contours of your pose. It sculpts the legs, hips, and butt and creates an overall opening through your chest and back.
Building Blocks: From Warrior II, first check your alignment and make sure your front knee is stacked over your ankle. As you inhale, straighten your front knee on the same plane as your foot and tilt your tailbone/pelvis to the back wall, as you reach your right arm forward. Reach down and grab your right shin (if this is easy to accomplish, you can lower your hand down toward the ankle and eventually to the floor). Bring your left arm up to the sky. Your arms should be stacked in one vertical line. Resist the temptation to sit in the lower shoulder; you want to lift up out of it and create full extension from fingertip to fingertip. Draw your scapulae down toward your hips.
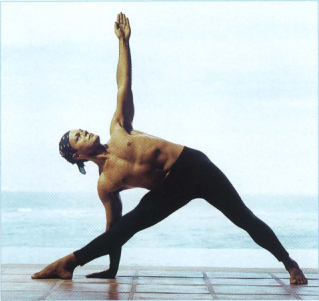
Pose 28: Triangle
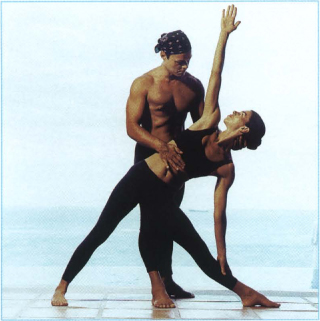
Triangle, modification
Your legs should be straight and powerful. Engage your upper thighs as you spin your inner thighs outward and away from each other. Pull your tail and belly in. Your torso should be stacked over your right thigh. Meditate on your left thumbnail.
You want your entire body—your hips, head, and heart—all on one plane, as if you are standing perfectly centered between two panes of glass. A common mistake in Triangle pose is to roll the upper shoulder downward toward the floor, which rotates your torso down and potentially puts your joint system at risk. You want to really focus on dropping the lower side of your rib cage toward the floor, stacking your upper lung over the lower, so your chest is open to the side wall. This will keep your torso rotating up and give you full expression through your whole upper body.
Modification: If it is difficult to keep your torso stacked over your thigh, bring your hand higher up on your shin, or to your thigh. You can also use a block under your lower hand. Gaze down if looking up strains your neck.
Spiritual Focus: When you sculpt with clay, you have to keep it moist so that it stays malleable. You have to spray it with water, otherwise it will dry out and harden. Our relaxed mind is to the body what water is to clay. As the mind relaxes, so will your body. With each breath, let go a little more. Be fluid . . . relax, breathe, and flow.
Connecting Vinyasa
After five full breaths, inhale and let your raised arm pull you up to standing. From here you’ll flow right into the next pose, Twisting Triangle.
Pose 20: Twisting Triangle (Parivrtta Trikonasana)
This is a deep twisting pose that squeezes and rinses all the organs and tissue of your mid-body, including your digestive system. It wrings out toxins from the liver, spleen, colon, gallbladder, and kidneys and releases the lumbar spine and helps relieve lower back pain. Twisting Triangle coordinates your whole body into one unified force.
Building Blocks: From Triangle pose, bring your hands to your hips and square them to the wall in front of you. You’ll probably need to turn your back foot in to a 45-degree angle in order to do this. Step your back foot in a little, bringing your feet about three to four feet apart. Really take the time to center your hips, because they will be your anchor in this pose.
Bring your left arm up next to your ear. As you inhale, reach way up high through your left hand (creating length through your spine) and on the exhalation, hinge forward from your hips and place the left palm on the floor to the outside of your right foot (or to the right leg, shin, foot, or on a block—wherever feels stable). Engage your abdominal lock. Use your hand to pull your right hip back in line with your left. Inhale, roll the right shoulder back, and extend the right arm straight up as you exhale. It’s okay if your back heel comes off the floor a little bit. Press through both arms, which should be on one vertical line. Stretch your chest toward your chin and your butt backward. As with regular Triangle pose, draw your scapulae down your back toward your hips. Turn your head and set your eyes high to your upper thumbnail.
It is essential to work toward a straight spine in Twisting Triangle; you never want to twist with a round back. So continually extend and lengthen your spine on every inhalation and work the rotation on the exhalations. Don’t force the twist! Simply revolve around as far as is healthy for you and work the pose there.
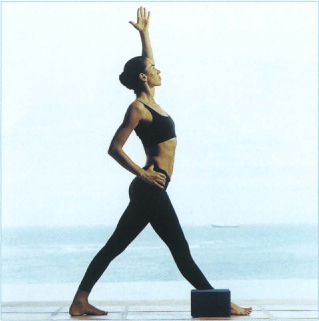
Pose 29: Twisting Triangle, preparation
You want to really engage your legs as the foundation in this pose. The stronger your lower body, the more extension you will have through the upper half It’s also important to focus on twisting from the torso, not the shoulders. Pull your right hip back, your left hip forward, working your legs like a pair of scissors. Turn your hips like a steering wheel until your pelvis is squared.
There is a balancing element to Twisting Triangle, so as with all balancing poses, set your gaze on one spot and breathe through that concentrated vision.

Twisting Triangle (assisted)
Risk Factor: Twisting too far past your edge strains the middle and lower back and the spine. Just be true to yourself and pay attention to what your body needs. Also, you never want to rotate a rounded back—it causes compression. Always extend your spine before you twist.
Modification: If you have a block, you can place it to the outside of your front foot and rest your hand on it. You can also lift your back heel; this will allow you to work with your pelvis, centering it and getting more leverage in your twist.
Spiritual Focus: Becoming impatient and frustrated with ourselves is our way of trying to control the outcomes of what we’re doing. Our willingness to relax, breathe, and stay calm and in the moment allows us to discover what is possible. When we relax, we align ourselves with a power and energy that ultimately works on our behalf in all dimensions of our lives.
Connecting Vinyasa
From Twisting Triangle, look down toward the floor and helicopter your arms up to standing. Step your back foot forward to Samasthiti and go through Vinyasa B again, this time stepping into Warrior I with your left foot. Repeat the previous sequence of Triangle (26) and Twisting Triangle (27) with your left foot forward. From your second Twisting Triangle, helicopter your arms up to standing so you are facing the side wall. This puts you in position for the next pose, Standing Straddle Bend.
Pose 30: Standing Straddle Bend (Prasarita Padottanasana A)
This deep hamstring and calf stretch is a great countermovement to any sports training that shortens and tightens the hamstrings, like running or cycling. Inverted forward bends tone the internal organs—the liver, spleen, kidneys, digestive organs, pancreas, and gallbladder. The deep release and introspective quality of this pose also quiets and soothes the nervous system.
Building Blocks: Facing the side wall, toe/heel your feet out so your legs are approximately four to five feet apart. Turn your toes in a little so your feet are slightly pigeon-toed. Catch your hips with your hands and, on the inhalation, lift your chest and chin upward, bringing a slight arch to your back. On the exhalation, hinge forward from your hips and set your hands flat on the floor, shoulder-width apart. Walk your fingers back so they are in line with your toes (eventually with your heels). Inhale, lift halfway up to a flat back with your chest forward and butt back, then exhale and fold forward again. Press your palms into your mat. Bring the crown of your head down as close to the floor as you can. Draw your elbows in toward each other to open the back, and use your arms to leverage your stretch. Eventually your arms should be at right angles with the elbows stacked over the wrists.
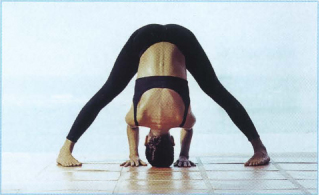
Pose 30: Standing Straddle Bend
Sway your hips forward in line with your heels to help release the lower back. Engage your quads, lifting up from the kneecaps. Lift your sitting bones and hamstrings to the heavens. Your legs should be straight and strong. Lift the inner ankle-bones a bit and press through the outer edges of your feet. Lift your inner thighs away from each other. You want to really open your groin in this pose. You’ve got good heat inside you now, so the tissue is nice and malleable. Why not use this opportunity to go into new territories of tissue, new frontiers, new thresholds? That’s what transformation is all about.
The ideal is to be able to rest the crown of your head on the floor, so with every inhalation extend your spine, and on every exhalation draw the top of your head down. (If your head easily reaches the floor, then shorten the width of your stance.) Now really reach . . . the only thing standing between your head and the floor is your mind!
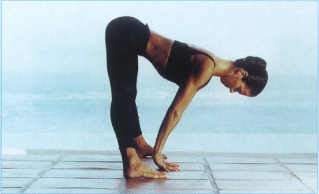
Standing Straddle Bend, halfway lift
Risk Factor: Beware of hyperextending your knees. Keep them straight but not locked. Also, don’t sag into your shoulders.
Modification: You can bend your knees or play with the width of your feet to find the perfect pose for your body.
Spiritual Focus: Be aware of all the times in your practice or in a pose when your mind asks, am I doing it right? Is this what I should be feeling? I don’t look like the photo in the book—I must be doing it wrong. Doubt these doubts! Let them pass and anchor your mind more deeply in the present moment. Allow this moment to flow into the next without doubting, comparing, judging, or analyzing. Simply observe, be open, accept, embrace what is right here, right now. Only this pose, only this moment.
Connecting Vinyasa
On the inhalation, lift halfway up, gazing forward. On the exhalation, bring your hands to your hips. Inhale and use your abdominal muscles to pull you back up to standing. Inhale. Exhale and open your arms up and out to the sides. Broaden your chest. You are now in position for the next pose, Namaste Forward Bend.
Pose 31: Namaste Forward Bend (Parsvottanasana)
This is an intense stretch that gets way down deep into the hamstrings. It also stretches the front of the shoulders and chest, and, as in all forward bends, releases all the muscles in the back. Lastly, the reverse Namaste hand position strengthens the wrists, which can be powerfully transformative and therapeutic for conditions like carpal tunnel syndrome and general wrist weaknesses. Strong wrists will help in Downward Facing Dog and ultimately handstands as you continue on in your practice.
Building Blocks: With your arms out to the sides, bring your hands together to what is called “reverse Namaste” at your back. To do this, bring your arms around behind your back to the space between your shoulder blades. Press your palms together in a prayerlike position with the fingers facing up (or down, if up strains your wrists). If your upper body is tight, try grabbing opposite hand to opposite elbow.
Pivot your body to the right so you are facing the back wall. Open your right foot and step your back foot in a little. Take a moment to square your hips and chest so your hipbones and nipples shine straight ahead. On the inhalation, root down into your legs and lift your chin and chest up, bringing a slight arch to your back. On the exhalation, hinge forward over your front leg. Pull your front hip back so your hips are in one line. Relax your head and neck and breathe deep.
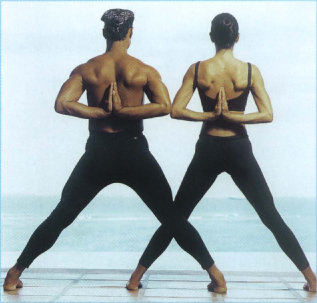
Pose 31: Namaste Forward Bend, preparation
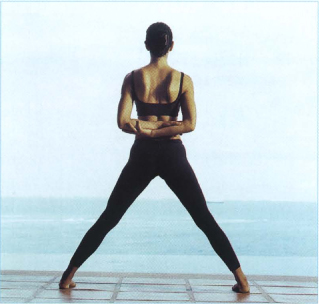
Namaste Forward Bend, preparation modification
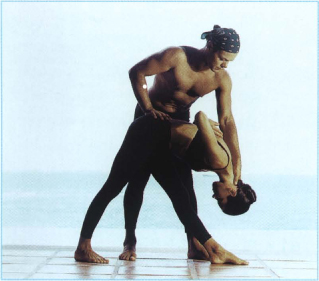
Namaste Forward Bend (assisted)
You’ll need to keep your legs strong to maintain your balance in this pose. The back leg must be perfectly straight, but the front knee can soften if you need to decrease the intensity a little. Breathe love into your hamstrings and melt away any tightness or tension that’s still there.
Squeeze your shoulder blades in toward each other, lifting your elbows. Press the palms of your hands together. Look to the big toe of your back foot and make it glow with the intensity of your gaze.
Risk Factor: It is natural to get dizzy in this pose, but the dizziness will pass. It is just stuck energy and toxicity coming up for release. Welcome it and work with it, because if it doesn’t come up and out, it stays there! If you get dizzy, do NOT close your eyes—you’ll end up a blob on the floor. Keep them open, stay alert, and remember to breathe. If you need to, come down into Child’s Pose to regain your equilibrium.
Modification: If the reverse Namaste hurts your wrists, turn your hands so your fingers are facing down. If this is still too intense, hold opposite hand to opposite elbow.
Spiritual Focus: Focus is the key. Take your pose seriously, but take yourself lightly.
Connecting Vinyasa
After five breaths, contract your abdominal muscles, stabilize your torso, and, leading with your chest, use these muscles to pull back up to standing. Keeping your hands in reverse Namaste, pivot on your heels 180 degrees so your left foot is forward. Repeat Namaste Forward Bend on this side for five breaths, then drop your hands to the floor on either side of your front foot, shoulder-width apart. Step your front leg back and come into the High Push-Up (8) position. From there, go to Low Push-Up (9) and then Upward Facing Dog (10). This puts you in position for the next pose, Locust.
6. Backbending Series: Igniting
When people age they tend to contract and pull into themselves. But yoga, and especially the spinal work we do in yoga, can actually reverse the aging process. You are only as young as your spine is supple, and these poses are the best way to keep your spine limber. If you are tight or weak in any part of your back, backbends are like medicine. Your energy system is centralized along your spine, and backbends remove blocks of energy stored there. They ignite electricity in your spine and bring your whole being to a healthier realm.
We live our lives in a forward direction. For the most part we walk, sit, drive, reach, communicate, and live in one direction. At the same time, gravity pulls us downward. Going backward generates awesome elasticity and suppleness in the hips. Backbends strengthen and sculpt the entire back while simultaneously creating true structural integrity. They empower and strengthen while dissolving heaviness of the heart and dullness of the mind.
Moving back requires courage and a sense of adventure as we move into the unfamiliar and unknown territory of what lies behind us. For many people, there is a fear that accompanies going backward. We are exposing our soft body (the abdomen and internal organs), which makes us feel vulnerable. This can bring up emotions that have been hidden in unknown places within us, allowing them to surface for release. Symbolically, going backward may represent returning to your past. But sometimes we need to go back in order to go forward, both physically and emotionally.
In all backbending poses, it is very important that you stay alert and conscious to what you are doing. Almost all injuries result when someone is not fully present. If you’ve ever been in an accident, you know it’s usually because someone wasn’t paying attention, even if only for a split second. Please, stay centered, stay focused, and stay in your body and breathe when doing backbends.
The Backbending Series consists of five poses (Locust, Bow, Camel, Bridge, and Wheel) and one neutralizing pose (Supta Baddha Konasana).
Pose 32: Locust (Salabhasana)
As the first pose in the spinal series, Locust brings your awareness to the spine and flushes the whole back side with fresh blood. You can feel the warmth bathe your whole body when you come out of this pose. It also lengthens and opens the front of the body and gives the digestive and other vital organs a deep and powerful massage. Locust conditions, hones, and creates a stabilizing strength in every muscle on the back side of the body, including the buttocks and thighs. It relaxes and eliminates tension, aches, and pains in the back.
Building Blocks: After holding Upward Facing Dog for five breaths, roll over your toes and go back into Downward Facing Dog for five breaths. From here, come forward into High Push-Up, and breathe in and out. To the count of five, lower yourself all the way to the floor. Rest on your mat and relax for a moment. Rest your arms by your side, palms facing up, and lay your head to one side. Love the floor like never before! Your practice opens you up to be grateful for all things . . . even a hard floor.
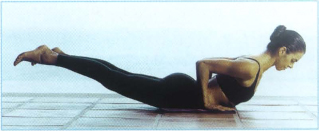
Pose 32: Locust
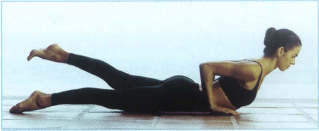
Locust, modification
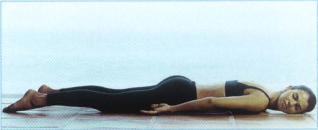
Rest from Locust (and Bow)
You may need to pad your hipbones here. You can use a towel or just fold up your mat. Flip your palms down to the floor and bring them in line with your hips, fingers facing forward, elbows bent and tucked into your sides. Bring your chin to the floor. Separate your feet so your legs are hip-width apart. Inhale, and in one fluid motion, lift your chest, ribs, thighs, and feet up off the floor. Ideally you want nothing but your palms, pelvis, and lower belly touching the floor. Squeeze your butt and thighs! Your legs must be straight and active, funneling energy through the balls of your feet. Spin your inner thighs up to the sky. Your feet are either together or hip-width apart.
Pull your heart muscle forward. Lower your head so your neck is long and in line with your spine. The crown of your head should be facing forward (men, the bald spot on the top of your head should be shining on the wall in front of you). Reach long, with full-body extension. Focus on the forward and backward action of your body—a tug-of-war. On the in breath the chest swells forward, on the out breath the legs extend back and up, as though someone was behind you pulling them out of your hip sockets. After five breaths, relax down, bringing one cheek to one side. Repeat this pose twice, ending with your cheek to the other side on your mat.
Risk Factor: You can strain your neck by jamming your chin up. Also, take care not to strain your lower back.
Modification: If this pose bothers your lower back, just bring one leg up at a time. Do the right leg and then the left.
Spiritual Focus: The present moment is forever new and offers a fresh beginning. In this moment our minds can be made new. In this moment our bodies can be electrified and made new. Not through suffering and pain, but through a new perception. Rewire your mind right here, right now, in this one moment and your whole world can change.
Pose 33: Bow Pose (Dhanurasana)
The Bow pose continues the stimulating effects of backbends and further strengthens and conditions the back side of the body. It is also an amazing chest-opener and a profound release for the fronts of the shoulders, hips, and thighs. Balancing your weight on your mid-body is like a tremendous massage for the digestive organs. The healthy pressure stimulates the kidneys and adrenals.
Building Blocks: From the resting position after Locust, bring your chin back to the floor. Bend your knees and bring them to hip width. Lift your heels up. Reach back with both arms and grab the tops of your feet with your thumbs pointing toward the floor (or, to deepen it, hold the outsides of your ankles and flex your feet). On the inhalation, press back through your legs as you lift your thighs and chest off the floor and pull your torso forward. Your legs are the anchor from which you are suspending your torso’s weight. The legs are resisting, the torso relaxing. This is the same forward-and-back action you took in Dancer’s Pose (which is the standing bow pose). The tighter the bow, the more spring you get for the arrow. Use your breath to lift both ends up. The complete expression of this pose is when you are extending your arms and legs straight up, forming an apex with your hands and feet.
Drop your head forward and relax your neck. Breathe through any tension. Spread your toes and keep them animated. Really relax into the pose—be as strain-free as you can be. After five breaths, relax down and rest with one cheek to one side. Repeat this pose a second time, relaxing down, with the other cheek against your mat. Then come into Down Dog (2) for a little rest and rejuvenation.
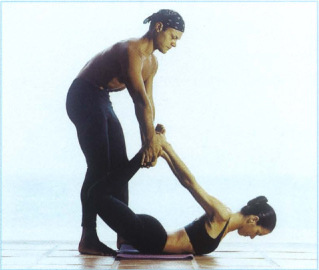
Pose 33: Bow (assisted)
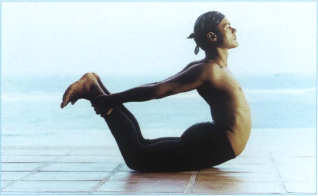
Bow
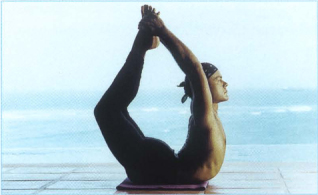
Full Bow
Risk Factor: Beware of letting your knees splay out wider than hip width. This puts the lower body joint systems at risk. Also, cranking your chin up can strain your neck.
Modification: If this hurts your lower back, bring one leg up at a time.
Spiritual Focus: The idea of relaxing, doing less, and going with the flow can scare us. We feel that we are hardly measuring up and doing enough as it is. We say to ourselves, “If I do less and become more passive I’ll never achieve anything.” But a relaxed energy has its own kind of power. Our personal force is strongest when we balance action with relaxation, like a bow and arrow. The bow provides tension from which the arrow releases. Neither is as effective without the energy of the other, and combined they carry you forward with astonishing power and grace.
Pose 34: Camel (Ustrasana)
Camel pose is the reverse position of sitting. Sitting is demanding and not a resting position. A consistent sitter is slowly bent out of shape and usually lacks the structural support and strength to sit in neutral, symmetrical, and natural alignment. Thus the back, neck, and shoulders all suffer. The front side of the torso and hips tighten, and over time the chest collapses forward, causing the shoulders to tighten as well. Just like an athlete in training, the professional sitter has created body imbalances and potential injury.
Backbending poses like Camel can help undo this. It is a terrific hip opener that releases the muscles you use for sitting. It releases the hip flexors, psoas, and some of the rotator muscles, which affect the entire body’s ability to move, whether in sports or in everyday life. It stretches and opens the entire front side of the torso (chest, abdominal wall, pectoral minor muscles, front of the shoulders, and biceps). You will also find a powerful emotional dimension to this pose that opens your heart center and sparks the emotional center of your body.
Building Blocks: From Downward Dog, come onto your knees with your shins pressing into the floor. You may want to double the mat under your knees for a little extra padding. Separate your knees and feet until they are hip-width apart. Bring your hands to your lower back with your fingers pointing up, thumbs into your sacrum, and contract the muscles in your lower body. Your lower body needs to be very strong in this pose; the power in back-bending poses comes from leg strength. Find your breath. Set your eyes, exhale, and scoop your tailbone down and under, then inhale your chest up and gently release your head back as a natural expression of a full backbend. Be careful with your neck. If this feels comfortable, reach back and set a hand on each heel, one at a time. Scooping your tailbone under first is very important to protect your lower back! The palms of your hands should be cupping your heels with your thumbs to the outside of your ankles. (If this feels difficult, see the modification.)
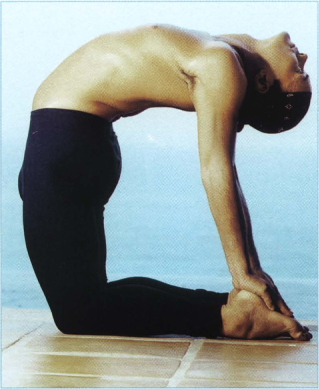
Pose 34: Camel
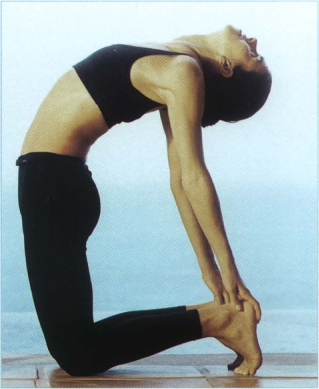
Camel, modification
Really squeeze from the waist down—your butt, thighs, and hamstrings contracting. From that strength, breathe as you energetically lift your chest toward the sky. Root down and lift up. Press your shinbones down with force and raise your heart high! Your chest lifts up, up, up, your heart center opens and expands like a helium balloon. You are not resting your upper body weight on your arms so much as your arms are like a taut line tied to your heels, preventing your chest wall from rocketing straight up through the ceiling. Press your hips forward a little. Move your shoulder blades down your back, pressing them away from your ears. You should feel a terrific stretch in your upper trapezium muscles (the muscles between your neck and shoulders).
After five breaths, tuck your chin to your chest, squeeze your lower body and root down, and from that leg strength slowly float back up to standing on your shins. Relax back down into Child’s Pose (or to keep the heat up, take Downward Facing Dog). Repeat Camel pose once more, going just a little bit farther the second time. Then go to Down Dog, take a few breaths, and rest in Child’s Pose.
Risk Factor: Dropping your head back can strain your neck if it’s tight, so pay close attention to what it needs. One way to protect your neck (and also to prevent blocking your airways) in all backbends is to first tuck your chin down and back slightly, as though you were holding a pencil under your chin, and then slowly drop your head back. Or simply work the pose with your head up and your chin to your chest.
Modification: If your lower back is tight, you can come up onto the balls of your feet—this will dilute the intensity of the movement by 40 percent. To dilute it even further, keep your hands at your low back, fingers facing up and pressing your sitting muscles down, then bend backward to a comfortable degree.
Spiritual Focus: The human body is a masterpiece of ingenuity. Without us having to think about it, our hearts beat about 100,000 times a day, our lungs expand and contract, and our body constantly re-creates itself In a challenging moment, we should trust its brilliance. Instead of telling it what to do or how far to go, let it tell you. Trust that small, quiet, secret voice—it knows!
Connecting Vinyasa
From Child’s Pose, reach your arms forward and step your feet back, coming into Downward Facing Dog (2). (If you are already in Downward Facing Dog, stay there.) Take active rest in Downward Facing Dog for a few breaths, then look forward to your hands, bend your knees, and jump through your arms to sitting. No big deal here, just do the best you can to jump forward to a cross-legged position. (If you prefer, walk your feet up to your hands and then sit.) Move back a little on your mat and lie on your back. You are now in position for the next pose, Bridge.
Pose 35: Bridge Pose (Setu Bandhasana)
Bridge pose has many benefits: It opens the chest and stretches the abdominal wall; tones the butt and thighs; and stabilizes, releases, and brings relief to the lower back. It opens the breathing body, creating a new awareness and rhythm.
Building Blocks: Lie on your back and place your feet flat on the floor hip-width apart, knees over your heels (not the toes). Tilt your pelvis and scoop your tailbone under. On the inhale, lift your hips up high, coming onto your shoulders. Walk your shoulder blades in toward each other underneath your torso, clasp your hands together, and interlace your fingers. Press down through your feet and upper arms. Keep your knees hip-width apart and spin your inner thighs down toward the floor. It’s very important not to let your knees splay out to the sides. Keep them directly above your heels at all times. Draw your belly in.
Gaze down to the tip of your nose. On the in breath expand your rib cage. On the out breath, drive the feet and upper arms down and the hips up higher.

Pose 35: Bridge
Risk Factor: Letting the knees splay out or come forward past the toes puts strain on the knee ligaments.
Modification: If you cannot lift your hips up high, just do what you can. Work to your capacity, even if that means coming halfway up. If you feel strain in your knees, move your heels a little farther away from your sitting bones, or play with the splay of your feet.
Spiritual Focus: Have no agenda other than to be fully present. Use your breath to connect your mind to the here and now and watch the moments unfold. No matter how much stress, pressure, or adversity the moment at hand presents, stay in your body, stay with your breath. Every time your mind wanders, simply begin again. If you lose presence and launch into reactivity, it’s OK; just notice it and begin again.
Connecting Vinyasa
After five breaths, release your hands and lower your hips to the mat. Relax for a few breaths, then repeat Bridge pose once more. Lower your hips again and stay as you are in preparation for the next pose, Wheel.
Pose 36: Wheel (Urdhva Dhanurasana)
Wheel is one of the most powerful poses in yoga practice. The entire front side of the body unfolds into a magnificent blossom. The muscles in the back of the legs and shoulders are especially strengthened and conditioned. This is one of the very best poses to open and release the tightness and tension in the upper back, chest, shoulders, and hip flexors. Your breathing apparatus is opened, which greatly increases the oxygen flow to your blood. You are also bringing love and life into your spine.
On a deeper level, Wheel inspires a sense of physical freedom, youthfulness, lightness, and joy. It can create tremendous emotional release.
Building Blocks: Lie on your back with your feet flat on the floor hip-width apart (same preparation as for Bridge pose). Place your hands flat next to your ears with the palms down and your fingertips toward your shoulders. Pull your elbows in so they are in line with your shoulder joints, then drop your shoulders down toward your buttocks.
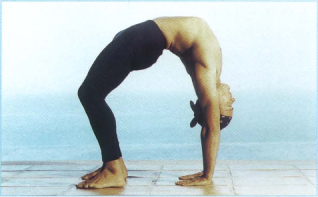
Pose 36: Wheel
Step one: Exhale and scoop your tail. On the inhalation, pressing down gently through the soles of your feet and hands, come onto the crown of your head at the floor. It is important to put your body weight into your hands and arms rather than sitting in your neck. If this is as far as you can comfortably go, that’s fine; just hold here for five breaths. Straightening your arms may be difficult if your shoulders are tight, but they will stretch and open over time with practice.
Step two: Pull your elbows in so they are in line with your shoulder joints, then drop your shoulder blades down your back. It’s very important that you find that movement before lifting up. Exhale here. Then, pressing down through the soles of your feet and your palms, inhale as you straighten your arms and launch up into a beautiful back-bend. Your head is heavy, your neck is free. This should feel so good! Spin your inner thighs down toward the floor to keep rooted and stable. Keep your knees drawn in toward each other at hip width—don’t let them splay out. Your feet are as parallel as possible, but a slight splay is OK.
Wheel can be very intense, and you might become fatigued before you get to five full breaths. But remember, right when you want to give up, right when you perceive failure, that is the moment you are about to cross into new territory. Change is uncomfortable. And when you feel as if you’ve got to quit, that’s probably the point at which you’re looking right into the possibility of changing at some level. That’s the time to stay calm and breathe deep. If you can stay with it in those difficult moments, you will grab the brass ring of transformation.
After five breaths, tuck your chin and slowly lower yourself from the top of your spine down to the bottom, then your hips. Do not bring your knees into your chest! A lot of teachers will tell you to do this, but that movement shocks your sacrum. Just keep the soles of your feet on the mat and your hips down (or come into Supta Baddha Konasana, the next pose).
Repeat Wheel pose three to six times. Yes, three to six times! The good news about backbends is that each one gets easier. With each one, you peel away a little more resistance. The final one may feel the most daunting, but it is what makes the difference between walking away at the end of your yoga practice and flying!
Risk Factor: If you don’t drop your shoulders down your back before lifting up, you risk straining your shoulders. You may not notice it at first, but over time and with consistent repetition of unhealthy movement you can create wear and tear on your shoulder joints. Dropping your scapulae stabilizes the shoulders. Distribute your weight on all four limbs rather than jamming into your shoulders.
Modification: Stay on the crown of your head with your arms at right angles. If you cannot do this, stay in Bridge pose until you are ready to move into the new territory of Wheel. Experiment with splaying your feet (not your knees) out a bit if you feel strain in your knees.
Spiritual Focus: Some people plant seeds in the spring and lose patience if they don’t see results immediately. If you’ve committed for a season, see it through. You don’t have to stay forever, but at least wait to see what blooms. What you see may surprise you and keep you for another season.
Connecting Vinyasa
After the final Wheel, lower yourself to your mat. While lying on your back with your shoulders on the mat, take a gentle twist, bringing both knees to one side and then the other, taking five breaths on each side. Then come to center and into the next pose, Supta Baddha Konasana.
Pose 37: Supta Baddha Konasana
Supta Baddha Konasana is another pose we refer to only by its Sanskrit name. It is a wonderful neutralizing pose, especially after the intensity of backbends. It soothes the nervous system, allowing the body some deep rest. It releases the lower back and hips while stretching the inner thigh muscles. As you drop into the floor and surrender to this pose, all of your internal organs and body systems are rebalanced and revitalized. This pose invites deep, authentic rest—a rare gift in our pressure-filled world.
From the resting position after Wheel, while lying on your back, bend your knees and bring the soles of your feet together, letting your legs and knees butterfly open to the sides. Your feet should be about one or two feet away from your groin. Scoop your tailbone under slightly, taking some of the arch out of your lower back. Let your belly drop. Lay your arms by your sides with your palms facing up (or, if you prefer, place your hands on your belly). Close your eyes, letting them relax in their sockets. Drop your mask, let go of your thoughts, relax deeply, and breathe.
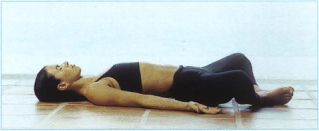
Pose 37: Supta Baddha Konasana
Modification: If you feel strain in your knees, move your feet a little farther away from your groin. There is a natural arch in your back, but if it creates strain, place your feet flat on the floor.
Spiritual Focus: Fear knocked at the door, faith answered, and fear disappeared.
7. Abdominal Series: Stability
You are only as strong as your core. Strengthening your limbs will give you agility and stability in your movements, but building core muscles gives you a deeper seat of power. It is an inner strength that stabilizes every move you make. Abdominal work is key to any healthy yoga practice because strong abs take unnecessary pressure off your lower back. Your poses become much lighter and easier when you generate the effort from that strong core rather than from isolated muscles in your back and limbs. And the nice by-product is that you end up with really toned and sculpted abs!
The abdominal strengtheners we do here are yoga variations of fitness crunches. The difference between what we do and regular crunches is that power yoga abdominal work is global: It integrates and coordinates the upper, lower, and mid-body in such a way that it creates new patterns of stabilized movement that trains your body for motions like carrying groceries, picking up your kids, and reaching up into your closet. This real-life flexible strength allows you to walk through the world with grace and ease.
Pose 38: Scissor Legs and 60/30 Lift
This two-part pose tones and strengthens the entire abdominal wall.
Building Blocks: From the resting position, lie on your back, bring your knees into your chest and give them a squeeze. Cradle your head with your hands and extend your legs straight up to the sky. Lower your right leg down to one foot above the floor. Flex your feet and press through both of your legs. Lift your head and bring both shoulder blades off the floor. Inhale and get ready.
Exhale and contract your belly in toward the floor as you pulse your torso up for ten counts. As you lift up, contract your abdominal wall. Match your breath to your movements. Change legs and repeat on the left side for ten counts.
Next, bring both legs up and bring your arms out parallel to the floor (or you can keep cradling your head if your neck needs support), keeping your shoulder blades off the floor. Lower your legs down 30 degrees and hold for five breaths. Then lower your legs down another 30 degrees and again hold for five breaths. Then lower your legs until the heels are two inches off the floor and hold for the last five breaths. Rest in Supta Baddha Konasana.
Pose 38: Scissor Legs
Pose 38: 60/30 Lift
Risk Factor: Don’t crank your neck; just let your head rest in your hands.
Modification: If you feel strain in the lower back, bend one knee and press the sole of that foot into the floor. Or experiment with bending both knees.
Spiritual Focus: In yoga, the body is considered a vehicle through which the world as a whole is transformed. A strong, healthy body is not meant to be a selfish end unto itself. To make our physical shape the end focus creates self-centeredness, disharmony, and disease. Rather, the body can be used as an instrument to express personal power for positive change in the world around us. That is the greatest inspiration we can have for building our core power.
Pose 39: Abdominal Twists
Abdominal Twists rewire the patterns of movement for graceful coordination and integrated force. They strengthen and tone the core muscles that are down deep as opposed to just the superficial ones—specifically the abdominal obliques, which are the support and stabilizing muscles for the lower back.
Building Blocks: After a few breaths in Supta Baddha Konasana, draw your knees up to your chest and give them a squeeze. If you want, you can rock back and forth a few times, forward and back, side to side, to massage your lower back. Then come onto your back with your knees in to your chest and lace your hands together under your head. Lift your shoulder blades off the floor, taking care not to strain your neck. Your head should be heavy, resting in your hands. Cradling your head, bring your elbows up to the outside of your knees.
On the out breath, straighten your right leg to a 45-degree angle and twist your right elbow to the outside of your left knee. Keep that lower shoulder blade raised, but don’t crank your neck with your hands. Pull up with your abdominal muscles. Hold for three counts, then, on the in breath, come back to center, touching your elbows to the outside of your knees. Contract your belly and bring your hips and shoulders up when you draw in, as if you are closing an accordion.
Exhale your left leg out and spin your left elbow to the outside of your right knee. Hold, and on the inhale come back to center, elbows to the outside of your knees. On the exhale you extend and twist, on the inhale pull in and tuck up. Match breath to movement. The rhythm is: Inhale to center. Hold. Exhale, straighten and spin. Inhale to center. Hold. Exhale, straighten and spin. Be mindful, not mindless. Stay present to your breath and your body. The more difficult it is, the more you breathe!
Repeat for ten breaths, and on the last one, reach everything up—your legs, your hips, your head, your hands—everything up to the ceiling to the count of ten. Everything reaching except your belly, which contracts and presses back into the floor. Then relax your head, neck, and the soles of your feet back down to your mat and rest in Supta Baddha Konasana.
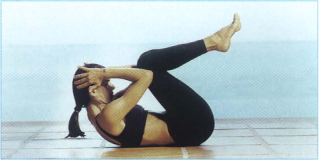
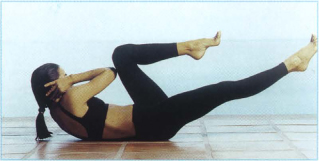
Pose 39: Abdominal Twist
Risk Factor: Beware of wrenching your neck and overarching your lower back.
Modification: Raising your legs to a 60-degree angle during the twist will ease some of the intensity. You can also keep both knees bent throughout to whatever degree you need.
Spiritual Focus: In every moment, we are either finding ourselves or losing ourselves. We are either now here in our body, or nowhere. Connecting mind, movement, and breath will always lead you back to the now moment—the place where all true healing and growth is possible.
Pose 40: Boat Pose (Navasana)
This pose creates structural integration and balance while it strengthens and tones the abdominal wall and hip flexor muscles. It stabilizes the back and torso by strengthening the abdominal obliques bilaterally, which gives lower back support internally. In addition, it rinses the organs of the belly.
Building Blocks: Come to a sitting position. Contract your abdominal wall as you lift your legs and torso up, bringing your arms forward until they are parallel to the floor. The object is to balance on your tail and sitting bones, so you look like a “V” To help with balance, you can keep your hands on the floor until your legs and torso are balanced, then extend your arms. If you need to bend your knees a bit, you can do that. But the ideal is to have your legs straight.
The lift and balance in this pose comes from your abdomen, back, and hips. Really engage those muscles to stabilize and lift your torso and your legs. At the same time, draw your sternum up to the sky. Squeeze your legs, press your inner thighs together, and activate your feet. Focus your eyes on a point in front of you and sail your beautiful boat!
Hold Navasana for five breaths, then bend your knees, cross your feet in front of you, keeping them raised off the floor. Press your hands down on the floor next to your hips, contract your abs, and lift your whole body off the floor for one breath. Come down and repeat the sequence—Navasana and then the crossed ankle lift—for a total of three to five sets. At the end lie flat on your back with the soles of your feet together in Supta Baddha Konasana.
Risk Factor: Beware of rounding or hyper-extending (overarching) your lower back. Emphasize your abdominal lock and dropping the front ribs down.
Modification: Either bend your knees slightly, or work with one foot on the floor if lifting both legs feels too strenuous. Another option is to keep your hands at the floor as you extend your legs straight. For the cross and lift, place one block on each side of your body to give some extra height.
Spiritual Focus: Your breath is what anchors you. It is always right there under your nose. Watch its ebb and flow as you glide through the crystal-clear waters of your equanimous mind.
Pose 40: Boat
8. Inversion Series: Rejuvenation
Any pose where you bring your head below your heart is considered an inversion. Inversions are a very important part of yoga practice. They flush the organs in the head and upper torso with fresh, oxygenated blood. They activate and electrify the glands that govern the immune system and the internal pharmacy, creating vitality and vigor. They drain the fluid from the legs and hips to create suppleness in the lower body. Over a period of years, whether you are inactive, athletic, or do a strong yoga practice, if you are not turning your world upside down with inversions, you tend to dry out. Your body will get stiffer and you will lose agility and mobility in your everyday movements. Inversions keep your body supple and elastic.
Reversing the flow of gravity moves lymph—the body’s “sewage”—through your system so metabolic waste can be released. It activates the thyroid and parathyroid glands, which boost and balance your metabolism.
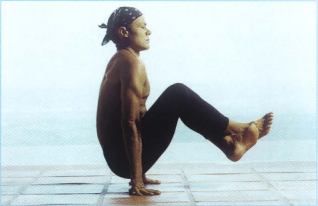
Boat, crossed ankle lift
There are many different inversion poses, including headstand, forearm balance, and handstands, and as you progress and mature in your practice I suggest you research and practice these more advanced inversions. But for the sake of creating a safe practice for you at home, I’ve chosen the three that are relatively simply but powerfully effective: Shoulder Stand, Plow, and Deaf Man’s Pose.
Pose 41: Shoulder Stand (Sarvangasana)
The Shoulder Stand drains the legs of metabolic waste and allows fresh, oxygen-rich blood to circulate through the head, heart, and chest. It clears and stimulates the sinuses, thyroid, and parathyroid glands. It infuses the whole body with radiance and makes you feel bright yet serene.
Building Blocks: Lying on your back, bring your knees into your chest. Contract your abdominal muscles and, on an exhalation, bring your legs and hips up high to the sky, rolling onto the back of your shoulders. Bring your hands to your lower back and walk your elbows and shoulder blades in toward each other. Press up through the soles of your feet, using your hands to support your hips and lift them higher.
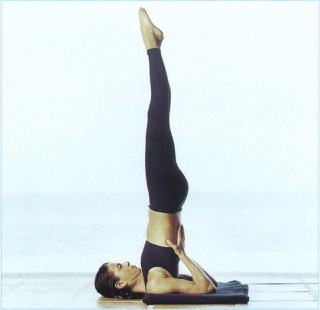
Pose 41: Shoulder Stand
Ideally, you want your body to be in a straight vertical line. Use your abdominal muscles to pull your legs, hips, and pubic bone high, and drive down through your elbows. Rotate your thighs in and toward the wall in front of you. Keep your ankle bones touching and your feet alive. Look straight up, never to the right or left.
A nice way to work this pose for greater support is to place a folded blanket under your shoulders only, with your head on the floor. Never place a blanket, towel, or any other object under your neck in an inversion! Make sure the blanket is folded evenly.
Stay in Shoulder Stand for ten breaths. From here, you will move directly into the next pose, Plow.
Risk factor: Do not turn your head once you are in this pose! Keep your chin in line with your spine and look straight up to avoid injuring your neck. You can also put too much strain on your neck by not drawing your weight upward.
Modification: If you have a weak lower back or neck problems or feel any strain in your neck, I encourage you to take this modification, which provides many of the same benefits. Lie on your back, arms to your sides, and simply lift your legs straight in the air to a perpendicular line. Keep your hips on the mat and hold here for the full five breaths. As with the regular Shoulder Stand, rotate your inner thighs in and engage a strong abdominal core.
Spiritual Focus: Forget what the pose looks like. The question is: What does it feel like? Your goal should be the opposite of glory-bound poses and performance. It is only when you shrink from all image-building processes that you begin to discover the prize of inner peace and authentic personal power.
Pose 42: Plow (Halasana)
Plow is an incredible stretch for the entire back, from the sacrum all the way up to the shoulders. It soothes, calms, and nurtures the vital internal body parts and nervous system.
Building Blocks: From Shoulder Stand, use your core power to slowly lower your straight legs to the floor behind your head. They may not reach the floor, and that’s fine; just go as far as you can and hold there. That is your edge in this pose. Remember, the thing that blocks your path is your path! If your feet touch the floor, bring your arms toward the front wall, interlacing your fingers and squeezing your elbows to a straight position. If your feet cannot reach the floor, just keep your hands at your lower back for support.
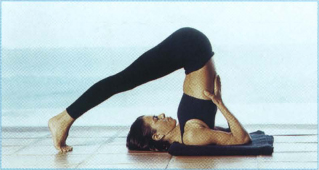
Pose 42: Plow
Relax your face and gaze forward to your navel. Breathe deep and free for five breaths.
Risk Factor: As in Shoulder Stand, it is very important that you do not turn your head to either side while in this pose, or you will wrench your neck.
Modification: You can set a folded blanket evenly beneath your shoulders for more support, or lower down with bent knees if you feel strain in your lower back. If you get stuck on your way back and your feet do not reach the mat, you can either set your feet on a wall behind you or just stay at that point and hold.
Spiritual Focus: Your meditative journey will be in two directions at once—inward and outward. To the degree that you come out of your head and are present in your body, you will see what to aim for in the tangible world. You will see what direction to take, how far to go, when to push and when to surrender. As you journey inward, you reflect your light outward.
Pose 43: Deaf Man’s Pose (Karnapidasana)
In this pose you restore the wisdom of the body and create sanctuary, deep release, and biochemical balance. The spine will surrender into this profound space-enhancing stretch.
Building Blocks: From Plow, bend and drop your knees in toward your ears. Sweep your arms out and around and take hold of your feet. You can experiment with bringing your hands to your heels, ankles, calves, or to the base of your back to make this comfortable. Your toes can be pointed or turned under. Relax into this shape and breathe deep and smooth.
Stay here for ten to twenty breaths, gradually increasing the amount of time you spend in this pose. Eventually you want to hold this pose for a full minute.
Risk Factor: Neck weaknesses need to be carefully observed here. Dilute the pressure as needed, or skip this pose entirely.
Modification: Place a blanket beneath your shoulders with your head remaining directly on the floor. Bring your knees to your forehead and your heels up toward your hips instead of bringing them to the floor.
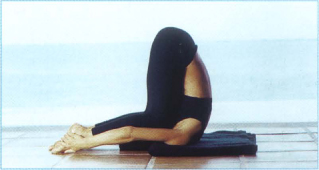
Pose 43: Deaf Man’s Pose
Spiritual Focus: Seal off the distractions around you and listen to the sound of your breath. Nothing to hear but the beautiful rhythm of your inhalations and exhalations. Follow its thread into the deepest place of restoration within you.
Connecting Vinyasa
Slowly and gently roll out of this pose onto your back, bringing your hands to your knees. Gently roll up and back five times. On the fifth time, bring your hands to the floor in front of you and with great momentum walk or jump your feet back to Low Push-Up (9) position. Inhale to Upward Facing Dog (10) and exhale to Downward Facing Dog (2). You are now in position for the next pose, Half Pigeon.
9. Hip Series: Opening
In the hip-opening series we focus on releasing and unlocking the adductor and rotator muscles of the buttocks. In addition, hip-opening poses dissolve lower back tension, knee discomfort, sciatic nerve pain, and improve blood flow to the lumbar spine, intestines, and reproductive glands. They create greater overall agility and freedom of movement.
The hips are the emotional storage depot for the body. They house a good portion of your tension and stress, and as you start releasing your pelvis and softening that tissue, the rest of your body effortlessly shifts into a natural order of alignment. Sometimes just by releasing tension and tightness we create healing and balance, working out the chinks and kinks in our bodies. If you have a neck problem, knee problem, low-back problem, headaches, or whatever, it’s amazing how all those aches, pains, and misalignments can disappear once you open up the hips.
When I worked with professional football players, who were very muscular and tight (most couldn’t touch their toes), I immediately started them on hip-opening poses. After only a few sessions, they started to loosen up and had more mobility in their entire bodies than they had had in years! I like to call the hips the “mother of all movement,” for obvious reasons.
Hip openers will bring resistance up faster than almost any other series of poses. They are very much in your face as far as the pain, but if you sit with the pain and don’t fight it, it passes. It passes through and out of you forever. Remember, the yogic principle that nothing is permanent. If you just breathe through these pains of purification, you will venture into whole new territories of growth. You reach down into the hidden pockets of tissue, to the places where your deepest power lies waiting to be tapped. Lifelong barriers melt away as the tissue releases and you gently peel away layers of old, useless bundles of energy and information.
I teach three hip openers in power yoga: Half-Pigeon, Double Pigeon, and Frog.
Pose 44: Half Pigeon (Adho Mukha Eda Pada Rajakapotasana)
Half Pigeon releases the periformis muscle, which is notorious for getting very tight in athletes and runners. If you are a professional “sitter,” this pose will also help keep those muscles from getting brittle, stiff, and sore.
Building Blocks: From Downward Facing Dog, look up between your hands and step your right foot to the outside of your left hand. Then drop your right knee near the right hand and drop your right hip down to the floor. You want to get your shin as parallel to the front edge of your mat as possible. Depending on the tightness in your hips, this can be difficult, so work to your degree of comfort. Flex your right foot. If you like, you can place your left palm on the sole of your right foot. Last, relax your upper body forward over your right shin, bringing your arms out straight in front of you and your forehead to the mat if it will reach. Work on squaring the front side of your torso down toward the floor. Your back leg and foot should be stretched straight back.
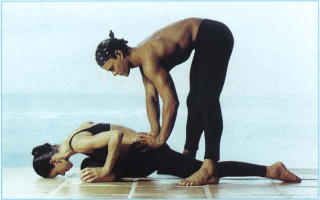
Pose 44: Half Pigeon (assisted)
You want to maintain as much of a center line as possible through your hips, so roll your left hip down toward the mat.
Channel your breath down into your hips and buttock, softening and releasing the tissue. This should feel so deep . . . so good . . . so freeing! If you feel fidgety or uncomfortable, it’s just anxiety coming up. But if you can recognize it as such and breathe through it, the discomfort will dissolve like snow in the summer sun. Tune in, breathe, relax. Break up tension, break with the old and break through to the new!
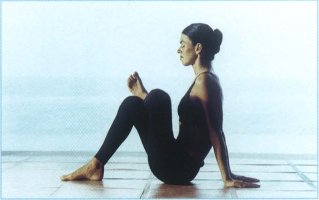
Pigeon, modification
Spiritual Focus: Slam on your mental brakes and expand into full acceptance of the present moment—everything you are feeling and what is happening. Don’t try to change anything. Just breathe, witness, and let go. Allow this moment to be exactly as it is, and watch with a quiet mind as each new moment unfolds. Allow yourself to be exactly as you are, so that you may break through your resistance.
Connecting Vinyasa
Breathe for five breaths, then bring your upper body back up slowly, resting on your hands. Leave your legs as they are in preparation for the next pose, Double Pigeon.
Pose 45: Double Pigeon (Dwapada Rajakapotasana)
Double Pigeon is a deep hip stretch that opens you up. Sometimes it is difficult to get into this pose. Take the time you need, because the rewards are large.
Building Blocks: From Half Pigeon, sit up and slowly bring the back leg up and around, stacking your left shin directly on top of your right shin. Ideally you want to get the upper foot to the outside of the opposite thigh so it is hanging in the air, not resting on top of your leg. Flex both feet. Walk your hands forward and relax down, letting your head hang forward, or set both hands on the upper knee and lean into it. If you can, bring your forehead down to your mat. Now just breathe way down deep into your pelvis as though it were hollow. Let the beautiful cleansing wind sweep away any tension that you are holding there.
Risk Factor: Pointing or collapsing your feet strains your knees and/or ankles. Keep your feet firmly flexed, lengthening through the heels.
Modification: If this pose is difficult for you, try this variation: From a seated position, set your feet flat on the floor with your knees bent. Bring one foot up to the opposite thigh. Set your hands on the floor behind your hips and walk them in, moving your torso toward your legs until you feel a deep stretch in your butt cheek.
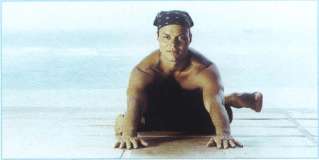
Pose 45: Double Pigeon
Spiritual Focus: Thoreau said, “Direct your eyes inward and you’ll find a thousand regions in your mind yet undiscovered. Travel them and be an expert in home cosmography.” Where are the uncharted regions within you?
Connecting Vinyasa
After five breaths, sweep the top leg back into Half Pigeon again. Set your palms on the floor and step back to Downward Facing Dog. Then bring your left foot forward to the outside of your right hand and repeat Half Pigeon and Double Pigeon on this side. When you are done, release your legs and come to a seated position for the next position, Frog.
Pose 46: Frog Pose (Bhekasana)
Frog pose reaches into and releases the muscles and tissue deep within the hips and groin. This pose is an intense, rejuvenating stretch that can be emotionally charged. After a long hold, your whole body will feel invigorated and infused with light.
Building Blocks: Face the side wall. Double up your mat on each end and stand on your knees with your shins pressing into the floor. Place your knees as far apart as you can, as if you’re doing a straddle-split on your knees. Go out to your maximum edge. Turn your heels out so the inner edges of your feet are against the mat and flex your feet. Your thighs and shins should form right angles. Check to make sure your heels are in line with your knees.
Come down on your forearms. Move your hips back toward the wall behind you until you feel a good stretch. Your head is heavy, your breathing deep. Really go to the potent point of stretch and stress and breathe that purifying wind down into the cavern of your body. You’re here for a little while, so just relax with it. Don’t fight, don’t panic. You’re perfectly safe in this pose. This is a wonderful opportunity to create a structural and emotional shift. It will change your body, but the willingness to hang in there is what will rewire your mind and ultimately change your life.
Hold this pose for twenty-five deep and powerful life-changing breaths.
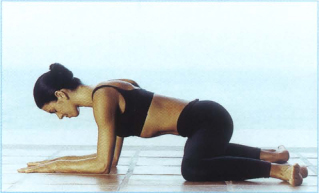
Pose 46: Frog
Risk Factor: Do not collapse into your lower back; stay lifted at your belly. There should be zero pain in the knee joints. If necessary, put more padding beneath your knees.
Modification: If your hips are really tight, you can roll up a blanket or use a bolster under your chest and belly. Eventually your hips will open as you continue to practice, so with time you won’t need the bolster.
Spiritual Focus: If you are not willing, you cannot open. Focus on healing and let the rest go. Notice how old patterns of attack and reactivity come up and just let them go. If you want your body to relax, it’s simple: Just relax your mind. If you want to let go of the baggage you are holding in your body, let go of the baggage in your mind. Be willing and all possibility unfolds before you.
Connecting Vinyasa
Come out of this pose by simply lying forward on your belly for a beautiful release from the deep hip work. Take a few breaths and then lie on your back, pulling your knees into your chest. Then come up into a seated position, scoot back to the middle of the mat, and extend your legs out in front of you. You are now in position for the Forward Bending Series.
10. Forward Bending Series: Release
Forward bends bring new energy and tone into the vital organs of the body. They lengthen and create a natural traction through the back side of the torso and dissolve tightness in the hamstrings, buttocks, and lower back. These cooling poses slow the pulse and unclutter the brain. Since they can be held for long periods, you have the time to really feel and relax deeply into your body.
There are two forward bending poses: Seated Single Leg Extension and Seated Forward Bend. Then you’ll take Tabletop and Fish Pose as neutralizing poses.
Pose 47: Seated Single Leg Extension (Janu Sirsasana)
This pose releases the calves, hamstrings, glutes, and back and improves blood circulation in the legs. It dissolves restlessness and irritability and soothes the brain and nervous system.
Building Blocks: From the upright seated position, bring your left heel in to the inside of your right thigh. Keep your right foot active and press the top of your right thigh into the floor. On the exhalation, reach forward and grab your foot with both hands if you can (if not, grab your ankle). Breathe in and lift halfway up to a straight back, then exhale and reach forward as you bend down.
You may want to try a little extra twisting action in this pose, so work your left ear down toward your right knee as you lift your right ribs up high. You may even want to bring your right hand to the floor to the outside of your hip to leverage your twist. Breathe deeply for five breaths, lift back up, and do the same steps on the other side for another five breaths.
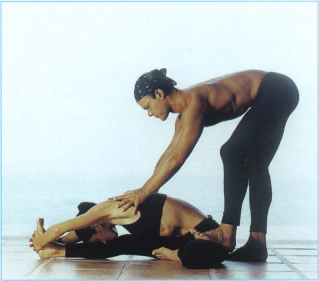
Pose 47: Seated Single Leg Extension (assisted)
Risk Factor: Bending at the waist can strain the lower spine. Hinge at the hips.
Modification: If you are really tight, bend the knee of your extended leg.
Spiritual Focus: Making an internal shift is like dropping a pebble in a pond. Every microshift ripples into and through your mind, your body, and your life, growing ever bigger and more powerful.
Connecting Vinyasa
After five breaths on the left side, come up and extend both legs out for the next pose, the Seated Forward Bend.
Pose 48: Seated Forward Bend (Paschimottanasana)
This is a wonderful countermovement to everything you have done up until now. It lengthens and releases the back side of the body and leaves you feeling neutral, balanced, and restored.
Building Blocks: Sitting upright with both legs extended out in front of you, reach under your butt and pull your sitting muscles out laterally so you come right onto your sitting bones. Your legs are together, ankles touching. Press the tops of your thighs down toward the floor and flex your feet. On the exhalation, reach forward, hinging from the hips, and grab your feet, ankles, or legs with both hands. (If you can’t grab your feet, try bending your knees, holding your feet, and then gradually pressing the tops of your thighs down to the floor to an intense yet comfortable degree.) Inhale and lift halfway up to a straight back, then exhale and fold forward. Keep your feet active and toes fanned. Let your elbows bend out to the side.
On the inhalation, use your hands to pull you forward, lengthening through the spine. On the exhalation, bring your torso down toward your knees. Inhale reach, exhale torso down. Don’t worry if your spine is rounded. Just try to lengthen it gradually and smoothly over time. Drop your head and release your neck. Soften your eyes and set your gaze between your legs.
It’s important that you focus on bending from the hips, not the waist. Pulling from your waist puts unnecessary strain on the lower back. It’s not about how far you go into this pose, but rather how you hold it in general: the compassion, intention, and overall integration of your movement. Hold this pose for ten breaths, coming back up to a seated position on an inhalation.
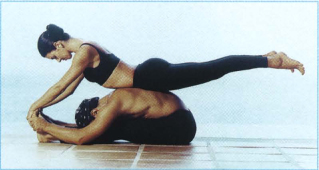
Pose 48: Seated Forward Bend (assisted)
Risk Factor: Bending at the waist can strain the spine. Work at hinging from your hips and extending through your spine.
Modification: Bend your knees. Or you can use a towel or strap around your feet as an extended handle.
Spiritual Focus: Some poses may lead you to think that yoga practice is too simple to deliver the results we need. But after a while you realize that we are much more likely to succeed because the program is simple and straightforward. We come to understand that it is far better to work at our own level of ability and do a fixed set of basic poses in a consistent and healthy way than to try many different things and fail. Yoga practice reminds us of the value and power of simplicity in personal growth.
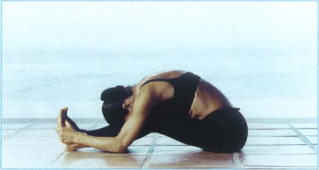
Seated Forward Bend, modification
Pose 49: Tabletop (Purvottanasana)
Tabletop neutralizes forward bends by releasing the back and opening up the front of the torso. It also stretches and tones the muscles in the front of the shoulders and biceps. This pose creates an overall feeling of release and expansion.
Building Blocks: From a seated position with your legs straight out in front of you, bring your hands back about twelve inches behind your hips, shoulder-width apart. Place your palms flat with your fingers facing forward. On the inhalation, press down through your arms and hands, straightening your elbows and lifting your hips up. Press all ten toes into the floor and lift your hips high. Drop your head back so the crown of your head is facing the floor. Gaze to the back wall and breathe deep and free.
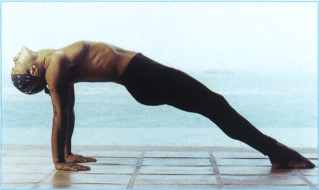
Pose 49: Tabletop
Modification: If it is difficult to lift your hips upward, bend your knees and walk your heels in under your knees. In this variation, you want your body from your chest to your knees to be parallel to the floor, like a table. If it hurts your neck to drop your head back, simply bring your chin up toward your chest.
Spiritual Focus: Step back from judgment and you will marvel at what transpires through you. If you are open, you will find more faith in what you do not know than in what you do know.