Chapter 5
Understanding SharePoint Sites and Hub Sites
IN THIS CHAPTER
 Getting a feel for the concept of a site
Discovering the available site templates
Creating a new site using a template
Figuring out how sites can be linked with Hub Sites
In Chapter 1, you get up and running with Office 365 and SharePoint Online in a matter of minutes by creating a SharePoint site using the Team Site template. In this chapter, you take a deeper dive into SharePoint sites. You learn how to create your own site using SharePoint’s various site templates and how to access it in Office 365. You explore some of the basic components of a site such as its navigation and pages. You also learn how SharePoint sites can be linked together using a new feature called Hub Sites.
Accessing SharePoint Sites in Office 365
If you are following along with the book, you created a Team Site in Chapter 1. You then learned how to open that site using the SharePoint Mobile App in Chapter 4. You can also open the same Team Site using your favorite web browser such as Microsoft Edge, Google Chrome, Mozilla Firefox, or Apple Safari. (And if you haven’t yet taken a peek at Chapters 1 and 4, do not despair — keep reading. You can get caught up along the way.)
To access the SharePoint Team Site you create in Chapter 1, you must first sign into Office 365 and then choose SharePoint from the available apps. Here’s how:
Open your web browser and navigate to
www.office.com.If you have signed in before, your dashboard will load. If you have not yet signed in, you will need to sign in here with the credentials you create in Chapter 1.
Click the waffle icon in the top-left corner of the screen and then click SharePoint, as shown in Figure 5-1.
The Frequent Sites page appears, which lists your frequently visited SharePoint sites (see Figure 5-2). In this case we only have the Team Site we created when we signed up for Office 365 in Chapter 1.
 You can also click SharePoint from the main dashboard to access the Frequent Sites page. However, if you are in another app, such as Outlook, you can always get to SharePoint using the waffle icon in the top-left corner.
Click the SharePoint site you want to open.
Presto! Your SharePoint site opens and you are ready to begin exploring it, as shown in Figure 5-3.
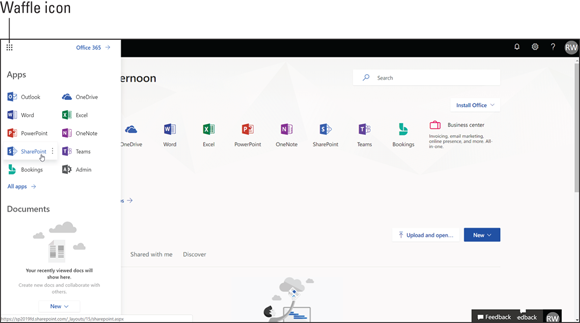
FIGURE 5-1: Selecting SharePoint from the main office.com landing page.
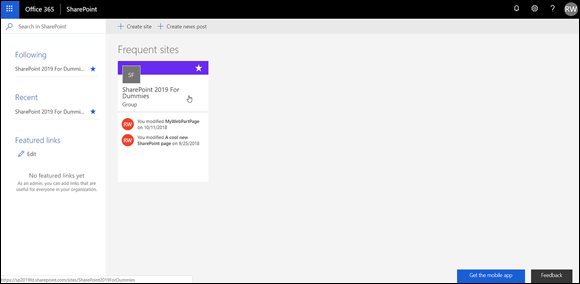
FIGURE 5-2: The Frequent Sites page in SharePoint.
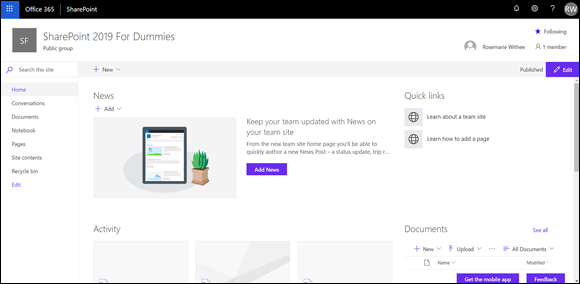
FIGURE 5-3: The main page of a SharePoint Team Site.
Accessing a site that is hosted in SharePoint Online, which is part of Office 365, may be a little different than sites that are hosted on your network. If your SharePoint site is hosted by your internal IT team on-premises, instead of going to www.office.com, you will need to ask them for the web address of your SharePoint site.
Exploring the SharePoint Team Site
Although you can choose from many different site templates when you create a SharePoint site, the most popular is the Team Site template, as it contains a number of useful features for teams to share content and apps and collaborate on projects.
When you first open your newly created Team Site, you can do a number of things right out of the gate. From the left-side navigation menu, you can partake in Conversations (which is an integration with Outlook), you can store your digital documents in the prebuilt Document Library app (Documents), you can open OneNote to keep shared notes (Notebook), and you can create new web pages (Pages).
The default page that appears when you first open your Team Site is the Home page, which is also always accessible by selecting Home from the navigation menu. The Team Site Home page has lots of useful functionality. It includes a section for News, Quick Links, Activity, Documents, and site Comments. You can also customize the Home page sections to fit your own needs, which you learn how to do in Chapter 6.
Finding your way around
All SharePoint Team Sites have the same features. If you're using a new Team Site, your site should be similar to the one shown earlier in Figure 5-3. If your site has been customized, it may look slightly different. Never fear: All the same features are there. You may just have to hunt a little bit to find them.
Almost every SharePoint site contains the following major sections:
- Header: The header spans the entire top of the page. The header in a SharePoint page acts much like the menu in a traditional Windows application, such as Microsoft Word. SharePoint even features the ribbon in the page header, similar to how the ribbon appears in the top of many Office applications. You expand it by clicking one of the tabs such as Files or Library. After you click a tab, the ribbon expands in a way that looks very similar to the rest of the Office products. We take a closer look at the ribbon in Chapter 6.
- Left navigation pane: The navigation pane provides quick access to the site’s document libraries, lists, and discussion boards. You can even add links to content you create, such as documents and web pages. The navigation is fully customizable and you can add any links you want. You can even add links to websites outside of SharePoint, such as a link to your partner website or any other favorite website.
- Page content: The content displays in the body of the page. Microsoft has done a nice job of provide a good default page for the Team Site. You can add your own pages and also customize the default page. Web pages are explored in Chapter 6.
Generally speaking, the header and left navigation pane stay fairly consistent, whereas the body of the page changes to display the content of the web page. This is very similar to how most websites work.
Microsoft has spent a lot of money on usability research to determine how best to lay out the pages in SharePoint. We highly encourage you to use the layouts provided by Microsoft instead of creating your own custom layouts.
Uploading documents
On a default Team Site (see Figure 5-3), you see a section in the lower-right part of the page called Documents. This seemingly innocuous little section is actually an example of SharePoint at its finest.
A link to the Documents section also appears in the navigation menu. This is a common theme in SharePoint. There are seemingly endless ways to do any one task in SharePoint, which can make for some interesting breakroom chatter. One person might insist on how to do something in SharePoint while another person might insist on a different way. In SharePoint both ways can be correct!
In a nutshell, Documents is a digital repository to store your files. Under the covers, however, Documents is a combination of pages, apps, and Web Parts. (You discover how it all comes together in the next few chapters.) Adding a new file, such as a Microsoft Word document, to Documents is as simple as clicking the New link in the Documents header, as shown in Figure 5-4. After a document is located in SharePoint, you have all the content management functionality right at your fingertips, such as check-in/check-out, versioning, security, and workflow.
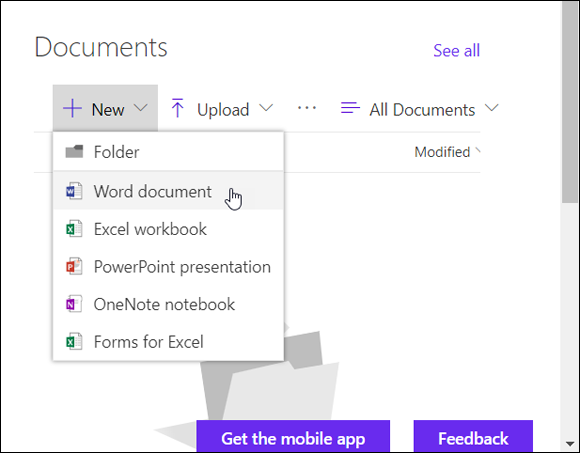
FIGURE 5-4: Adding a new document to a SharePoint Team Site.
Sharing your team site
A site without any users is a bit pointless. You can share your SharePoint Team Site in a number of different ways. The easiest way to share is to invite users to the site. When you share a site, the people you are sharing with will receive an email with all the information they need to access the site.
Share your site from your web browser
To share your SharePoint site using your web browser, follow these steps:
- Open your web browser and navigate to the SharePoint Team Site you want to share.
Click the gear icon in the upper-right corner and select Site Permissions.
The Site Permissions window opens.
Click the “Invite people” button and choose to add members to the group of users who can access the site or choose to share the site only.
In this example, we will choose to share the site only, as shown in Figure 5-5, which opens the Share Site window shown in Figure 5-6.
If you choose to add members to the group you will be presented with a list of users who are already part of your Office 365 subscription. If you are following along with the book, you will only see a single user (unless you have added more along the way).Enter the email address of the person with whom you want to share the site.
 If the person is outside of your organization, a message that alerts you to that fact appears. This notice is important, as you want to be careful not to share information outside of your organization if it shouldn’t be shared. If you are an administrator, you can turn off the ability to share with people outside of the organization completely.
- Type a message to the person with whom you are sharing the site, confirm that the check box for Send Email is selected, and then click Add (see Figure 5-6).
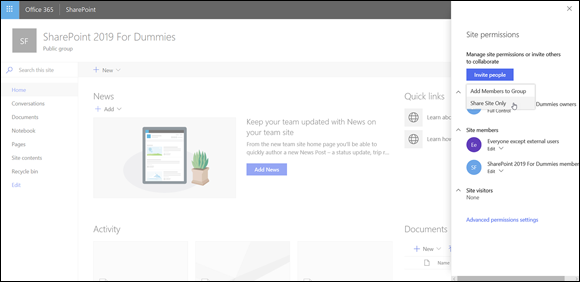
FIGURE 5-5: Inviting people to a SharePoint site.
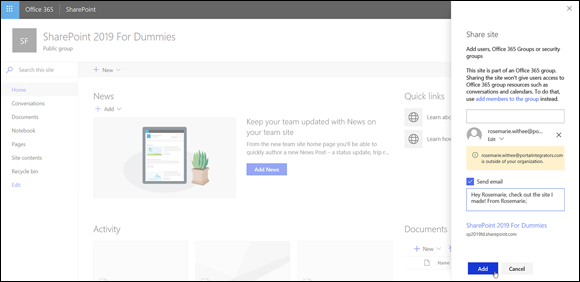
FIGURE 5-6: Sharing a SharePoint site by sending an email.
If you are using the classic SharePoint experience, your interface will be different than we describe here. For example, in the past, a Share button would be displayed at the top of a site. However, there could be a number of reasons why you may not see this button. We have seen where it doesn’t appear in the Chrome browser but appears in others. We outlined the procedure to share a site via the Site Permissions window since this method works regardless of whether you see a Share button at the top of your screen or not.
 If you don’t have permission to share access to the site, you won’t see the Site Permissions button when you click the gear icon — SharePoint automatically removes it. In general with SharePoint, if you read about something and it doesn’t match what you see on your site, it is probably due to one of two issues: First, you might not have the right permissions for that particular feature; or second, the feature might not be activated or configured for your site. For example, if email is not configured for your SharePoint instance, you won’t see the Share button.
To find out more about activating and deactivating features, check out Chapter 17. And of course, you must also have the right permissions to activate the feature you’re looking for.
Share your site from the SharePoint Mobile App
To share your SharePoint site using the SharePoint Mobile App, follow these steps:
- Open the SharePoint Mobile App on our smartphone or tablet and navigate to the site you want to share.
- Tap the share icon in the upper-right corner of the screen, as shown in Figure 5-7.
Choose how you want to share the site.
From this point the process is the same as you would use for sharing anything else from your mobile device. For example, on iOS you see the familiar sharing mechanism displays, as shown in Figure 5-8.
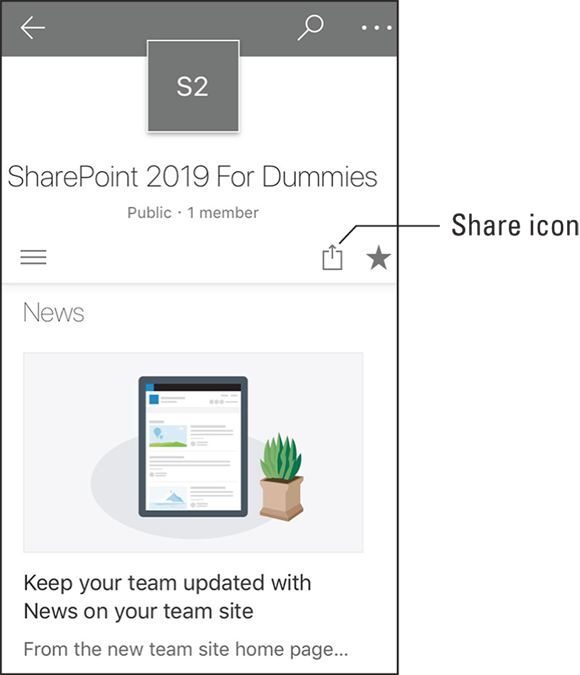
FIGURE 5-7: The Share icon on a SharePoint site on an iPhone.
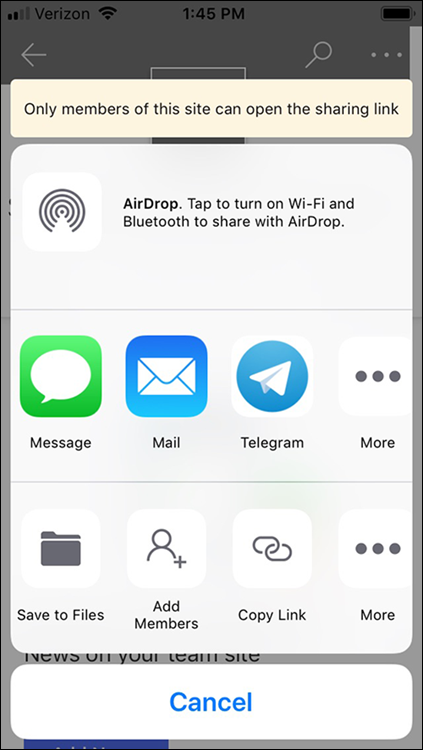
FIGURE 5-8: Sharing a SharePoint site from an iPhone using the SharePoint Mobile App.
Creating a SharePoint Site
You can create a new SharePoint site using your web browser or the SharePoint Mobile App. When you create a SharePoint site, you first must select the site template you want to use. Each site template includes all the preconfigured elements you need, such as specific features, default pages, and navigation. The most popular site template is still the Team Site template since it contains a broad set of features designed for team interaction and collaboration. But it is important to understand the other templates that are available so you can use them when you need them.
You can create a new SharePoint site using your web browser or the SharePoint Mobile App. The following sections show you how.
Create a site from your web browser
To create a new site using your web browser, follow these steps:
- Open your web browser and navigate to your existing SharePoint site.
Click the gear icon in the upper-right corner of the screen and choose Site Contents.
The Contents screen for the site appears.
Click the New drop-down menu and select Subsite, as shown in Figure 5-9.
The New SharePoint Site screen appears, as shown in Figure 5-10.
- In the Title and Description section, enter a title and description for the new site.
- In the Web Site Address section, enter how you want the site to appear in the URL of the web browser.
In the Template Selection section select a site template for the site.
The Team Site template is the default, but there are several other site templates to choose from as well. We recommend creating one of each and exploring them to understand how the templates work. This is important so you can create the right site for your particular situation. In this example we will choose to create a Blog site.
If you are ever in doubt about which template to use, you are usually safe with the Team Site template.- In the Permission section, choose whether you want the new site to have the same permissions as the parent site or if you want to create new permissions, as shown in Figure 5-11.
- In the Navigation section, decide how you want the navigation displayed on the parent site and if you want the new site to show the parent site’s navigation too.
Click Create to create the new SharePoint site.
After a few moments your new site will be created and opened in your browser, as shown in Figure 5-12.
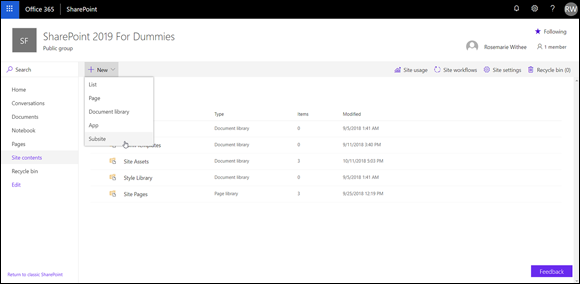
FIGURE 5-9: The New drop-down menu.
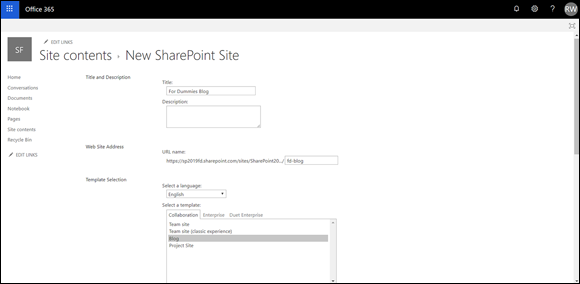
FIGURE 5-10: The New SharePoint Site screen.
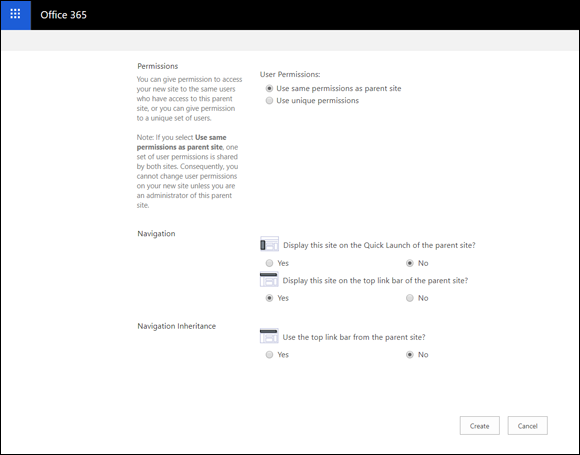
FIGURE 5-11: Setting permssions in the New SharePoint Site screen.
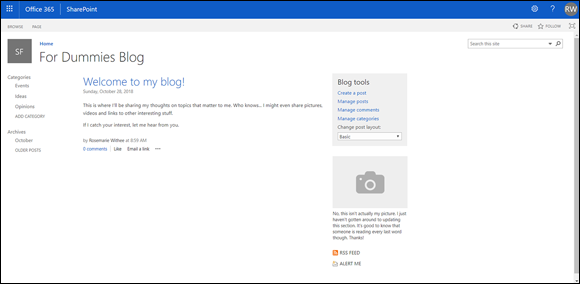
FIGURE 5-12: A new SharePoint site based on the Blog template.
In addition to creating a subsite you can create a parent site called a Site Collection. To do that, you need to go into the administrative interface of Office 365. We cover how to create a Site Collection you can use as a client portal in Chapter 19.
Create a site from the SharePoint Mobile App
To create a new site using the SharePoint Mobile App, follow these steps:
- Open the SharePoint Mobile App on your smartphone or tablet.
- Tap the hamburger menu in the top-left corner to open the navigation window and tap Site Contents.
- On the Site Contents screen, tap the plus (+) icon and choose Subsite, as shown in Figure 5-13.
- Fill in the title, URL, permissions, and navigation information for your new site (as described in the previous section for creating a site using your web browser) and click Create.
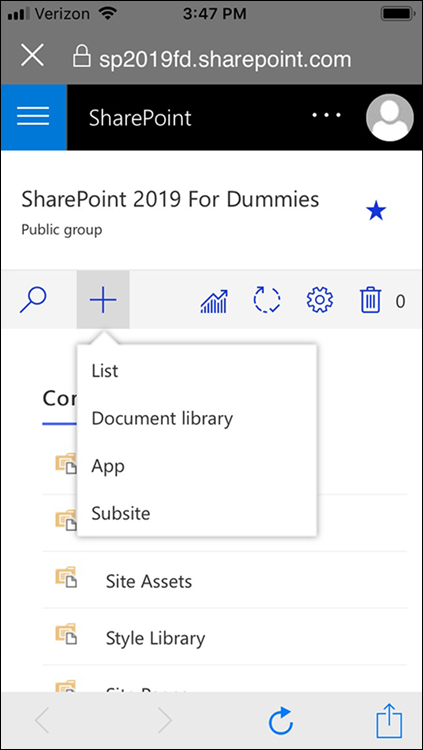
FIGURE 5-13: Creating a site in the SharePoint Mobile App on an iPhone.
 Every SharePoint site is contained within another SharePoint site in a hierarchy. At the top of the hierarchy is a special type of site called a site collection. Creating and administering a site collection takes special permissions. Every site within the site collection is called a subsite. Both types of websites are often just referred to as a website or site. The site you just created is a subsite of whatever site you were in when you created it. There are really no differences between using a site that is a site collection and a site that is a subsite. To users, both types of sites look and act the same. The differences lie in the navigation, security settings, and features. (The differences between administering a subsite and a site collection are discussed in Chapters 18 and 19.)
Requesting a SharePoint Site
If you aren’t a site administrator, you won’t have permissions to create a new SharePoint site. In this case, you need to request one. Most organizations have a process for requesting a team site. For example, you might send an email request to the SharePoint administrator or fill out a form.
Whatever you have to do to get your own SharePoint team site in your organization, get one. At a minimum, you need to provide your SharePoint administrator with the following information to get a team site:
- The site name: This is the friendly caption that appears in the header of your site and in any site directory where your site may be listed.
- The site template: The template determines what kind of site SharePoint makes for you. SharePoint includes dozens of predefined site templates. Your company may even create custom site templates. Tell your administrator you want a team site, which is the most popular of all the site templates.
- The web address or URL: This address is the unique location where your team site is hosted. In most organizations, all team sites are located off the same root web address. Some examples we’ve seen include
http://intranet.company.com/sites
http://portal/projectsites
http://sharepoint/sites
Your organization may also ask who has permission to access the site. By default, all SharePoint team sites have three basic kinds of users, which are called SharePoint groups:
- Visitors have Read Only permission. They can view your site without making any contributions.
- Members can participate in your team site by uploading and editing documents or adding tasks or other items.
- Owners have Full Control permission to customize the site. As the person requesting the team site, the SharePoint administrator likely assumes that you’re the proud owner unless you specifically tell him or her who owns the site.
You need to decide which users fit into these three SharePoint groups. SharePoint offers more than just these three groups, and you can create your own groups to meet your needs.
Your site’s users must be connected physically to your network or have permission from your network administrator to access your network remotely. Some companies set up a special kind of deployment for SharePoint, called an extranet, that provides a secure way for non-employees to log in to their SharePoint team sites without actually being on the internal company network.
Setting up SharePoint in an extranet environment can be done in lots of ways. Configuring a SharePoint extranet in your company’s network can be complex and is outside the scope of this book. However, the good news is that SharePoint Online, which is part of the Office 365 suite, eliminates many of the technical barriers to creating an extranet.
Grouping Sites with Hub Sites
SharePoint 2019 includes a new feature called Hub Sites, which enables you to group SharePoint sites together in a single unit called a hub site. In particular, with a hub site you can group navigation together to make sites easier to navigate as a group and create simple content rollups and search areas. If you have the need for more than one SharePoint site, and you need to group them together and have a single entry into all of the sites, a hub site is the way to go.
Hub sites are brand new in SharePoint Online, and as of this writing, you need to use PowerShell in order to create a hub site. Once the hub site is created, you can manage it through the web interface.
Microsoft provides detailed guidance on creating a hub site using PowerShell, but be warned. PowerShell is a command-line interface and is not for the faint of heart. If you want to read about creating a hub site using PowerShell, check out the Microsoft article “Set up your SharePoint hub site” on the Microsoft Office support site. The easiest way to find it is to go to support.office.com and search for the exact title.