Chapter 22
Finding What You Need with Search
IN THIS CHAPTER
 Searching for content in SharePoint
Refining results to narrow down content
Customizing SharePoint search capabilities
Creating your own Search Center site
SharePoint search provides a powerful and intuitive mechanism for finding content. Right out of the box, SharePoint lets users search for content and narrow down results. SharePoint search can be configured and fine-tuned to meet the needs of your organization. In this manner, you can think of search as a platform instead of a feature that is either on or off.
In this chapter, we walk you through how search works in SharePoint. You find out how to search for content and refine results. You then explore some of the configuration options available for search and discover how to create your own Search Center site.
Understanding How SharePoint Search Works
Search is an often-misunderstood feature in SharePoint. Many users simply think that search is either on or off. In fact, search can be configured and is very robust. For example, the results of a SharePoint search can be tweaked using query rules in order to provide the best possible results for users. Maybe a user searches for marketing, but what she is really looking for is the Marketing app, which contains all the official marketing documents for the organization. Using query rules, you can make the Marketing app show up at the top of the search results.
 One of the biggest improvements in search in SharePoint is the integration of FAST search. FAST was an Oslo, Norway–based company that Microsoft acquired. In previous versions of SharePoint, FAST search was a separate product. In modern SharePoint, the FAST technology is baked right into SharePoint. So when you search in SharePoint, you’re using FAST technology even if you don’t realize it.
Under the covers, SharePoint search is provided through the Search Service application. The Search Service application crawls through content and creates an index. The index is then used to provide results for a search query. (Service applications are administered in Central Administration.)
When a user types a term in the Search text box and presses Enter, the Search Service application consults the index and returns the results in a web page.
If you add a new document or item but can’t find it in a search result, then the search service has not yet crawled and indexed the content. The frequency of crawling is set by a farm administrator in Central Administration.
Searching for Content
Searching for content in SharePoint is straightforward. Every site contains a Search text box in the upper-left corner, as shown in Figure 22-1.
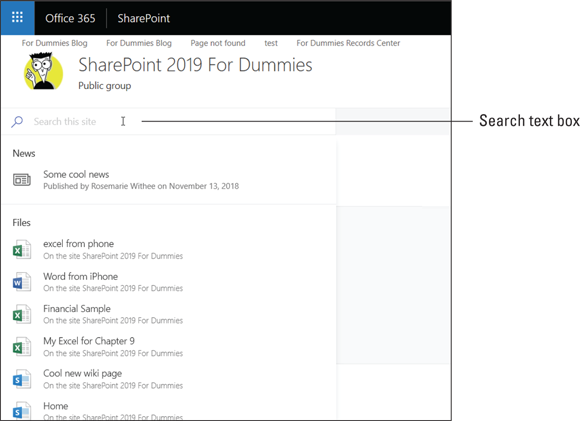
FIGURE 22-1: The Search text box on a SharePoint site.
To search for content, you simply type your term in the text box and click the magnifying glass to the left of the Search text box. The SharePoint search engine performs a query using your terms and displays the results.
Aside from simply typing in search terms, you can instruct the search engine to do special things in a number of ways when it performs the query. For example, you can use special characters and limit the search results based on properties in SharePoint.
Searching for a string using quotation marks
When you enter multiple terms in the Search text box, the SharePoint search engine looks through the content and returns instances that contain any of those words. If you want a phrase of two or more words (called a string), then you need to surround the phrase in quotation marks. For example, the following search query returns any content that contains either the word Annual or the word Report.
Annual Report
If you’re looking for content where the words are found together, then you would type the search string in quotation marks.
"Annual Report"
The search engine takes anything within the quotation marks and looks for that entire string in the content.
Wildcard searches
The asterisk character (*) can be used to represent a wildcard in a search. For example, maybe you need to find a document that you know begins with Quarter, but you can’t remember if it is Quarters or Quarterly. You could use the wildcard character to search for everything that begins with the word Quarter as follows:
Quarter*
This search would return everything that begins with the term Quarter, including Quarterly and Quarters.
Along the same lines, you might know that the first word is Quarterly, but you don’t know if the second word is Reports or Results. You would then use the quotation marks along with the wildcard character to tell the search engine that you want all content that contains the word Quarterly followed by any word that starts with the letter R. The query would be as follows:
"Quarterly R*"
The wildcard character is a very powerful way to expand your search results when you know only a piece of the puzzle instead of an exact term.
Including and excluding terms
You can instruct the search engine to only return results that include a certain word by using the + symbol. For example, you could write your search as:
Annual Reports +Marketing
The plus symbol says that any content that is returned must have the word Marketing in it, in addition to either the word Annual or the word Reports.
One problem with search is that you often get many more results than you can sift through. You can also exclude specific words to trim your search results. For example, you might be searching for product marketing content, but want to exclude any content that contains the word internal. You could write your search as follows:
"Product Marketing" -internal
The search engine then returns all content that contains either the words Product or Marketing and removes any content that also contains the word internal.
Building compound search queries using Boolean operators
Building compound search queries involves multiple search expressions. You use the Boolean operators to string expressions together into compound queries.
The Boolean operators consist of the following:
- AND: Only returns content when both statements are true.
- NOT: Only returns content where the statement is not true. This is the same thing as using the minus sign, as described in the previous section.
- OR: Returns content when one or more of the statements are true.
 Typing two words in the Search text box is the same thing as typing the first word followed by OR and then typing the second word. Where Boolean operators become valuable is when they are used with parentheses. Boolean operators are often used in combination with parentheses in order to let the search engine know how to group the query statements, as described in the next section.
Getting fancy with the parentheses
The parentheses characters, ( and ), are used to build compound search queries that use multiple expressions. For example, you might want to search for two key words and narrow the results down by one type of property or another. How would you write all this together in a search term? Wouldn’t the search engine get confused? Well, you use parentheses to tell the search engine exactly what you want it to do and when. For example, say you want to search for any content that has the string For Dummies or contains the word Reports. You would write this query as:
"For Dummies" OR Reports
Now say you also want the query to also only show content where the location property of the content is Pacific Northwest or the author is Rosemarie Withee. You use parentheses to combine these two aspects:
("For Dummies" OR Reports) AND (location:"Pacific
Northwest" OR author:"Rosemarie Withee")
Note that when you actually type a long query, it will all be on one line in the Search text box. (The margins in this book required a line break.) When you enter a query into the Search text box, don’t press Enter until you’re ready to execute your search. Hitting the Enter key is the same as clicking the magnifying glass.
Finding terms in proximity
You sometimes may need to find content where you know two words are near each other but not necessarily right next to each other. For example, take a look at the following sentence:
The sales figures for China are excellent.
This sentence contains the words sales and China in close proximity. If you were just to type sales China in the Search text box, you would surely get this content, but you also might get a ton of other, irrelevant content. You could find the result you’re looking for using the NEAR operator as follows:
"sales" NEAR(5) "China"
The number in the parentheses lets the NEAR operator know that you want to only turn results where the words are within five words of each other. The number is not required, however. You could just as easily write the query:
"sales" NEAR "China"
When you do not specify the number of words, the search engine uses eight words as a default. That is, the words are considered near if they are within eight words of each other.
You might come across a scenario where it isn’t enough if two terms are near each other, but they should also appear in a particular order. For example, you might want to only return results were the word sales is followed by the word China within a certain number of words. The Boolean operator that makes this possible is ONEAR.
The ONEAR operator works just like the NEAR operator; however, it assumes an order. The following query tells the search engine to only return content where the word sales is followed by the word China within five words.
"sales" ONEAR(5) "China"
Same meaning, different terms
Did you watch the TV, telly, or television? Did you go to the theater or theatre? Well, you could watch or attend either and it would all mean the same thing. Synonyms are easy for humans to understand. So easy, in fact, that we don’t pay many of the obvious ones much thought. Have you ever heard someone answer the question by saying he doesn’t watch television but watches TV? If only computers could be so smart.
The WORDS operator is used to let the search engine know when two words mean the same thing. For example, if you’re looking for all content that references California, you could write the query as follows:
WORDS(CA, California)
The result is that the search engine knows CA and California mean the same thing and returns the results accordingly. This begs the question, why not just type the two words in the Search text box? The answer is in the ranking of the results. If the search engine knows these words mean the same thing, then it will return results accordingly. If it doesn’t know this, then it might return content that contains both terms California and CA at the top of the list but have more relevant content that only contains the word CA farther down the list. If you use the WORDS operator, the search engine knows that these words mean the same and will provide you the best matches in the results.
Viewing and Refining Search Results
After a query is run, you are presented with the results page, as shown in Figure 22-2.
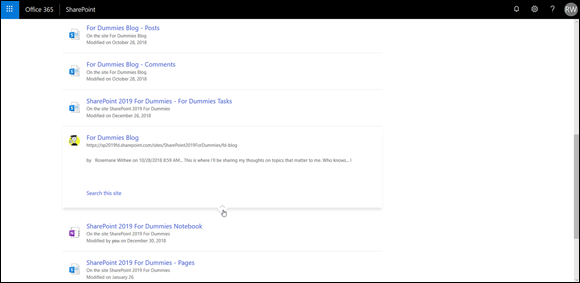
FIGURE 22-2: The search results page.
The results page has a lot going on, but it’s mostly intuitive. When you hover the mouse cursor over a search result, you see an icon that allows you to expand that result and see a preview of the content and relevant information about the type of content. In Figure 22-2, you can see that the result is a SharePoint site, while in Figure 22-3 the result is an Office Word document.
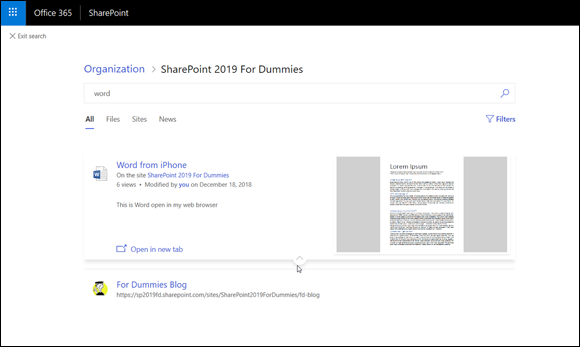
FIGURE 22-3: An Office Word document in the search results page.
The left side of the page includes refiners for narrowing down the results. You can click a particular type of content, click a particular author, or narrow the results based on the date the content was modified.
We find narrowing down content based on the last modified date to be an extremely useful feature because stale content can be a real problem in search results.
Making Search Your Users’ Best Friend
Finding the right content can be an exercise in frustration. Companies like Google were founded on the basis of indexing the Internet and providing access through search. Before Google, the Internet was organized into pockets of content on services such as AOL. After Google roared onto the scene, you could just browse to www.google.com and type in what you were looking for in the Search text box, and presto, it was usually right there in the first few pages of results. How did Google do it? It used specialized algorithms to index all the content on the Internet.
Search has come a long way since the early days of Google (though Google still dominates). SharePoint search is a platform designed to let your users find content in, and outside, of your SharePoint environment. Right out of the box, SharePoint indexes content in your SharePoint sites and returns the results. Many organizations don’t take search any further than the out-of-box experience, but they should.
As a site administrator, you can tweak the SharePoint search results based on the nuances of your company. For example, maybe you have a site for call center representatives. You know they’re always searching for product documentation, so you don’t want the official product documentation sites to appear mixed down in with the rest of the content that just happens to mention the products. You can configure SharePoint search to promote the official pages above other pages. You can even create related searches that will show up right next to the search results that users see. All of this is made possible using query rules.
A query rule is a rule that SharePoint search uses when processing a search query. Well, that seems fairly obvious by the name. In other words, a query rule allows you, as a site administrator, the ability to instruct the search engine how to respond to certain queries.
The search query functionality provides the same result as the Best Bets functionality of previous SharePoint versions. The Best Bets functionality has been extended to include related search blocks and result ranking. The entire feature set is now made possible in search queries.
Here’s an example to help you understand how a query rule works. This example consists of two parts. The first is that you want a Marketing app to show up whenever someone searches for the words marketing or sales. In this example, the Marketing app is a library that contains all the sanctioned sales and marketing material of the organization. The second part is that you want a result block added to the results whenever someone searches for marketing or sales. A results block is just a parallel query of your choosing that will show up in the search results.
To promote the Marketing app whenever a person searches for the words marketing or sales, follow these steps:
Navigate to the Site Settings page by the Settings gear icon in the top right of the screen and selecting Site Contents, and then click the Site Settings button.
The Site Settings page appears.
In the Search section, click the Query Rules link.
The Manage Query Rules page appears.
If you’re a site collection administrator, you also see the Search Query Rules link in the Site Collection Administration section of the Site Settings page. The difference between these two Query Rules settings is that one affects only the site, and the other affects every site in the entire site collection. Because in this example, you only want to build the query for your particular site, click the Query Rules link in the Search section of the Site Settings page.
Click the Result Source drop-down list and select Local SharePoint Results (System), as shown in Figure 22-4.
The Query Rules load for the Local SharePoint Results source.
The Result Source drop-down list enables you to set the context of the query rule you’re creating. Notice that there are many different result source options. These allow you to create finely tuned query rules. For example, you might want to create a rule for people search or conversations. In this example, you want only results for the local SharePoint site, so you choose Local SharePoint Results (System).
Click the New Query Rule button.
The Add Query Rule page is displayed.
Enter a name for the rule in the Name text box, and then provide the search terms marketing and sales with a semicolon as a separator in the Search Term text box.
The exact text you should type is
marketing; salesClick the Add Promoted Result link.
The Add Promoted Result dialog box is displayed, as shown in Figure 22-5.
A promoted result is the same as a Best Bet in previous versions of SharePoint. When someone searches for the exact words marketing or sales, the promoted result appears at the top of the results page.
Enter a title for your promoted result in the Title text box, provide the URL to the desired content in the URL text box, and type a description of the promoted result in the Description text box.
In this example, we typed Promoted Result for Sales Example in the Title text box. The Sales app is an app created from the Document Library App template with the name Sales.
- Click Save to save the promoted result to the query rule.
Click the Add Result Block link to add a related search to the results of a search that uses the specified words (marketing or sales in this example).
The Add Result Block dialog box is displayed, as shown in Figure 22-6.
In the Title text box, enter the title for the result block.
The default is to show the search terms that were used for the result block.
In the Configure Query text box, enter the search terms you want to use for the result block.
Think of these terms as if you were searching the SharePoint site and wanted to include this second search in a search for marketing or sales. In this example, we use the default which is the subject terms, which will return all content with this exact string sales or marketing.
- Click OK to save the result block, and then click Save to save the query rule.
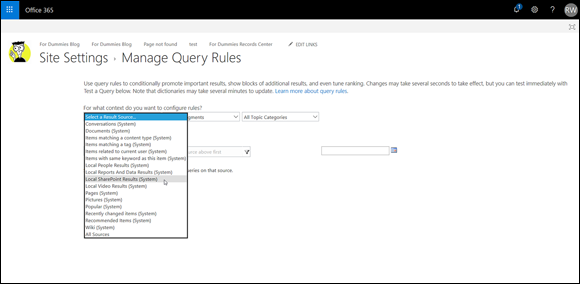
FIGURE 22-4: Selecting Local SharePoint Results from the Manage Query Rules page.
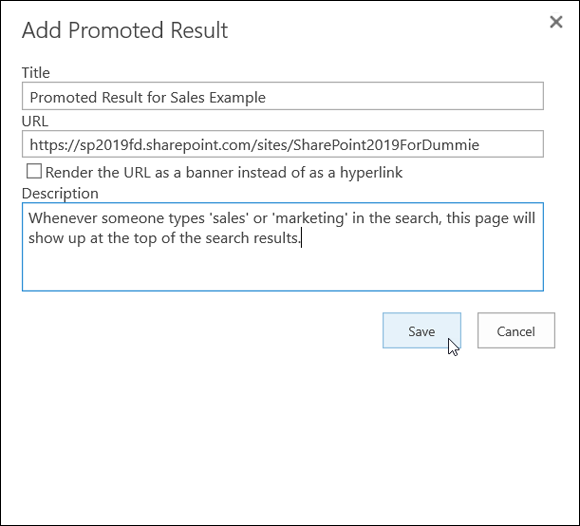
FIGURE 22-5: The Add Promoted Result dialog box.
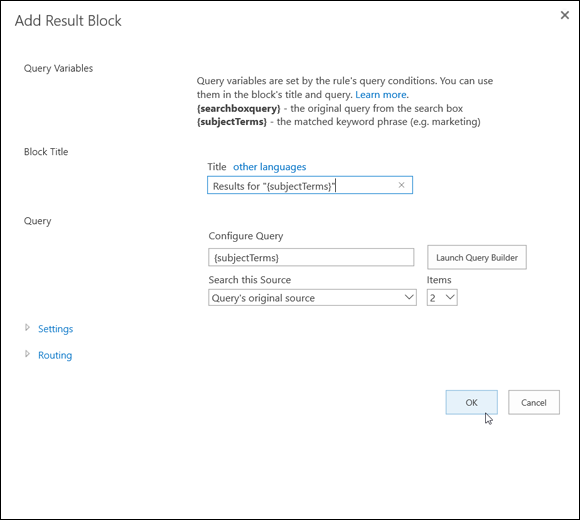
FIGURE 22-6: The Add Result Block dialog box.
Now when a user types the search term marketing or sales into the Search text box for the site, she sees a promoted Marketing app at the top of the page and the result block for a parallel search with the words “Portal Integrators Sales.” Figure 22-7 shows the result.
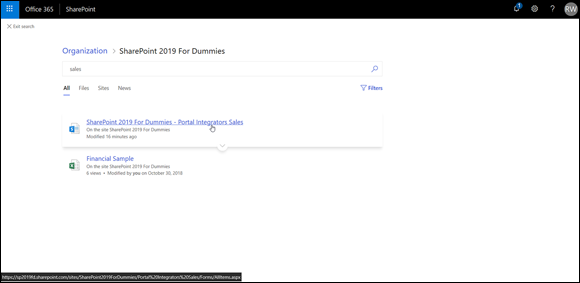
FIGURE 22-7: The search results page with a marketing/sales query rule.
The example only covers a small portion of the possibilities with query rules. We recommend playing around with them and tweaking them to provide just the right results for your users. As users begin to search on the site, you can see what terms they type in the Search text box and adapt the query rules to suit their needs. From your users’ perspectives, the search will get better and better as time progresses, even if you’re the wizard behind the curtain pulling the strings to make it happen.
Search results don’t appear immediately after you make a change. In order to see the change, you need to wait for the search engine to reindex the content in the site. Indexing just means looking through all the content and prepping it for search results accordingly. You can force the site to start reindexing by going to Site Settings, opening the Search and Offline Availability page, and then clicking the Reindex Site button.
Removing Content from Search Results
By default, items and documents in apps appear in search results. You may not want these items to appear in search results. To keep items and documents in apps out of search results, follow these steps:
Navigate to the app that you want to remove from search by clicking the Settings gear icon and choosing Site Contents.
You see a list of all apps.
Open the app settings page by clicking the gear icon again and clicking List Settings or Library Settings.
The App Settings page appears.
Click the Advanced Settings link in the General Settings section.
The Advanced Settings page appears.
- In the Search section, select the No radio button, as shown in Figure 22-8.
Click OK to save the settings.
The content of the app will not be indexed the next time the search engine indexes content.
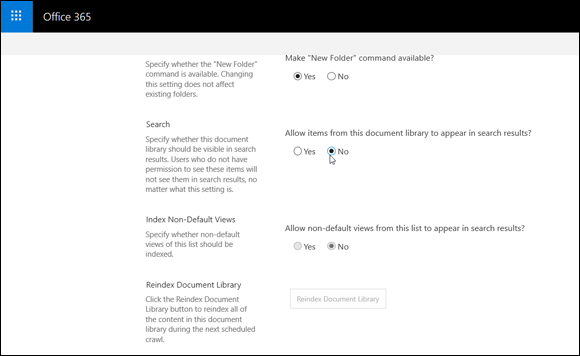
FIGURE 22-8: Removing the contents of an app from SharePoint search results.
You can view which properties are searched by clicking the Schema link in the Search section of the Site Settings page. The Search column shows whether the property is used in building the search index.
The Search Service Application administrator can also remove specific results from the search index or results. This is accomplished in the Search Service Application Management page. Click the Crawl Log, find the result to remove, click the ellipsis button for the item, and choose Remove the Item from the Index. Likewise, a URL can be removed from the results by clicking the Search Result Removal page in the Queries and Results section of the Search Service Application management page in Central Administration and entering the URL that should be removed from the search result. You can find the result to remove by clicking the URL view and then clicking the arrow to choose the Remove the Item from the Index link.
Reviewing Search Analytics
SharePoint provides a number of usage reports for search. These include reports such as Number of Queries, Top Queries, Abandoned Queries, No Result Queries, and Query Rule Usage. The good news is that the reports are based in Excel, so you can download them, open them in Excel, and use the data to present in nice graphs for executives. The reports can be found in the Search Service Application in Central Administration. Click the Usage Reports link in the Diagnostics section.
Note: You must have access to Central Administration and be a Search Service Application administrator to access these search usage reports.
In addition to the search usage reports, you can also check out the view usage for content in SharePoint to help you refine your search queries. You access the view usage statistics by clicking the Most Popular Items button on the List or Library tab of an app.
Adding a Search Center Site
You can configure search for your site and settings at the site collection level and point results to a specific Search Center site. A Search Center site is a SharePoint site that has been created using a search template. By creating a Search Center site, you have the ability to customize it for your particular needs.
SharePoint provides two site templates that are built for delivering search results. You can use these templates to create a branded search experience or to customize how results appear. The Search Center site templates are:
- Basic Search Center: This template delivers a stripped-down search experience in one page. This site template uses Web Part pages and is essentially a team site specialized for search.
- Enterprise Search Center: This template provides multiple pages for displaying search results. This site template uses publishing pages, which makes it easier to brand and customize than a page based on the Basic Search Center template.
Follow the steps in Chapter 5 to create a new site, and choose one of the Search Center templates. You will find them on the Enterprise tab, as shown in Figure 22-9.
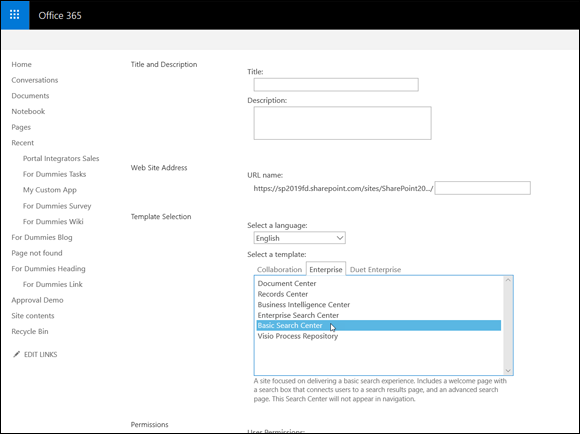
FIGURE 22-9: Selecting a Search Center template when creating a new site.
To configure your site collection to use your Search Center site:
Click the Settings gear icon and choose Site Contents and then click the Site Settings button that appears in the ribbon.
The Site Settings page appears.
In the Site Collection Administration section, click the Search Settings link.
The Search Settings page appears, as shown in Figure 22-10.
Enter the URL of the Search Center site in the Search Center URL text box.
Your search center doesn’t have to be in the same site collection as the sites that are using it for search. You can create a new site collection using one of the Search Center templates and configure multiple site collections to use that same search center.
Click OK to save the settings.
After making the change, you need to wait up to 30 minutes before the change is reflected in search.
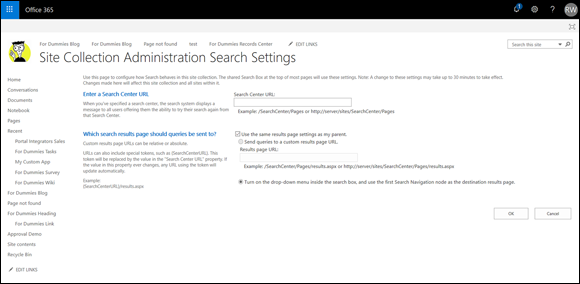
FIGURE 22-10: Configure search settings.
After the Search Center site is in place and configured in Search Settings, all results are directed to the search site. It takes some time for the changes to take effect, however, because a SharePoint scheduled process has to update the configuration for the site. If you don’t see your changes right away, check back an hour later. You can then develop the search site to meet the specific needs of your organization.
 The settings we describe in this section set the default experience for all Search text boxes in your site. Individual Search text boxes found on the master page, in page layouts, or placed directly on web pages can be configured to use the default settings or have their own custom settings.
You aren’t restricted to using the Search Web Parts in the search center. You can create your own search results page and add the Search Web Parts to the page.