CHAPTER 24
Planting
Returning complex native plant communities to the forest — and with them native wildlife — is usually the primary goal of those interested in restoring the landscape. Yet simply replanting a diversity of species on a site in which they may have thrived in the past is often doomed to failure. Eager volunteers may plant hundreds of wildflowers in an urban woodland fragment, only to find that even with vigorous maintenance almost nothing is left after a few years. Elsewhere rare plants, rescued and relocated from a development site to a nature preserve, seem to thrive for a season or two and then suddenly disappear for reasons not understood.
The mortality rate for forest transplants can often be very high, above 90 percent, so assessing what is really feasible in any given situation is especially important. People often want to start replanting prematurely, before disturbance is controlled, planting woodland wildflowers, for example, before the litter layer is stable enough. In a relatively degraded area, efforts to reestablish conservative species may be futile until a stable landscape matrix is established. Seedling survival rates are also better where weedy competition is under control. Good managers learn to “read” the landscape, to take the cues about what approaches are likely to work well in the future, by monitoring natural analogs to the landscape on reference sites and recording site conditions, stabilizing erosion, and removing exotics in concert with replanting. If these tasks are done at the beginning, the chances of reestablishing indigenous species are certainly better.
Before embarking upon a planting program, the restoration team should address the issue of how to obtain plants. Any serious restoration will require establishing a propagation program, either independently or in cooperation with another agency, organization, or specialized nursery. Commercial nurseries may also be important to your effort. You must evaluate the sources of the plant propagules as well as the suitability of their production techniques — for example, local varieties produced by seed versus vegetative monocultures and grafted plants. If you are fortunate, you may find a local naturalist or botanist who has been collecting and propagating local flora and will be willing to provide propagules for your effort since no major seed producers grow local varieties of native meadow grasses and wildflowers of the eastern forest. All “regional” mixes of meadow seed, for example, by definition, consist of nonlocal subspecies, which may threaten the genetic identity of local ecotypes. Another key question is whether or not you will use material produced by seed or vegetative means, as well as what propagules should be locally collected and according to what protocols.
A variety of different planting techniques, each with different opportunities and drawbacks, can be used in wooded landscapes and should be considered in developing replanting strategies. Sometimes the most effective way to plant is to release the seeds that are already on the site, such as with prescribed burning and exotics removal or even by shaking the seedpods to distribute their contents, rather than to introduce propagules from elsewhere. For most sites a combination of approaches is the most useful. This chapter describes a variety of strategies:
- Planting methods and strategies
- Fertilizing and pruning
- Propagation, transplanting, and collecting
- Exclosures
Guidelines for Reestablishing a Forest’s Structure and Composition
A forest often dies from the ground up. The smaller plants, both woody and herbaceous, are the most vulnerable. The canopy may be the last to go, declining for years above a trampled, compacted, and eroded ground.
Restoration too, begins on the ground, with new recruitment. Many herbaceous species, for example, will not find appropriate habitat until the forest floor is alive again. Where the soil has been severely disturbed, it may be a very long time before conditions suitable for many species develop. Here are several guidelines for reestablishing forest layers:
• Watch where reproduction is occurring naturally — these are places of opportunity in the landscape.
Under relatively stable conditions, the gaps in a forest created by the loss of a large tree (or trees) are usually the places where most of the expansion of existing plants and the recruitment of new species is occurring. In a more disturbed landscape this effect may be due to edges and clearings newly created by human activities. The most immediate beneficiaries of the space are the already-present smaller trees that are “released” to grow rapidly into the gap, but new species also appear. Some plants, such as tulip poplar and black birch, colonize so well under these conditions that they are called “gap-phase species.” These same conditions offer the restorationist somewhat enhanced chances of establishing new plants in the wild. Exotics also often benefit from gaps, so expect some new problems to arise.
• Look for analogous natural conditions and mimic their planting patterns. Plant in patterns you have observed on the site or in analogous habitats, which are not evenly spaced as in an orchard or plantation. Planting patterns found in nature reflect important functions; small trees growing in clumps, for example, protect one another and are less vulnerable than a single stem. Let the site inform you about how to plant, based on its soils, aspect, drainage, moisture, successional status, and associates — that is, species commonly found together under natural conditions.
• The reintroduction of herbaceous plants is especially difficult, so expect some mortality and start with small-scale experiments.
Species disseminated by birds and wind, including most trees and many shrubs, reestablish relatively rapidly. Other means of dissemination, such as ants, are far less effective in the fragmented forest. Seek help from an invertebrate specialist to develop an ant and/or beetle restoration program. Consider planting on sites that will get ongoing maintenance, and, of course, monitor what happens. You may need to establish fairly large populations before there are enough individual plants as food sources to support ant colonies, for example.
• Periodically reassess the need to plant at all based on changes that have occurred over time and the rate at which the landscape is recovering or deteriorating.
As a general rule, it is preferable to start with exotics removal and stabilization of bare soil and allow for some natural recruitment before determining which species to consider planting. There is little need to plant species that are reproducing locally; they will develop more rapidly than transplants anyway. Nevertheless, achieving diversity may still depend upon your introduction of an array of potential propagules. Use the restoration model site and historic records (see Chapter 21, “Monitoring and Management”) to determine which species that are not now part of your landscape are most characteristic and under what conditions they would likely reoccur. Add propagules incrementally to restore some of the range of recruitment opportunities that prevailed in the past. Some species will require repeated introductions to establish themselves.
• Protect and preserve the genetic raw materials of the local landscape.
Learn how to propagate local subspecies responsibly. Study the plant population genetics of your landscape to determine local genotypes and ecotypes and the level of local adaptation. Develop an approach and guidelines to reintroduce plants in the landscape that conserve genetic richness for adaptation and evolution. Recognize the role we play as consumers and distributors of plants and seeds and other organisms in creating the problems of blight and disease, as well as by introducing hybrids and varieties that trigger competition for land area that decimates local subspecies. The best way to produce sustainable landscapes is to patronize responsible producers and support local propagators and regional nurseries that practice sustainable horticulture.
For a set of Guidelines for Gene Conservation through Propagating and Procuring Plants for Restoration, contact Marylee Guinon at Sycamore Associates, 910 Mountain View Drive, Lafayette, CA 94549, 510-284-1766.
Planting Methods and Strategies
Techniques for reintroducing native plants are developing rapidly as more and more people become involved in restoration. The developers of new tools and techniques are moving away from large plants and heavy equipment to lightweight materials that can be carried in by backpack and to smaller, more agile equipment that can pick its way across vulnerable terrain. New production techniques offer smaller, readily transplantable plants whose survival is enhanced by mycorrhizal inoculations, water-holding gels, and vigorous root systems. New products can be used to protect vulnerable new plants until they become well established.
The production method and size of the plant determine what planting methods are suitable. Large-rooted specimen plants are usually transplanted with a large volume of soil; smaller specimens of many woody species can be transplanted without soil.
Under woodland conditions consider planting woody seedlings in and around stumps and logs. This approach allows the least possible soil disturbance and enhances seedling survival, especially during dry spells, because the spongy log may hold water far longer than surface soils. In addition to stumps, you can plant just above check logs to give the plant both protection as well as a better supply of moisture and nutrients. These methods are the most appropriate overall for establishing the widest array of species under forested conditions. Other good sites are the clefts of roots at the base of trees, where there is minimal competition from tree roots and additional moisture from stem flow, that is, water flowing down the trunk.
When trying to establish forest in expansive, open conditions, try and evaluate several different sizes of plants to increase survival rates. Mixed-size plantings are less vulnerable to exceptional climatic conditions, which might eliminate an entire season of work if only one method is employed. Use mixed species as well, including both canopy and understory species. Plant in loose clumps and gaps — this technique is called “nucleation” — rather than in rows plantation-style. More random placement makes the woodland look more natural in appearance and varies the conditions available for plant succession.
Recommended stocking rates — the density of planting — vary widely based on available budget for both plants and long-term maintenance. Seedlings are often spaced as close as 3 feet and as far as 8 feet apart with good results (Figures 24.1 and 24.2). Whips — young trees — may be from 6 to 12 feet apart. Consider these to be average densities rather than recommended spacing. The goal is to establish a dense and layered forest of mixed species rather than to space each tree for optimal specimen growth. Trees planted in mixed clusters in variably spaced patches have a higher survival rate than those planted on equally spaced centers or than monospecific plantings.
Mulch plants with a thin layer of woodchips. If possible, water newly planted trees during severe dry spells. An occasional deep soak is better than a frequent light sprinkling. Of course, the first watering may have to be the last, but your chances for success go up with limited supplemental watering during the first season.

Figure 24.1. Planting clusters of native trees was the first step in restoring this site.
Figure 24.2. Mixed-species groves now stabilize ground once eroded by trampling,
Balled-and-Burlapped Plants
Balled-and-burlapped (B & B) plants are transplanted in a ball of soil wrapped in burlap. Today, especially larger specimens may also be contained in a wire basket that holds the rootball intact. B & B is the most common planting method for larger trees and specimen shrubs in the Northeast. Indeed, many native species with taproots that do not transplant well by means of B & B are largely unavailable in the trade. Transplanting with this method is usually successful because it sustains enough of the root system for the plant to survive.
The Association of American Nurserymen has developed recommended minimum standards for B & B plants. Do not be tempted by bargain prices offered for a larger plant than specified if it comes with a smaller rootball. Do not accept a plant wrapped in plastic fabric and twine instead of biodegradable burlap and jute twine. The rootball should be completely intact. Cracks in the rootball mean damage to the root system. Reject any damaged rootballs. Dig plants when dormant. Late digging, after the buds have started to swell in the spring, substantially reduces the likelihood of survival, although some species can be dug when in full leaf if they are well maintained before and after planting.
Although many species are available in B & B form, especially in larger sizes, the size and weight of the rootball are major limiting factors in woodland restoration. Even a relatively small rootball is difficult for two people to carry any distance, which places severe restrictions on the use of B & B plant material in woodland areas where vehicular access is undesirable or unavailable. In addition, B & B plants are expensive, further limiting their use in restoration. The large excavation required for their planting adversely affects adjacent plants and entails extensive soil disturbance. Current best practice advocates as wide a hole as possible, especially in the first foot of soil, to encourage roots to expand outward. This convention, however, is inappropriate in all forests, except the most disturbed sites, where soil reworking is necessary for other reasons. Large, well-developed specimens rarely do well planted under canopy cover and may recover poorly from transplant shock in the shade.
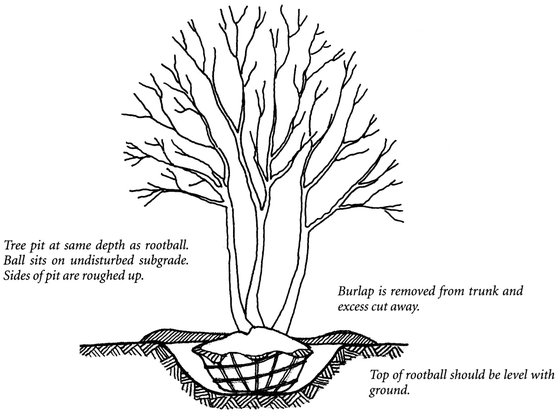
Figure 24.3. Balled-and-burlapped tree placed in planting pit.
When planting B & B trees (Figure 24.3), dig the hole slightly wider at the top than the bottom to ensure that you can backfill without leaving air pockets. Dig the hole no deeper than is required to accommodate the depth of the ball. A deeper hole does not benefit the plant and may jeopardize it should settlement occur. The top of the rootball should be at the same elevation as it was before the plant was dug, or slightly higher if the soils on site are wetter than in the nursery.
Position the tree so that it is generally perpendicular to the ground, or leaning in the same direction as adjacent trees. Leave the biodegradable burlap wrap and twine in place, cutting away only excess wrappings. Do not dislodge the rootball in any way. Where clay soils predominate, use a shovel or pick to scarify edges of the pit to break through the impermeable layer of soil to minimize the likelihood of glazing and ensure better root penetration beyond the soil of the rootball. Backfill around the root area and gently tamp the soil to prevent major air pockets, but do not overcompact. Do not use a backfill mix or modify the native soil to which the plant must adjust over time. Watering the plant with a hose at a slow dribble helps settle the soil. Prune only broken, damaged, or wilted branches after planting.
Some planting recommendations suggest mounding the soil at the outer edge of the planting ring to form a water-holding berm; however, this approach may encourage root growth to remain within the berm, close to the tree, as if the plant were still confined to its B & B state. In most instances a ring of woody mulch over the rootball is adequate to conserve moisture. Do not mound mulch up around the trunk of the tree. It will damage the bark and encourage insects and disease. This common landscape practice has shortened the life of many plants.
Movement is necessary for building the trunk’s strength. Swaying actually stimulates root growth, so not staking the plant is really best. In extreme conditions, use a flexible stake so that the trunk will sway in the wind. Remove the stake and wire after one year or less. Leaving wire or string around the tree can kill it. Do not wrap the trunk with tree wrap or protective tape, even to discourage pests. Tree bark needs air and sunlight in order to build a healthy protective sheath. The wrap slows the tree’s ability to adapt to the site and may in fact provide a cozy home for insects.
One exception to the no-wrap/no-stake guideline occurs in areas where theft or vandalism of smaller trees is predictable. To prevent theft, you can secure saplings with flexible adhesive wrap to a stake driven at least 12 to 18 inches into subsoil below the hole you’ve dug. The new plant may, however, need protection from browsing, such as deer fencing. Other methods for protecting new plants are described later in this chapter.
Container-Grown Plants
You can purchase many smaller plants, both herbaceous and woody, in containers ranging from plugs to several gallons in size. Although the plants may be smaller than those available in balled-and-burlapped form, many more species are commercially available. The soil in the containers may make them heavy; however, because the plants are often small, they are generally not difficult to transport to the planting site.
Container growing is ideal for many native species that are difficult to transplant in B & B form, such as hickories, sassafras, sumac, and black gum, as well as herbaceous species (Figure 24.4). To add to your planting stock, you might consider having volunteers start and grow native plants in containers from seed. When planting in containers, repot frequently to allow healthy, rather than girdled or pot-bound, root systems to grow. Planting times are also broader because the plants are less subject to moisture stress from loss of roots in the transplanting process than with B & B.
Figure 24.4. A wide range of species and sizes of plants may be purchased in containers from local propagators.
The shoot growth and root and soil mass also contribute to site stabilizations on steep slopes (Figure 24.5). The most difficult task in transplanting container-grown plants is determining at what stage a new seedling is suitable for planting out in the field. Younger specimens are often better in woodlands than older ones; an older plant might have difficulty adapting to the sudden change from the nursery to the forest. Plant very small sizes only in the springtime; they are too vulnerable to frost-heaving in the fall.
When purchasing container-grown plants, inspect the bottoms of the containers to see if the plants have outgrown them, rejecting specimens with overgrown, kinked, coiled, or girdled roots; they will not develop properly after planting.
Transplanting container-grown plants into the ground needs to be done with care to avoid damaging roots. When planting, carefully remove the plant from its container by gently upending the container or cutting it away from the soil, which should be held as a mass by the dense roots of the plant. If the soil is not held well by roots, the plant probably has not yet developed adequately. Be extremely careful when unpotting herbaceous plants or when examining their roots because they are much more sensitive to handling than woody species and more likely to be damaged. If a plant is very sensitive to handling, try soaking the pot inside a bucket overnight. Examine the sides of the root mass for roots that are J-shaped, kinked, or circling the pot and that could develop into girdling roots over time. If they are, the plant has poor survival prospects because these problems do not correct themselves. Pruning the plant’s roots in an attempt to correct these deficiencies in the field may expose the plant to soil-borne diseases.

Figure 24.5. Containerized plants hold well on steep slopes.
Set container-grown plants in a hole no deeper than, and only slightly wider than, the container. Leave only enough room to backfill properly, and water and mulch the plant, if possible. Water lightly in very dry conditions during the first growing season, but don’t overwater; the object is to ensure survival, not to weaken the plant for the long haul by accustoming it to a high level of maintenance.
Rootstocks, Corms, Rhizomes, and Bulbs
Some plants, such as ferns and many wetland species, are available as rootstocks, corms, or rhizomes. They may have specific planting requirements, such as a specified depth, and it may not be obvious which side is up, so obtain planting instructions from the supplier.
You can wrap wetland rootstocks in squares of burlap weighted with a large stone or two and then drop them into shallow water. The burlap affords some protection from waterfowl grazing (Figure 24.6), and the weight of the stone holds the propagule in place without digging a planting hole.
Bareroot Plants
Bareroot trees and shrubs are less expensive and lighter than B & B or container-grown plants because they are sold without soil. Dug when dormant, usually late fall or early spring, bareroot plants are kept in cold storage at temperatures just above freezing with a very high humidity until they are shipped. The bareroot plant usually arrives with its roots wrapped in moist straw inside a plastic bag.
Bareroot planting is a convenient method for planting large numbers of small trees (Figure 24.7) because they are easy to handle and readily available from nurseries. Increasingly they are sold at larger sizes, but an individual can still carry them without difficulty. Bareroot planting also entails far less soil disturbance than container or B & B planting. Not all species, however, are suitable for bareroot planting. Soft-rooted plants like magnolias are extremely difficult to handle in bareroot form, but different peoples’ experience and recommendations vary.
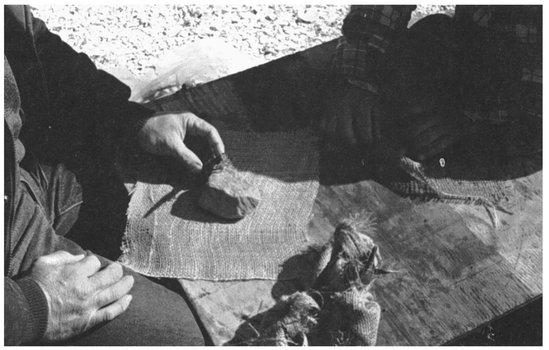
Figure 24.6. Wrapping wetland rootstocks in a square of burlap, weighted with a fist-size stone, allows you to simply drop them into shallow water, rather than trying to dig and plant them in muck.
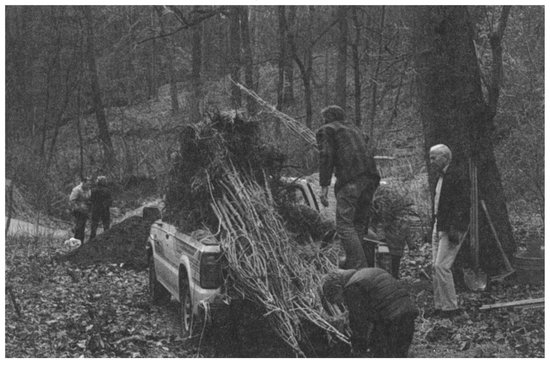
Figure 24.7. Bareroot plants are lightweight and easily carried on-site.
Bareroot planting times are restricted. Ideally, plant bareroot trees as soon as the ground can be worked to take advantage of cooler temperatures and damper soils. Do not plant bareroot material after the weather turns hot and dry. Expect high losses with bareroot trees if they are stored, shipped, or planted improperly. For best survival, try larger sizes (8 to 10 feet), planted early in the spring and watered through the first season, especially where browsing by deer is likely.
Upon arrival on the site, store bareroot trees in the shade and cover their roots with moist mulch, straw, or compost. Do not allow roots to dry out. Consider additional protective measures, such as a wetting solution that is mixed with water to form a gel thick enough to cling to the roots (Figure 24.8). Wetting agents retain many times their own weight of water. Before planting, clip only broken or damaged roots with a clean, sharp tool and dip the entire root system in the wetting solution to rehydrate the root system and to maintain an even moisture balance in the soil after planting.
For larger bareroot plants, greater than 1 inch in trunk diameter, dig a hole 6 inches larger than the size of the root system when it is spread out and about 18 inches deep (Figure 24.9). Leave rocks in the soil where they help improve drainage. Make a small, well-compacted mound of earth in the center of the hole and spread the roots over it. Position the tree so that its main stem is growing more or less straight up. Backfill soil around the roots. Tamp the soil evenly in layers to eliminate air pockets and poorly compacted areas.

Figure 24.8. Keep bareroot plants from drying out. A wetting gel that coats the roots before planting is helpful.
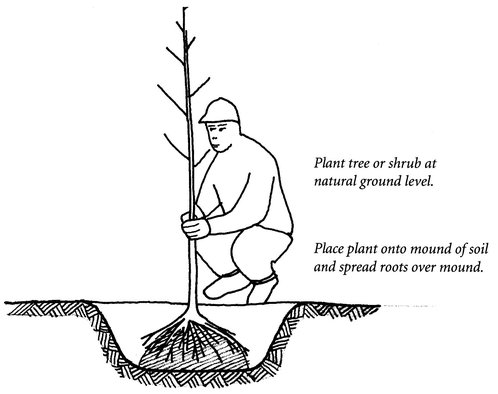
Figure 24.9. When planting bareroot, be sure to spread and press the roots around a mound of soil in the pit to ensure good soil and root contact and to eliminate air pockets.
Keep bareroot seedlings in a bag with wet straw or water until you can plant them; do not carry them to the site in your hand or they will dry out. To plant seedling- and sapling-size bareroot plants, use a planting bar or dibble bar to create a 12-inch V-shaped notch (Figure 24.10). Place the seedling upright about 1 inch deeper than in the nursery. After planting, tamp the soil firmly with your foot to prevent air pockets, but do not pound the soil. Water in well. One experienced volunteer can plant 500 to 700 seedlings a day. During dry spells, bareroot plants often develop slowly enough to survive conditions that would kill a B & B plant. Do not stake except in the most extreme conditions.
Cuttings
Cuttings are new plants developed from a vegetative part of the parent plant rather than from a seed. They are relatively small, lightweight, and easy to handle and may be planted before or after roots develop. Because they are produced by vegetative, rather than sexual, reproduction, their genetic diversity is limited to that of the parent stock. The plants produced are very uniform and therefore are often used in agriculture and in high-production horticulture to reproduce, for example, woody plants such as blueberries. Tissue culture, a form of cloning from selected cells, is a more intense vegetative process that utilizes parent material efficiently and generates high volumes of identical plants at relatively low cost.
Despite the limited genetic diversity, cuttings may be especially useful in situations where enough plants are needed to ensure a very dense cover very rapidly, such as for erosion control with soil bioengineering. Many woodland shrubs, such as blueberries and huckleberries, naturally spread vegetatively and may have very low seed viability, making them good candidates for establishment by cuttings. New technologies can speed up the process of establishment. For example, you can use vine cuttings that are rooted in growth chambers, then spread over the ground and watered temporarily in a rooting medium to create a bed of groundcover that otherwise would take years to establish. Variations on this method, although not yet perfected for forested conditions, hold promise for reintroducing finicky herbaceous species that also may benefit from additional care during an initial establishment period.
Many soil bioengineering techniques, including those described earlier for streambank stabilization, require cuttings to be planted directly in the field, before they have developed roots. These are useful planting techniques even where extra stabilization is not required and are easy to implement if source material is available nearby. They are most useful at edges and in open landscapes where rapid reforestation is desired. However, because these techniques rely on roots developing after planting, they must be used in areas of full sun exposure and so are of limited application under canopy cover. Currently, the diversity of species that may be used in this way is very restricted, although the list of suitable plants will certainly expand with more field trials. Typically, species that spread vegetatively as a common natural reproduction method, such as willows, shrub dogwoods, elderberries, and alders, are most suitable. You can harvest plant material from the site or nearby natural areas with minimal impact and with care.
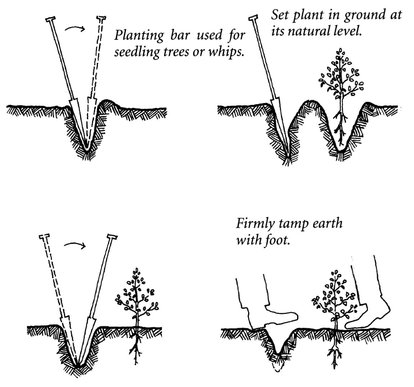
Figure 24.10. A planting bar eases the task of planting seedlings.
Squirrel-Cache Planting
Squirrel-cache planting is very simple in concept and practice: just place several seeds in the same hole. The multiple seedlings have safety in numbers; they also benefit one another by sharing shade to conserve moisture. In severe environments the cache planting method may make the difference between surviving and dying. One example is the black soils of many abandoned coal mines, where the temperature gets so high that seedlings easily die. With squirrel-cache planting, only a portion of each tree’s bark is exposed to heat damage, the outer edge rather than the entire circumference. In many cases all the seedlings survive where one would have failed.
Stump Planting
A seed that falls onto or gets taken to a rotting stump where there is the space and opportunity to grow as well as some protection from other already-established plants is lucky indeed. Mimic these conditions by directly planting seeds in stumps. Wait until the interior of the stump is spongy enough to hold moisture well and to embed the seed or seedling in the rotting wood.
Seedbed Preparation
Some seedbed preparation in woodlands is useful for fostering the germination of new seeds as well as seeds already in the soil. Seedbed preparation in woodlands is driven by the need to minimize damage to existing plants in the landscape. Plowing, disking, raking and other techniques often used for seeding are entirely inappropriate in woodlands.
Although minimizing soil disturbance is desirable, good soil and seed contact is necessary. Pull back small patches of the litter layer to expose areas of soil before seeding. Do not rototill or work the soil well. Simply press the seeds into the soil well and cover with only a minimal amount of litter.
Because sprouting may be improved with prescribed burning, research the fire history of your landscape to evaluate the possibility of incorporating prescribed burning into your seeding program. Where you cannot reintroduce fire as a large-scale management tool, you maybe able to mimic the conditions that occur after a fire to some extent. For example, you can use small-scale spot burns in small patches to create more favorable conditions for the germination of oaks, sassafras, and many woodland ephemerals. Exposing small areas of bare soil beneath ground litter and sprinkling the surface with very small amounts of lime and sand mimics postfire conditions to a degree. The result may well be dozens of oak seedlings appearing in a single season in a square-yard patch. Some herbaceous species do not establish well unless methods like these are used.
Protecting New Plants
New plants may need protection from browsing by deer, rabbits, and other wildlife. Saplings and larger trees may require either fencing or protective collars to protect their lower trunks from damage. You can make individual temporary tree fences from a variety of materials, such as old snow or silt fence. Commercial collar — a coiled strip of plastic that can be loosely wrapped around the trunk — also is available. Sizes range from tall enough to protect from deer browse and rubbing to short collars for use where only smaller mammals such as rabbits hinder establishment. You must remove both fencing and protective collars after a season or two, before they inhibit tree growth or fall apart. As always, evaluate any new product or procedure in the field before applying it on a large scale.
One currently popular method is to completely enclose smaller-size plants in a tube to protect both leaves and bark from browsing while also somewhat conserving moisture by creating greenhouse-like conditions within the tube. This interim level of protection gives the plant an opportunity to establish under difficult conditions. There are varied tube-type protectors on the market, and new ones appear frequently. They typically vary in strength from hard plastic to a thin film, in height from a few inches to 8 feet, and, of course, in cost and weight. Opacity is also variable; use the most transparent products available if they are to be used in woodland conditions. You must cover the top with screening if the sapling is too small to allow birds to escape after entering in search of insects. Remove tube-type protectors after no more than one year because the tree develops no strength when it is confined in one. If left in too long, a plant may simply flop over when the support is removed, just as if it had been staked too long. Despite the early growth spurt, many managers report difficulty in weaning plants from the tubes and continued dependency on staking. Because unprotected trees catch up in height with the assisted plants within a few years, it is probably preferable to find other ways to protect plants from browsing.
Avoid all such products when they are not truly needed. All entail extra cost as well as labor, and thus disturbance in the landscape. You may be able to accomplish an adequate degree of protection more simply. One group working in Wissahickon Park in Philadelphia noticed abundant tree seedlings in a patch of the invasive and thorny devil’s walkingstick in an area where deer had consumed most of them. The team removed some of the walkingstick to lessen competition with the seedlings but left enough to continue to deter deer. They then stuck the thorny stems they had removed upright in the ground around newly planted saplings to afford them better protection. In Central Park, one crew member “planted” dead brush upright in the landscape to discourage walking on top of new plants (Figure 24.11). In released meadows, herbaceous growth may be so dense that additional protection of woody plants is unnecessary. Plots at the Pennypark Ecological Restoration Trust, outside Philadelphia, suggest that woody seedings and saplings grown in sulfur-treated meadows may be less palatable to deer.
Fertilizing and Pruning
Fertilizing is not necessary or desirable except in the most extreme conditions. Do not consider fertilizing unless you have taken soil samples and have determined critical limiting factors that exceed the range of conditions to which local species are adapted.
Phosphorus is the nutrient most necessary during transplanting and may be somewhat limited where nitrogen loads are high. Nitrogen can have negative effects and should be avoided whenever possible. Where necessary, use a slow-release variety. Allow no fertilizer to come into contact with root systems. Mineral rock dust as an alternative to fertilizer is an option that merits further exploration.
Pruning should not be necessary except to remove broken and damaged or hazardous limbs. In general, wait at least a year before pruning to ensure that you remove only dead wood. The best time to prune trees is late winter or very early spring, when the plants are dormant and before buds swell and the sap begins to flow. Never leave stubs partway up the branch; cut off the whole branch instead. Never prune behind the branch’s bark ridge, the folded area of bark where the branch leaves the tree trunk or a large branch; this practice wounds the tree. Never top trees by completely severing the leader, the main upright branch, midway up the tree. Where a major limb is to be removed, locate the branch bark ridge; then stub cut the branch about 12 inches above the branch bark ridge so that the weight of the branch does not rip the final cut. Next, locate a point (A on Figure 24.12) at the crotch of the branch but outside the branch bark ridge. Locate a second point above the swelling where the branch meets the branch collar (B on Figure 24.12). Make the final cut at line AB. If the limb is large enough that tearing is a risk, use the three-cuts methods to prune. The first cut goes under the branch about a foot or so from the trunk. The second cut goes just beyond the first cut and starts from above. If the limb falls and the branch tears, the rip will stop at the first cut. The stub of the branch can be cut safely to the desired point with cut three.
Figure 24.11. Inconspicuous dead branches driven into the ground deter trampling around new plants in Central Park.
Alex Shigo has spent his life studying the nature of tree wounds and their effect over time on the plant. His books are singularly informative. A good introduction is A New Tree Biology: Facts, Photos, and Philosophies on Trees and Their Problems and Proper Care. It and other related publications are available from Shigo and Trees, Associates, 4 Denbow Road, Durham, NH 03824.
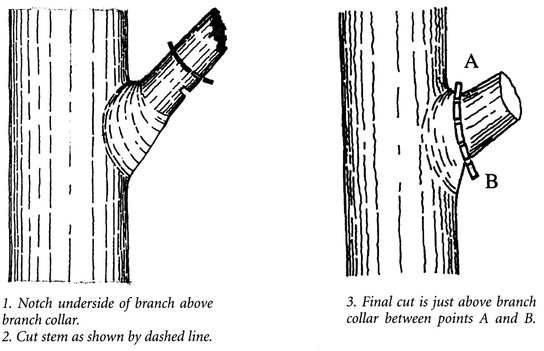
Figure 24.12. Pruning.
Propagation, Transplanting, and Collecting
Propagation, like other aspects of gardening, is part art, part science, and part joy. There is an incredible amount to be discovered about native species and their successful recruitment. The goal of these guidelines is only to give you some incentive to start. Start small. There is a lot of “feel” and experience to successful propagation. Take advantage of area horticulturists and spark their interest in the challenges of trying to propagate less-familiar native species. Volunteers with The Nature Conservancy in Chicago have demonstrated just how creative they can be at developing new methods suited to particular native species:
“Everyone loves to gather Indian grass,” says Steve Packard, “because it feels so good when it comes off. When it’s ripe, you just pull your hand up the stalk, and you have this big handful of seeds, and you dump them in the bag. With rattlesnake master, on the other hand, the seed is spiny and tough. One way to do it is to wear gloves and wrench the heads off. Later on, we developed better methods. With rattlesnake master, for instance, we cut the heads off with garden snippers and throw them in a box with a screen on the bottom. Someone rubs the heads, and the seeds separate and run through the screen, and you catch them in another box” (Stevens 1995, 54).
Collecting Seed
The following guidelines for seed collecting were taken from “Growing Pains: The Ethics of Collecting from the Wild,” by Sue McIninch (1993):
- Identify the plant before you take the seed. Make sure the plant is not a rare or endangered species.
- If the plant is on private property, ask permission from the owner of the property before collecting any seed from the plants. Landowners are generally responsive to such requests.
- NEVER take all of the seed, always leave some for natural dispersion. If the seed is a fruit or a pome and considered food for wildlife make sure you have left some for this purpose too.
- If the plant is common in the area, take samples from a variety of plants. Sometimes pollination, maturation and seed ripening can occur at different times even within the same community. Sun exposure, prevailing wind patterns all have an effect on the ripening process.
- Identify or test soil conditions and observe the habitat that the plant grows in. Feel secure enough that you can replicate these condition. If you do not think you can do this, pick another species to propagate. It is important to not waste seed (5).
Collect seed only when it is ripe, which is likely to be in mid to late fall. In general, ripe seed is darker, harder, and larger than the unripe seed. The leaves of the plant may already appear brown and dead. Collect seeds inside fruit when they are ripe or just after. Gather seeds in hard capsules just before the capsule splits. Often, simply shaking the stem will release the seed, telling you when it is ready. The fresher the seed, the better. An added virtue of seed is that it is free of pathogens such as bacteria and viruses, so you are unlikely to spread disease via seed.
Cleaning Seed
Most seeds keep best if they are cleaned of all extraneous chaff and dust so dust-borne or chaff-borne mold and fungi are less likely to grow. But cleaning seed is sometimes easier said than done and may require inventiveness and experimentation if no effective method is described in your reference books. You can clean seed in many different ways, including shaking them in a bag or over newspaper, winnowing them with an electric or manual fan, or by blowing lightly over them in a shallow container. Soak fleshy fruits in water to ferment them for a few days and separate the seed easily. Allow the seed to dry for a few weeks in paper bags, envelopes, or open cardboard trays, but not in plastic.
Storing Seed
Some seeds require scarification — slitting or softening of the seed coat in water — and some need a period of rest before it is time for them to sprout. Dormancy, temperature, and humidity requirements for germination vary widely among species. The cold and damp also trigger certain chemical changes that break the dormancy of seed. When in doubt, you can always mimic nature and simply plant seed outside where it might fall naturally if adult plants were around, although that option is not always suitable because it may waste hard-to-obtain seed.
If the seed has been properly dried, you can stratify — store and chill — the seed in a vegetable crisper or an unheated shed or garage until enough time has elapsed to permit germination, which varies with species. Place them in moist sand or sawdust and keep them for four months at 32 to 41 degrees Fahrenheit. Mix seed with an equal volume of damp fine sand and store in plastic bags in the refrigerator at 32 to 38 degrees Fahrenheit. Dry seed fully before storing in mouse-proof sealed plastic containers such as garbage cans or in plastic bags hung on thin string from the ceiling. Many early-spring bloomers, however, do best when sown fresh.
Sowing Seed
In spring, to get a head start on planting, you can sow seeds in a growing medium indoors. Try mixing the seed with wet sand for more even distribution. Do not let the soil dry out completely until shoots appear. When transplanting outside, use no fertilizer and be sure, if at all possible, to water during times of drought until the new plants are well established. Plant fleshy fruits and nuts and acorns immediately in containers or in the field (if they are not dug up by squirrels). Do not expect quick results. Many woodland species take years to germinate or show any discernible aboveground growth.
Propagation by Division and Cuttings
You can often propagate woodland plants vegetatively, through division and cuttings as well as other methods. Fleshy rhizomes and rootstocks that form clumps of stems usually can be divided. The general rule is to divide when plants are not blooming; thus a plant that blooms in late summer or early fall would be divided in the spring, a spring ephemeral in the fall. If winters are cold in your region, divide spring bloomers in early fall so that the roots can develop before cold weather sets in. To make a division, break up the segments of the root mass or cut them apart with a sharp knife.
To divide bulbs, first let their foliage die back, then dig up the bulblets produced around the mother bulb. You can store them until the appropriate planting time and then replant them at the same depth as the parent bulb, with the growing tip pointed upwards.
Plants with a single taproot can be propagated by stem cuttings. Many woodland plants, such as bleeding heart, can be propagated by division and as cuttings. Because a cutting will be identical to the parent plant, use as many different source plants as you can to maximize the biodiversity of the species you are propagating.
To make a cutting of a softwood plant, like hollies and willow, cut a stem below a leaf during the growing season; then plant in shade with a rooting hormone. Remove the lower leaves or cut off half of the large leaves. You’ll need to keep the cutting moist and surrounded by high humidity until it roots. One way is to cover it with a plastic-bag “greenhouse.” Each day or so, remove the plastic bag for a few minutes.
To make a woody cutting, cut a stem from the previous season’s growth below the leaf bud while the plant is dormant. Refrigerate the stem during the winter, and then plant it on the site in spring. A rooting hormone is usually helpful. To be sure you plant it right side up, make a slanted cut on the bottom end and a flat cut at the top when you first take the cutting. Set the cutting in the soil at a 45-degree angle to maximize rooting. Hardwood cuttings work well for elderberries, buttonbush, and willows, for example.
You can plant rooted or unrooted cuttings directly in the ground, protecting and keeping them moist with a plastic-bag greenhouse. Partial shade is usually necessary to maintain adequate soil moisture.
Layering is also a very adaptable and simple method of outdoor propagation that requires no plastic. One layering method simply requires you to bend a stem until it touches the ground and bury about a 4-inch section. Once new growth has emerged, you can separate the new plant from the parent and transplant it.
According to the New England Wildflower Society, the following species of wild herbs are relatively easy to cultivate from seed or divisions:
| SCIENTIFIC NAMES | COMMON NAMES |
|---|---|
| Adiantum pedatum | maidenhair fern |
| Allium tricoccum | wild leek |
| Aralia spp. | sarsaparilla |
| Asarum canadense* | wild ginger |
| Cimicifuga racemosa | black cohosh |
| Collinsonia canadensis | stoneroot |
| Gaultheria procumbens | wintergreen |
| Hydrastis canadensis* | goldenseal |
| Matteuccia struthiopteris | ostrich fern |
| Mitchella repens | partridgeberry |
| Panax quinquefolius | ginseng |
| Podophyllum peltatum | mayapple |
| Polygonatum spp.* | Solomon’s seal |
| Sanguinaria canadensis | bloodroot |
| * Sow seeds of these species immediately upon ripening. If the seeds dry out, they will take many years to germinate, if ever. | |
Some species are notoriously difficult to propagate because of symbiotic relationships with mycorrhizal fungi. Do not jeopardize their natural success by collecting seed or try to propagate them without adequate expertise. These include many orchids such as lady’s slipper, spotted wintergreen, and ground pines. Some others are very slow but can be cultivated with care, including trillium and blue cohosh.
The following is a list of some plant hosts to butterflies:
| TREES, SHRUBS, AND VINES | BUTTERFLIES AND MOTHS |
|---|---|
| beach plum | cecropia moth |
| black cherry | tiger swallowtail, red-spotted purple butterfly, Prometheus moth, cecropia moth, hummingbird moth, viceroy |
| flowering dogwood | spring azure butterfly |
| hackberry | hackberry butterfly, snout butterfly, question mark butterfly |
| persimmon | luna moth |
| sassafras | spicebush swallowtail, imperial moth |
| sumac | spring azure butterfly |
| sweetgum | luna moth, royal walnut moth or regal moth |
| trumpet honeysuckle | hummingbird moth |
| tulip poplar | tiger swallowtail, spicebush swallowtail |
| Virginia creeper | pandorus sphinx, lettered sphinx, hog sphinx |
| white pine | imperial moth |
| willow | mourning cloak, red-spotted purple |
| NATIVE FORBS | BUTTERFLIES AND MOTHS |
|---|---|
| aster | pearl crescent |
| bidens | variegated fritillary |
| butterfly weed | monarch |
| goldenrod | monarch |
| milkweed | monarch |
| violets | fritillaries |
Unfortunately, a number of invasive exotic species continue to be recommended for use in butterfly gardens even though there are native alternatives that do not pose threats to other species. Commonly recommended exotics that should be avoided include autumn and Russian olive and Japanese and Tartarian honeysuckles.
Do not be tempted to plant only one species, such as all beebalm, because it so effectively draws butterflies. Rather, plant a variety of species that will flower throughout the season.
There are many books on propagating native species. Here are some of the best:
The Wildflower Gardener’s Guide: Northeast, Mid-Atlantic, Great Lakes, Eastern Canada, by Henry Warren Art (1987) Storey Communications, 105 Schoolhouse Road, Pownal, VT 05261, 802-823-5810.
Collecting, Processing and Germinating Seed of Wildland Plants, by James A.Young and Cheryl G. Young (1986). Timber Press, Portland, OR.
Growing and Propagating Wildflowers, by Harry R. Phillips (1985). University of North Carolina Press, Chapel Hill, NC.
The Reference Manual of Woody Plant Propagation: From Seed to Tissue Culture, by Michael Dirr and Charles Heuser (1987). Varsity Press, Athens, GA.
Several publications are available directly from the New England Wildflower Society, 508-877-9348, including “Propagation of Native Plants,” “Garden in the Woods Cultivation Guide,” and “Sources of Propagated Plants.”
Contract Propagation
Consider contracting with local propagators to grow native species that are otherwise unavailable. Plugs of native grasses that persist in light woodland, such as switchgrass and little bluestem, are easily produced at fairly low cost, as are “sods” or “mats” of shrub and/or herbaceous communities. Be sure to review appropriate guidelines with all collectors of any plants or propagules, professional and amateur alike.
Transplanting and Salvage
Do not overlook opportunities to rescue and transplant plants from areas where they are about to be disturbed. Even if you have been unsuccessful with transplants, try again: it’s important not to let any plant resource go to waste. Obviously, you should not deplete a native habitat, nor should you collect rare or endangered species without special expertise and permits. Consider collecting plants from an area being developed and relocating them to analogous protected habitats. Where disturbance levels are fairly low, consider collecting from elsewhere on your site to revegetate small patches.
A tree-mover, or tree spade (Figure 24.13), is often useful for moving larger trees and shrubs that are harvested on a site or, at least, very locally. Small mats of shrubs can often be collected quite easily to expand on-site populations. John Monro, a Pennsylvania ecologist, developed a very effective tool for plant salvage that is now available for sale in several sizes. His soil moving machine lifts and removes large blocks of soil as well as the plants, propagules, and soil organisms inhabiting them in uniform-size units that can be reassembled at a restoration site. Mycorrhizal- and fungal-dependent species typically survive because the soil block remains intact. The tool, called a soil mat lifter, was developed by Monro Ecological Services, 990 Old Sumneytown Pike, Harleysville, PA 19438-1215, 610-287-0671, and is owned by Resource Conservation Corporation. It is available through Bentley Development Co., P.O. Box 338, Old Route 22, Blairsville, PA 15717, 412-459-5775. Monro also teaches courses in plant salvage for the Society for Ecological Restoration.
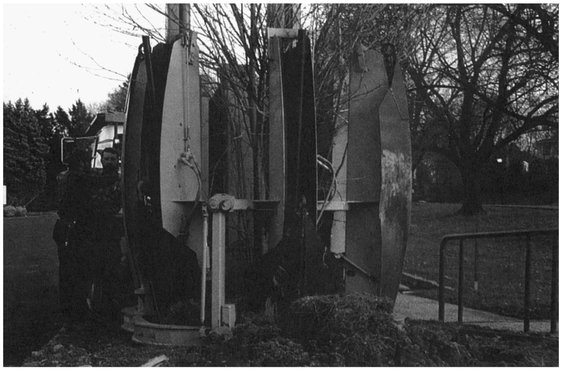
Figure 24.13. A tree spade allows very large plants to be moved with limited losses.