02
PALETTES, BRUSHES & OTHER PAINTING TOOLS
The tools you choose will not make your talent suddenly spring into being, but the right tools will aid your progress, discovery, and innovation. As you read the discussions of tools and look at the examples of art presented throughout this book, ask yourself if you can imagine producing similar results. Always keep in mind that there are many ways to achieve an effect. For example, if I want to make a painting with an expanse of sky, I could use a fan brush. Or I could use a mop with thin washes. I could use a wedge-like paint-shaping tool, spreading several graduated tones ranging from dark to light blue across the canvas. I might even use a roller to create the gradation I want. All this and I haven’t even mentioned the possibility of spraying the paint.
The most essential tool you’ll use is the palette on which you’ll put out your paints and mix your colors, so let’s begin with it.
THE PALETTE: DRY OR WET?
A palette is any surface you use for mixing colors before applying them to a painting. You might not think that the kind of surface you mix your paint on would make much difference in how you execute the painting or even to the final outcome of a work, but it certainly does when you’re painting with acrylics. There are two main types of palettes for acrylics, and the difference between them is whether the palette is “dry” or “wet.” Painters using some variation of a wet palette have almost always produced acrylic paintings with gradual tonal changes with no difficulty. A dry palette, however, is seldom used when it is important to keep a range of tonal changes available over any length of time, because regular acrylic paint simply dries out too quickly on a dry palette.
THE DRY PALETTE
A dry palette is the kind of artists’ palette you’re undoubtedly already familiar with: a surface of wood, plastic, or paper, commonly portable enough to hold in one hand. Dry palettes were what painters used even before Flemish artist Jan van Eyck perfected the mixing of oil paints early in the fifteenth century. But a dry palette may not be the best choice when you’re working with the fast-drying acrylic paints that were the only acrylics available for the first fifty years of the medium’s history. The newer acrylic paints, discussed in chapter 1, that have an extended open time do lend themselves to a dry palette, however.

The rich brown tones of a traditional wooden palette are enticing, but wood is very impractical for the acrylic painter. Because acrylic paint is water-soluble, it will damage the grain of the wood, eventually discoloring those rich tones that attracted you. Many artists also find that mixing paints on a colored surface makes finding the right mixed hue more difficult.
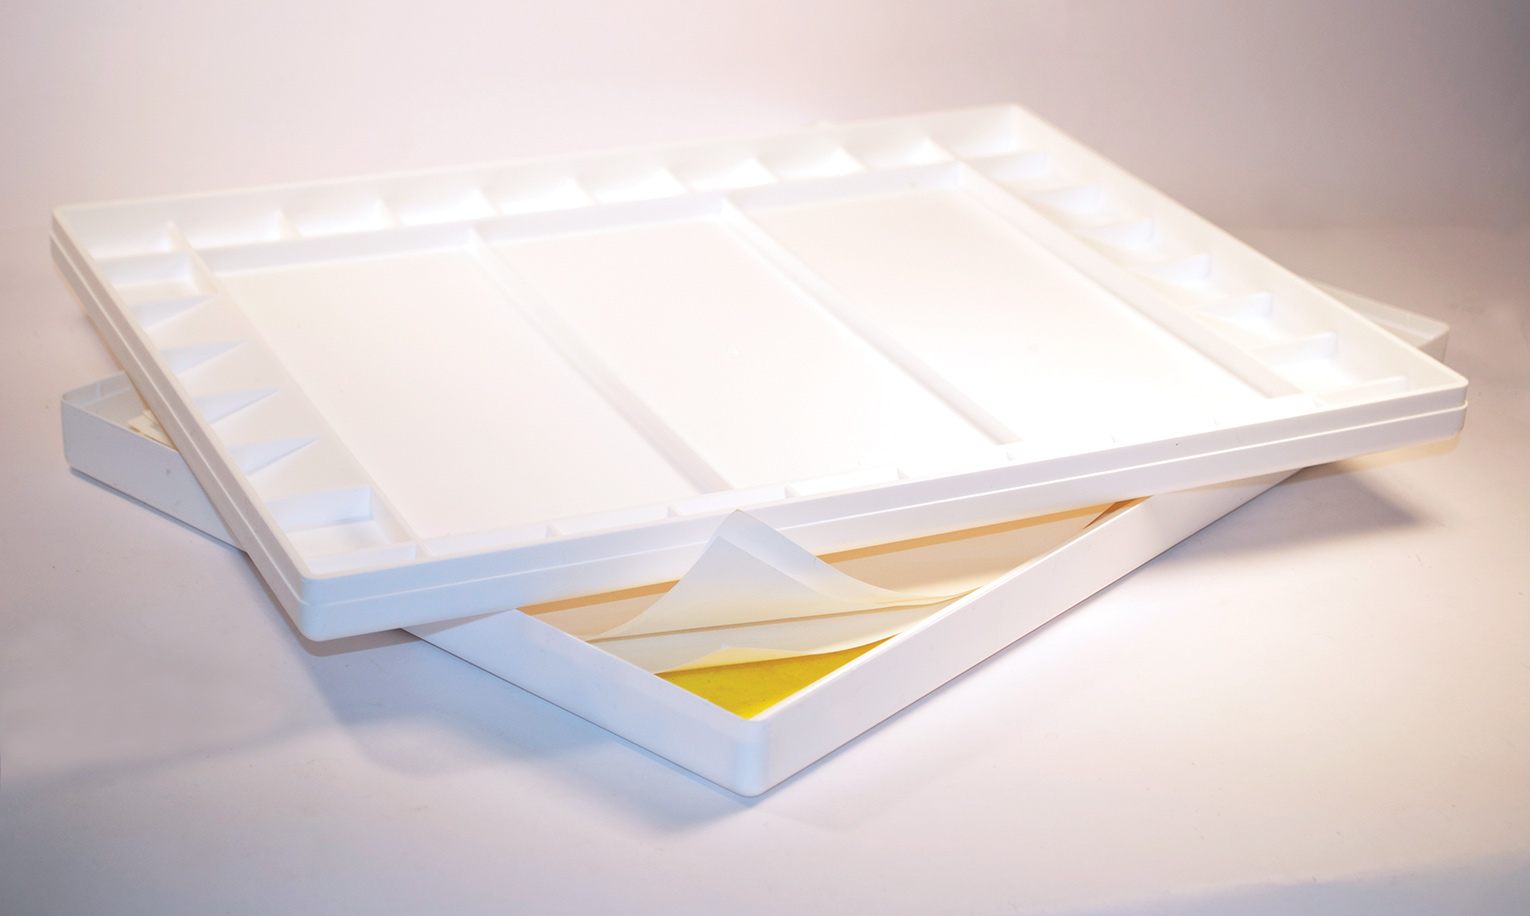
A dry palette does have one advantage over a wet palette: it allows the painter to maintain what is sometimes called a “sweet spot”—a workable thickness that isn’t really possible with a wet palette because of the thinning of the paint that continuously occurs with the latter. I have managed to keep paint workable on a dry palette for more than two weeks by keeping the palette in an airtight box—like Masterson’s Palette Seal shown middle, left—between painting sessions and by misting occasionally with water.

Masterson’s Palette Seal is an ideal storage container for a dry palette measuring up to 12 × 16 inches.
ARTFUL TIP Don’t Do It Yourself
On YouTube, you’ll find a number of videos teaching you how to make your own wet palette using paper towels. Don’t do this! If you do, you’ll end up with paper fibers in your paint, so spring for one of the commercial wet palettes instead. The small amount of money you’ll save with a homemade palette simply isn’t worth it.

I have found that a sheet of strong safety glass like the one shown here makes a very good dry palette. A white or gray plastic palette is also a preferable choice for a dry palette, because as with the glass, you’ll be able to see the colors you’re mixing better, so you won’t have any surprises when you apply them to the painting. Unlike wood, these surfaces are impervious to water and should not stain from any of the colors commonly available.


Today, paper palette pads are available from many manufacturers. An advantage is that at the end of a painting session you can simply discard the sheet you’ve been using. Most paper palettes are white, but I find a gray paper palette more useful, because mixing color on this middle-value surface provides an easier path to accuracy.
THE WET PALETTE
A wet palette allows you to return to the same fresh paint day after day. There is no crusty, dried-out skin on the colors, and you can start just where you left off. This isn’t only convenient but will also save you a lot of money in the long term, since you won’t have to continually replace paint that’s become hard and unworkable, as it does if you use a dry palette and conventional acrylic paint.
The design of a wet palette is simple: It consists of a fairly flat, sealable plastic box containing a thin sponge; a sheet of special paper that is exceptionally porous rests atop the sponge. When the sponge is dampened, the porous paper transfers moisture to the paint placed on it, and when the lid is closed the paper (and therefore the paint) remains damp for an extended period of time because of the constant ambient humidity of the environment within the box. The paper is also very tough; even though it stays damp, it doesn’t tear easily.
A few art materials manufacturers make wet palettes, but the most commonly available brand—and the brand that I have used for over thirty years—is Masterson. The company makes two kinds of wet palettes: the Masterson Sta-Wet Premier Palette, which costs about twenty dollars, and the slightly more expensive Masterson Super Pro Palette, whose hard white plastic case can also double as a dry palette if you need it. The Super Pro has a slightly smaller work surface (10 × 14¼ inches) than the Premier Palette (11¾ × 16 inches). I should note that the Super Pro lid doesn’t close quite as snugly as that of the Premier Palette (or, as a matter of fact, as the lid of the Palette Seal box discussed in the preceding section). Replacement sponges and paper for both palettes are readily available.

Masterson makes two somewhat different wet palettes: The Sta-Wet Premier Palette (top) is the basic model, with sponge, paper, and an airtight box. The Super Pro (bottom) is slightly smaller; its lid doubles as a divided palette for watercolors (not really useful for acrylics).
To reduce the risk of mold inside the sealed palette, I add a little bit of household ammonia to the water with which I wet the sponge: about two tablespoons to a pint of water. (Ammonia, by the way, is part of the formulation of most acrylic paint.) The unpleasant odor of the ammonia will dissipate very quickly, and you may repeat this treatment any time your wet palette starts to smell of mold. This is more than the amount recommended by Masterson, but I have found that less is ineffective in preventing mold and mildew.
ARTFUL TIP A Wet Palette That’s Even Wetter
I discovered the Masterson Sta-Wet Palette at about the same time that I first made the mixture of water, flow enhancer, and retarder that I call “Van Patten’s Solution”—and it soon dawned on me that I could use a very diluted version of this solution, with just a splash of retarder and enhancer added to the water, as a wetting agent for the palette’s sponge. The obvious benefit is that the paint is constantly infused with the agents that improve flow and extend open time. Using Van Patten’s Solution in this way, I have been able to keep mixed color workable for about two years, though I don’t recommend trying to keep paint that long! One slight disadvantage is that the paint will become a little less viscous.
BRUSHES
As Van Gogh reportedly said, “Painting is drawing with color.” If the beginning painter can think of the brush as a kind of drawing tool, starting to paint may seem easier. When teaching a class of people new to painting, I suggest that each student buy a couple of small brushes (sizes 2 and 4). A small brush with a small charge of paint may be used more or less like a pencil or a piece of charcoal and can provide a nice bridge between drawing and painting.
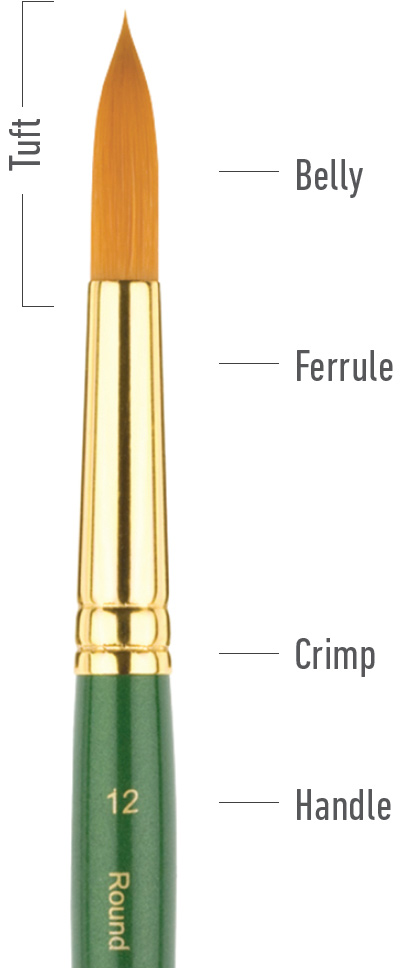
A brush’s anatomy consists of the tuft (with a “belly” that holds the paint); a metal sleeve, called the ferrule, that holds the hairs or bristles in place; and a wooden or plastic handle (secured by a crimp in the ferrule).
I suggest you do the same—or, better, buy one of the prepackaged sets of brushes offered by many brush companies. You can start with either a synthetic or a mixed synthetic/natural hair set. You will probably pay about half of what you would if you purchased the brushes separately. I also recommend you buy one painting knife (also called a palette knife) like the one pictured opposite to be used for paint mixing and for keeping the palette orderly.
BRUSHING UP Taking Care of Your Brushes
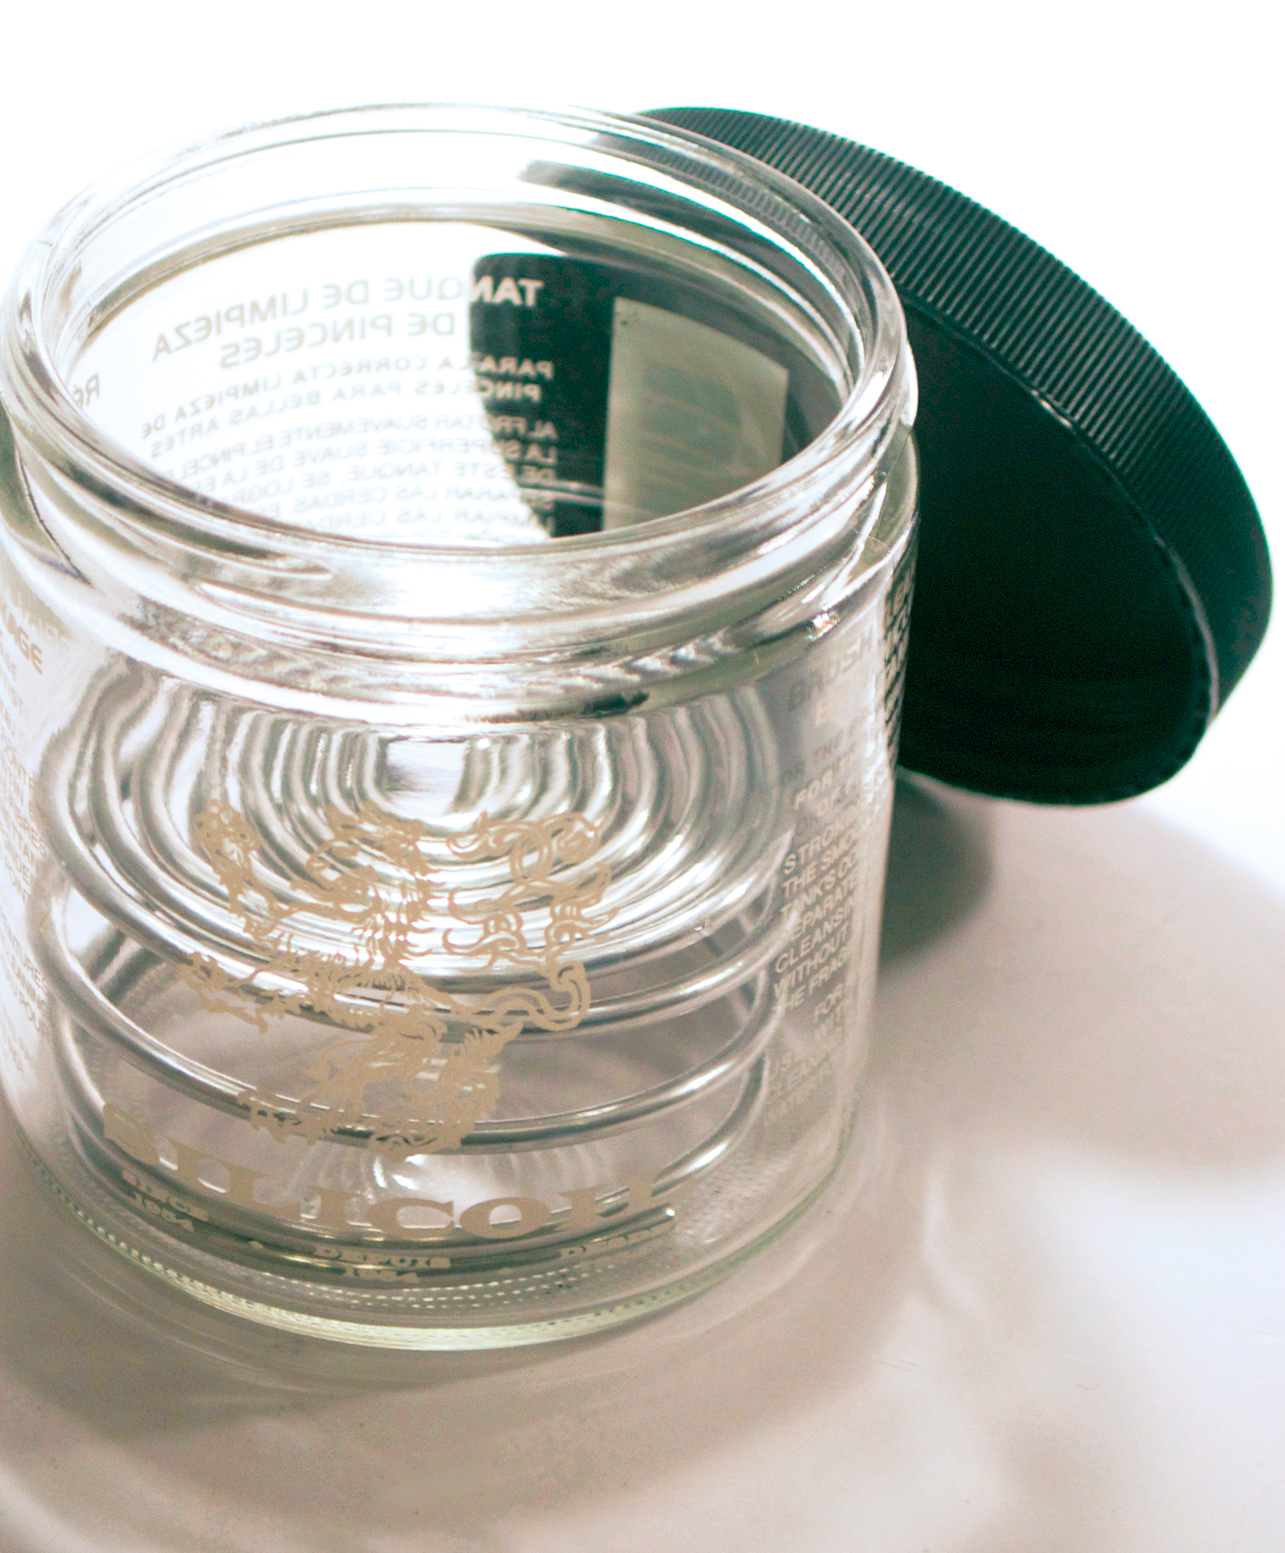
The coil inside this brush-cleaning jar holds the tufts of the brushes above the sediment that gathers below.
If you want your brushes to last, you’ve got to keep them clean. Careful washing should follow the use of any paintbrush. Work dish detergent into the base of the hair near the ferrule. Scrub the brush against the palm of your hand using a circular or back–and–forth motion. You are finished when you don’t see any color coming from the brush—just white suds. After the brush is completely clean, and while it is still wet, shape the brush. If the brush fails to take its original shape, fill the brush with soap and water as though you were cleaning it again. This time do not rinse the brush, but shape it into its original shape while it is still soapy and wet.
Somewhat reluctantly, I will also mention a method of removing dried acrylic paint from brushes. The one sure solvent for dried acrylic paint is acetone. This is a flammable, poisonous fluid, which should be used only after the warnings on the container are read and the dangers considered. If you still decide to use it, be sure there is adequate ventilation (outside is best) and there is no chance of any fire. The Silicoil-brand brush cleaning jar (right) has worked for me. I fill it with acetone and use it with great caution. There are other, less dangerous cleaners available, which can be used with the same type of container, though they may be less effective than acetone. Try Bristle Magic or Blick Artist’s Acrylic Remover.
As you progress as an acrylic painter, you’ll definitely want to acquire more brushes. There are numerous types, with each shape having a different feel and purpose. The sidebar covers the basic types that are most useful to the acrylic painter. Another sidebar, lists several specialty brushes and describes their uses. Use these as references as you build your own collection of brushes. Brushes are the most basic of tools that an artist has. While it is the imagination and skill of the artist that produce the content of a fine work of art, the tools used to achieve that goal should be chosen with care and treated with the respect that such equipment deserves.

Even if you’re not using painting knives for impasto, you’ll need a painting knife for mixing paints on the palette and for keeping the palette tidy. For those purposes, choose one with a narrow blade.
The most important consideration when choosing brushes for acrylic painting may be the kind of hair or bristle from which the tuft is made. There are two broad classifications of brush hair: natural and synthetic. It is generally agreed that natural hairs—most often made from animal pelts—are not the best choice for acrylic painting. That’s because all these hairs are porous to some degree, meaning they have a tendency to soak up and hold water. And water will eventually weaken the brush hair, making it break off or fall out of the brush. Over the last few decades, however, brush makers have created synthetic filaments that successfully mimic natural hairs, sometimes even surpassing the resilience of animal hair. (Princeton Art & Brush Co.’s Catalyst line is a good example of such high-quality synthetic brushes.)
Brushes nowadays are often made with a combination of natural and synthetic materials in varying proportions. Because there are so many different kinds of brushes with so many combinations of hair, it is difficult to make specific recommendations. Also, every artist has his or her own individual likes and dislikes. So the best advice I can give is this: If you already have some brushes, begin by using them. After you’ve finished a few acrylic paintings, you’ll begin to see which brushes you prefer to use. Trust yourself. Or begin with just a few brushes of different sizes and shapes from the same line—perhaps in one of those prepackaged sets mentioned earlier—to find out whether you’re comfortable with the feel and the result. If not, try another line. You’ll certainly want to visit an art supplies store to look at and feel the brushes. If pressed to make a recommendation, I would say that Princeton Art & Brush Co.’s RealValue Brush Selection Pack “combination set” (see photo), which includes both synthetic- and natural-bristle brushes in a range of sizes, has the greatest variety at a very decent price. And remember, there’s nothing wrong with asking sales staff for recommendations; many salespeople at art supplies shops are themselves artists or art students and will be happy to help you make decisions.
All that said, it can be useful to know something about the characteristics of various natural and synthetic hairs. Here, based on my own experience using various kinds of brushes with acrylic paints, are some quick notes on their positives and negatives.

A prepackaged set of brushes like this one is a good option for the beginning painter.
BRUSHING UP Basic Brush Shapes
This part of the book may serve as a quick reference before or while you are embarking on a brush-buying adventure. The many sizes and shapes of brushes can be confusing, but if you make yourself think of function and form as the core principles in choosing brushes, you will be fine.
Round
The round is the most versatile and commonly used of all brush shapes. The hair is set in a round ferrule, or collar, and usually comes to a point easily when it is charged—that is, full of paint. Rounds are especially useful for painting edges or any passage requiring some precision.

Round (synthetic bristle)
Flat
The flattened ferrule gives the brush known as the flat its chisel-like shape. Flats typically are very good for applying paint in areas needing either a smooth or impasto surface, but not quite as good when a drier paint charge is needed because the length tends to reduce the control needed in smaller more vigorous scumbling applications. They’re useful if you want a stroke to have a squared-off beginning or end.

Flat (natural bristle)
Bright
The bright is shaped much like the flat, but the bundle of hairs is shorter. Used in many of the same kinds of passages as flats, brights are also very good for creating a scumbled surface. Scumbling means applying a (usually) thin coat of paint with an almost-dry brush in a sort of scrubbing fashion, forcing the hairs into the surface rather than sliding the brush across the passage.

Bright (synthetic bristle)
Filbert
The filbert gets its name from the shape of its tuft, which is both flat and rounded, sort of like the shape of a filbert nut (a kind of hazelnut). This unusually shaped brush, whose tuft becomes an oval at the tip, may be used much as a round, flat, or bright, though the oval tip produces a unique stroke.

Filbert (synthetic bristle)
Some brush companies are now offering a short-haired filbert (also pictured), which I find useful for the way I paint. I often use a lightly charged brush to scumble thinly applied paint with a soft edge definition. The short-haired filbert is one of the few brushes that meet this need.

Short-haired filbert (natural bristle)
Egbert
The Egbert is basically an extra-long filbert. Its shape and length make the egbert a great paint carrier (better than a filbert), and hog bristle egberts have a wonderful spring even when fully charged, which comes in handy when you’re working with very thin paint. An egbert will retain its shape well if you are careful not to leave it bent while resting in water or, even worse, to let it dry in a bent state.

Egbert (natural hog bristle)
Fan
The wide, thin fan brush was designed primarily for blending, though I have also used fan brushes for glazing and even varnishing. Because a fan brush holds a very limited charge of paint, its hairs get involved with neighboring areas of paint as it glides across the canvas, making it the ideal tool for blending one color into another.

Fan (synthetic hair)
NATURAL BRUSH HAIRS
Hog bristle is the toughest of all the natural hairs. Artists generally use hog-bristle brushes when scumbling or when any other vigorous application of paint is needed. Brushes made from Chungking hog hair, a Chinese product, have been favored for many years because of this hair’s durability.

Hog bristle (filbert)
Badger is a soft yet springy hair. I often use badger-hair brushes, though I do not recommend them to other painters because this natural hair is so soft that it can wear down in just a week of use. Oddly, it is this fragility that makes badger a good choice for me, because the brush wears down to a blunt, almost filbert-like shape—but much smaller and shorter than any filbert I have been able to find. If you wish to use badger brushes, you can minimize wear by using one of the slower-drying paints, which helps prevent the buildup of dried paint at the ferrule that, over time, can break the hairs.

Badger (filbert)
Mongoose is very similar to badger hair but less springy. I have been disappointed with these brushes, because I tend to use a scrubbing or scumbling application of paint.

Mongoose (round)
Squirrel has always been a poor choice for me because of the harsh treatment I tend to give brushes. Under that treatment, squirrel brushes suffer excessive hair loss, and I’ve found they have a rather flabby feel when used with paint of almost any viscosity; however, squirrel brushes are good when using very highly thinned paint for washes or any time you need exceptional fluid-holding properties—so I do recommend squirrel if you are primarily painting in a thin, radiantly transparent watercolor style.

Squirrel (round)
BRUSHING UP Handles, Long and Short
Brush handles come in different lengths, dictated by custom, the medium used, and the scale of the work. Traditionally, long-handled brushes have been used for painting with oils and acrylics on canvas—a convention that probably came into being because an artist working at an easel on a large-scale painting often needs to step back from the work to see what’s happening on the canvas. Also, long-handled brushes enable a more “painterly” technique, because you can hold the brush near the handle’s end—a very different grip than you use when working with a pencil, for example. For beginners, I recommend longer-handled brushes because they allow more flexibility in style (painterly or looser brushwork) and because the greater distance from both painting and palette helps keep things neat.
Red sable is commonly thought of as the gold standard for delicate and precise paint handling. Red sable brushes are most suitable for slow-drying paint that’s used quite thinly. These brushes require careful handling and are definitely not good for scumbling or any really vigorous brushwork.

Red sable (round)
Black sable is also known by another name: fitch. (Just one more slightly confusing thing in the world of paintbrushes.) It is much like red sable, but the hair shafts are slightly thicker, giving black sable/fitch considerably more spring. The exceptional smoothness of its stroke makes it the brush of choice among portrait artists and many other realists. You’ll find that black sable/fitch brushes may be even a little more expensive than red sable.

Black sable, or fitch (flat)
SYNTHETIC BRUSH HAIRS
Acrylic painters most often use brushes with synthetic hair. Because of major innovations and improvements by brush manufacturers, the selection of synthetic brushes (and brushes that combine synthetic and natural fibers) that are specifically designed for acrylic and other non-oil-based paints is now extremely broad. Among the synthetic brushes that mimic natural-fiber brushes are synthetic bristle, synthetic mongoose, synthetic squirrel, and synthetic sable (see photos opposite, bottom and top, right). These synthetic-hair brushes have the same attributes as their natural-hair counterparts—except that, in some cases, they’re better. For example, the Princeton Art & Brush Co. produces a unique synthetic mongoose that performs like its more costly natural twin but lasts much longer. In fact, most synthetic facsimiles of natural hairs have longer life-expectancies.

Synthetic bristle (bright)

Synthetic mongoose (filbert)

Synthetic squirrel (bright)

Synthetic sable (round)
And then there are the synthetic fibers that don’t mimic natural hairs—including Taklon, a polyester fiber (originally developed by DuPont) that permits an exceptionally smooth, velvety application of paint on many kinds of surfaces, both smooth and coarse. Taklon brushes retain their shape very well and, like other synthetics, do not soak up water to become saturated and thereby compromised.

Several brush manufacturers offer Taklon brushes in both white and golden varieties.
I personally have a brand-new favorite among synthetic-hair brushes: the line of Catalyst Polytip Bristle brushes created by the Princeton Art & Brush Co. These brushes have a completely different feel from any others. Their somewhat rigid though springy and responsive filaments taper toward the tip and then end in a multipart tip that imitates the “split ends” of natural hairs. This “polytip” enables the brushes to discharge paint in a uniquely even way. The most important function of a brush is to deliver its charge of fluid to the painting, and these brushes give the artist an unprecedented degree of control. (However, I am still looking for the “perfect” brush!)

The Catalyst brushes made by the Princeton Art & Brush Co. are a great advance in synthetic-hair brush technology.

This promotional shot shows one of the Catalyst brushes in use.
Specialty brushes, like the dagger and the rigger, are not usually considered essential for “fine art.” Instead, they are typically used by sign painters or those who add racing stripes to cars. Therefore these are truly specialty brushes. Though not known for their fine art–associated tasks, these line-making brushes, along with their close relative the angle brush, may be used by artists working with abstract painting to great advantage. Since painting has no set boundaries, having been freed by the modern thinking that emerged in the twentieth century, the craft of the sign painter may very well be combined with that of the fine artist.
Angle
The hair of an angle brush is cut at an angle for making precise curves and lines. Angle brushes may be either flats or brights, like the Catalyst synthetic Polytip Bristle brush pictured here.

Angle
Rigger
The exceptionally long-haired brush called the rigger is primarily used for painting long thin lines. A natural-hair rigger is shown.

Rigger
Dagger
Though it is designed for painting stripes, the dagger may also be used for curves and fine-edged detail work. A synthetic-blend dagger is shown.

Dagger
Mop
The mop is usually used with thin, watery applications of paint and seldom if ever with thicker mixtures of unthinned acrylic paint. One possible point of confusion: You’ll sometimes see a similarly shaped brush, called the oval wash brush, also referred to as a mop. But don’t trouble yourself over this. When searching for a brush that will hold a lot of watery paint, just look for one with a large, somewhat foppish tuft, and don’t worry about what it’s called. The mop shown is made of synthetic (light gold Taklon) bristle.

Mop
OTHER STUDIO SUPPLIES
Beyond a palette and brushes and perhaps some other painting tools, there are a number of other items that you, as a beginning acrylic painter, must have, as well as some you may want to have. Foremost among the must-haves is the lowly bucket or pail. When I teach, I find that students often forget to bring a bucket to the first class—but a bucket is absolutely essential, since you’ll use water from the bucket to wet your brushes and to rinse them between uses. I always think that the larger the bucket, the better: a larger volume of water means that the water won’t become unusably dirty so quickly. When it comes to refreshing the water in my bucket, I’m a procrastinator, so a big bucket is a hedge against dirty water affecting my work. A bucket, by the way, is also handy for transporting art supplies and for storing materials when you are not busy making art.
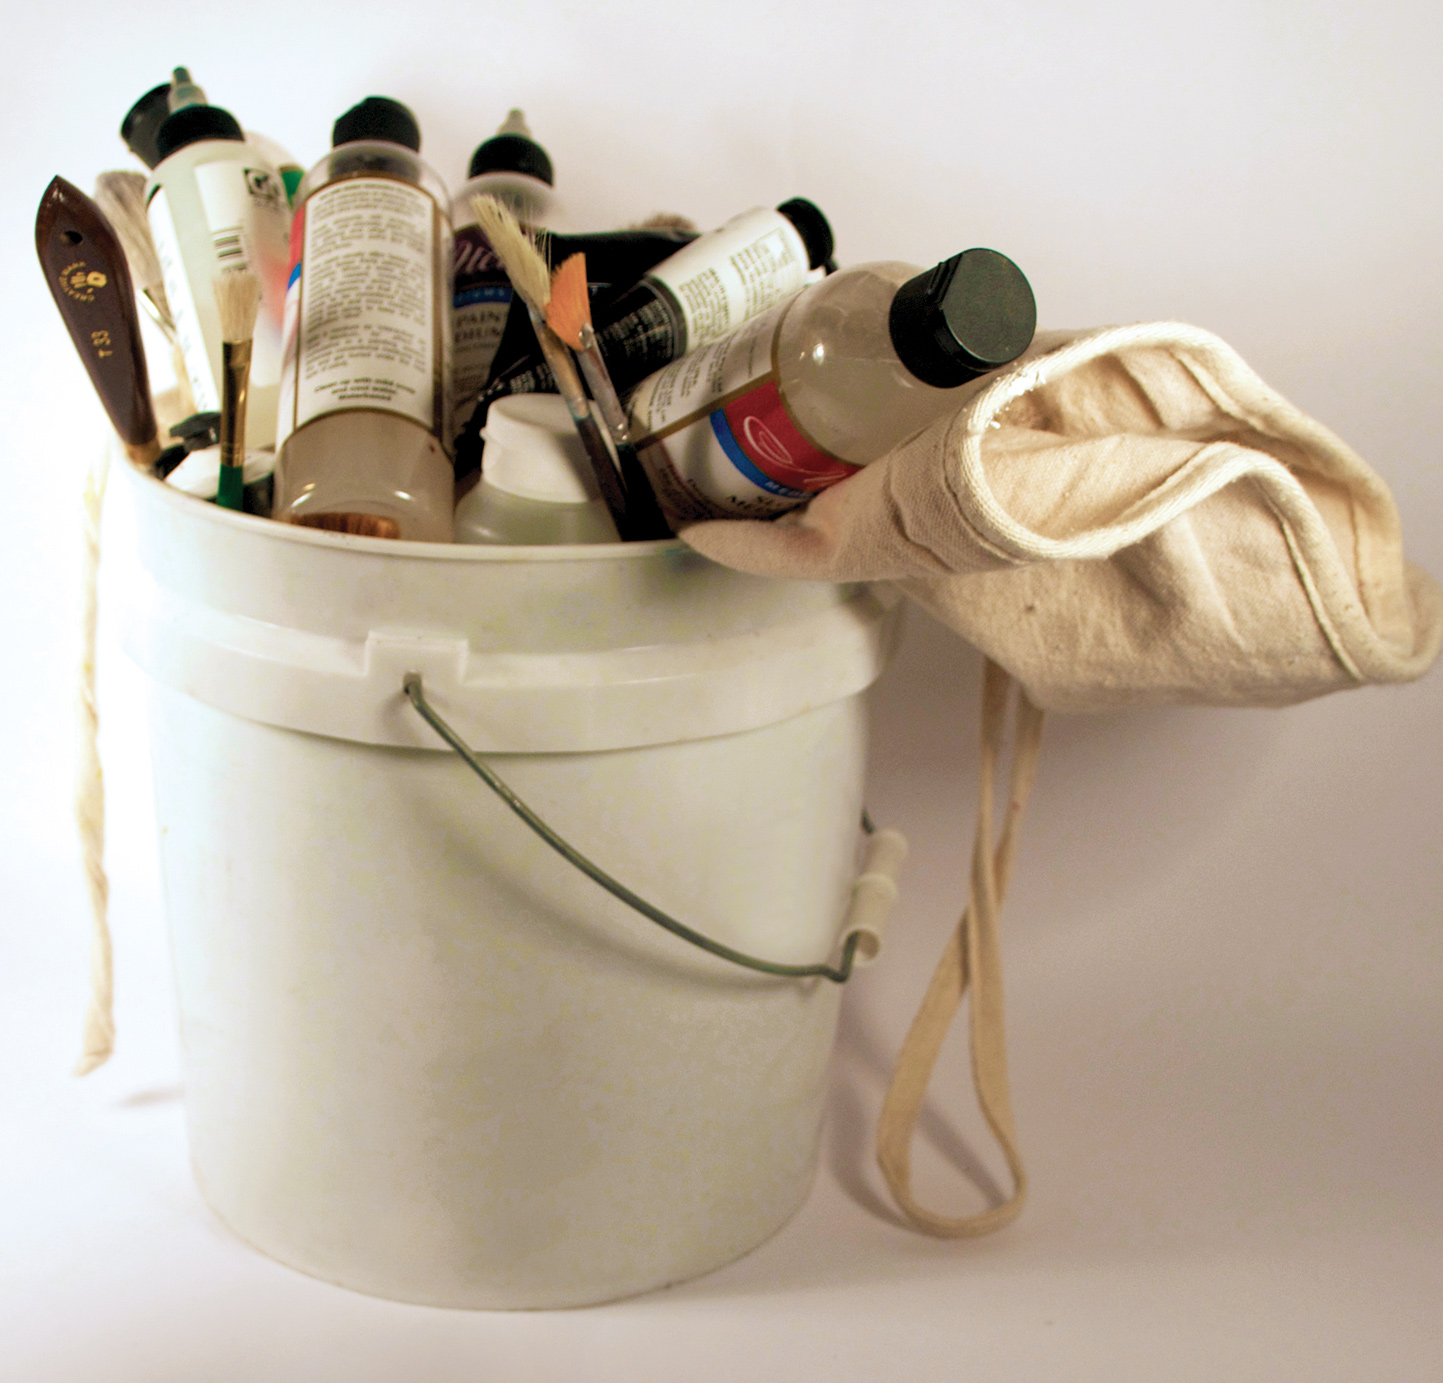
A bucket to hold the water you’ll use while painting is an essential tool; it can double as a storage/carrying container for supplies.
Before the advent of the scalable wet palette, airtight jars provided the only means for acrylic painters to mix paints and have those colors remain fresh and usable for subsequent painting sessions. Although they aren’t quite so necessary as they used to be, jars with screw-top lids are still useful, especially when you’re mixing a relatively large quantity of a color. Inexpensive plastic jars are stocked by many supermarkets and drugstores—and, of course, sold by art supplies shops. Although your project will determine how many of these containers you need and what size they should be, I usually recommend that beginners purchase a package of six small jars. And I also recommend getting several squeeze bottles of different sizes, as well, for mixing and thinning fluid paint and for storing mediums and other additives. And don’t forget about all those containers you usually put in the recycling: wash out those mayo and peanut butter jars, and use them in the studio instead of throwing them away.

Squeeze bottles like these are handy for keeping quantities of mixed colors fresh, among other uses.
Paint loses moisture on both the palette and the canvas. Using a fine misting spray refreshes the moisture on the painting’s surface, giving you more time to move the paint around even when you’re working with ordinary, fast-drying acrylics. And using a mister on a dry or wet palette keeps the paint from forming a rubbery skin. Spray devices come in two basic types: trigger-types and fine atomizer-type misters. The trigger type (like the largest of the sprayers shown in the photo to the right) is great for spraying a large volume of water quickly. But it has been my experience that a trigger-type sprayer can throw out some big blobs of water along with the fine spray, so I usually reserve the trigger sprayer for misting my palette or for misting the painting’s surface when I am working a large blended area where the texture of the spray is not very important. Fine atomizer-type misters—like the smaller sprayers in the photo—are much better for dampening fine blended areas where the work demands detailed precision.

Misters and trigger-type sprayers are useful for moistening paint on the palette and on the canvas.
Finally, I don’t want to leave the humble X-Acto knife off this list of should-have items. I constantly find the X-Acto knife (with a no. 11 blade) useful for trimming stray fiber or extra cloth off a freshly stretched canvas or even scraping a clump of paint off the surface of a painting when it’s dry and too stubborn to yield to any other method.

Every acrylic painter’s tool kit should include an X-Acto knife.
KEEPING CLEAN AND CLEANING UP
Acrylic paint sticks to cloth very well, making it hard to remove. So you’ll be wise to cover your clothes with an apron or old shirt while painting. Keeping a roll of paper towels at hand is also a good idea; choose higher-end paper towels, like Bounty, because you can scrub with them and even rinse them out and reuse them without the towels disintegrating. In an emergency, you can use water from your bucket and paper towels to get wet or not-quite-dry paint off your hands until you can get to a sink and do a real job with soap. If you wish, you can use cloth rags, but be careful to avoid rags that may leave threads or bits of fabric on your brush or your work.

For cleaning up, keep damp wipes, paper towels, and rubbing alcohol on hand—and don’t forget to wear an apron to keep paint off your clothes.
Rubbing alcohol is good for removing dried paint from clothing or anything else. The alcohol compromises the paint’s bond to a surface, making it possible to lift the paint off. I have gotten paint on my clothes many times, and I usually use rubbing alcohol followed as soon as practical with one of the prewash stain-removing products available in your supermarket’s detergent aisle. (Even if the garment is wool, the application of alcohol is still a good idea.) Dry cleaning will usually get acrylic paint out of clothes, but note: It is usually easier to get the dried paint out if you haven’t introduced water while the paint is wet. Water will only thin the paint, causing a wider and more efficient saturation of the fiber with paint. If you work at home and notice still-wet paint on your clothes, you can usually remove it with laundry soap and water. Liquid laundry detergent will mix with the paint, throwing all of the bonding properties of acrylic resin out of play and making water a vehicle for carrying the paint away (scrape the excess off the clothing first).
ARTFUL TIP Painting Knives: An Inexpensive Alternative
For many years, painters have used painting knives, also called palette knives, to manipulate paint on canvas and other surfaces. Knives, like brushes, come in many different sizes and shapes designed for different uses. For the beginner, I recommend just the single painting knife, to be used primarily for paint mixing and housekeeping on the palette. But if you want to play around with painting knives without spending a lot of money, pick up an inexpensive set of plastic knives like those shown on the right.

Metal painting knives can be expensive, but sets of plastic knives provide a good alternative for the beginning painter who’d like to try working in impasto.
In the last few years, a brand-new category of painting tool has come onto the market: the color shaper. The color shapers in the Princeton Art & Brush Co.’s Catalyst line (which also includes brushes) can be found in many better art supplies stores. Some of these tools, made of a rubber-like material with moderately flexible tips, resemble brushes, but they’re really unlike anything else. Because of their springy quality, they are surprisingly friendly to someone who has used brushes. Though they cannot be charged with paint they make great rearrangers of workable paint that is already on the canvas. These tools are most useful for painters working with heavier paint and using gels and pastes. If an in-progress painting has several layers of different-colored paint, you can scrape through to reveal one or more of these layers, or you can scrape right down to the base layer. Or you can use one of the wedges to slather layers of impasto color on your painting, allowing only bits of the lower strata of pigment to peek through. It’s good to be aware of these tools as your experience grows and you want to try new modes of expression.

The Princeton Art & Brush Co.’s innovative Catalyst line includes paint shapers (left) and wedges (right).

Juan Escauriaza, On the Ramp (detail), 2012, acrylic on linen, 51 × 30 inches (130 × 75 cm). Courtesy of the artist.