Copyright © 2009 by Amy Stein. Click here for terms of use.
Do this program of exercises if you are suffering either bladder or bowel incontinence—or both—as a result of pelvic floor muscle weakness or pelvic organ prolapse, or if you have a feeling of heaviness or a falling-out feeling in the pelvic region with no accompanying pain. These exercises may also mitigate a decreased libido or an inability to achieve orgasm; men who suffer erectile dysfunction due to weak muscles may also benefit from these exercises. Do not do them if you feel any urgency, pain, constipation, or retention, if you must relieve yourself frequently at night, or if you have any of the symptoms described in Chapter 3. You must wait until those symptoms are 100 percent improved through the End-the-Pain routine before you undertake them. Only then should you begin to slowly integrate these exercises into your normal daily routine. If the previous symptoms return, stop these exercises and return to the End-the-Pain routine only. Symptoms indicating the use of these exercises may include the following:
In Both Men and Women
• Stress urinary or bowel incontinence (involuntary leakage due to an increase in abdominal pressure, as from sneezing, coughing, running, etc.)
• Decreased libido due to weak pelvic floor muscles
• Difficulty achieving orgasm due to weak pelvic floor muscles
In Women Only
• Prenatal and postpartum stress incontinence
• Cystocele (descent of anterior vaginal wall)
• Rectocele (descent of posterior vaginal wall)
• Enterocele (descent of intestine)
• Uterocele (descent of the uterus)
• Urethrocele (descent of the urethra)
In Men Only
• Erectile dysfunction
• Rectal organ prolapse
Incontinence is the involuntary leaking of urine, feces, or gas. Often, people only become aware of the problem when they note staining on their underclothing.
But incontinence is really just a symptom. It signals a weakness in the muscles of the pelvic floor. Strengthen those muscles, and you very likely will end the incontinence.
How do the muscles of the pelvic floor grow weak? There are any number of possible causes. Childbirth can certainly weaken the pelvic floor. So can surgery; for example, we frequently see this muscle weakness and the resulting incontinence in men who have undergone prostatectomy for the treatment of prostate cancer. Injury or trauma, an illness that decreases the immune system, fatigue, or hormonal changes can also diminish the strength and elasticity of these muscles. If you lift heavy weights all day long and are straining your pelvic floor muscles as you do so, if you're excessively overweight or obese, if you have very poor posture, if you find yourself straining against a condition of constipation, you can weaken your pelvic floor. And, unfortunately, these muscles also lose strength as we age and grow less active.
And while incontinence is perhaps the most evident of the symptoms of this weakness, there are others. One is organ prolapse—when a part of the bladder or another organ literally slips out of place, producing a feeling of fullness as if something is falling out of you. Prolapse happens when the muscles and connective tissue have become so weak they are no longer holding up the organ; with no "floor" to support it, the organ simply sags.
Sex is another area where muscle weakness can be telling: individuals may have difficulty achieving orgasm when the pelvic floor muscles are weak, for those are the muscles that work to increase blood flow, stimulation, and satisfaction.
Clearly, the way to address all these symptoms is to strengthen the muscles of the pelvic floor, and that's just what the Strengthen-the-Muscles routine sets out to do. It proceeds in four parts. The key to all the parts of the Strengthen-the-Muscles program is the Kegel exercise you'll learn in Part 1. But perhaps just as important as learning to do Kegels correctly is to learn to relax the pelvic floor muscles between exercises.
One of my first patients many years ago was a Pilates instructor—I'll call her Sandy. As I'm sure you know, Pilates is a wonderful program of exercises geared precisely to enhancing core strength and flexibility. Sandy, in her mid-50s, was a sweet and delightful woman who was a living example of Pilates' strengths.
So I was surprised that she had come to my physical therapy studio complaining of a gradual onset of urinary urgency and frequency along with difficulty achieving orgasm. The urinary urgency had recently developed into urinary urge incontinence—that is, Sandy would feel a strong urge, would rush to the bathroom, but would invariably end up leaking before she got there.
Both Sandy and I were puzzled that a Pilates practitioner, who regularly worked the muscles of her core, could have a weak pelvic floor. In fact, on that first visit, Sandy enthusiastically demonstrated for me some of her Pilates teaching. She lay on her back, engaged her abdominals, and lifted her pelvic floor muscles as she slowly raised one leg and smoothly did leg circles in the air. She switched legs. She showed me the signature Pilates 100, challenging the abs and back. All the while, Sandy kept repeating what she told her students during a teaching session: "And, tighten those abdominal muscles and lift the pelvic floor. And tighten. And lift. Tighten. And lift."
Watching and listening, I suddenly had an insight into what the problem was. "Sandy," I asked her, "do you ever have your class relax the pelvic floor—or are you always tightening and never resting those muscles?" She replied that since the aim was to keep the students' heart rate relatively high during class, she limited the resting to three times during the one-hour session.
I was pretty sure that was the key to the diagnosis of Sandy's problem. "By resting so rarely," I suggested, "you're never really relaxing the pelvic floor muscles. The result is that they have probably shortened and are now pulling on your bladder and urethra, and that's what's causing your urinary urgency and frequency. Moreover," I explained, "shortened pelvic floor muscles have a difficult time contracting and going through their full range of motion. That's why you're having trouble coming to orgasm and with leaking."
The answer, I suggested, was to reeducate Sandy's pelvic floor muscles to relax—basically, to do the End-the-Pain routine of Chapter 3. For although in her case the muscles were probably not weak, their inability to relax certainly diminished their power—with the resulting incontinence and sexual dysfunction.
The bottom line? Relaxing the muscles between exercises is as important as the exercises themselves. Your muscles won't function with strength unless you learn how to relax them, so be sure to follow carefully the instructions to relax the muscles in these exercises. In addition, it's a good idea to relax altogether between each set of exercises.
Also, don't forget to breathe. As you learned in the End-the-Pain routine, not breathing—holding your breath—while you exercise is completely counterproductive. Breathe deeply before each exercise, then start to count as you begin the exercise—whatever it is. This forces you to breathe while doing the exercise. After a while, this becomes automatic.
So take a breath, and let's begin those exercises now.
10-second slow Kegels | 10 reps 3 times a day |
2-second fast Kegels | 10 reps 3 times a day |
Tight abs | 10–30 reps, once a day |
Hip external rotation | 10–30 reps, once a day |
Hip adduction | 10–30 reps, once a day |
Bridge | 10–30 reps, once a day |
Pelvic tilt | 10–30 reps, once a day |
Slow standing Kegels | 5–10 reps, once a day |
Fast standing Kegels | 5–10 reps, once a day |
One-foot squat with Kegel | 5–10 reps, once a day |
Two-foot squat with Kegel | 5–10 reps, once a day |
Sit-and-stand with Kegel | 5–10 reps, once a day |
Marching in place | 10 reps, once a day |
Small jumps | 10 reps, once a day |
Big jumps | 10 reps, once a day |
Lunges | 10 reps, once a day |
Dr. Arnold Kegel, who died in 1981, was a Los Angeles–based gynecologist who developed exercises for regularly clenching and unclenching the muscles of the pelvic floor. Kegel developed the exercises to help his patients increase their sexual function and gratification as well as to address problems of prolapse and incontinence. Although the exercises now bear his name—we tell patients to "Do your Kegels"—the methodology has really been known since ancient times and has numerous variants in the practices of Eastern religions.
Kegels are what are called resistive exercises. Specifically, as you deliberately control a muscle's movement, you incrementally increase its ability to contract. As you do your Kegels over time, this contractile strength will grow, and the muscles of your pelvic floor will become broader and thicker and will gain increased muscle tone.
But not everybody should do Kegels. If you find that the Kegel clench causes pain or increased bladder or bowel frequency or urgency, stop. It may mean that the pelvic floor muscles are spasmed or shortened, and doing the Kegels may only spasm or shorten them further. See your doctor or health-care provider if that is the case. Also, it's advisable to consult with a gynecologist or a pelvic floor physical therapist to make sure that your incontinence problem is in fact a result of a weakened pelvic floor or possible prolapsed organ. In other words, be sure of the cause before you attempt Kegels as the solution.
The Strengthen-the-Muscles routine calls for doing Kegels in conjunction with an exercise for tightening your core abdominal muscle, the transverse abdominus. Although they are only connected by fascia (connective tissue), these two sets of muscles deep in the body's core—the pelvic floor and the transverse abdominus—are mutually supportive. They need to work together, and for that to happen with maximum benefit, they also need to be equally fit. That's why Part 1 of the Strengthen-the-Muscles routine asks you to strengthen both by doing the Kegel and tight abs exercises as a pair.
Start, however, by doing the two exercises separately—maybe doing your Kegels in the morning and tight abs at night. Once you're comfortable doing both, by all means put the two together. This will not only enhance your core strength and coordination, it will also decrease the time spent on your exercise routine by some five minutes.
Their joint effect is beneficial in many ways. Obviously, these exercises enhance muscle strength, and they increase the flow of blood to the muscles and the pelvic organs as well. The risk of infection is thereby lowered, and that too helps stave off pelvic floor disorders. What's more, the strengthening of these muscles can enhance sexual stimulation and sexual gratification as well.
Spend at least two weeks on Part 1.
Kegels are absolutely basic to the entire Strengthen-the-Muscles routine, and it's very important that they be done correctly. Done wrong, Kegels simply won't work, and patients who don't see results can grow discouraged. Even worse, you could end up with more problems. For example, if you do the Kegels wrong and instead are overusing accessory muscles like the glutes or the inner thighs, this could produce trigger points on those muscles—that is, hyperirritable spots that are painful to the touch and that can also lead to new pain and new problems.
The key to doing Kegels correctly is to locate your own pelvic floor muscles. There's a simple way to do this: while urinating, stop the urine from flowing by tightening or squeezing the muscles. Those are the muscles you're going to clench and unclench when you do your Kegels. If you find that clenching the muscles minimizes but does not completely stop the urine stream, you've found the right muscles, but you've also learned that they're very weak indeed—a solid indication that you need to do the Strengthen-the-Muscles routine.
Do this locating and identifying exercise very briefly and only temporarily—maybe once a week initially, until you identify the muscles—because doing it repeatedly while urinating sends a confusing signal to the brain that may eventually produce a urinary dysfunction.
Another way to locate the muscles you're looking for is during sexual activity. Squeeze around your partner's finger or penis; the muscle you tighten in doing so is the precise muscle you'll want to clench and unclench—contract and relax—when you do your Kegels.
Here's how to do your Kegels to strengthen your pelvic floor:
Lie or sit down, whichever you prefer. You may use a pillow as a wedge under the small of your back if you like.
Find the muscle you identified earlier and clench it, then relax. Clench again, then relax. And so on. One clench-and-relax constitutes a repetition, and both sides of the repetition—both the clenching and the unclenching—are equally important. Remember Sandy, the Pilates instructor? Relax as deliberately and for as long as you clench the muscle.
You may find it difficult to do Kegels at first if your muscles are very weak. But each repetition really will increase the strength of the muscles, and in time, doing your Kegels will become easier—guaranteed. Do these Kegels three times a day if you have one of the problems listed at the beginning of this chapter, but no more than three times a week if you're doing them just to enhance your sex life.
1. Tighten the muscle and hold for 10 seconds, relax for 10 seconds. Do 10 repetitions to strengthen your slow-twitch pelvic floor muscles.
2. Tighten and hold for two seconds, relax for two seconds. Do 10 repetitions to strengthen the fast-twitch fiber muscles.
The two different basic Kegel exercises differ only in timing, not in the process. What's the difference?
Your first set of Kegels, held for 10 seconds, then relaxed for 10, addresses the slow-twitch fibers that make up some 70 percent of the muscles. These are the muscle fibers that provide support and resist fatigue. The second set of Kegels—two-second Kegels—strengthen those fast-contraction fibers that help open and close the bladder and bowel and that are so essential in sexual activity. The two sets of Kegels mean you're strengthening both your marathon endurance muscles and the sprinter muscles that provide a quick jolt of power when needed.
If you've done the End-the-Pain routine, you already know about the tight abs exercise. It's an exercise for strengthening the muscle known as the transverse abdominus, the muscle deep in the abdomen that wraps around your lower abdomen above your pelvis, like a corset. In strengthening the transverse abdominus, you also help to stabilize your core. Do the exercise once a day:
1. Lie on your back, bend your legs at the knee with knees hip-width apart, and make sure both feet are flat on the floor.
2. As if you were zipping up a tight pair of jeans, tighten your navel down toward your spine, keeping your spine in a neutral position. Don't "suck in" your belly; just contract it so that you feel the muscles in your lower abdomen tighten. Do not tilt your pelvis up or down. Do not bear down on the pelvic floor muscles. All of that is counterproductive to what this exercise sets out to do.
3. Hold the contraction for five seconds, relax for five seconds. Do five repetitions. Over time, increase the hold to 10 seconds with five seconds of relaxation between reps, and increase the repetitions to 30.
Once you have been doing Kegels and the tight abs exercise successfully for a couple of weeks, you're ready to add hip and additional core exercises to the basic Strengthen-the-Muscles routine. The muscles of the hips and core all work together with one another and with the pelvic floor and assist in stabilizing the pelvis, the abdomen, and the back. Take another look at the diagram of the pelvis in Chapter 1 (Figures 1.1 and 1.2), and you will see again how all these muscles form that bowl-like sling at the body's core. Weakness in these muscles of the sling may result in dysfunction in the low part of the back, the pelvis, and the sacroiliac region, and it may also lead to incontinence and prolapsed pelvic organs.
That's why we add the following four exercises to the Strengthen-the-Muscles routine. The idea is do a Kegel contract-and-relax while you do each of these exercises. That takes concentration and may be difficult at first. If so, get comfortable with the exercises of Part 2 on their own to begin with, then add the Kegels later on.
If you manage to do all four of the Part 2 exercises with Kegels—in other words, you are able to do the hip external rotation, hip adduction, bridge, and pelvic tilt while doing Kegels—Part 2 can simply replace the basic Kegels of Part 1. Otherwise, do at least two of these exercises every day in addition to your Kegels.
Whatever the number of Part 2 exercises you do, it's very important to do them slowly and with maximum control. If you toss them off quickly, you'll get no benefit at all. You might even injure yourself. So do each exercise slowly and deliberately. Concentrate.
For all four, you will be lying on your back with your knees bent. If you like, place a thin pillow under your head for comfort.
Take four weeks to perfect Part 2.
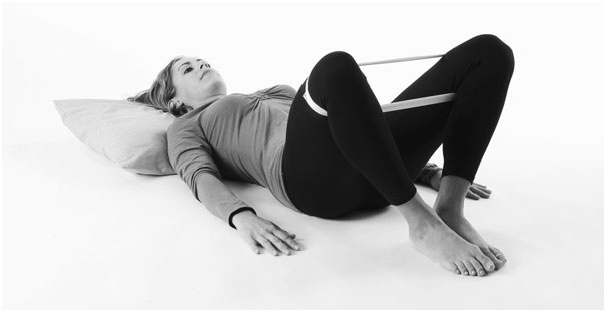
On your back with your knees bent and feet together, tighten your transverse abdominus and slowly separate your knees—feet still together—until the knees are about 24 inches apart. Hold the position—with a Kegel—for three seconds, then slowly return your knees together in the center. Relax for five seconds.
Once this exercise becomes easy, you may add resistance by pressing your hands against the separation of the knees on the

outside of your thighs. You may also use a resistance band for this purpose.
The hip external rotation exercise strengthens some of your butt muscles as well as your hip muscles. Do 10 repetitions, working up to 30 repetitions, once a day.
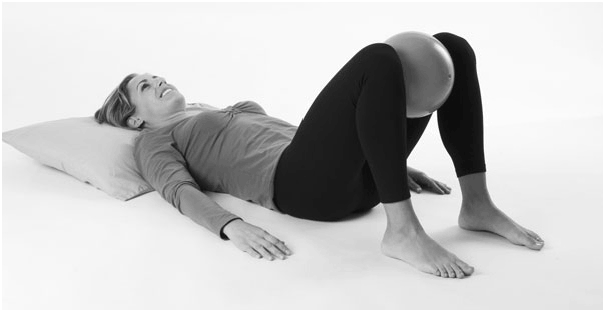
You'll need a pillow or a ball for this exercise. On your back with your knees bent and feet hip-width apart, tighten your transverse abdominus, then squeeze the pillow or ball between your knees—while doing a Kegel—and hold the position for 10 seconds. Relax for 10 seconds. Do 10 repetitions of this inner thigh-strengthening exercise, increasing to 30 reps, once a day.
On your back, knees bent, feet flat and hip-width apart, tighten your transverse abdominus, then slowly raise your pelvis while doing a Kegel. Keep holding the muscles until you reach the top of
the bridge, then slowly lower the pelvis, still tightening the pelvic floor muscles.
Now relax totally for five seconds.
This exercise strengthens the top of the thigh, hamstrings, lower back, abs, and glutes. Repeat it a total of 10 times, increasing to 30 reps, once a day.
On your back, knees bent, feet flat and hip-width apart, tighten your abdominal muscles by sinking your belly button toward your spine—as if you were zipping up a tight pair of jeans—and tilt your pelvis upward toward the ceiling. Simultaneously, squeeze and lift the pelvic floor muscles in a Kegel. Don't forget to breathe. Hold for 10 seconds, then relax for 10 seconds for one repetition. Pelvic

tilts strengthen your abdominal muscles and help to stabilize your core. Do 10 repetitions, increasing to 30 reps, once a day.
As I explained in Chapter 3—and it bears repeating here—there is one important caution before you undertake the abdominal exercises: if you have diastisis recti, you will need to perform a corrective exercise first. Diastisis recti is a fairly common disorder in which the right and left muscles of the abdomen, which are attached to one another with connective tissue, have become separated. Common causes of the separation are chronic straining, pregnancy, obesity, and more. To test for diastisis recti, lie down on your back, knees bent, feet on the floor or bed. Place two fingers about an inch directly below the navel and lift your head to contract the abdominal muscles. Then place two fingers about an inch directly above the navel and lift your head to contract the abdominal muscles. If you feel a separation of more than two fingers in either location, chances are you have diastisis recti, in which case I recommend you see a physical therapist or healthcare provider for a proper diagnosis.
When you stand upright, your pelvic floor muscles are parallel to the floor and are thus fighting gravity. The three exercises of Part 3, therefore, provide a particular challenge to your muscles—especially since you must do a Kegel simultaneously with each exercise. Again, do each exercise slowly and in a controlled manner in order to avoid injury and gain maximum benefit for your effort. Take four weeks for Part 3.
Stand with your feet hip-width apart. Do five slow Kegels as you breathe deeply: hold for 10 seconds, rest for 10 seconds. Then do five fast Kegels: hold for two seconds, rest for two seconds. Work up to 10 repetitions of both the 10-second and two-second standing Kegels.
Start with feet a foot apart as you contract your abdominal muscles and tighten your pelvic floor in a Kegel. Now, with your back straight, slowly lower your buttocks and bend your knees to 45 degrees, making sure the knees do not extend past the toes. Hold for three seconds, then rise up slowly, still maintaining the Kegel. Now relax for three seconds.
Do five repetitions, and slowly work up to 10. Once you have worked up to 10 reps, you are ready to advance to the two-foot squat with Kegel (Step 3).
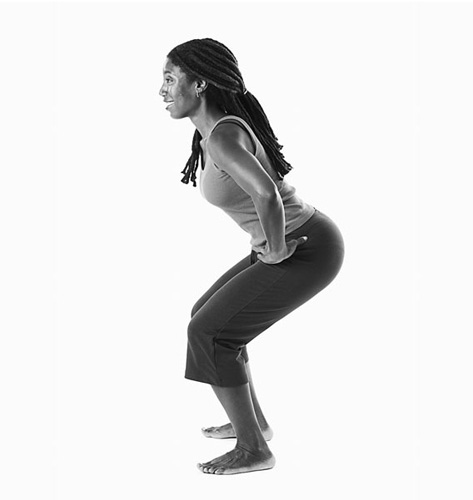
Do exactly the same thing as in the previous exercise, but squat with your feet two feet apart. Start with five reps, and work up to 10.
You'll need a firm chair without wheels. Start out seated at the edge of the chair with your feet hip-width apart, flat on the floor, and slightly back so you have leverage to stand. Keeping your back straight, lean forward at the hips, tighten your abdominal and pelvic floor muscles, and count to five as you slowly lift your buttocks off the chair and stand up. Rest, standing, for three seconds. With knees still hip-width apart and with your back straight, tighten your abdominals, do a Kegel, and count to five as you slowly lower yourself back onto the chair; be careful not to extend your knees out beyond your toes. Do not flop onto the chair; that will defeat the muscle-strengthening purpose of the exercise.
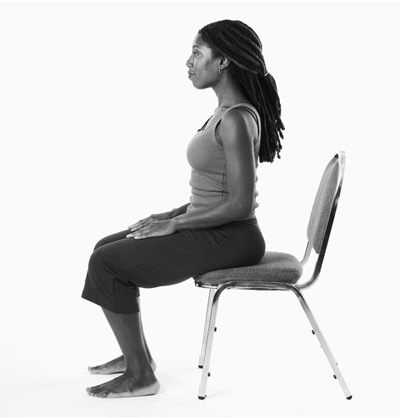
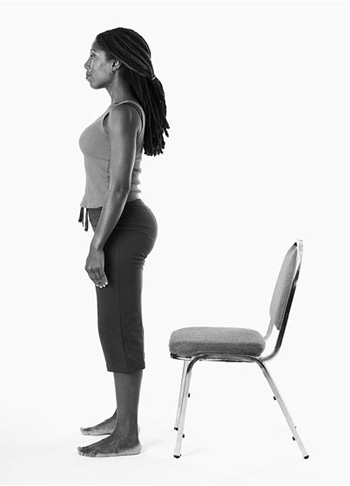
From seated position to seated position is one repetition. Start out doing five, and slowly work up to 10 repetitions. Don't forget to breathe!
If you find it too difficult to rise up out of the chair, try putting a couple of phone books on the seat. Gradually remove the books as you get stronger.
Although you'll be on the move for these exercises, it's still important to do them slowly, while breathing, and in a controlled manner. Also, you must do a Kegel with each exercise, so you'll need to concentrate.
Tighten your abs and do a Kegel as you march in place for 10 seconds. Rest for five seconds. Do this 10 times. To make it more challenging, lift your knees higher and march faster, making sure that you maintain tight abs and tightened pelvic floor muscles for the full 10 seconds.
Tighten your abs and do a Kegel as you jump one to two inches off the ground. Rest for two seconds. Do 10 repetitions.
Tighten your abs and do a Kegel and jump up five to six inches. Take a two-second rest. Do 10 of these big jumps.
Stand with feet hip-width apart. Keeping your torso upright and your pelvis square, extend your right foot three feet in front of your left foot. Tighten your abs and your pelvic floor muscles in a Kegel, and slowly lower your torso straight down so that your left knee bends between 45 and 90 degrees—depending on your strength and comfort level. Hold this lunge position for three seconds. Still holding the tight abs and Kegel, and with torso still upright, slowly raise yourself as you straighten your right knee. Rest for five seconds.
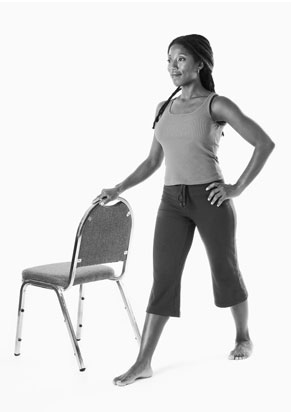
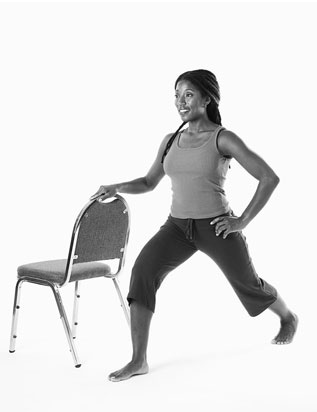
Do 10 repetitions, then switch legs, extending your left foot in front of your right. Do the exercise 10 more times with the left foot in front.
As you gain the muscular strength you're seeking in these exercises, you can adjust the routine. At first, Kegels, which are basic to the Strengthen-the-Muscles routine, can easily be incorporated into your daily activities. Do them when you find yourself listening to a presentation at work, or at the movies, or while commuting on the bus or train. Or, as I mentioned earlier, if you are able to integrate Kegels into Parts 2 through 4, then you need not do the exercises of Part 1.
Once you've advanced through the total three-and-a-half month program and have gained proficiency and comfort in each part—as well as enhanced muscle strength—you can consolidate your daily workout into a minimum of five exercises, choosing any you like from Parts 2, 3, and 4. Be sure to vary the five—or more—exercises you do each day. Mix it up so that you continue to address all the components of the pelvic floor and keep yourself fit all over, inside and out.
Keep up Parts 2, 3 and 4 even if your symptoms have improved 100 percent—but at this point only three or four times a week. It is a good practice for a lifetime of well-being. If, however, your symptoms persist after three and a half months, see a specialist in pelvic floor dysfunction and incontinence.