

BUTTERNUT SQUASH WITH PIQUILLO CREMA

This is a de-engineered Rick Bayless pasta recipe. Serve it as is and it’s a rich vegetable side dish. Toss it with noodles for a delicious pasta dinner. Puree it and it’ll be a crazy rich butternut squash soup!

MAKES 4 SERVINGS
PIQUILLO CREMA
4 garlic cloves, peeled
+ olive oil
1 C Mexican crema, heavy cream, or crème fraîche
½ C jarred and drained piquillo peppers or 3 fresh red poblano chilies, charred and skins removed, sliced into strips
1 t kosher salt
SQUASH
2 lb peeled butternut squash
2 T reserved garlic oil or olive oil
+ kosher salt
1 C grated Mexican queso añejo, Pecorino Romano, or parmesan
¼ C coarsely chopped cilantro
1 Make the garlic confit: Put the garlic in a small pot with just enough olive oil to float the cloves. Set over medium heat until bubbles form around the garlic (the oil will be about 185°F). Reduce the heat to low to maintain the temperature and confit the garlic until it is very soft and lightly golden brown, about 20 minutes. Strain the garlic out and reserve the oil.
2 Warm the crema (or one of its stand-ins) in a glass measuring cup in a microwave for 1 minute at 50 percent power. Pour into the blender with the peppers, garlic, and salt and blend until smooth. Set aside.
3 Prepare the squash: Heat the oven to 400°F. Cut the peeled squash into cubes and toss with the oil and season with salt. Arrange in an even layer on a sheet pan. Roast, tossing occasionally, until just tender and golden brown, about 30 minutes.
4 Pour the crema-pepper mixture into a large (10-inch) skillet set over low heat. Add the roasted squash and toss to combine. Stir in ½ cup of the cheese and divide among 4 bowls. Top each bowl with a portion of the remaining cheese and sprinkle with cilantro.
OR
Pour the crema-pepper mixture into a large (10-inch) skillet set over low heat. Stir in ½ cup of the cheese until it’s warmed through and completely melted. Divide the roasted squash among 4 bowls and top each with crema, a portion of the remaining cheese, and a sprinkle of cilantro.
MEMELITAS WITH VEGETABLE PEELER SALAD

Let’s start at the beginning: Hannah, my wife, started making this for our family after she read in a glossier food magazine than Lucky Peach that Alice Waters used to make a snack like this for her daughter. It was never a dish for guests, but it was something we came to rely on and that I actively looked forward to, and it was more vegetably than just quesadillas, which are what the children want to eat most of the time anyway.
Then when we were in Los Angeles, we went to Guelaguetza, an epic and beyond-wonderful Oaxacan restaurant, and what did they have on the kids’ menu? Tortillas smeared with beans and covered in melted cheese called memelitas (along with French fries and a little bowl of lime-spiked chicken soup; it made me wish I was a kid).
The “vegetable peeler” salad just refers to the “method” of slicing up any firm-fleshed vegetables very thinly using a peeler. You could add fennel, kohlrabi, peppers, broccoli stems, whatever sturdy veg is lurking in the fridge. The 15 or so minutes between making the salad and getting the memelitas on the table gives the lime and salt a chance to break them down a little bit and make them pickley and peppy.
MAKES 4 SERVINGS
SALAD
2 large carrots, peeled, then shaved with a vegetable peeler
4 radishes, thinly sliced or shaved (watermelon radishes are nice if you can score ’em!)
1 C thinly sliced white cabbage
½ t kosher salt
1 lime, juiced
MEMELITAS
12 corn tortillas
1 C refried beans (canned are fine)
½ lb fresh torn or shredded cheese, preferably Oaxacan, though mozzarella will do and I’ve used Monterey Jack in a pinch
+ lime wedges
+ avocado slices
+ hot sauce
1 Make the “salad”: Combine the carrots, radishes, and cabbage in a bowl. Add the salt and lime juice, then toss to coat and set aside while you assemble the memelitas.
2 Make the memelitas: Spread each tortilla with a tablespoon or so of the refried beans and top with the cheese. Warm the memelitas in a toaster oven or regular oven set to broil, until the cheese is melted, 2 to 3 minutes
3 Top each memelita with a three-finger pinch of salad and serve with lime wedges, sliced avocado, and hot sauce on the side.
SPANAKORIZO

Spanakorizo looks like a humdrum pile of spinach and rice, an Aegean mom’s Tuesday-night fallback. But—and I know we’re supposed to love all our children equally—it has emerged, at the end of the book-making process, as my favorite dish out of the whole volume.
There’s something about the unification of rice and greens that makes this dish feel “complete” and satisfying in a dog-scratching-its-deepest-itch sort of way; something about the way that mess of onions and garlic and leek and dill don’t exactly disappear into the dish but don’t stand out to be noticed. Spanakorizo is a dish that’s greater than the sum of its parts, better than it has any right to be, and certain to be a fixture of my table—and hopefully yours—for years to come.
MAKES 4 SERVINGS
½ C olive oil, plus more for finishing
1 onion, cut in half and thinly sliced into half-moons
1 bunch scallions, thinly sliced
1 leek, white part only, cut in half, rinsed well, and thinly sliced
+ kosher salt
1 package (16 oz) frozen spinach
1 bunch dill, chopped
1 C long-grain rice
1½ C water
+ juice of 1½ lemons (cut that extra ½ lemon into wedges and bring to the table)
+ freshly ground black pepper
1 Heat ¼ cup of the olive oil over medium-high heat in a pot large enough to eventually host the whole party. After a minute, add the onion, scallions, and leek and a large pinch of salt. Sauté the onion mixture, stirring occasionally, until it has wilted, maybe 5 minutes. Stir in the spinach, dill, and another pinch of salt and sauté, stirring until all are wilted, probably fewer but certainly no more than 5 minutes.
2 Add the rice, water, remaining oil, and lemon juice and bring to a boil. Reduce the heat to low and cover; cook for 15 minutes. Take the pan off the heat and let rest unmolested for 10 minutes before serving. Zazz the spanakorizo up with salt, pepper, additional oil (glug it on like a Greek grandma), and fresh lemon before it goes to the table. Eβιβα!
MALFATTI IN BROWN BUTTER WITH SAGE
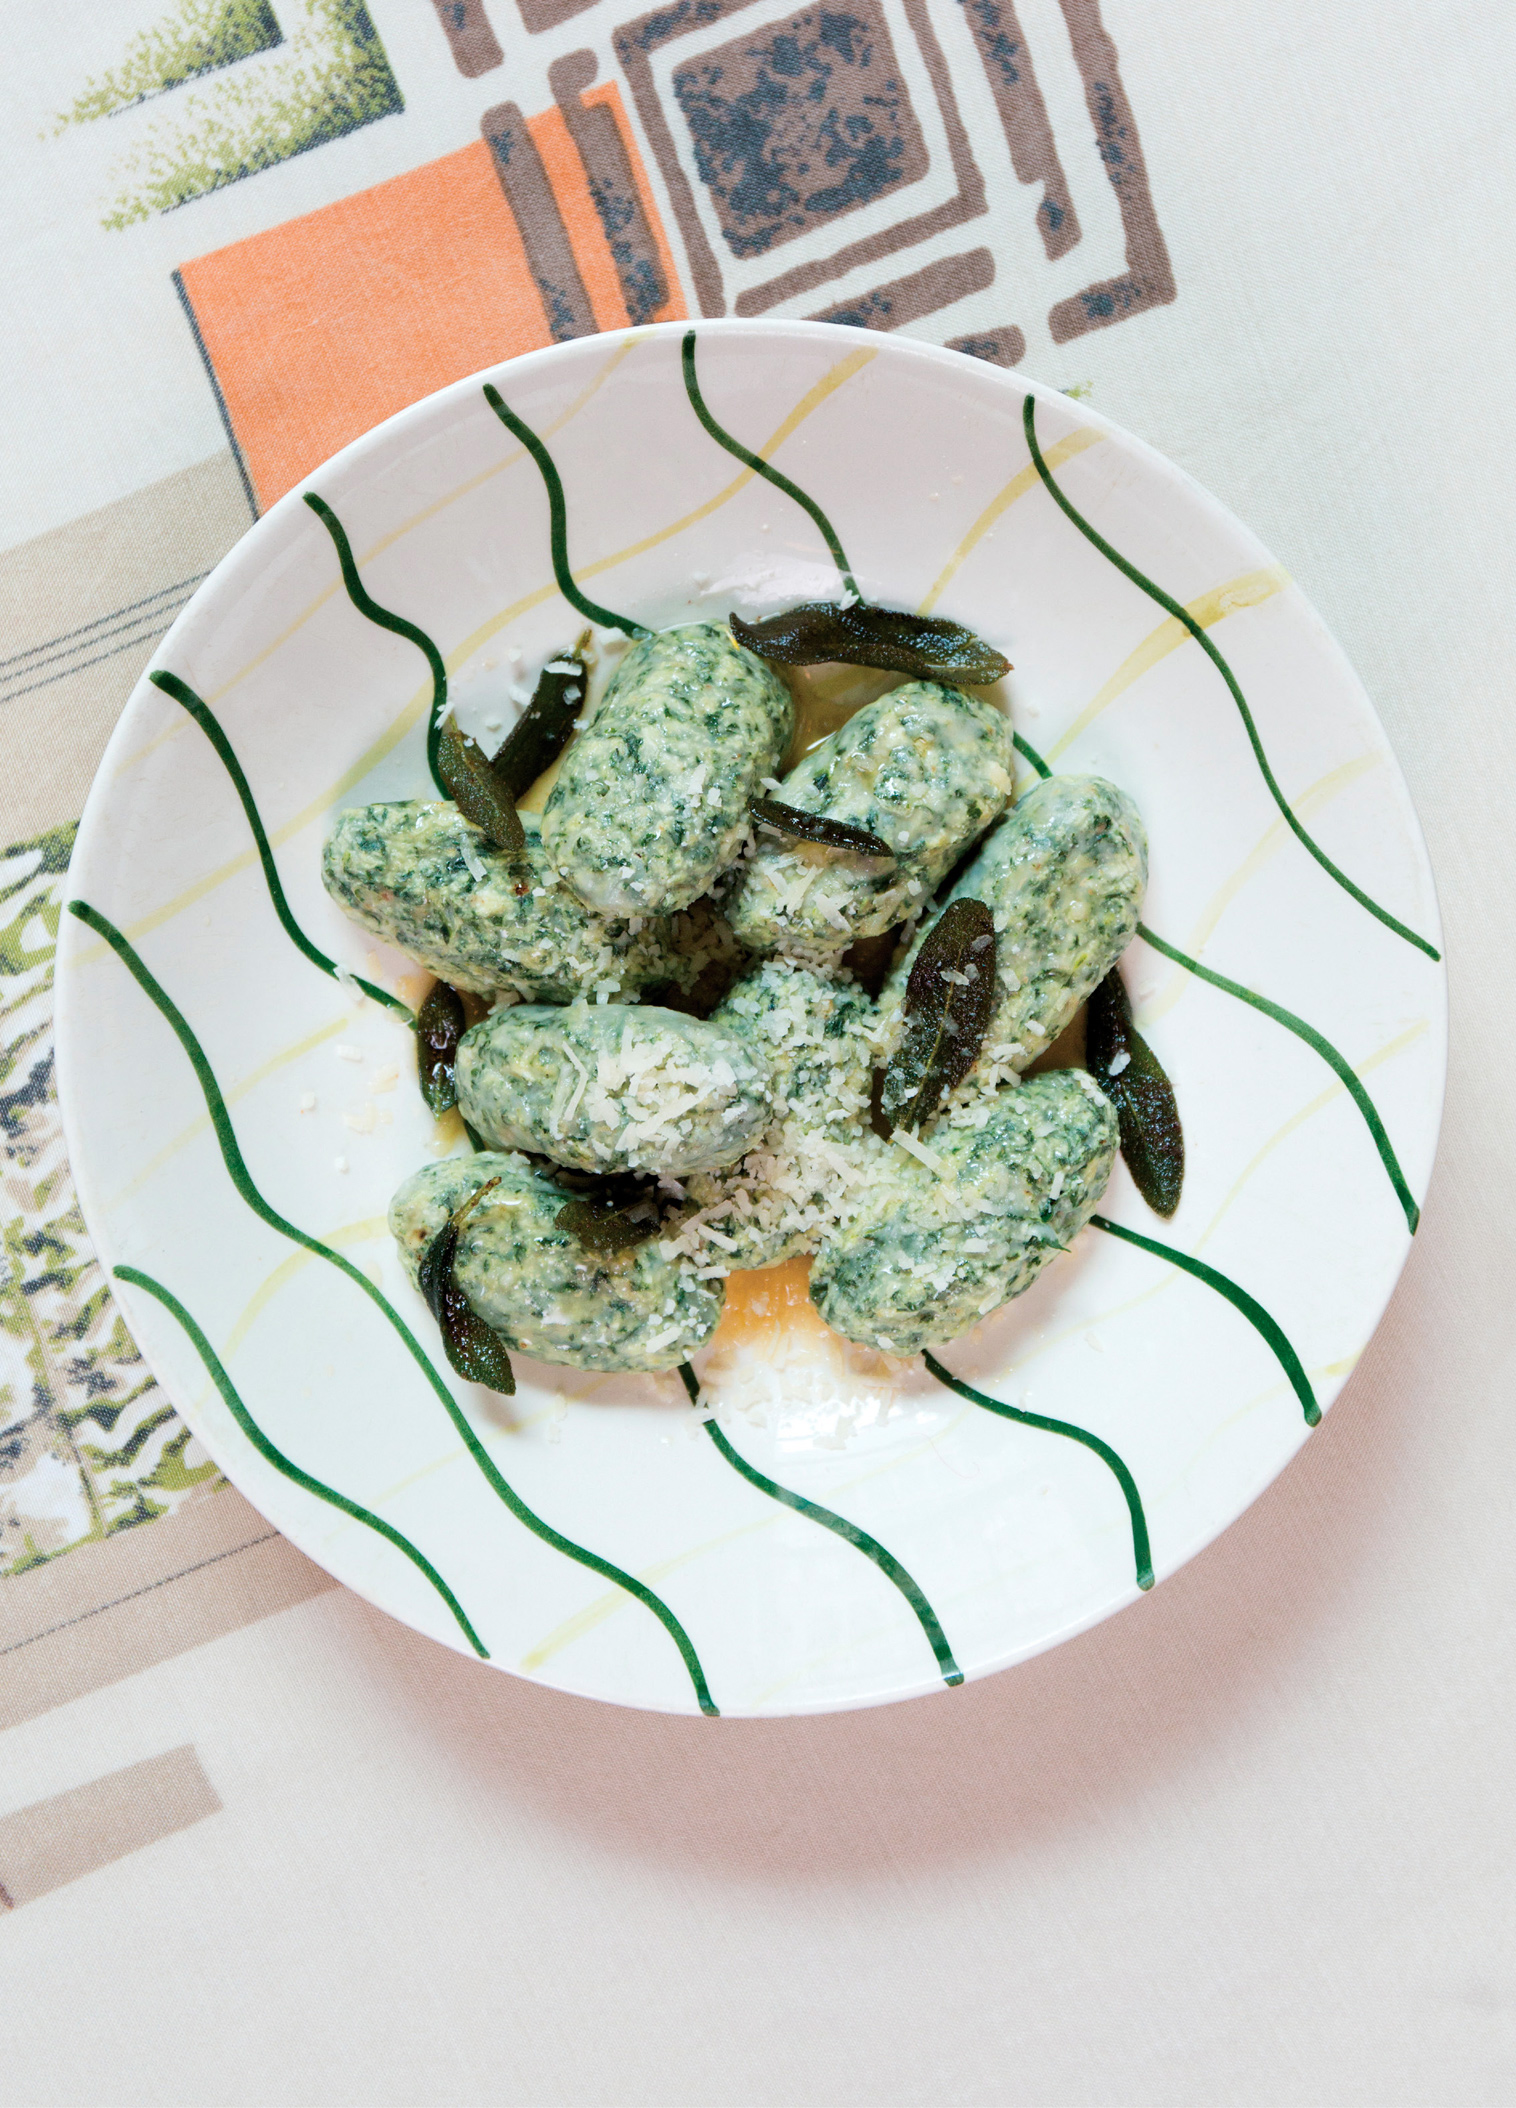
Gnocchi and gnudi became pillowy pastas of prominence in the last decade; potato is the vegetable that powers them both. Malfatti is a member of that same pasta family in that it offers an equally elegant eating experience except it is made with a whole mess of cooked-down and wrung-out greens. Virtue and luxury have never looked so good together.
MAKES 4 SERVINGS
12 oz fresh ricotta cheese
+ kosher salt
3 lb Swiss chard or lacinato kale, stemmed and roughly chopped
4 T unsalted butter, melted, plus 1 stick (4 oz) for serving
¼ C fine dried bread crumbs
2 eggs, beaten
+ whole nutmeg
+ freshly ground black pepper
16 fresh sage leaves
+ parmesan cheese
1 Place the ricotta in a fine-mesh strainer or cheesecloth and let drain overnight in the refrigerator.
2 Bring a large pot of water to a boil, salt it generously, and blanch the greens until tender but still bright green, 3 to 4 minutes. Drain and squeeze them dry. Place the greens in a clean kitchen towel, gather the corners, and squeeze to extract as much liquid as possible from the greens. Finely chop the greens. Return them to the kitchen towel and squeeze once more. There will be about 1 cup of greens if you’ve squeezed them well. Unwrap and toss with your fingers to separate the strands.
3 Combine the drained ricotta, squeezed greens, 4 tablespoons melted butter, the bread crumbs, and eggs in a large bowl. Break up the ricotta with a spoon, then fold in with the other ingredients. Grate some nutmeg over the bowl, season with ½ teaspoon salt and ¼ teaspoon black pepper, and stir the seasonings in.
4 Scoop or roll the malfatti into 1-ounce egg-shaped dumplings (you will have 20 to 24 dumplings). Lay them like soldiers on a parchment-lined baking sheet. (Malfatti can be frozen like this, if you like. Pop the frozen dumplings from the tray and store in the freezer in a zip-top bag for up to 1 month.)
5 Bring a large pot of water to a boil and salt it well. Cook the malfatti in batches of 10 to 12, adding them to the pot one by one and distributing them around the pot so they do not stick to one another. They are done when they float to the surface and more than half of each dumpling bobs above the surface of the water, about 8 minutes. Malfatti should be evenly cooked through when done; to test for doneness, cut one in half. The texture of the dumpling should be fluffy and uniform throughout.
6 While the malfatti are cooking, heat the remaining butter in a wide skillet. Add the sage leaves and a generous pinch of salt. Set the skillet over medium-low heat and allow the butter to gently melt and begin to brown. The sage leaves will sizzle and become golden and crunchy.
7 When the butter is browned and the sizzling subsides, remove the pan from the heat and add the malfatti. Gently toss the dumplings to coat them in the brown butter, then divide them among pasta bowls. Shower with parmesan and serve hot.

JESSICA KOSLOW
SQIRL, LOS ANGELES

PM: What is a power vegetable to you?
JK: I think it’s two-pronged. A power vegetable can be a meaty vegetable, like Brussels sprouts: They have such a heft and weight that they can take the place of the meat. Broccoli, cauliflower, too. And then there are the things that smash really well: potatoes, squash, parsnips, carrots.
But for me, there’s also the power vegetable that can lift you up, the kind that’s all about lightness—the lettuces, the celtuce. I’m hoping that you find a way to put sprouts in the book. Things that are nutrient rich and that you’re eating raw. They’re vibrant. They remind you that the world is alive.
PM: I’m more of a burn-your-vegetables-and-soak-them-in-umami kind of guy. What’s life like when you look at it through turmeric-juice-colored glasses?
JK: Like a shaved Brussels sprout salad with a lot of acid. Or roasted delicata squash, but served cold and finished with pumpkin seed oil and toasted pumpkin seeds, sprouts, pomegranate, and a green sauce and yogurt. We’ll serve these things warm too, but in a context where you want more of a salad—more of a live food—we’ll serve them cold. That way, you’re able to get a certain vibrancy from a vegetable you may look at as something to be burned and seared and charred. You can flip it the other way, and make it feel more alive. And you get that totally other extreme from the kind of power vegetable that you’re talking about.
And I don’t think you should discount sprouting—not just sprouts as a garnish or finishing touch, which, aside from being a little pricey, are a great and wildly easy way to make a dish prettier and tastier—but sprouting your grains and legumes. We sprout mung beans and all sorts of foods I like to think of as “pods.” I think sprouting makes them more delicious, they feel more “alive,” and they certainly cook more quickly.
Sprouts have always had a special place in my heart, though—when I was a kid I used to go to the market with my mom, bring home a big bag of sprouts, dump them in a salad bowl with olive oil and lemon and a can of tuna and it was one of my favorite make-it-myself lunches.
PM: We both know that vegetables aren’t boring, but what are the techniques that you use to make vegetables exciting? You’ve got roasted squash, it’s cold, it’s got a number of different condiments on it, it’s got sweetness, it’s got acid. What’s in your bag of tricks to make vegetables more vibrant?
JK: I think the sweet and the sour and the salt play. They all play. And on top of that, there’s some sort of textural component like toasted buckwheat groats, oven-dehydrated quinoa, or a candied granola. That crunchiness.
I think we all grew up eating bags of chips and Rice Krispies Treats, and we want the crunch. So there’s gotta be that textural component. That’s a satisfying thing for many people. Once you play those flavors—sweet, salty, savory—and then finish it with something that’s maybe not necessarily bread crumbs, you’ve got them.
Beyond that, though, I think it’s important to think about what you’re cooking and when and where it’s coming from. I don’t think that all the people who come to eat at Sqirl are at the farmers’ market all the time like we are; they may not know they’re eating during the narrow window when we can finish their lentil soup with sprouting broccoli flowers. But we do, and it makes us happy to know we’re connecting the people we’re feeding to what’s happening in the unpaved, beautiful world outside the city. I think there’s “power”in that, too!
ROASTED SQUASH WITH PIPIÁN ROJO

Pipián rojo is a member of the greater mole family. (That’s mo-lay, the delicious category of Mexican sauces, not moles, those disgusting subterranean animals.) It has a complex flavor and an opulent richness that doesn’t come from animal fat, like so many European sauces, but from ground pumpkin seeds. (Other pipiáns and moles are thickened with tortillas, or masa, or nuts; it’s a fascinating world to explore.)
Pipián rojo would make a pile of junk mail taste good, but since some people might not consider junk mail to be a vegetable, we’ve paired it here with roasted kabocha squash, which is one of those vegetables that’s so good it’d be okay with junk-mail sauce poured over it. But we don’t have the recipe for that.
I like to eat this with a big pile of warmed tortillas, though it is self-sufficient enough to work on its own, and perfectly comfortable on top of a bowl of rice or some other hipper grain.
MAKES 4 SERVINGS
2 2 lb kabocha squashes
+ kosher salt
+ sesame seeds
+ lime cheeks
1 Heat the oven to 375°F. Line a baking sheet with parchment paper.
2 With a sharp, heavy knife, cut the kabochas in half vertically through the stem end. Don’t remove the seeds. Lay the halves cut side down on the lined baking sheet. Roast the squashes until they are tender enough to be pierced with a paring knife, 30 to 40 minutes. The skin may be quite firm but the flesh will, at that point, be soft and caramelized in spots.
3 When the squashes are cool enough to handle, flip them over and carefully scoop out their seeds and pulp, taking care not to break the flesh. Slide a large serving spoon between the skin and flesh of the squash, removing the flesh from each half in two or three large wedges.
4 Place the wedges from each half into a shallow bowl or dinner plate, season with salt, and blanket each with pipián rojo. Sprinkle with sesame seeds and serve with a lime cheek.
PIPIÁN ROJO

Makes 2½ cups (4 to 6 servings)
3 dried guajillo chilies
2 dried ancho chilies (or 2 more guajillos)
2 T neutral oil
3 garlic cloves
½ C chopped onion
2 bay leaves
1 t dried oregano
½ t ground cumin
½ t sweet paprika
⅛ t ground cinnamon
4 C water
½ C pumpkin seeds
2 T sesame seeds
1 t kosher salt
1 Pull the stems from the chilies and shake out and discard their seeds. Tear the chilies into pieces the size of a postage stamp.
2 Heat the oil in a large, heavy skillet over medium-low heat. Add the torn chilies, garlic, and onion, and toss to coat them in the oil. Sweat the vegetables until the onion and garlic are soft and the oil has turned red from the chilies, about 8 minutes. Stir in the bay leaves, oregano, cumin, paprika, and cinnamon. Continue cooking, stirring often, until the spices have melded and give off a heady aroma, about 2 minutes. Add the water and bring to a boil. Reduce the heat and gently simmer until the sauce base has reduced by half (to about 2 cups), about 20 minutes.
3 Meanwhile, place the pumpkin seeds in a medium skillet and set over medium-low heat. Warm the seeds, tossing them in the pan so that they toast evenly, until they have darkened a few shades, 3 to 4 minutes. A few will pop and dance in the pan. Slide them onto a plate and add the sesame seeds to the pan. Toast the seeds, shaking the pan, until they are a dirty blond, about 2 minutes. Slide them onto the plate with the pumpkin seeds and let cool.
4 Carefully purée the hot sauce base and cooled seeds in a blender or with an immersion blender until very smooth. Return the sauce to the pan and bring to a simmer. Simmer until the sauce has thickened, about 5 minutes, and season with the salt. The pipián can be eaten immediately but will taste best after being cooled and stored in the fridge for a couple of days. Reheat it gently, adding splashes of water to loosen the sauce if needed.
SWEET POTATO BURRITOS

In this evening’s production of YOUR BURRITO, the role of Chorizo will be played by its understudy, Sweet Potato. Please remember to silence your cell phones before the show begins.
MAKES 4 SERVINGS
1½ lb sweet potatoes, peeled and cut into ½” pieces
1 T neutral oil
1 t kosher salt
¼ t freshly ground black pepper
2 t chili powder
¼ t ground cumin
¼ t ground coriander
½ t oregano
+ pinch ground cinnamon
+ pinch ground cloves
4 12” flour tortillas
TO PUT IN YOUR BURRITO
+ cooked rice
+ cooked beans
+ avocado slices
+ sour cream
+ shredded cheese
+ cilantro leaves
+ thinly sliced iceberg lettuce
+ pickled jalapeño chilies
1 Heat the oven to 400°F. Line a baking sheet with parchment paper.
2 Combine the sweet potatoes, oil, salt, cumin, chili powder, coriander, and black pepper in a bowl and toss to coat. Arrange in a single layer on the lined baking sheet and roast until tender and caramelized, about 30 minutes.
3 Assemble the burritos. See the burrito-filling instructions.


SALSA VERDE

I learned to make salsa verde this way from Marc Meyer, the first chef I ever worked on a cookbook with. I like it more than any other salsa verde except the one at La Super Rica taqueria in Santa Barbara, California, but I can’t for the life of me figure out how they do it. For us mortals, this will do.
MAKES 3 CUPS
1 lb tomatillos
1 medium onion, cut into ½”-thick rings
8 garlic cloves, unpeeled
1 jalapeño chili
+ neutral oil
¼ C chopped cilantro stems + ¼ C cilantro leaves
1 t kosher salt
+ fresh lime juice
1 Heat the broiler to high.
2 Dunk the tomatillos in a bowl of hot water to dissolve the sticky sap on their skin and loosen their papery sheaths. Remove and discard the papery outsides. Rub the tomatillos, onion slices, garlic cloves, and jalapeño with oil to coat and arrange them on a rimmed baking sheet. Broil the vegetables, turning once, until they are charred (actually charred, not just browned) and softened, about 10 minutes. Remove from the broiler and cool them enough to handle.
3 Trim the stem from the jalapeño (and scrape out the seeds, if you want less heat), squeeze the garlic cloves out of their skins, and transfer them and the tomatillos and onion to a blender or food processor and process until smooth. Add the cilantro and salt and continue processing until very smooth. Taste the salsa and adjust the seasoning with a pinch of salt or squeeze of lime juice as needed.

SALTIE’S CLEAN SLATE

The sandwich is a coalition of the willing: a coalition of elements that are all willing to be AWESOME. The hummus has MISO in it. The pickled beets are ROASTED. The naan is truly, honestly easy to make and criminally good. You can add other herbs (dill!) or other pickled things (they often have turmeric-yellow bread-and-butter-style pickled onions) on there too, but don’t skip out on any of the following. If your commitment to Power! and/or awesomeness is weak, at least try making the naan before you write off this recipe as too complicated—it’ll draw you into trying the rest!
For those wondering where such a wonderful sandwich comes from: Her creator is Caroline Fidanza, a chef who, during her decade at Diner, did the most honest market-driven cooking in the city at a time when everybody else was pretending at it, and helped to codify the idea of a Brooklyn restaurant—the idea that’s been exported and repackaged around the world since. You can score her handiwork these days at Saltie, a tiny slip of a spot on Metropolitan Avenue in Williamsburg, Brooklyn.
MAKES 4 SANDWICHES
YOGURT SAUCE
½ C plain whole-milk yogurt
1 T olive oil
1 t white wine vinegar
½ t ground sumac
+ kosher salt
SANDWICHES
4 pieces cooked Naan
1 C Hummus
1 C cooked quinoa
1 C bite-size pieces of Pickled Beets
½ C julienned carrots
½ C julienned radishes
¼ C torn fresh mint
¼ C sliced scallions
1 Make the yogurt sauce: Stir the yogurt, olive oil, vinegar, and sumac together in a small bowl. Season lightly with salt. Refrigerate until ready to use.
2 Assemble the sandwiches: Lay one round of naan on a work surface and spread it with ¼ cup hummus. Spread 2 tablespoons of yogurt sauce over the hummus, then sprinkle with ¼ cup quinoa. Arrange the beets, carrots, and radishes on top, then sprinkle with the mint and scallions. Repeat to make 4 sandwiches.
PICKLED BEETS

Makes A quart Container’s Worth
1 lb beets
2 C water
1 T olive oil
1½ t kosher salt
1 C red wine vinegar
½ C sugar
1 t black peppercorns
1 t coriander seeds
1 t mustard seeds
1 star anise
3 allspice berries
1 Heat the oven to 400°F.
2 Fit the beets snugly in a roasting pan and carefully add 1 cup of water. Drizzle with the olive oil and season with 1 teaspoon of the salt. Cover the pan with foil and roast until the beets are tender, about 1 hour. When cool enough to handle, rub the skins from the beets with paper towels and slice into ¼-inch-thick rounds. Place the slices in a jar or bowl.
3 Combine the red wine vinegar, remaining 1 cup water, sugar, peppercorns, coriander, mustard seeds, star anise, allspice berries, and remaining ½ teaspoon salt in a saucepan. Place over high heat and bring to a simmer, stirring to dissolve the sugar. Pour the hot pickling liquid over the beets, and let cool. Cover and refrigerate for at least 24 hours. Refrigerated, pickles will stay fresh for up to 2 months.
NAAN

Makes 4 ROUNDS
1 C all-purpose flour, plus more for dusting
⅓ C whole-grain spelt flour or whole wheat flour
½ t kosher salt
¼ t baking powder
⅔ C buttermilk or yogurt
+ olive oil, for cooking the naan
1 Whisk together the flours, salt, and baking powder in a large bowl. Add the buttermilk and stir with a wooden spoon until the dough becomes too stiff to mix. Dust your hands with all-purpose flour and knead the dough in the bowl to form a uniform texture. Shape into a ball, wrap in plastic, and refrigerate for at least 1 hour and up to 1 day.
2 When ready to make the naan, unwrap the dough, place it on a floured work surface, and divide it into four equal pieces. Dust the pieces with flour and roll them out to 7- to 8-inch rounds.
3 Heat a cast iron pan over medium-high heat until a wisp of smoke rises from the surface. Drizzle a teaspoon of olive oil into the pan, pick up one piece of dough, pass it between your two hands to shake off excess flour, and lay it in the skillet. Cook the dough until the surface is covered in bubbles, then drizzle with another teaspoon of oil and flip. Continue cooking until the naan is puffy and browned, around 1 minute longer. Remove from the pan and keep warm. Repeat for the remaining pieces of dough.
ROASTED CABBAGE WITH BANANA BLOSSOM DRESSING

Ever wonder why cans of Thai curry paste are so small? Because there’s so much POWER in each one. I think of them as little tins of saved time, and use part of one to make the fiery, fragrant dressing for this satisfying and meaty wedge of roasted cabbage. It’s a Thai-influenced dish that could happily serve as a main course alongside some sticky or jasmine rice.
The name, should you be wondering, is a tip of the hat to Uncle Boon’s, a Thai restaurant in Manhattan—this is a simplified version of the salad dressing they put on finely sliced banana blossoms and, less exotically, charcoal-roasted cabbage.
MAKES 6 SERVINGS
+ neutral oil
1 green or white cabbage (3 lb), cut through the core end into 6 wedges
+ kosher salt
½ C coconut milk
¼ C red curry paste
3 T fresh lime juice
2 T fish sauce
1 T sugar
+ stuff to scatter on top of the cabbage: peanuts, cilantro leaves, sliced fresh chilies, and/or fried shallots (either homemade—as in steps 1 and 2 of Zucchini Mujadara—or purchased from a well-stocked Asian supermarket, or use French’s fried onions from the supermarket)
1 Heat the oven to 400°F. Slick a rimmed baking sheet with oil.
2 Grease up your cabbage wedges: They don’t need to shine like hardbodies on Venice Beach, but the oil will help bring the heat to the cabbage, will turn it tender inside and crisp outside, and that’s how you want it to be. Sprinkle your cabbies with salt and pop the tray of ’em into the oven. They will take about 40 minutes to cook through, and you’ll want to flip them once midway on their journey, to ensure even browning. You know they’re ready when the core end offers no meaningful resistance to the tip of a sharp knife.
3 While the cabbage is cooking, make the dressing: Combine 1 tablespoon of oil, the coconut milk, curry paste, lime juice, fish sauce, and sugar in a blender or a container into which you can insert an immersion blender or a jar with a lid that you can shake the bejesus out of it. Regardless of the method, you’re looking to end up with a homogenous, unified dressing. It will keep in the fridge for days should you decide to make it in advance.
4 The wedges go on plates; the dressing is generously drizzled on top of them. Scatter with garnishes and serve, warm or at room temperature, with a fork and a steak knife, to help cut up the cabbage.
TOFU AKURI

This is one of my family’s recipes, from Coomi Mishra, my brother-in-law’s wife’s mother. It’s usually made with eggs but she substitutes tofu—which makes this a vegan scramble—the sort of thing your cousin who’s a freshman at Reed College probably lives off of, except this one is more delicious. Coomi told us, “For us Parsis, it is usually served as a breakfast item. We usually serve it with white sliced bread or with roti or chapati. My memories are also of taking it in the form of a sandwich for school lunches or for a particularly delicious picnic meal.” From Coomi’s kitchen to yours, for picnics, Parsi and otherwise.
MAKES 4 SERVINGS
1 container extra-firm tofu
2 T olive oil
1 C finely diced onion
1½ C finely diced potato
2 t minced garlic
1 slice (¼”) fresh ginger, minced
⅓ C water
+ kosher salt
½ C cilantro leaves
1 plum tomato, seeded and diced
1 green chili (optional), minced
¼ t ground turmeric
+ freshly ground black pepper
1 Drain the tofu and set on a plate lined with several layers of paper towels. Top with another plate and press in this fashion for at least 20 minutes or as long as overnight (in the refrigerator). This will firm the tofu and yield a light and fluffy scramble instead of a soggy one.
2 Pat the tofu dry. Mash the tofu with a fork, creating small curds resembling scrambled eggs.
3 Heat the olive oil in a large cast iron skillet over medium-high heat. Add the onion and cook until its edges are translucent and golden, about 5 minutes. Add the potato, garlic, and ginger and cook, stirring often, until the potato picks up some color, about 3 minutes. Add the water and a pinch of salt, cover, reduce the heat to medium-low, and steam the potatoes until they are just tender but not at all falling apart, about 10 minutes.
4 Uncover and allow any remaining water to steam off before stirring in half of the cilantro (save the rest to garnish the dish), along with the tomato, chili (if using), and turmeric. Cook until the tomato has softened and the bottom of the pan is dry, about 5 minutes.
5 Fold the tofu into the potato mixture and continue folding until the tofu is heated through, about 3 minutes. Finish with the remaining cilantro and a few grinds of black pepper.
FALAFEL

The power of falafel is, to me, unquestionable. But the method of making them? I didn’t even know there was a debate. Fortunately there is Mary-Frances Heck in my life and in the development and testing of this book she was adamant: We have to use a meat grinder to make our falafel.
Really? I asked sheepishly. A meat grinder in a vegetable book? (I am, of course, a fan of the perverse, particularly the variety of mundane perversity that including a meat grinder counts as, but I dislike summoning outré equipment for its own sake.) She persisted. Most real falafel makers use a grinder, she told me. She told me of side-by-side food processor vs. meat grinder taste tests conducted in kitchens she’d cooked in. She sent me YouTube videos from the Holy Land to demonstrate that this wasn’t an academic point being argued by Irish-Americans, but a timeworn truth of the falafel elite. And so I yielded. (She can’t stop me from parenthetically noting that you can, of course, use a food processor, but Ms. Heck will say you will be missing out on the uniform little bits of chickpea that fry up crunchy-on-the-outside and fluffy-on-the-inside; that the end product will taste but not feel like falafel.)
Regardless of how you grind your chickpeas, falafel don’t fly solo: Pair them with Hummus, Arab or Israeli Salad, Tabbouleh, Laban Khiyar (not that they’d be bad with any of those yogurt sauces), tahini sauce, Pickled Beets, and pita or Naan.
MAKES 32 PIECES
1 lb dried chickpeas
2 garlic cloves, chopped
1 C chopped onion
1 C finely chopped parsley
1 T coriander seeds
2 t kosher salt
1 t ground cumin
½ t freshly ground black pepper
+ peanut or canola oil, for frying
1 Place the chickpeas in a large bowl and add water to cover by at least 2 inches. Cover and refrigerate overnight.
2 Drain the chickpeas and dry out the bowl. Return the chickpeas to the bowl and toss them with the garlic, onion, parsley, coriander, salt, cumin, and pepper.
3 Assemble a meat grinder with the fine (⅛-inch) die. Pass the chickpea mixture through the grinder twice, taking care not to compact the mixture after it has been ground the second time. (Note, please, that this falafel mix can be bulk-frozen flat in a zip-top bag, or shaped into balls and deposited on a parchment-lined baking sheet, frozen, then transferred to a zip-top bag and stored in the freezer for 1 month.)
4 Pour 2 inches of oil into a large, heavy pot. Bring the oil to 350°F.
5 Using a 1-ounce ice cream scoop, shape the falafel mixture into 1-inch balls. (Alternatively, shape 2 tablespoons of the mixture into a ball or hockey puck with your hands, taking care not to pack the mixture too tightly.) Fry them in batches, bobbing and turning them with a spider, until deeply browned, crunchy, and cooked through, about 4 minutes. Drain on paper towels and serve hot.
ZUCCHINI MUJADARA

I remember the first time my wife, Hannah, made mujadara for dinner—I think it was out of Mina Stone’s excellent cookbook Cooking for Artists. I was pretty down on the idea—how exciting can lentils and rice be, I idiotically thought to myself—and then more or less elbowed my children away from the dinner table as I ate most of the family-size portion. In our version, we use caramelized zucchini in place of the more standard onions, and fried shallots contribute their crunch as a garnish. This is a complete-meal vegetable dish as rewarding as anything with meat in it.
MAKES 6 SERVINGS
½ lb shallots, peeled
1½ C neutral oil, for frying
+ kosher salt and freshly ground black pepper
1 C brown lentils, picked over for stones
+ olive oil
2 bay leaves
1 C basmati rice, rinsed in cold water until it runs clear
2 lb zucchini, coarsely grated (3 large zucchini)
1 Thinly slice the shallots into rings on a mandoline. You can also use a knife, but make the slices as thin and even as possible. There will be about 2 cups of sliced shallots when all is said and done.
2 Combine the shallots and neutral oil in a wide, high-sided pan suitable for frying. Set the pan over low heat, and let it ride, swirling or stirring occasionally. Avoid the temptation to increase the heat—these shallots will become crisp, not greasy, so be patient. When the shallots are golden brown, after 20 to 30 minutes, remove them from the oil with a strainer to a baking sheet lined with paper towels. Season them with salt and pepper and let them cool. Reserve the cooled shallot oil for cooking zucchini (any extra is lovely in a salad dressing). The fried shallots will stay fresh in an airtight container for a few days.
3 Cover the lentils with 2 inches of cool water in a medium pot and season with 1 teaspoon of salt. Bring to a simmer, then reduce the heat to medium-low and simmer until just tender, 20 to 25 minutes. Drain the lentils and toss them with 1 tablespoon of olive oil.
4 While the lentils are cooking, place another medium pot over high heat and add 1½ cups of cold water, the bay leaves, a pinch of salt, and the rice. Bring to a boil, then cover, reduce the heat to low, and cook until all of the water is absorbed, 15 minutes. Remove from the heat and let rest 10 minutes. Fluff the rice with a fork and set aside.
5 In a skillet, heat ½ cup of the shallot oil over medium-high heat. Squeeze a handful of the grated zucchini, letting the juices drain back in the bowl, and add it to the oil, scattering it around the pan. Fry the zucchini, shaking the pan so the individual strands of zucchini float. When they are light golden and have shrunk to half their size, strain from the oil with a spider or slotted spoon and place on a large plate in a single layer. Repeat with the remaining zucchini, adding olive oil as needed to the pan, until all of it is caramelized.
6 Toss the lentils and rice together in a large bowl, then fold in the zucchini. Handle the mujadara gently, maintaining the individuality of the components and not mashing them together. Dress with a touch more oil or salt if needed, then arrange on a platter. Top with the fried shallots and serve.
EGGPLANT MARINARA

I wrote a cookbook with the guys from Frankies Spuntino a few years back. It is filled with easy to achieve recipes for their lightened-up take on Italian-American cuisine. They’ve decided to revise the eggplant recipe in future editions to reflect the way they make it now—more classically, with battered-and-fried nightshades. But I remain steadfastly dedicated to this fairly healthy bastardization of the dish. I am including it here to memorialize its excellence. I will eat this hot or cold, in a sandwich, as a main course, anything. I would eat it in a car, at a bar, with a bear, I would eat it anywhere.
MAKES 4 TO 6 SERVINGS
3 large eggplants, sliced crosswise into ½”-thick disks
¼ C olive oil
+ kosher salt and white pepper
3 C tomato sauce (use your own, your grandma’s, or the Simple Tomato Sauce)
3 C grated Parmigiano-Reggiano cheese
½ large ball fresh mozzarella (about 8 oz), cut into ¼”-thick slices (or, if you’re feeling fancy, 1 ball of mozzarella di bufala, sliced the same way)
1 Heat the oven to 350°F.
2 Toss the sliced eggplant with the olive oil, salt, and white pepper in a large bowl, making sure that the eggplant is evenly dressed. Arrange the eggplant slices in a single layer across two baking sheets. Pop it into the oven for 30 minutes, flipping it once midway, until it’s mottled in parts and deeply browned in others and beginning to shrink away from the skin. (You want the eggplant to be pretty delicious looking at this stage; if it looks parcooked, keep it going. You can’t really overcook it for these purposes.)
3 Coat the bottom of a casserole (or other ovenproof vessel appropriate for a lasagna-type preparation) in a thick layer of tomato sauce. Nestle a single layer of eggplant slices into the sauce, sprinkle with salt and pepper, and give the eggplants a good coating of Parmigiano. Repeat the layering—tomato, eggplant, salt and pepper, Parmigiano—until all the ingredients are used, finishing with a layer of Parmigiano. Cover the pan with foil and bake for 1 hour. Serve hot, cold, or in between.
4 Serve it with a layer of cold mozzarella slices on top of or alongside portions of eggplant.
MUSHROOMS EN PAPILLOTE (SORT OF)

This is a perfect power vegetable as long as you accept mushrooms as vegetables and, if you don’t, we’re really too far gone to debate that point now. EASE IS POWER and this is on the embarrassing end of the ease spectrum. It’s got tableside panache, it harnesses the fermented umami of soy sauce and the fattiness of butter, and it could make a bowl of rice into dinner (maybe do one of these per person in that case). Or you could serve it with fish or chicken or some other vegetables that will be jealous at its effortless swagger.
MAKES 1 OR 2 SERVINGS
½ lb mixed mushrooms, trimmed and cut into bite-size pieces
2 T unsalted butter
1 T soy sauce
+ freshly ground black pepper
+ lemon wedges
1 Heat the oven to 450°F.
2 Take a 12-inch square of parchment or foil, fold it in half, then unfold it and pile the mushrooms on one half. Cut the butter into 6 to 8 pieces and arrange over the mushrooms. Drizzle with the soy sauce. Fold the paper or foil over the mushrooms and crimp the open ends to seal the package.
3 Place the packet on a rimmed baking sheet and roast until the mushrooms are tender, about 20 minutes. Carefully open the packet—the steam will be hot!—preferably at the table. Season with a couple of grinds of pepper and a squeeze of lemon.
ROOT VEGETABLE TAGINE WITH RED CHERMOULA AND COUSCOUS

As a meat eater (sorry everybody!), my yardstick for our tagine progress was measured in missing links of merguez. This version—which marshals a turbocharged chermoula and works with the sort of underwhelming root cellar–y veggies you can find just about anywhere—passes muster. The chickpeas add body; the raisins add the sweetness it needs. If you have a veggie soirée on the books, this’ll do just fine with a nice, chilled Algerian wine.
MAKES 6 SERVINGS
TAGINE
2 large carrots
1 bunch baby turnips or 2 medium turnips
2 waxy, yellow-fleshed potatoes
1 large sweet potato
1 small celery root
½ lb cipollini onions, peeled
½ C cooked (or—who we kidding?—canned) chickpeas
¼ C raisins
COUSCOUS
1 C dry couscous
1 cinnamon stick (1”) or 1 pinch ground cinnamon
1 bay leaf
+ kosher salt
1 T unsalted butter
1 C boiling water
1 Make the tagine: Heat the oven to 325°F. Peel, trim, and chop the carrots, turnips, potatoes, sweet potato, and celery root into approximate 1-inch pieces. Some variation in size is welcome.
2 Lay down a bed of the onions in a large tagine or Dutch oven. Follow them with the largest chunks of the hardiest vegetables, which you will arrange around the perimeter of the pan. Pile up the chickpeas and raisins in the middle. Scatter the smaller pieces of vegetables over the top. Pour the chermoula over all. If you are using a Dutch oven instead of a sanctioned tagine, tear off an 18-inch sheet of foil. Shape it into a cone with the same diameter as the pot. Place this hat atop the vegetables to mimic the shape of a tagine top, then cover the pan with the lid. It facilitates self-basting, which is kind of the point of tagine cooking.
3 Slide the tagine into the oven and bake for 1 hour without disturbing it. Remove from the oven and gently toss to combine the ingredients.
4 Make the couscous: Combine the couscous, cinnamon, bay leaf, salt, and butter in a heatproof bowl. Pour the boiling water over the couscous and cover the bowl with plastic wrap. Let stand for 5 minutes. Uncover and fluff the couscous with a fork.
5 To serve, dole out portions of the tagine over steaming bowls of couscous, and bring the remainder to the table for your guests to help themselves.
RED CHERMOULA
MAKES 2 CUPS
2 T tomato paste
+ pinch of saffron threads
2 T boiling water
2 T sweet paprika
1 T kosher salt
2 t smoked paprika (pimentón)
2 t ground cumin
¼ t freshly ground black pepper
+ pinch of cayenne pepper
¾ C cool water
¼ C chopped parsley
¼ C chopped cilantro
2 T chopped preserved lemon
2 T chopped garlic
2 T fresh lemon juice
½ C olive oil
Combine the tomato paste and saffron in a heatproof bowl and add the boiling water, stirring to loosen the tomato paste. Whisk in the sweet paprika, salt, smoked paprika, cumin, black pepper, and cayenne until smooth. Stir in the cool water, then mix in the parsley, cilantro, preserved lemon, garlic, and lemon juice. Finally whisk in the olive oil. Taste for salt and season as needed: It should be a powerful, assertive sauce, something that can burrow to the bland heart of a steamed turnip and make it taste good. Refrigerate until ready to use. It will certainly keep in the fridge for a few days.
CAULIFLOWER CHAAT

This not-actually-very-Indian-at-all dish celebrates the delicious versatility of cauliflower and the compelling flavor of chaat masala, which marshals amchoor, or dried mango powder, to give it the sort of power that the chef Mario Batali would probably celebrate with a #yumbang on the internets. It is not a traditional chaat but a lovingly conceived bastard child of many Indian dishes we dig. I’d happily eat it out of a paper cone or a bowl of rice. The list of optional add-ins is long, but the more of them you can scrape together, the merrier you will be.
MAKES 4 SERVINGS
1 head cauliflower, cut into small florets, stem chopped
1 t garam masala
¼ t cayenne pepper
1 t ground coriander
¼ t ground turmeric
¾ t fennel seeds
¾ t cumin seeds
1 C cooked (or canned) chickpeas
2 T olive oil
1 t kosher salt
+ freshly ground black pepper
1 t chaat masala or amchoor or juice of ½ lemon or lime
¼ C chopped cilantro, plus more leaves for garnish
¼ C minced red onion
¼ C finely chopped tomato
¼ C finely chopped cucumber
½ C thin yogurt or Raita
2– 4 T maple syrup, sweet tamarind sauce, or chutney
+ green chutney
1–2 finely sliced bird’s-eye chilies
+ your favorite hot sauce
1 In a large bowl, toss the cauliflower with the garam masala, cayenne, coriander, turmeric, fennel seeds, and cumin seeds until coated. Add the chickpeas, olive oil, salt, and black pepper and toss to combine.
2 Heat the oven to 450°F. Spread the cauliflower mixture evenly on a sheet pan and roast for 15 minutes, or until everything is looking nice and toasty.
3 When slightly cooled, toss the mixture with the chaat masala (or amchoor if you have it), chopped cilantro, red onion, tomato, and cucumber.
4 If you’re serving it family-style, garnish with the yogurt, maple syrup, green chutney, cilantro leaves, chilies, and hot sauce. If you’re serving it individually, divide into bowls and garnish each separately. Make ’em look nice!
TOFU CONEY ISLAND

This is a chili dog crossed with cheese fries that does not include cheese, dog, traditional chili, or anything else your average vegan would object to. It is also more satisfying than the typical caveman-on-the-boardwalk type of concoction that its name pays homage to. I can’t not greedily power through a plate of it when I’m at Ivan Ramen, and then I am so fat and happy it is hard to slurp down a bowl of his ramen with the appropriate gusto. You will not be similarly challenged when making it at home.
MAKES 4 SERVINGS
16 oz firm or extra-firm tofu
¼ C cornstarch
+ canola oil, for frying
4 T finely diced yellow onion
+ yellow mustard
1 Cut the tofu into approximately 3 × ½ × ½-inch fries. For added texture, intrigue, and Coney Island authenticity, use a crinkle cutter to shape your fries.
2 Put the cornstarch in a shallow baking pan and roll the fries around in it to coat them, then shake off the excess.
3 Pour ¼ inch of oil into a large, high-sided skillet set over medium-high heat. When the oil shimmers, add a handful of tofu fries to the skillet. The oil should come a little more than halfway up the sides of the fries. Cook them until golden and crisp on the first side, about 4 minutes. Turn and cook until crisp on all sides, another 3 to 4 minutes in all. Drain on paper towels. Repeat, adding oil to the pan as needed, until all the fries are fried.
4 Arrange a pile of fries on each of 4 plates. Smother with a ladleful of hot chili and sprinkle with 1 tablespoon diced onions. Squiggle mustard over the pile.
MISO MUSHROOM CHILI
This makes more than you need for the tofu fries, but it is a deeply delicious vegetarian chili and I know that you will find another purpose for it.
Makes 1 quart
¼ C canola oil
1 large onion, diced
1 lb button mushrooms
1 t kosher salt
1 T grated garlic
1 T grated fresh ginger
⅔ C ketchup
¼ C sake
¼ C mirin
⅓ C red miso
3 T soy sauce
3 T white vinegar
1 T sugar
6–8 oz beech or other small tender mushrooms, trimmed and chopped
1 T fresh lemon juice
1 Heat the oil in a medium pan over low heat. Add the onion, button mushrooms, and salt and cook until the mushrooms release their liquid and the liquid evaporates, about 25 minutes.
2 Add the garlic and ginger and cook gently for 10 more minutes. Stir in the ketchup, sake, mirin, miso, soy sauce, vinegar, and sugar. Simmer, partially covered, for 15 minutes.
3 Add the beech mushrooms and lemon juice and cook until the mushrooms have softened, about 5 minutes. Cool or use immediately.
KUNG PAO CELERIES

This was one of those quixotic missions: What can we do that tastes like junky—but not too junky!— takeout? But takeout that’s vegetable-centric? We chose kung pao as our flavor profile, that slightly spicy mix of chopped-up things that so many places get wrong.
Testing took a while: There was an early rendition with sweet potatoes I was first excited about and later disappointed in. Later on there was tweaking of the sauce to make sure it was sharp and not just mall-gloopy. Eventually there was a mixed-veg version that didn’t quite make the cut, but the celeries in it showed well. That’s how we settled on this mix of celery root and plain celery—and the resulting dish was met with much approval, particularly by a beloved vegan babysitter of mine.
It was good, I thought, but was it good enough? I was ready to take us through another round of testing when I reached for the previous night’s leftovers for breakfast and had my eureka moment: I like this dish so much more cold! Everybody else thinks I’m crazy, so go ahead and eat it hot with friends/family/strangers at the hostel, but save a smidge for the morning with your coffee.
MAKES 4 SERVINGS
SAUCE
1 T Chinkiang vinegar
1 T Shaoxing wine or sherry
1 T soy sauce
1 t sesame oil
1 t sugar
1 t cornstarch
STIR-FRY
2 T neutral oil
1 medium celery root (about 1½ lb), peeled and cut into ½” dice
+ kosher salt
2 celery stalks, cut into ½” pieces
1 red bell pepper, cut into ½” pieces
5 scallions, white and green parts separated, thinly sliced
1 jalapeño chili, sliced (2 T)
1 T chopped garlic (2 to 3 cloves)
1 T chopped fresh ginger (about 1”)
10 dried Tianjin chilies or chiles de árbol, or 1 t chili flakes
1 t cracked Sichuan peppercorns
2 T chili oil
¼ C roasted peanuts
1 Make the sauce: Stir together the vinegar, wine, soy sauce, sesame oil, sugar, cornstarch, and 2 tablespoons water in a small bowl to dissolve the sugar and cornstarch. Set aside.
2 For the stir-fry: Heat 1 tablespoon of the neutral oil in a wok or large skillet over medium-high heat. After a minute, add the celery root, toss to coat in oil, and cook until lightly browned in spots and steaming hot, about 3 minutes. Season with salt, toss again, and add ¼ cup water to the pan. Cover, reduce the heat to medium-low, and steam the celery root until nearly tender, about 10 minutes. Transfer to a plate with a slotted spoon. Wipe out the wok (you’re not cleaning it, you’re just getting rid of any bits that will burn when the fire comes back) and return it to the heat.
3 Heat the remaining 1 tablespoon oil in the wok over high heat. Add the celery and bell pepper and stir-fry for 1 minute. Add the scallion whites, jalapeño, garlic, and ginger and stir-fry for 30 seconds. Add the dried chilies and peppercorns and stir-fry for 10 seconds. Return the celery root to the wok and toss to combine everything. Pour in the reserved sauce and toss to coat all. Bring the mixture to a full boil. Once the sauce thickens, remove the pan from the heat, stir in the chili oil, and sprinkle with peanuts and scallion greens. Serve hot with rice. Or cold with coffee.