Chapter 7
Migrating and Refactoring
This chapter covers the following subjects:
Migrating to AWS: This chapter begins with a brief overview of possible approaches to migrating applications to AWS. For each approach, you will learn about the benefits, drawbacks, and possible tools to use to achieve the desired effects.
AWS Migration Tools and Services: This section covers AWS migration tools and explores some examples of how to perform data and application migrations in AWS.
This chapter covers content important to the following exam domain:
Domain 4: Refactoring
4.1 Optimize application to best use AWS services and features.
4.2 Migrate existing application code to run on AWS.
When you decide to develop a new application, you will probably be considering the cloud as your primary deployment mechanism. Authoring an application from scratch allows you to take full advantage of the benefits of having pay-as-you-go, dynamic, unlimited resources that can be provisioned to exactly satisfy the requirements of the user traffic. Most of these benefits are unmatched in applications deployed on premises. For most businesses and enterprises, the reality of cloud adoption means that existing applications that have been deployed in traditional environments will need to be adapted and migrated to the cloud. More and more frequently, the developers of the existing applications will be included in migrations, and this chapter discusses approaches, tools, and services that can help you deliver valuable insights into both the running code and services that can be used to migrate that code to AWS.
“Do I Know This Already?” Quiz
The “Do I Know This Already?” quiz allows you to assess whether you should read the entire chapter. Table 7-1 lists the major headings in this chapter and the “Do I Know This Already?” quiz questions covering the material in those headings so you can assess your knowledge of these specific areas. The answers to the “Do I Know This Already?” quiz appear in Appendix A, “Answers to the ‘Do I Know This Already?’ Quizzes and Q&A Sections.”
Table 7-1 “Do I Know This Already?” Foundation Topics Section-to-Question Mapping
Foundations Topics Section |
Questions |
Migrating to AWS |
6 |
AWS Migration Tools and Services |
1–5, 7–10 |
1. What is the maximum supported size of an S3 multipart upload?
500 MB
5 GB
5 TB
500 GB
2. Which of the following is not a supported SMS migration source?
VMware
Hyper-V
KVM
Azure
3. What needs to be created before you can start a VM import with the AWS VM Import/Export service?
An import S3 bucket with the appropriate ACL
An import EBS volume of the appropriate size
An import EC2 instance of the appropriate size
An import role with the appropriate permissions
4. What is the maximum capacity of a Snowmobile system?
100 PB
100 TB
1 PB
1 ZB
5. Which AWS services are supported as the targets for a DataSync migration? (Choose all that apply.)
EFS
EBS
S3
RDS
6. Which of the following is the easiest approach to migrating an application to AWS?
Refactoring
Lift-and-shift
Rewriting
Replacing
7. DMS supports both heterogeneous and homogenous migrations from on premises to AWS, from AWS to on premises, and from EC2 to RDS. Which tool or tools do you need to use to allow for a DMS heterogenous migration? (Choose two.)
DMS Advanced
SCT
S3
Redshift
8. In an S3 multipart upload, what is the smallest number of segments for a 10 GB file?
1
2
10
1024
9. In AWS DMS, what is required to connect the source and target databases and perform the migration?
DMS connector
DMS replication instance
DMS Schema Conversion Tool
DMS account
10. What steps need to be taken to successfully import a running VM to AWS?
Create a disk snapshot and run VM Import/Export on the running VM disk image.
Power off the instance and run VM Import/Export on the powered-off VM.
Power off the instance, create an image and upload it to S3, and run VM Import/Export on the S3 key.
Create a disk snapshot, upload it to S3, and then run VM Import/Export on the S3 key.
Foundation Topics
Migrating to AWS
Now that you are familiar with the AWS environment, you can start discovering ways to move your applications to the AWS cloud. There are several approaches to moving applications to the cloud, and the business driver for cloud adoption determines which approach is best. The business driver can range from cost reduction to management overhead reduction to deployment simplification to DevOps adoption and globalization. Each business driver sets out a unique goal, and some of these drivers are incompatible with each other.
For example, if you are looking for both cost optimization and management overhead reduction, you need to keep a close eye on the monthly (even daily) spend on AWS services as well as striving to use as much managed services as possible. Both goals sometimes can be hard to achieve at the same time, so it might be useful to focus on one task at a time.
To get a better idea of the end goal of cloud adoption, you need to have a clear idea of the business goal. It is crucial that the migration constraints—including how much effort and capital is available for the migration—be defined by the business and the application owners. Only after all aspects of the business requirements are taken into account should you consider defining a strategy for the migration. The following are some of the most common approaches to migrating to the cloud:
Lift-and-shift: This involves moving an application in its intact form from on premises to AWS. For example, you can use the VM Import/Export operation to import an image of an entire existing virtual machine directly into AWS.
Redeploy: This involves moving the application code in its intact form and deploying the application code to the cloud. This approach allows you to choose from the cloud infrastructure and platform services, and it allows you to take advantage of some of the benefits of the cloud.
Refactor: This involves optimizing the code to better fit into the cloud without changing the behavior. Refactoring usually allows you to take even better advantage of the cloud but is more labor intensive from a development point of view.
Rewrite: This approach basically gives you a blank slate. Rewriting might be the best option when the application that needs to be moved to the cloud has legacy dependencies that prevent the move even if you refactor.
Replace: Instead of rewriting the application, it might make sense to look at existing Software as a Service (SaaS) solutions and replace your application. This can be a valid move when the business driver dictates that the management of the IT environment must be reduced at any cost.
Retire: Another consideration is retiring the application all together. Consider what purpose the application serves and decide if there is another application that could take over or if this is even still required. When retiring applications, you can simply create a backup of the data and move the data into a cloud archive service such as Glacier.
Before deciding on an approach for your whole application stack, you should consider segmenting the application into components that can be migrated separately. This is essentially the monolith-to-microservices approach but on the scale of the complete application stack. You should always strive to identify complete systems, application components, and application functions that can be operated independently and classify them according to the categories from the preceding list.
As a developer, your approach to migrating applications should be to try to deploy your code on the freshest environment possible. This will ensure that you have the most control over the deployment and will not need to deal with any unknowns. If you are practicing DevOps and/or CI/CD, it should be fairly straightforward to either choose a simple redeployment or even a swift refactoring of your code to the AWS cloud. When making the move, you should consider how and where you can swap out servers for services. Making use of managed services allows you to provision the required components with a few CLI commands or even straight out of your code. To abstract your application to a level above managed services, you can choose serverless components. In serverless services, you fully integrate the provisioning and the service interaction through the same API.
For example, when you require a database, you can provision a Relational Database Service (RDS) instance via a single API call. But you still need to manage the scaling and configure access for the application because the data manipulation is managed via SQL. You could also provision a DynamoDB table. In this case, the configuration is done through the same API interface as the data access, which means the application can automatically provision, use, and decommission the table as needed. DynamoDB is a versatile service as it can be used for any type of permanent or temporary use case and with any amount of data.
When code has dependencies that are difficult to move, when the codebase is full of legacy features, or when some features are not even required anymore, it might make more sense to rewrite the application completely. Rewriting allows you to completely optimize the code for the cloud and also allows you to start off from serverless and then choose platform only if the serverless component would not be able to perform the desired action or, in fringe cases, might be less efficient. Rewriting also allows you to focus on making your application completely cloud native and deliver the best possible efficiency with the least effort. When a rewrite is not possible, you should consider replacing the application with a commercial option or a service that can do the job more efficiently. For example, when migrating to the cloud, you should consider using the authentication options available in the cloud instead of relying on your own authentication mechanism. In the long run, custom authentication will be more difficult to manage and could possibly become more expensive than using a cloud service to achieve the same goal.
When redeployment, refactoring, rewriting, or replacement are not possible, you need to consider the other two options. For example, when an application component uses a legacy approach to licensing or is tied to a certain specific operating system component, or when you simply do not have the source code of the application, lift-and-shift is the only option. Although lift-and-shift is a simple solution for many such cases, you should try to use it as little as possible because bringing legacy components into the cloud can result in the need to jump over hoops in the future. For this reason, you should never take the option to retire a legacy application off the table. Although retiring should be considered as a last resort, typically, it is not considered at all.
AWS Migration Tools and Services
Before choosing a migration strategy, you need to consider some of the limiting factors of the data and the application components to AWS. There are several possible challenges to consider before moving the application, including the following:
Compatibility: Is the application operating system or code compatible with the cloud?
Dependencies: Does the application have dependencies that will make it difficult to move?
Complexity: Is the application tied to other services running on premises?
Volume: Is the volume of application data too large to move in an efficient manner over the Internet?
AWS has created services that simplify the way you move an application to the cloud—from services that help you lift and shift applications, operating systems, files, and databases, to services that can help you efficiently move large datasets through physical devices, as discussed later in this chapter.

VM Import/Export
The VM Import/Export service was designed to allow AWS customers to import and export virtual machine images from and to their on-premises virtualization environment to the AWS cloud. The service supports a wide range of commercial virtual machine images that can be imported with a simple CLI command. This is an ideal solution when performing lift-and-shift operations where some migration downtime is acceptable.
Before you start the import/export process, you need to create a role and give it permissions to the import/export bucket that will host the VM image. Example 7-1 shows the settings that allow you to create the vmiport role.
Example 7-1 IAM Policy That Allows the VM Import Service to Assume the vmiport Role
{
   "Version": "2012-10-17",
   "Statement": [
      {
         "Effect": "Allow",
         "Principal": { "Service": "vmie.amazonaws.com" },
         "Action": "sts:AssumeRole",
         "Condition": {
            "StringEquals":{
               "sts:Externalid": "vmimport"
            }
         }
      }
   ]
}
If you save this file as vm-images-role.josn, you can create the role with the following command:
aws iam create-role --role-name vmimport --assume-role-policy-
document file://vm-import-role.json
Next, you need to create a policy for this role. Example 7-2 shows the required permissions for the role and specifies the everyonelovesaws bucket for both importing and exporting. You can change the bucket name to your own and need to ensure that you have chosen the correct bucket for the import and export if you will be using two separate buckets.
Example 7-2 An IAM Policy for the vmiport Role
{
   "Version":"2012-10-17",
   "Statement":[
      {
         "Effect":"Allow",
         "Action":[
            "s3:GetBucketLocation",
            "s3:GetObject",
            "s3:ListBucket"
         ],
         "Resource":[
            "arn:aws:s3:::everyonelovesaws",
            "arn:aws:s3:::everyonelovesaws/*"
         ]
      },
      {
         "Effect":"Allow",
         "Action":[
            "s3:GetBucketLocation",
            "s3:GetObject",
            "s3:ListBucket",
            "s3:PutObject",
            "s3:GetBucketAcl"
         ],
         "Resource":[
            "arn:aws:s3:::everyonelovesaws",
            "arn:aws:s3:::everyonelovesaws/*"
         ]
      },
      {
         "Effect":"Allow",
         "Action":[
            "ec2:ModifySnapshotAttribute",
            "ec2:CopySnapshot",
            "ec2:RegisterImage",
            "ec2:Describe*"
         ],
         "Resource":"*"
      }
   ]
}
After you save this file as vm-images-policy.josn, you can update the role permissions with the following command:
aws iam put-role-policy --role-name vmimport --policy-name
vmimport --policy-document file://vm-import-policy.json
Next, you need to upload your image to the import S3 bucket and set the location in the image definition file, as demonstrated in Example 7-3. Note that the VM image format is vmdk in this example, and it was uploaded to the everyonelovesaws bucket and has the key myvm/testvm01.vmkd. You should change the format, bucket, and key value to your own.
Example 7-3 A VM Import Definition That Specifies the S3 Bucket and Key to Use for the Import Process
[
  {
    "Description": "root-disk",
    "Format": "vmdk",
    "UserBucket": {
        "S3Bucket": "everyonelovesaws",
        "S3Key": "myvm/testvm01.vmdk"
    }
  }
]
Save this file as vm-images.josn and then simply import the image:
aws ec2 import-image --description "My VM" \

--disk-containers file://vm-images.json
The response includes the status and ID of the import and should look something like the output in Example 7-4.
Example 7-4 Response of the import-image Command
{
    "Status": "active",
    "Description": "My VM",
    "SnapshotDetails": [
        {
            "UserBucket": {
                "S3Bucket": "everyonelovesaws",
                "S3Key": "myvm/testvm01.vmdk"
            },
            "DiskImageSize": 0.0,
            "Format": "VMDK"
        }
    ],
    "Progress": "2",
    "StatusMessage": "pending",
    "ImportTaskId": "import-ami-022bb28a724d8128e"
}
To see the status of the import operation, you can follow up the previous task with the following command specifying the port task ID:
aws ec2 describe-import-image-tasks --import-task-ids
import-ami-022bb28a724d8128e
The response to the command includes one of the following statuses:
active: The import task has been started.
updating: The import task status is updating.
validating/validated: The image being imported is being validated or has been validated.
deleting/deleted: The import task is being canceled or there is an issue with the provided image.
converting: The image is being converted.
completed: The task has completed.
Server Migration Service
The previous example simply imported the VM from an offline VM image. When this kind of downtime is not possible, you can use the AWS Server Migration Service (SMS). SMS enables you to incrementally and continuously migrate from your on-premises VMware vSphere, Microsoft Hyper-V/SCVMM, and Azure virtual machines to the AWS cloud. The incremental nature of the migration process ensures that you achieve zero downtime and can perform full feature testing before deploying your application on AWS. You should consider SMS as an option when performing lift-and-shift operations on mission-critical services and applications.
When choosing SMS as the solution, you need to consider the limits of SMS, which only allows you to perform 50 concurrent migrations from your environment to AWS and allows each VM migration to take place for up to 90 days. The service uses an encrypted TLS connection to transfer the data over the Internet to AWS. When planning for a migration using SMS, always consider the bandwidth available to the migration process and the impact of the bandwidth consumption on your environment.
Finally, you should consider the cost aspect of running the service. While there is no additional cost associated with using SMS itself, the service does use a connector virtual machine that needs to be installed in your existing environment. This could carry additional cost if resources on premises are constrained or need to be internally allocated, and it definitely carries a cost if you are migrating from Azure. In addition, SMS creates an EBS snapshot for every incremental copy of data and retains that snapshot indefinitely. It is up to you to ensure that older snapshots that will no longer be needed are deleted. There is also a transient S3 cost associated with the migration because the service also replicates volumes to S3 temporarily before creating the EBS snapshot.
Database Migration Service and Schema Conversion Tool
When you need to migrate a database, you can use the Database Migration Service (DMS). DMS allows you to migrate from on premises, other clouds, and AWS EC2 instances to the RDS and Redshift services. DMS is designed for migrations of databases in the same incremental fashion as SMS and allows you to migrate a database through a one-time migration process or set up an ongoing migration. With the ongoing migration option, the process allows you to both migrate mission-critical workloads and maintain a replica of the database in the cloud for disaster recovery purposes.
DMS is designed for both homogenous and heterogeneous database migrations; however, you need to convert the schema to match the target database when performing a heterogeneous migration. For this purpose, AWS has created the Schema Conversion Tool (SCT), which can be installed on the target database server to help convert the schema from the existing database format to the desired format. The combination of DMS and SCT can help you migrate a wide range of databases that can be found on premises and in other cloud environments to either RDS or Redshift.
Migrating a Database by Using DMS

This section shows how to use DMS to migrate a MySQL database from an Ubuntu Linux EC2 instance running in your cloud. You need to prepare two roles for use with DMS. The first role will use the built in AmazonDMSVPCManagementRole policy to allow access to the VPC, and the second one will allow access to CloudWatch through the built-in AmazonDMSCloudWatchLogsRole policy. The JSON script in Example 7-5 can be used to create both roles.
Example 7-5 IAM Policy That Allows the DMS Service to Assume the Role
{
   "Version": "2012-10-17",
   "Statement": [
   {
     "Effect": "Allow",
     "Principal": {
        "Service": "dms.amazonaws.com"
     },
   "Action": "sts:AssumeRole"
   }
 ]
}
Save this file as dms-role.json and use it in the following command to create the dms-vpc-role role:
aws iam create-role --role-name dms-vpc-role --assume-role-policy-
document file://dms-role.json
Assign the built-in AmazonDMSVPCManagementRole policy to the newly created dms-vpc-role role:
aws iam attach-role-policy --role-name dms-vpc-role --policy-arn
arn:aws:iam::aws:policy/service-role/AmazonDMSVPCManagementRole
Create the dms-cloudwatch-role role:
aws iam create-role --role-name dms-cloudwatch-logs-role
--assume-role-policy-document file://dms-role.json
Assign the built-in AmazonDMSCloudWatchLogsRole policy to the newly created dms-cloudwatch-role role:
aws iam attach-role-policy --role-name dms-cloudwatch-logs-
role --policy-arn arn:aws:iam::aws:policy/service-role/
AmazonDMSCloudWatchLogsRole
When you have these prerequisites sorted, you can launch a new Ubuntu Linux instance and install the MySQL service on it. Deploy the instance in the default VPC and ensure that you open port 22 for SSH and port 3306 for MySQL in the security group when launching the instance so that you can connect to the console and so the DMS service will be able to connect to the database. Once you have connected to the instance via SSH, install and configure the MySQL service:
sudo -i

apt-get update -y

apt-get install mysql-server -y
The service installs without a password for the root user, so you need to log in to the MySQL CLI and set a password that you will use with the DMS. To log in, leave the password blank:
mysql -u root -p
Once in the MySQL console, set the following:
SET PASSWORD FOR 'root'@'localhost' = PASSWORD('mydmspassword');

exit;
Open the MySQL configuration file and set it up to listen on all IP addresses, so it will be accessible from the DMS service:
vi /etc/mysql/mysql.conf.d/mysqld.cnf
Change the bind address from 127.0.0.1 to 0.0.0.0:
bind-address = 0.0.0.0
Add the following lines to the config file:
server-id = 1

log_bin = mysql-bin

binlog_format = row
Restart the MySQL service to ensure that all changes have taken effect:
/etc/init.d/mysql restart
Now you need to create a database and give it some structure so you have some test data, so save the content in Example 7-6 as testdata.sql.

Example 7-6 SQL Script to Create a Sample Database
CREATE DATABASE books;
USE books;
CREATE TABLE `authors` (
        `id` INT(11) NOT NULL AUTO_INCREMENT,
        `first_name` VARCHAR(50) NOT NULL COLLATE 'utf8_unicode_ci',
        `last_name` VARCHAR(50) NOT NULL COLLATE 'utf8_unicode_ci',
        `email` VARCHAR(100) NOT NULL COLLATE 'utf8_unicode_ci',
        `birthdate` DATE NOT NULL,
        `added` TIMESTAMP NOT NULL DEFAULT CURRENT_TIMESTAMP,
        PRIMARY KEY (`id`),
        UNIQUE INDEX `email` (`email`)
)
Now you can import this data into the MySQL database by simply issuing the following command:
mysql < testdata.sql
List the databases in the server by issuing the following command:
mysql -e "show databases"
The output of the command should show that the book database now exists, as demonstrated in Example 7-7.
Example 7-7 Output of the show databases Command
+--------------------+
| Database           |
+--------------------+
| information_schema |
| books              |
| mysql              |
| performance_schema |
| sys                |
+--------------------+
Next, log in to the RDS Management Console and start an RDS instance by clicking the Create database button, as shown in Figure 7-1.
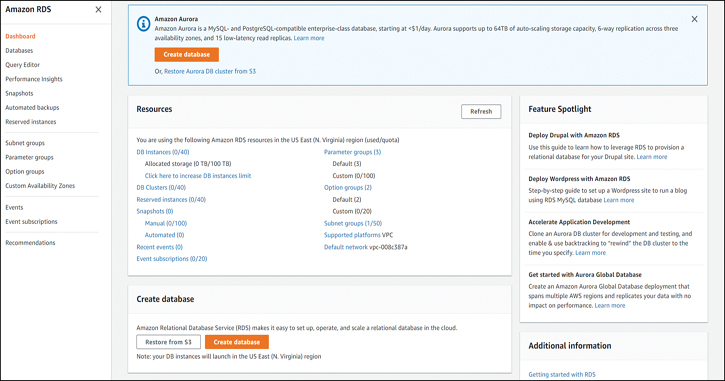
Figure 7-1 The RDS Management Console
In the Create Database dialog, select the Standard Create method and the MySQL engine option, as shown in Figure 7-2.

Figure 7-2 Creating the RDS Database: Engine Option
Next, scroll down and select the free tier and enter the database name you would like to use, as shown in Figure 7-3.
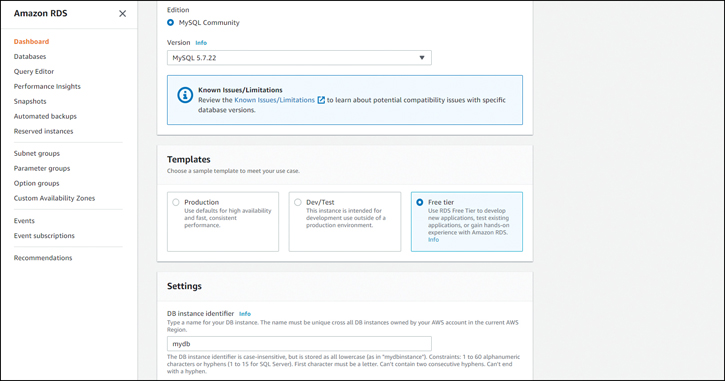
Figure 7-3 Creating the RDS Database: Tier Option
Next, scroll down and enter the master username and password you want to use with this instance, as shown in Figure 7-4. In this section, also select the size of the instance as db.t2.micro.

Figure 7-4 Creating the RDS Database: Credentials and Instance Size
Continue scrolling down to the Storage section and allocate 20 GB and disable storage autoscaling, as shown in Figure 7-5. Leave all other settings at their defaults.
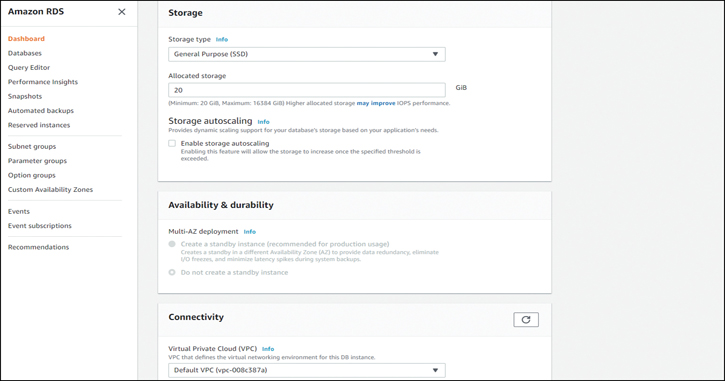
Figure 7-5 Creating the RDS Database: Storage
In the Connectivity section, select your default VPC and ensure that you select the security group that you created when you deployed the EC2 instance, as shown in Figure 7-6.
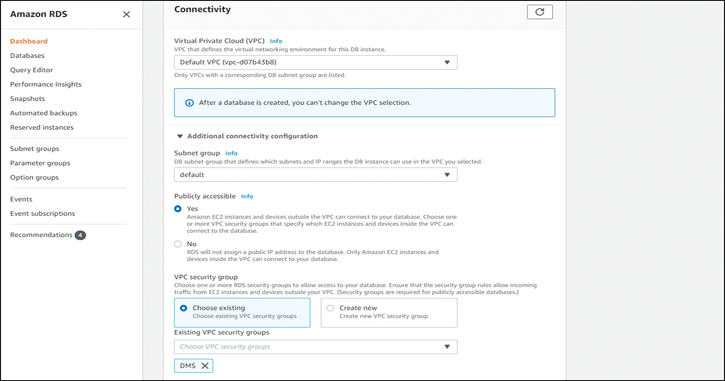
Figure 7-6 Creating the RDS Database: Connectivity
In the final step, ensure that Password authentication is selected, as shown in Figure 7-7, and then click the Create database button.
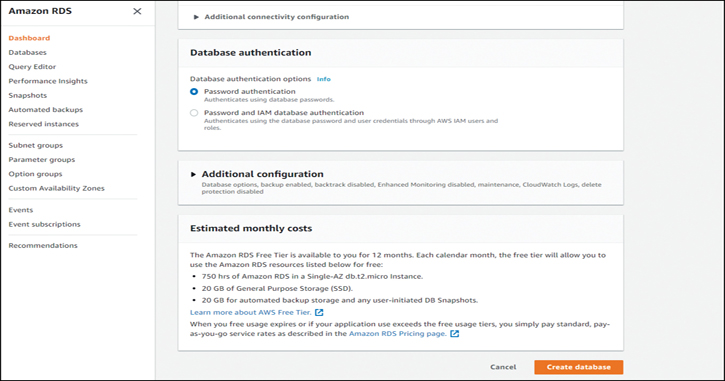
Figure 7-7 Creating the RDS Database: Final Step
After the database is created, wait for the instance to become active and collect the DNS name from the Management Console. Next, log in to the Ubuntu Linux EC2 instance and list the databases in the RDS instance. You can use the following command, replacing the instance DNS name after -h with your RDS instance name:
mysql -h mydb.cpwpqyrglyaz.us-east-2.rds.amazonaws.com -u admin
-p -e "show databases"
The output of the command should show the default RDS databases and should look something like the output shown in Example 7-8.
Example 7-8 Output of the show database Command for the RDS Database
+--------------------+
| Database           |
+--------------------+
| information_schema |
| innodb             |
| mysql              |
| performance_schema |
| sys                |
+--------------------+
Now that you have a source and a target, you need to set up a replication instance in the DMS. Log back in to the Management Console and navigate to the DMS service. Click the Create replication instance button, as shown in Figure 7-8.
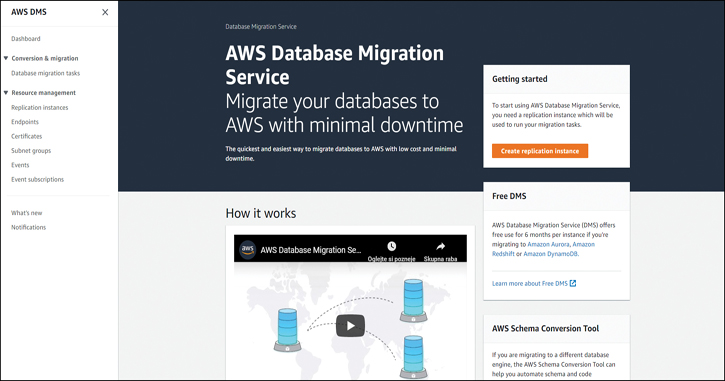
Figure 7-8 The DMS Management Console
In the Create Replication Instance dialog, configure a name and description for your instance and allocate 10 GB of storage to it, as shown in Figure 7-9. (This will be more than enough storage space for this example.) In this dialog, also select the VPC identifier of your default VPC.

Figure 7-9 Creating a DMS Replication Instance: Instance Configuration
Next, ensure that the instance is publicly accessible. Expand the Advanced security and network configuration section and ensure that the security group is set to the same one you used for the EC2 instance and the RDS database, as shown in Figure 7-10.
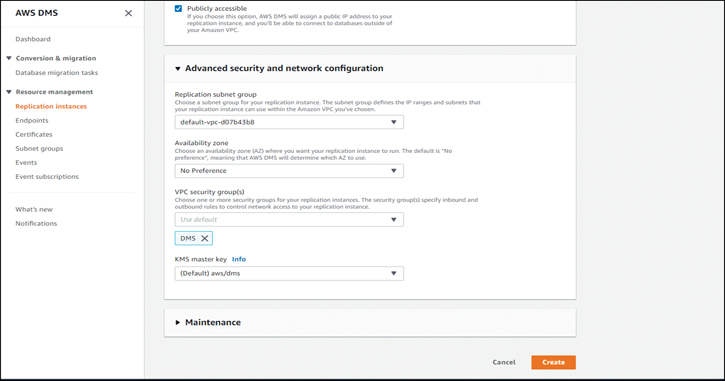
Figure 7-10 Creating a DMS Replication Instance: Advanced Security
Now that the instance is created, you need to wait a few minutes for it to become available. Note the public IP address of the DMS instance, as shown in Figure 7-11, for use in the next step.
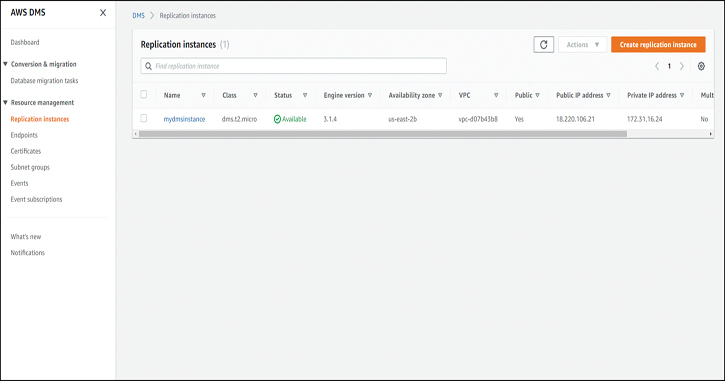
Figure 7-11 The DMS Replication Instance Is Available
Now that the instance is created, you need to log back in to the EC2 Ubuntu instance and enable access from the DMS instance, using the IP address of the DMS instance that you just noted:
GRANT ALL ON *.* to root@'18.220.106.21' IDENTIFIED BY
'mydmspassword';

FLUSH PRIVILEGES;

EXIT;
Next, you need to return to the managed console and create the source and target endpoints. For the source endpoint, configure the EX2 instance as the target. Enter the public IP address of the instance as the server name, as shown in Figure 7-12.
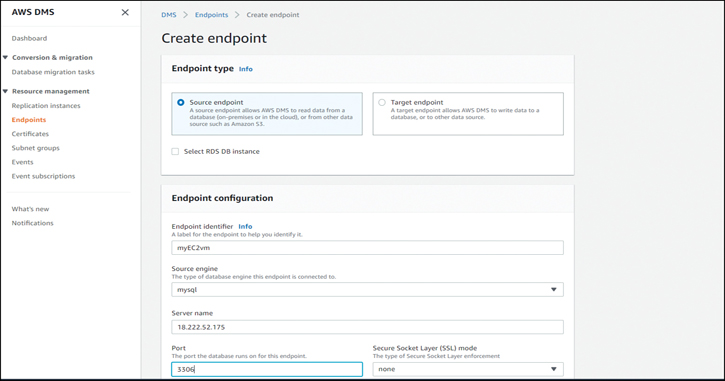
Figure 7-12 Creating a DMS Source Endpoint
Set the port to 3306 and enter the authentication details for your root user, as shown in Figure 7-13.

Figure 7-13 Creating a DMS Source Endpoint: Final Step
Next, set up the target endpoint. Select the Select RDS DB instance check box and choose your RDS instance as the target, as shown in Figure 7-14.
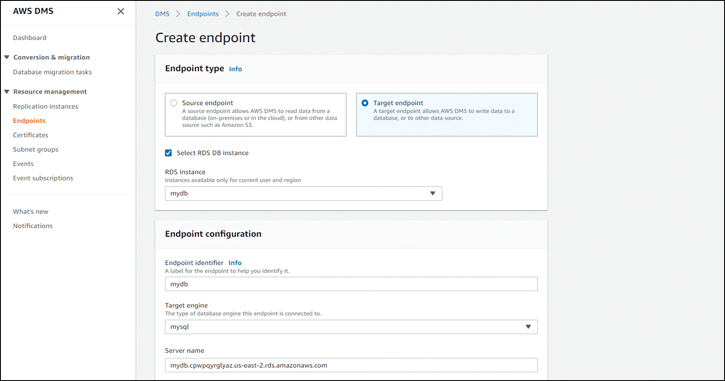
Figure 7-14 Creating a DMS Target Endpoint
Enter the password for the admin user that you set when you created the RDS instance and click Create endpoint (see Figure 7-15).

Figure 7-15 Creating a DMS Target Endpoint: Final Step
Now that both endpoints are created and active, as shown in Figure 7-16, you can click each one and run a connectivity test from the replication instance.

Figure 7-16 DMS Endpoints Are Active
For each endpoint, click the Test connections button in the body of the page, as shown in Figure 7-17.
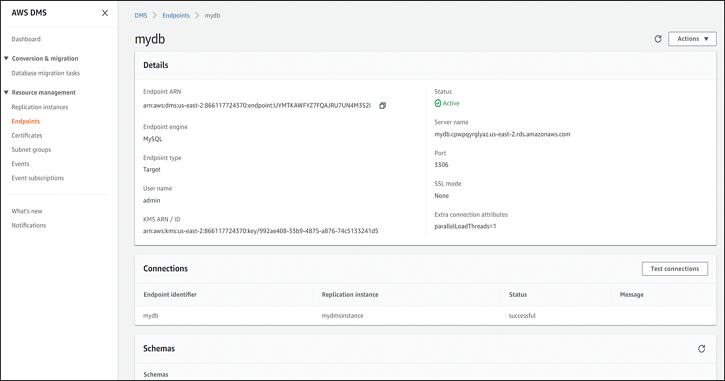
Figure 7-17 Testing a DMS Target Endpoint
When you run the test, select the replication instance that you created, as shown in Figure 7-18. The test should be run on both the source and target endpoints, and both tests should be successful before you move on to the next step.
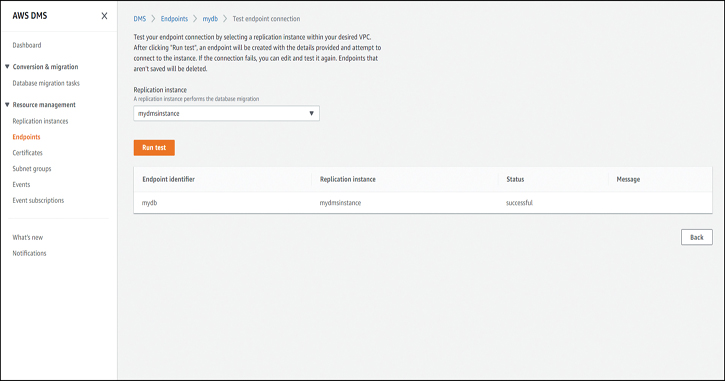
Figure 7-18 Successful Test of a DMS Target Endpoint
After the target endpoints are created and tested, you need to set up a database migration task. Enter your source and destination endpoints and create a task identifier and description. In the example in Figure 7-19, Migrate existing data is selected as the migration type, but you could also set up a continuous migration with the Migrate existing data and replicate ongoing changes option.
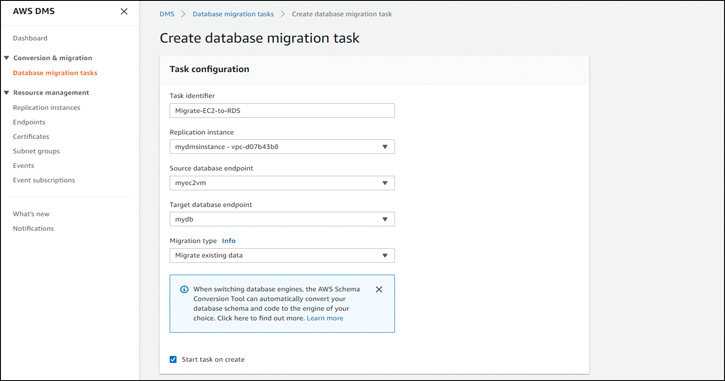
Figure 7-19 Creating a DMS Database Replication Task
For table preparation, select Do nothing, as shown in Figure 7-20, as you do not want the server to remove the DRS default tables. Leave the other settings at their defaults.

Figure 7-20 Creating a DMS Database Replication Task: Settings
You also need to set up a table mapping. Under Schema, select the Enter a schema option and name the schema books, as shown in Figure 7-21. For the table, enter authors so that the books database is replicated from the EC2 instance.

Figure 7-21 Creating a DMS Database Replication Task
When the task is started, it takes a few minutes for the replication to complete. When the replication has completed, you should see the task finish with a Load complete message, as shown in Figure 7-22.
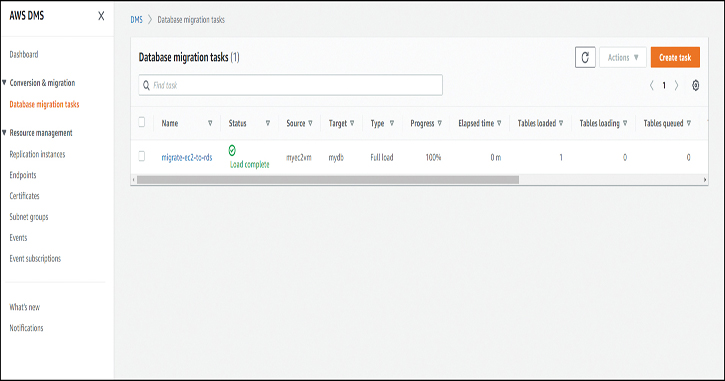
Figure 7-22 DMS Task Completed
Now all that you need to do is run the command to show the databases against your RDS instance on your Ubuntu Linux EC2 and verify that the database has been replicated:
mysql -h mydb.cpwpqyrglyaz.us-east-2.rds.amazonaws.com -u admin
-p -e "show databases"
The output of the command should now show the books database as well as the default RDS databases in the RDS instance and should look something like Example 7-9.
Example 7-9 Output of the show database Command After Successful Migration—with the Books Database Present
+--------------------+
| Database           |
+--------------------+
| information_schema |
| awsdms_control     |
| books              |
| innodb             |
| mysql              |
| performance_schema |
| sys                |
+--------------------+
Transferring Files to AWS
Sometimes the data that needs to be transferred from on premises to AWS is simple static files. Chapter 5, “Going Serverless in AWS,” discusses using S3 and copying single files to S3 through the AWS CLI. When you have large numbers of files or are working with large files, this can be cumbersome. The following two sections discuss two features of the AWS S3 command line that can help you transfer large numbers of files and transfer large files in multiple segments.

S3 Sync
When you need to transfer large numbers of files, S3 Sync is a nice option that is built in to the S3 CLI. As you can imagine, the tool simply synchronizes the state of the files on the local directory with S3 or vice versa. You can use S3 Sync to copy large numbers of files to and from S3 in a single command.
To test S3 Sync, you can create a new folder that contains some files. Use the following command to create the directory, enter it, and create five files:
mkdir sync && cd sync && touch file{1..5}.txt
Next, you simply need to create an S3 bucket to sync with and run the following command:
aws s3 sync . s3://mylittlesyncbucket
In this example, a bucket called mylittlesyncbucket is created. You can replace this part of the command with your bucket name.
The output should look as shown in Example 7-10. Note that the files are uploaded in random sequence.
Example 7-10 Output of the s3 sync Command
upload: ./file2.txt to s3://mylittlesyncbucket/file10.txt
upload: ./file1.txt to s3://mylittlesyncbucket/file1.txt
upload: ./file5.txt to s3://mylittlesyncbucket/file5.txt
upload: ./file3.txt to s3://mylittlesyncbucket/file8.txt
upload: ./file4.txt to s3://mylittlesyncbucket/file4.txt
Now you can log in to the AWS Management Console and see that the bucket has been synced with the local directory, as shown in Figure 7-23.

Figure 7-23 S3 Bucket Has Been Synced
You can now modify or add more files to the directory and rerun the s3 sync command. As you will see, only the files that have changed are copied over.
To synchronize your files in the opposite direction, simply swap the command to specify the S3 target first and the directory second, like so:
aws s3 sync s3://mylittlesyncbucket .
This command copies any files that do not exist in the local directory from S3.
Consider using versioning if you are cloning files through S3 Sync so that any accidental rewrites can be reverted.
S3 Multipart Uploads

When working with large files, you want to be able to upload them to S3 as quickly as possible. To do this, you can use the S3 multipart upload functionality, which gives you the ability to upload a large file in several segments. There are some limitations to multipart uploads:
The smallest part of a multipart upload is 5 MB.
The maximum number of segments is 10,000.
The largest possible combined file size is 5 TB.
You can see that even with these limitations, S3 multipart has great potential.
You need to consider a few additional key points about each multipart upload. First, you need to split up the file that you are uploading on your operating system before you begin the operation. Next, you need to upload the file parts in parallel to get the most benefit from this operation.
When you split up a file into parts, your first instinct may be to iterate through the filenames by pushing the parts through a do-while loop, but that wouldn’t really make a lot of sense because it would still upload the parts sequentially within the do-while loop. You need to execute a function on each file at the same time to start the part uploads at the same time and thus take full advantage of the multipart process. You will learn how to achieve this in the example that follows using the AWS CLI; however, you should take note of the lessons learned about not iterating through the files into your development practices and make sure you parallelize your execution as demonstrated in this example.
Begin by downloading this large 100 MB image file:
wget https://everyonelovesaws.s3.us-east-2.amazonaws.com/world.png
Next, use the Linux split command to split the file into 10 pieces and remove the original file and store the file pieces in the multipart/ directory:
mkdir multipart && mv world.png multipart/ && cd multipart && \

split -n 10 world.png && rm world.png && cd ..
Now look at what happens when you initiate a multipart upload:
aws s3api create-multipart-upload --bucket mylittlesyncbucket
--key world.png
The output of this command provides you with a bucket name, a key name, and an UploadId that you need to use when you upload your parts, as demonstrated in Example 7-11.
Example 7-11 Output of the create-multipart-upload Command
{
    "Bucket": "mylittlesyncbucket",
    "UploadId": "2HscWfRZYJCILJVdMpJJ4dfaAKD4ntjYKqgw.uFNrgvXv0Qk5e.
10q_UMsvOsGTUKNoc1CqDdQ6oAtHI6KTTkPRpJurOrtbd7C3xKbDQSkVwwhX3k3O4a8UQb.DSm.at",
    "Key": "world.png"
}
aws s3api upload-part --bucket mylittlesyncbucket \
--key world.png --part-number 1 --body multipart/xaa --upload-id "2HscWfRZYJCILJV
dMpJJ4dfaAKD4ntjYKqgw.uFNrgvXv0Qk5e.10q_UMsvOsGTUKNoc1CqDdQ6oAtHI6KTTkPRpJurOrtbd
7C3xKbDQSkVwwhX3k3O4a8UQb.DSm.at" --profile default
The response from this command is the ETag ID of the key that will be created when the operation is complete. You need to use the ETag ID in a properly formatted JSON file to complete the multipart operation:
{
     "ETag": "\"cea5605333e43d86aaa1d751ca03e0f8\""
}
As you can see, the only way to complete this operation in an efficient manner would be to automate and feed the JSON responses from your commands and create the required input data for the next command. You can cancel the operation and prepare to automate. To cancel the multipart upload, you need to specify the bucket, key, and UploadId:
aws s3api abort-multipart-upload --bucket mylittlesyncbucket
--key world.png --upload-id "2HscWfRZYJCILJVdMpJJ4dfaAKD4ntjYKqgw.
uFNrgvXv0Qk5e.10q_UMsvOsGTUKNoc1CqDdQ6oAtHI6KTTkPRpJurOrtbd7C3
xKbDQSkVwwhX3k3O4a8UQb.DSm.at"
Before you can automate, you also need something to read the JSON tags being returned by the AWS commands. For this purpose, you can install a JSON filter called jq that will allow you to capture the output and feed it into a variable that you will be able to use in your commands to both simplify the operation and create the JSON file for the multipart upload. Assuming that you are running Amazon Linux, you can install jq with the following command:
sudo yum -y install jq
Next, create the UploadID variable by feeding it the create-multipart-command into and filtering just the UploadId JSON content with the jq command. The following parts are included with this command:
UploadId=`: Opens a quotation for the variable
aws s3api create-multipart-upload --bucket mylittlesyncbucket --key world.png: Runs the AWL CLI command
jq -r '.UploadId': Reads the content of the UploadId response
`: Closes the quotation for the variable
The complete command to run looks like this:
UploadId=`aws s3api create-multipart-upload --bucket
mylittlesyncbucket --key world.png | jq -r '.UploadId'`
Because you fed the command into a variable, no response is given. You can run the following command to see the UploadId variable:
echo $UploadId
Next, you need to create the input.json file to record the ETag ID for all the parts. The first line defines the parts so you simply echo the correct formatting for the first line:
echo "{\"Parts\":[ " > input.json
Because you need the ETag from each upload, you can feed the upload-part command into the eTag# variable by reading the JSON of the AWS CLI output with jq, just as you did for the previous AWS command. You can then pipe the output into an echo command for each file part to create a separate new line entry in the input.json file for its respective part. Finally, the && operator ensures that all the commands are executed at the same time and all parts are uploaded in parallel:
eTag1=`: Opens a quotation for the unique ETag variable for each file.
aws s3api upload-part --bucket mylittlesyncbucket --key world.png --part-number 1 --body multipart/xaa --upload-id $UploadId: Runs the AWS CLI command using the previously defined $UploadId variable. This command also uploads the file part to AWS.
| jq -r '.ETag': Reads the content of the ETag response.
`: Closes the quotation for the variable.
&& echo "{\"ETag\":$eTag1,\"PartNumber\":1}", >> input.json: Feeds the $eTag variable into an echo operation and appends a new line in the input.json file.
&&: Ensures that the next command is run in parallel.
\: Adds a new line.
You need a command for each file, and the last file must end the echo without the, separator to maintain the sanity of JSON. The final command to upload the 10 parts should look as shown in Example 7-12.

Example 7-12 An Example of Parallel Input for the Multipart Upload Operation
eTag1=`aws s3api upload-part --bucket mylittlesyncbucket --key world.png --part-
number 1 --body multipart/xaa --upload-id $UploadId --profile default | jq -r
'.ETag'` && \
echo "{\"ETag\":$eTag1,\"PartNumber\":1}", >> input.json && \
eTag2=`aws s3api upload-part --bucket mylittlesyncbucket --key world.png --part-
number 2 --body multipart/xab --upload-id $UploadId --profile default | jq -r
'.ETag'` && \
echo "{\"ETag\":$eTag2,\"PartNumber\":2}", >> input.json && \
eTag3=`aws s3api upload-part --bucket mylittlesyncbucket --key world.png --part-
number 3 --body multipart/xac --upload-id $UploadId --profile default | jq -r
'.ETag'` && \
echo "{\"ETag\":$eTag3,\"PartNumber\":3}", >> input.json && \
eTag4=`aws s3api upload-part --bucket mylittlesyncbucket --key world.png --part-
number 4 --body multipart/xad --upload-id $UploadId --profile default | jq -r
'.ETag'` && \
echo "{\"ETag\":$eTag4,\"PartNumber\":4}", >> input.json && \
eTag5=`aws s3api upload-part --bucket mylittlesyncbucket --key world.png --part-
number 5 --body multipart/xae --upload-id $UploadId --profile default | jq -r
'.ETag'` && \
echo "{\"ETag\":$eTag5,\"PartNumber\":5}", >> input.json && \
eTag6=`aws s3api upload-part --bucket mylittlesyncbucket --key world.png --part-
number 6 --body multipart/xaf --upload-id $UploadId --profile default | jq -r
'.ETag'` && \
echo "{\"ETag\":$eTag6,\"PartNumber\":6}", >> input.json && \
eTag7=`aws s3api upload-part --bucket mylittlesyncbucket --key world.png --part-
number 7 --body multipart/xag --upload-id $UploadId --profile default | jq -r
'.ETag'` && \
echo "{\"ETag\":$eTag7,\"PartNumber\":7}", >> input.json && \
eTag8=`aws s3api upload-part --bucket mylittlesyncbucket --key world.png --part-
number 8 --body multipart/xah --upload-id $UploadId --profile default | jq -r
'.ETag'` && \
echo "{\"ETag\":$eTag8,\"PartNumber\":8}", >> input.json && \
eTag9=`aws s3api upload-part --bucket mylittlesyncbucket --key world.png --part-
number 9 --body multipart/xai --upload-id $UploadId --profile default | jq -r
'.ETag'` && \
echo "{\"ETag\":$eTag9,\"PartNumber\":9}", >> input.json && \
eTag10=`aws s3api upload-part --bucket mylittlesyncbucket --key world.png --part-
number 10 --body multipart/xaj --upload-id $UploadId --profile default | jq -r
'.ETag'` && \
echo "{\"ETag\":$eTag10,\"PartNumber\":10}" >> input.json
You can freely retry this part of the exercise by removing the && operators to run the operation in sequence instead of in parallel and compare the time it takes to complete the operation. When the previous command completes, you need to close the input.json file with the following command:
echo "]}" >> input.json
Finally, you finish the multipart upload by specifying the input.json file in the following command:
aws s3api complete-multipart-upload --multipart-upload file://
input.json --bucket mylittlesyncbucket --key world.png --upload-id
$UploadId --profile default
You should receive a response with the S3 location from AWS, indicating that the file has been uploaded successfully, as demonstrated in Example 7-13.
Example 7-13 Output of the complete-multipart-upload Command
{
    "ETag": "\"e0f0997c8e0e56492867164435ab8eb9-10\"",
    "Bucket": "mylittlesyncbucket",
    "Location": "https://mylittlesyncbucket.s3.us-east-2.amazonaws.com/world.png",
    "Key": "world.png"
}
The file is now uploaded and reassembled in the AWS back end. You can navigate to your bucket and download the file to see if the image has been preserved. If you have completed the exercise correctly, you should see a topographical map of the world. Now you just need to clean up the multipart directory:
rm multipart/* && rmdir multipart/
AWS DataSync
As you can see, copying files with S3 can, in some cases, be quite challenging. In addition, the target for your files might need to be a shared file system where production servers need access to the files with as little replication lag as possible. The AWS DataSync service can ease the migration of shared files from an on-premises file server to an AWS EFS service as well as simplify the delivery of files to S3. The service requires you to install an agent in the on-premises environment, which then connects through a TLS-encrypted Internet connection to the DataSync service. When this connection is made, you can simply set up the source and target in the AWS Management Console and set up a one-time or continuous migration. The service works in a very similar fashion to the DMS service, giving you the ability to not only migrate but also maintain two active copies of your file shares: one on premises and one in the cloud.
AWS Storage Gateway
The AWS Storage Gateway is a device that can connect your on-premises environment with an AWS back end. The system is available as a software and hardware (U.S. only) appliance and allows you to seamlessly connect your on-premises S3 environment and Glacier. There are three modes of operation available in the AWS Storage Gateway:
File Gateway: A file share service with support for the NFS and SMB protocols. The service sends all files to an S3 bucket and allows you to access the files from on premises as well as from AWS. The service allows you to life cycle the data in the bucket and make use of S3 features such as versioning and cross-region replication.
Volume Gateway: This mode enables you to mount volumes on the appliance through the iSCSI protocol. Data from Volume Gateway is stored as EBS snapshots and can be restored in AWS in case of a major outage in your on-premise environment.
Tape Gateway: This mode exposes a virtual media changer and virtual tapes to your backup software and allows you to redirect your traditional backups to the cloud. The backed-up data can be stored on S3 or directly to Glacier; however, the exact functionality is dependent on the backup software capabilities.
Snowball and Snowball Edge
To transfer very large datasets to the cloud, you can use the Snowball and Snowmobile services. These two services allow you to send your data directly on encrypted, tamper-proof, specialized physical media to AWS and transfer large datasets without impacting the performance of your Internet connection.
For example, suppose you need to transfer 70 TB of data through a 1 Gbps Internet connection. You will assume 70% utilization, which is considered good. The transfer of this dataset would take approximately 10 days. An option would be to set up a costlier link with more throughput; however, if this operation is required only once, then doing that might not make sense at all. You should also consider that the 70% utilization would possibly negatively impact other operations on the same Internet line.
To avoid this, you can use Snowball. Snowball is a hardware device with up to 100 TB* of capacity (*available on the Snowball Edge device) that AWS can ship to your address to allow you to transfer large datasets in a much faster manner without impacting your uplink. Ordering a device is very simple as it is done through the Management Console. After you order a Snowball device, you receive an approximate delivery time. The devices can be shipped overnight if required to speed up the process even more. Once a Snowball device is delivered, you simply plug it in to your network, and the 10, 25, or 40 Gigabit Ethernet connection on the device enables you to use an S3-compatible endpoint to copy your data on the device. This means that you can transfer your 70 TB dataset to the device in less than 5 hours at 90% utilization on the local network. When the transfer is complete, you disconnect and power off the device and order the return shipping service. The device has an e-ink label that automatically has the correct address for delivery. The device can be shipped to AWS overnight, and when it is delivered, the AWS team copies the contents of the device onto an S3 bucket. This way, you can transfer the same 70 TB dataset in approximately three days from when you order the device to when it is delivered and available on S3. Typically, you should avoid overnighting the device since it can become very expensive to do that. So in a typical scenario, the whole process should take less than a week. The rule of thumb is that if your dataset would have taken more than a week to transfer to AWS, you should order a Snowball device.
A Snowball Edge device also enables you to use the computing power in the device itself. It gives you the ability to spin up an EC2 instance on the device, run Lambda functions, and even run an RDS database. This way, you can test your plans on the local device before moving to AWS. Because you can spin up a local RDS database, it also allows you to migrate databases to RDS in a very efficient manner.
Snowmobile
When you need to move petabytes or zettabytes of data to the cloud, you need to call up a Snowmobile device. AWS can send a truck with a 45-foot shipping container full of disks and network devices. The system has a storage capacity of 100 PB and 1 Tbps of network connectivity, which means it is suitable for any data transfer operations that would otherwise take three weeks or longer to complete. AWS can deliver more than one Snowmobile device if your datacenter has the connectivity required and the disk capacity to match.
Exam Preparation Tasks
To prepare for the exam, use this section to review the topics covered and the key aspects that will allow you to gain the knowledge required to pass the exam. To gain the necessary knowledge, complete the exercises, examples, and questions in this section in combination with Chapter 9, “Final Preparation,” and the exam simulation questions in the Pearson Test Prep Software Online.
Review All Key Topics
Review the most important topics in this chapter, noted with the Key Topics icon in the outer margin of the page. Table 7-2 lists these key topics and the page number on which each is found.

Table 7-2 Key Topics for Chapter 7
Key Topic Element |
Description |
Page Number |
Section |
VM Import/Export |
231 |
Section |
Migrating a Database Using DMS |
235 |
SQL Script to Create a Sample Database |
237 |
|
Section |
S3 Sync |
249 |
Section |
S3 Multipart Uploads |
250 |
An Example of Parallel Input for the Multipart Upload Operation |
253 |
Define Key Terms
Define the following key terms from this chapter and check your answers in the glossary:
Q&A
The answers to these questions appear in Appendix A. For more practice with exam format questions, use the Pearson Test Prep Software Online.
1. True or false: When planning to migrate, you should never consider retiring an application.
2. Which AWS service allows you to import a VM image to AWS EC2?
3. True or false: The Database Migration service allows for migrations no longer than 90 days.
4. Which tool can you use with DMS to allow for a migration from Oracle to MySQL?
5. Which directions of file synchronization does S3 Sync support?
6. Which service would allow you to continuously sync an NFS server with an EFS service?
7. Complete this sentence: Multipart uploads file segments are managed by ______.
8. True or false: To complete a multipart upload, each file part needs to have its ETag presented in a properly formatted JSON file.
9. What is the minimum size of an S3 multipart upload segment?
10. When should you consider using a Snowball device to transfer data?