
We’ll begin the step-by-step instructions with a simple bow. We cover each step in detail, from working with the pattern to gluing the finished project. As you progress through the projects, we’ll provide fewer detailed instructions. This will help you to rely on the techniques you are learning.
The techniques are a culmination of my “trial and lots of errors” since the late 1970s. With these instructions you will be able to enjoy the art of intarsia without experiencing all of the pitfalls. It’s great to learn from more than 35 years of experience!
Before you start shaping each project, search online for photos of the object or animal. It’s very useful to have photos of the real thing close by to refer to. I print as many as I can find, including views from different angles. The Internet has made it easy to print resource material without having a huge library.


In your first project, you will practice choosing wood, attaching the pattern, and cutting the pieces. You’ll learn the fundamentals of shaping by sanding the parts to give the bow dimension. Also, you will learn how to apply a great professional finish. This lesson is fairly easy; however, the basics for simple and complex projects are the same.
WOOD
■ Medium wood, such as Western red cedar, oak, maple, or pine, ¾" (1.9cm) thick: 6½" x 7½" (16.5cm x 19.1cm)
■ Backing material, such as luan plywood or tempered hardboard (Masonite), ¼" (6mm) thick: 6½" x 7½" (16.5cm x 19.1cm)
MATERIALS
■ Bow pattern: 3 copies
■ Repositionable spray adhesive, glue stick, or glue machine
■ Wood glue
■ Double-sided tape
■ Polyurethane wiping gel
■ Paper towels
■ Lint-free terry cloth towel
■ Foam brush, disposable: 1" (2.5cm) wide
■ Leather dye: brown (optional)
■ Acrylic spray: clear
■ Mirror hanger
TOOLS
■ Scroll saw (or band saw)
■ Saw blades: #5 reverse skip-tooth
■ Sandpaper or file
■ Contouring sander (a pneumatic [air-inflated] sander is best, but a belt sander or disc sander will work)
■ Mechanical pencil
■ Carving knife or X-Acto knife (optional)
■ Woodburner (optional)

Before you start working on any project, study the pattern. This is a good habit to learn; the ability to anticipate problems will make your work more enjoyable.
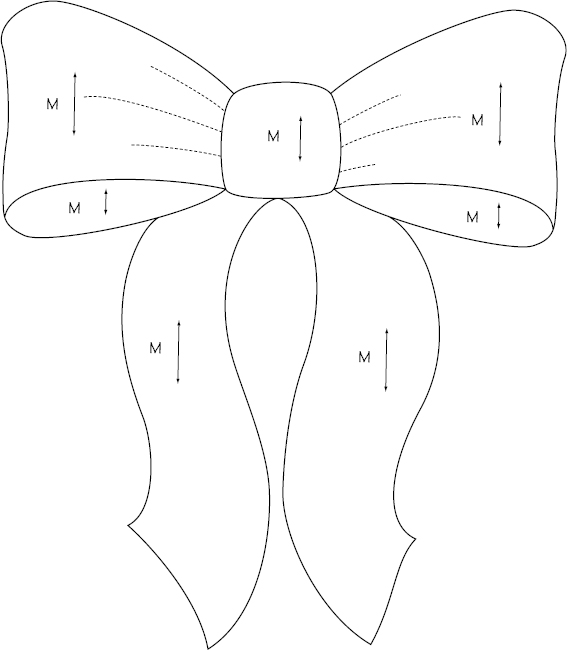
Glance over the bow pattern on here. The bow pattern has only one color of wood, and all the grain directions are the same. This tells me that I will need just one copy of the pattern to make the bow. I like to make a couple of extra copies: one for my master and an extra one just in case. If you do not have wood wide enough to put the pattern on in one piece (a 7", or 17.8cm, width for this project), you will need one more copy of the pattern, making a total of four copies.
Next I check what wood is involved. The bow only uses one color, a medium (M) shade of wood. As I study the pattern, I note there isn’t a whole lot of detail. If I can find some really unusual grain patterns in a piece of wood, it will make the bow more interesting. Also, because the grain direction is the same, it will help if I use wood at least ¾" (1.9cm) thick, so the bow will have much more depth. If I cut this out of ¼" (6mm)-thick wood and barely rounded it, the bow would look flat.
You can use whatever wood you have on hand for this project. We use Western red cedar, which comes somewhat smooth on the face and both edges. We run the rough side through a planer, taking off just enough to make the board lie flat. Clean up both sides if needed; I am always trying to conserve the thickness of the wood.
TIP
TO CHECK THAT the wood is flat on the bottom, place it on a flat surface. If it rocks, use a belt sander to remove the high spot. You can also tape sandpaper to the table and rub the warped board across it by hand.
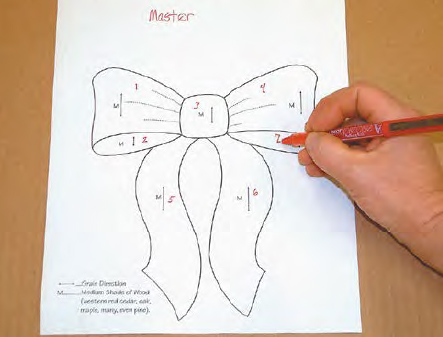
STEP 1: Label one of the pattern copies as the “master.” I like to number the master, numbering each part consecutively for the bow.
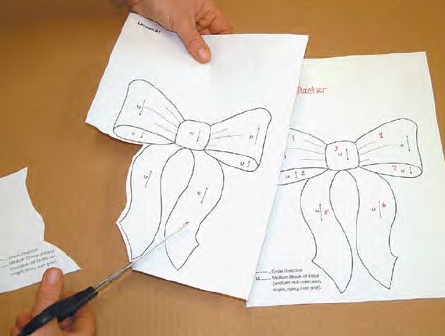
STEP 2: Trim one of the copies, giving it about a ¼" (6mm) border around the line work. Transfer the numbers from the master onto the copy.
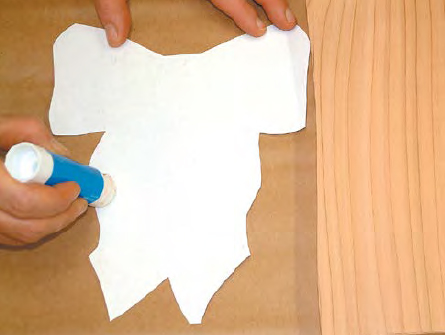
STEP 3: Glue the pattern to the wood. See here for detailed instructions for attaching the pattern to the wood.
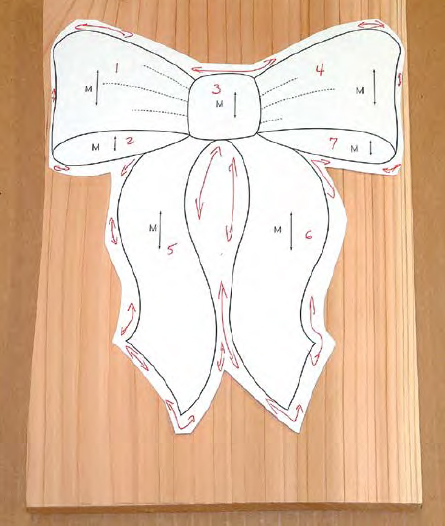
STEP 4: Mark the outside edges. I draw arrows on all of them. This way, when you start sawing, you can saw the outside edges first. Nothing fits next to the outside parts, so you can relax a bit and get into the swing of sawing before you have to make any parts fit. Finally, turn the piece of wood over and make sure that any burr or tear-out is removed from the back so the material will lie flat on the table.

STEP 5: Set up the scroll saw or band saw so the blade is square to the table. Check it with a small square.

STEP 6: Start sawing at the knot of the bow. By sawing this section first and then removing it, the rest of the bow can be cut without the fear of bumping into the knot with the blade. On a project such as this bow, it is less important that you stay exactly on the line because the bow will be sawed apart and put back together which will make for a nice fit; however, when sawing projects that have different colors of wood, the sawing needs to be more accurate.
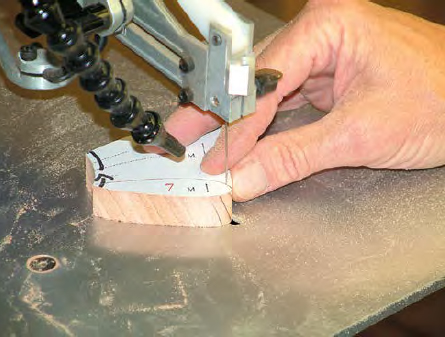
STEP 7: After removing the knot, you can saw out the rest of the bow. Plan the cuts so you are holding onto a larger piece of material and cutting off smaller pieces; the good part will just drop off the main piece of material. Avoid holding very tiny pieces.
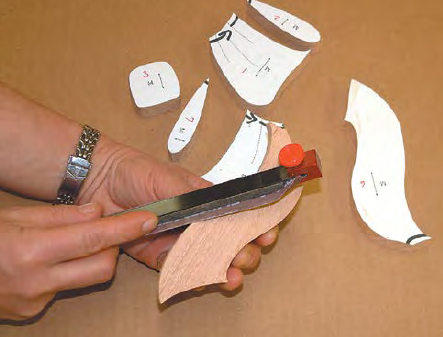
STEP 8: When you have cut all of the parts, remove the burr or tear-out on the back side of the pieces. I use sandpaper or a file.
STEP 9: Before you remove the patterns, check the overall project to see if everything is fitting correctly. Because we cut the bow out of the same piece of wood, fit shouldn’t be a problem. If you had to use two pieces of wood for the bow, there may be some discrepancies where the sections meet. The lines remaining on the pattern may reveal where the fit problem is. If there is not any linework evident but there is still a fit problem, mark the part and trim it with the saw. We use a new sharp blade in the scroll saw to trim parts.
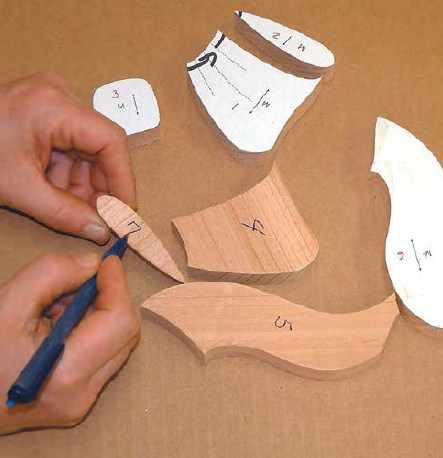
STEP 10: Transfer the number from the pattern onto the back of the part. Finally, remove the pattern.
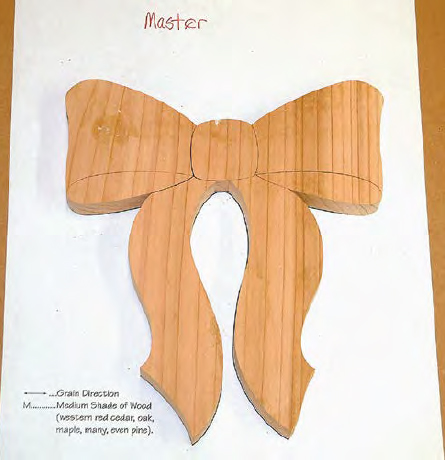
STEP 11: Take a minute to study the project again and plan your next steps. The first parts you sand will determine how much dimension your project will have, so I start with the parts that would be the background (the parts farthest from the viewer). On the bow, those are the two hanging ribbons, which I will taper toward the bow. Then, I’ll sand the next closest areas, which are the backs of the bow. Next, I’ll sand the upper bow parts. Last, I’ll sand the center of the bow. With this plan in mind, I start the shaping process.

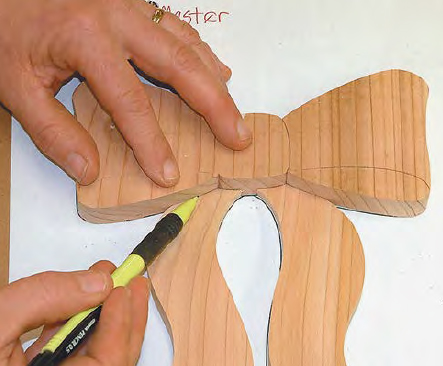
STEP 12: I use a soft, flexible sander and press each piece firmly against the drum. The soft sander makes it easier to get flowing, smooth contours. Sand the ribbons down toward the bow, bringing it down to about a ¼" (6mm) thick. With a mechanical pencil, mark where the ribbons join the lower side of the bow. The pencil lines will be your guides.
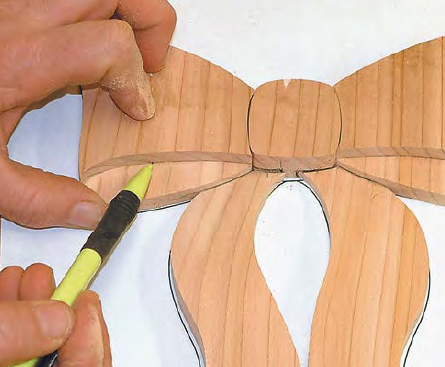
STEP 13: Sand the two small parts under the bow down to about ½" (1.3cm) thick. (Mark a ½", or 1.3cm, line on the part to give you a line to sand to.) On one side of the part, it will have the mark you made from the ribbons. Do not sand below these pencil lines. I hold the part with the critical pencil line facing me, so I can watch it at all times. Put the sanded pieces back in place and mark with a pencil where these two parts join the bow.
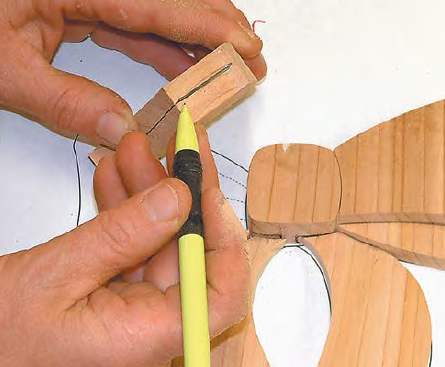
STEP 14: On the two upper bow sections, mark a line about a ½" (1.3cm) from the bottom up on the area that touches the center of the bow. Taper the upper bow parts down toward the center to the ½" (1.3cm) mark. While you have the parts out, go ahead and round the outside edges of the bow.
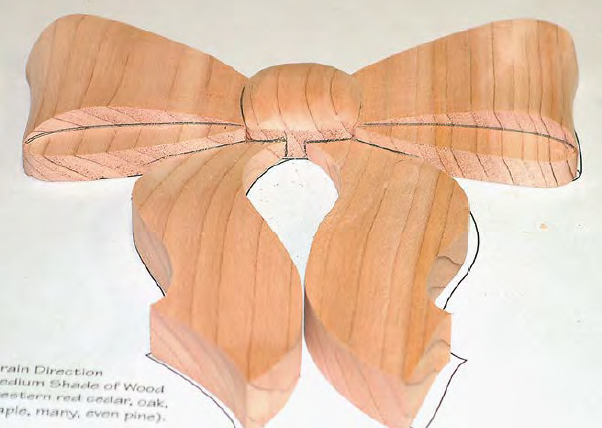
STEP 15: Round the center of the bow toward the new pencil lines. Then, round the center on the top and the lower part where they join the two hanging ribbons. Be sure to stay above the pencil lines that indicate the thicknesses of the ribbons.
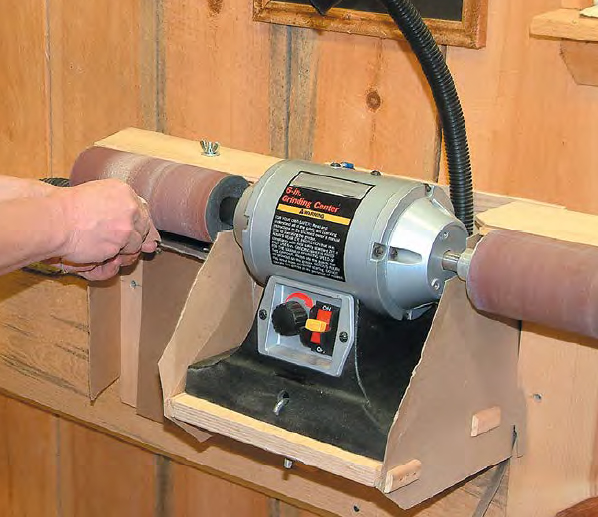
STEP 16: Refine the bow following the same order we used to rough it in. For example, on the hanging ribbons, sand a dip in the lower portion of the ribbon so it looks as though it is flipping up. Clean up the parts and any exposed/outside edges by sanding in the direction of the grain with a finer sanding drum, such as 220 grit, as you work.

STEP 17: If you alter the height of the hanging ribbons where they meet the bow, mark the new thickness line. I like to sand some curves and a dip in the ribbons to give them a softer feel.
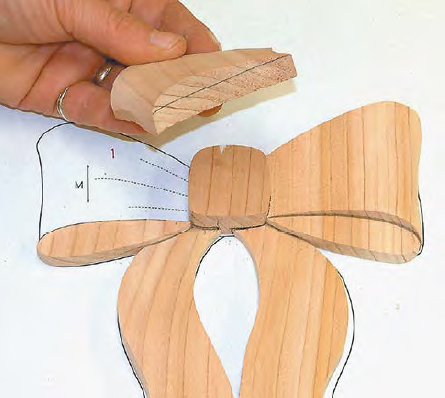
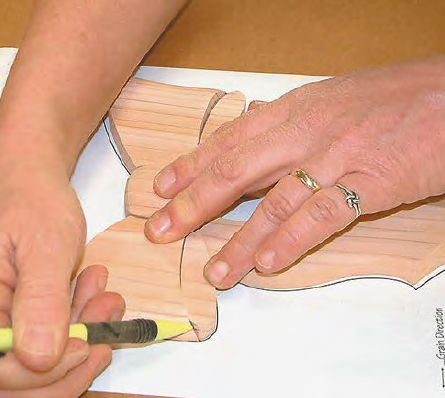
STEP 18: Next, work on the two upper bow sections. If you didn’t round the outside edges, do it now. Round almost to the bottom edge of the wood. If you need make the part under the bow match the roundness, mark the new thickness and sand the lower bow portion to match it.

STEP 19: Add some wrinkles and folds to the bow. Transfer the dashed lines from the pattern using a pencil or carbon paper, then use the edge of the Flex Drum sander, a handheld rotary tool, and/or a woodburner to carve, burn, or cut the lines for added detail. Clean up any exposed edges and place the upper bow parts back.
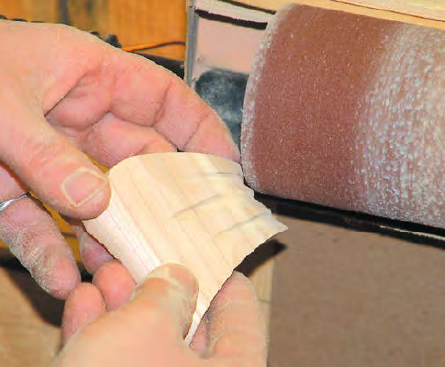
STEP 20: We rounded the upper bow portions, so we need to adjust the lower, or back, side of the bow pieces to follow the same curve. Mark where the outer edge of the bow joins the lower/back side of the bow. Put a concave curve on the back side of the bow parts, blending it to the rounded part of the upper bow. Shape the center last. It is the thickest piece and should have pencil marks on three of the four sides. Sand the section with the grain, and then once again clean up any exposed edges.
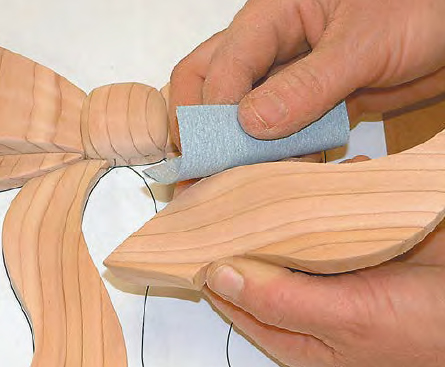
STEP 21: Erase any pencil lines that may be showing and check again for any deep scratches. Lightly hand-sand the sharp edges of each part with 180- and then 220-grit sandpaper. You can see where the grain pattern changed where the creases were sanded. Details like this will add to the beauty of the finished project.
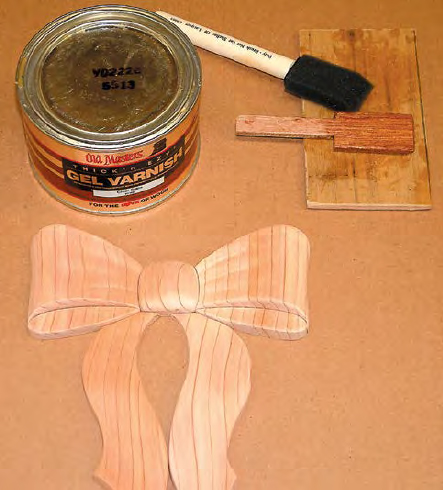
STEP 22: Use compressed air to clean any dust off all of the surfaces. Then, gather your equipment: a can of polyurethane wiping gel, a 1" (2.5cm) disposable foam brush, paper towels, and a piece of scrap ¼" (6mm)-thick plywood for handling the gel.

STEP 23: Open the gel can, turn the lid over, and use the paddle to remove some gel. Place the gel on the underside of the lid and then put the lid (upside down) back on the can. If you work out of an open can, a skin can form over the gel. (If that happens, just scrape off and dispose of the dried gel.)
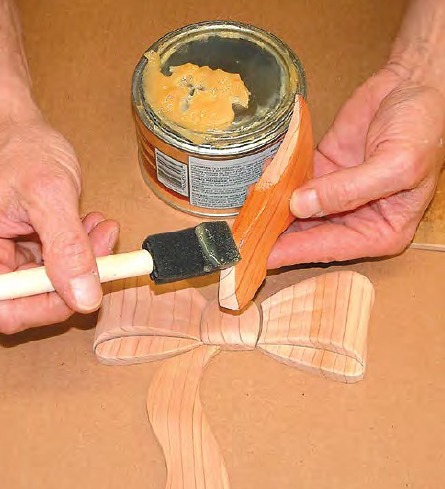
STEP 24: Apply a liberal amount of the gel, especially on the first coat. I apply it to the sanded side of the part and then to all edges. Do not coat the back of the part. The gel is very forgiving, so if you touch a coated area with your fingers, just apply a little more gel to the spot.
TIP
BEFORE YOU BEGIN, be sure to read and follow the manufacturer’s recommendations and cautions for applying their specific finish.
TIP
THE GEL WORKS very well with cedar and does not raise the grain, so there is no need to sand or use steel wool between coats. The gel will raise the grain slightly on white woods like aspen and white pine, so we sand lightly with 0000 steel wool before applying the third coat.
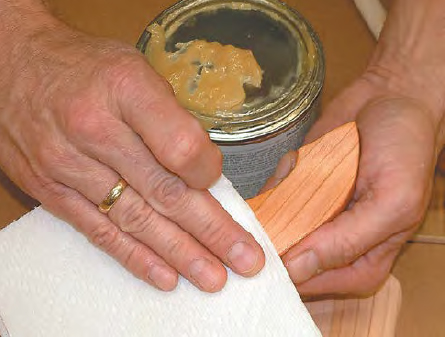
STEP 25: The gel is ready to wipe off in about one minute. Note: If you leave a part too long before wiping, the gel will become tacky. Just apply more gel, wait a few seconds, and then start wiping. Fold a full sheet of paper towel into fourths and use it to wipe off the excess gel and go around the edges. Use a fresh towel to buff the part with the grain. We can usually use the first towel and the buffing towel for four or five parts before they need to be changed. When it’s time to change the towels, use the buffing towel to wipe off the excess and use a new towel to buff.
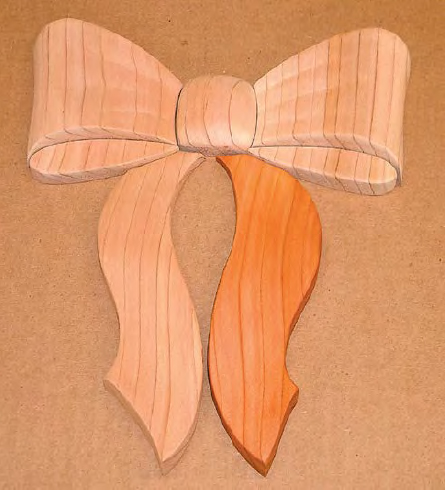
STEP 26: Coat two or three pieces, and then start wiping. I wipe all of the parts and then start the process over again until I have coated all of the parts. Allow the first coat of gel to dry overnight. Apply a second coat of gel. Don’t coat all of the edges; just do the edges that are exposed around the outside of the project. Let the project dry for four to six hours, and then apply a third, and final, coat. Let the third coat dry for at least four hours before assembling the project.
TIP
SOME PARTS WILL have sharp inside corners, which may make it difficult to remove the gel. Blow these areas with compressed air, which liquefies the gel. Check the tops of the parts for any gel that may have run, and wipe these areas immediately.
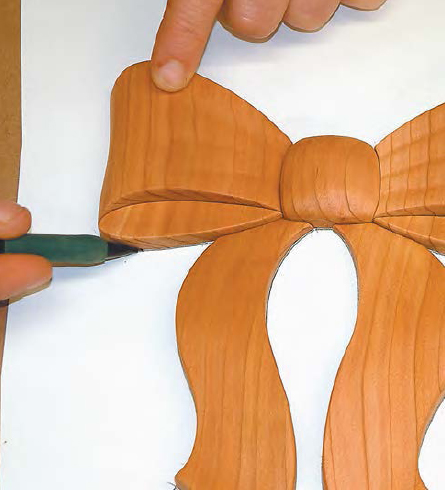
STEP 27: Instead of using the pattern to cut the backing board, I like to trace around the actual parts. I find this technique is more accurate because I might have sanded the edges or altered the shape. Spray a piece of paper with a light coat of adhesive to keep the parts from sliding, arrange the pieces, and draw around them. Then, use more adhesive spray and stick the paper to ¼" (6mm)-thick Luan plywood or tempered hardboard or Masonite. (If you use tempered hardboard, you can skip the dye in Step 29.)
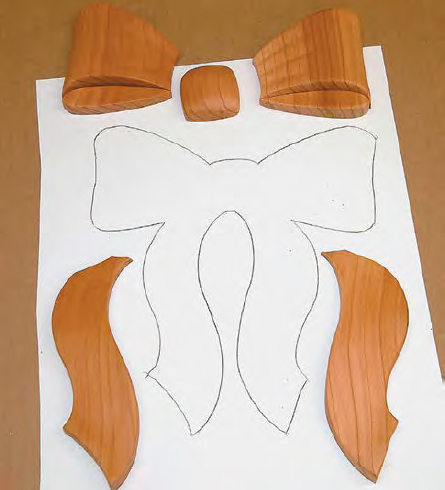
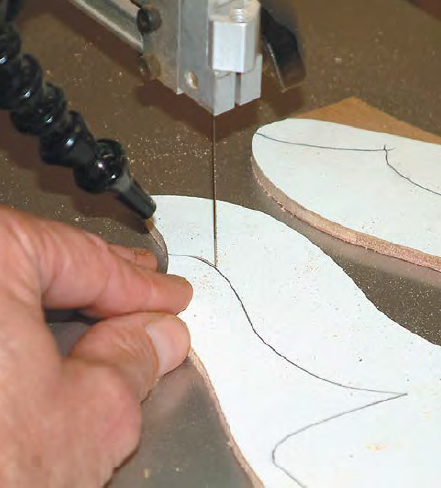
STEP 28: Cut the backing, staying to the inside of the line about 1/32" to 1/16" (1mm to 2mm). This will make the backing a little smaller than the project, which ensures that the backing does not hang out past the project when the pieces are glued down.
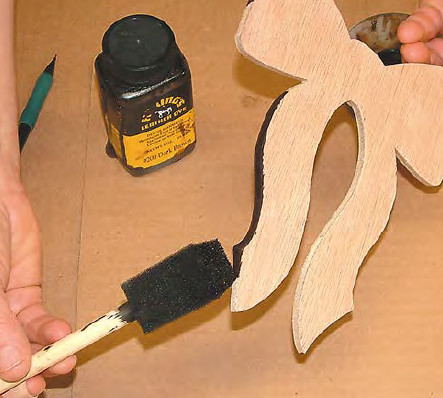
STEP 29: Sand the edges of the backing, and then stain them with a dark brown leather dye. The dye is alcohol based and dries very quickly.

STEP 30: Check the fit of the parts on the backing. Sand the back of the backing to remove most of the dye that may have run. Do not sand the front gluing surface. Spray clear acrylic on the back and the edges of the backing.
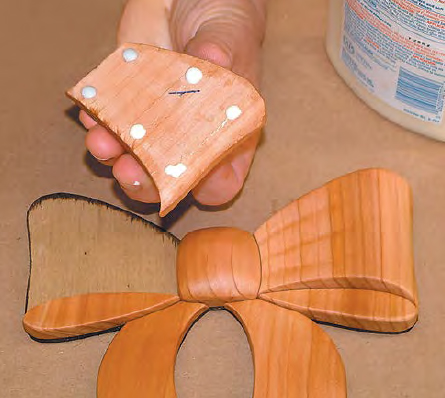
STEP 31: Check for placement on the backing, going for optimum fit. Then carefully pick up one of the hanging ribbons and dot its back with woodworker’s glue. Check the project to get another view of its final position, and then press the part firmly in place. Hold it for about 15 seconds without moving it. Then, glue the left bow. With these two parts locked in place, there is not much fear of the parts moving around as you glue them down. Apply glue sparingly to avoid warping the wood. Let the glue set.
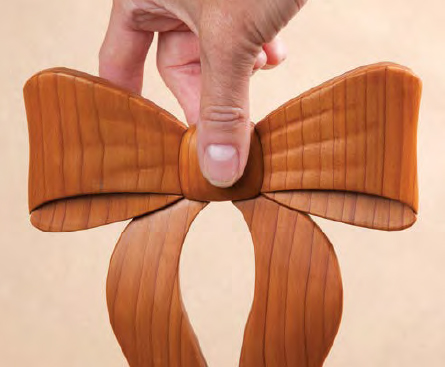
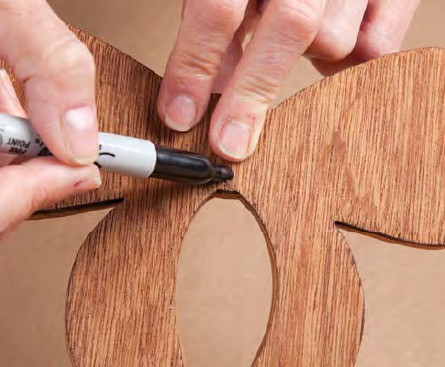
STEP 32: To find the center of the project, pinch it between your thumb and forefinger. Adjust it until it hangs evenly, and then mark the back at your fingertip.
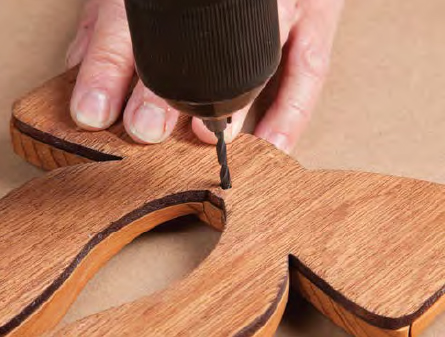
STEP 33: Check that the wood is at least ⅝ (1.6cm) thick. Choose a drill bit slightly smaller than the hanger screw, and mark the bit for depth to be sure you don’t drill through the project. Drill the hole.
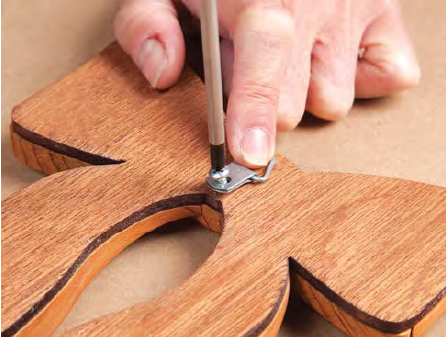
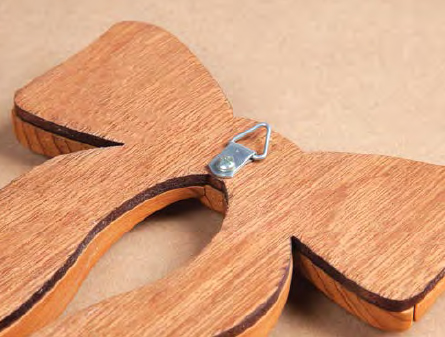
STEP 34: Install the hanger, being careful not to overtighten the screw.
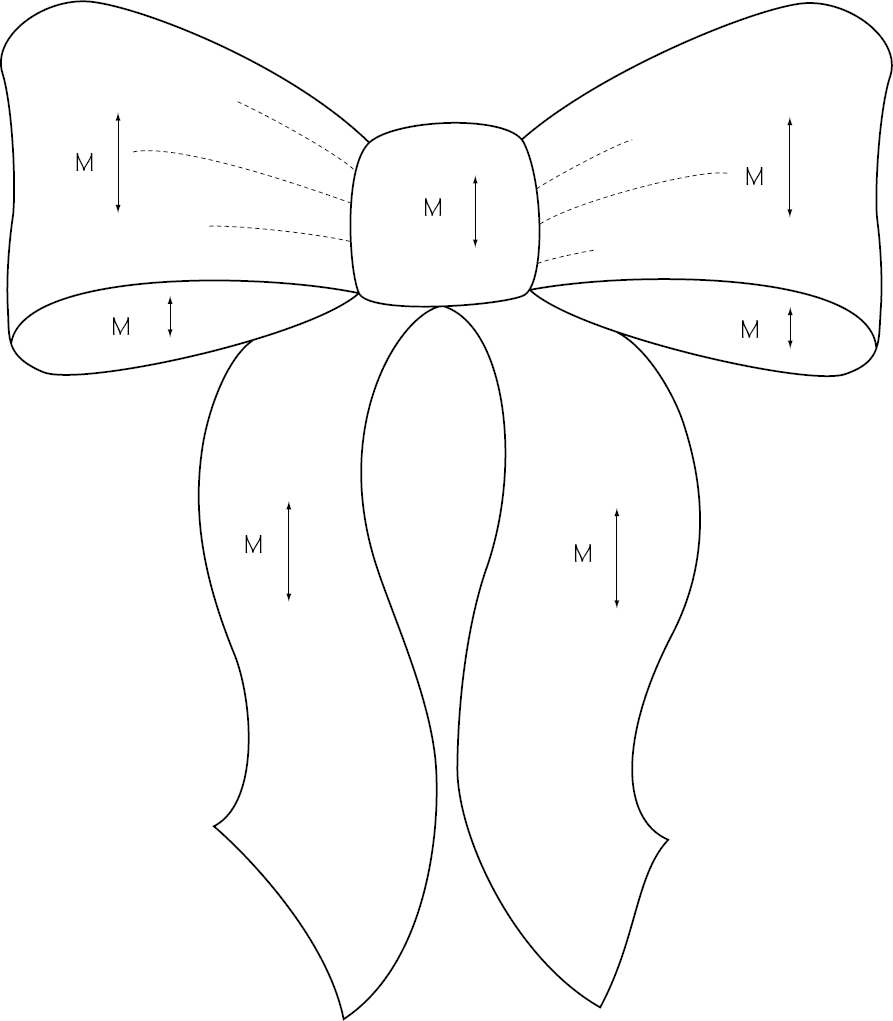
Pattern is shown actual size.
 Grain direction
 Medium shade of wood (Western red cedar, oak, maple, or pine)
© Judy Gale Roberts and Jerry Booher
In this lesson you will learn to use a sanding shim to sand sections as a unit when you need a consistent contour. Also, you will work with two shades of wood, use a dowel for the eye, and add details using a woodburner.
WOOD
■ Dark wood, such as Western red cedar, ¾" (1.9cm) thick: 4" x 13" (10.2cm x 33cm)
■ White wood, such as aspen, ¾" (1.9cm) thick: 2" x 13" (5.1cm x 33cm)
■ Backing material, such as luan plywood, ¼" (6mm) thick: 4" x 13" (10.2cm x 33cm) plus extra for shim
■ Dowel, ⅛" (3mm) dia.: 2" (2.5cm) long
MATERIALS
■ Whale pattern: 4 copies
■ Repositionable spray adhesive, glue stick, or glue machine
■ Wood glue
■ Double-sided tape
■ Polyurethane wiping gel
■ Paper towels
■ Lint-free terry cloth towel
■ Foam brush, disposable: 1" (2.5cm) wide
■ Leather dye: brown
■ Acrylic spray: clear
■ Mirror hanger
TOOLS
■ Scroll saw (or band saw)
■ Saw blades: #5 reverse skip-tooth
■ Sandpaper or file
■ Contouring sander (a pneumatic [air-inflated] sander is best, but a belt sander or disc sander will work)
■ Mechanical pencil
■ Drill and bit: ⅛" (3mm) dia.
■ Carving knife or X-Acto knife (optional)
■ Woodburner (optional)


STEP 1: Glance over the pattern. The whale has two colors of wood, and the grain direction is the same for all of the white parts and for all of the dark parts. You can lay these areas out as one section each. This tells me I will need at least two copies of the pattern. I like to make a couple of extra copies: one for my master and an extra one just in case.
STEP 2: Label one of the pattern copies as the master, and number each part. Using one of the copies, cut the white (W) sections, giving them about a ¼" (6mm) border around the line work. Use another copy to cut the dark (D) parts, also leaving about ¼" (6mm) border around the line work. Transfer the numbers from the master to the cut pattern pieces. Attach the patterns to the wood. (See here for instructions.)
Sawing the whale is a little different than sawing the bow, but it is still pretty basic. There are only two colors on the whale: a dark and a white. Notice the grain-direction arrows on both colors. The grain direction is running the same on each color, so each color can be cut from the same piece of wood. Note: Before you start cutting the parts, drill the hole for the eye. It’s always a good idea to do any drilling before you start cutting pieces.

STEP 3: Let’s start with the dark parts. Because the upper body, tail, dorsal fin, and flipper are all dark, we can cut them all from the same piece of wood. I like to start from the back area between the dorsal fin and the tail. Enter the cut and proceed toward the tail where the point is.
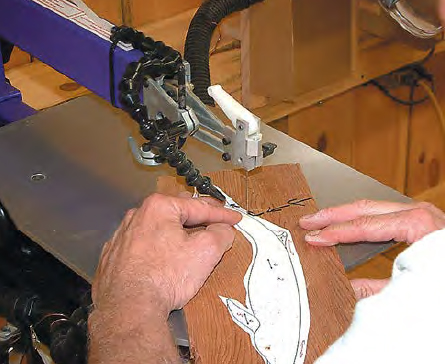
STEP 4: Once you reach the point in the tail, back out of the cut, reverse the direction, and cut toward the head. Do not follow around the dorsal fin. Continue cutting along the back (we will get to the dorsal fin later) and around the head, and then finally off the part.
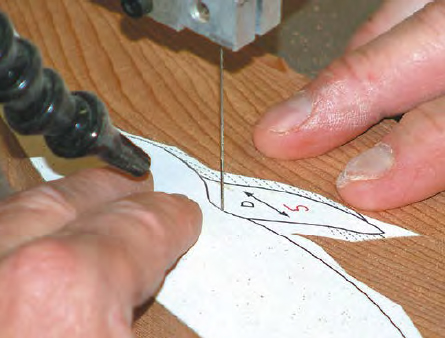
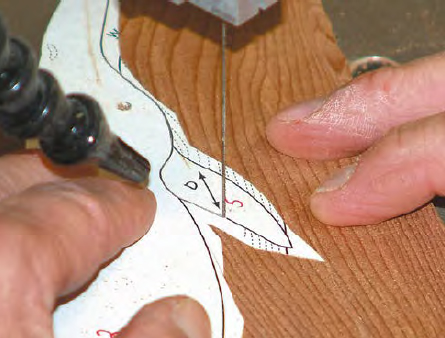
STEP 5: Enter the part at the mouth area and continue cutting until you reach the fin. Go past the front part of the fin. Follow the fin on its back side, and then off the part. Set this section aside.
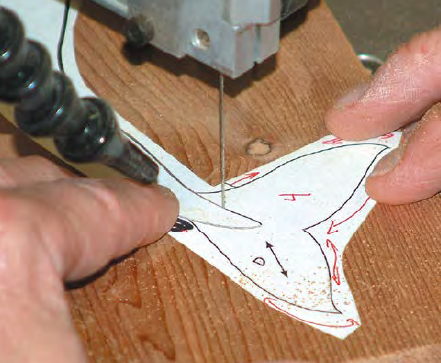
STEP 6: Enter where the fin was on the belly of the whale and continue cutting until you get all the way into the tail and join the tip of the body. The tail section will then fall away.
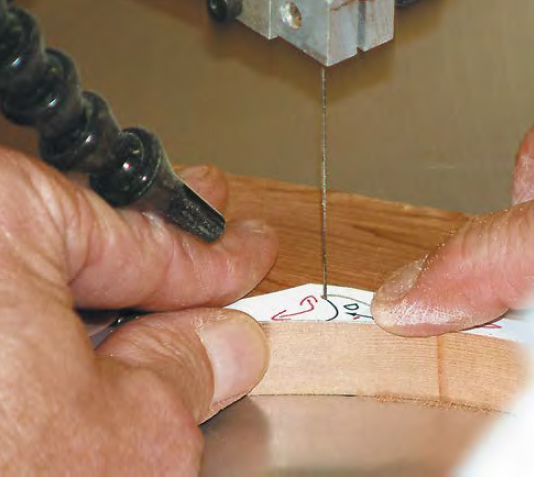

STEP 7: Cut the rest of the tail section and then the dorsal fin and flipper. This will be all of the dark parts.
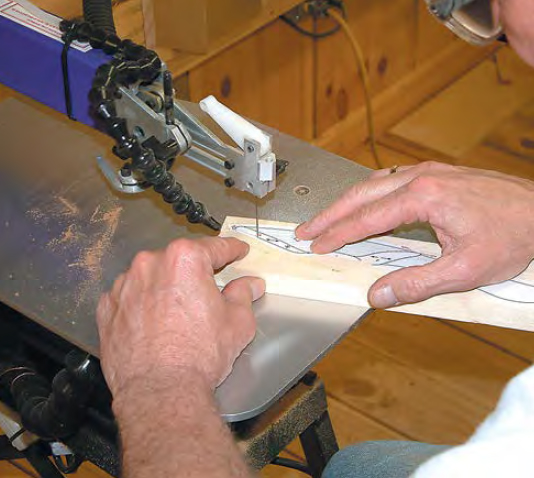
STEP 8: Cut the white parts much in the same way as we did the dark parts. Start at the upper section of the mouth and continue cutting past where the fin was and onto the belly on the back side of the fin. Continue along the belly and then off the end of the part. This belly section and the dark section have to match up, so saw slowly and remove the entire line.
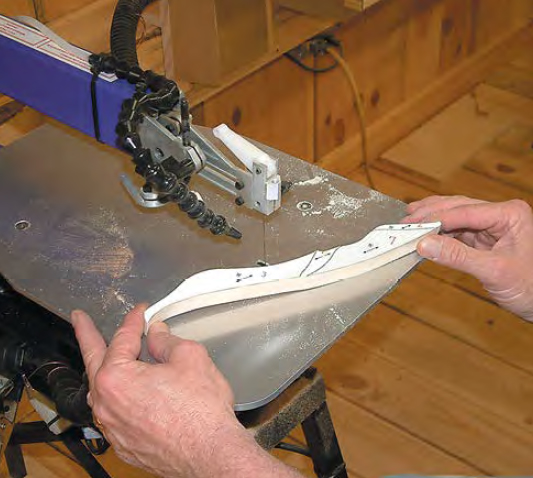
STEP 9: Start sawing at either end along the belly of the whale. This area does not have to fit against another part, so you can relax a little. After you cut the belly section, you will be left with a long, slender part. Remove the mouth and the fin area. Check that you have cut all of the parts, and then remove any burrs on the back sides of the pieces so they will sit flat.
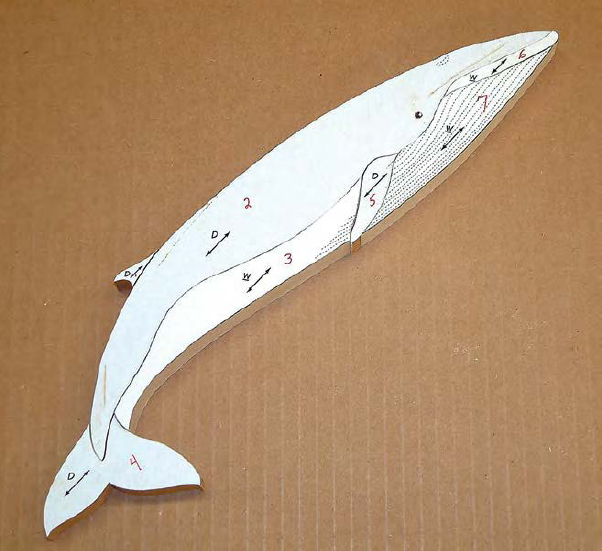
STEP 10: Place the pieces together and check that everything is fitting correctly. You may have fit problems between the dark upper section and the white belly section. Look for pattern lines, which may reveal the problem. If there aren’t any lines evident but the pieces still don’t fit, mark the part and trim it with the saw, using a new sharp blade.
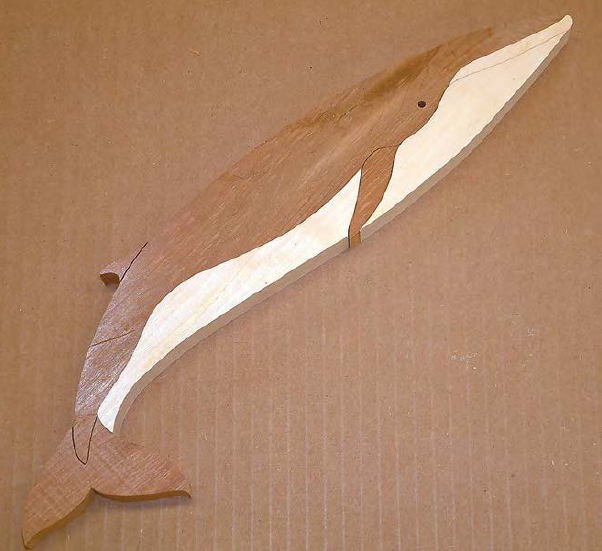
STEP 11: Transfer the pattern numbers to the backs of the parts and then remove the pattern pieces. Take a minute and study the project again while you plan the shaping. Consider finding photos of real whales to refer to while you are shaping the pieces.
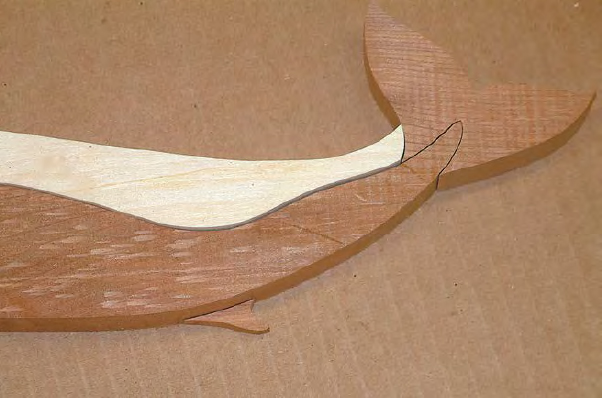
STEP 12: Sand the dorsal fin down to about ¼" (6mm) thick. With a mechanical pencil, mark where the fin joins the back. This pencil line will be a guide when you start sanding the back of the whale.
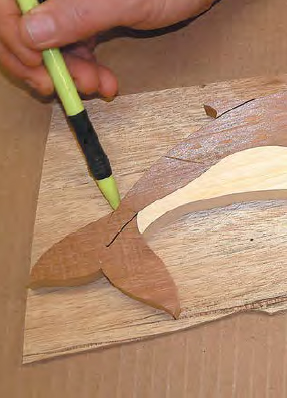
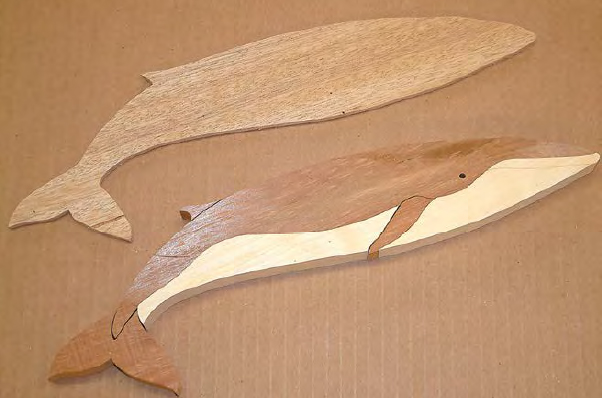
STEP 13: Make a sanding shim. A sanding shim is a backing to which multiple pieces are taped so they can be sanded as one piece. Assemble the pieces you want to sand together on a scrap piece of ¼" (6mm)-thick plywood and trace around them. For the whale, include the tail section along with the body sections. Check that the sanding shim is flat. It will be almost impossible to keep parts taped to a warped shim.
TIP
I BUY THE cheapest carpet tape available—we want to avoid a permanent bond. For the same reason, it is best not to leave sections taped up overnight. The longer the pieces sit, the harder it is to take them apart. Note: If a part starts to come off while you are using the shim, stop and re-tape it. Holding it on with your fingers will cause problems and take more time than re-taping.
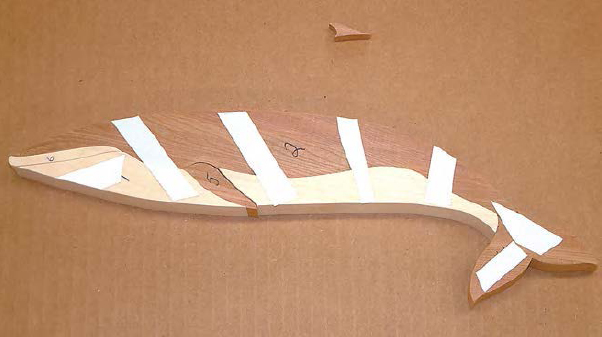
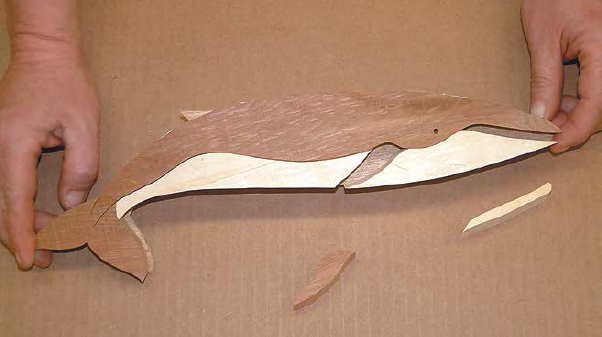
STEP 14: Turn the parts upside down, excluding the side flipper and the white lip (you can use them for placement, but do not tape them). Dust the parts and the shim, and then use at least two pieces of carpet tape on each part to hold them to the shim.

STEP 15: The side flipper is the thickest part, so you need to sand the rest of the body down. Making sure the side flipper is not attached to the shim, sand the entire surface of the whale to about ⅝ (1.6cm) thick. Once the parts are close to ⅝ (1.6cm) thick, start rounding the outside edges. Watch the pencil line for the fin on the whale’s back; do not sand below the line. To sand the tail, lower both outside edges. The center where the tail joins the body will be the thickest. After you get the tail to its basic shape, remove the tail flipper. Smooth the tail along the top edges.
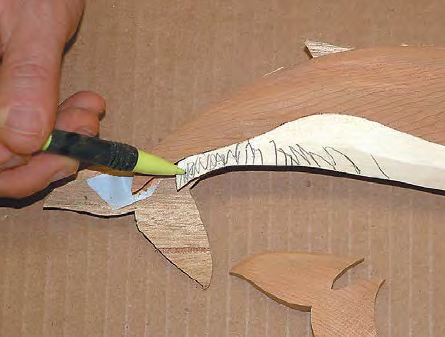
STEP 16: Put the tail back in place and mark the white section and the dark section. Round the white belly part down below the tail line. The white section will round toward the outside edge.

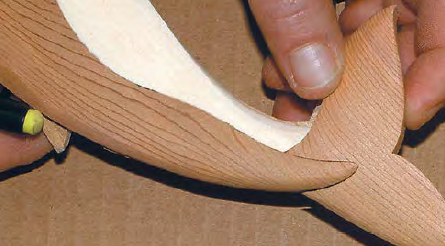
STEP 17: Round the dark end where it joins the tail. Then, round the tail entry part to match the flatter fin area.
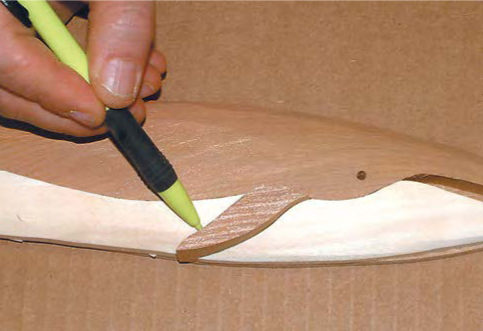
STEP 18: Put the side flipper in place and mark with a pencil where the dark and white parts join. Taper the flipper toward the dark body. The flipper will be thickest at the lower edge. This will give the appearance that it is attached to the body on the side and flares out toward the bottom.

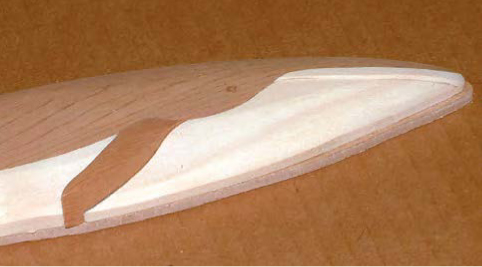
STEP 19: Put the white lip section in place and mark around it. Make this section about 1/16" (2mm) thicker than the parts around it. Watch the pencil lines. If you happen to sand below the line, just lower the parts around it and start again.
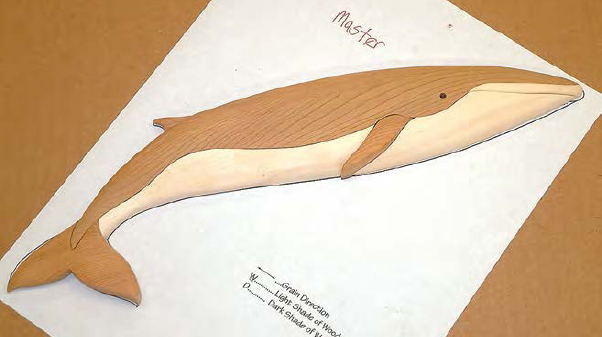
STEP 20: Sand the dorsal fin with the grain. To help make it look more streamlined, roll the front edge of the fin. Then, with the body still taped together on the sanding shim, sand the entire whale with the grain by hand using 180- and then 220-grit sandpaper. When you are done, remove the pieces from the shim.
STEP 21: Clean up the tail, sanding any exposed areas. Sand the side flipper and round the edge facing the front. Clean up the upper lip.
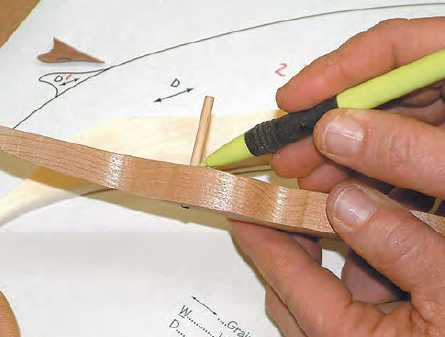
STEP 22: For the eye, round the end of a short piece of ⅛" (3mm)-diameter dowel. If the dowel is light colored, burn the exposed end to darken it. Slide the dowel into the whale from the back, mark it for length, and then cut it. Glue it in place now so you don’t lose it.
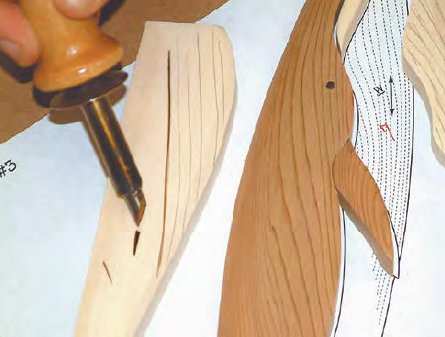
STEP 23: Transfer the dashed lines from the pattern to the whale’s chin/belly area. Transfer the air hole pattern as well. Draw a few lines on a piece of scrap wood, and then practice using a woodburner or a hand rotary tool to burn or carve the lines. If you burn blobs when you set the woodburner on a line, tap it on a piece of scrap first to remove some excess heat. When you feel confident, burn the lines and air hole on the project pieces.
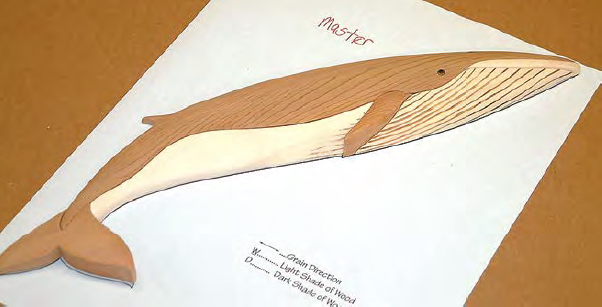
STEP 24: Erase any pencil lines that may be showing. Check again for any deep scratches or burrs on the backs of pieces; sand as necessary with 180- and then 220-grit sandpaper.
STEP 25: Apply the finish. See here for instructions. See the tip for information about white wood.
STEP 26: Cut the backing board. See here for instructions.
STEP 27: Assemble the project. See here for instructions.
STEP 28: Attach a picture hanger, if desired. See here for instructions.
GRACEFUL WHALE
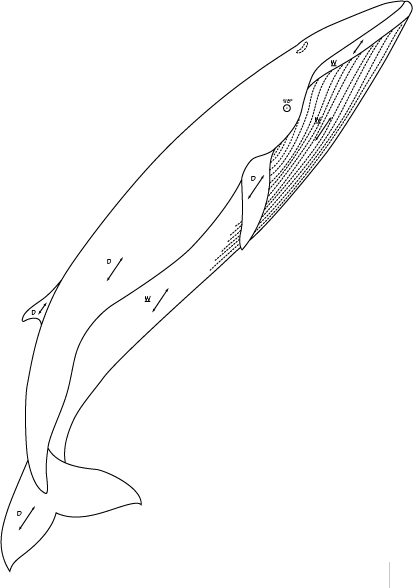
Pattern is shown actual size.
 Grain direction
 White wood, such as aspen
 Dark wood, such as Western red cedar
© Judy Gale Roberts and Jerry Booher
You will learn how to use two sanding shims for the wing and body sections of the seagull, as well as how to edge tape. You will use four shades of wood to make the seagull.
WOOD
■ White wood, such as aspen, ¾" (1.9cm) thick: 4" x 6" (10.2cm x 15.2cm)
■ Light wood, such as maple or pine, ¾" (1.9cm) thick: 2" x 5½" (5.1cm x 14cm)
■ Medium wood, such as Western red cedar, oak, maple, or pine, ¾" (1.9cm) thick: 3" (7.6cm) square
■ Medium-dark wood, such as Western red cedar, ¾" (1.9cm) thick: 2" (5.1cm) square
■ Dowel, ⅛" (3mm) dia.: 2" (2.5cm) long
■ Backing material, such as luan plywood, ¼" (6mm) thick: 4½" x 12" (11.4cm x 30.5cm) plus extra for shims
MATERIALS
■ Seagull pattern: 4 copies
■ Repositionable spray adhesive, glue stick, or glue machine
■ Wood glue
■ Double-sided tape
■ Polyurethane wiping gel
■ Paper towels
■ Lint-free terry cloth towel
■ Foam brush, disposable: 1" (2.5cm) wide
■ Leather dye: brown
■ Acrylic spray: clear
■ Mirror hanger
TOOLS
■ Scroll saw (or band saw)
■ Saw blades: #5 reverse skip-tooth; #7 (for aspen if desired)
■ Sandpaper or file
■ Contouring sander (a pneumatic [air-inflated] sander is best, but a belt sander or disc sander will work)
■ Mechanical pencil
■ Drill and bit: ⅛" (3mm) dia.
■ Carving knife or X-Acto knife (optional)
■ Woodburner (optional)


STEP 1: Glance over the pattern. The seagull has four colors of wood. The grain direction goes many ways. When you cut up the pattern to get the complete part, you waste the other portions of the pattern, so I like to make a game of getting as many good parts out of a pattern using the smallest number of patterns possible. Try using a pencil to map out the cuts before you actually cut the pattern. You can make the seagull with three copies: two for the pattern pieces and one for the master. But it’s good to have an extra one just in case.
STEP 2: Label one of the pattern copies as the master, and number each part. Using one of the copies, cut the white (W) sections, leaving about a ¼" (6mm) border around the lines. Then cut the two M leg parts and the two MD wing tips, giving the pieces the same border. There is nothing usable left on the pattern, so use another copy to cut the W background wing section, the LT under wing section, and the two W leg sections, making sure each has the ¼" (6mm) border. Transfer the numbers from the master to the cut pattern pieces. Attach the patterns to the wood. (See here for instructions.)

STEP 3: Drill any holes, like the eye, before you start sawing. I like to cut my wood by colors. I try to cut the light pieces first, then the medium pieces, and then the dark pieces. I cut the white parts last.
TIP
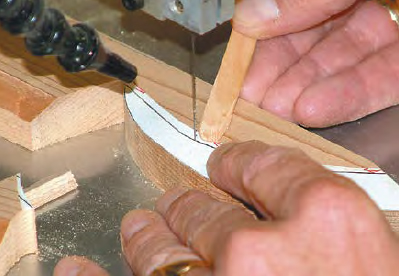
I KEEP A wooden craft stick near the saw at all times. If the pattern starts to flap a little while sawing, I use the stick to hold the paper down until I can finish the cut.
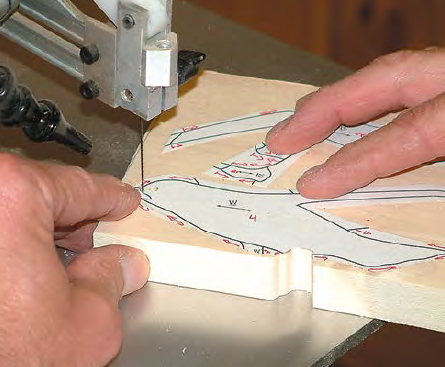
STEP 4: I use aspen for “white” wood. It cuts differently than the cedar, so I save it for last and change to a more aggressive blade, such as a #7.
TIP

BEFORE YOU BEGIN to saw, be sure to remove the burr on the bottom of the wood so it sits flat on the saw. Also, use a small square to be sure the saw blade is perfectly vertical in its holder. I also use the small square to check that my cuts are square to the bottom of the parts. Keeping the pieces flat and square will help them fit together better later.
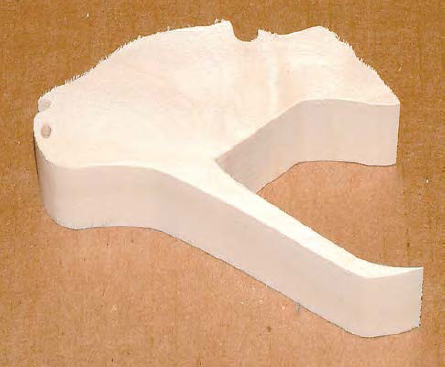
STEP 5: Check all of the pieces and sand off the burrs on the bottoms. Then, place the pieces together and check that everything is fitting correctly. Because we cut parts from many different pieces of wood, there is more of a chance to have fit problems. Look for pattern lines, which may reveal the problem. If there aren’t any lines evident but the pieces still don’t fit, mark the part and trim it with the saw, using a new sharp blade.
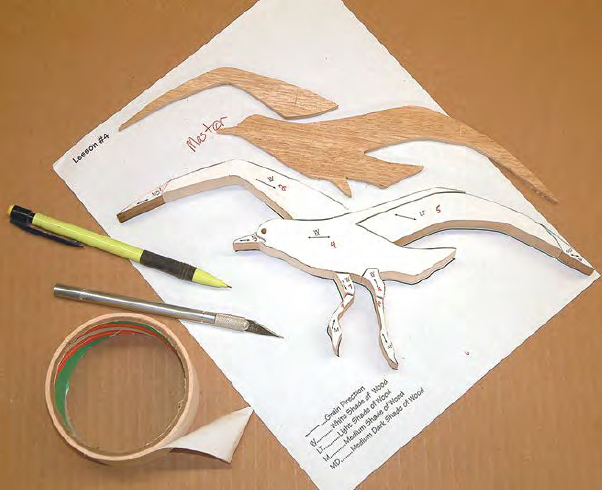
STEP 6: Transfer the pattern numbers to the backs of the parts and then remove the pattern pieces. Take a minute and study the project again while you plan the shaping. Consider finding photos of real seagulls to refer to while you are shaping the pieces.
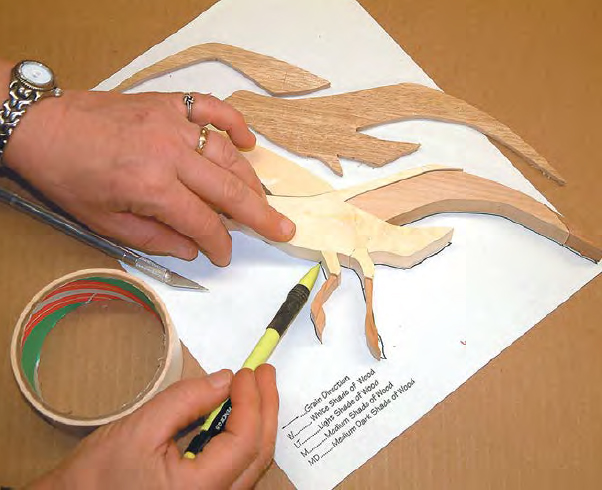
STEP 7: Make the sanding shims. (See here for details.) Either use the pattern or trace around the parts. One shim should include the beak, the white body part, the light section under the wing, and the medium-dark tip on the wing. A second shim should include the other white part of the wing and the medium-dark end piece. Check that the shims are flat.
STEP 8: With a mechanical pencil, mark where the left white leg section joins the body. It helps to know the placement and the shape of the part where the two join. Don’t guess where it goes.

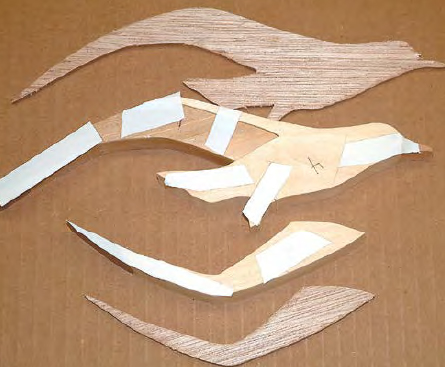
STEP 9: Tape the pieces to the shims. Dust the pieces and shims first, and use at least two pieces of tape on each part to hold it down. Put tape between the joint of the white and the medium-dark parts of the left and right wing tips. Edge-taping these thin parts will help hold them to the shim. The easiest way to remove the paper part of the double-sided tape is to put the point of the knife blade barely under the paper, then pull back. This is much easier than trying to separate the paper at the edge of the tape.
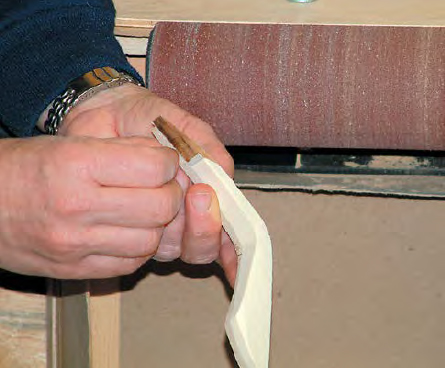
STEP 10: Start sanding the left wing. Taper the white part down about ¼" (6mm) toward the body. Take the rest of the wing down to about ½" (1.3cm) thick. Next, taper from the bend in the wing down toward the medium-dark part. Hold the taped assembly with the dark part on the upper side. The larger white part will help support the small medium-dark part to keep it in place. The high point will be the bend in the wing. Leave the left wing taped up for now.

STEP 11: Put the left wing (still taped to the shim) where it belongs against the upper body. Mark with a pencil where these two sections join. When you sand this area of the head and body, stay above this pencil line.

STEP 12: Use a scrap piece of ¼" (6mm)-thick plywood to raise the legs the same height as the parts with the sanding shims. Sand the left leg (both the white and medium pieces) down to about ¼" (6mm) thick. You can leave the foot part a little thicker. Mark where the left leg joins the lower body. When sanding the body section, stay above this pencil line.
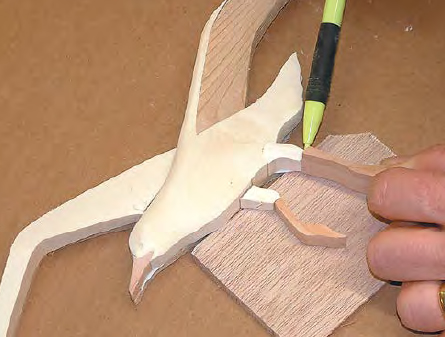
STEP 13: Sand the upper right leg where it joins the body. You could sand the upper leg and body individually; however, keeping them together at this time will keep you from sanding too much off where the two join. Sand the area down to about ½" (1.3cm) thick. Take the white upper leg off the sanding shim. When sanding around this area, stay away from that part.
STEP 14: Rough in the head and beak. Round the head, tapering it down toward the beak and continuing the taper to the end of the beak. For the wing on the right, blend the white and the light woods together. Round along the top edge of the wing. Sand the lower side of the wing, tapering it down toward the body. Get where you can with the sander while the parts are taped together, because most of it will get sanded again when we take it apart.
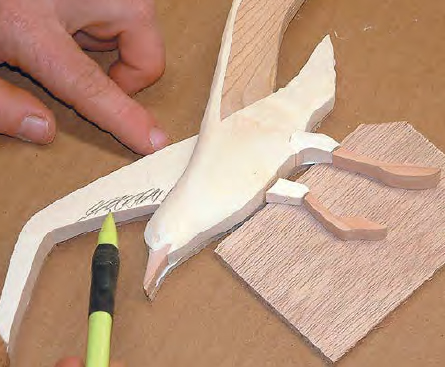
STEP 15: Put the left wing in place to check the overall project. Mark the left leg. Place some scrap ¼" (6mm)-thick plywood under the legs to keep everything the right thickness. Mark where the white and medium sections meet. Taper the medium leg part down to the pencil line. If you sanded too much wood away around the head area, you may need to sand the left wing down some more. I mark on the face of the wood the areas that need to be sanded. If everything looks correct, take all of the parts off the sanding shim except the light and medium-dark parts of the right wing.
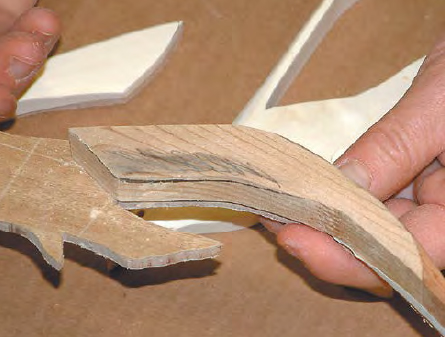
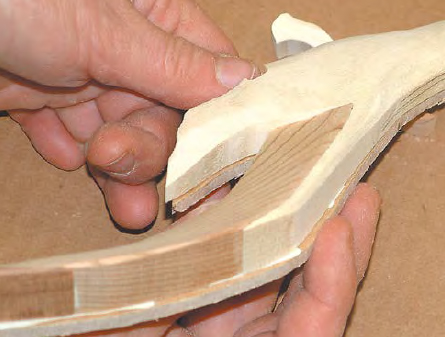
STEP 16: Taper the lower portion of the LT wing part down toward the lower portion of the body. I like to mark the face of the wood to know exactly where I want to remove material before I start sanding. Then, put it back together and see if there is a difference. We are trying to make the wing look as though it is tucked in behind the body.

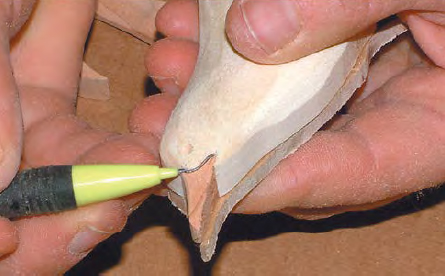
STEP 17: Sand the beak down about 1/16" (2mm), and then put it back in place and mark the head section where the two parts join. Round the head section down to the pencil line.
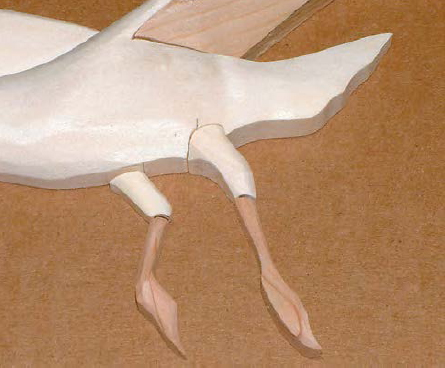
STEP 18: To give the left leg more detail, taper the white part down a little toward the medium foot piece. Sand a bend in the leg. After the taper, round it toward the outside edges. Next, taper the medium leg to meet the white part. Round the upper leg section of the medium part. To give the foot a bird-like feel, sand the pointed part down toward the point. Do the same for the leg in the foreground.
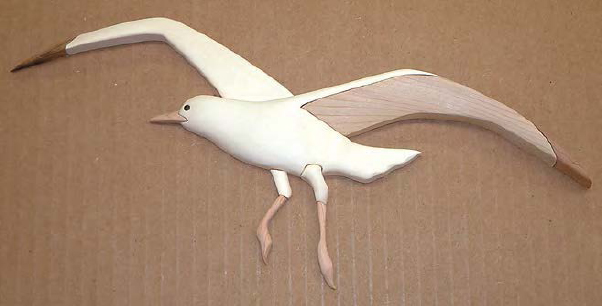
STEP 19: Soften the outside edges of the left wing and sand the parts with the grain. Taper the tail toward the outside edge.
STEP 20: For the eye, round the end of a short piece of ⅛" (3mm)-diameter dowel. If the dowel is light colored, burn the exposed end to darken it. Slide the dowel into the seagull from the back, mark it for length, and then cut it. Glue it in place now so you don’t lose it.
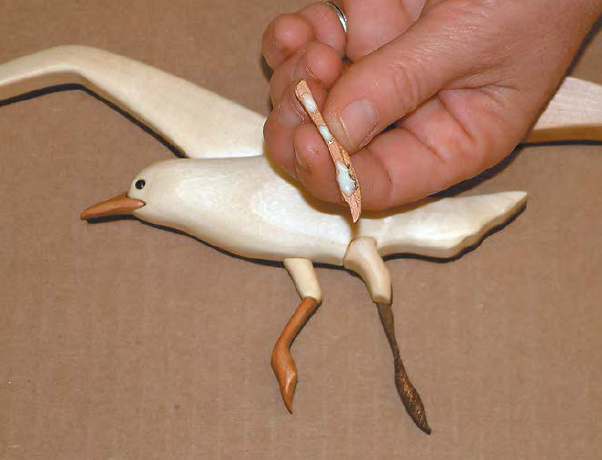
STEP 21: Erase any pencil lines that may be showing. Check again for any deep scratches or burrs on the backs of pieces; sand as necessary with 180- and then 220-grit sandpaper.
STEP 22: Apply the finish. See here for instructions. See the tip on here for information about white wood.
STEP 23: Cut the backing board. See here for instructions.
STEP 24: Assemble the project. See here for instructions.
STEP 25: Attach a picture hanger, if desired. See here for instructions.
SEAGULL IN FLIGHT

 Grain direction
 Medium shade of wood (Western red cedar, oak, maple, or pine)
 White wood, such as aspen
 Light wood, such as maple or pine
 Medium-dark wood, such as Western red cedar
Pattern is shown actual size.
© Judy Gale Roberts and Jerry Booher
You will practice using two sanding shims for the wing and body sections of the seagull. You will use four shades of wood to make the seagull.
WOOD
■ White wood, such as aspen, ¾" (1.9cm) thick: 5" x 9" (12.7cm x 22.9cm)
■ Light wood, such as maple or pine, ¾" (1.9cm) thick: 2" x 5" (5.1cm x 12.7cm)
■ Medium wood, such as Western red cedar, oak, maple, or pine, ¾" (1.9cm) thick: 2" x 3" (5.1cm x 7.6cm)
■ Medium-dark wood, such as Western red cedar, ¾" (1.9cm) thick: 4" (10.2cm) square
■ Dowel, ⅛" (3mm) dia.: 2" (2.5cm) long
■ Backing material, such as luan plywood, ¼" (6mm) thick: 5" x 10½" (12.7cm x 26.7cm), plus extra for shims
MATERIALS
■ Seagull pattern: 4 copies
■ Repositionable spray adhesive, glue stick, or glue machine
■ Wood glue
■ Double-sided tape
■ Polyurethane wiping gel
■ Paper towels
■ Lint-free terry cloth towel
■ Foam brush, disposable: 1" (2.5cm) wide
■ Leather dye: brown
■ Acrylic spray: clear
■ Mirror hanger
TOOLS
■ Scroll saw (or band saw)
■ Saw blades: #5 reverse skip-tooth; #7 (for aspen if desired)
■ Sandpaper or file
■ Contouring sander (a pneumatic [air-inflated] sander is best, but a belt sander or disc sander will work)
■ Mechanical pencil
■ Drill and bit: ⅛" (3mm) dia.
■ Carving knife or X-Acto knife (optional)
■ Woodburner (optional)

STEP 1: Refer to the instructions for the Seagull in Flight (here) and prepare the pattern, attach it to the wood, and cut the pieces. Be sure to drill the eye hole before you cut the body piece.

STEP 2: Check all of the pieces and sand off the burrs on the bottoms. Then, place the pieces together and check that everything is fitting correctly. Mark any pieces that don’t fit and trim them with the saw, using a new sharp blade. Transfer the pattern numbers to the backs of the parts and then remove the pattern pieces.
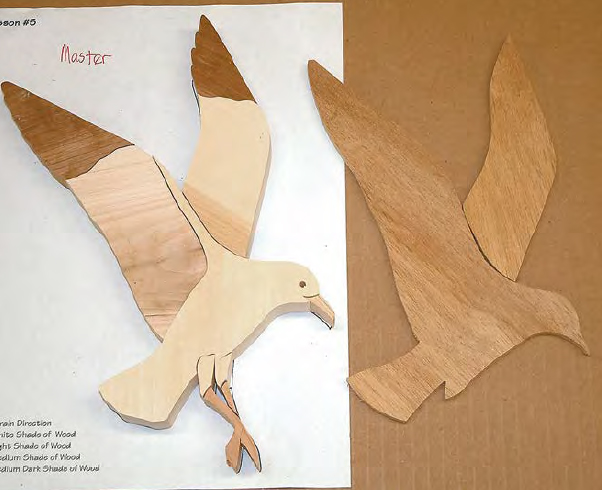
STEP 3: Cut the sanding shims. One shim should include the MD left wing, LT left wing, W body, and W left upper leg. The other shim should include the MD right wing and W right wing. Make sure the shims are perfectly flat.
STEP 4: Tape the pieces to the sanding shims as appropriate. See here for details. Use a scrap piece of ¼" (6mm)-thick plywood to temporarily raise the leg parts so they will be on the same level as the body on the sanding shim. Note: The head around the eye will be the thickest part of the project.
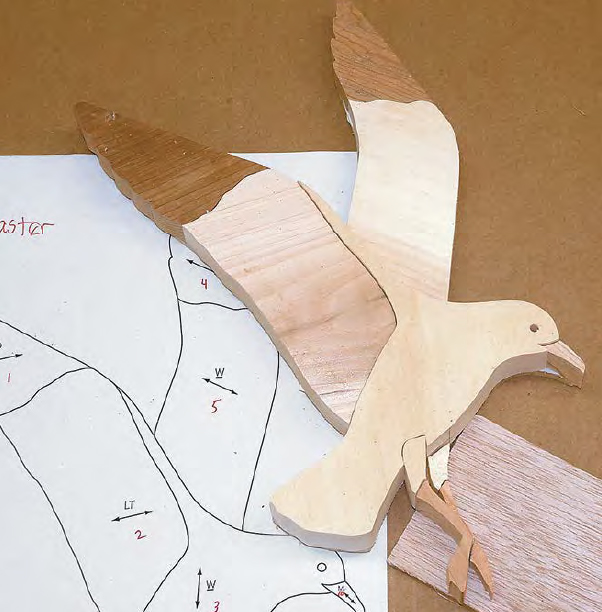
STEP 5: Sand the white part of the right leg down to about a ¼" (6mm) thick. Mark where the white section joins the body and the medium-colored leg/foot parts. Sand the medium leg part next. Sand the entire right leg down to ¼" (6mm) thick. The white section and medium section are behind the left leg, which is in the foreground.

STEP 6: Taper the white part of the right wing toward the body. Bring it down to ¼" (6mm) thick. In order to round the body of the seagull, you will need to remove at least ½" (1.3cm) off the top of the white wing section. Take the rest of the wing down to about ½" (1.3cm) thick. Next, start where the white and medium dark parts join and taper from the bend in the wing toward the outer wing edge. Leave the right wing taped up for now.
STEP 7: Put the right wing (still taped to the shim) where it belongs against the upper body. Mark where the two sections join. When you sand this area of the body, stay above this line. Mark where the right leg joins the lower body, and stay above this line, also.
STEP 8: With the parts taped securely, sand the left leg where it joins the body (the white part). Rough in around the head and beak. Round the head, tapering it down toward the beak and continuing the taper to the end of the beak.
STEP 9: For the wing on the left, blend the white and the light woods together. Round along the top edge of the wing. Sand the lower side of the wing, tapering it down toward the body. Sand where you can, because most of it will get sanded when we take it apart. Taper the tail area to about ½" (1.3cm) thick.
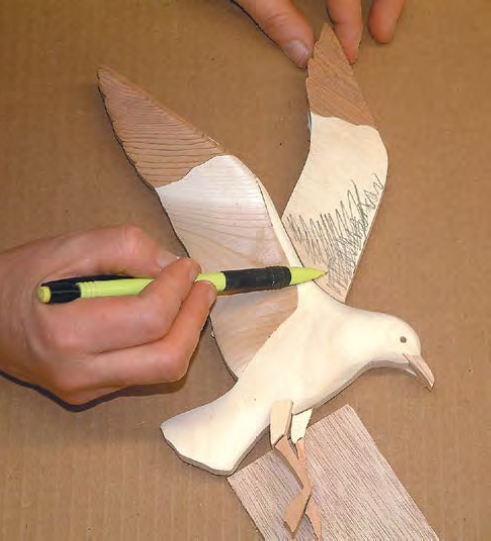
STEP 10: Put the right wing in place to check the overall progress. If you have sanded away too much of the thickness around the head area, you may need to sand the right wing down some more.

STEP 11: Put the left leg in place and mark where the body joins the leg. Lower the leg almost to the pencil line, and then round the lower edges.
STEP 12: Use scrap ¼" (6mm)-thick plywood to keep everything the same thickness until you take the gull parts off the sanding shims. Make a little definition between the head and body by lowering the neck area. It’s helpful to mark the face of the wood to give an indication where to sand.
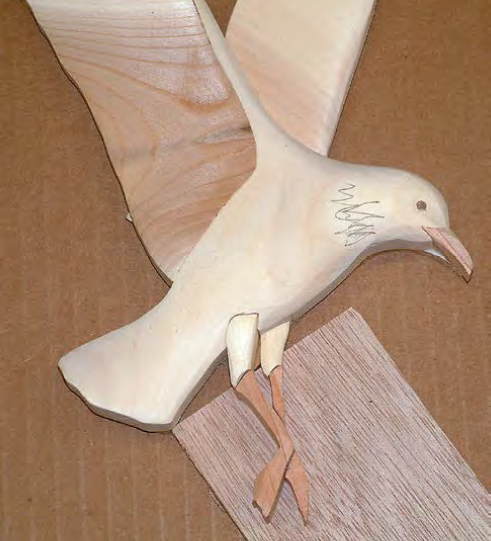
STEP 13: Round the right leg toward the outside edges. To give the foot a bird-like feel, sand the pointed part down toward the point. Do the same for the leg in the foreground. There’s not much more to do to the right wing. Just soften the outside edges, and then sand the parts with the grain.
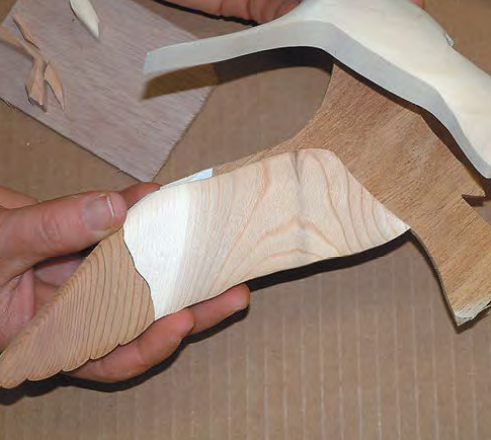
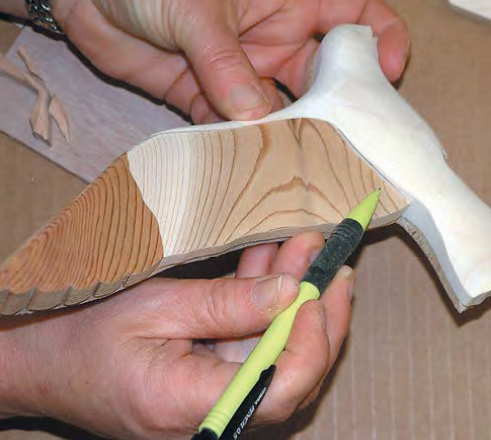
STEP 14: Take the white portion of the gull off the sanding shim. Taper the light part down toward the tail. Put the part back in place and mark where it joins the body. When you round this section of the body, stay above the pencil mark.
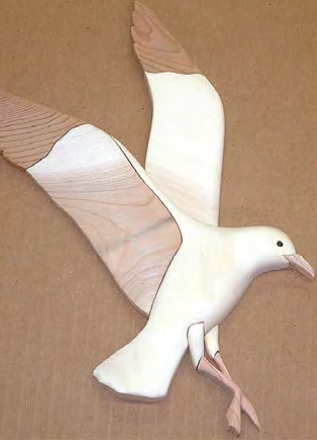
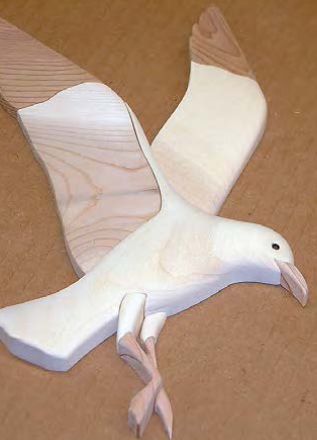
STEP 15: Sand the medium left leg/foot part down to the line so it matches the white body part. Round the leg portion of the medium leg/foot part. Then, taper the point of the foot down toward the bottom. Watch the pencil lines showing the thickness of the right leg; stay above those lines. The left leg is in the foreground, so it should be thicker than the right leg. Taper the tail toward the outside edge.
STEP 16: Take the beak out and sand it down about 1/16" (2mm). Then, mark the face area and roll the face down to the pencil line.
STEP 17: For the eye, round the end of a short piece of ⅛" (3mm)-diameter dowel. If the dowel is light colored, burn the exposed end to darken it. Slide the dowel into the gull from the back, mark it for length, and then cut it. Glue it in place now so you don’t lose it.
STEP 18: Erase any pencil lines that may be showing. Check again for any deep scratches or burrs on the backs of pieces; sand as necessary with 180- and then 220-grit sandpaper.
STEP 19: Apply the finish. See here for instructions. See the tip on here for information about white wood.
STEP 20: Cut the backing board. See here for instructions.
STEP 21: Assemble the project. See here for instructions.
STEP 22: Attach a picture hanger, if desired. See here for instructions.
SEAGULL LANDING
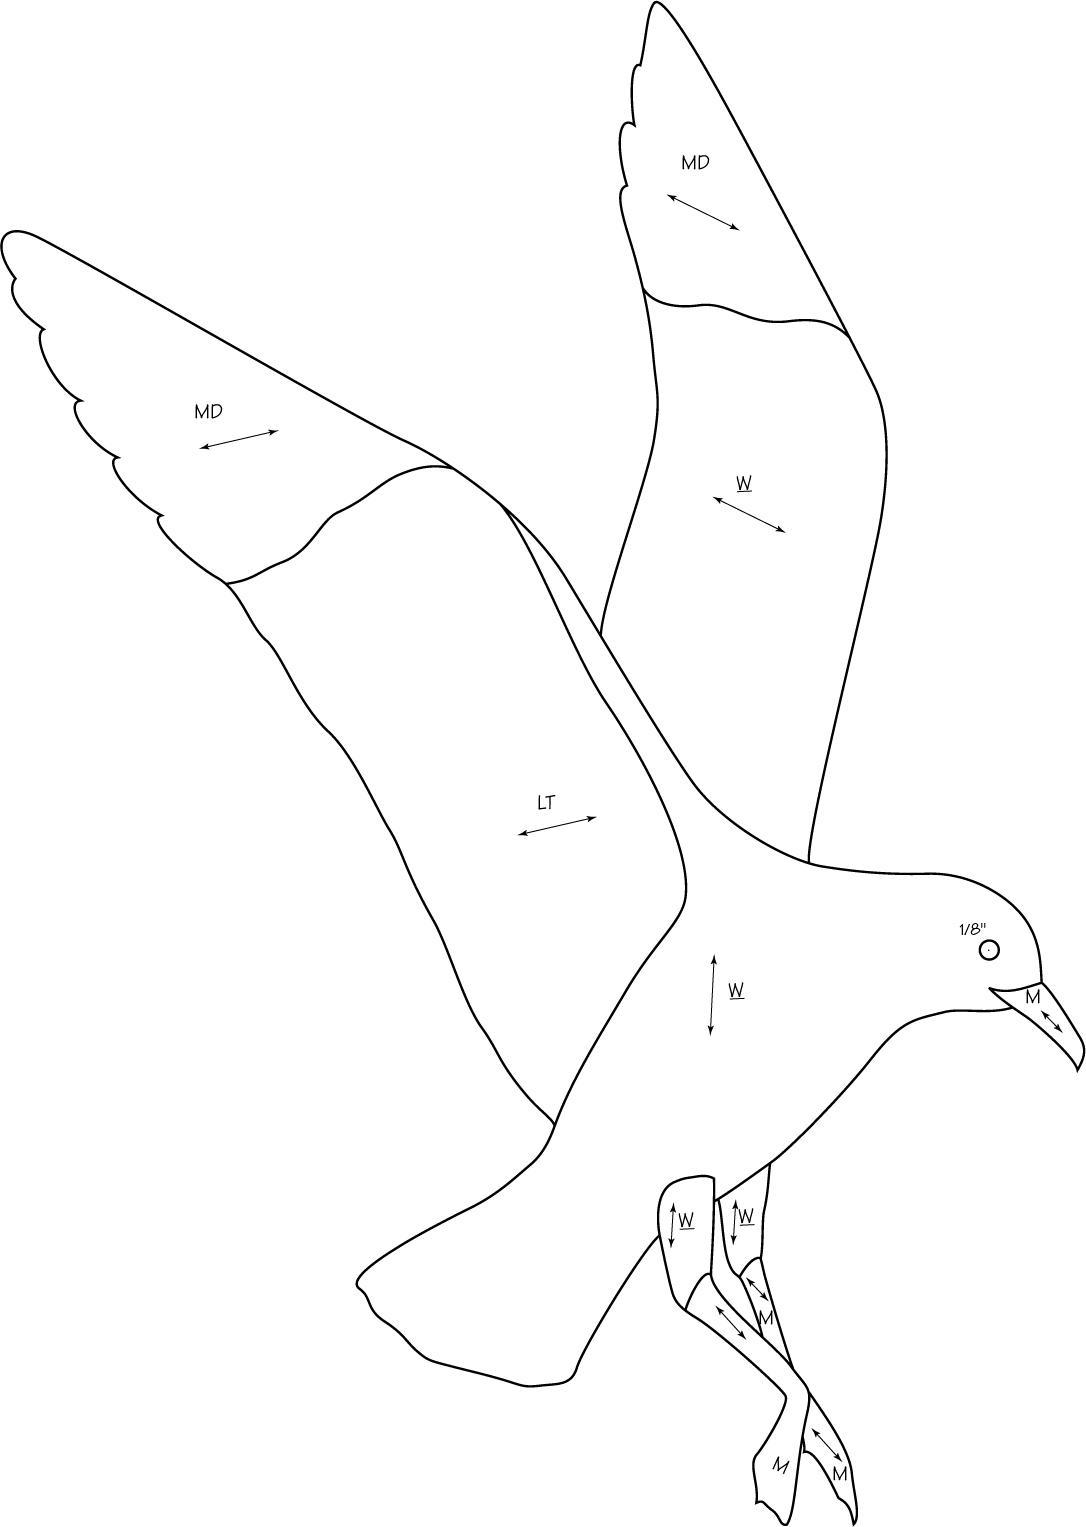
Pattern is shown actual size.
 Grain direction
 Medium shade of wood (Western red cedar, oak, maple, or pine)
 White wood, such as aspen
 Light wood, such as maple or pine
 Medium-dark wood, such as Western red cedar
© Judy Gale Roberts and Jerry Booher
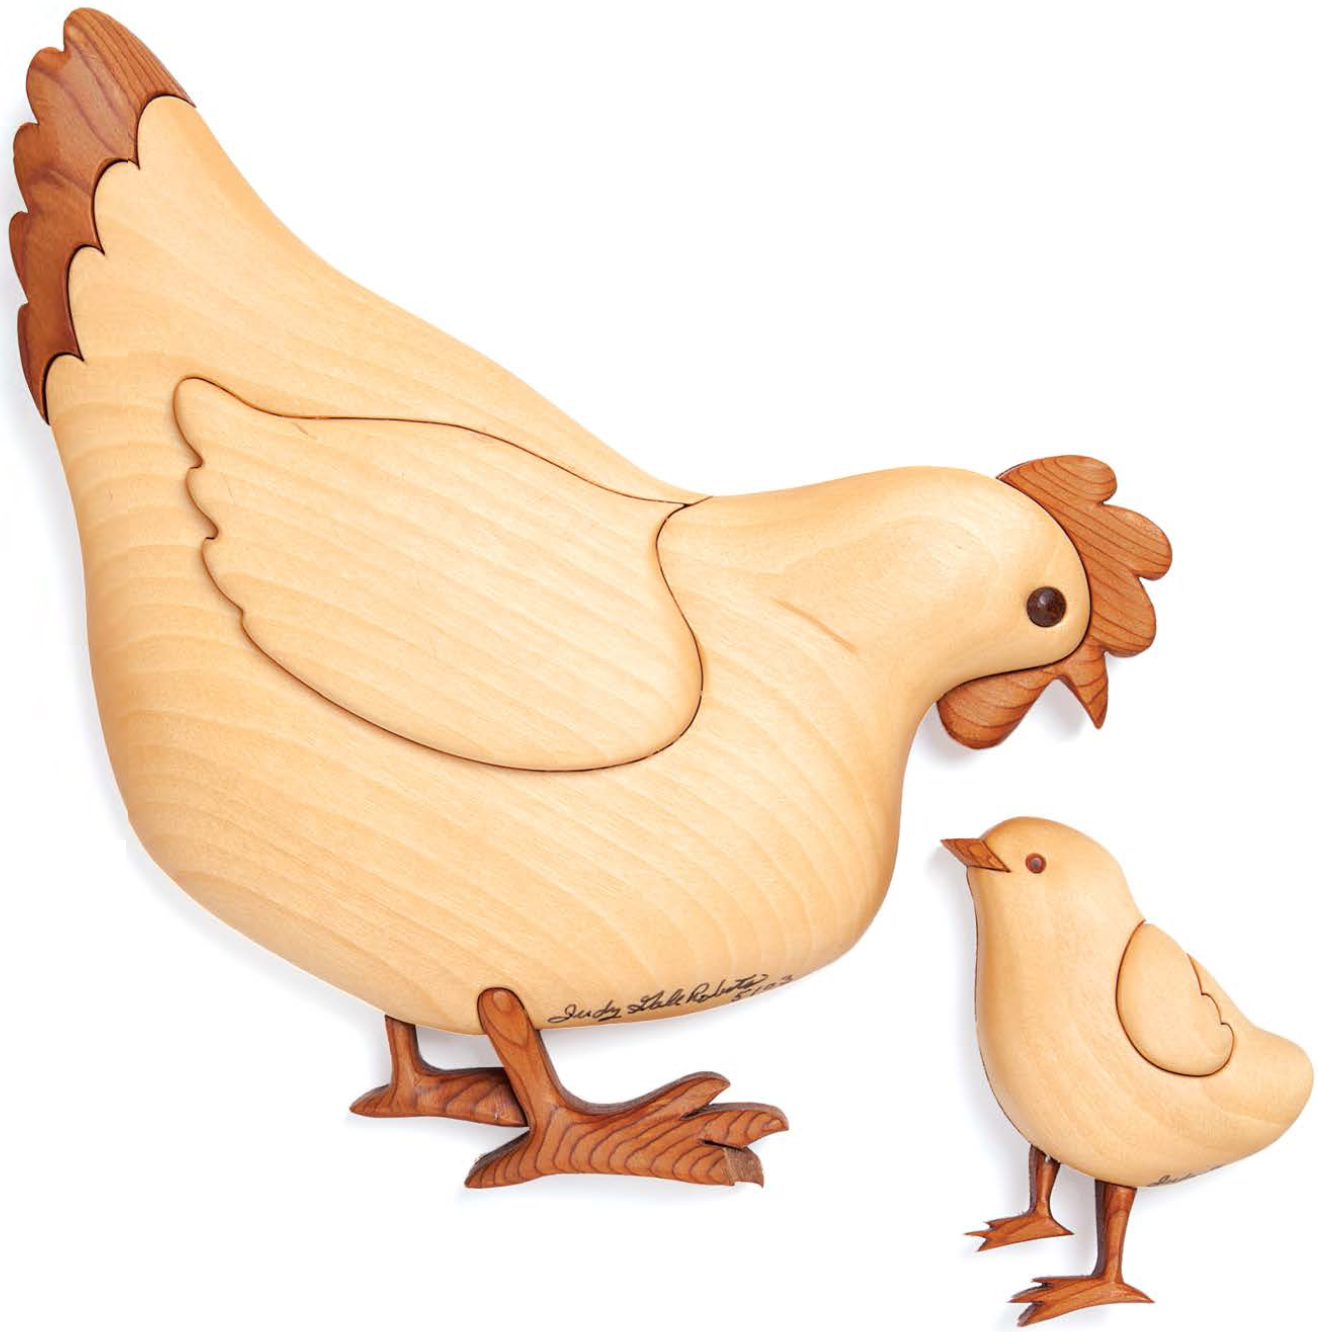
In this project, you will practice making intricate cuts, learn how to use shims to raise parts, and continue using sanding shims.
WOOD
■ White wood, such as aspen, ¾" (1.9cm) thick: 6" x 10" (15.2cm x 25.4cm)
■ Medium wood, such as Western red cedar, oak, maple, or pine, ¾" (1.9cm) thick: 5" (12.7cm) square
■ Medium-dark wood, such as Western red cedar, ¾" (1.9cm) thick: 2" x 3" (5.1cm x 7.6cm)
■ Dowel, ⅛" (3mm) dia.: 2" (2.5cm) long
■ Dowel, ¼" (6mm) dia.: 2" (2.5cm) long
■ Backing material, such as luan plywood, ¼" (6mm) thick: 9" (22.9cm) square, plus more for shims
MATERIALS
■ Hen and Chick patterns: 4 copies
■ Repositionable spray adhesive, glue stick, or glue machine
■ Wood glue
■ Tape: double-sided carpet; clear
■ Polyurethane wiping gel
■ Paper towels
■ Lint-free terry cloth towel
■ Foam brush, disposable: 1" (2.5cm) wide
■ Leather dye: brown
■ Acrylic spray: clear
■ Mirror hanger
TOOLS
■ Scroll saw (or band saw)
■ Saw blades: #5 reverse skip-tooth; #2; #7 (for aspen, if desired)
■ Sandpaper or file
■ Contouring sander (a pneumatic [air-inflated] sander is best, but a belt sander or disc sander will work)
■ Mechanical pencil
■ Drill and bits: ⅛" (3mm), ¼" (6mm) dia.
■ Carving knife or X-Acto knife (optional)
■ Woodburner (optional)
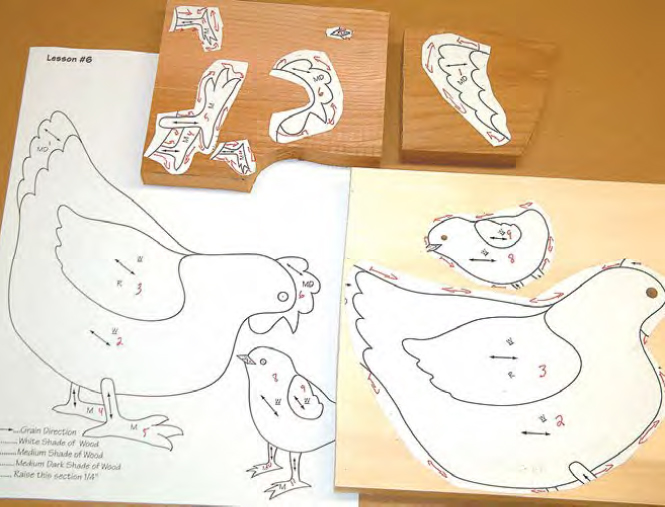
STEP 1: Referring to the instructions on here 1 and 2 as necessary, prepare the pattern, attach it to the wood, and cut the pieces. Be sure to drill the eye holes before you cut the body pieces. I use a smaller blade, such as a #2, to cut the wings because the smaller kerf (split from cutting) creates a tighter fit later.
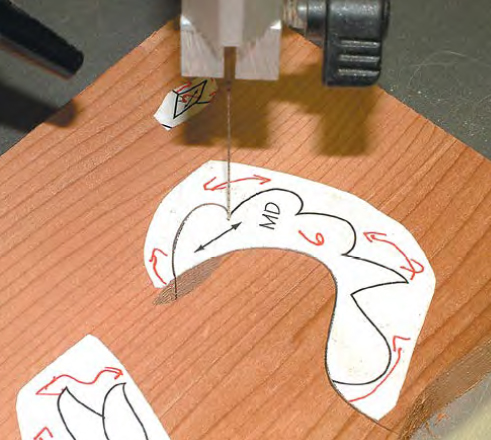

STEP 2: The hen’s crest and tail both have sharp inside corners, which can be tricky to cut. Enter the back side of the crest, and cut the first curve until you come to the point. Back up, cut a loop in the scrap wood, and remove the loop. Then, back into the cut to the place where you stopped the first cut and proceed to cut around the second hump. Repeat the technique until you have cut all of the humps. If you miss the mark on a corner, just go back in and trim as necessary.
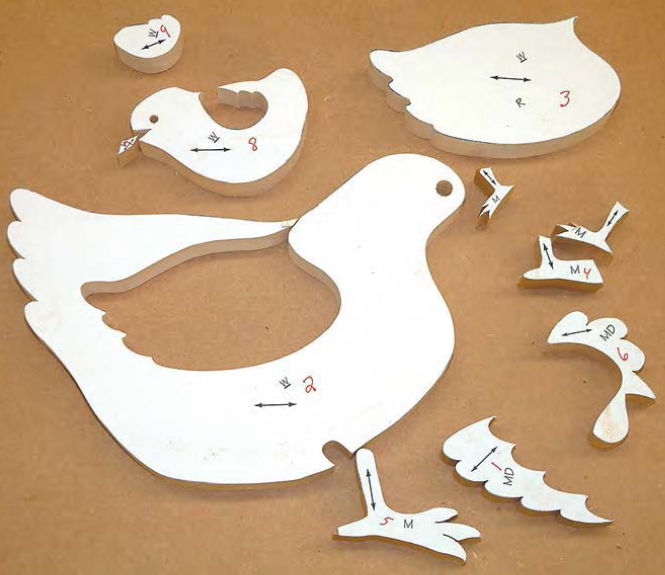
STEP 3: Check all of the pieces and sand off the burrs on the bottoms. Then, place the pieces together and check that everything is fitting correctly. Mark any pieces that don’t fit and trim them with the saw, using a new, sharp blade. Transfer the pattern numbers to the backs of the parts and then remove the pattern pieces.

STEP 4: Cut the shims. The sanding shim should include the hen’s MD tail and W body. I cut a second shim—called a raising shim—to place under the hen’s wing and raise it above the body. Because the chick’s wing borders the edge of the project, I can’t use a shim (it would make the edge unattractive). I’ll have to sand down the entire body instead. Make sure the shims are perfectly flat.
TIP
IF YOU CAN’T find flat ¼" (6mm)-thick plywood, you can glue together two pieces of ⅛" (3mm)-thick tempered hardboard (Masonite).
STEP 5: Sand the chick’s left leg to about ¼" (6mm) thick and sand the right one to about ⅜ (1cm) thick. Mark the lower body where the legs join.

STEP 6: Remove the wing and sand the chick’s body until it is ⅝ (1.6cm) thick. Round the belly area, making sure you don’t round it below the pencil marks for the legs. Round the head down the back and soften all of the outside edges.
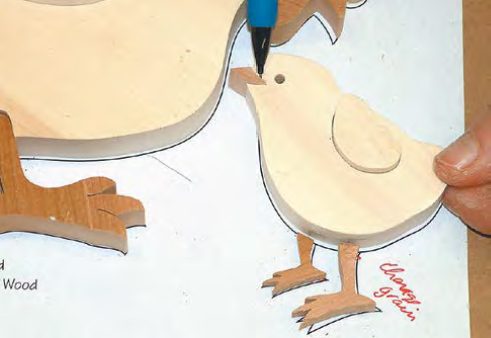
STEP 7: Put the beak in place and mark where the head meets it. Sand the beak down to the line to match the same thickness. The beak should look like it is coming out of the face.
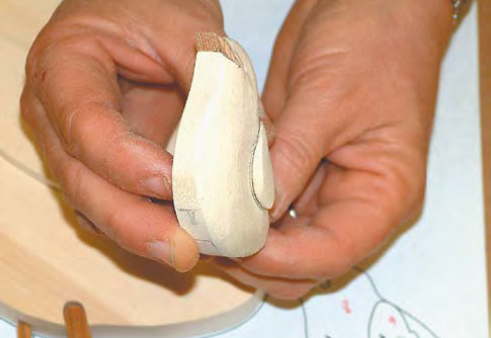
STEP 8: Put the wing in place and mark the thickness of the body. Round the wing toward the back side, leaving some thickness on the lower wing section.
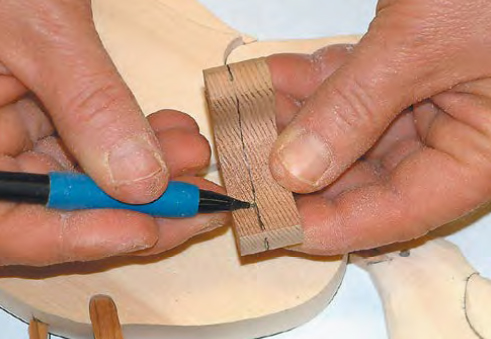
STEP 9: Sand the medium-dark beak/crest piece to ½" (1.3cm) thick. Be sure to use your pencil and mark the parts just sanded. Sand the left leg down to about ⅜. With a pencil, mark where the leg section joins the body and the right leg/foot part.
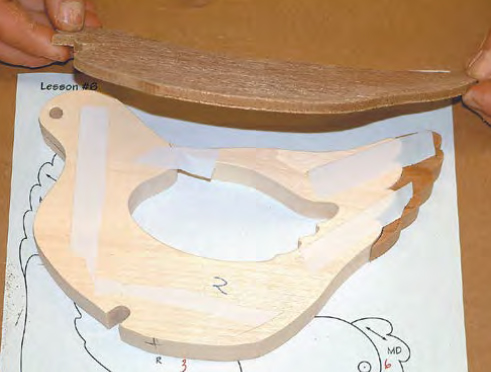

STEP 10: Tape the pieces to the sanding shim. See here for details. Sand the body. Round the head down to the ½" (1.3cm) thickness of the beak/crest line. Round the body part in the belly area, being careful not to sand below the thickness mark for the left leg. Round the outside edge of the entire chicken, except for the tail section (leave the tail more flat). With the pieces still taped together, finish-sand the areas where the medium-dark and white parts join.

STEP 11: Place the raising shim and wing section in place, and mark where the body joins the wing. Sand a contour similar to the body, keeping the wing thicker than the body. Watch the pencil lines and don’t sand below them. To add more detail, carve or sand grooves between the feathers.

STEP 12: Put the right foot in place and mark where the body hits the leg. Sand the leg to match the mark. The leg will look as though it is coming out of the body along the same plane.
STEP 13: Remove the hen from the sanding shim. Clean up the pieces and add more detail where needed. For example, the hen could use more detail sanding on the feet and some carving/sanding between the toes. Use an X-Acto knife or a small sander to get into these tight spaces.
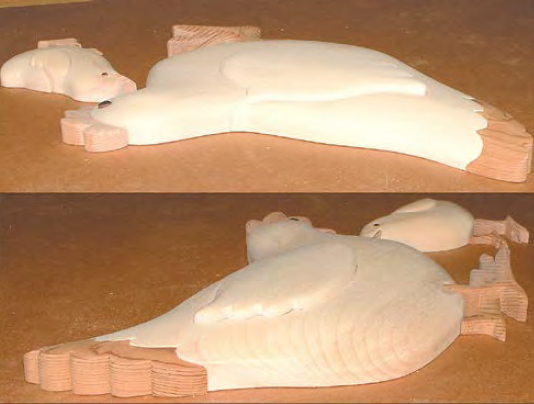
STEP 14: Soften the hard edges on the tail, crown, and wings by sanding a small radius on the edges.
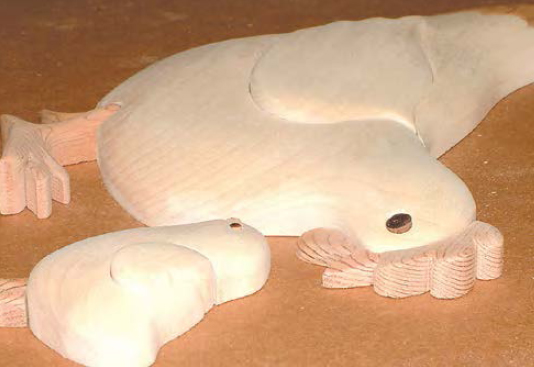
STEP 15: For the chick’s eye, round the end of a short piece of ⅛" (3mm)-diameter dowel. If the dowel is light colored, burn the exposed end to darken it. Slide the dowel into the chick from the back, mark it for length, and then cut it. Glue it in place now so you don’t lose it. Repeat with a ¼" (6mm)-diameter dowel for the hen.
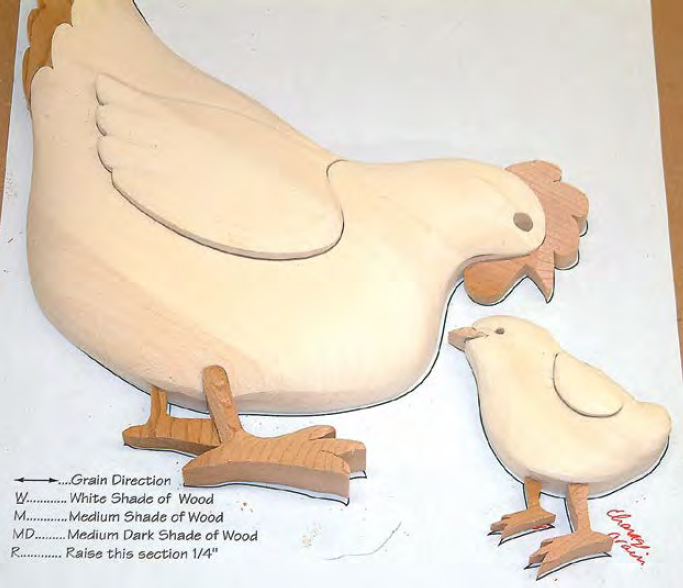
STEP 16: Erase any pencil lines that may be showing. Check again for any deep scratches or burrs on the backs of pieces; sand as necessary with 180- and then 220-grit sandpaper.
STEP 17: Apply the finish. See here for instructions. See the tip on here for information about white wood.
STEP 18: Cut the backing board. See here for instructions.
STEP 19: Assemble the project. See here for instructions.
STEP 20: Attach a picture hanger, if desired. See here for instructions.
SWEET HEN AND CHICK
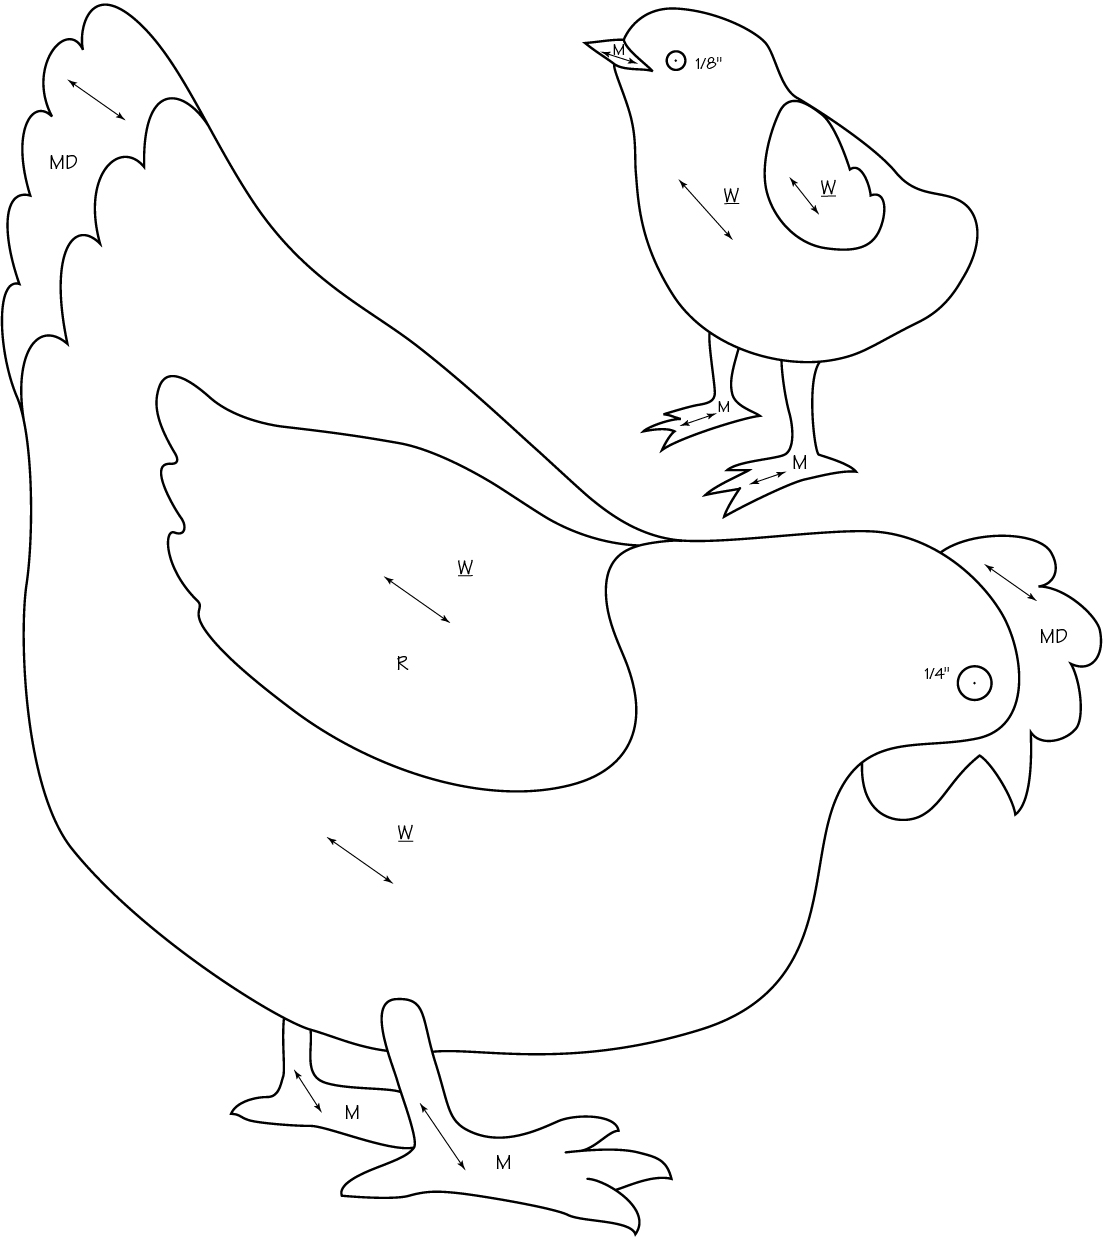
Pattern is shown actual size.
 Grain direction
 White wood (aspen)
 Medium wood (Western red cedar, oak, maple, or pine)
 Medium-dark wood (Western red cedar)
 Raise this section ¼" (6mm)
© Judy Gale Roberts and Jerry Booher
Practice wood selection (using natural highlights in the wood), using a shim to raise a section, and a little carving to accentuate parts.
WOOD
■ Note: Read Step 1 before choosing the wood for this project.
■ Light wood, such as Western red cedar or white oak, ¾" (1.9cm) thick: 2" x 3" (5.1cm x 7.6cm)
■ Medium wood, such as Western red cedar, oak, maple, or pine, ¾" (1.9cm) thick: 6" (15.2cm) square
■ Medium-dark wood, such as Western red cedar, cherry, or pecan, ¾" (1.9cm) thick: 2" x 3" (5.1cm x 7.6cm)
■ Dark wood, such as Western red cedar or walnut, ¾" (1.9cm) thick: 1" x 3" (2.5cm x 7.6cm)
■ Dowel, 1/16" (2mm) dia.: 2" (2.5cm) long
■ Backing material, such as luan plywood, ¼" (6mm) thick: 6" x 7" (15.2cm x 17.8cm), plus more for shims
MATERIALS
■ Apple with Worm patterns: 5 copies
■ Repositionable spray adhesive, glue stick, or glue machine
■ Wood glue
■ Tape: double-sided carpet; clear
■ Polyurethane wiping gel
■ Paper towels
■ Lint-free terry cloth towel
■ Foam brush, disposable: 1" (2.5cm) wide
■ Leather dye: brown
■ Acrylic spray: clear
■ Mirror hanger
TOOLS
■ Scroll saw (or band saw)
■ Saw blades: #5 reverse skip-tooth; #2
■ Sandpaper or file
■ Contouring sander (a pneumatic [air-inflated] sander is best, but a belt sander or disc sander will work)
■ Mechanical pencil
■ Drill and bits: 1/16" (2mm) dia.
■ Carving knife or woodburner (optional)

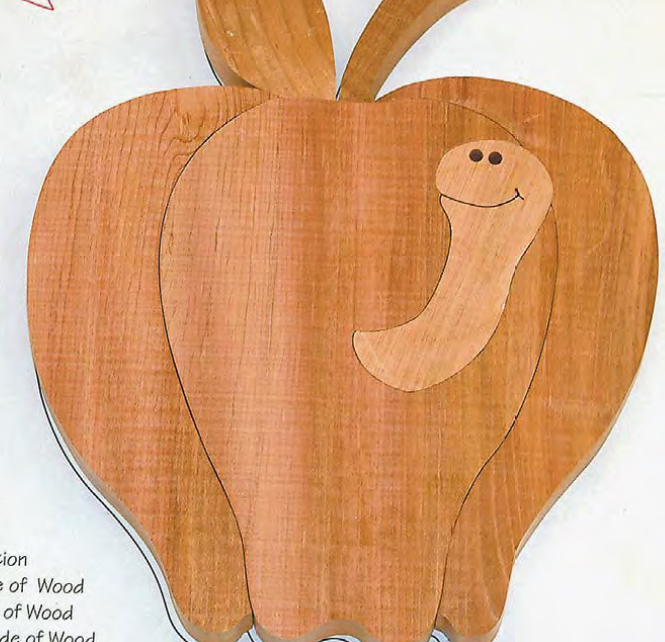
STEP 1: Create a sense of light and add extra dimension in a project by choosing highlighted wood for one side of the project. To accomplish this, draw an arrow indicating the direction of the light source (think of the sun or a lamp shining from a specific direction). Then, as you lay out the parts, look for wood that fades from dark to light and put the lighter shade on the side with the light source arrow. You can see that the apple is lighter on the left, near the “light,” and darker on the right, in the “shade.”

STEP 2: Referring to the instructions on here 1 and 2 as necessary, prepare the pattern, attach it to the wood, and cut the pieces. If you plan to highlight one side of the apple, cut the M sections individually. If you don’t have the wood to do this, cut the M apple parts as one section, leaving the usual ¼" (6mm) border around the lines. Drill the eye hole before you cut the worm piece. Use a smaller blade, such as a #2, to cut the apple into pieces.
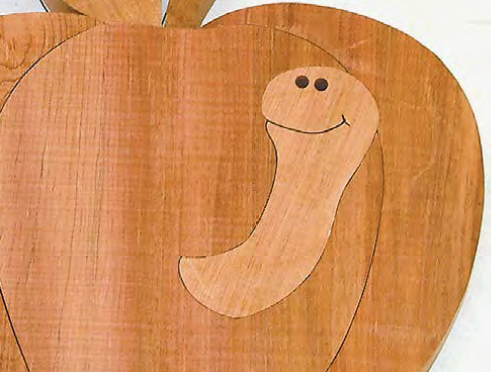
STEP 3: The smile on the worm is a single #5 blade width. At the end of the smile, make a quick turn and saw half of the cross section. Back out of the cut, reverse the direction, and back into the end of the section that you just cut. Cut the other short part of the smile and back out of the cut.
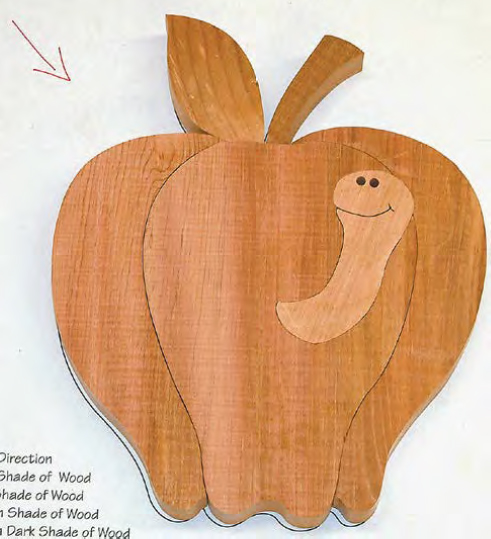
STEP 4: Check all of the pieces and sand off the burrs on the bottoms. Then, place the pieces together and check that everything is fitting correctly. If you cut the apple from one piece of wood, all of the pieces should fit perfectly. Mark any pieces that don’t fit and trim them with the saw, using a new, sharp blade. If the worm doesn’t fit, it’s better to trim the apple than the worm. Transfer the pattern numbers to the backs of the parts and then remove the pattern pieces.
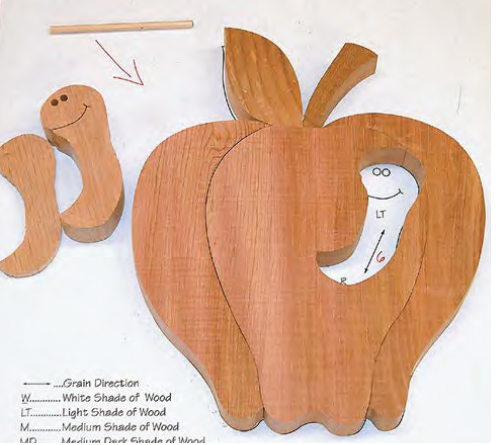
STEP 5: Cut a raising shim. It will fit under the worm to raise it above the apple surface. This project does not need a sanding shim.
TIP
THIS PROJECT LOOKS great made from hardwoods. Try using red heart for the apple, green poplar for the leaf, walnut for the stem, and maybe some spalted maple for the worm.

STEP 6: Mark the leaf and sand it to ¼" (6mm) thick. Taper it toward the top of the apple, so it is ⅛" (3mm) thick where it meets the apple.

STEP 7: Mark where the leaf joins the stem and the apple. Taper the stem toward the apple, staying just above the leaf line.
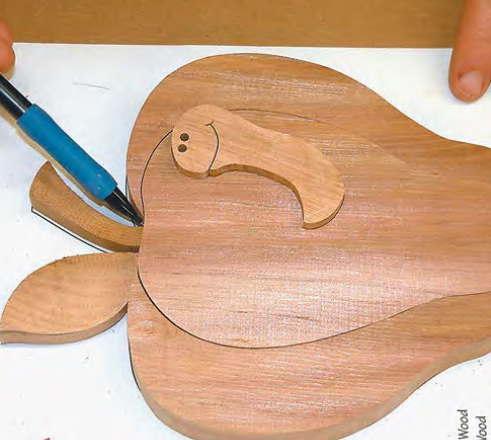
STEP 8: Mark with a pencil where the stem joins the apple.
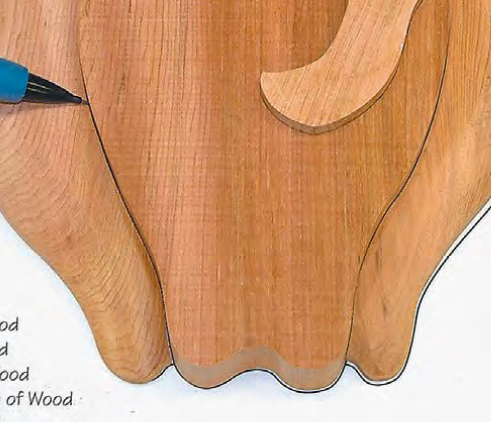
STEP 9: If possible, grab an apple to use as reference while you sand the wooden apple. Notice that the top of the apple has a larger diameter than the bottom. First sand the left and right sides of the apple down to about ½" (1.3cm) thick, and then taper them toward the bottom.
TIP
I FOUND IT’S better to sand a piece to the correct thickness first, and then round the edges. When parts are rounded, it is harder to see the thickness. This will ensure that you have a variety of depths and will make your project much more dimensional.
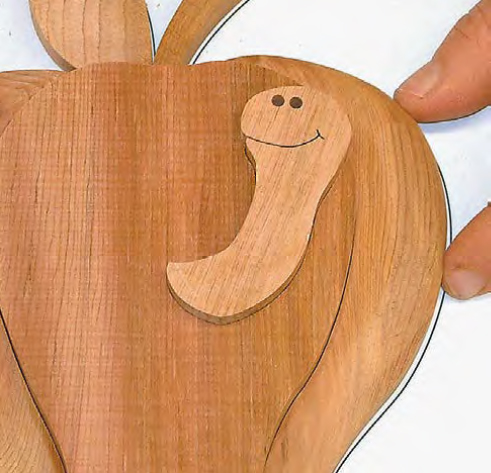
STEP 10: Start rounding the outside edges. Stay above the pencil lines for the stem and leaf parts. Because this is a free-form project, you can round the apple all the way down the outside edges. If the project had a part that joined the outside edge, you wouldn’t want to sand the outside edges. Put these two outer sections back in place and mark with your pencil where they join.
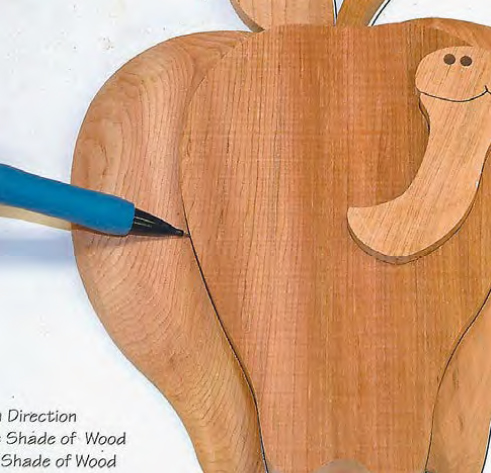
STEP 11: The apple’s middle section should stay ¾" (1.9cm) thick at the top and center. Taper it toward the bottom, and then round it down to the pencil lines on the sides. Stay above the pencil lines, or you will need to lower the outer apple sections.

STEP 12: Put the shim and the worm in place. Mark where the apple joins the worm. The worm’s head will be its thickest part. Taper the worm down to the pencil line where it meets the apple so the worm appears to be coming out of the apple. Round the worm to the pencil lines, leaving the head a knob-like shape.
STEP 13: Mark the stem if the thickness of the leaf has changed. Roll the stem right to the leaf line. Sand the top and outside edge, and round them down to the outside edge. Mark the apple if the stem and leaf thicknesses changed. Sand the apple with the grain to give it a very smooth appearance.

STEP 14: Remove the worm and shim. Carve, burn, or sand the area around the worm’s hole (indicated by dashed lines on the pattern). You can use a sharp knife or a rotary tool to carve small dips where the dashed lines are and then accent the carving with a woodburner.
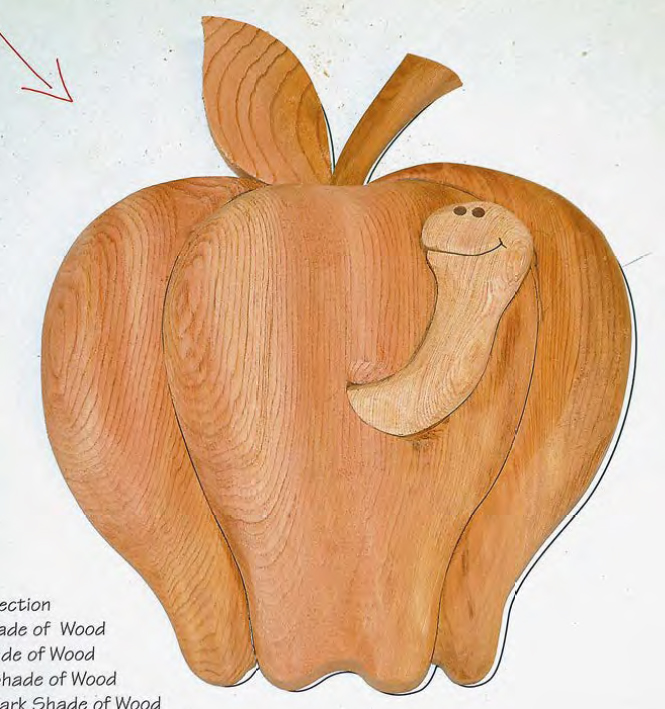
STEP 15: Put the worm back in place. If more wood was exposed after carving the dips in Step 14, mark the sides of the worm and clean up its exposed sides.

STEP 16: Add definition to the worm’s face by carving the lower portion of the smile very slightly (1/32", or 1mm). This is just enough to make the smile stand out. Use a sharp knife, rotary tool, or hand-sanding.

STEP 17: For the worm’s eye, round the end of a short piece of 1/16" (2mm)-diameter dowel. If the dowel is light colored, burn the exposed end to darken it. Slide the dowel into the worm from the back, mark it for length, and then cut it. Glue it in place now so you don’t lose it.
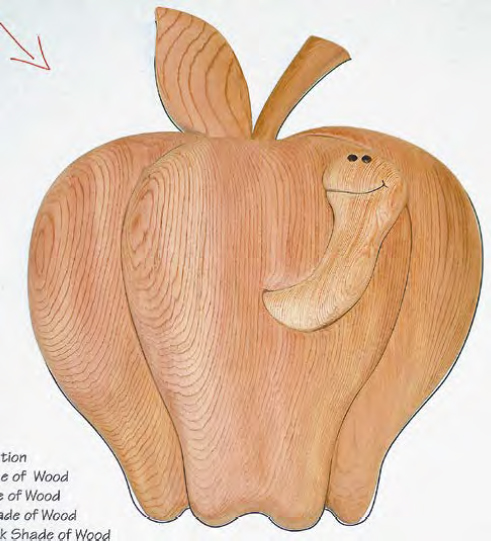
STEP 18: Erase any pencil lines that may be showing. Check again for any deep scratches or burrs on the backs of pieces; sand as necessary with 180- and then 220-grit sandpaper. Because this is a free-form project, you can roll the apple all the way to the lower edge.
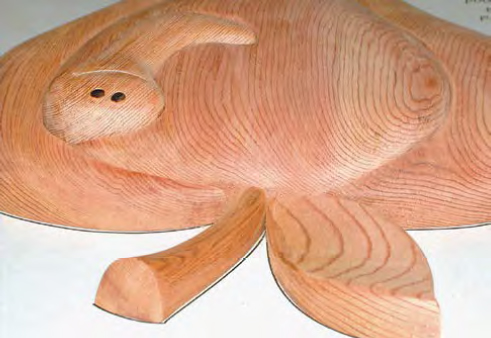
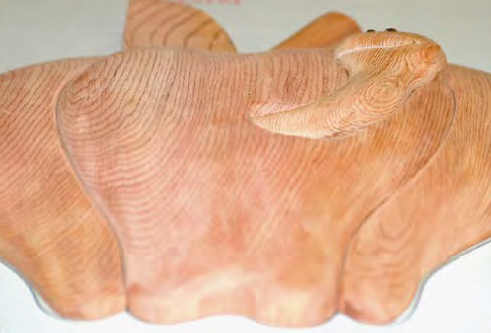
STEP 19: Apply the finish. See here for instructions.
STEP 20: Cut the backing board. See here for instructions.
STEP 21: Assemble the project. See here for instructions.
STEP 22: Attach a picture hanger, if desired. See here for instructions.
EARLY WORM GETS THE APPLE
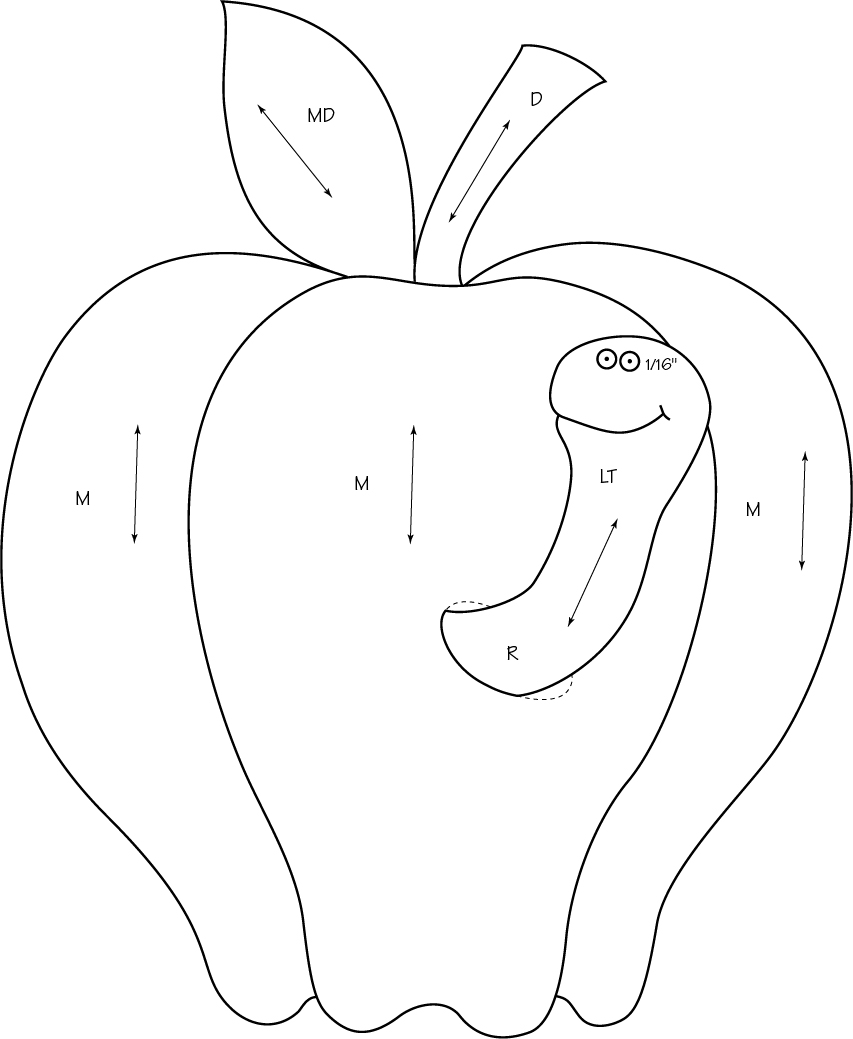
Pattern is shown actual size.
 Grain direction
 Light wood (Western red cedar or white oak)
 Medium wood (Western red cedar, oak, maple, or pine)
 Medium-dark wood (Western red cedar, cherry, or pecan)
 Dark wood (Western red cedar or walnut)
 Raise area ¼" (6mm)
© Judy Gale Roberts and Jerry Booher