Deep-water floating start: You can either tread water in a vertical position, or lie horizontally and scull with your heels close to the water’s surface and your head up and forward (but don’t lift your neck too high). You may want to make wide, sweeping movements with your arms and legs to encourage others to keep their distance. Be aware of what is happening around you, and as soon as the whistle, gun or cannon sounds, use a whip- or side scissor-kick to accelerate. This can be practised in the deep end of a swimming pool.
If athletes are grouped in waves, and you’re not the first to start, you can watch other swimmers and note the route they take to the first buoy. This will give you an indication of any currents and the best line to take depending on your experience. Beginners should position themselves at the back or the side of the start group to avoid the main melee. You may swim slightly further but you will also reduce the risk of panic or disruption. You could also delay your start slightly to allow the other swimmers to take off, giving you a clear space of water in which to embark on your open-water adventure. Experienced athletes should start in a position that minimises the distance to the first buoy, bearing in mind any currents.
PACING
If you are a beginner, I suggest starting, and staying, at a steady and relaxed pace and intensity. Try to avoid panting or holding your breath, which can increase anxiety and induce panic. If you feel yourself becoming overly anxious, focus on intrinsic factors that you can control, especially calm and controlled breathing, long exhales in the water and smooth hand entry and arm strokes. Starting out too hard can cause your heart rate to spike, leaving you in oxygen debt and fighting for breath. If you find yourself panicking, don’t immediately flip on to your back and take large gasps of air. This can result in hyperventilation (taking in too much oxygen), a high heart rate and dizziness. Instead, stay tummy-down, turn your head to get a good breath of air, then put your face in the water and focus on blowing bubbles at a steady rate. If you do want to take some time out, slowly twist your head to the side, breathe and unhurriedly lift your head out of the water. Then either do a few strokes of breaststroke or tread water, take long slow breaths, look around, find your bearings and slowly start front crawl again when you feel ready.
More experienced swimmers should swim at a higher intensity for the first 200m for positioning reasons. This means about 75–80 per cent of maximum 50m effort. You can then settle into your sustainable race intensity and pace, which you would have determined, and internalised, in training.
SIGHTING AND NAVIGATION
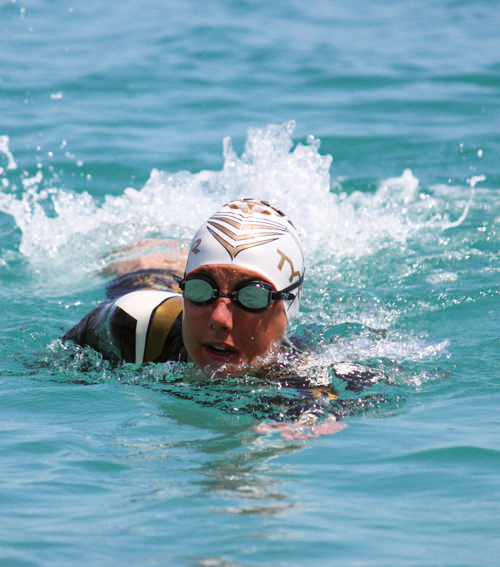
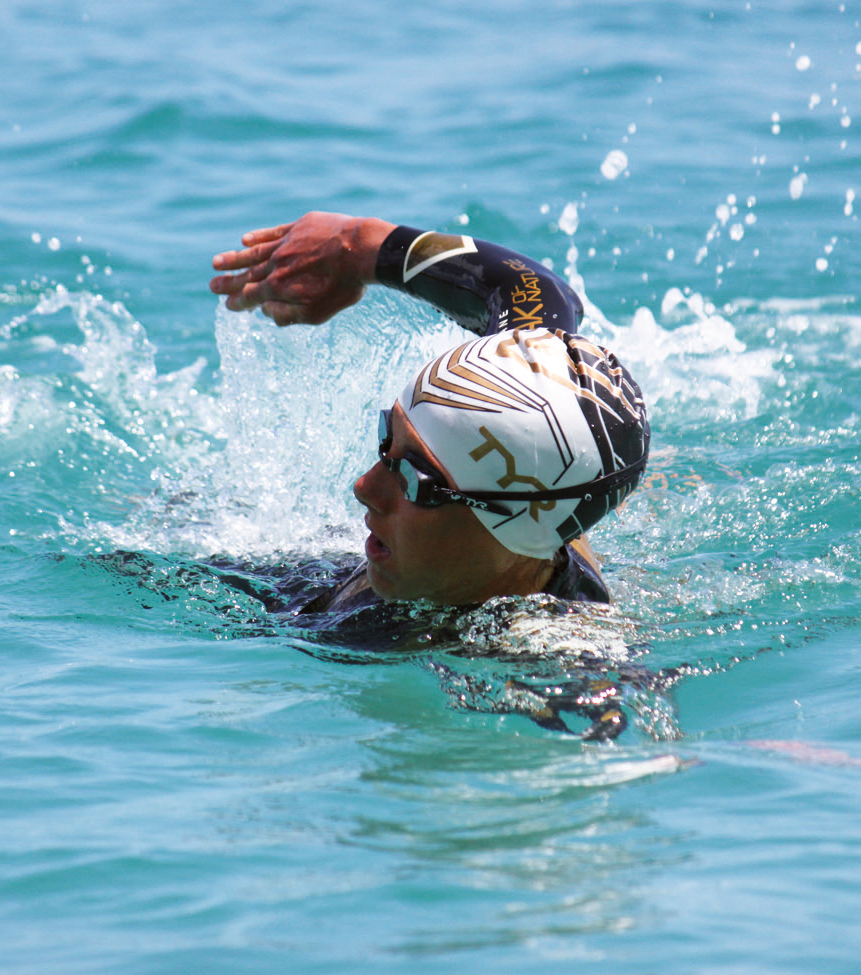
It’s easy to sight in a pool: you simply follow the black line. Unfortunately, there are no such lines in the open water, so you’ll need to be able to stay in a straight line or risk adding a few hundred metres to your race. In open water, you could simply follow the bubbles of the feet in front of you, but you are placing your trust in them to go the right way, so you should be able to periodically “sight” or “spot” to make sure you’re heading in the right direction. To sight, you need a “marker.” This can be one of the race buoys or a tall, visible and immovable landmark that you would have identified beforehand (see section on transitions on here). In a pack and/or in choppy conditions, it is often easier to sight these land-based markers than the smaller buoys. If you are swimming in a river/canal, look at the bank/towpath as part of your normal stroke to keep you on course.
The world’s best triathletes and open-water swimmers can sight without disrupting the rhythm of their stroke or their body position. Press down lightly on the water with your lead arm, lift the head slightly above the goggle line just before you take a breath, look forward and, as you lower it, turn your head to the side to breathe. Don’t try to breathe and sight at the same time, otherwise you’ll lift your head too high and your hips and legs will drop. It’s equally important not to lift your head for too long. The sight–turn–breathe technique should be quick, smooth and fluid, as opposed to three separate movements, to ensure you can maintain your stroke and rhythm.
If you naturally swim straight you can sight every 12–15 strokes. If you have a little more trouble swimming straight you should sight more frequently, say every 7–9 strokes. Sometimes the initial sight gives you only a rough idea of where you’re headed, so practise taking two sights on successive strokes.
Another element that affects how often you sight is the weather. If the water is calm with minimal glare, you can sight less as the visibility will be greater and it will be easier to see the markers. However, if there are high winds and the water is choppy, the markers are more difficult to see. If you sight in the trough of a wave you might not glimpse the buoy/marker and may need to take another look after a couple more strokes. If it is choppy, you may need to lift your head slightly higher, resulting in your legs sinking slightly. Counteract this by kicking a bit more.

LOSING YOUR GOGGLES
Although rare, there’s always the possibility that you will lose your goggles (or they become dislodged) as a result of rushing water, a flailing arm or a broken strap. Taking to the water with an extra pair of goggles wrapped round your wrist or ankle is dangerous and causes unnecessary drag. Instead, practise swimming without goggles and opening your eyes under water, as well as slowly rolling on to your back/treading water to readjust your goggles if they become dislodged. Some swimmers put their goggles underneath their swim cap to reduce the risk of the strap getting pulled or slipping off.
TRAINING TIP
• In the pool, swim with your eyes closed for 9–10 strokes. This will help you learn to swim straight without looking at the black line on the bottom of the pool. A glance at the lane ropes will tell you which side you veer to, and you can work with your coach to correct stroke asymmetry that might be causing the swerve—often crossing over the centre line at the front of the stroke or under the body. Over time, you should be able to increase the number of strokes and still swim in a straight line.
• Swim normally, but look up to the end of the pool twice every length using the sighting technique outlined previously.
• Water polo drill: swim 15–25m of the pool with your head up. Don’t turn your head to the side to breathe. This is a great way to build strength in your neck and make you aware of how your lower body sinks when your head is raised.
TURNING
Turns during a triathlon swim take place around the buoys. There are generally three types of buoys in a race: the smaller, intermediate buoys, the larger turn buoys and the finish buoys (or archway). Open water is not a controlled environment, and currents, tides and waves can move the buoys. Make sure you know how many turns there are, where they are and how they are marked out (e.g. the colour of the turning buoy is often different from the other course markers). Ninety-degree turns are the norm in an open-water swim (rarely will a triathlon have a 180-degree turn as sending swimmers head-on towards other competitors isn’t a great idea).
The area around a turn buoy can be a traffic jam of people with flailing arms and legs. It is important to pick the right strategy depending on your ability. If you swim to the inside (that is, hugging the buoy as close as possible), you risk being caught in the crowd but with the potential to gain on the entire field if you don’t get stuck. If you swim to the outside of the pack, you increase the distance swum but avoid the melee. Beginners should remain on the outside to avoid the claustrophobia of too many swimmers. Intermediate swimmers may also want to take the outside path on the first buoy when the pack may be larger and take a tighter line at the latter stages of the swim when the pack may have thinned out. Advanced swimmers will always try to take the shortest route, jostling for position as they approach the buoy.
There are a few ways of getting around a buoy. The first, and best for beginners, is simply to swim around, but twist your body in the direction of the turn. The second method is the sweep turn. Use the arm closest to the inside of the turn as a pivot by keeping it straight and deep through the underwater phase of the stroke. Then, with the outside arm, take wide, sweeping strokes to propel you around the turn. More experienced swimmers may wish to try the much more difficult “roll” or “corkscrew” turn, where you roll on to your back mid-turn before turning 90 degrees as you roll back on to your front. For advanced swimmers, the buoys provide a break from the uniform speed/effort and these athletes can utilise pace changes as they negotiate the turn to create/exploit gaps in the field.
TRAINING TIP
• Practise turning in deep water, either in the middle of a pool with no lane ropes or at the wall without touching.
• Place a buoy or something similar in the pool. First, practise 90-degree turns solo and then progress into small groups. Experiment with different approaches to the buoy—coming in for a wide turn or cutting the corner as tight as possible. Use the different techniques outlined above.
• Try both left and right turns because, just as we have dominant sides of our bodies, we also have dominant and weak turning sides.
TRAINING TIP
• Most swimming lanes are wide enough to cram three swimmers in side by side. Form an arrow head with those at either side on the hip of the lead swimmer and complete 6 × 25m sets fast. Alternate starting positions, and gain confidence in being able to swim with arms and legs flying around you.
• Practise pace-line sets where groups of swimmers closely follow one another, changing pace and leaders throughout the set.
DRAFTING
It is legal to draft during the swim portion of a triathlon. Beginners should not concern themselves too much with drafting techniques, but intermediate and advanced swimmers will find this skill extremely beneficial. Studies show that drafting saves around 20 per cent of the energy expenditure of swimming, theoretically leaving you fresher for the bike and run. It can also enable you to swim faster than normal by sitting on the toes of someone speedier.
There are two ways to draft: 1) swimming directly behind another athlete, almost close enough to touch their toes; or 2) swimming in their wake. This involves positioning yourself next to the chest of another swimmer, almost under their armpit. If you decide to use the second method, you may wish swim on the non-breathing (blind) side of the other athlete (if they’re not breathing bilaterally) so you can make any tactical moves without being seen. More advanced swimmers should be constantly aware of their competitors and react to changes in pace/direction as necessary. If you find yourself boxed in, or wishing to change to the inside/outside to a position that better suits your breathing pattern, slow down for one/two strokes, quickly dart across the legs of your competitor and kick hard to re-establish your position.
It is important to be aware of the downfalls to drafting. First, you may become complacent and rely on another person to navigate—so make sure you continue to sight, lest you both head off in the wrong direction. It may also mean swimming at someone else’s pace, which may be too slow/too fast.
PRE-RACE SWIM PREPARATION
In addition to technique and skills, there are other swim-specific things to know before race day, which can usually be found on the event website and/or from athletes who have completed the race before (but remember that courses and conditions change):
![]() the distance you need to swim and whether it is in a pool (and what length pool it is) or open water (e.g. canal, sea, river);
the distance you need to swim and whether it is in a pool (and what length pool it is) or open water (e.g. canal, sea, river);
![]() the swim cut-off time (before entering the race, beginners need to make sure they are able to complete the distance in the allocated time frame);
the swim cut-off time (before entering the race, beginners need to make sure they are able to complete the distance in the allocated time frame);
![]() the race rules, including wetsuit regulations (e.g. the water temperature cut-off below which wetsuits are allowed);
the race rules, including wetsuit regulations (e.g. the water temperature cut-off below which wetsuits are allowed);
![]() the type of start: deep-water, beach or (rarely) dive start and whether it is a mass start or a wave start;
the type of start: deep-water, beach or (rarely) dive start and whether it is a mass start or a wave start;
![]() the start time (of your wave, if applicable);
the start time (of your wave, if applicable);
![]() whether and where you can do a warm-up and for how long;
whether and where you can do a warm-up and for how long;
![]() starting mechanism: whistle, a cannon or a shout of “go”;
starting mechanism: whistle, a cannon or a shout of “go”;
![]() the swim course: swim entrance and exit, direction of the swim (clockwise or anticlockwise), number and location of the buoys (and the approximate distances between them);
the swim course: swim entrance and exit, direction of the swim (clockwise or anticlockwise), number and location of the buoys (and the approximate distances between them);
![]() conditions such as tides, currents, the ocean floor, any rocks or other hazards;
conditions such as tides, currents, the ocean floor, any rocks or other hazards;
![]() the layout of transition, e.g. the swim exit, bike-racking area and change tents.
the layout of transition, e.g. the swim exit, bike-racking area and change tents.
If it’s a major event, there’s often time to carry out a practice swim prior to the race. This can be invaluable in helping you establish sight lines and land-based markers around the course, and get a sense of the conditions (although be mindful that these may change come race day).