Chapter 1. Introducing iMovie
Whether you’ve been an iMovie fan since the program debuted way back in 1999 or you’re taking your first foray into editing home movies, you’ll be impressed by iMovie’s features and your ability to edit video on both your Mac desktop and any iOS device you have.
In brief, iMovie is video-editing software that grabs the raw footage from your camcorder, camera, phone, or computer and lets you edit it easily, quickly, and creatively. In this chapter, you’ll learn the many ways you can use iMovie (some of which may surprise you) and take a look at the iMovie workspace.
The iMovie Revolution
Over the decades, home movies have gotten a bad rap. Do some random browsing on YouTube and you’ll find all kinds of offenders: unending shots of cats sleeping on sofas, high-school plays filmed from the back of the auditorium, and random vacation moments where the camera shakes enough to simulate an earthquake.
Most people know that you can improve home movies by editing out the bad parts and concentrating on the good, but until iMovie came along, that was an expensive and time-consuming undertaking. You needed several thousand dollars’ worth of digitizing cards, complicated editing software, and the highest-powered computer equipment available. Unless you were getting a paycheck at the end of the process, editing your own movies just wasn’t worth it.
Then along came iMovie, the world’s least expensive version of what Hollywood pros call nonlinear editing software. In the old days, your recorded footage sat on a videotape, and you edited your clips in linear fashion—you laboriously rewound and fast-forwarded through every frame of the tape to get to the parts you wanted. Nowadays, you don’t do any rewinding or fast-forwarding; you can instantly jump to any piece of footage you want.
Why does this history lesson matter? Because it feels pretty dang cool to know that, right there on your Mac, you have video-editing powers that not long ago would’ve left trained professionals drooling. Little old you can take the cats, the high-school plays, and the vacations and make them look downright epic. With iMovie and a camera, you’re ready to go.
iMovie’s Many Roles
If you’re reading this book, you probably have some idea of the kind of movies you want to make. Here are a few possibilities you may not have thought of. All are natural projects for iMovie:
Home movies. Plain old home movies—casual documentaries of your life, your kids’ lives, your school life, your trips—are the single most popular use for iMovie. Using the program, you can delete all but the best scenes (and cut that unending shot of the ground when you forgot to turn off your camcorder). And using the shooting tips you’ll find in this book, you can improve the quality of that footage even before you shoot.
Web movies. But why limit your aspirations to people you know? If you’ve got something funny or interesting on “film,” why not share it with the Internet at large? In iMovie, posting to YouTube, Vimeo, and Facebook are only a menu command away—and that’s just the beginning. New film festivals, websites, and magazines, all dedicated to independent makers of short movies, are springing up everywhere.
Business videos. Because it’s so easy to post and share your iMovie creations on the Internet, you should consider video a useful tool in whatever you do. If you’re a real estate agent, blow away your rivals (and save your clients time) by showing movies, not still photos, of the properties you represent. If you’re an executive, quit boring your comrades with stupefying PowerPoint slides and make your point with video instead.
Video photo albums. A video photo album can be much more exciting, accessible, and engaging than one on paper. Take your digital photos and assemble them in sequence, and then add some crossfades, titles, and music. The result is a much more interesting display than a book of motionless images, thanks in part to iMovie’s Ken Burns effect (The Ken Burns Effect).
Just-for-fun projects. Never again can anyone over the age of 8 complain that there’s “nothing to do.” Set your kids loose with a camera and instructions to make a fake rock video, commercial, or documentary.
Training films. If there’s a better use for video than how-to instruction, you’d be hard-pressed to name it. Make a video for new employees to show them the ropes. Create a video that ships with your product to humanize your company and to help customers make the most of their purchases. Post videos on the Web to teach newcomers how to play the banjo, grow a garden, kick a football, or use a computer program—and then market it.
Interviews. You’re lucky enough to live in an age when you can manipulate video clips in a movie just as easily as you do words in a word processor. Capitalize on this. Create family histories. Film relatives who still remember the War, the Birth, the Immigration. Or create a time-capsule, time-lapse film: Ask your kids or parents the same four questions every year on their birthdays (such as, “What’s your greatest worry right now?” or “If you had one wish…?” or “Where do you want to be in 5 years?”). Then, after 5 or 10 or 20 years, splice together the answers for an enlightening fast-forward through a human life.
Broadcast segments. Want a taste of the real world? Call your cable TV company about its public-access channels. (As required by law, every cable company offers a channel or two for ordinary citizens to use for their own programming.) Find out the time and format restraints, and then make a documentary, short film, or other piece for actual broadcast. Advertise the airing to everyone you know. It’s a small-time start, but it’s real broadcasting.
Of course, you could skip the small time and upload your videos straight from iMovie to CNN’s iReport website. Here, amateur reporters post their own news items for all the world to watch. On occasion, CNN even turns to these videos for its nationwide broadcasts.
Analyze performance. There’s no better way to improve your golf swing, tennis form, musical performance, or public speaking style than to study footage of yourself. If you’re a teacher, camp counselor, or coach, then film your students, campers, or players so that they can benefit from self-analysis, too.
iMovie, the Program
Although you need a Mac and a camera to capture your adventures, the iMovie story is really all about software, both the footage as it exists on your Mac and the iMovie program itself. So a few basics about iMovie are in order.
iMovie on a New Mac
If you bought a Mac after October 2013, the latest version of
iMovie is probably already on your hard drive. To see, open the
Mac’s Finder, select Applications, and then look for the iMovie
entry. If iMovie is indeed preinstalled, you’ll probably find its
star-shaped icon ( ) sitting in your Mac’s Dock, too.
Note
“Wait a minute!” you may be saying. “What about iMovie on my iPad? Isn’t this book going to cover that?” Yes, in Part 4 of this book. iMovie on the Mac and iMovie for iOS may share the same name, but their design and features make them more like distant cousins.
iMovie for an Existing Mac
If your Mac didn’t come with iMovie, you can get it from
Apple’s App Store, a built-in software shop that every Mac links
to—find it quickly by clicking  →App Store. Once in the virtual store, type
iMovie into the search box. There you can read
all about the program and start downloading and installing it (Figure 1-1).
→App Store. Once in the virtual store, type
iMovie into the search box. There you can read
all about the program and start downloading and installing it (Figure 1-1).

If you bought your previous versions of iMovie from the App Store, or if you have iMovie ’11 already on your Mac, you’ll get the newest version as a free upgrade. If not, Apple will ask you to pony up $14.99. (If that seems steep, consider that previous versions of iMovie came in a software bundle called iLife that cost anywhere from $50 to $80.)
Apple says iMovie requires a Mac running OS X Mavericks (version 10.9) or later. Apple also recommends at least 4 GB of memory. It goes without saying, of course, that the more memory you have (and the bigger your screen and the faster your processor), the happier you and iMovie will be. This program is seriously hungry for horsepower.
Tip
Consider installing GarageBand from the App Store, too, even if you’re not a musician. It can help you edit the sound for your movie, and it’s free for everyone.
iMovie takes up almost 2 GB of your hard drive. When you finish downloading it, you’ll find iMovie in your Applications folder and the iMovie icon in your Dock.
Note
Installing the new version of iMovie doesn’t replace or remove older versions. Once you install the new version, you’ll find the older version in a folder called “iMovie 9.0.9” (or whatever iMovie version you had) in your Applications folder, ready to run when necessary.
Keep this older version around for a while. The latest version of iMovie might be missing some features that you counted on in the past. These features may find their way back into the program with future updates, but in the meantime you can always go back to the older software.
“.1” Updates
Like any other software company, Apple occasionally releases new versions of iMovie: version 10.1, version 10.2, and so on (or even 10.1.1, then 10.1.2, and so on). Each “point” upgrade (as in “iMovie ten-point-one”) is free and improves the program’s reliability. Upgrades are well worth installing for any program, but they’re especially important for iMovie—they do more than squash bugs; they often add features you want.
You don’t have to look far to find these updates. One day
you’ll be online and a notification will pop up onscreen, letting
you know that there’s a new “point” update for your version of
iMovie, and offering to install it for you. (If you set your App
Store preferences to install updates automatically, your Mac will
download and install the update without any input from you. You can
turn on this option at →System Preferences→App Store.)
When the updater finishes, your original copy of iMovie has morphed into the updated version of the program. (One way to find out what version of iMovie you have is to open the program and then choose iMovie→About iMovie.)
This book assumes that you have at least iMovie 10.0.3.
Getting into iMovie
After you install iMovie, open it by double-clicking its icon in
the Applications folder, or by single-clicking the star-shaped icon
() in the Dock.
Now, just in case you had somehow forgotten that iMovie is a totally new program, a special starter screen appears to let you know. Click Continue to get a rundown of iMovie’s new features (Figure 1-2).

Tour iMovie
The latest version of iMovie boasts a shiny new appearance. If you’ve used a prior version of the program over the past few years, you’ll see a mostly familiar layout. Although Apple changed a lot with this version, the basic concepts are the same. Here’s a tour of what you’ll find once you launch the program—please keep your arms and legs in the vehicle at all times.
The Lay of the Land
If you’ve never used iMovie before, the program looks pretty barren when you first launch it—no raw footage, no movie-in-progress: You essentially have a blank canvas. But if you’re upgrading iMovie, or if you spend a little time importing footage into the new version (Importing Video), you see a screen that looks like the one in Figure 1-3.

An iMovie full of footage is a happy-looking iMovie. At first glance, it can also be a confusing iMovie. Here’s a summary of the parts of the window shown in Figure 1-3. You’ll learn about each of them in detail on the coming pages.
Libraries list. iMovie stores all your imported footage here, organized by event (see How Events Work).
Event browser. Here’s where you review your imported footage and select the good bits for inclusion in your movie.
Viewer. Review either your raw footage or your movie-in-progress here.
Content Library. Here live the stock goodies that iMovie provides to jazz up your production.
Project pane. This is where you build your movie, piece by piece, by dragging the footage you choose in the Event browser here.
Events and Projects: The Core of Moviemaking
As Figure 1-3 shows, iMovie dedicates most of its screen real estate to two panes, the Event browser and the Project pane. The Event window displays all your raw footage, and the Project pane is where you assemble your clips into a movie. You’ll do most of your work in these two windows.
Note
The Event browser is called that because, for most people, the things you film tend to be organized around events in your life, like vacations, weddings, and graduations. You’ll learn all about events in Chapter 3.
The most basic edit you’ll make in iMovie is highlighting some footage in the Event browser and sticking it into the Project pane. This simple process is described extensively in Chapter 5.
The new version of iMovie lets you display or hide the Project
pane. (The old version dedicated permanent real estate to it.) In
Figure 1-3, you can
see a little  in the top-left corner of the Project pane.
Click that and the Project pane disappears, leaving a usefully
bigger Event browser, along with a bigger Viewer (see the next
section). That’s one of the many changes to how projects now work,
covered in Chapter 4.
in the top-left corner of the Project pane.
Click that and the Project pane disappears, leaving a usefully
bigger Event browser, along with a bigger Viewer (see the next
section). That’s one of the many changes to how projects now work,
covered in Chapter 4.
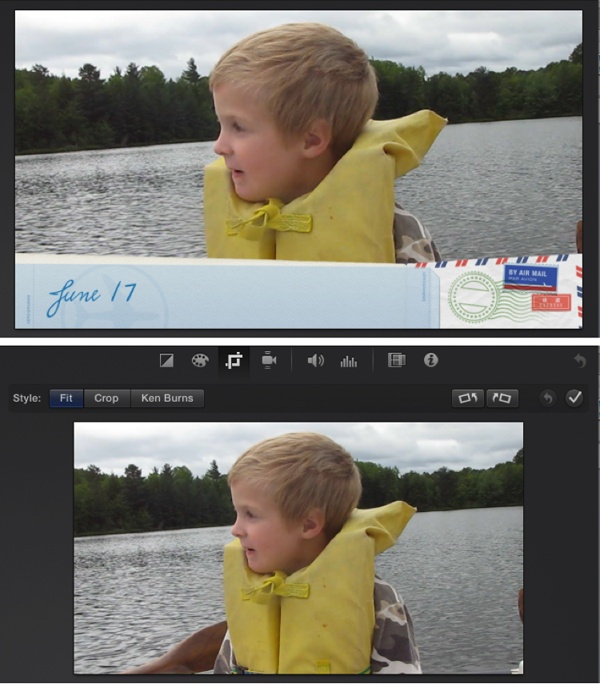
The Viewer
The Viewer sits in the top-right corner of the iMovie window. Its name is deceptive, though, because you can do a lot more than view your movie here. You can make quite a few cosmetic edits here, too, like correcting color and cropping frames (iMovie calls these edits “adjustments”). Take a look at Figure 1-4 to see some of the tools that call the Viewer home.
Note
In iMovies past, you used to be able to use a second monitor for the Viewer, giving you both a larger preview and more space for your project and event footage. This version of iMovie no longer sports that feature. Hopefully, Apple will reinstate it.
The Content Library
Making movies takes a lot more than just piecing clips together. You’ll also want to include professional elements like titles, music, transitions, and photographs. You’ll turn to the Content Library for these sorts of things. Think of it as the place you’ll find anything that’s not a video clip. (In other words, the Content Library contains everything but “content.”)
Figure 1-3 shows the Content Library in the lower-left corner. You’ll learn about each of the items there in the chapters to follow. In the meantime, click around and explore the tools. You can waste a good hour entertaining yourself with the sound effects alone.