Chapter 24. iMovie for iOS Sharing
Unless you’re gathering your loved ones around your iPhone or iPad screen, you probably want to share your hard work far and wide. How does the entire Internet sound? You can upload your movie straight from your iDevice to Facebook, YouTube, Vimeo, and even CNN’s citizen-reporter website, iReport. As long as someone has a web browser and an Internet connection, he’s part of your audience.
If you care less about web stardom and more about getting your movie onto another device, like an iPhone, a Mac, or an Apple TV, iMovie can accommodate you there, too.
Read on to discover all the ways you can share your movies from iMovie for iOS.
Share Movies, Trailers, or Clips
A word before getting into the details of sharing. On First, a Word About Sharing Raw Footage, you can read how iMovie on the Mac is a little stingy when it comes to sharing footage in your Events library; you can’t share it until you move it into a project.
iMovie for iOS is much more generous. It lets you share not only projects (movies or trailers), but individual video clips, too. That saves you the time and hassle of building a new project just to share a single clip.
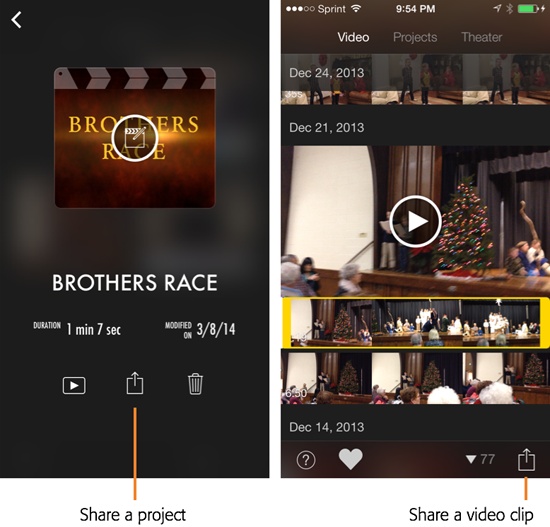
To share a project, use the Share button on iMovie for iOS’s Project screen, shown in Figure 24-1, left. To share an individual clip, go to the Media screen for videos (click Videos from iMovie’s main screen), and use the Share button shown in Figure 24-1, right.
Share to the Web
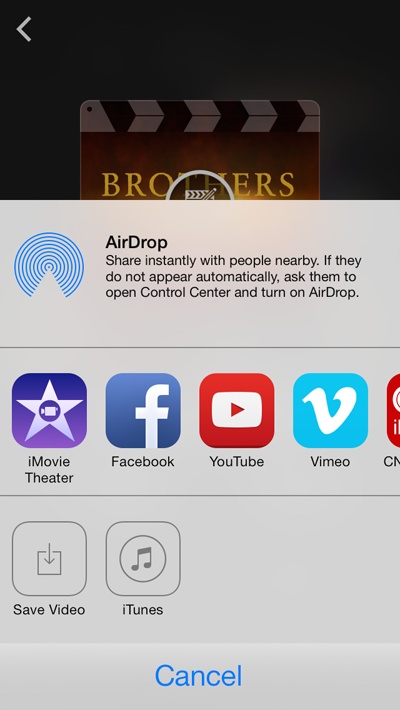
Facebook, YouTube, Vimeo, and CNN iReport are four far-reaching websites for distributing your movies. You’ll find them covered in detail in Chapter 15, so, to save some trees (and pixels, if you’re reading electronically), this chapter covers only the aspects of sharing unique to iOS devices. For details on using each service, refer to the information starting on Share to YouTube.
Note
Each of these websites requires an account—complete with user name and password—before you can share anything. To set up an account for any of them, see the instructions in Chapter 15.
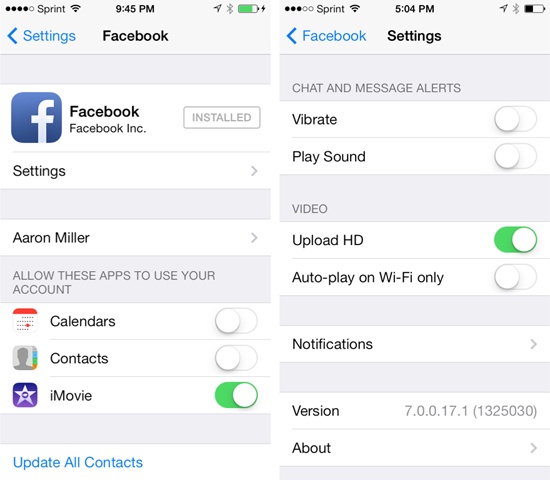
When you tap the Share button from the Media screen, Facebook is one of your destination choices (Figure 24-2). iOS has some pretty deep integration with Facebook, so you set up your account from the Settings app on your iDevice. (Figure 24-3). Open Settings, scroll down to Facebook, and then tap the panel to open Facebook’s Share Project screen.
If you haven’t signed into Facebook yet, fill in your user name and password. If you have, be sure you can share your movie to Facebook. Under “Allow these apps to use your account,” turn on iMovie access. Then click the Settings button on the same screen and turn on Upload HD, as shown in Figure 24-3. If, for some reason, you don’t see iMovie listed under “Allow these apps…” go back into iMovie and try sharing a movie to Facebook. Your device asks your permission to share movies with Facebook.
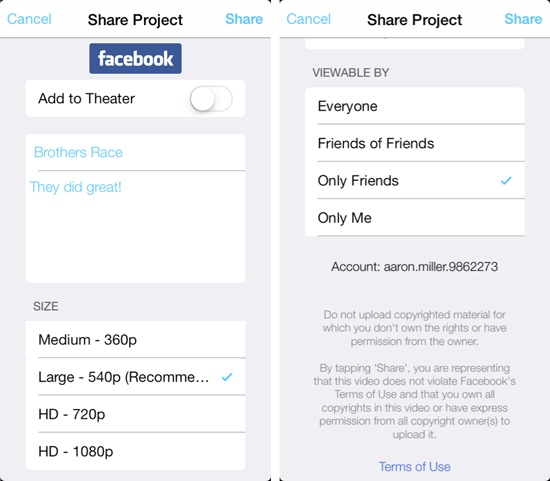
With your account information entered and access granted, tap the Share button from iMovie’s Media screen to launch the Share Project screen (Figure 24-4). Tap Facebook, and then enter the movie or clip’s name and description, choose a movie quality, and decide who can see your video. (See Share to Facebook for more on these choices.) Then tap Share.
Note
See the “Add to Theater” switch on the Share Project screen? It shows up on all the Internet sharing screens. Its purpose is to add your video to iMovie Theater, explained on Sharing Basics.
iMovie exports your video, uploads it, and then gives you a chance to visit it or tell a friend where to find it. Don’t worry if you forget the exact web address. You can always get to it by tapping to share the same thing to Facebook again. When you do, iMovie reminds you that you’ve already shared it, and you can go see it or tell a friend about it again. You can publish the same project a second time (if, for example, you made changes to it), but that doesn’t replace the old version; it just uploads a new one.
Note
For reasons unknown, when you visit your video from iMovie, it opens your iDevice’s Safari browser and sends you to the web version of Facebook instead of to the Facebook app. If you prefer to use the app, you can find your video by looking in your account timeline.
iMovie doesn’t help you manage a video once you upload it, so editing or deleting your video requires a trip to Facebook.
YouTube
The first time you share to YouTube, you have to log into your account (YouTube isn’t integrated with iOS the same way Facebook is). Enter your user name and password, and you see the YouTube Share Project screen (Figure 24-5).
Fill in the details about your movie, including the size of the file you want to upload and who can see it (choose Public to make it available to the world). Tap Share once you decide.

Note
iMovie repeatedly recommends 540p quality for your videos. That’s fine, but uploading in HD format (720p or 1080p) is worth the trouble if you have the time and a speedy connection that can handle hefty HD files. After all, you want your friends watching your movie in the highest quality possible.
iMovie uploads your movie and tells you where you and your friends can find it. As with Facebook, trying to share the file to YouTube again results in a reminder that you’ve been this way before. And again, to edit or delete your video, you have to log into YouTube itself.
Vimeo
iOS integrates your Vimeo account the same way it does for Facebook, so you need to take a trip to the Settings app to enter your login details. (iMovie sends you there if you haven’t signed in yet.)
Once that’s done, Vimeo sharing is almost identical to YouTube sharing. The only difference is that you choose Anyone instead of Public to share your video with the world.
CNN iReport
Like YouTube, CNN iReport is not integrated into iOS, so iMovie will prompt you to log into your account. Once done, fill in the details about your movie.
Note that iReport doesn’t offer a privacy setting—iReport videos are, by design, public. In addition, you can’t delete them. Short of persuading someone at CNN to remove a video you’ve uploaded, it’s going to stay there.
Share to Other Devices
Sharing between devices is covered in detail in Chapter 16. In keeping with the spirit of conservation, only new information related to iOS devices will make the cut here.
The Camera Roll
All kinds of apps can tap into an iDevice’s Camera Roll, the shared photo library explained in detail on Duplicate Audio. That includes apps for third-party file-sharing services like Dropbox, making it easy to upload a video from your Camera Roll to Dropbox so you can share the Dropbox folder with family and friends.
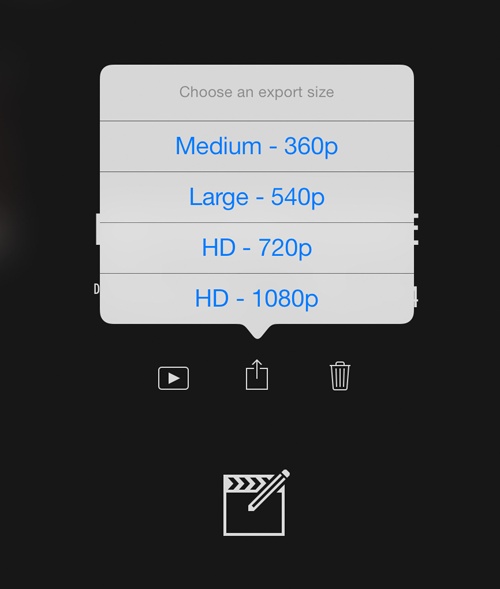
To share to your Camera Roll, tap the Share button and then choose Save Video. Once you select a file size (Figure 24-6), iMovie processes your movie and sticks it in the Camera Roll, nestled among all the other video clips and photos found there. Now any app that can access your Camera Roll can see your video.
iMovie Theater
iMovie Theater is a convenient way to share videos among all the devices on the same iCloud account. This includes Macs, iDevices, and AppleTVs. You can share full 1080p HD movies, too, making this a really slick setup.
Chapter 16 discusses iMovie Theater at length (starting on Sharing Basics). All you really need to know here is that you can share any clip or project to iMovie Theater from your iPhone, iPad, or iPod Touch by choosing iMovie Theater from the Share menu, or by turning on the Add to Theater switch anytime you share a video to the Internet.
Once you upload a video, tap Theater in your iDevice’s toolbar to see it. Unlike in iMovie for the Mac, you don’t need to worry about uploading the video to iCloud—iMovie for iOS automatically does that when you share a movie to iMovie Theater.
iMessage
iMessage is Apple’s free messaging service for all Mac and iDevice owners. Not only can you send messages, but you can also send photos, videos, and other files.
Because iMessage’s maximum file size is 100 MB, iMovie automatically exports your movie at a video quality that’s, well, low—360p, in fact. If you need to transfer something of higher quality, like HD, consider using AirDrop (described on AirDrop) or iTunes.
When you choose Message from the Share window, iMovie automatically converts your project and starts a new message (“Check out my video!”) with your movie attached to it (Figure 24-7). (You can, of course, edit the message.) Type in your recipient’s contact information and then tap Send.
Mail’s data limits, as noted in Chapter 16, are dramatically lower than iMessage’s for most email accounts. When you choose Mail from the Share menu, iMovie generates the same low-quality video (360p) it does for iMessage and opens a new mail message with your video attached. Type in the name of your recipient and a message, and then tap Send.

AirDrop
If you’ve been underwhelmed by the sharing options thus far, get ready to be impressed. AirDrop—discussed in detail on Transfer Video from One iDevice to Another—is a tool that lets you share files between iOS devices.
Note
AirDrop for the Mac works only between Macs; AirDrop for iOS works only between iOS devices. There’s no way to use AirDrop to share between a Mac and an iOS device. To do that, you need to use one of the other sharing methods discussed here.
Before you use AirDrop, you need to know a few things:
You have to have two iOS devices, both of them running iOS 7 or later and both of which support AirDrop. That includes an iPhone 5 or later, iPad fourth generation or later, any iPad mini, and an iPod Touch fifth generation or later.
You need to turn on both WiFi and Bluetooth on each device. You can do this in the Settings app.
The devices need to be within at least a couple dozen feet of each other; the closer the better.
The receiving device needs to be AirDrop-available to the sending device. Do this by swiping up from the bottom of your screen to show the Control Center. Tap AirDrop and choose Contacts Only if the other person has an iCloud address that’s in your address book. If not, choose Everyone. (You can easily come back and change this later if you want.)
If you’ve covered these bases, AirDrop sharing works this way:
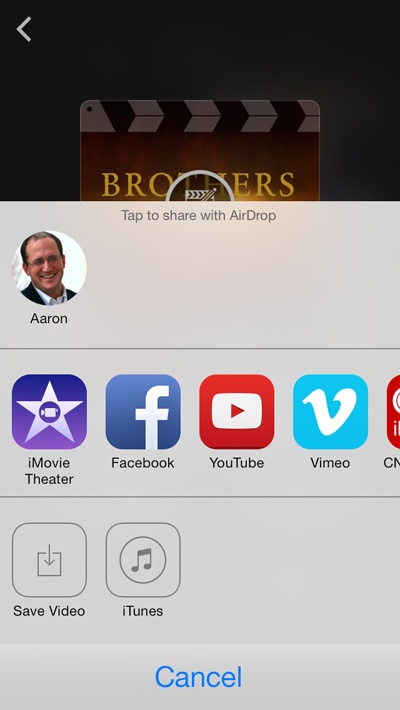
The Share screen appears, with an AirDrop logo at the top. Wait a moment or two, and your friend’s device should show up, replacing the logo (Figure 24-8).
Tap your friend’s name.
When you do, your friend’s device displays a message asking him to accept the file.
Tell your friend to tap Accept.
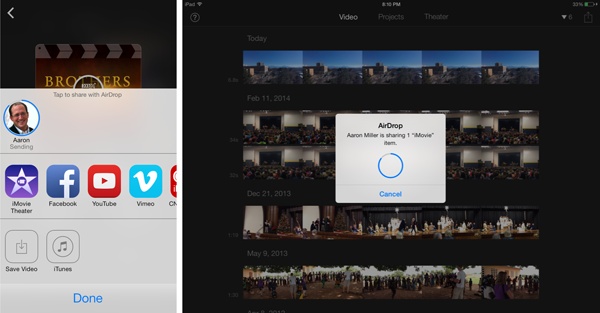
After accepting the file, AirDrop starts copying it from one device to the other. Both devices show the progress using a blue circle (Figure 24-9).

When AirDrop finishes, your friend’s device posts a message telling you the transfer is finished and invites you to check out the file you sent.
Tip
As noted on Transfer Video from One iDevice to Another, AirDrop works for sending full-blown projects in addition to standalone videos. That’s really convenient. You can piece together a basic video on your iPhone, and then use AirDrop to send it to your iPad, where you have more elbow room to work. Or you could use AirDrop to share a project you’re handing off to a friend for finishing.
iPhoto or Aperture
Every iDevice has a camera. That means both iPhoto (which is free with every Mac) and Aperture ($80 in the Mac App Store) can import your gadget’s photos and videos just as it can any other camera’s photos and videos. To make that happen, you first have to save your images and movies to the Camera Roll (see Add Clips as Overlays for the details). Once there, you can import them into iPhoto, Aperture, or any other compatible photo-management program on your Mac or PC.