In this chapter, we are going to see in action how to set up a database, configure data access, and build REST API endpoints.
Creating a New Empty Database
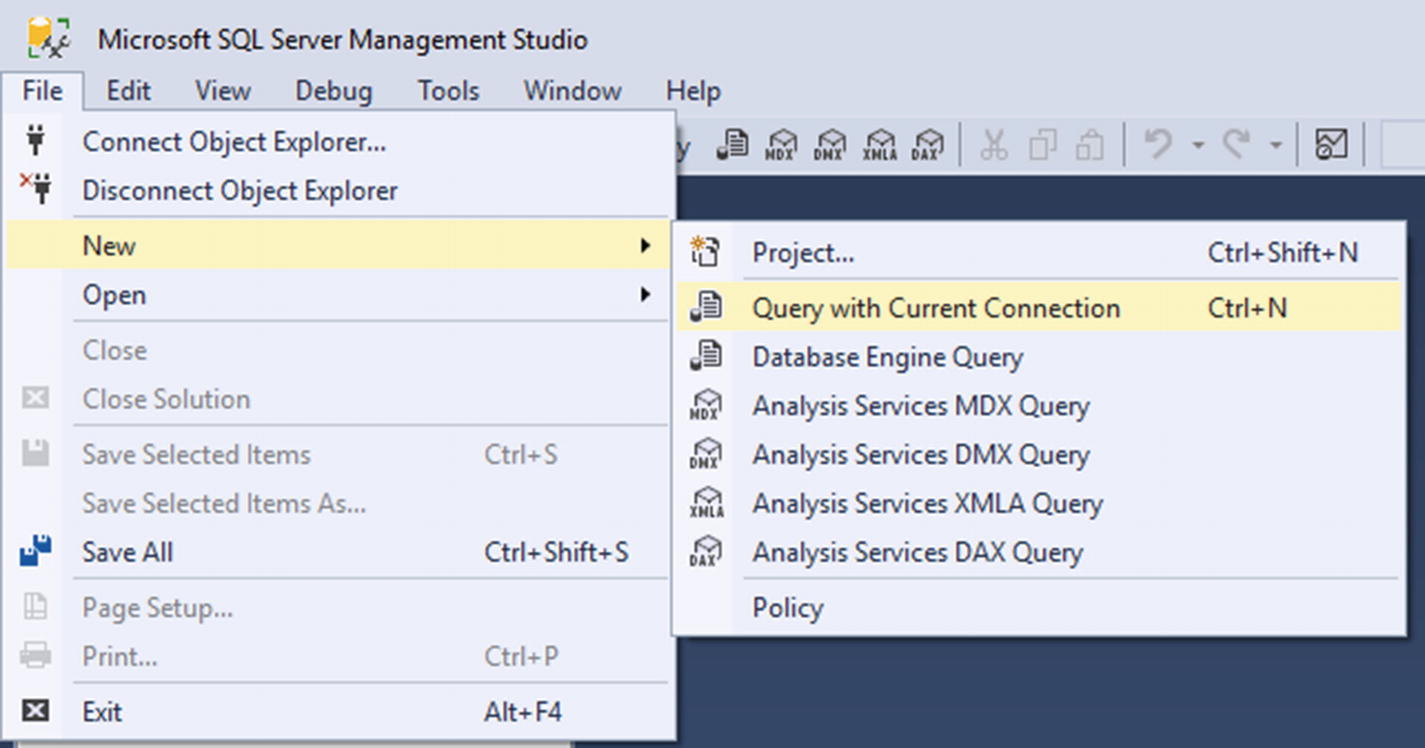
Create a new query editor

Execute SQL query
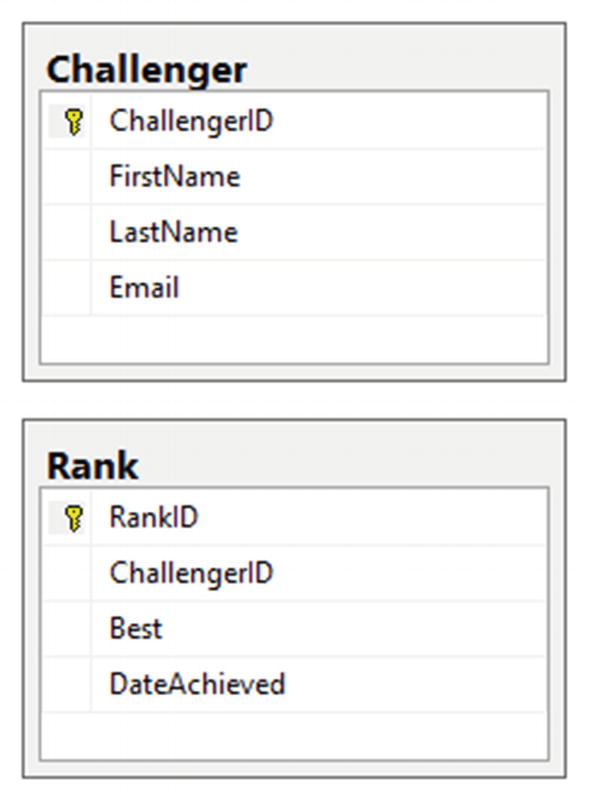
The database schema
The database tables that we’ve created are very plain and simple. The dbo.Challenger table contains some basic properties for us to identify a user who plays the game. The dbo.Rank table similarly contains basic properties to help us identify which user has the highest rank.
Keep in mind that this book doesn’t focuses on databases, so if you are new to SQL databases, I really recommend that you start looking at some resources like books or online tutorials to learn the basic foundations of databases.
Now that we’ve set up our database, it’s time for us to build a REST service to handle database calls and CRUD operations. We are choosing Web API because it’s a perfect fit to build RESTful services in the context of .NET. It also allows other client apps (mobile apps, web apps, and even desktop apps) to consume our API via endpoints. This would enable our application to allow clients to access data in any type of application as long as it supports HTTP services.
Creating the ASP.NET Web API Project

Create a new ASP.NET Web API project
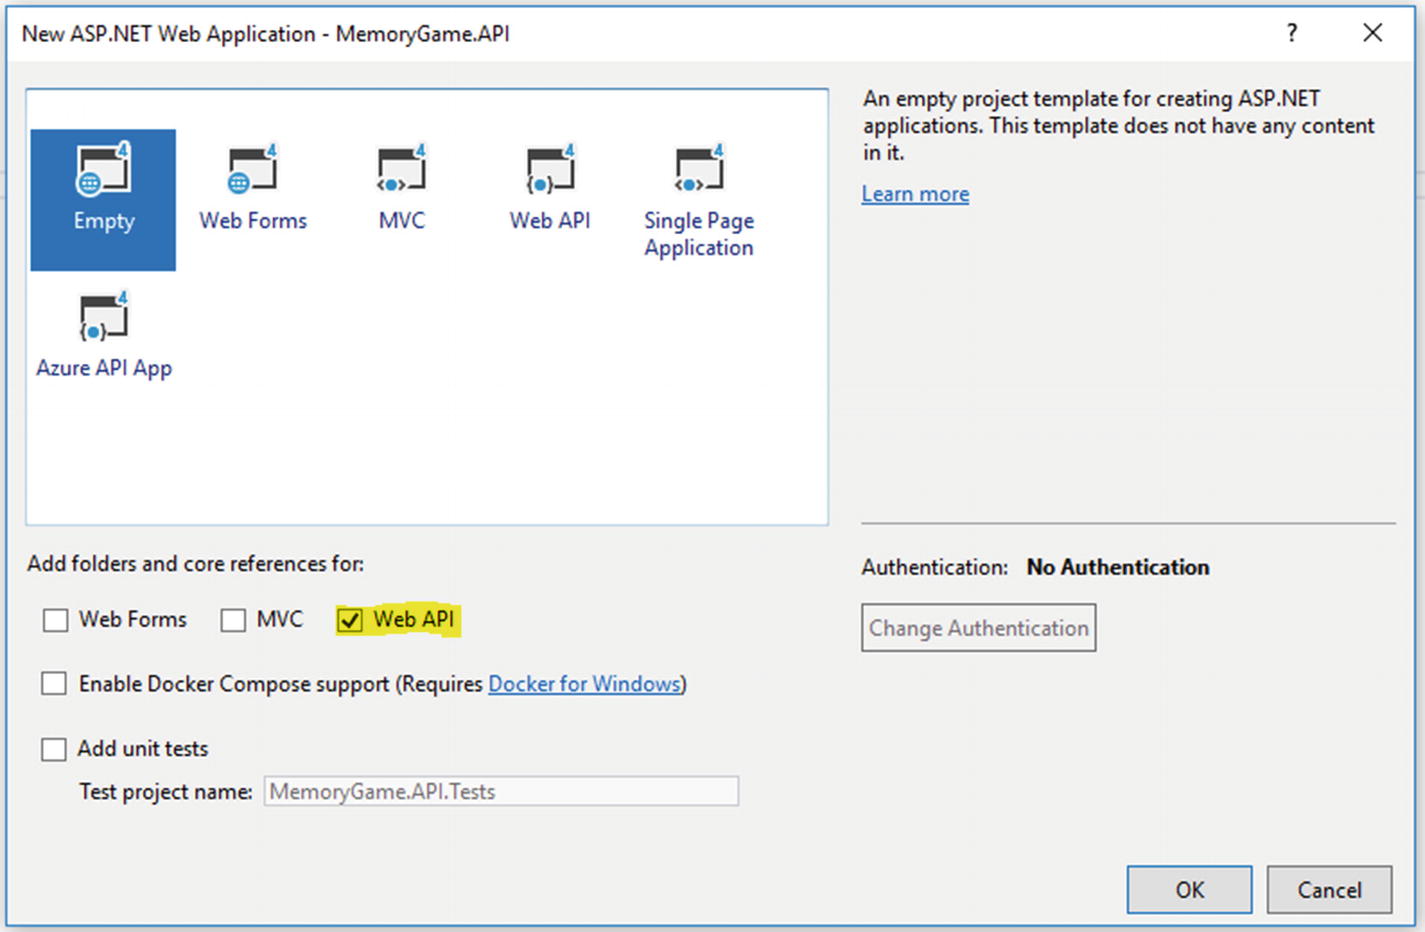
Selecting an empty Web API template
The default generated files
The config.MapHttpAttributeRoutes() line enables attribute routing, in which you can configure custom routes at the controller or action level of your Web API class. For more information about attribute routing, read the following: https://docs.microsoft.com/en-us/aspnet/web-api/overview/web-api-routing-and-actions/attribute-routing-in-web-api-2 .
The second line of code defines a default route template to the routing table using convention-based routing. Each entry in the routing table contains a route template. The default route template for Web API is “api/{controller}/{id}”. In this template, “api” is a literal path segment, and {controller} and {id} are placeholder variables. When the Web API server receives an HTTP request, it tries to match the URI against one of the route templates in the routing table. For more information about conventional routing, read the following: https://docs.microsoft.com/en-us/aspnet/web-api/overview/web-api-routing-and-actions/routing-in-aspnet-web-api .
ASP.NET routing is the ability to have URLs represent abstract actions rather than concrete physical files. If you are familiar with ASP.NET MVC, Web API routing is very similar to MVC routing. The main difference is that Web API uses the HTTP method, not the URI path, to select the action.
For this demo, we are going to use attribute routing to add route templates in the routing table because it gives us more flexibility in defining routes than convention routing.
Integrating EF
Now that we have our Web API project ready, let’s continue by implementing our data access layer to work with data from database.
In the software development world, most applications require a data store or a database. So, we all need a code to read/write our data stored in a database or a data store. Creating and maintaining code for database make for tedious work and a real challenge. That’s where an ORM like EF comes into place.
What Is an ORM?
Applications can work in terms of a more application-centric conceptual model, including types with inheritance, complex members, and relationships.
Applications are freed from hard-coded dependencies on a particular data engine or storage schema.
Mappings between the conceptual model and the storage-specific schema can change without changing the application code.
Developers can work with a consistent application object model that can be mapped to various storage schemas, possibly implemented in different database management systems.
Multiple conceptual models can be mapped to a single storage schema.
Language-integrated query (LINQ) support provides compile-time syntax validation for queries against a conceptual model.
What is EF?
To recap, EF is an ORM that enables .NET developers to work with relational data using domain-specific objects. It eliminates the need for most of the data access code that developers usually need to write.
This could simply mean that using EF we will be working with entities (class/object representation of your data structure) and letting the framework handle the basic create, read, udpate, and delete (CRUD) operations. In traditional ADO.NET, you will write the SQL queries directly against tables/columns/procedures and you don’t have entities, so it’s much less object oriented.
For more information, read the following: https://msdn.microsoft.com/en-us/library/aa937723(v=vs.113).aspx .
Just like any other ORM, there are two main design workflows supported by EF: In the Code-First approach, you create your classes (POCO entities) and generate a new database out from them. The Database-First approach allows you to use an existing database and generate classes based on your database schema. For this demo, we’re going to use a Database-First approach, as we already have an existing database created.
Setting Up a Data Access Layer
- 1.
Right-click the “DB” folder and then select Add ➤ New Item.
- 2.
On the left pane under Visual C# item, select Data ➤ ADO.NET Entity Data Model.
- 3.
Name the file as “MemoryGameDB” and then click Add.
- 4.
In the next wizard, select EF Designer from Database and then click Next.
- 5.
Click the “New Connection…” button.
- 6.
Select Microsoft SQL Server under Data source and click Continue.
- 7.
Supply the database server name to where you created the database. In my case, the name of my SQL server is “ADMIN-PC\SQLEXPRESS01”. Remember that yours can be different, so make sure you supply the correct instance. You can find the server name in SSMS.
- 8.
Select or enter the database name. In this case, the database name for this example is “MemoryGame”.
- 9.Click the Test Connection button to see if it’s successful just like in the following figure:
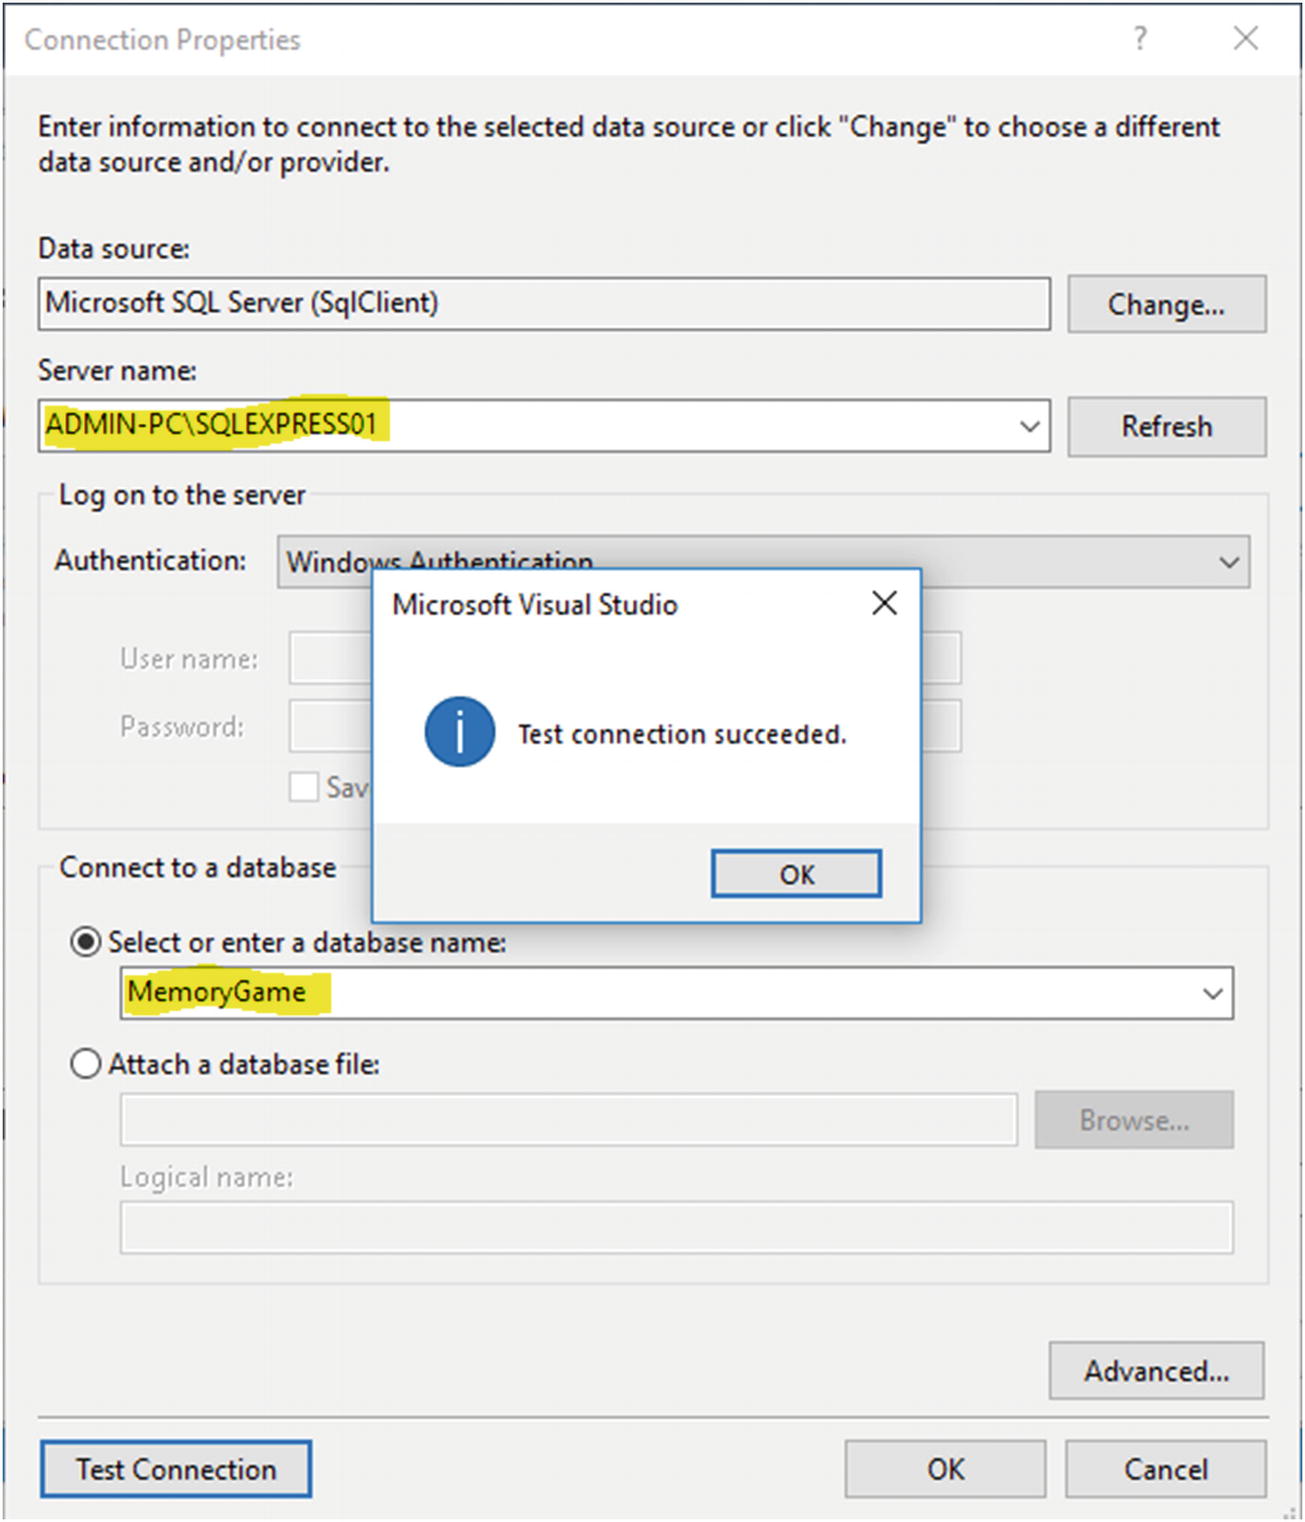 Figure 3-7
Testing the database connection
- 10.
Click OK to close the pop-up dialog and click OK again to generate the connection string that will be used for our application.
- 11.
In the next wizard, click Next.
- 12.
Select EF 6.x and then click Next.
- 13.
Select the “Challenger” and “Rank” tables and then click Finish.
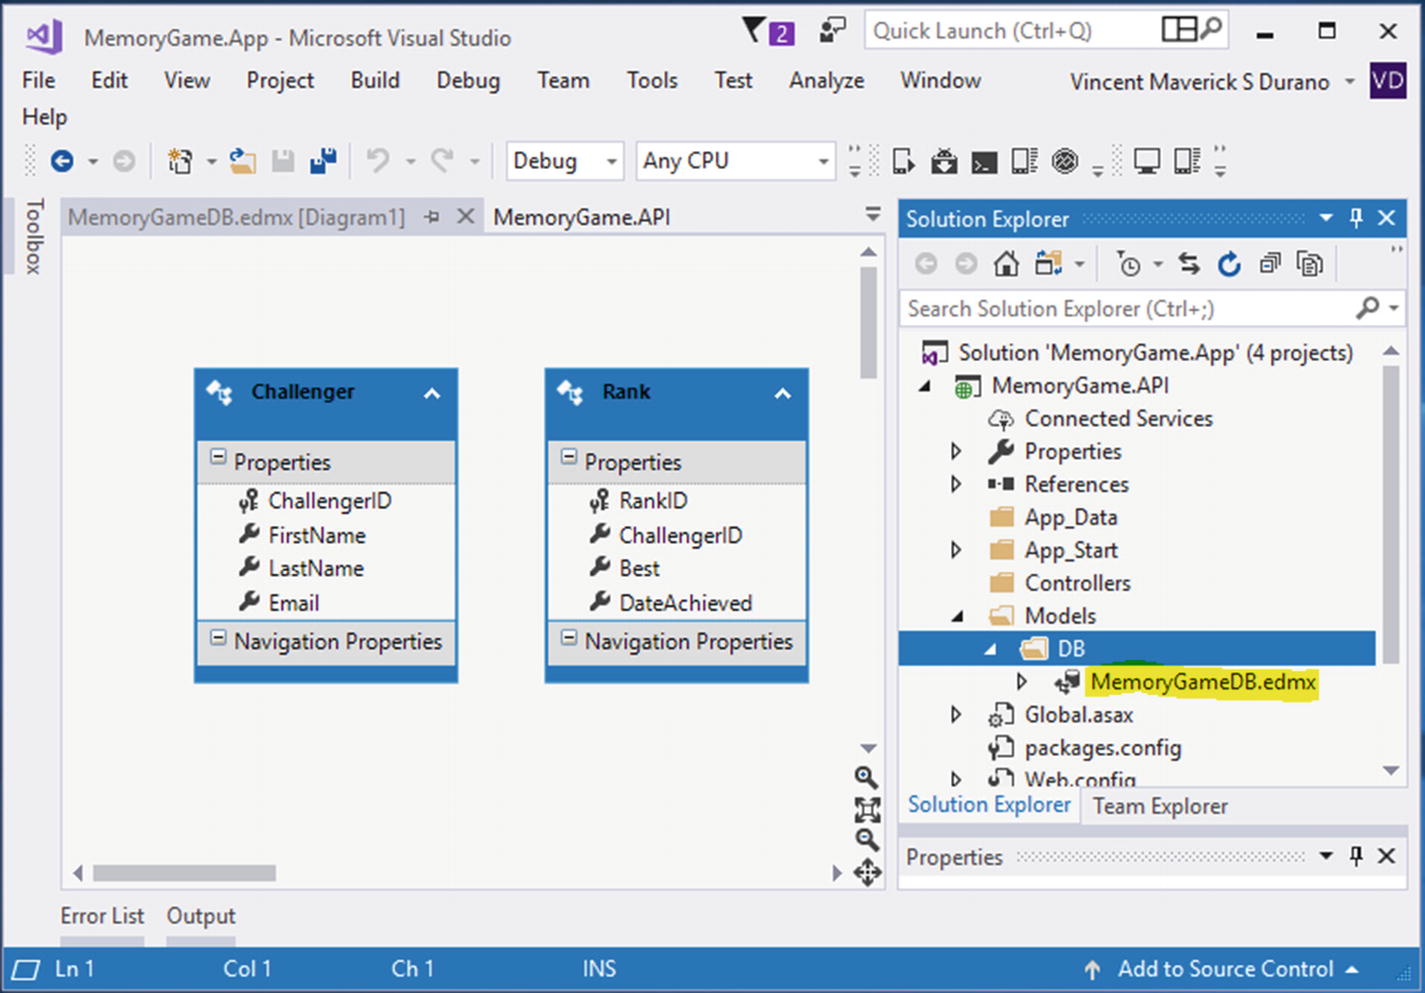
The generated entity models
What happens there is that EF automatically generates the business objects for you and lets you query against it. The EDMX or the entity data model will serve as the main gateway by which you retrieve objects from the database and resubmit changes.
MemoryGameDB.Context.tt
MemoryGameDB.Designer.cs
MemoryGameDB.Edmx.diagram
MemoryGameDB.tt
The MemoryGameEntities class represents a session with the database and allows you to query and save instances of the entity classes. This class derives from DbContext and exposes DbSet virtual properties that represent collections of the specified entities in the context. Since we are working with the EF Designer (EDMX), the context is automatically generated for us. If you are working with the Code-First approach, you will typically write the context yourself.
You may have noticed that the models generated are created as partial classes. This means that you can extend them by creating another partial class for each of the entity model classes when necessary.
Write and execute queries
Materialize query results as entity objects
Track changes that are made to those objects
Persist object changes back on the database
Bind objects in memory to UI controls
Challenger.cs
Rank.cs
The classes generated in the preceding will be used as a type of DbSet objects. The DbSet class represents an entity set that can be used for CRUD operations.
The DbSet class is derived from IQuerayable. So, we can use LINQ for querying against DbSet, which will be converted to a SQL query. EF API executes this SQL query to the underlying database, gets the flat result set, converts it into appropriate entity objects, and returns it as a query result.
Implementing CRUD Operations
Let’s take a look of what we just did there.
The ChallengerViewModel DTO is nothing but a plain class that houses some properties that will be used in the view or any client that consumes the API.
The HTTPApiResponse object is class that holds an enum and three main basic properties: Status, StatusCode, and StatusDescription. This object will be used in the GameManager class methods as a response or return type object.
The GameManager class is the central class where we handle the actual CRUD operations. This is where we use EF to communicate with the database by working with a conceptual data entity instead of a real SQL query. EF enables us to work with a database using .NET objects and eliminates the need for most of the data access code that developers usually need to write.
The method GetAll is a public property that returns an IEnumerable<ChallengerViewModel>. The sole purpose of this property is to get the data; that is why we only set a getter accessor. Creating a property with only a getter makes your property read-only for any code that is outside the class.
The method GetAllChallengerRank() basically fetches the challenger’s profile and its corresponding rank. The first line of the code within the method creates an instance of the DbContext called MemoryGameEntities. We wrap the code for instantiating the DbContext within the using block to ensure that the objects will be properly disposed of after using them.
The next line uses a LINQ query expression to query the data. The query joins the db.Challenger and db.Rank DbSets using the join clause. We then select the data that we need and associate them into a strongly typed object called ChallengerViewModel, order the results by highest rank, and return the result by calling the ToList() function. ToList() is an extension method that sits within the System.Linq namespace, which converts collections (IEnumerables) to list instances.
The UpdateCurrentBest() method takes the DB.Rank class as the parameter. The code block basically gets the Rank object based on the ChallengerID using the LINQ Where function and assigns the result into a variable data. We then call the LINQ Any() function to check if the object contains any single element in a sequence.
If there’s any data returned from the query, then we create an instance of the Rank class and set the result from the data variable using the FirstOrDefault() LINQ function. The LINQ FirstOrDefault()is an eager function that returns the first element of a sequence that satisfies a specified condition. Once the FirstOrDefault() function is invoked, EF will automatically issue a parameterize SQL query to the database, in which the SQL Server can understand and then bring back the result to the entity model. We then assign the new values to each field and call the SaveChanges() method to update the database with the changes.
Otherwise, if there’s no data or if the LINQ Any() function returns false, then we simply create a new record in the database.
Finally, we return an HTTPApiResponse object indicating that the operation is successful.
As the method name suggests, the GetChallengerID() method gets the ChallengerID of the challenger by passing an e-mail as the parameter. The preceding code may be familiar to you by now, as it uses common LINQ functions that we previously talked about such as the Where(), Any(), and FirstOrDefault().
The AddChallengerID() method takes a DB.Challenger class. The preceding code checks if the data associated with the e-mail already exists in the database. If it does, then it returns an error; otherwise it adds a new entry to the database and returns a successful response.
The code implementation of GetChallengerByEmail() function is somewhat similar to the GetAllChallengerRank() function. The only difference is that we filter the data by e-mail using the LINQ Where() function, and this returns only a single result using the LINQ SingleOrDefault() function. The SingleOrDefault() function is similar to FirstOrDefault() in the sense of returning just a single row. However, they differ in terms of how they are used. Whenever you use SingleOrDefault(), you clearly state that the query should result in at most a single result. On the other hand, when FirstOrDefault() is used, the query can return any number of results, but you state that you only want the first one. Since we let e-mail be unique, we are sure that e-mails can’t be duplicated, and thus we opt for SingleOrDefault().
The DeleteChallenger() method takes an id as the parameter. This means it deletes all information for a certain challenger and its associated rank. The code basically checks for the existence of the challenger by querying the database using the LINQ Where() function. If the record exists, then it will delete the record that is associated with the id in both the Rank and Challenger database tables. Otherwise, it returns a response saying the associated ID was not found.
GetAll() – A short method that calls the GetAllChallengerRank() method and returns an IEnumerable<ChallengerViewModel>.
GetAllChallengerRank() - Gets all the challenger names and their corresponding ranks. It uses LINQ to query the model and sort the data. This method returns a List<ChallengerViewModel> object.
GetChallengerByEmail(string email) – Gets the challenger information and its corresponding rank by e-mail. This method returns a ChallengerViewModel object.
GetChallengerID(string email) – Gets the challenger ID by passing an e-mail address as parameter. This method returns an int type.
AddChallenger(DB.Challenger c) – Adds a new challenger to the database. This method returns an HTTPApiResponse object.
UpdateCurrentBest(DB.Rank user) – Updates the rank of a challenger to the newly achieved high score. This method returns an HTTPApiResponse object.
DeleteChallenger(int id) – Deletes a challenger from the database. This method returns an HTTPApiResponse object.
A Friendly Reminder
It was my intent not to decouple the actual implementation of the data access layer, as I’m trying to make this demo as simple as possible. In a real-world scenario where you want to deal with a complex database and value the testability of your data access, then I’d recommend you implement a data repository pattern. The main reason for adding your own repository implementation is so that you can use DependencyInjection (DI) and make your code more testable. EF is not that testable out of the box, but it’s quite easy to make a mockable version of the EF data context with an Interface that can be injected. In other words, if you implement an interface for your data access, other services such as Web API can just use that interface instead of directly accessing your DBContext from your Web API controller.
The Web API Endpoints
Now that we have our data access ready, we can start creating the API endpoints to serve data using ASP.NET Web API. As a recap, Web API is a framework used to build HTTP services and is an ideal platform for building RESTful applications on the .NET Framework.
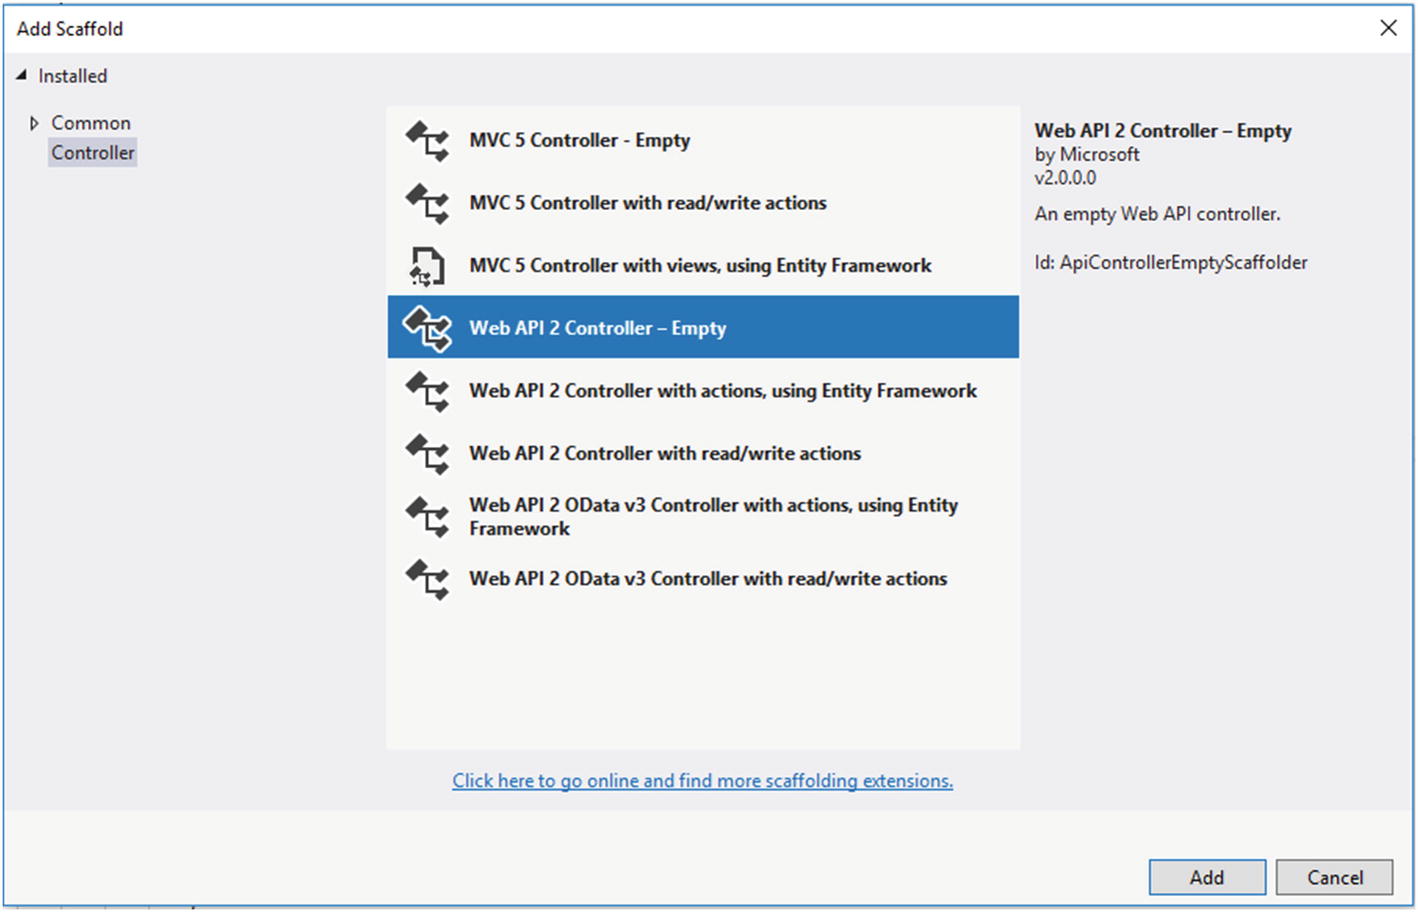
Adding a new empty Web API 2 controller
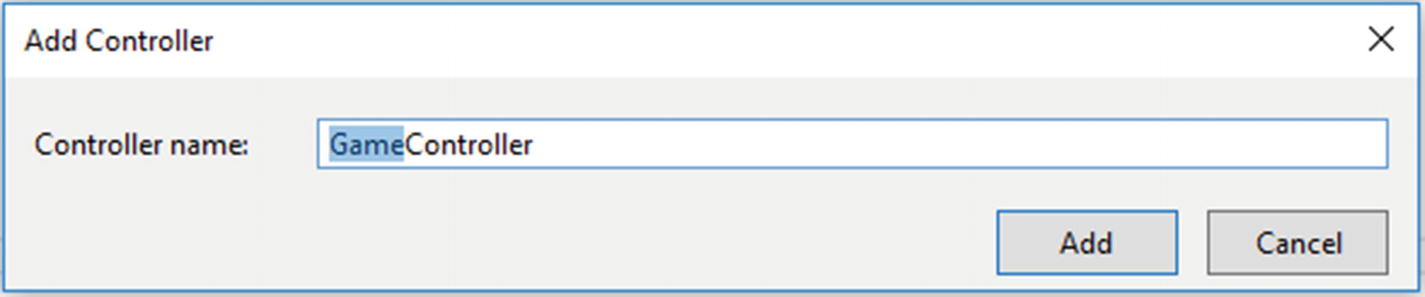
Assigning the controller name
The GameController class is the main entry point for the API endpoints. This class derives the ApiController class and uses the RoutePrefix attribute for defining a common prefix for all routes within the class. In this demo, the common route prefix is “api/game/players”.
If you have worked with ASP.NET MVC, then you are already familiar with controllers. They work similarly in Web API, but controllers in Web API derive from the ApiController class instead of the controller class. The first major difference you will notice is that actions on Web API controllers do not return views, they return data.
This code is the class constructor of the GameController class. This is where we initialize the creation of the GameManager class instance. The GameManager is the data access gateway, which contains the methods for handling CRUD operations. Just to remind you again, you may want to implement an Interface to decouple the GameManager object from your Web API controller to make your class more testable.
The Get() method fetches all challenger data from the database and returns an IEnumerable<ChallengerViewModel>. Notice that the method is decorated with the [HttpGet] and [Route] attributes. This means that this method can be invoked only on a GET Http request and routes to “api/game/players”. Setting the route attribute to empty ( [Route(“”)] ) automatically maps to the base route defined at the class level.
The GetPlayerID() method takes an e-mail as the parameter. This method invokes the GetChallengerID() from the GameChallenger class, which returns the ID of a challenger that is associated in the e-mail. This method can be invoked only on a GET Http request, as we are decorating the method with the [HttpGet] attribute. The {email} value in the route is the parameter template holder that maps to the string email parameter of the GetPlayerID() method. This method routes to the following endpoint: “api/game/players/testemail.com/”, where “testemail.com” is the value of e-mail passed to the route template.
The GetPlayerProfile() method also takes an e-mail as the parameter and invokes the GetChallengerByEmail() method from the GameManager class. This method can be invoked only on a GET Http request, as we are decorating the method with the [HttpGet] attribute. This method routes to “api/game/players/profile/testemail.com/”, where “testemail.com” is the value of e-mail passed to the route template.
The SavePlayer() method takes a Challenger model as the parameter and creates a new entry into the database. This method invokes the SaveChallenger() method from the GameManager class and returns an HTTPApiResponse object. Notice that the method is now decorated with the [HttpPost]. This means that this method can be invoked only on a POST Http request and routes to base endpoint “api/game/players”.
The AddScore() method takes a Rank model as the parameter and creates or updates the current best score of the challenger record in the database. This method invokes the UpdateCurrentBest() method from the GameManager class and returns void. This method can be invoked only on a POST Http request, and it routes to “api/game/players/score”.
The DeletePlayer() method takes an integer value as the parameter and deletes the challenger profile and associated rank record in the database. This method invokes the DeleteChallenger() method of the GameManager class and returns an HTTPApiResponse object. It uses the [HttpDelete] attribute to denote that this method can be invoked only on a DELETE Http request, and it routes to “api/game/players/1”, where “1” is the value of ID passed into the route table.
HTTP Method | C# Method | Endpoint (Route) | Description |
|---|---|---|---|
GET | Get() | api/game/players | Gets all the challenger and rank data |
POST | AddPlayer(Challenger user) | api/game/players | Adds a new challenger |
POST | UpdateScore(Rank user) | api/game/players/score | Adds or updates a challenger score |
DELETE | DeletePlayer(int id) | api/game/players/{id} | Removes a player |
GET | GetPlayerID(string email) | api/game/players/{email} | Gets the challenger ID based on e-mail |
GET | GetPlayerProfile(string email) | api/game/players/profile/{email} | Gets the challenger information based on e-mail |
All Web API endpoints in the example are contained within a single class, as I’m trying to make this demo as simple as possible. In a real-world scenario when you are dealing with large data models, I would strongly recommend you separate each controller implementation and follow the REST standards whenever you can. It’s also recommended to always wrap your API response with meaningful results and handle possible errors. You may check out my article about writing a custom wrapper for managing API exceptions and consistent responses here for an example: http://vmsdurano.com/asp-net-core-and-web-api-a-custom-wrapper-for-managing-exceptions-and-consistent-responses/ .
Enabling CORS
Now that we have our API endpoints ready, the final step that we are going to do on this project is to enable CORS. We need this because this API will be consumed in other applications that probably have difference domains.
Here’s the CORS definition as per the documentation here: https://msdn.microsoft.com/en-us/magazine/dn532203.aspx
Cross-origin resource sharing (CORS) is a World Wide Web Consortium (W3C) specification (commonly considered part of HTML5) that lets JavaScript overcome the same-origin policy security restriction imposed by browsers. The same-origin policy) means that your JavaScript can only make AJAX calls back to the same origin of the containing Web page (where “origin” is defined as the combination of host name, protocol and port number). For example, JavaScript on a Web page from http://foo.com can’t make AJAX calls to http://bar.com (or to http://www.foo.com , https://foo.com or http://foo.com:999 , for that matter).
CORS relaxes this restriction by letting servers indicate which origins are allowed to call them. CORS is enforced by browsers but must be implemented on the server, and the most recent release of ASP.NET Web API 2 has full CORS support. With Web API 2, you can configure policy to allow JavaScript clients from a different origin to access your APIs.
- 1.
Install Microsoft.AspNet.WebApi.Cors via nugget. The latest stable version as of this time of writing is 5.2.6.
- 2.
Navigate to the App_Start folder and then open WebApiConfig.cs. Add the following code to the WebApiConfig.Register method:
config.EnableCors();
- 3.
Open the GameController class and then declare the following namespace:
using System.Web.Http.Cors;
- 4.Finally, add the [EnableCors] attribute just like in the following:[EnableCors(origins: "http://localhost:60273", headers: "*", methods: "*")]public class GameController : ApiController
Note that you’ll have to replace the value of origins based on the URI of the consuming client. Otherwise, you can use the “*” wildcard to allow any domain to access your API.
At this point, we are done creating the required API endpoints. Before moving into the Chapter 4, I would suggest you do a Clean and then Rebuild to ensure that the application has no compilation errors.
Sample cURLs
One of the advantages of REST APIs is that you can use almost any programming language to call the endpoint. The endpoint is simply a resource located on a web server at a specific path.
Each programming language has a different way of making web calls. Rather than exhausting your energy by trying to show how to make web calls in .NET, Java, Python, C++, JavaScript, Ruby, and so on, you can just show the call using cURL.
cURL provides a generic, language-agnostic way to demonstrate HTTP requests and responses. Users can see the format of the request, including any headers and other parameters. Your users can translate this into the specific format for the language they’re using.
Get All Players
curl -X GET \http://localhost:56393/api/game/players \-H 'Cache-Control: no-cache' \
Get the Player ChallengerID
curl -X GET \http://localhost:56393/api/game/players/testemail.com/ \-H 'Cache-Control: no-cache' \
Get the Player Profile
curl -X GET \http://localhost:56393/api/game/players/profile/testemail.com/ \-H 'Cache-Control: no-cache' \
Add a New Player
curl -X POST \http://localhost:56393/api/game/players \-H 'Cache-Control: no-cache' \-H 'Content-Type: application/json' \-d '{"Email":"vynnmarkus@email.com","FirstName":"Vynn Markus","LastName":"Durano"}'
Update a Player Score
curl -X POST \http://localhost:56393/api/game/players/score \-H 'Cache-Control: no-cache' \-H 'Content-Type: application/json' \-d '{"ChallengerID":1,"Best":3,"DateAchieved":"9/23/2018 4:16"}'
Delete a Player
curl -X DELETE \http://localhost:56393/api/game/players/1 \-H 'Cache-Control: no-cache' \
Command | Description |
|---|---|
-X | The -X signifies the method used for the request. Common options are GET, POST, DELETE, PUT. |
-H | Submits the request header to the resource. This is very common with REST API requests because the authorization is usually included in the header. |
-d | Includes data to post to the URL. The data needs to be URL encoded. Data can also be passed in the request body. |
For the available list of the cURL commands that you can use, see the cURL documentation here: https://curl.haxx.se/docs/manpage.html
Testing with Postman
You can also download Postman to test out the API endpoints that we have created earlier. Postman is really a handy tool to test APIs without needing to create a UI, and it’s absolutely free. Get it here: www.getpostman.com/
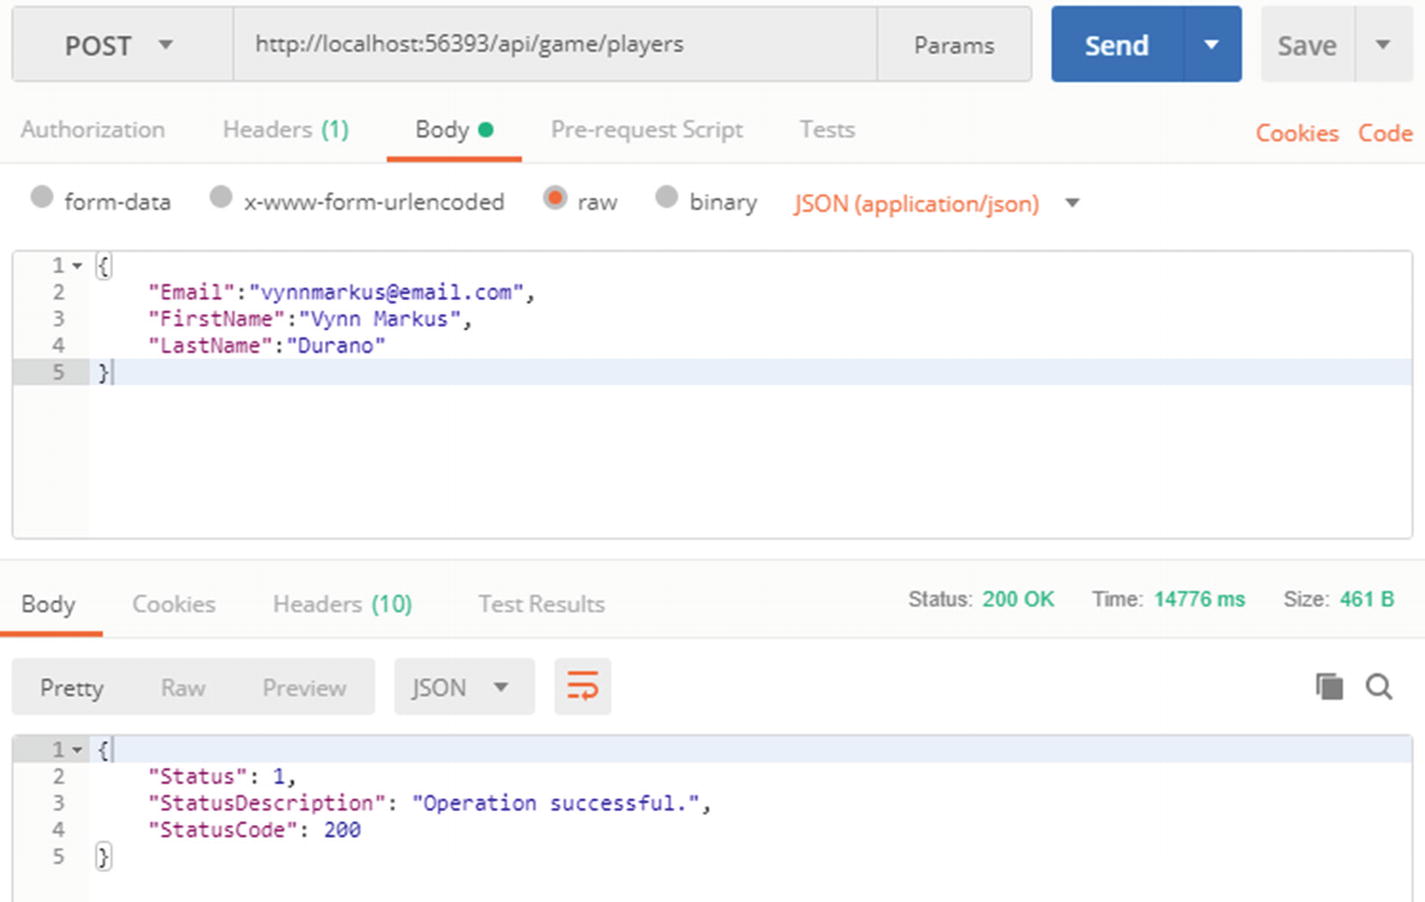
Testing an API with Postman