Making a Media Center
In This Chapter

- Media center options for the Raspberry Pi
- Setting up and installing Raspbmc
- Extending your media center’s functionality with plug-ins
- Remote control options
One of the most popular, and useful, projects you can do with your Raspberry Pi is turn it into a media center. Then, with it, you’ll be able to stream movies, store movies on an external hard drive to watch, or stream movies from your home computer to your Raspberry Pi.
If you’re not familiar with media centers, they’re pretty handy. If you’ve used a device like a Roku or Apple TV, that’s essentially what you’ll get here, but you can customize it a lot more than you can with those devices. For example, you can install custom themes to change the look and install apps for online services like YouTube.
To make a media center, you’ll create a SD card much like you did with Raspbian in Chapter 8, but instead of using Raspbian, you’ll use one of three different media center images. When you’re finished, you’ll have a small, low-power media center you can hook up to your TV to watch movies and other video any time you want.
In this chapter, I cover the various options for media centers, show you how to set one up, and guide you through the various customization options you have to make your media center your own.
Raspberry Pi–Powered Media Center Capabilities
A Raspberry Pi makes a surprisingly powerful little media center. Typically speaking, building your own media center could cost you around $500, but with the Raspberry Pi, you can build one for around $35.
With your Raspberry Pi–powered media center, you can stream movies and television shows from the internet, your computer, or an external hard drive. Obviously, adding an external hard drive to your media center increases the cost of the project a bit, but it’ll be considerably less than $500.
Streaming Content from the Web
The big appeal of a media center is its capability to stream video from online resources. That means you no longer have to hover over a small laptop screen to watch streaming videos.
With a Raspberry Pi media center, you can play just about any online video on your TV. You can stream content from YouTube (youtube.com), Funny or Die (funnyordie.com), College Humor (collegehumor.com), FOX (fox.com), CBS (cbs.com), NBC (nbc.com), and more. Countless websites offer streaming video you can access and play through your media center.
Playing Movies and Music from Your Home Network
In addition to streaming from websites, you can stream movies, television shows, and music from your home computer to your Raspberry Pi.
If you’ve ripped (copied) your DVD or CD collection to your home computer, you can stream that content from your computer’s hard drive to your Raspberry Pi. Then, you have the capability to watch any video you want on your big-screen TV—without having to move your desktop computer over to your TV.

HARDWARE HELPER
The Raspberry Pi doesn’t have a built-in hard drive, so it might seem like an odd choice for a media player. However, with an external hard drive, you can store as many movies and TV shows as will fit, and the Raspberry Pi can stream right from the external drive. Plus, the external drive is portable, so you can use it on any other computer you have.
If your computer has a lot of empty storage space, that’s another easy way to keep costs down on this project.
Attaching External Storage to Your Pi
To make it even easier, you don’t have to deal with your home computer at all. If you’d prefer, you can attach an external hard drive to your Raspberry Pi and store your movies and music there so your Raspberry Pi can easily access them.
All you need for this is an external hard drive with a USB port so you can connect it to your Raspberry Pi. Then you can transfer movies or music to your hard drive any way you like.
Raspberry Pi Media Center Limitations
The Raspberry Pi makes an excellent media center, but it’s important to keep in mind that, at a fraction of the cost, it’s not nearly as powerful as other options. It doesn’t have the power to stream full 1080p HD videos smoothly, for example, and it’s a little slower than most big PC builds.
Likewise, the Raspberry Pi doesn’t have the power to do a lot of encoding. That means you’ll need to get your videos in the proper format before you play them through your Raspberry Pi. It’s an easy enough problem to work around though, so don’t let that deter you from getting your Raspberry Pi media center set up.

DEFINITION
Encoding refers to the video codec, the software that enables compression and decompression of a digital video, with which a file is saved. Different types of software save using different codecs, and codecs can change the quality of a video. Codecs that retain HD quality and sound tend to struggle a bit on the Raspberry Pi because there’s so much data in them.
Raspberry Pi Media Center Options
You have a lot of options when it comes to operating systems for your Raspberry Pi media center. Three of the most popular are Raspbmc (raspbmc.com), OpenELEC (openelec.tv), and XBian (xbian.org).
Each has its own strengths and weaknesses. They all look pretty much the same, but they work very differently from one another. In addition, some are better suited for different types of use.
Let’s break down what they’re all best for.
Like Raspbian, Raspbmc is the default media center on the Raspberry Pi. It’s the most widely supported, full-featured media center operating system available.
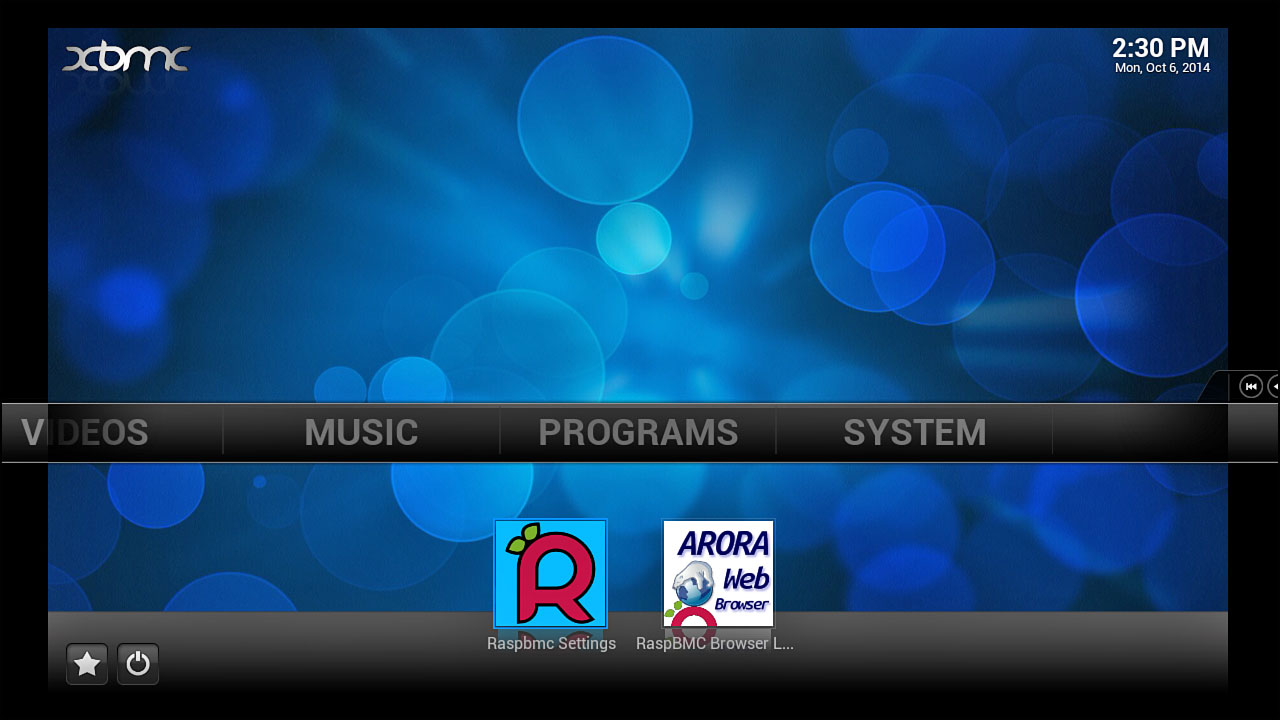
At a glance, Raspbmc looks just like XBMC on Windows, a Mac, or Linux.
Raspbmc is based on the popular media center XBMC, so XBMC users will feel right at home with Raspbmc, right out of the box. Raspbmc runs a full version of Linux, so it’s a big file that takes a bit of time to boot up. That said, part of the appeal of Raspbmc is similar to Raspbian: you don’t really need to do a lot of work to get it set up and working.

DEFINITION
XBMC is media center software initially made for the Xbox. Since its launch, it has come to many different operating systems–the Raspberry Pi included. It’s basically a media player and streaming software so you can turn a computer into a media device. It’s meant to play videos and music and display photos. Originally, XBMC stood for Xbox Media Center, but in 2014, the team announced the software would change names to Kodi.
Like Raspbian, Raspbmc is based on the Linux distribution Debian. Developer Sam Nazarko, a computer science student from London, created it with the goal of making an XBMC media center on the Raspberry Pi as simple as possible.
Raspbmc is a solid starting point with media centers because it’s packed with features that work without any effort on your part. Out of the box, you can stream music, use AirPlay, use a PVR (personal video recorder), and more. Likewise, pretty much all the add-ons work right away, so you don’t need to dig into a bunch of settings or download additional software.

AirPlay is an Apple software that enables your Raspberry Pi to receive a music signal from your home computer. With it, you can stream music from software like iTunes right to your Raspberry Pi–no cables necessary. It’s handy when your computer isn’t connected to your living room’s speakers. PVR stands for personal video recorder. It’s often the device you get with a cable package to record live video from your TV, but it’s also used in camcorders. With Raspbmc, you can access the video saved on your PVR so you don’t have to go through your cable box.
Raspbmc also comes with a bunch of other features that makes it great for beginners. Wi-Fi works out of the box, installation is easy on any platform, it automatically downloads new updates, and it can even be installed on a hard drive instead of an SD card if you want more storage.
Raspbmc is available from raspbmc.com.
OpenELEC
Whereas Raspbmc is packed full of features, OpenELEC strips them away. The goal of OpenELEC is speed, so it’s kept as simple as possible.
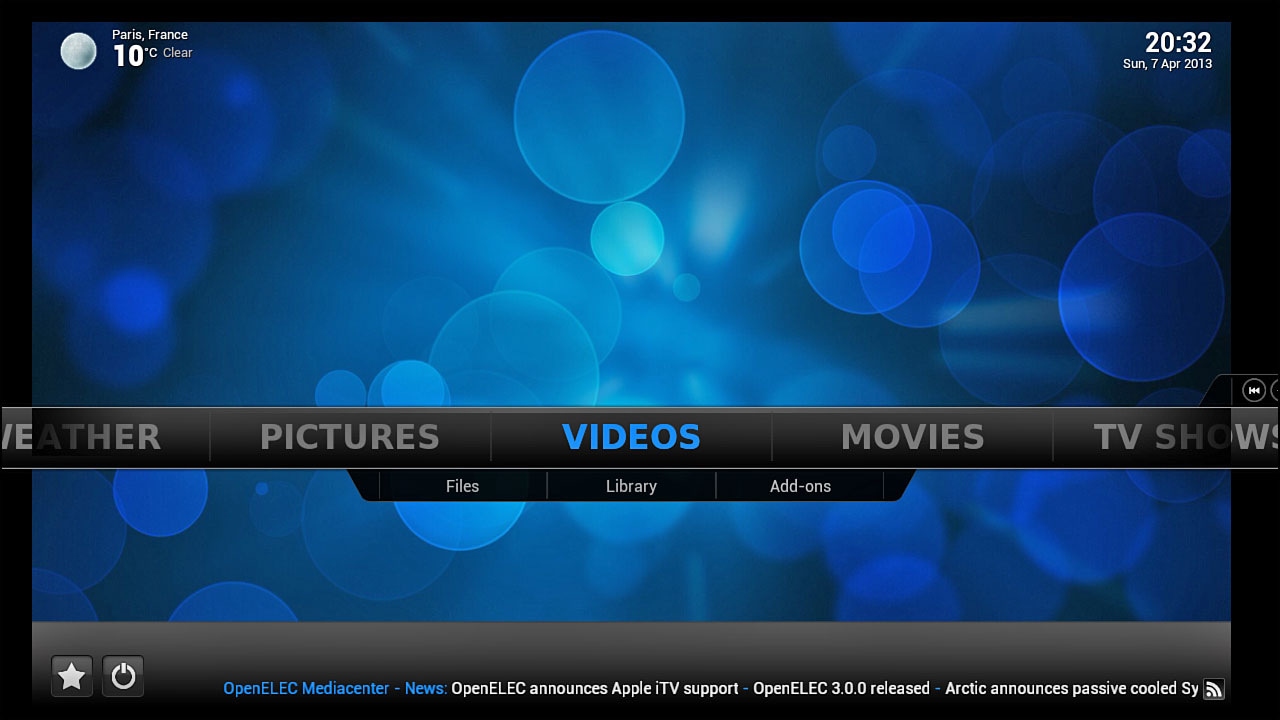
OpenELEC’s main screen is nearly identical to Raspbmc.
Unlike Raspbmc, OpenELEC isn’t built on top of a previously made Linux distribution. It’s just a media center, and it can’t do anything else. It’s still built around XBMC, but it doesn’t bother with the operating system beneath it.
OpenELEC was created to do one thing—be a blazing-fast media center. This means you’ll only be able to use your Raspberry Pi as a media center when your OpenELEC SD card is in. It also means installation and support is a little harder for beginner users because it’s not packed with every single driver for every single accessory. In many cases, you’ll have to go find drivers and plug-ins to get OpenELEC working how you want it to.
OpenELEC doesn’t do nearly as much hand-holding as Raspbmc. For the most part, you’re left to your own devices to get it installed and running. Once it is, you have to get all your accessories working, download the necessary plug-ins, and set up repositories on your own. It’s by no means an unachievable task, but it takes a lot more effort than if you were using Raspbmc.
OpenELEC is available from openelec.tv.
XBian
Raspbmc concentrates on ease-of-use, OpenELEC prioritizes simplicity, but XBian focuses on cutting-edge features.
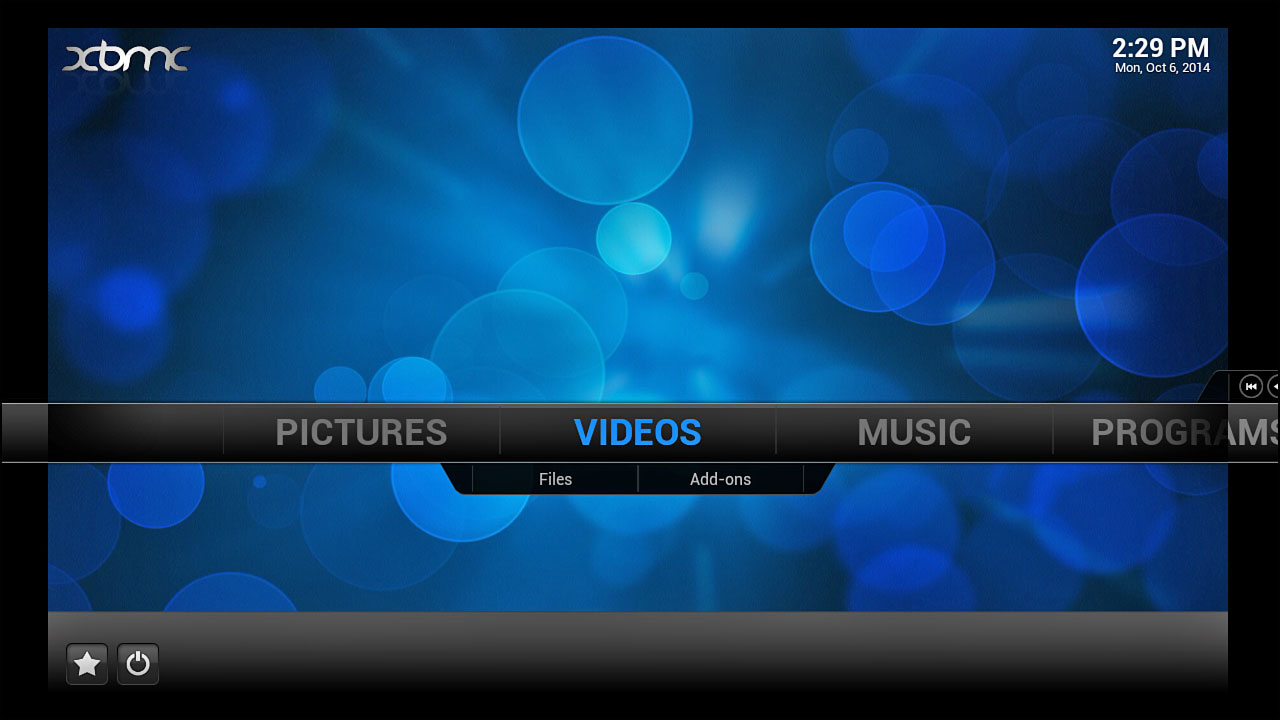
The XBian’s main title screen is similar to both Raspbmc and OpenElec.
Like Raspbmc, XBian is built on Raspbian and comes with most of the same packages and add-ons as Raspbmc. This makes it easy to set up and get running without a lot of technical skill. Also like Raspbmc, XBian does just about everything you need right from the start, including supporting Wi-Fi adapters, AirPlay, and more.
However, unlike Raspbmc, XBian still manages to be fast because it’s built on a more lightweight version of Debian than Raspbian. (Raspbian is based on Debian.) That makes XBian a little speedier than Raspbmc.
The key difference between Raspbmc and XBian is the media center software itself. XBian is all about the latest features. It’s essentially a testing ground for new features, updates, and software, and many times, you get new software and features with XBian before anyone else. It also means XBian is constantly being updated with new builds, so you often need to download software when you start it.

PI POINTER
Remember, all it takes to swap between different operating systems on the Raspberry Pi is a new SD card. So if you’re not really certain which media center software is right for you, give them all a try. It only takes a few minutes to format and load an SD card, and you can swap among several different ones quickly to find the one that’s right for you.
Sounds great, right? There’s a catch, though. With the up-to-the-minute features, you sometimes also get some bugs. Software sometimes won’t load properly, videos won’t stream cleanly, or in the worst case, you won’t be able to turn on your media center at all.
XBian is available from xbian.org.
Media Center Operating System Pros and Cons
Now that you’ve got a good overview of what each media center operating system does, let’s break it all down. The following table offers a pros and cons list to help you make the right choice.
| Operating System | Pros | Cons |
| Raspbmc | Good for beginners; includes all the software you need out of the box; easy to install; has lots of room to customize it however you like | Is slow; has a large installation size; has infrequent updates |
| OpenELEC | Incredibly fast; has a simple interface that’s easy to use; fully customizable | Is harder to set up; requires more work to download extra software; doesn’t include as much support for tweaking as Raspbmc does |
| XBian | Is fast; is very customizable; is easy to set up; cutting-edge new features are added all the time | Potentially has lots of bugs; is slightly more difficult to use than Raspbmc; Fixing bugs usually requires an expert |
In the end, the operating system you choose comes down to what you want from a media center. But for this book, let’s install Raspbmc. It’s the easiest to install, the best suited for new users, and gives a good overview of exactly what a media center can do.

SOFTWARE SOLUTION
If you have some extra time, it’s worth installing each of these operating systems and testing them out. You might be surprised by which one you end up preferring. Once you commit to one, it takes up a lot of time to set up a new one, so be sure you’re happy with your choice.
Installing Raspbmc
If you already installed Raspbian in Chapter 8, a lot of this section, in which you learn to install Raspbmc, will look familiar to you, as the process is almost identical.
However, the installation process for Windows is significantly easier than if you’re on a Mac.
Downloading and Installing Raspbmc
The process for downloading and installing Raspbmc is a bit different depending on what type of personal computer you’re using.
Windows:
Windows users get a very easy download and installation process with Raspbmc. You simply download a small installation program, and it downloads the latest release of Raspbmc and installs it onto your SD card. Here’s what you need to do:
- From your Windows computer, head to raspbmc.com/wiki/user/windows-installation and click the link at the top of the page to download the installer.
- When the installer is finished downloading, double-click the raspbmc-win32.zip file to unzip the setup file.
- Double-click the setup.exe file to open the Raspbmc setup utility.
- Insert your SD card into your computer, and click Refresh.
- Select your SD card in the Raspbmc Installer.
- Check the box marked I accept the license agreement.
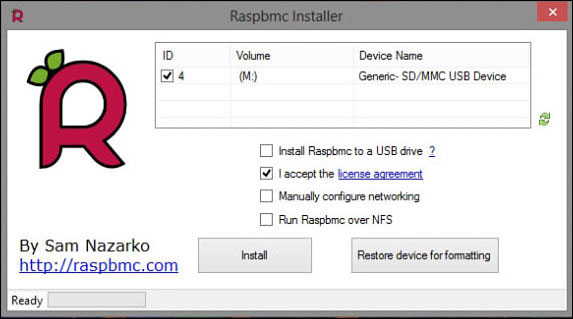
The Raspbmc installer for Windows makes setup easy.
- Click Install, and wait for Raspbmc to do its thing.
When it’s finished, eject your SD card and you’re ready to go.
Mac:
Raspbmc’s installation process is a little more difficult on the Mac, but it’s still pretty straightforward. Remember in Chapter 9 when we talked about how OS X uses a similar command line to Linux? You’ll be using that here as well.
- On your Mac, open Terminal by clicking Applications > Utilities > Terminal. You’re greeted with a command line interface much like the Raspberry Pi’s.
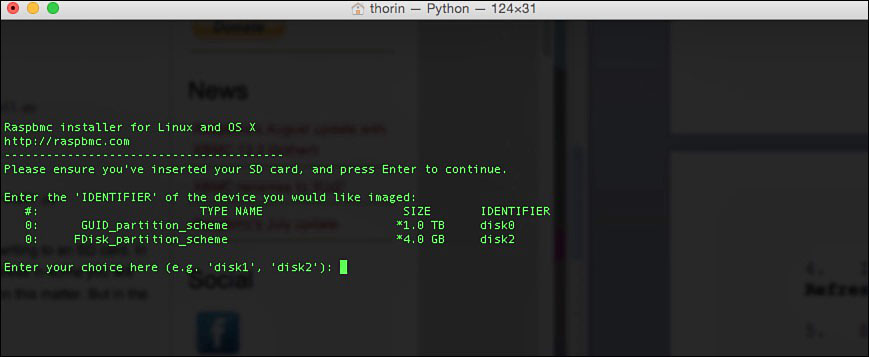
The Raspbmc installer on a Mac requires a few more steps.
- In Terminal, type in the following:
curl -O http://svn.stmlabs.com/svn/raspbmc/release/installers/python/install.py - When this finishes downloading, type in this:
chmod +x install.py - Insert your SD card.
- Type in this:
sudo python install.py - Enter your Mac’s password.
- You’ll now see a prompt asking you to select your SD card. If you have just an SD card inserted, you’ll likely see two options. One of them is your hard drive, and the other is your SD card. Your hard drive is likely much larger and listed as disk0. The SD card should display the same size as what’s listed on the SD card and likely is identified as disk2. Type in your SD card as your choice.

PI POINTER
Be very, very careful not to type in your hard drive in step 7. If you select the wrong drive, you’ll erase everything on your Mac’s hard drive.
- Type in
Y, and press Enter when prompted. - Wait for the download to complete.
- When prompted Would you like to set up your post-installation settings, type
N, and press Enter.
When the process is complete, eject your SD card.
The First Run
Now, insert your SD card into your Raspberry Pi, plug in your keyboard and TV, and connect the power cord. Now it’s time to run through Raspbmc’s first run process.
When you first start up Raspbmc, it’ll run some processes in the background and reboot a couple times. This is normal, so let it do what it needs to do. Eventually, you’ll be greeted with the Raspbmc main screen.

PI POINTER
When you first start Raspbmc, it’ll take a little while because it needs to download extra software, unpack some files, and do some general maintenance. It shouldn’t take longer than 5 to 10 minutes, but give yourself some time and walk away while it does its thing.
When it launches, use your keyboard’s arrow keys to select the language you prefer.
Now it’s time to get your network set up:
- Use your keyboard’s arrow keys to navigate to Programs > Raspbmc Settings, and tap the Enter key.
- Use the arrow keys to navigate to the Network Mode section. If you’re wired, leave it how it is. If you’re wireless, tap Enter until Wireless (WIFI) Network is selected. If you’re wired, you’re done with the process. If you’re on wireless, continue to the next step.
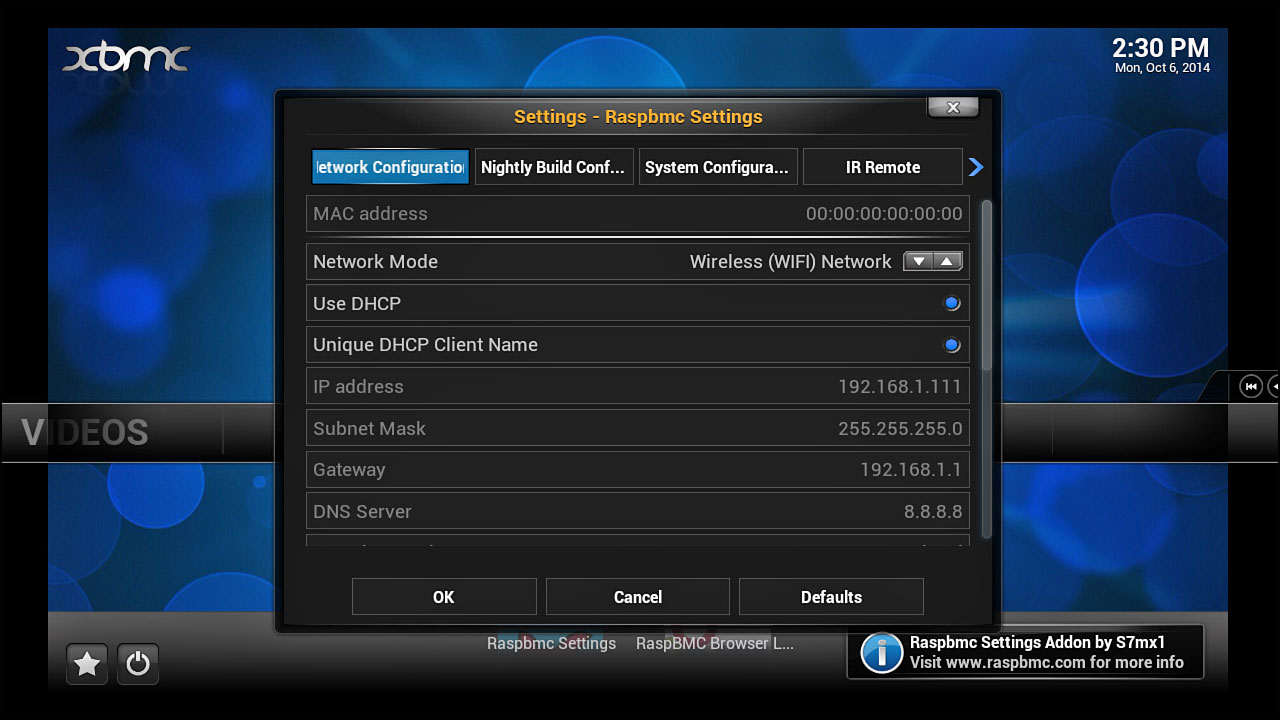
On the first run, you’ll set and change some settings in Raspbmc.
- Scroll down to Scan Networks, and tap Enter. Select your wireless router’s name from the list that comes up, and press Enter.
- Scroll down to the WIFI Key, and tap Enter. Enter your router’s password, and tap Enter again.
That’s it. Your Raspbmc media center should now be connected to the internet.
Raspbmc works out of the box, but you’ll need to do a few little things to get everything working properly on your network. You’ll also need to configure a few basic settings so Raspbmc looks and operates properly.
Adjusting Resolution
There’s a good chance that your first boot of Raspbmc has some display problems. If you can’t see the whole screen or the resolution seems wrong, you can adjust both very easily.
- Scroll over to System.
- Select Settings.
- Scroll down to System.
- Select Video output, and press the right arrow key.
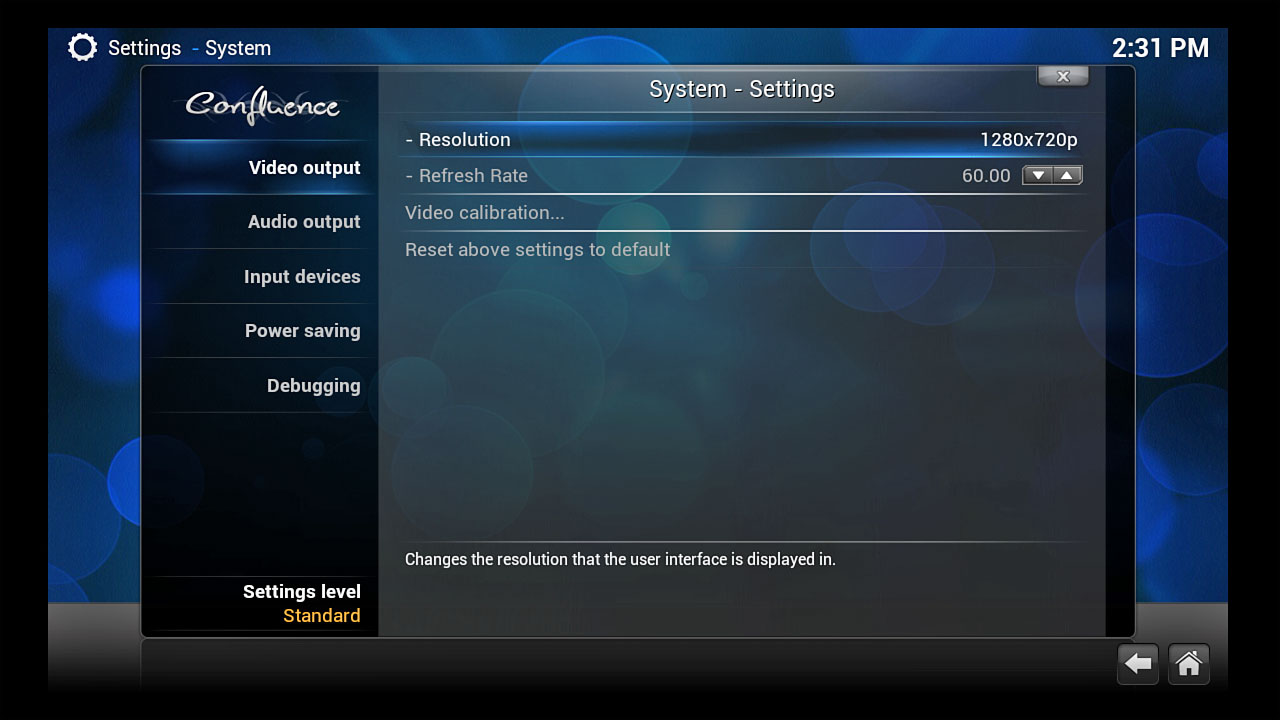
You can customize the video output, audio output, and more.
- Select Resolution, and press Enter.
- Then choose your monitor’s resolution. If you’re not sure, 1280×720p is the best resolution for HD monitors and TVs. Tap Enter when you’ve made your choice.
- Scroll down to Video calibration…, and press Enter.
- Use the arrow keys to adjust your screen so the square in the top-left corner is visible. Then press Enter.
- Use the arrow keys to adjust your screen so the square in the bottom-right corner of the screen is visible. Press Enter.
- Move the arrow keys so the blue line on the bottom of the screen is visible. Press Enter.
- Use your arrow keys to adjust the rectangle until it’s square. Press Enter.
- Press Esc to get back to the main settings screen.
Now you should be able to see the whole screen much better in Raspbmc.
Setting Up Local Network Playback Options
Now you need to be sure your Raspberry Pi can access any servers you’re running in your home—your local network.
- Head to the Systems tab, and press Enter.
- Head to Settings, and press Enter.
- Scroll down to Services, and press Enter.
- Scroll down to AirPlay, and press the right arrow key.
- Navigate to Allow XBMC to receive AirPlay content, and press the space bar.
- Press the left arrow key.
- Navigate to UPnP, and press the right arrow key.
- Highlight Allow control of XBMC via UpnP.
Now you’ll be able to access videos and music streamed from other devices on your local network.
If you prefer to play videos directly on your Raspberry Pi, you can plug in an external hard drive or USB flash drive with your favorite videos on it. Raspbmc will recognize the videos right away. Just select the Videos tab and then Files.
The Risks and Rewards of Overclocking
The Raspberry Pi supports overclocking, which is a fancy way of saying it can go a little faster than the 700MHz speed the processor is made to run. Essentially, overclocking means you’re pushing your Raspberry Pi’s processor a little harder than usual so programs can run faster.
The good news is that overclocking is officially supported, so you don’t need to worry about voiding your warranty.
That said, doing so does come with some caveats.

DEFINITION
Overclocking refers to making your CPU work harder than it’s supposed to. The Raspberry Pi has a 700MHz processor, but you can overclock it up to 900MHz for speed increases. You can overclock your Raspberry Pi with any operating system, including Raspbian. It’s not as useful there as it is with Raspbmc, but you might see some benefits with it enabled. Just head to the raspi-config screen and select Overclocking, and you should notice some speed increases.
When you overclock your Raspberry Pi, you force the processor to work overtime. This makes the device hotter, which can cause problems if you’re running it for too long. Generally, the Raspberry Pi will crash if you’re running it overclocked too high, but it could potentially burn the board as well. So it’s best to only overclock when you really need it.
You’ll see some benefits with overclocking in Raspbmc. The Raspberry Pi isn’t that fast, so overclocking can make it a bit more useable and quick to open videos.
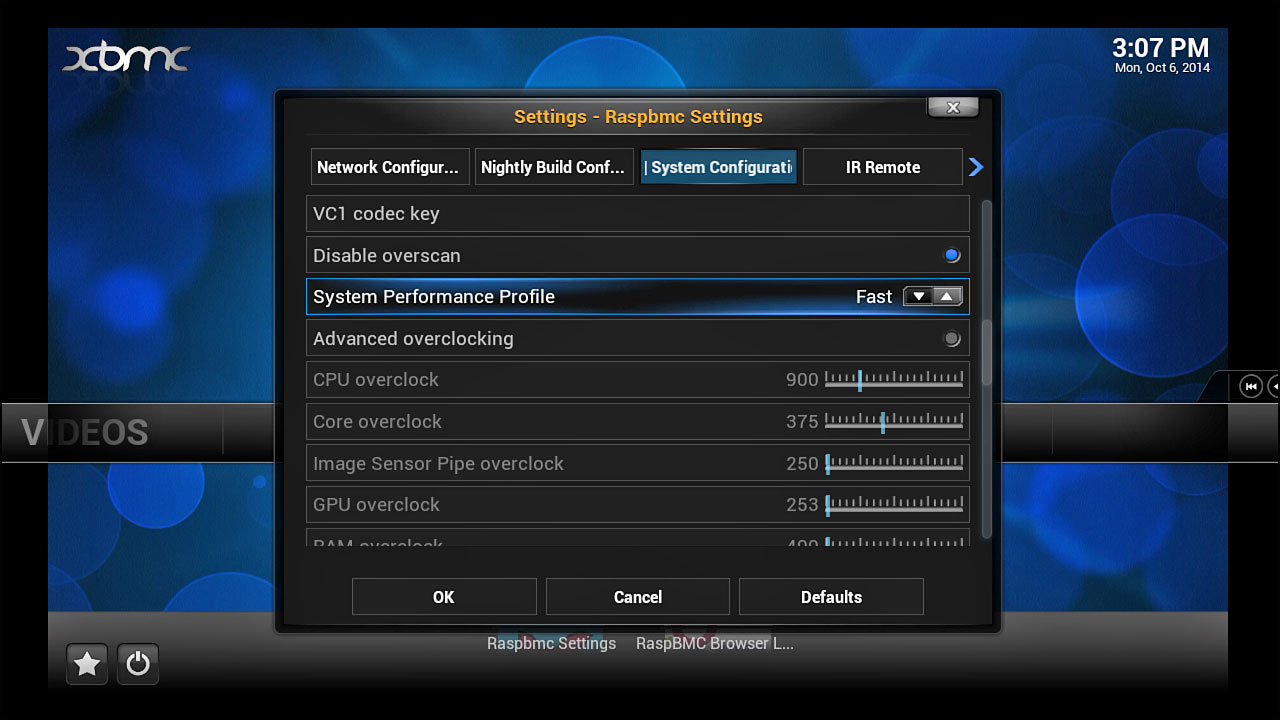
There’s a nice in-between so you can just overclock it a little. Here’s how to do it:
- Head to the Programs tab.
- Select Raspbmc Settings.
- Select System Configuration from the top menu.
- Scroll down until you get to System Performance Profile.
- Press Enter until it reads Fast.
Overclocking is a nice option, but be sure not to overdo it.
- Scroll down to the OK button, and press Enter.
- When it asks you to restart, select Yes.
This overclocks your Raspberry Pi just a little bit, but it’s a noticeable difference. It’s safe, too, so you shouldn’t have to worry about your Raspberry Pi overheating at all.
When you’re finished with overclock mode, follow these steps to turn it off again.
XBMC Add-Ons and Repositories
You’ve likely already noticed that Raspbmc is pretty empty when you first load it up. Don’t worry. What makes Raspbmc (or any XBMC) special is the add-ons. With add-ons, you can access video content from all over the web.
Browsing the Add-On Repositories
Add-ons are installed from repositories, just like other Linux software. By default, by downloading and installing Raspbmc, you have access to the main add-on directory from XBMC. This should be plenty to get you started with.
Here’s how to browse the available add-ons:
- Head to the Videos tab.
- Select Add-ons, and press Enter.
- Scroll down to Get more…, and press Enter.
Now, you’ll find a massive list of all the available add-ons for your Raspbmc.
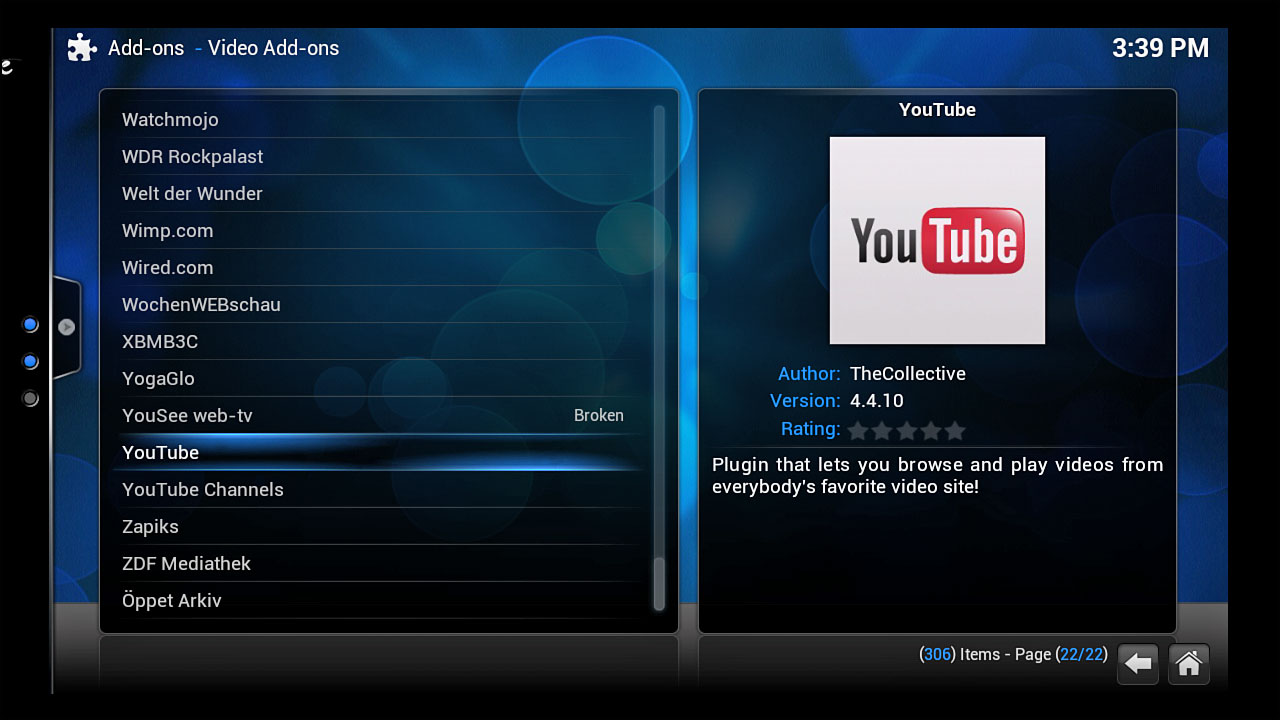
Raspbmc links to a large selection of add-ons.
Installing Add-Ons
When you’ve found an add-on you want to install, you need to take a few steps to get it loaded into Raspbmc.
Here’s how:
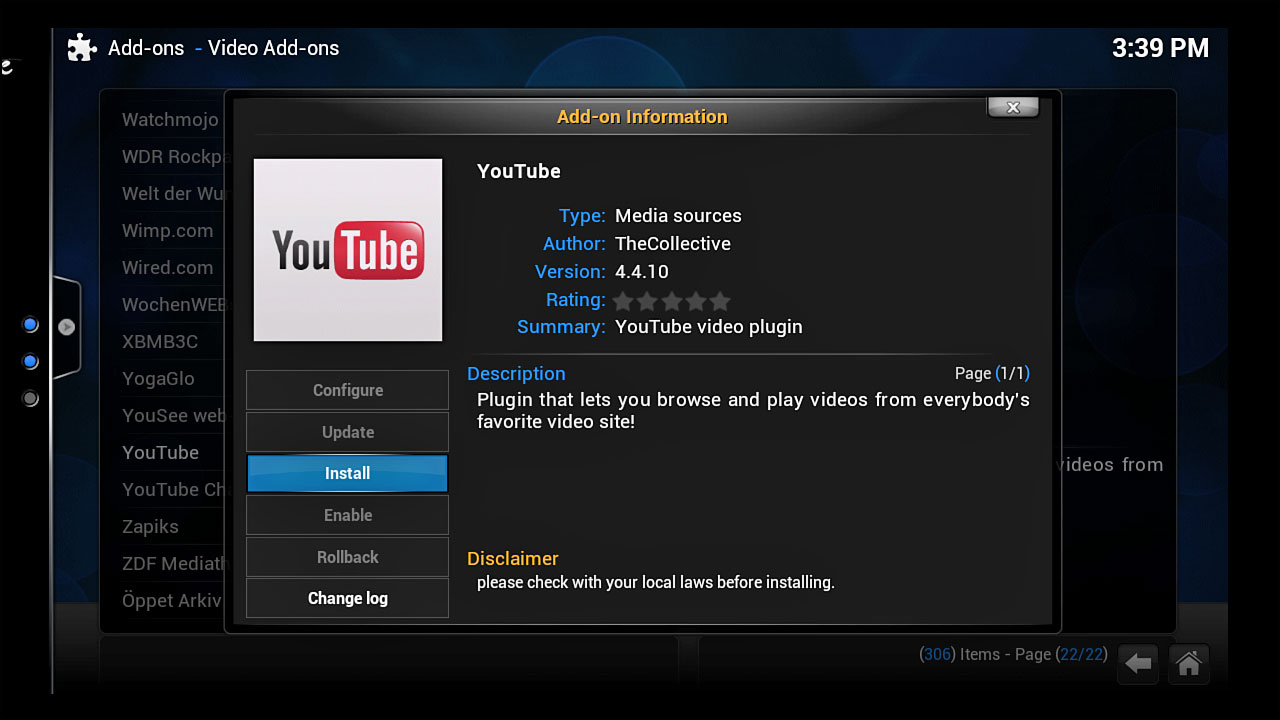
- Highlight the add-on you want to install, and press Enter.
- When the next screen comes up, highlight Install, and press Enter.
Raspbmc makes installing add-ons easy.
- Wait for it to download.
- To open an add-on, navigate to Videos and select Add-ons.
- You’re shown a list of the add-ons you have installed. Select the one you want to launch, and press Enter.
That’s it. Now you’ve installed an add-on and you’re able to check any video you want inside of it. The same works for both image and audio add-ons, so feel free to find some cool media to entertain yourself with.

SOFTWARE SOLUTION
Similar to Linux, XBMC has a lot of different repositories in addition to the default one built into Raspbmc. Unfortunately, these repositories don’t always contain add-ons that are guaranteed to work with the Raspberry Pi. If you don’t find an add-on you like, search online to see if someone’s made one in a private repository. You can then add that repository to Raspbmc and give the add-on a try.
The number of add-ons available for Raspbmc is a bit overwhelming. To help you wade through them all and find some useful ones, here are a few of the most popular:
TV channels: Many TV channels upload videos to their websites, and lots of those are available in Raspbmc. Popular options include CBS News, Discovery Channel, ESPN, FOX News, Food Network, and PBS. You’ll also find video streams of specific shows like South Park, The Daily Show, and The Colbert Report.
YouTube: YouTube gets a special nod here because it’s the biggest repository of free videos online. Once you install the YouTube add-on, you have access to every single YouTube video available, right from your Raspberry Pi.
Web series: It’s not just about broadcast shows from big name producers; your Raspbmc also is a great place to watch shows from your favorite web series. Popular options include College Humor, Funny or Die, G4, Geek and Sundry, Giant Bomb, How Stuff Works, TED Talks, The Onion, and more.
Play around with different channels, look through the available lists, and find some stuff you like. You might be surprised at how much video content is available online for free.
Remote Controls
If you don’t want to deal with using your keyboard and mouse with Raspbmc, you can set up a remote to use instead.
Even better, you can use your smartphone as a remote so you don’t need to buy anything new.
Raspbmc-Supported Remotes
Raspbmc supports a handful of remotes out of the box:
- Xbox DVD playback remote
- ATI/X10 remote
- CyberLink 0766:02404 remote
- MCE remote
- Hama remote
Most of these remotes come with a small USB receiver. Just plug the receiver into the Raspberry Pi’s USB port, and the remote should work right away.
If you don’t want to purchase a remote control, you can use your smartphone as a remote control very easily. Let’s look at how to do it.
First, you’ll need to download the remote control app for your smartphone:
- On an iPhone, open the App Store. On an Android phone, open the Play Store.
- Search for Official XBMC Remote.
- Download and install the free application.
With the application downloaded to your smartphone, it’s time to get Raspbmc in order.
- In Raspbmc, navigate to the System tab and select Summary information.
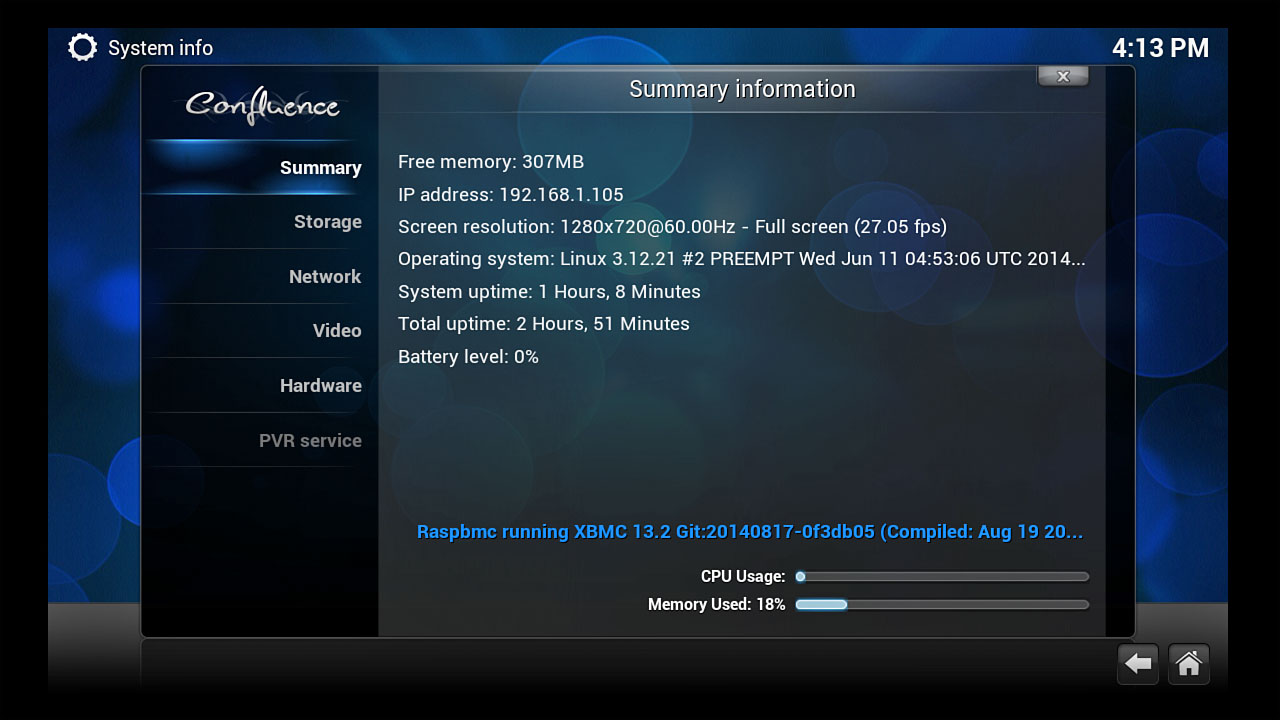
The Summary information screen gives you lots of details.
- Under Summary, you’ll see IP address. Make a note of that number. It should start with 192.168.1.xxx.
- Press Esc to head back to the main menu.
- Select Settings under the System tab.
- Navigate to Services, and press Enter.
- Select Webserver, and press the right arrow key.
- Be sure Allow control of XBMC via HTTP is checked. If not, press Enter.
- Make a note of the Port.
- On your smartphone, open the XBMC Remote application you downloaded.
- Tap the Add Host option.
- In the description field, type
Raspberry Pi. - In the host section, type in the number you wrote down in step 2.
- In the next text field, type in the port number you recorded in step 8.
- Tap Save.
- Your Raspberry Pi should now be listed on your phone’s home screen or a subsequent screen. Tap it to connect your smartphone to your Raspberry Pi.

PI POINTER
If you don’t have a smartphone, you can use your personal computer as a remote. In your computer’s web browser, type your Raspberry Pi’s URL, a colon, and the port number to access the remote screen. It should read something like 192.168.1.105:80.
Now you can control Raspbmc right from your smartphone or tablet—no keyboard required. You can use the navigation buttons on your phone to move around Raspbmc and pull up movies and TV shows you already have loaded on the Raspberry Pi using the menu button in the top-left corner.
The Least You Need to Know
- Raspbmc is an operating system based on Debian, the same Linux distribution upon which Raspbian is based.
- Once you’ve set up Raspbmc, you can stream movies from online resources or store movies locally on your Raspberry Pi to play.
- The Raspberry Pi isn’t super powerful, but it can handle most video formats.
- You can overclock your Raspberry Pi to get a little more speed out of it.
- You can use your smartphone or tablet as a remote control so you don’t have to buy extra equipment (unless you want it!).
