Setting Up a Personal VPN
In This Chapter

- Why a VPN is worth having
- Making your local network VPN friendly
- Transforming your Raspberry Pi into a VPN
- Remote VPN control
Unless you’re really involved in the tech industry, you probably don’t know what a VPN, or virtual private network, is or what it does—nor why you’d want to make one with your Raspberry Pi. VPNs are an easy way to protect yourself and your data online, so it’s worth looking into. When you connect to a VPN, it secures your internet connection so nobody can spy on what you’re doing. With hacks on bank accounts and public cloud storage becoming more common, a VPN is a simple solution to the problem.
VPNs can help you secure your data no matter where you are. You can connect to it from your phone or computer from inside your house or when you’re away from it. This is great when you’re not home and using public Wi-Fi somewhere like a coffee shop. Connecting to a VPN means no one else can spy on what you’re doing.
A VPN also adds encryption to your data so even if someone somehow does get a hold of your information, they can’t do anything with it. It’s essentially a beefed-up security measure that makes all your online dealings a lot more secure without much effort on your part.

A virtual private network (VPN) acts as a security measure between your computer and the internet. It ensures all data sent through it is encrypted so nobody can steal it. As the name suggests, it’s not a physical network; rather, it’s created using software on a computer. In this case, that’s the Raspberry Pi. Encryption is a means of encoding data so only authorized parties can understand it.
The installation process for OpenVPN—the software you use to create a VPN—takes a bit of effort because it’s not just about setting up your Raspberry Pi. You also need to configure the VPN itself.
This might all sound overwhelming at first, but let’s break down the steps you’ll take to make it a little less intimidating:
- Configure your home network for VPN: You need to set up your home network so it can easily find your Raspberry Pi.
- Configure your Raspberry Pi for internet access: The whole point of a VPN is accessibility anywhere, so you need to give your Raspberry Pi an address where you can access it via the internet.
- Install OpenVPN: The installation process is just a few lines you’ll type into the command line and then you’ll get some special security keys.
- Set up your Windows or Mac computer: You’ll install some software on your personal computer and then set up those security keys.
Really, that’s all there is to it. The process takes a good amount of time, but it’s not necessarily difficult. You should be pretty familiar with your Raspberry Pi at this point, but be sure you’re comfortable with the command line before you start this project. When you’ve got everything set up, you’ll be able to use your VPN safely and securely from anywhere in the world.
In this chapter, I walk you through the specifics of what a VPN is, why you’d use it, and how it helps your security.

PI POINTER
You need Raspbian installed on your Raspberry Pi before you can start this process. If you need to, check back to Chapter 8 for instructions on getting Raspbian up and running.
A VPN is a group of computers linked together via the internet. Typically, a business uses a VPN to connect data centers, and individuals can then use those VPNs to access that network, even if they’re not physically on-site. VPNs are essentially virtual tunnels that connect remote computers. VPNs also encrypt any communication that passes over them, so they’re often used when a company wants to keep its data private. Everyday internet users can benefit from this encryption, too.
Typically, you launch a VPN client such as OpenVPN on your computer, log in, and wait while your computer exchanges some information with the server. After both computers verify each other, all the communication that goes through the VPN is encrypted and secured so no one can eavesdrop.
Physically, a VPN can be any computer as long as it’s running special software. This is exactly why the Raspberry Pi is perfect as a VPN. You can keep it connected all the time so you can access it from anywhere; it’s tiny so it doesn’t get in the way; and because it’s not on your primary computer, you don’t have to worry about hogging resources. In addition, it’s optional. You can use it when you need security, like when you’re looking at your bank statements via the coffee shop Wi-Fi, but skip it when you don’t need it.
Because VPNs secure and encrypt your data, they tend to slow down your internet connection speed. For most web browsing, it’s usually not very noticeable, but you’ll likely notice a slowdown enough to make it annoying when you’re just trying to watch Netflix, for example. In such cases, it’s usually best to ignore the VPN and only use it when you’re sending private data.
Security and Encryption
Generally, when you connect to the internet, your computer links directly to a website and the data transferred between the two is sent in an easily readable plain text format. With a VPN, your computer goes through the VPN, where your information is encrypted and made anonymous before your computer connects to a website. The same process works in reverse, so all data you request from a site is encrypted before it reaches your computer.

PI POINTER
As more and more online retailers are hacked, security is becoming increasing important for all of us. A VPN gives you the peace of mind to browse whatever you want, wherever you are because it makes your connection secure. If you often use coffee shop Wi-Fi or you’re an international traveler, this is very helpful.
A VPN can do this through a variety of different security protocols, but here are the most popular methods:
Point-to-Point Tunneling Protocol (PPTP): PPTP creates a tunnel between computers so they can easily connect to each other. This data is private, but it’s not encrypted. PPTP has been around for a long time, but due to its lack of encryption, it’s not used much anymore.
Layer 2 Tunneling Protocol (L2TP) and Internet Protocol Security (IPsec): Alone, L2TP works similar to PPTP, but combined with IPsec, it benefits from encryption. IPsec encrypts data, secures a data channel, and checks the data to ensure it’s never compromised.
Secure Sockets Layer (SSL): This is the same type of security you get when you log on to your bank’s website or any other site that starts with https. SSL essentially creates a secure connection between two computers so the data sent between them is encrypted instead of being sent as plain text.
Secure Shell (SSH): SSH creates both the VPN tunnel between two computers and the encryption that protects that data. The data itself is never encrypted, but the tunnel through which it travels is.
Basically, a VPN modifies the data that goes through it so your internet service provider, hackers, or even the government can’t tell what it is.
Why Use a VPN?
You might be thinking that this type of security is overkill for you. But VPNs are important for every internet user.
VPNs are useful for students and remote workers who need to access their school or employer network remotely. (In such cases, the school or business probably already has a VPN set up, but it’s still good to know how they work.) If you work on public Wi-Fi a lot, VPNs are an easy way to secure everything you do on those networks. It’s surprisingly easy for a hacker to grab your data when you’re somewhere like a coffee shop, so using the extra layer of security is essential.
If you’re in a country that has a lot of government-enforced restrictions on internet access, a VPN enables you to get around those restrictions. Not only can VPNs encrypt and secure your data, they also can spoof your location so it looks like you’re accessing the internet from another place.
VPNs are important for securing your private data—everything from your passwords to your bank account info–when you’re online. There’s really no harm in setting one up, especially if you’re trying to find a good use for your Raspberry Pi.
OpenVPN, the VPN client you’ll use for this project, is free and open source. It’s also compatible with a lot of different operating systems.
OpenVPN uses the SSL security protocol. This makes it highly secure but still pretty easy to use. The encryption is handled by OpenSSL, another bit of open-source software. The end result is a free, easy-to-use, DIY security solution.
I call for OpenVPN on your Raspberry Pi for a number of reasons. First, it’s very secure. Second, it’s easy to set up. Third, it’s likely always going to be free. Other Raspberry Pi VPNs have gone to a pay model that includes subscriptions. OpenVPN will likely always be free as long as you’re the one doing the installation. You learn exactly how to do that in this chapter.
OpenVPN is also widely supported across several operating systems. You won’t have any trouble bringing up OpenVPN on your Windows computer, Mac machine, or even your smartphone.

SOFTWARE SOLUTION
You might be noticing an open-source software theme. The Raspberry Pi itself is open source, as is its operating system and much of the software it runs is open source. This is ideal for the Raspberry Pi enthusiast, because it means you can load your device with all the software you need for free.
James Yonan conceived OpenVPN while he was traveling internationally and noticed that logging in to computers remotely was difficult in countries where there were security concerns. So he decided to create a VPN solution that was both secure and easy to use. As a result, OpenVPN was born in 2001.
The name OpenVPN is also a nod to OpenSSL and meant as a clear indication that this is free and open-source software. It might seem that making the software open source is a bad idea with security, but it’s actually helped strengthen it and make the security stronger. With more eyes on the OpenVPN source code, more people understand how it works, and subsequently more people can find potential bugs and security flaws.
OpenVPN was initially made for Linux, and without the support of the Linux community, it would have had a much harder time gaining ground. Now, OpenVPN is one of the most popular VPN solutions around and has an active group of people talking about it.
Before you can install and set up OpenVPN, you need to get your home network and Raspberry Pi ready for it. To do that, you need to log in to your home router and adjust some settings.
If you’ve never logged into your home router before, this might seem intimidating. But it’s not as difficult as you might think, and you only need to poke around in a few settings to get everything working.
Changing Your Home Network for a VPN
To access your Raspberry Pi remotely, you need to be able to access your home network from anywhere. This means connecting your Raspberry Pi to the internet at large, making your Raspberry Pi a server that’s accessible just like any other website you might visit.
To do this, you need to set up your Raspberry Pi with a static IP address. This gives your Raspberry Pi a set place on your home network. You also need to assign your Raspberry Pi a DNS address so it’s accessible over the internet. Essentially, you’re going to open your Raspberry Pi to the internet at large, but you’ll do so in a way that only you have access to it.

DEFINITION
A static IP address is a set spot where your Raspberry Pi is always located, no matter how many times you reboot. Your router assigns each device on your network a number when it logs into it. This is usually done automatically based on when you turn on each device. So if you power on your computer first in the morning, it’s number 2 (the router’s 1), your phone is 3, and so on. This can be a bit random, so it’s best to give your Raspberry Pi a set, or static, address so you can always find it without looking up the number. A DNS (domain name server) address is basically the internet’s phone book. To get to a website, you type in a name, but behind that name is a series of numbers, much like your IP address.
Logging in to Your Home Router
First, you need to log in to your home router. This process is a little different on every router, but I’ll try to provide a general-enough outline on how to do this so you’ll be able to make it work with your particular router.
To log in to your router, you’ll need to determine your router’s IP address. This is usually something like 192.168.X.X or 10.0.X.X. When you’ve figured out your router’s IP address, you can access it from your computer’s web browser.
But first you need to figure out the address. Here’s how:
Windows:
It takes a bit of effort to track down your router’s IP address in Windows. You’ll be using the command line:
- Open the Windows Command Window. Click Start > Run, and type
cmd. Press Enter. - Type
ipconfiginto the command line, and press Enter. - Look for Default Gateway in the displayed results. This is your router’s IP address.
- Type that address into your computer’s web browser to load your router’s login page.
When you get to the login page, type the username and password for your router.

PI POINTER
If you’ve never logged in to your router before (on either a Windows PC or a Mac), consult the manual that came with your router for your username and password.
Mac:
Determining your IP address on a Mac is very easy. You’ll just make a single click of the mouse:
- When you’re connected to your router’s Wi-Fi, tap the Option key on your keyboard and right-click the Wi-Fi symbol in your Mac’s top menu bar.
- Look for the IP Address: address. Type that number into your computer’s web browser to get to the login page.
When you get to the login page, type your username and password for your router.
 Assigning Your Raspberry Pi a Static Internal IP Address
Now that you’re logged in to your router, let’s give your Raspberry Pi a static internal IP address where it will be accessible anytime you need it. Typically, when your Raspberry Pi logs into your router, it takes whatever number is available. Assigning it a static IP address means it’s always at the same address, login after login.
You’ll do this from the command line on your Raspberry Pi. Be sure your Raspberry Pi is connected to the internet, and open the command line in LXTerminal or Raspbian:
- Type
ifconfig, and press Enter. - Look for the section titled eth0 if you’re connected to Ethernet or wlan0 if you’re connected to Wi-Fi.
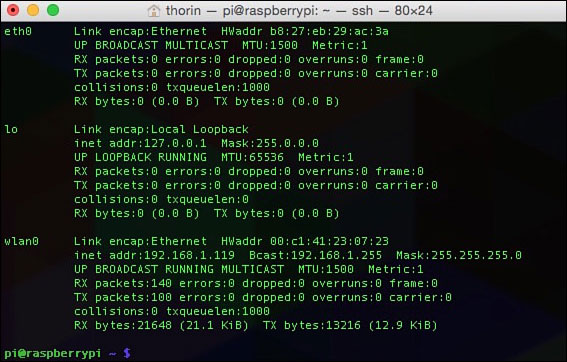
The
ifconfigmenu shows you a ton of information about your Wi-Fi network. - Write down the numbers listed after inet addr (you’ll use this for the “address” section in step 8), Bcast (for the “broadcast” section in step 8), and Mask (for the “netmask” section in step 8).
- Type in
netstat -nr, and press Enter. - Write down the numbers listed under Gateway Address (for the “gateway” section in step 8) and Destination Address (for the “network” section in step 8).
- Type in
sudo nano /etc/network/interfaces, and press Enter. - Look for the line that reads iface eth0 inet dhcp, and edit it to iface eth0 inet static.
- Right below that line, type in the following, substituting the numbers you wrote down in steps 3 and 5 for the X’s:
address xxx.xxx.x.xx
netmask xxx.xxx.xxx.x
network xxx.xxx.x.xx
broadcast xxx.xxx.x.xx
gateway xxx.xxx.x.xx - Press Ctrl+X to exit and save your changes.
Now, your Raspberry Pi has a static IP address and will always be accessible at the same place.

PI POINTER
Be very careful when writing down all the information in this exercise. Even one wrong number can make the whole system not work. Type data into the command line carefully, too. Take your time and double-check your work throughout so you don’t have to troubleshoot later. For longer sections of information you need to type in (5 lines or more), such as that in step 8, you can log on to idiotsguides.com/raspberrypi and copy and paste.
Assigning Your Raspberry Pi a Static External IP Address via Dynamic DNS
After your Raspberry Pi has a static internal IP address, you need to set it up with a static external IP address as well. You’ll do this through a service called dynamic DNS.

DEFINITION
Dynamic DNS simply means a DNS name is automatically updated even when the number behind it changes. This is helpful for your server because your ISP will change your address from time to time. Dynamic DNS ensures you can still find it, even when it changes.
Giving your Raspberry Pi an external IP address through dynamic DNS makes it accessible from the internet. This enables you to access your Raspberry Pi from anywhere in the world you have an internet connection.
You have a lot of options for getting a dynamic DNS address, but for this lesson, let’s use DNSdynamic (dnsdynamic.org).
Here’s what to do:
- Head to dnsdynamic.org.
- Check for a domain availability by typing a domain name you’d like to assign to your Raspberry Pi in the check availability box. You can use whatever you want here. Follow the instructions, and you’ll get a host service that reads something like myraspberrypi.dnsdynamic.com. You’ll also get some more configuration settings. Hold on to these for step 7.
- Head back to your Raspberry Pi, and open the command line.
- Type in
sudo apt-get install ddclient, and press Enter. This installs the dynamic DNS client. Wait for it to download and install. - When it’s finished, it will run automatically. Select the DNS server you picked, or select Other if you’re using DNSdynamic.
- Enter the address of the DNS server you registered in step 2.
- Now you need to edit the file to include your information. Type in
sudo nano /etc/ddclient/ddclient.conf, and press Enter. Write in all the information you gathered in step 2. - Finally, add one more line to the top of the file that reads
daemon=600. This tells your internet service provider to check the address every 600 seconds, or 10 minutes. - Press Ctrl+X to save and exit the project.
- Now type in
ddclient. This launches the dynamic DNS client so your Raspberry Pi is accessible online.
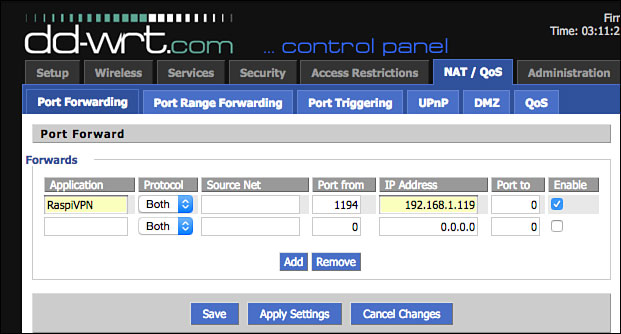
Before you can get to it, you’ll need to configure your router to allow access from the internet. Assuming you’re still logged into your router, here’s what you need to do:
- Look for a tab or setting that reads NAT /QoS, and click it.
- Find the Port Forwarding tab, and click it.
- Typically, you’ll need to click an Add button to add a new port forwarding address.
- In the boxes, enter your Raspberry Pi’s static IP address under address and 1194 under port. Save it, and exit your router.
Configuring your router to allow external internet access takes just a few steps.
Your Raspberry Pi is now accessible via the internet.

PI POINTER
Remember, all routers are a little different, so if you can’t find your router’s port forwarding section, refer to your owner’s manual.
Other Dynamic DNS Options
DNSdynamic isn’t your only choice for getting a dynamic DNS address. Here are a few other suggestions if you’d like to try something different:
- Duck DNS (duckdns.org)
- DtDNS (dtdns.com)
- No-IP (noip.com)
- YDNS (ydns.eu)
- FreeDNS (freedns.afraid.org)
All these options are free and will do the job, so you can choose any one you like. Remember to make a note of the address you get from the dynamic DNS server though. You’ll need it later.
Preparing Your Raspberry Pi for OpenVPN
Before you can set up OpenVPN, you need to make a few changes on your Raspberry Pi. In this section, I show you how to install Raspbian, secure your Raspberry Pi with a better password, enable SSH so you can access your Raspberry Pi from your home computer, and set up a remote connection on your computer.
Installing Raspbian
OpenVPN can work on any version of Linux, but Raspbian’s your best option. If you haven’t done so already, refer to Chapter 8 for the full guide to installing Raspbian.
You can use an existing SD card upon which you have Raspbian installed.
Changing Your Default Password
If you didn’t change your password when you set up Raspbian, you need to do it now. By the end of this project, your Raspberry Pi will be accessible from the internet and will be used for sending encrypting data. The last thing you want to do is keep the default password.
Here’s what to do:
- From the command line in Raspbian or LXTerminal, type
raspi-config, and press Enter. - Scroll down to Change password for ‘pi’ user, and press Enter. Then type in a new password.
Don’t exit out of raspi-config just yet. You’ve got one more setting to change.
Installing SSH for Remote Connectivity
Now you need to set up SSH on your Raspberry Pi. This enables you to remotely connect to your Raspberry Pi from your home computer.
Here’s how:
- In raspi-config, scroll down to Enable or Disable SSH Server, and press Enter.
- Turn the setting to On.
- Exit raspi-config.
Now, SSH is on and you have a solid new password. It’s time to connect to your Raspberry Pi remotely from your home computer.

DEFINITION
SSH stands for Secure Shell. It’s a network protocol made for secure data communication over the command line. In this case, it’s a way for you to log in to your Raspberry Pi’s command line from your home computer.
Connecting to Your Raspberry Pi Remotely
Your next step is to remotely connect to your Raspberry Pi from your Windows or Mac computer. This is one of the coolest things you can do with SSH.
When you’re connected, you can easily transfer files between your computer and your Raspberry Pi, and you even can access the command line from your home computer. You don’t even have to connect your Raspberry Pi to a monitor if you don’t want to.

The remote SSH screen looks just like your Raspberry Pi’s command line.
Earlier in this chapter, you gave your Raspberry Pi a static IP address. With it, you can SSH into your Raspberry Pi at the same address every time. You’ll do this differently on a Windows PC than you will on a Mac.
Windows:
On Windows, you’ll need to download some software before you can SSH into your Raspberry Pi.
Here’s what to do:
- Head to www.chiark.greenend.org.uk/~sgtatham/putty/download.html and download PuTTY.
- When the file has downloaded, open putty.exe.
- Enter your Raspberry Pi’s IP address under Host Name.
- Tap Enter to open a command line.
- Enter your Raspberry Pi’s username and password and press Enter.
Now, you’re connected to your Raspberry Pi on your Windows PC. You can control your Raspberry Pi just like you would if you were in front of the device itself.
Mac:
If you own a Mac, you already have SSH built in to your computer, and you can access your Raspberry Pi using the Terminal app. Here’s how:
- Launch Terminal on your Mac from Applications > Utilities > Terminal.
- Type in
ssh pi@yourIPaddress. Replace yourIPaddress with the static IP address you assigned your Raspberry Pi earlier. For example, ssh pi@192.168.1.105. - When prompted for the password on your Raspberry Pi, type it in and press Enter.
That’s it. You can now control your Raspberry Pi from Terminal on your Mac just like you would from the command line on the Raspberry Pi. You should also see your Raspberry Pi in Finder, so you can drag and drop files onto it if you need to.

PI POINTER
Once you have SSH enabled, you can do all sorts of things with your Raspberry Pi without ever needing to touch it. You can control it from your personal computer’s command line, set up file transfers, and even poke around in the file system. You’ll do all that and more throughout this chapter.
Installing OpenVPN on Your Raspberry Pi
Okay, now that all the preliminary stuff is out of the way, it’s time to actually install OpenVPN. This process is super easy and works just like downloading other software onto your Raspberry Pi.
Downloading OpenVPN
To download and install OpenVPN, you use the command line. In the previous section, you set up a connection between your Raspberry Pi and your computer. That means you can run these commands from your personal computer, or you can stick to your running them from your Raspberry Pi.
Either way, here’s what to do:
- At the command line, type in
sudo apt-get update, and press Enter. - Next, type in
sudo apt-get upgrade, and press Enter. - Finally, type in
sudo apt-get install openvpn, and press Enter.
OpenVPN should now download and install. When it’s done, you can move on to generate your security keys and certificates.
Generating Your Security Keys
Just like a real key, security keys give you access to your Raspberry Pi while blocking out anyone else. It’s essentially the same as locking the door to your house.
Here’s how to set up your security keys:
- First you need to give yourself superuser access for everything you do. To do this, at the command line, type in
sudo -s. This opens a new window where you’re always logged in as the superuser. - Now, you’re going to copy a directory. Type in the following to copy the directory and everything underneath it:
cp -r /usr/share/doc/openvpn/examples/easy-rsa/2.0/etc/openvpn/easy-rsa - Type in
cd /etc/openvpn/easy-rsa. This moves you over to your new directory. - Now it’s time to edit the file you just moved. Type in
nano vars. This opens your text editor. - Next you need to edit a single line in the text file. Look for the line that starts export EASY_RSA, and change it to
export EASY_RSA="/etc/openvpn/easy-rsa". This simply tells your Raspberry Pi where to store your encryption keys. - Press Ctrl+X to save and exit the editor.
That’s the first part of getting the security keys ready to go. Next you’ll build the certificates.
Generating Your Security Certificates
With your key generator set up, next you need to get your security certificates in order. Certificates verify the ownership of a key and ensure that only a person with the key can access your Raspberry Pi. This type of key is the same thing you’d see in your browser’s URL when you log into your bank’s website.

DEFINITION
A security certificate is the information that allows another computer to decrypt an encrypted message you send. Without the certificate, the two computers can’t understand each other.
This is one of the more complicated parts, so be sure you type everything in this section exactly.
Here’s what to do:
- At the command line, type in
cd /etc/openvpn/easy-rsa, and press Enter. - Type in
source ./vars, and press Enter. This loads the document you were editing earlier. - Type in
./build-ca, and press Enter. This builds your certificate.
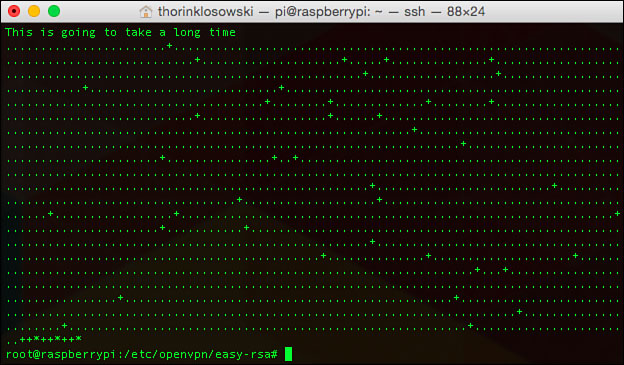
When you finish the command, you’ll get an output with your security certificates.
Your Raspberry Pi will now ask you a bunch of questions about location, names, and more. These are optional. Fill them out if you want, or just press Enter to skip through them.
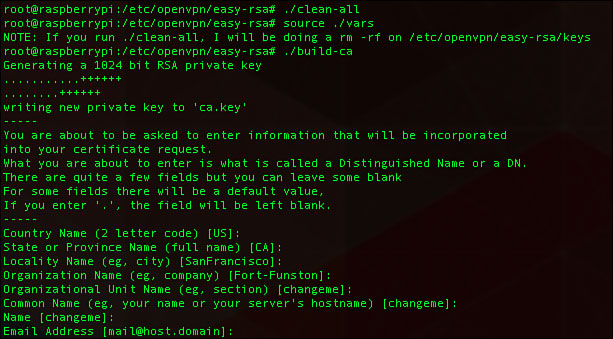
Building certificates takes a bit of time, but you’ll see the encryption process in action as it does its job.
One area you need to address is setting a name for your server. Type in the following, replacing SERVERNAME with the name you want:
./build-key-server SERVERNAME
It can be anything you want, so be creative. For the purposes of this lesson, I’m calling it raspberrypiVPN.

PI POINTER
Be sure to write down your server name somewhere you’ll remember it. You’ll need it in some of the upcoming steps. It’s good practice to do this with any information you manually enter.
In addition, fill in these prompts:
- Common Name: Enter the name you gave your server here.
- A challenge password? Leave this blank.
- Sign the certificate? Type
Y. - 1 out of 1 certificate requests certified, commit? Press
Y.
With your server set up, it’s time to build your keys. You’ll make a key for each of the devices you want to connect to the VPN. You can get by with just creating one, but then only one device can access the VPN at once. It’s best to create a few for each of your devices.
Here’s what to do:
- At the command line, type in
./build-key-passname, replacing name with the device you want to make the key for. For example, you could do./build-key-pass client1. Do this for every device you want a key for. You can name them however you like. Just be sure you remember or jot down the names. - When you build a key pass, you get three prompts:
Enter PEM pass phrase: Make a password. Be sure it’s something you’ll remember.
A challenge password? Leave this blank.
Sign the certificate? Enter inYhere, and press Enter. - After the key is generated, type in
cd keys, and press Enter. - Finally, type in
openssl rsa -in DEVICENAME.key -des3 -outDEVICENAME .3des.key, replacing DEVICENAME with the name you used in step 1, and press Enter. For example, using the device name client1, you’d typeopenssl rsa -in client1.key -des3 -out client1.3des.key.
That’s it for the certificates and keys.
Building the Key Exchange
Next up, you need to build the key exchange. Think of this like handing the keys over to a friend so they can get into your house.
Here are the steps to take:
- Type in
cd /etc/openvpn/easy-rsa, and press Enter to return to the key directory. - Type in
./build-dh, and press Enter. This builds the key exchange. It might take a little while. - When it’s finished, you’re going to add one more layer of protection. Type in
openvpn -genkey -secret keys/ta.key, and press Enter.
Your keys and your certificates are now established. Your Raspberry Pi has a static IP address, and it’s accessible online. You’re almost there. Now you need to edit the OpenVPN configuration file.
 Writing the OpenVPN Configuration File
Unfortunately, the OpenVPN software isn’t smart enough to take everything you worked through already in this chapter and integrate it into its own configuration file. That means you’ll have to make your own. This will require a lot of typing—or copying and pasting from idiotsguides.com/raspberrypi—so get comfortable.
Here’s how to write the OpenVPN configuration file:
- Type in
nano /etc/openvpn/server.conf. This will create a new blank file. - Now you’re going to need to type in a lot of information. Type all of this into the text file you just created, substituting your own information from the previous steps when noted.
local 192.168.1.0#Enter the IP address of your Raspberry Pi that you got up above here.dev tunproto udpport 1194ca /etc/openvpn/easy-rsa/keys/ca.crtcert /etc/openvpn/easy-rsa/keys/Server.crt #Enter in your server certificate you generated above here. In our example it’s raspberrypiVPN.crtkey /etc/openvpn/easy-rsa/keys/Server.key #Enter the server key you made above here, in our example, it’s raspberrypiVPN.keydh /etc/openvpn/easy-rsa/keys/dh1024.pemserver 10.8.0.0255.255.255.0ifconfig 10.8.0.1 10.8.0.2push "route 10.8.0.1 255.255.255.255"push "route 10.8.0.0255.255.255.0"push "route 192.168.2.0255.255.255.0" #Enter your Raspberry Pi’s IP address here after "route"dhcp-option DNS yourdynamicaddress.server.com" #Enter your Dynamic DNS address herepush "redirect-gateway def1"client-to-clientduplicate-cnkeepalive 10120cipher AES-128-CBCcomp-lzouser nobodygroup nogrouppersist-keypersist-tunstatus /var/log/openvpn-status.log 20log /var/log/openvpn.logverb 1
The OpenVPN configuration file has a lot of stuff to set up. Take your time getting it right.
- Tap Ctrl+X to save the file and exit the editor.

Remember, in programming, the # symbol is used to “comment out” a line. This tells the program not to read anything after the symbol. It’s often used to add comments to code so other people can understand it or to just leave notes for yourself. In this case, it’s helpful to note where you need to add your own information.

Be sure you remove the # from this line; otherwise, your VPN won’t work.
I know that was a lot of typing, but you’re not quite finished yet. You need to edit a couple more files. These next two are really easy though:
- Back at the command line, type in
nano /etc/sysctl.conf. - Find the line that reads Uncomment the next line to enable packet forwarding for IPv4. Delete the # sign on the line below that. This allows the Raspberry Pi to relay information between your computer and the internet.
- Tap Ctrl+X to save and exit the editor.
- Finally, type in
sysctl -p, and press Enter. This reloads the file you just edited with the changes you just made.
The configuration file is all set up. One last edit on your Raspberry Pi, and you’re good to go.
 Setting Up Your Raspberry Pi’s Firewall
By default, the Raspberry Pi has a firewall set up that ensures nobody can access your Raspberry Pi from the internet. This is great for security, but you need to access your Raspberry Pi from anywhere.
The solution is to create a hole in the firewall for the VPN. You also need to be sure your Raspberry Pi loads all the details at launch.

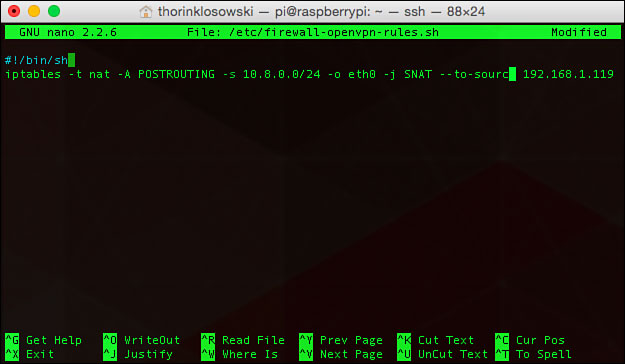
These are the rules of your firewall. You can alter them as you see fit.
- At the command line, type in
nano /etc/firewall-openvpn-rules.sh, and press Enter. - This creates a blank document in which you’re going to write a script that’ll load at launch to open the firewall a little. Type this into the file:
#!/bin/shiptables -t nat -A POSTROUTING -s 10.8.0.0/24 -o eth0-j SNAT -to-source 192.168.X.XReplace
192.168.X.Xwith the IP address of your Raspberry Pi. If your device is wireless and not connected to your router with an Ethernet cable, replace eth0 withwlan0. - When you’re done, press Ctrl+X to save and exit the document.
- Back at the command line, you’ll change the permissions for the files you created. This makes them accessible where they need to be and ensures others can’t edit them. Type in
chmod 700/etc/firewall-openvpn-rules.sh, and press Enter. - Type in
chown root /etc/firewall-openvpn-rules.sh, and press Enter.
That changes your permissions.
Finally, you need to edit your network configuration file so it loads all your stuff at startup. Here’s how:
- Type in
nano /etc/network/interfaces, and press Enter. - Find the line reads iface eth0 inet static. Add a new line below that by pressing Enter.
- Press Tab to create an indent.
- Type in
pre-up /etc/firewall-openvpn-rules.sh, and tap Ctrl+X to exit and save the document.
Your Raspberry Pi is now set up as a VPN server. Reboot to be sure all the settings are loaded. Type in sudo reboot, and wait for the system to reboot.

PI POINTER
If you’re connected to the Raspberry Pi over SSH, you need to reconnect after the system reboots. Just give it a few minutes to do its thing, and type in the SSH command again. Remember, it’s probably something like ssh pi@192.168.1.2.
 Configuring Keys for Each Client
Your Raspberry Pi is a fully functional VPN server now, but unfortunately, you still can’t do much with it. You need to create a configuration file for each of the clients you want to connect to your Raspberry Pi.
Remember earlier in the chapter where you created a bunch of different keys for each of your devices? In this section, you’re going to configure your Raspberry Pi so it works with those devices. You’re going to create a program that runs and does this for you automatically. The program comes from Eric Jodoin of the SANS Institute.
First, you’ll need to create text file to store some information:
- At the command line, type in
sudo nano /etc/openvpn/easy-rsa/keys/Default.txt, and press Enter. This creates a blank text file. - Type the following into the text file (or copy and paste from idiotsguides.com/raspberrypi), replacing YOUR PUBLIC IP ADDRESS with the dynamic DNS address you got earlier in this chapter:
clientdev tunproto udpremote YOUR PUBLIC IP ADDRESS 1194resolv-retry infinitenobindpersist-keypersist-tunmute-replay-warningsns-cert-type serverkey-direction 1cipher AES-128-CBCcomp-lzoverb 1mute 20 - Press Ctrl+X to exit and save the document.
Next, you create the program that will compile information for all your keys.
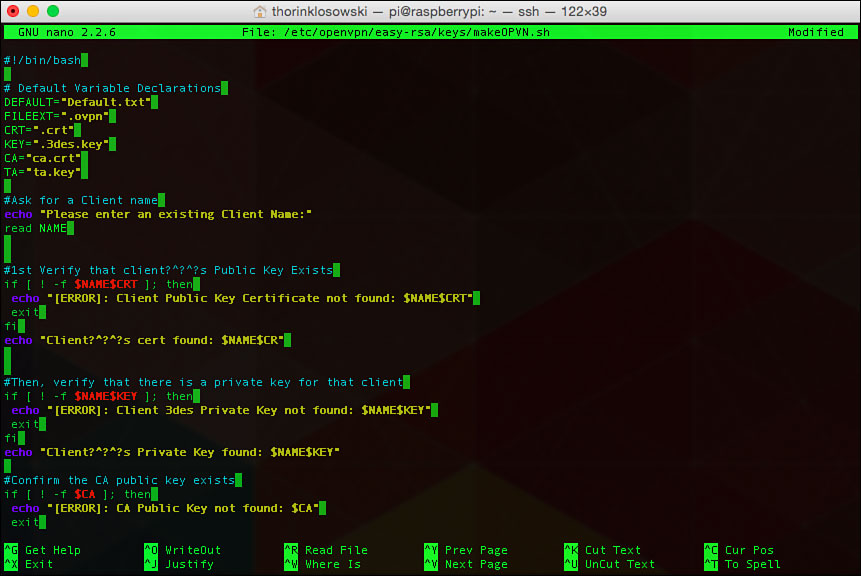
This is your key generation program. It’s a little complex, but mostly it uses commands you’ve seen before.
- Type in
sudo nano /etc/openvpn/easy-rsa/keys/MakeOPVN.sh, and press Enter. - Type the following into the file (or copy and paste from idiotsguides.com/raspberrypi), being sure to avoid typos:
#!/bin/bash# Default Variable DeclarationsDEFAULT="Default.txt"FILEEXT=".ovpn"CRT=".crt"KEY=".3des.key"CA="ca.crt"TA="ta.key"#Ask for a Client nameecho "Please enter an existing Client Name:"read NAME#1st Verify that client’s Public Key Existsif [ ! -f $NAME$CRT ]; thenecho "[ERROR]: Client Public Key Certificate not found: $NAME$CRT"exitfiecho "Client’s cert found: $NAME$CR"#Then, verify that there is a private key for that clientif [ ! -f $NAME$KEY ]; thenecho "[ERROR]: Client 3des Private Key not found: $NAME$KEY"exitfiecho "Client’s Private Key found: $NAME$KEY"#Confirm the CA public key existsif [ ! -f $CA ]; thenecho "[ERROR]: CA Public Key not found: $CA"exitfiecho "CA public Key found: $CA"#Confirm the tls-auth ta key file existsif [ ! -f $TA ]; thenecho "[ERROR]: tls-auth Key not found: $TA"exitfiecho "tls-auth Private Key found: $TA"#Ready to make a new .opvn file--Start by populating with thedefault filecat $DEFAULT > $NAME$FILEEXT#Now, append the CA Public Certecho "<ca>" >> $NAME$FILEEXTcat $CA >> $NAME$FILEEXTecho "</ca>" >> $NAME$FILEEXT#Next append the client Public Certecho "<cert>" >> $NAME$FILEEXTcat $NAME$CRT | sed -ne '/-BEGIN CERTIFICATE-/,/-END CERTIFICATE-/p' >> $NAME$FILEEXTecho "</cert>" >> $NAME$FILEEXT#Then, append the client Private Keycat $NAME$KEY >> $NAME$FILEEXTecho "</key>" >> $NAME$FILEEXT#Finally, append the TA Private Keyecho "<tls-auth>" >> $NAME$FILEEXTcat $TA >> $NAME$FILEEXTecho "</tls-auth>" >> $NAME$FILEEXTecho "Done! $NAME$FILEEXT Successfully Created."#Script written by Eric Jodoin\ No newlineat end of file - When you’re finished, press Ctrl+X to exit and save.
- Type in
cd /etc/openvpn/easy-rsa/keys/, and press Enter. - Next you need to change the permissions so you can run the program. Type in
chmod 700MakeOPVN.sh, and press Enter. - Now, it’s time to run your program. Type in
./MakeOPVN.sh, and press Enter. - As the script runs, it will ask you for the names of your clients. You generated keys for each of your devices and named them earlier. Type those names in here (our example was client1). Repeat the process for each client.
With that, your VPN is fully up and running and accessible from all your computers. You’re going to grab these configuration files you just created a little later when you’re setting up your clients. Let’s get to actually using it.
Terminal Commands to Start and Stop the VPN
You already set up your VPN to run on startup, but if you need to manually start or stop it, you’ll need to know a couple terminal commands:
- To start OpenVPN, type in
sudo openvpnservername.conf(replace servername with your server’s name), and press Enter. - To stop it, type in
sudo killall openvpn, and press Enter.
You shouldn’t have to deal with this much, but it’s good to know how to do it, just in case.
Installing OpenVPN on Your Computer
Finally, it’s time to get OpenVPN onto your personal computer. Your VPN is up and running on your Raspberry Pi, but you need to tell your personal computer how to route its traffic through it so everything is secured—it doesn’t do this automatically.
To install the OpenVPN client you’ll need to download some software.
Windows:
To access your Raspberry Pi’s VPN, you need special software on Windows. You’ll do this through software called OpenVPN:
- Download the newest version of OpenVPN for your operating system from openvpn.net/index.php/open-source/downloads.html.
- When the file is finished downloading, double-click it to launch the installer.
- Launch the software by double-clicking the OpenVPN file that was just installed.
After you launch the software, you’ll get some prompts to set it up. Move on to the “Setting Up Security Keys and Config Files” section to get the files you need here.
Mac:
On your Mac, you’ll use software called Tunnelblick to access your VPN:
- Download Tunnelblick from code.google.com/p/tunnelblick.
- Double-click the DMG file you downloaded to open it.
- Double-click the Tunnelblick.app icon to launch the installer.
- When it’s finished installing, navigate to Applications > Tunnelblick, and click it to launch the app.
When you first launch Tunnelblick, it’ll ask you for some configuration files. You need to grab those from the Raspberry Pi.

PI POINTER
You also can set up VPN on your smartphone or tablet. Look for OpenVPN clients in your smartphone’s store to find the app to help you set it all up.
Setting Up Security Keys and Config Files
To use your VPN, you need to install the configuration files on your computer. These are the files you created earlier when you ran the program you made. These OpenVPN files are your keys. Think of this step as handing over keys to all your friends you want to let in.
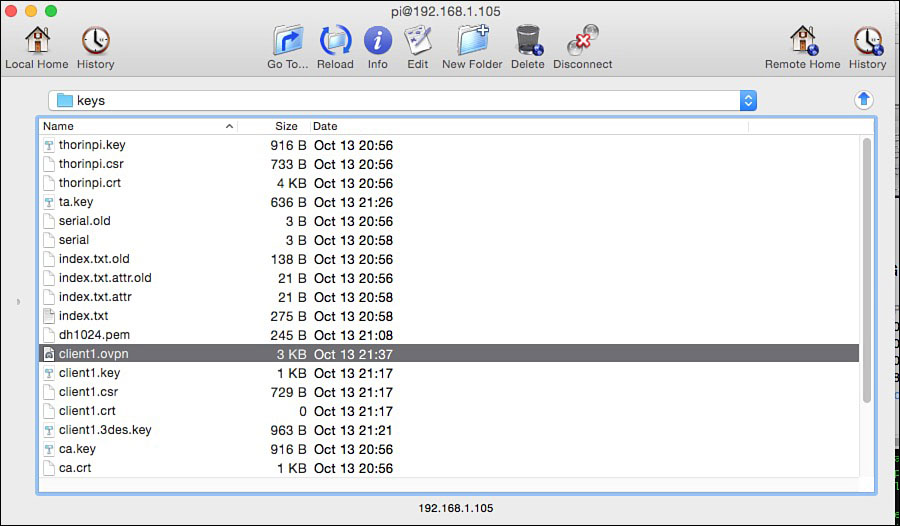
You’ll need to copy your security keys for each computer that uses the VPN.
Windows:
On Windows, you need to connect to your Raspberry Pi with the WinSCP software:
- Download WinSCP from winscp.net/eng/index.php.
- Launch WinSCP. In the Connect to: box, type in your Raspberry Pi’s internal IP address. You probably have this memorized by now.
- Type in
pifor the username. - Click the Connect button. When prompted, enter your password.
- You’re now connected to your Raspberry Pi. Navigate to the /etc/openvpn/easy-rsa/keys/ folder, and find the OpenVPN file for the client. It should be called something like client1.opvn. Drag it to your desktop.
- Double-click the client1.opvn file. This opens it in Tunnelblick and automatically sets it up for you.
On a Mac, you need to connect to your Raspberry pi with Fugu SSH:
- Download Fugu SSH from sourceforge.net/projects/fugussh.
- Open the software. In the Connect to: box, type in your Raspberry Pi’s internal IP address.
- Type in
pifor the username. - Click the Connect button. When prompted, enter your password.
- You’re now connected to your Raspberry Pi. Navigate to the /etc/openvpn/easy-rsa/keys/ folder, and find the OpenVPN file for the client. It should be called something like client1.opvn. Drag it to your desktop.
- Double-click the client1.opvn file. This opens it in Tunnelblick and automatically sets it up for you.
Your personal computer now has the key to your VPN so it can access it.

SOFTWARE SOLUTION
The nice thing about using this SSH software is it gives you access to your Raspberry Pi’s file system. If you need to copy files from your primary computer over to your Raspberry Pi, or if you want to copy files from your Raspberry Pi to your computer, you can do so easily with this software.
Connecting to Your Pi VPN Remotely
Are you ready to use your VPN? You now can securely browse the web and also access files on your Raspberry Pi or home computer remotely over a secure connection. All your hard work is about to pay off because now that you’re set up, this process is very easy—and will continue to be in the future.
From here on out, connecting to your Raspberry Pi and using the VPN is just a couple clicks away. Whether you’re at a coffee shop in Budapest or an airport Wi-Fi network in Buffalo, you’ll always have a secure connection as long as your Raspberry Pi is powered up.
Windows:
- Launch the OpenVPN Connect software, and click the connect yourclientname button.
- Enter your password. You’re now browsing on a secure connection.
Mac:
- Launch Tunnelclick, and click the Connect yourclientname button.
- Enter your password, and all your browsing will be secure.
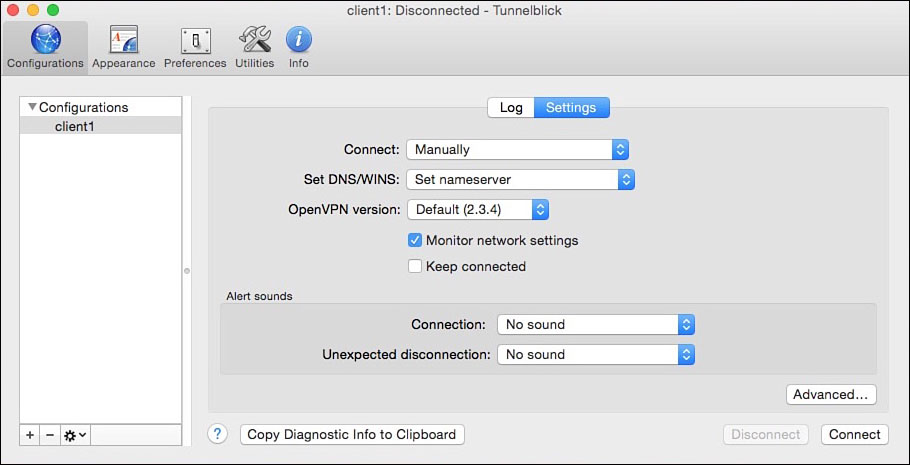
Now that everything is set up, connecting to your VPN remotely is just a click away.
Accessing Files and Folders Remotely
In addition to getting a secure connection for browsing the web, you can access all your files on your Raspberry Pi—and any other computer connected to your VPN—from anywhere. This means that even if you’re away from home, you can access your home computer’s files from your laptop.
As long as your VPN on your Raspberry Pi is on and you leave your home computer connected to it, you’ll see the option to connect to your home computer remotely from your laptop in either Explorer on Windows or Finder on a Mac. Just click on your computer, and you’re connected.
- Setting up a VPN gives you a secure connection to the internet from anywhere in the world.
- Your VPN client runs right on top of Raspbian, so you don’t need to create a separate SD card for this project.
- VPNs encrypt all the data you transfer through them, so they’re great when you need to connect to public Wi-Fi.
- The process of setting up your VPN is time-consuming and might seem a little difficult, but once you have it up, it’s very easy to use.
