Making a Wireless Router
In This Chapter

- Turning your Raspberry Pi into a Wi-Fi spot
- Setting up your Wi-Fi adapter as an access point
- Enabling internet forwarding
If you’ve been following along with the projects in this book so far, you’ve already used your Raspberry Pi for a host of projects, including turning it into a server you can access from anywhere. But you might not realize your Raspberry Pi can be used as an actual wireless network router, too.
It might not look like it from the outside, but your home Wi-Fi router is actually just a small computer. It might even run Linux. So with some work, some downloads, and some tinkering with configuration files, you can turn your Raspberry Pi into a router that works just like one you’d buy at a store.
Building your own router means you can bring it with you anywhere you might need a Wi-Fi connection. For example, it’s great for hotels that notoriously have terrible Wi-Fi but decent wired connections. It’s also a handy, inexpensive way to share an internet connection wherever you are. The best part about building your own device is that you can customize it however you like. You can set it up and use whatever components you want and change settings to suit your specific needs. You’re basically creating your own little Wi-Fi hot spot, so make it yours.
In this chapter, you learn to set up Wi-Fi on your Raspberry Pi, configure it to access the internet, and route that internet connection to external devices. All you need is your Raspberry Pi, a power adapter, an SD card, an Ethernet cable, and a Wi-Fi adapter.
This one’s going to take a lot of work in the command line, so get your typing fingers ready.
What a Raspberry Pi Router Can Do
A Raspberry Pi router works similarly to a Wi-Fi hot spot. It won’t have the same configuration screen or complicated settings an off-the-shelf router has, but it will connect your computers and get them online.
It also will be able to link all your computers so they can communicate with each other. And when your router is all set up, it really won’t require you to do anything with it other than leave it plugged in to your modem. You’ll even be able to upgrade it easily with the newest wireless tech simply by buying a new Wi-Fi adapter, instead of purchasing a whole new machine.

HARDWARE HELPER
Not all Wi-Fi cards are created equal. Some are faster than others and broadcast at different rates. The same goes for routers. The nice thing about using your Raspberry Pi as a router is that you can upgrade the speed without buying a whole new unit by just upgrading the Wi-Fi adapter.
Installing Raspbian
As you’ve likely come to realize over the course of this book, Raspbian is the backbone of most Raspberry Pi projects. The same is true for this project.
But in this case, you need to make a brand-new Raspbian SD card instead of trying to multitask with one you’ve used for another project. You’re going to tinker around with how your Raspberry Pi operates a lot throughout this chapter, and it isn’t going to work the same way you’d need it to with other projects. After all, you’re setting it up so the internet comes out of your Raspberry Pi, not into it, so it’s fundamentally a different type of machine.
So if you haven’t already, turn back to Chapter 8 and follow the directions to install Raspbian on a new SD card. When it’s all set up, head back here.
You need a USB Wi-Fi adapter for this project. I covered wireless adapters pretty extensively in Chapter 11. As a reminder, check out elinux.org/RPi_USB_Wi-Fi_Adapters for a list of all the Wi-Fi adapters that work on the Raspberry Pi.
The Wi-Fi adapter you choose should support something called AP mode. AP stands for “access point,” and it enables the adapter to receive incoming Wi-Fi connections from multiple sources as a host.

DEFINITION
AP mode stands for access point mode and basically just means that the wireless adapter can act as an interface for a router or server.
Countless affordable Wi-Fi adapters support AP mode, so be sure to check before you purchase an adapter. If you’re not sure if yours does, I show you how to do a second check in an upcoming step to verify it’s working properly.
Setting Up SSH
You’re going to run your Raspberry Pi in headless mode, which means you don’t need a monitor connected. You’ll set up and use SSH so you can control your Raspberry Pi from your personal computer.
Windows:
On Windows, you need to download some software before you can SSH into your Raspberry Pi. Here’s what to do:
- Head to www.chiark.greenend.org.uk/~sgtatham/putty/download.html and download PuTTY.
- When it’s downloaded, open putty.exe.
- Under Host Name, enter your Raspberry Pi’s IP address. If you don’t know your Raspberry Pi’s IP address, hook your Raspberry Pi to a screen and type in
ifconfig. Under inetaddress: you’ll see your IP address number. - Tap Enter to open a command line.
- Enter your Raspberry Pi’s username and password.
Now, you’re connected to your Raspberry Pi on Windows. You can control your Raspberry Pi from the command line just as if you were sitting in front of it. Because your Raspberry Pi is only operating as a router, this is really all you need to do.
Mac:
If you own a Mac, you already have SSH built into your computer and you can access your Raspberry Pi using the Terminal app. Here’s how:
- Launch Terminal on your Mac from Applications > Utilities > Terminal.
- Type in
ssh pi@yourIPaddress. For example,ssh pi@192.168.1.105. If you don’t know your Raspberry Pi’s IP address, hook your Raspberry Pi up to a screen and type inifconfig. Under inetaddress: you’ll see your IP address number. - When prompted for your Raspberry Pi password, type it in and press Enter.
That’s it. You can now control your Raspberry Pi from Terminal on your Mac just like you would from the command line on your Raspberry Pi. Your Raspberry Pi is just acting as a router here, so this is all you need to do.
Installing the Required Components
Now to get the various components installed. You can do this with the apt-get install command in the command line, or you can do it in bulk by following the command with as many apps as you need.
First, let’s take a look at what you’re installing.

SOFTWARE SOLUTION
Before you start any project, run the update commands for the Raspberry Pi. Start with sudo apt-get update, and follow that with sudo apt-get upgrade. These two commands check for updates online and ensure all your installed software is the newest version. It’s the same basic idea as updating apps on your phone, but you have to manually type in a command instead of tapping an icon.
To set up your router, you need to install a few different bits of software. Some of this stuff is usually included in Raspbian, but it’s good to double-check that everything is up to date.
rfkill: This wireless utility allows you to query the state of different interfaces. Some wireless adapters can use this and some can’t, but it’s good to have it installed for this project.
zd1211-firmware: This is a common firmware for wireless adapters. Chances are that Raspbian has your firmware installed already, but this ensures you’re covered.
hostapd: This is an authenticator for wireless adapter. It makes it so your wireless card can properly communicate with your network.
hostap-utils: This is a set of extra tools for hostapd.
iw: This is a wireless configuration utility.
dnsmasq: This is the tool that allows you to use your Raspberry Pi as a router.
bridge-utils: This is used for devices connected over Ethernet and makes it possible for your Pi to connect to your modem.
The installation process for your tools is super easy. Before you start, be sure your Raspberry Pi’s Wi-Fi adapter is plugged in and you’re plugged in to your modem with the Ethernet cable.
Here are the steps:
- Open the command line either on your Raspberry Pi or on your computer over SSH.
- Type in
sudo apt-get install rfkill zd1211-firmware hostapd hostap-utils iw dnsmasq bridge-utils, and press Enter.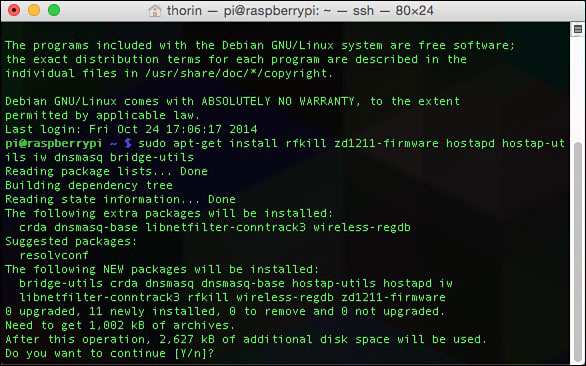
The
sudo apt-get installcommand lets you install multiple pieces of software at once with one line of text. - Wait for all your utilities to download and install.
With everything installed and ready to go, it’s time to get to work.

SOFTWARE SOLUTION
Before you set up just about any new piece of hardware, it’s a good idea to search for, download, and install any software updates available, even if your hardware seems to work out of the box.
Configuring Your USB Wireless Adapter
You need to do a bit of work before your wireless adapter will operate as a router. Essentially, you need to set it up as a bridge between the computers on your network and your modem.
Testing Your USB Wireless Adapter
Before you do anything, you need to be sure your wireless adapter will work for this project.
Here’s what to do next:
- At the command line, type in
lsusband press Enter. - Look for your USB wireless adapter on the list displayed. If it’s included, your Raspberry Pi recognizes it. If not, head back to Chapter 11 to learn how to find and install the proper drivers.
- Next, you need to verify that your wireless adapter supports AP mode. Type in
iw list, and press Enter. - You’ll get a list of information about your wireless adapter. Find the line that reads Supported interface modes: and be sure AP is included in the list.
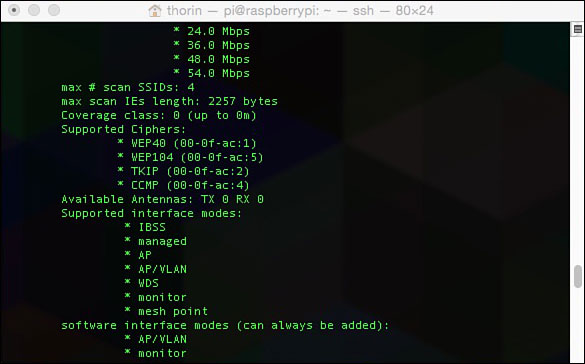
The results from iw list tell you if your adapter supports AP mode.
Now that you’ve verified that your wireless adapter works, it’s time to configure it.
 Configuring a Wireless Interface
Configuring your wireless adapter is a bit complicated. You’re also going to create backups of everything you edit so you can roll back to the default settings if anything goes wrong.
Here’s what to do:
- First, you’re going to back up your network preferences. At the command line, type in
sudo cp /etc/network/interfaces /etc/network/interfaces.oldand press Enter. - Now that it’s backed up, it’s time to edit. Type in
sudo nano /etc/network/interfaces, and press Enter. - You’re greeted with the text editor and your network preferences. Here, you’re going to add a bunch of information and change some stuff around. Delete everything in the text file and replace it with the following:
auto loauto br0iface lo inet loopbackiface eth0inet dhcpallow-hotplug wlan0allow-hotplug eth0iface wlan0inet manualiface br0inet dhcpbridge_fd 1bridge_hello 3bridge_maxage 10bridge_stp offbridge_ports eth0 - When you’re done, tap Ctrl+X to save and exit.
- Next, restart the Wi-Fi interface. Type in
sudo ifdown wlan0, and press Enter. - Type in
sudo ifup wlan0, and press Enter.
Now your wireless adapter is ready. Let’s configure your router settings.

PI POINTER
If you don’t really need a router, you can use this project as an access point or range extender to make your home network’s Wi-Fi go a little farther. This is helpful if you have rooms in a basement or attic that don’t have access to the internet because they’re too far away from a router.
Now you need to tell your Raspberry Pi how to behave as a router. This requires some more typing and changing of your configuration files.
Here’s what to do:
- First, you need to see which driver your wireless adapter is using. At the command line, type in
lsusb -tand press Enter. - Look for your wireless adapter on the list. Under Driver= you should see the driver it’s using. Make a note of it; you’ll need it in the upcoming steps.
- You’re going to make a backup of your hostapd settings. Type in
sudo cp, and press Enter.
/etc/hostapd/hostapd.conf /etc/hostapd/hostapd.conf.old - Now hop into the text editor, type in
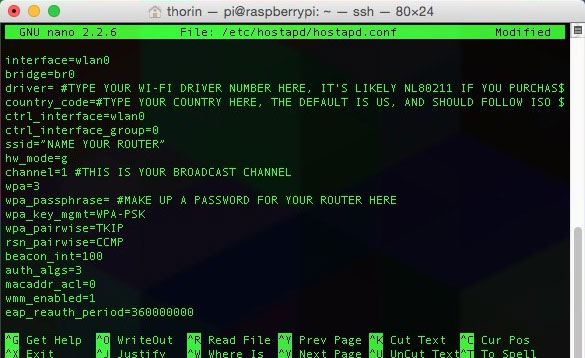
sudo nano /etc/hostapd/hostapd.conf, and press Enter. - You’re not editing the hostapd.conf file, but you need to modify it so it looks like this, replacing everything in all caps with your information:
interface=wlan0bridge=br0driver= #TYPE YOUR WI-FI DRIVER NUMBER HERE, IT’S LIKELY NL80211 IF YOU PURCHASED A GENERIC ADAPTERcountry_code= #TYPE YOUR COUNTRY HERE; THE DEFAULT IS US AND SHOULD FOLLOW ISO 3166-1 FOR OTHER COUNTRIESctrl_interface=wlan0ctrl_interface_group=0ssid="NAME YOUR ROUTER"hw_mode=gchannel=1 #THIS IS YOUR BROADCAST CHANNELwpa=3wpa_passphrase= #MAKE UP A PASSWORD FOR YOUR ROUTER HEREwpa_key_mgmt=WPA-PSKwpa_pairwise=TKIPrsn_pairwise=CCMPbeacon_int=100auth_algs=3macaddr_acl=0wmm_enabled=1eap_reauth_period=360000000The hostapd.conf screen is where you set up the specifics of your router.
- When you’re done, press Ctrl+X to save and exit.
- Now you need to restart everything. Type in
sudo service networking restart, and press Enter. - Type in
sudo service hostapd restart, and press Enter.
Now your Raspberry Pi will show up when you scan for Wi-Fi networks on your computer. But you’re not done yet.

PI POINTER
Remember that when you’re typing in any command or text into a text editor, it’s incredibly important to get it exactly right. Not only do you need to ensure the letters and numbers are correct, you also have to be sure the spacing and even capitalization is the same.
 Configuring DNS Settings
Next, you need to configure the DNS settings so your Raspberry Pi understands that it’s supposed to communicate with the internet.
Here’s what to do:
- You’re going to copy and backup the configuration file again. Type in
sudo cp, and press Enter.
/etc/dnsmasq.conf /etc/dnsmasq.conf.old - Type in
sudo nano /etc/dnsmasq.conf, and press Enter to open the text editor. - You’re looking for three different lines in the text editor to uncomment. Find these three lines, remove the # before each of them, and add
wlan0to the interface= line:domain-neededinterface=wlan0dhcp-range=192.168.2.1,192.168.2.254,12h - Now, verify you did everything correctly by typing in
cat /etc/dnsmasq.conf | grep -v "#" | sed '/^$/d', and press Enter. If it’s correct, you’ll get a reading with the three lines in step 3. - Type in
sudo service dnsmasq restart, and press Enter.
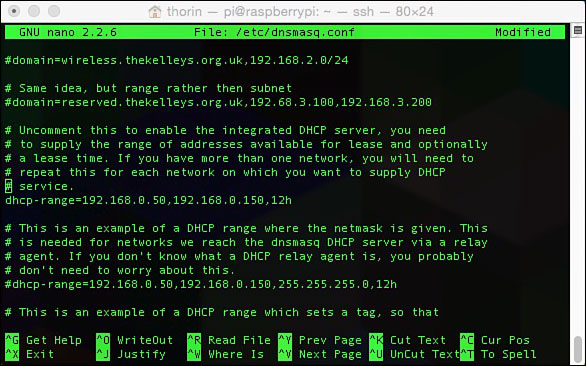
The DNS screen shows that your device can connect to the internet.
This restarts the DNS with the new settings. Although you still need to do one more thing to get access to the internet, at this point, you should see your Raspberry Pi router pop up on your computer like this:
image
If you see this, you know everything’s working. Now you just need to bridge the gap between the internet, your Raspberry Pi, and your computer.
Accessing the Internet
To access the internet as a whole, you need to enable port forwarding and network address translation (NAT). This basically allows your Raspberry Pi to take information from the internet and communicate it to your computer.
For your Raspberry Pi to work as a router, you need to enable a feature called port forwarding.

DEFINITION
Port forwarding enables your router to communicate with the internet. It translates the address online into a packet of information. A port is a number that makes it possible for your internal IP address to communicate with the outside internet.
To get port forwarding working on your Raspberry Pi, you only need to type in one command:
sudo sysctl -w net.ipv4.ip_forward=1
Press Enter, and port forwarding is now enabled. Just one more step until you’re done.
Enabling NAT
NAT is required for just about anything communicating with the internet. It enables multiple computers on your home network to talk with one router.
To enable NAT, type in the following and press Enter:
sudo iptables -t nat -A POSTROUTING -j MASQUERADE

DEFINITION
Network address translation (NAT) makes it possible for your computer to communicate with the internet by setting up your internal IP address and a second group of IP addresses for external traffic.
With that, your Raspberry Pi is acting as a router. On your computer, open the Wi-Fi menu, and select your Raspberry Pi from the list. Open your web browser, and open a test site. If everything’s working, you should have full access to the internet.
Setting Everything to Start on Boot
Finally, you want all these processes to start right when you boot up your Raspberry Pi. Here’s
how to make that happen:
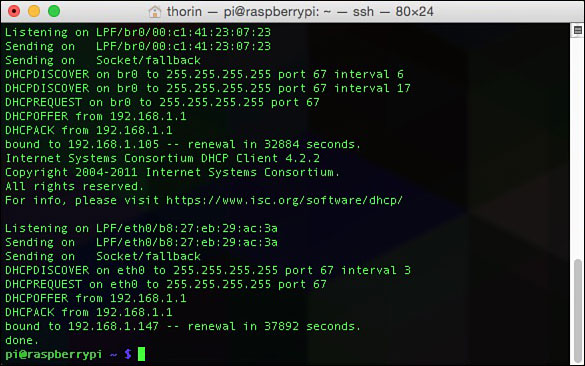
Be sure your router settings start on boot so you don’t have to start them manually.
- First, verify everything is working properly. Type in
sudo service hostapd start,
and press Enter. - Type in
sudo service dnsmasq start, and press Enter. - If both of these services start with no errors, you can add them to startup. Type in
sudo update-rc.d hostapd enable, and press Enter. - Type in
sudo update-rc.d dnsmasq start enable, and press Enter. - Finally, you need to remove one thing from the startup process. Type in
sudo mv,
/usr/ share/dbus-1/system/services/fi.epitest.hostap.WPASupplicant.service~/
and press Enter.
Now your router processes will load when you boot up your Raspberry Pi, no extra configuration required.

PI POINTER
Be sure your Raspberry Pi has a good, strong password enabled. The Wi-Fi signal is broadcasting just like a home router, so you don’t want neighbors or anyone passing by to be able to just log in because your password is password.
- You can easily turn your Raspberry Pi into a wireless router you can use anywhere to network computers together.
- You need a wireless adapter for this project, but otherwise you just need your Raspberry Pi.
- You also need a new copy of Raspbian installed before you can start this process.
- Enable port forwarding and NAT in order for your Raspberry Pi to communicate with the internet.
