Creating a Web Server
In This Chapter

- Setting up a web server on your Raspberry Pi
- Making your web server accessible online
- Setting up ownCloud, a WordPress blog, and other services
- Working with databases, FTP, and more
Running a web server can be a complicated task and requires a lot of work, but the act of actually putting together a server is pretty simple. After all, although it seems complex, a server is really nothing more than a computer with special software installed that’s accessible from the internet.
Your Raspberry Pi makes an excellent little web server, provided you don’t expect to see a large amount of traffic. When you get it set up, it works just like any other web server on the internet. You can type an address into your web browser, and you’ll load a website that’s housed on your Raspberry Pi. It’ll be a little slow, but considering it’s basically a free option to host your own website, it has quite a few different uses.
In this chapter, you learn how to turn your Raspberry Pi into a web server that has numerous extra features. In addition to hosting what’s needed for a website, you also discover how to install your own cloud storage software, establish a blog, set up various server utilities, and make the whole thing accessible from the internet. Basically, you’ll be running your own website from your Raspberry Pi.

Running your own server calls for much of what you’ve learned in this book so far. You need to install programs, configure databases, edit configuration files, and push your Raspberry Pi to the limits. Server administration is a complicated job that takes years of training to get right, but this chapter gets you started on a hobby that can easily become a career.
You won’t learn much about web design in this chapter. That’s an entire book in itself. You’ll get your server up and running though, and with services like WordPress installed, you’ll be able to put together a simple website pretty quickly if you want.
All you need for this project is your Raspberry Pi, an Ethernet cable to attach your Pi to your home router, and a spare SD card. You can technically host everything you need on an 8GB SD card, but if you really want to power a whole website, an external hard drive is recommended. Opt for at least a 100GB drive. Anything larger than that is fine as well.
This project will take an entire day, if not more, to complete, so before you start, be sure you have the time to finish. It’s easy to stop at nearly any point if you need to, but still give yourself plenty of time to work on this project.
What a Raspberry Pi Web Server Can Do
At its most basic level, a web server is a computer that serves up files in the form of web pages. If you go to any website online, there’s a server behind it that stores those files.
This project teaches you how to turn your Raspberry Pi into a Linux server, and by the end of it,
your Raspberry Pi will be the same kind of web server as one you’d expect to find hosting sites anywhere else online. Typically speaking, if you wanted to set up a website for yourself, you’d usually buy server space from an online provider. This negates that process and hosts your website right on your own Raspberry Pi.
In this chapter, you learn how to install everything needed to run your server. This includes all the backend software websites need to work as well as software to create your own blog.
However, it’s not just about hosting a website, so if you have no interest in running your own blog or site, that’s okay. You also learn to install software called ownCloud in this chapter. ownCloud is cloud storage software that works similar to something like Dropbox. You can easily sync files, music, and media between computers using ownCloud and your Raspberry Pi without having to pay another service to do it for you.

Running a professional web server can certainly be a full-time job, but don’t let that dissuade you from trying this project. From a hobbyist’s point of view, it’s a great way to learn about how websites work from multiple angles. Setting up the server is just half the process. You eventually need to learn how to actually make a website, too.
What’s Included
Because this is such a large project, let’s take some time to really dig in to what you’ll be doing before you get into it. You spend more time with each of the following elements throughout the chapter, but it’s a good idea to know what you’re getting into before you take on this project. Here’s what will end up on your server:
Webmin administration interface: Webmin (webmin.com) is a server management web interface. After you install it, Webmin is essentially your hub for everything on your server. You can install new stuff, upload files, and more. Think of it like your server’s operating system.
Shell in a Box: Instead of running the command line on your Raspberry Pi or through SSH, you’ll use Shell in a Box throughout this lesson. Shell in a Box (code.google.com/p/shellinabox) is basically just a web interface for the command line. So instead of downloading special software, you can run command line commands from your browser. It makes things a lot easier.
Apache web server: This is the actual server end of your server. Apache (apache.org) is open source, so it’s free and up to date with modern web standards. It’s also secure and pretty easy to add new functionality to.
MySQL: MySQL (mysql.com) is open-source database software. Databases are required for just about every website, especially anything that includes login information or complex lists.
PHP 5: PHP (php.net) is a server-side scripting language. It’s pretty standard on servers and required for any website that uses dynamic content like a blog or cloud server.
FTP access: If you want to upload files to your server remotely, FTP is the easiest way to do it. In this case, FTP access is useful because you can dial into your server to manage the file system remotely.
Samba: Samba (samba.org) is similar to FTP but only works on a local network. If you’re managing your server from the same network, Samba is an easy way to transfer files from a computer to your server.
ownCloud: ownCloud (ownCloud.org) is a cloud storage platform. With it, you can store files, sync contacts, create calendars, and even edit documents—you can basically have your own private cloud storage system you host yourself.
WordPress: WordPress (wordpress.com) is an open-source blogging system. It’s one of the most popular blog content management systems because you can customize it in countless ways. Once you get it installed, you’ll easily be able to run your own blog on your Raspberry Pi.
That covers the essentials. You’ll also download a handful of smaller tools to help get your server up and running.

DEFINITION
MySQL is a database management system. Working with MySQL can be advanced stuff, but you can still run a server on your Raspberry Pi without really touching it.
PHP (PHP: Hypertext Preprocessor) is an open-source scripting language that can be embedded into HTML and is often used to run the back end of web servers so small scripts can run on websites. It’s a language in itself and difficult to learn, but in this case, you’ll mostly just install it on your Raspberry Pi so basic websites can function.
FTP (file transfer protocol) is a network standard used to transfer files from one computer to another, usually over the internet. If you’re away from your server, you’d use FTP to get files onto it.
This is by no means the only way to run a server. You have a ton of options, and you can customize your server in a variety of ways. In fact, what’s in this chapter is just one of many ways to set up a server on your Raspberry Pi. This is plenty to get you started if you want to explore other ways of doing it after you work through this lesson.
Limitations of a Raspberry Pi Web Server
Before we get too deep into this, I should remind you that the Raspberry Pi is a pretty slow little computer. It can’t handle a ton of things at once, so any web pages you host on it will be a little slow as well. For that reason, it’s recommended you stick with simple and small-scale projects here.
Your Raspberry Pi server is perfect for hosting your résumé website, for example, because it probably doesn’t get a lot of traffic. You also could use it to host other one-off projects, like your wedding landing page or a graduation announcement. It’s not recommended for anything that would get a lot of traffic, like your email or social media pages, because the Raspberry Pi simply can’t handle it.
This isn’t a bad thing by any means, but it’s something to think about before you continue.
Before you do anything else, you need to get your basic server set up. You’re going to use a variation on Raspbian called Turnkey (turnkeylinux.org). Turnkey is a Linux distribution made specifically for turning a machine into a web server. In this project, you’ll use a distribution created by GitHub user ghoulmann that’s built specifically for the Raspberry Pi. This makes the process as quick and simple as possible, although you’ll still have to do some work to get everything actually going.
Let’s get Turnkey onto your SD card and work through the initial setup for your Raspberry Pi. Here’s what to do:
- Download the Turnkey image from github.com/downloads/ghoulmann/Raspliance-Core/raspliance-core-02.img.tar.gz.
- Double-click the tar.gz file to unzip it.
- Burn the IMG file to an SD card using the same method you used to burn Raspbian in Chapter 8. With the image on your SD card, plug it in to your Raspberry Pi.
- Connect your Raspberry Pi to a monitor and a keyboard, and boot it up.

HARDWARE HELPER
The monitor and keyboard connections in step 4 are just temporary. You only need to keep your Raspberry Pi attached to a keyboard and monitor for this initial setup.
- The operating system will take a little while to boot up. When it does, it’ll ask you for a password. Create a password, and enter it twice.
- At this point, you might see the raspi-config screen. If you do, select the first option, Expand rootfs, and press Enter. When it’s done, exit to get back to the Turnkey setup.
- Next, you’ll see your network information in the CORE appliance services menu. Make a note of all these numbers because you’ll need them later.
That’s it for the initial Turnkey setup. You can power off your monitor and disconnect your keyboard if you want. You won’t need them attached to your Raspberry Pi again for this project.
Now your Raspberry Pi has the basic software needed to run a server. Technically, you could skip to the end of this chapter and put it online, but it won’t do you much good at this point. Your version of Webmin is pretty old and needs to get updated, and you need to set up a few other things before your server is actually useable. However, if you really just wanted a static web page that just displays a block of text, you could do that right now if you wanted. Assuming you want more than that, let’s move on.
Webmin (webmin.com) is the interface for your server. Think of it like your operating system. Although you can jump to the command line and do everything you need to, the interface makes it a lot easier to use.

PI POINTER
Webmin is one of many different graphical interfaces for servers. Other similar software include cPanel (cpanel.net), OpenPanel (openpanel.com), Ajenti (ajenti.org), and ZPanel (zpanelcp.com). Many of these are also free, so you can experiment with alternatives once you’re set up.
You can access Webmin from any web browser. Once you’re in, you’ll find all kinds of utilities for managing your own website. You can configure a variety of different apps, including PHP and MySQL through the web interface.
Webmin runs primarily on Linux, so it’s perfectly functional on the Raspberry Pi. It’s not required by any means–in fact, if you wanted to, you could do everything in this chapter from the command line—but Webmin makes things a lot easier to manage.
Logging in to Webmin
Now to log in to Webmin. Remember those numbers you wrote down in step 7 of the initial setup process earlier? You need those now.
- Open your main computer web browser, and type in the address you wrote down from Webmin earlier. It should read something like
https://192.168.1.112:12321. Be sure you use https or the page won’t load. The initial string of numbers is your Raspberry Pi’s IP address. The numbers after the colon are the port. - Your browser might give you a warning that the connection isn’t private. That’s okay for now, so skip through it. (The warning is simply saying the site you’re connecting to can’t be verified, which is true, because you haven’t set anything up yet.)
- At the Turnkey Linux login page, log in with the username
rootand the password you created during the initial setup process.
After you log in, you’ll see the Webmin main page.
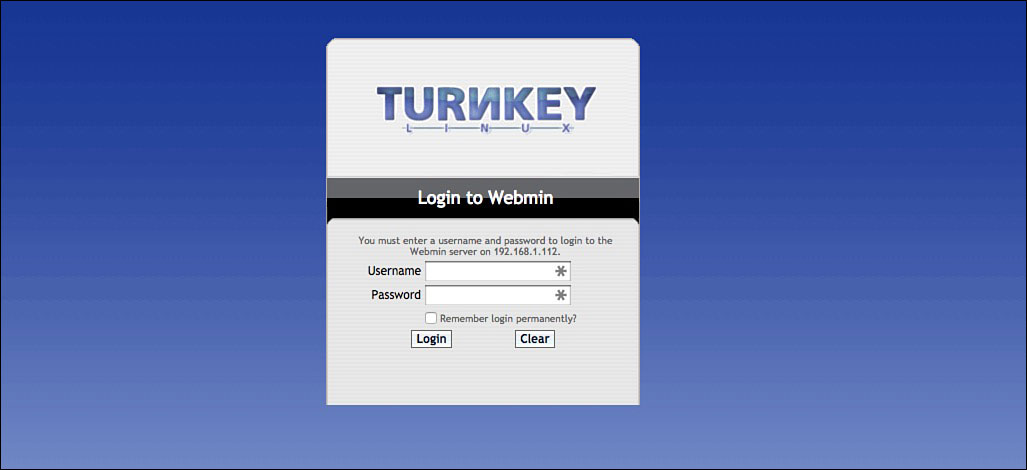
The initial Webmin login page is where you finally start configuring everything.
Upgrading Webmin
Everything looks like it’s ready to go, but before you start setting up your server, you need to update Webmin. Click the Upgrade Webmin Now button to start the update process.
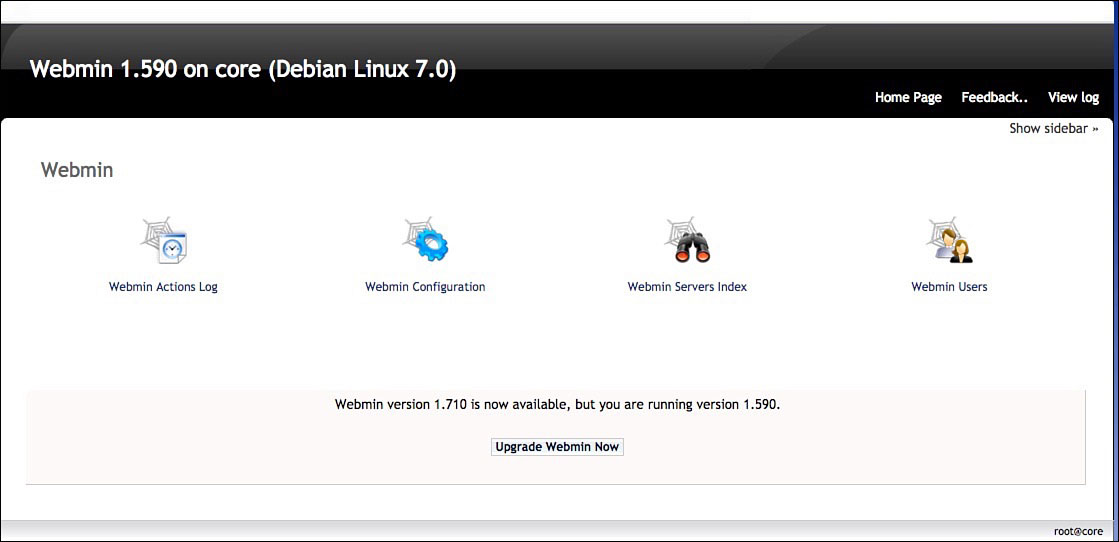
Before you proceed, you need to upgrade Webmin.
You’ll then see a bunch of text on the screen about various things downloading and uncompressing.
Just let Webmin do its thing. It will take a few minutes to work. At certain points, it will say something like Download complete or Package signature verified successfully. This doesn’t mean the update is finished, so let it go until you see Webmin has been installed and started successfully.
When it’s complete, click the Return to Webmin Configuration button. You’ll see a lot of cool-looking stuff to mess around with here, but hold off for a second. You need to do a few other things first.
Logging in over the Shell Interface
Included in your Turnkey distribution is software called Shell in the Box, which enables you to log in and use the command line on your Raspberry Pi server from your web browser. It also makes things a lot easier to manage and allows you to run your Pi without a monitor.
Shell in a Box is a web-based terminal emulator. It gives you access to the command line on your Raspberry Pi server from any web browser. This is helpful with a web server because you often need to get into the command line to do things Webmin can’t do. You might need to download a specific set of files, for example, or move things around quickly. With Shell in a Box, you can do everything you can normally do in the command line. The only difference is you’re not directly in front of your Raspberry Pi.
Shell in a Box is included with the Turnkey distribution you’re using, so you don’t need to do anything extra to get it working.

SOFTWARE SOLUTION
You don’t have to use Shell in the Box. If you’d prefer to use SSH and your computer’s shell program, that’s another option. The nice thing about Shell in the Box is that you don’t need extra software, so you can access it anywhere.
Logging in Through Your Browser
Because you don’t need any special software, you can log in to Shell in the Box from your computer’s browser. Here’s how:
- In your web browser, type in the web shell address you wrote down earlier. It’ll read something like
https://192.168.1.112:12320. - You’ll likely see the unsafe warning again. Skip it, and you’re greeted with a shell login that looks just like the command line.
The shell interface looks just like the command line on your Raspberry Pi, but it’s in your browser.
- Type in
rootfor the username and your password for the password. From here on out, you’ll be using this shell just like you would if you set up SSH.
You’re now logged in to your Raspberry Pi server and can interact with the command line. Let’s change up some settings.
Changing Your Host Name
Chances are, you don’t want your server to be called CORE, which is the default host name. The good news is, you can change it to whatever you want. Here’s what to do:
- At the command line, type in
nano /etc/hostname, and press Enter. - Replace CORE with whatever you want your host name to be.
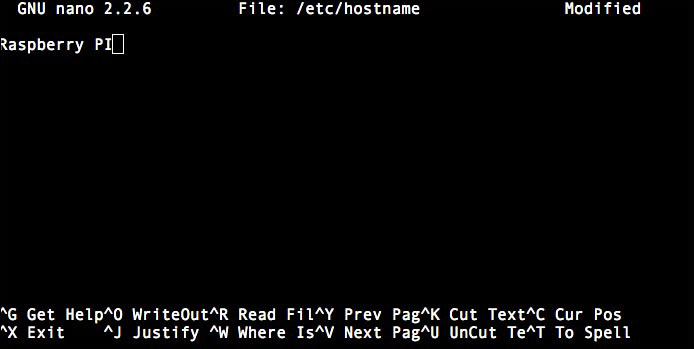
You can edit your host name to whatever you’d like it to be.
- Tap Ctrl+X to save and exit.
- Type in
rebootto reboot the system so your change takes effect.
Now, your server has the host name you want.
Mounting an External Hard Drive (Optional)
If you want to store a lot of stuff on your web server, you should attach an external hard drive. This isn’t required by any means, but if you plan on hosting anything more than a couple static websites with a lot of text, you’ll want an external drive.
External hard drives are inexpensive, and just about any of them will work for this project. Get something big so you don’t need to upgrade in the future. Any hard drive larger than 100GB should be plenty for what you need.
Downloading NTFS
Assuming you’re using an NTFS-formatted external hard drive, you need to install some NTFS software. This part’s super easy:
- Go to your command line tab, and type in
apt-get install ntfs-3g. - Press Enter.
Wait for it to download and install everything. It’ll take a little while.

DEFINITION
New technology file system (NTFS) is a file system originally developed for Windows but that’s now supported by every operating system. Out of the box, many hard drives are already formatted as NTFS, but you can check yours by typing sudo blkid into the command line.
Mounting Your Hard Drive
Next, you need to mount your hard drive so Webmin knows where it is. Typically, you’d do this from the command line, but Webmin has a simpler method built into it. Here’s what to do:
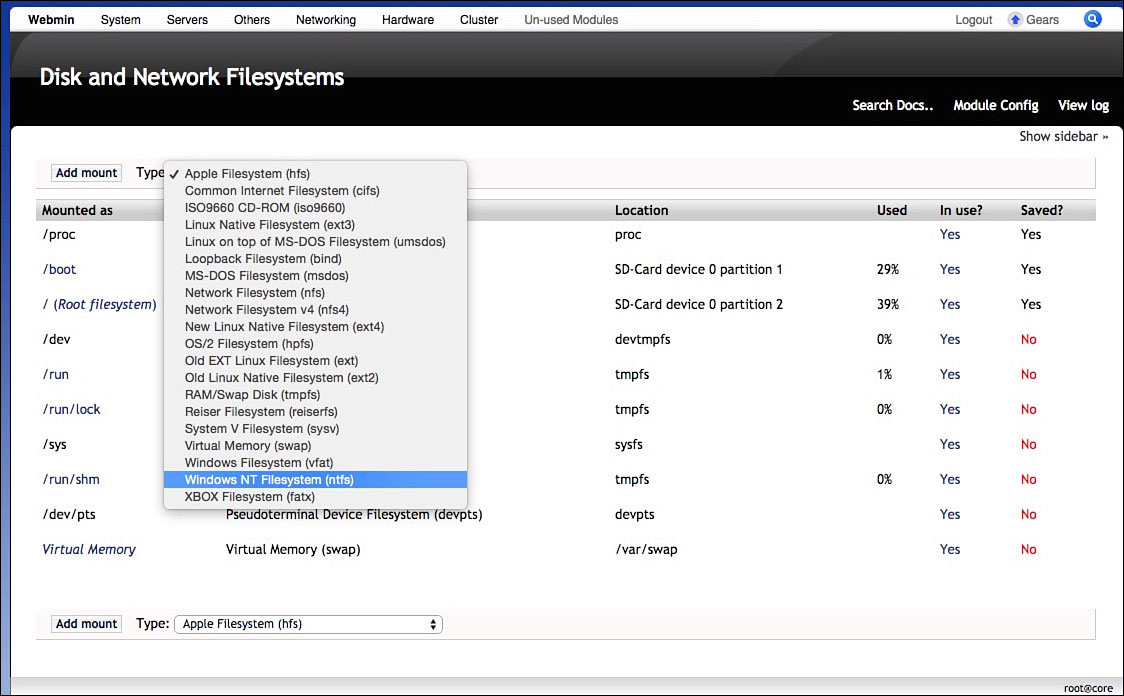
- Back on the Webmin configuration screen, click System.
- Select Disk and Network Filesystems.
- From the drop-down menu, select Windows NT Filesystem (ntfs).
If you have a hard drive connected to your Raspberry Pi, mounting it in Webmin is just a click away.
- Under Mounted as, type in
media/hdd. - Be sure Save and mount on boot and Mount are both selected.
- Under Disk, select your hard drive. There should be only one option.
- Under Read only, choose No. Leave the rest of the settings as they are.
- Click Create.
Now your hard drive is mounted and useable by your server. You should see it listed on the Disk and Network Filesystems page.
Installing MySQL
Next you need to download and configure MySQL. MySQL is database software that provides the back end for a lot of modern websites. “Database software” might sound pretty boring, and at a glance, MySQL isn’t exactly the most exciting piece of software you’ll install. However, it is very necessary.
In order to add, access, and process data stored on your server, you need database management software. That’s exactly what MySQL is. It takes a look at the massive amounts of tables, stats, and details on your server and turns them into useable information. If all your data is a spreadsheet, for example, MySQL is your Excel.
MySQL is required to make all kinds of things on websites. The most obvious is login information, but it’s also used to store specifics about picture galleries, lists, and even the basic structure of a website. If your site has various folders that link to other ones, MySQL is there to understand that relationship.
MySQL is incredibly complicated, and entire careers are built around managing MySQL databases. Don’t let that worry you, though. It’s good to have an understanding of how MySQL works and what it is, but you can get through this project without such extensive knowledge. The more you tinker with your private web server, the more you’ll learn about MySQL, and that’ll be enough knowledge for you.

PI POINTER
MySQL is one of the most popular and widely used pieces of database software. It’s second only to SQLite (sqlite.org), which is similar to MySQL but a little more lightweight. Certainly other options are out there, but MySQL is the industry standard for nearly every website.
Downloading and Installing MySQL
Next, it’s time to install MySQL because without it, you won’t be able to use any of the advanced features like ownCloud or WordPress featured later in this chapter.
Here’s how to download and install MySQL:
- On the Webmin page, click Un-used modules.
- Select MySQL Database Server.
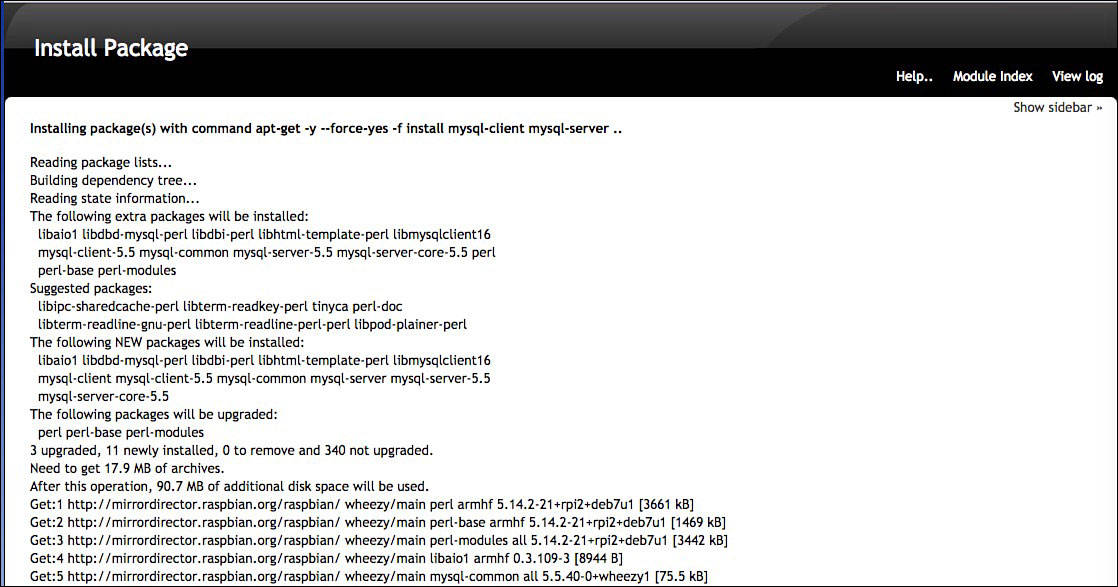
- Click on Click here to download and install MySQL. You’ll see a bunch of text on the screen, so wait until it all downloads and everything installs.
The MySQL install page will take a little while to install everything.
This process might take some time, so let it do its thing and don’t close your browser window. When it’s finished, you’ll see a message on the bottom saying Return to MySQL Database Server. Click that message to head back to the main page.
Setting Up a Database
Now MySQL is installed, but it’s not really doing anything. In order to actually use it for something, you’ll need to set up a database for your various web applications to use. In this case, you’ll set one up for OwnCloud.
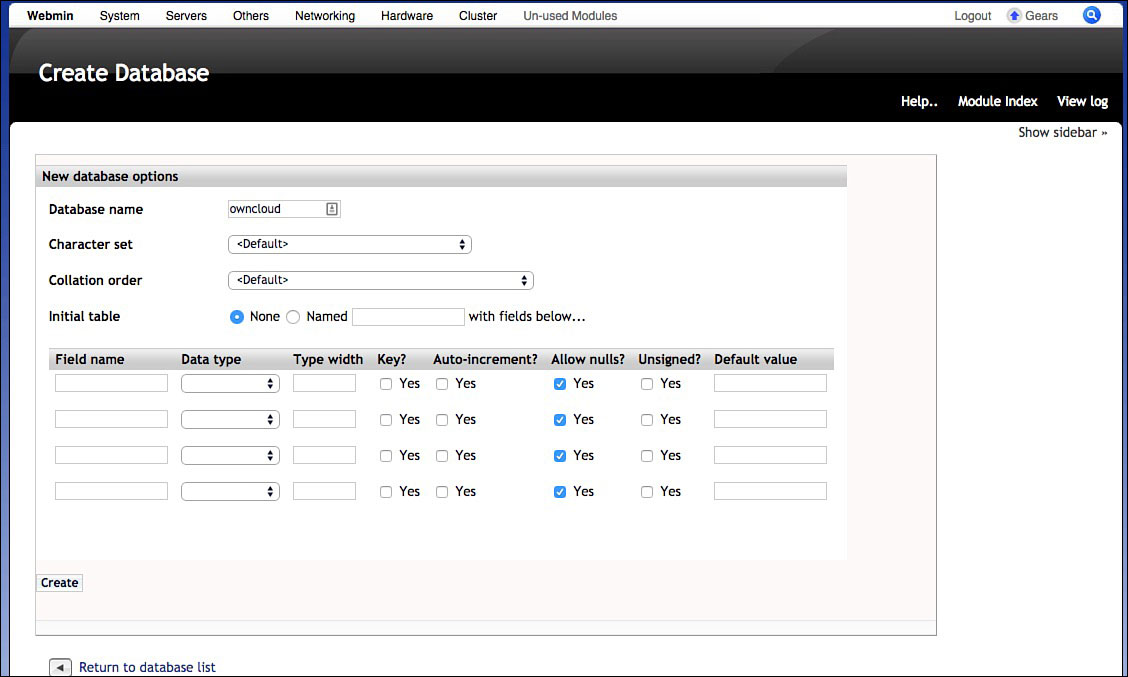
Setting up a new database in MySQL is very quick and easy.
- In Webmin, click Servers.
- Select MySQL Database Server.
- Click Create New Database.
- Name your database here. Because this one’s for ownCloud, let’s just call it
owncloud. - Leave all the other fields here blank. Click Create at the bottom of the page to make the database.
That’s all it takes to create a database. Now you’ll establish a user so you can actually access your database.
Adding a New User to MySQL
For security, it’s good to create a new user for your database. This way, all your data is secured behind a username and password. When you create a user, the web application attached to that database only has access to the database you give the user, so if it’s ever compromised, the user can’t access the rest of the database. Plus, it just makes things a little neater and easier to understand if you ever do a server overhaul.
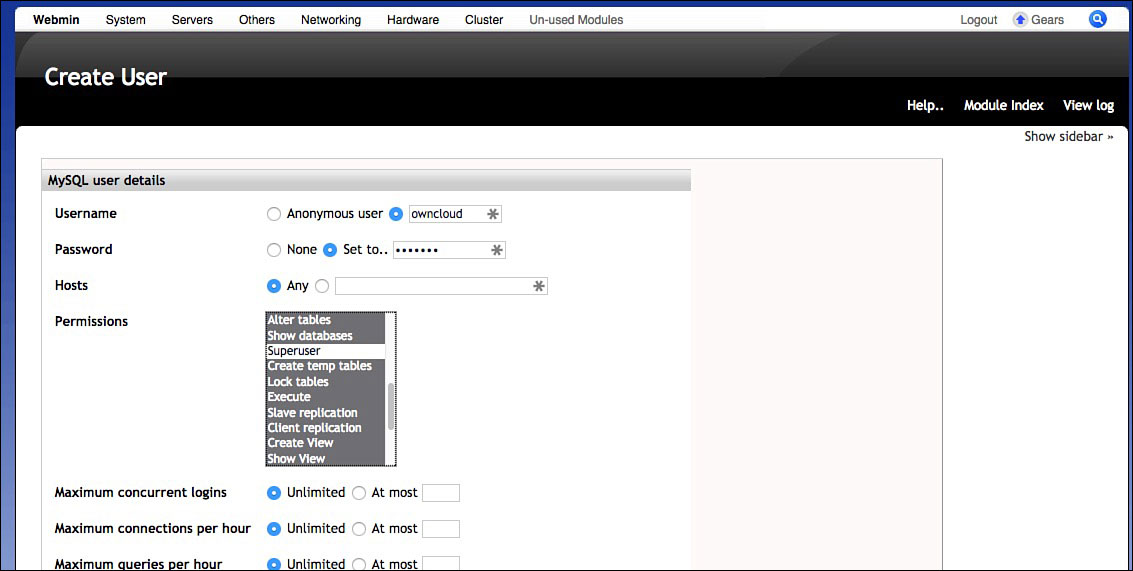
Every MySQL database you create should have its own user to help add security.
Here’s what to do:
- In Webmin, click Servers.
- Select MySQL Database Server.
- Select User Permissions.
- Click on Create new user.
- Create a username. For consistency’s sake, I’ll use
owncloud, but you can make yours whatever you want. - Create a password. Be sure it’s something you can remember!
- Leave the Hosts section blank.
- Under Permissions, select everything except Superuser.
- Leave everything else how it is. Click Create when you’re done.
Now you’ve created a user for your ownCloud install, which we’ll get to later in this chapter.

PI POINTER
If you want different databases, you can add as many users as you want here. Besides ownCloud, you’ll also need one if you decide to install WordPress. You can share databases among web applications, but it’s not a good idea. It’s better if you set up a new database for each application. That way, if something goes wrong with one of them, it doesn’t affect the entire database.
Installing PHP
Next you need to install PHP. Like MySQL, PHP is required for just about all web applications, so this is a must if you plan on doing anything interesting with your server. In this project, it’s necessary for both WordPress and ownCloud.
PHP is a scripting language used in web development and works as the back end for many websites. It provides the scripts for sites that perform calculations, process user input, read files, and more. It works with HTML to provide information that’s displayed on the site. Like a lot of things in this chapter, a full explanation of PHP can be a book in itself, but you won’t be messing around with it beyond installing it here.
Downloading and installing PHP is super easy and works just like installing any other software:
- Open your command line tab, and type in
apt-get install php5 php-pear php5-mysql. - Press Enter.
This process might take a little while.
You also need FTP software. FTP is a file transferring protocol that allows you to move files between computers on a network. With FTP software installed, you can dial in to your web server from any computer, no matter where you are in the world.
You’ll be setting up your web server in your home on your own Raspberry Pi, so you might need to connect to it remotely at some point to upload files. For example, maybe you’re on vacation and realize the main web page has a typo on it. FTP makes this super easy to access and update.
FTP is also helpful if you decide you want to store some files on your server. Let’s say you have a big presentation to give at work but you can’t seem to find a thumb drive to put it on as you’re getting ready that morning. With FTP, you can upload the presentation file to your private server and then download it to your office computer when you get to work. It’s simple, secure, and typically pretty fast.
Downloading FTP Software
First, you need to download some FTP software and configure it:
- At the command line, type in
apt-get install proftpd, and press Enter. - Wait for the software to download and install. When it’s finished, type in
echo, and press Enter.
"/bin/false" >> /etc/shells
Once that’s finished, your next task is in the Webmin panel.
Configuring Webmin
Now you’re going to tell Webmin that you installed FTP access. That way, it knows what it’s supposed to do when you try to connect over FTP.
Here’s what to do:
- Click on Webmin.
- Select Webmin Configuration.
- Select Webmin Modules.
- Click the box next to Standard module from www.webmin.com.
- Click the … button to the right of that.
- Select proftpd from the list.
- Click Install Module. Wait for everything to install.
- When it’s finished installing, click Systems at the top of the page.
- Select Users and Groups.
- Select Create User.
- Under Username, type in a username. For consistency, I’ll use
PiFTP. - Leave everything else blank. Under Shell, select /bin/false.
- Select Normal Password, and type in a password.
- Select New Group with the same name as user.
- Leave everything else how it is, and select Create at the bottom of the page.
You’ve now added FTP to your web server and created a login to use with it. When you’re totally finished with this project, you’ll be able to log in remotely to your web server and access your files via FTP.

PI POINTER
You can access your FTP server from either special software on your computer or just through your web browser by typing in ftp://yoursite.com. This won’t be useful until you get your server online in the later section of this chapter, though.
Installing Samba (Optional)
FTP is great for remote file management, but chances are, you’ll be managing most of that stuff locally on a computer that’s on the same network as your Raspberry Pi server. For that, you’ll want to install Samba.
Like FTP, Samba is a file sharing protocol. The difference here is that Samba is for sharing files inside a network. So if you have your home computer connected to the same network as your Raspberry Pi web server, you can easily transfer files between the two. Considering you’ll likely do most of your web site management this way, Samba makes things a lot easier to use.
Downloading and Installing Samba
Installing Samba from Webmin is super easy and only requires a few clicks to complete:
- In Webmin, click on Un-used Modules.
- Select Samba Windows File Sharing.
- Click on Click here to download and install Samba.
Again, this will take a little while to download and install, so give it some time. When you see Return to Samba Windows File Sharing, the install is done.
Setting Up Samba
Samba’s an easy way to share files between your server and a computer on the same network, but it needs a little help understanding what’s going on before it’ll work. Here’s what you need to do:
- Back in the Webmin, select Servers.
- Select Samba.
- Select all the checkboxes next to the different directories.
- Click on Delete Selected Drives. Don’t worry; nothing’s getting deleted. This is just part of the setup process.
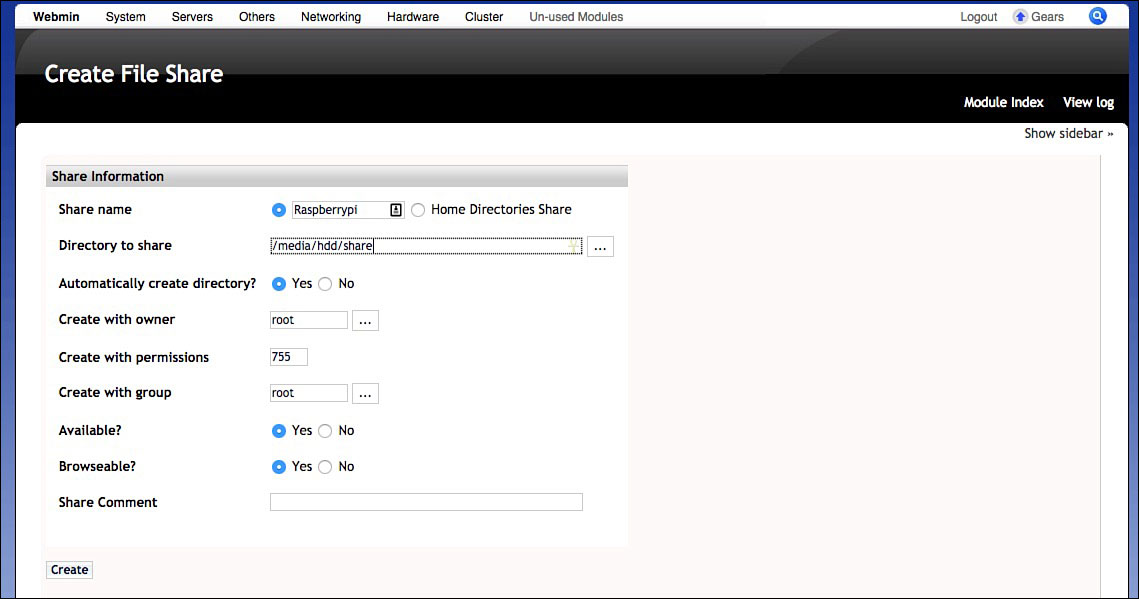
- Click on Create a New File Share.
- Fill in the following information:
Share name: Type any name you want here
Directory to share:/media/hdd/share
Automatically create directory? Yes
Create with owner:root
Create with permissions:755
Create with group:root
Available? Yes
Browseable? Yes
When you’re done, click Create.When Samba file sharing is set up, you can easily move files between your home computer and your server.
- You’ll now see your mounted drive. Click on it.
- Click the Security and Access Control option.
- Change Writable to
Yes. - Click Save.
Now, the folder you mounted will be shared locally on your network. You can do this with any other folders you want to share individually by following these instructions and changing the Directory to share option to another folder.

PI POINTER
You might see Samba called Samba Windows File Sharing in the menu. That’s okay. You’ll be able to access your Raspberry Pi web server’s Samba shares from Windows, Mac, and Linux.
Creating a New Samba User
Now you need to add a little security to your Samba share. This is done by creating a user and a password. Here’s how:
- Open the command line in Shell in a Box.
- Type in
pbdedit -a -u root, and press Enter. - Enter a password for Samba.
That’s it. You now should have access to your server from your Windows or Mac computer. Just click on the server in Explorer in Windows or Finder in Mac to access it.
Installing ownCloud (Optional)
Next, you’ll install ownCloud. ownCloud is free and open-source software that enables you to sync data across computers using your own server. It’s easy to install on your home server.
ownCloud was originally created as a private alternative to services like Dropbox and iCloud, and it works similarly. Out of the box, you can store files on ownCloud that you can access from other computers or mobile apps. It also has a built-in media player, a variety of tools, and more. With ownCloud, you can install the software on your own server, which means you don’t have to pay monthly fees for extra storage like you would with some other similar services.
Let’s take a look at a few of the bigger features included with ownCloud to get an idea of how it works:
File syncing and storage: ownCloud works exactly like Dropbox in that you create a folder on your computer and everything you do in that folder automatically synchs to your server and any other computer attached to the same account. So if you save a text file in your computer’s ownCloud folder, it’s automatically uploaded to ownCloud as a backup. If you make any edits, the new file is uploaded as well. It’s great for backups.
Calendar: ownCloud includes a basic calendar you can sync across your various devices. If you’ve ever used Google Calendar, it works similarly.
Music streaming: Want to have access to your music library from anywhere in the world? ownCloud features music playing software. Just upload your MP3 files to your server, and you can play them in any web browser from the ownCloud page.
Photo gallery, video viewing, and PDF viewing: ownCloud includes software to view all the types of files you could possible need it to. So if you upload all your photos, you can easily access them in a slideshow view. If you want to watch some videos stored on your server, you can. In addition, you can open basic documents like PDFs.
Apps: ownCloud isn’t limited to what’s in the box. If you need more features, you can install third-party apps to get a little more functionality. These apps range from file editing software to games.
If you want, you can set up ownCloud on your server and never actually host a website. This is ideal if you’re tired of paying fees for online storage or you’d prefer to keep your private data off third-party services.

ownCloud mobile apps are available for Android and iOS. With these apps, you can access your server’s file easily while you’re on the go. You also can play music, so if you’re storing your music library on your server, you can get to it no matter where you are. Likewise, there are apps for Windows, Mac, and Linux that add syncing capability so it’s easy to upload files. You can grab all of them at owncloud.org.
Installing ownCloud
You can install ownCloud from the Webmin screen, which makes things pretty easy:
- In Webmin, click on System.
- Select Software Packages.
- Click the button next to Package from APT.
- Type in
ownCloud, and click Install.

The ownCloud installation takes just a couple clicks.
Like pretty much everything else so far, it’ll take a little while for ownCloud to download and install, so sit back and relax while it does its thing. When it’s finished, it’ll say Return to module index.
You’ll need to finish with a bit of work in the command line:
- Open Shell in a Box.
- Type in
cd /media/hdd, and press Enter. - Type in
mkdir cloud, and press Enter to create a directory for the ownCloud installation. - Type in
chmod 750/media/hdd/cloud, and press Enter to change the permissions of the folder.
That’s it for the back end portion of setting up ownCloud. Now it’s time to configure it.
Configuring ownCloud
You’ll configure OwnCloud using a web address. Here’s how:
- Navigate to YourPisIPAddress/owncloud from your browser. It should be something like 192.168.1.112/owncloud.
- At the login screen, you’ll create a new user account. Pick a username and password, and type them into the appropriate boxes.
- Click the Advanced button. Change Data folder: to
/media/hdd/cloud.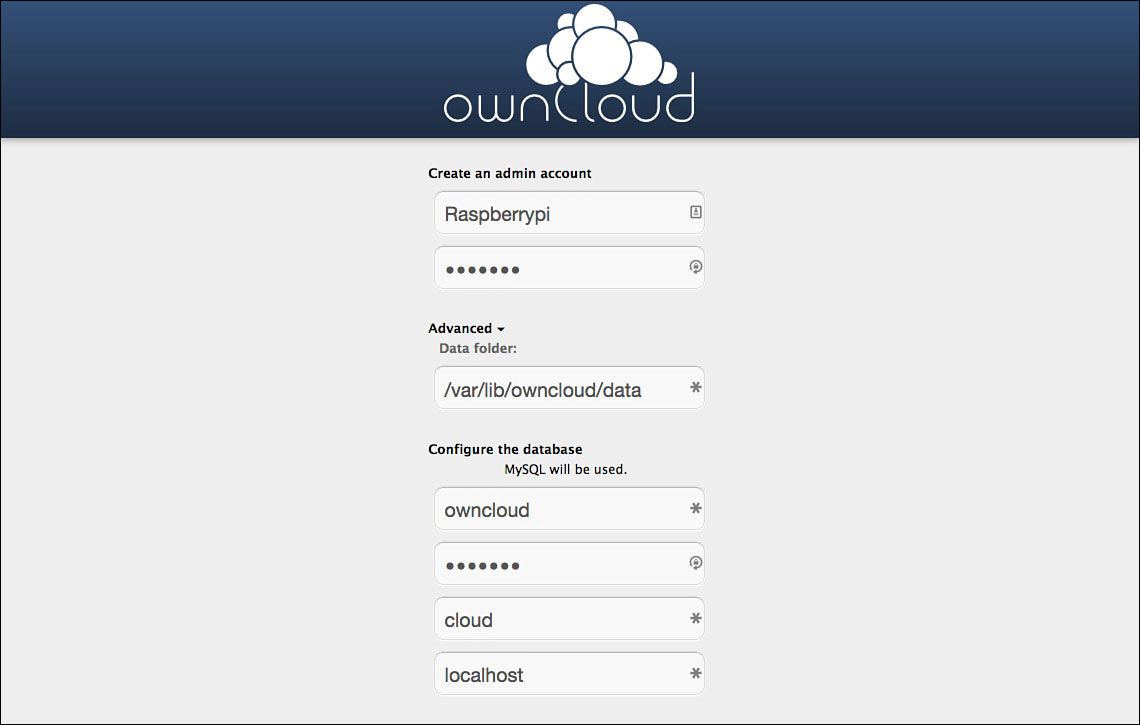
When you finish the installation, you can set up ownCloud in a variety of ways.
- Select MySQL.
- Enter in the MySQL info you made before. Our example was
ownCloud. - Type in the database name.
- Select Finish.
Now ownCloud is all set up. It’s time to start using it.

PI POINTER
Your ownCloud installation is locked away behind a password, but be just as careful with your login information as you would be with any other public service. This might be hosted on your own server, but that doesn’t mean somebody’s won’t happen upon it randomly. Use a good, strong password, and don’t share it with anyone.
Using ownCloud
As you’ve already learned, ownCloud is packed with quite a bit of stuff. Thankfully, most of it’s pretty self-explanatory to use, but let’s make a quick run through the menus.

You can access all your files from the main ownCloud screen.
Files: Here is where all the files you’ve uploaded into ownCloud will reside. This is a pretty basic file browser, but it’s easy to navigate and use. You also can share files from here if you need to send something to a friend or colleague.
Music: If you’ve uploaded any MP3 files to ownCloud, you can play them here. The music player’s not going to blow iTunes out of the water, but it gets the job done and gives you access to all your music, regardless of where you are.
Contacts: If you want to sync your address book with ownCloud, this is where you do it. After you’ve uploaded your contacts, you can easily access them from anywhere.
Calendar: ownCloud makes a handy calendar. You can sync your desktop and mobile calendars with ownCloud so they all match.
Pictures: This is where your photos are stored. Just click the tab and then a picture, and you’ll be able to start a slideshow of everything included here. This is an easy and inexpensive way to back up all your photos to any external hard drive without a lot of hassle.
That’s the basics of ownCloud. There’s a lot more tucked away inside of it, but this is plenty to get you started.
Installing WordPress (Optional)
If you’re interested in running a blog on your web server, you’ll need to install some blogging software. WordPress is free, open source, and easy to use, so it’s a great addition to your Raspberry Pi web server.
WordPress is a content management system (CMS), which is really just a fancy way of saying it’s a back end for a blog. Once you have WordPress installed, you can create new blog posts, post your favorite pictures, and run any type of blog you want.
The nice thing about WordPress is how extensible it is. It’s not just a boring old blog. You can alter it in countless ways, change the look, change how it functions, and so much more.
Running a WordPress blog and customizing it to suit your content can be a full-time job, but you don’t have to take it that far. It’s actually pretty easy to learn the basics. Once you get it installed, things like posting a new blog post or changing the theme are all pretty self-explanatory, so even if you have no experience running a blog, you’ll be able to figure out what you need to get it online.
Setting Up a WordPress Database
You’ll need to give WordPress its own MySQL database. This is where it’ll store all kinds of basic information so it can work properly. Here’s how it’s done:
- In Webmin, click on Servers.
- Select MySQL Database Server.
- Click on Create new database.
- Give the database the name
wordpress. - Click Create.
Now you need to set up a user for the WordPress database.
- Back at the MySQL Database Server screen, select User Permissions.
- Click User Permissions.
- Select Create New User.
- Under Username, type in
wordpress. - Give your database a password under Password.
- Under Permissions, pick Select table data, Insert table data, Update table data, Delete table data, and Create tables.
- Click Create.

PI POINTER
If it’s just you running the blog, you can safely select everything under permissions if you really want to tinker with things. The Permissions settings in step 6 are really the bare minimum for WordPress to work, but it keeps things locked down so nobody messes with something you don’t want them to access.
Now your MySQL database is all set up. Let’s get WordPress installed.
Downloading and Installing WordPress
You can download and install WordPress from the command line:
- Open Shell in a Box.
- Type in
wget http://WordPress.org/latest.tar.gz, and press Enter. Wait for WordPress to download. - Type in
tar xzf latest.tar.gz /var/www/, and press Enter. This unpacks the WordPress file into your server’s website folder. - Head back to your computer’s browser, and type in
RaspberryPiIPaddress/wordpress. It should read something like192.168.1.112/wordPress.
Next, you’ll configure WordPress with the databases you set up earlier.
Creating a WordPress Configuration File
Now that WordPress is installed, it’s time to get it set up.
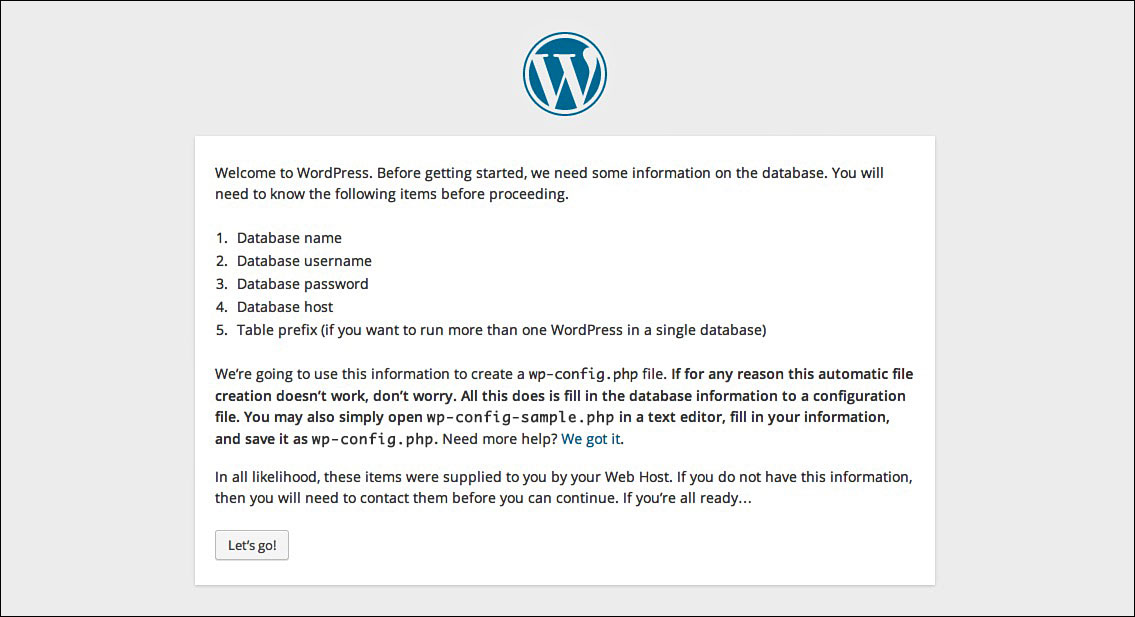
Before you can use it, you need to configure WordPress to work with your database.
Here’s what to do:
- From your main WordPress page, click on Let’s go!
- Enter in your database name, your user name, and the password you created in the previous step for MySQL.
- Under Database Host, type in
localhost. Leave the Table Prefix setting alone. - Click Submit.
You’re almost there. Now you need to install WordPress on your web server.
Installing WordPress
Previously, you downloaded and installed what’s basically an installer for WordPress. Now it’s time to get it actually working:
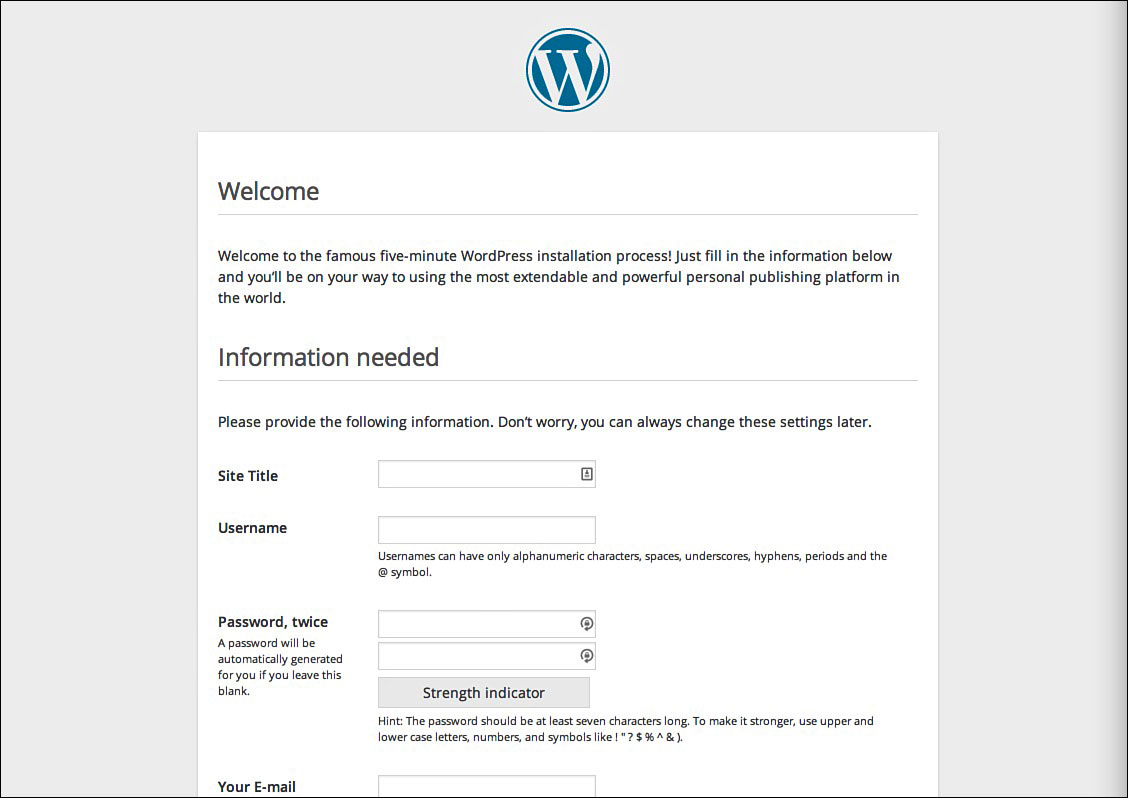
- Click the Run the Install button.
- Now you’ll create a special user for WordPress and WordPress alone. This is different from the MySQL user you set up before. Give your website a title, create a username for yourself, type in a password, and enter your email address.
Now it’s time to actually install the WordPress front end you’ll use.
- Click Install WordPress.
- When it’s finished, click Log In.
Congratulations! WordPress is now installed. Go ahead and log in with your username and password.

SOFTWARE SOLUTION
Besides WordPress, you can install countless other content management systems on your blog. If you don’t end up liking WordPress, you might also want to check out Drupal (drupal.org), Ghost (ghost.org), or Plone (plone.org). Each has its strengths and weaknesses, but they’re all free and pretty easy to get up and running on your web server if you want to use one of them instead of WordPress.
As mentioned earlier, running a WordPress blog can be a full-time job, so don’t worry if you think it looks a little overwhelming. In this section, let’s look at the main Dashboard screen so you’re more familiar with how it works.
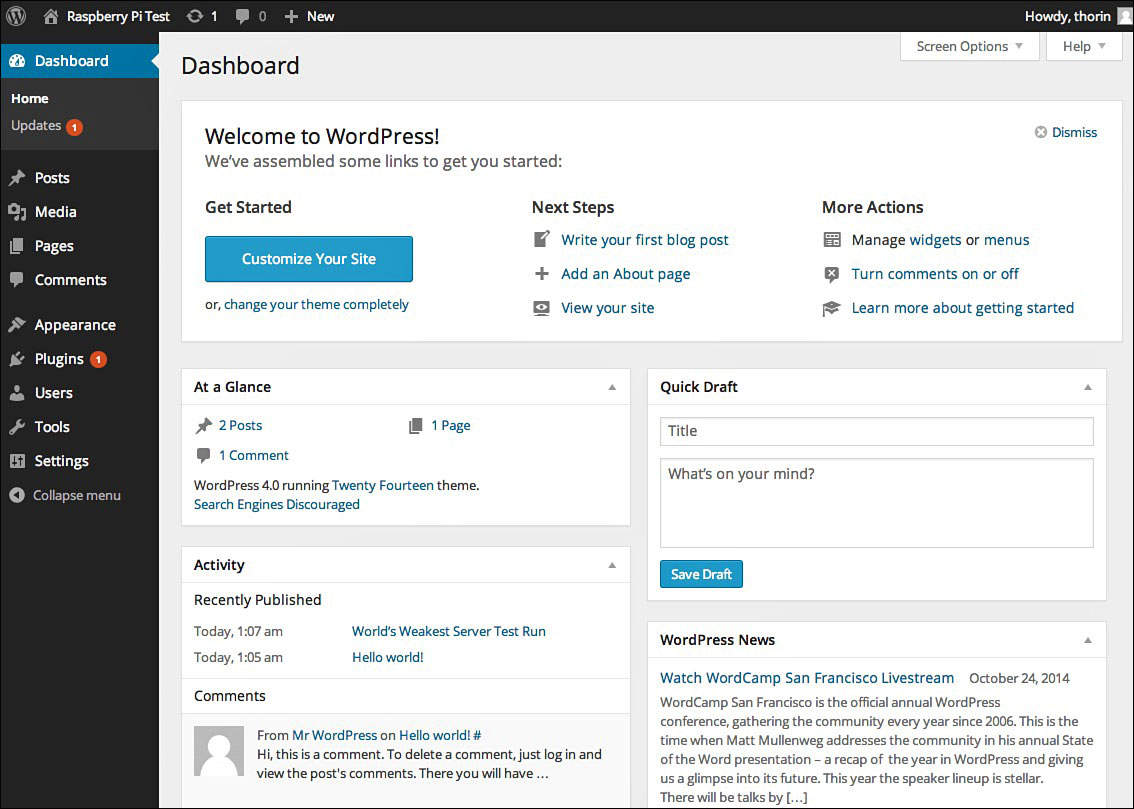
If you’ve ever used a blog before, the WordPress Dashboard should be familiar to you.
Dashboard: This is the main landing page you come to when you log in to your WordPress site. Here you’ll find a menu screen that gets you to other settings, a Quick Draft area where you can quickly type up a blog post, and a link to customizing your blog. This might look a little overwhelming, but click around on the Dashboard to figure out what everything does.
Posts: This is where you can look at all your existing posts, write new posts, and edit old posts. If you’re looking to write your first blog post for your new site, this is where to start.
Media: The media section is where you’ll find any videos, sound files, or images you’ve uploaded to your site.
Pages: In WordPress, you get a blog post that’s simply part of your blog, and pages, which are separate and static. For example, if you wanted to include an “About Us” section on your blog, you’d make a new page. You can do that here.
Comments: If someone comments on one of your blog posts, you’ll find their note here. You can dismiss comments, get rid of spam, and ensure nobody’s being a jerk on your blog in this section.
Appearance: This is where you’ll make the big changes to your WordPress blog. You can alter little things like font and colors, or you can change the entire appearance of the whole site with different themes. Themes are basically design overhauls for your WordPress blog. You can choose from a variety of free themes from this page or upload and create some yourself.
Plugins: Plugins let you alter how things work on your blog. Think of them like little micro apps. Say you don’t like the WordPress comment system. If that’s the case, you can find a plugin that changes how it works. Plugins range from altering where a title is located to creating a giant calendar, so mess around in this section to find some cool stuff to customize how your site works.
Users: You don’t have to be the only one contributing to your WordPress blog. If you want to invite friends along to blog with you, you can do so by giving them a user account here.
Tools: This includes a bunch of advanced tools for moving blogs between different accounts. You probably won’t need to do much here.
Settings: This page handles just about every single setting imaginable on your WordPress blog. You can change the name, alter how links work, change the time, and so much more. It’s worth spending a bit of time poking around here to see exactly what you can do.
That’s a very brief overview of WordPress. WordPress is an incredibly powerful blogging platform with entire books dedicated to how to use it, so don’t be surprised if there’s a bit of a learning curve here.
Still, if you just want to post some blog posts and have some fun, you can get to using WordPress right away. Just click that New Post button, and you’re on your way.

PI POINTER
WordPress might seem like it has a billion and one options, but don’t let that discourage you from poking around. Start by just making a few blog posts and then move on to customization. Using free themes online is a really easy way to set your site apart from the rest without knowing a bit of code, so that’s a good place to start.
Assigning Your Raspberry Pi an IP Address
Now you’re running your very own web server in your home, and it’s packed with a ton of cool features. The only problem is that it’s only accessible to computers on your home network. To fix this, you need to open your server to the internet so you can access it while you’re out and about.
You have a range of options for doing this. We worked with dynamic DNS in Chapters 13 and 16. Let’s use a different service this time around. In this case, No-IP.
Getting an External IP Address with No-IP
Before you can set up and install No-IP on your server, you need to sign up for an account. Here’s what to do:
- Head to noip.com/sign-up.
- Fill in the form to create an account, being sure to click the Free Sign Up button for a free account.
Your resulting address will be yourname.ddns.net.
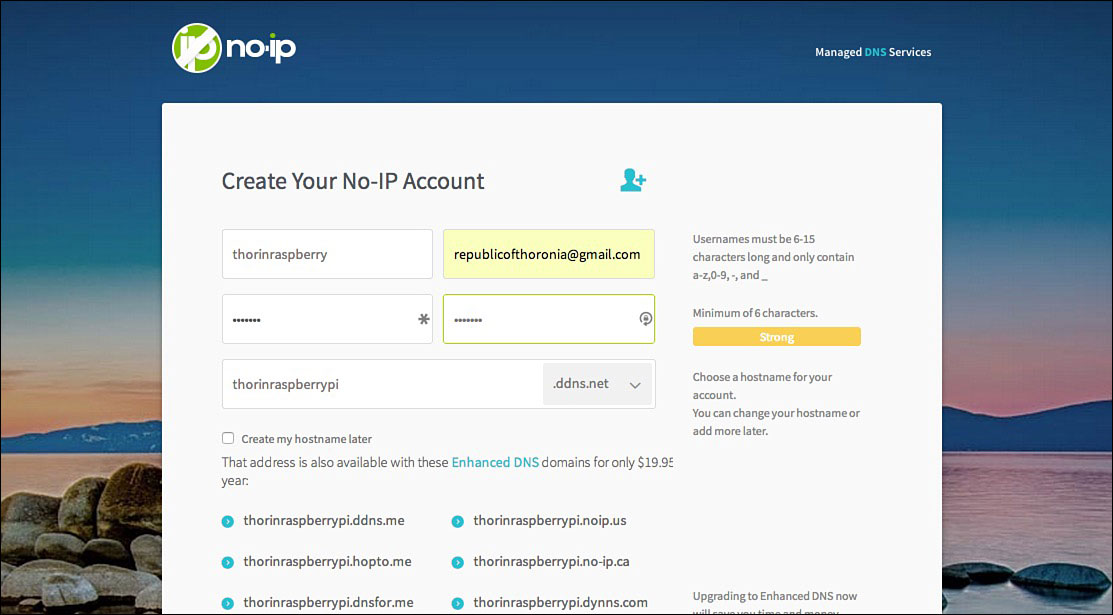
The No-IP sign-up page takes just a few seconds to fill out.
Next, you need to install the No-IP server. That means one last job in the command line. Here’s what to do:
- Open Shell in a Box in your browser.
- Type in
cd /usr/local/src, and press Enter to change to this directly. - Type in
wget http://www.no-ip.com/client/linux/noip-duc-linux.tar.gz, and press Enter to download and install No-IP. Give it a little bit of time to download and install. - Type in
tar -zxvf noip-duc-linux.tar.gz, and press Enter. - Type in
cd no-ip-2.1.9-1, and press Enter. - Type
make, and press Enter to create the file. - Type in
make installto start the installation. - When prompted, enter in your No-IP email address and password you registered earlier.
- When prompted, leave the update interval at 30.
- When prompted to Do you wish to run something at successful update, press
N.
With that, you’re registered online and your website has an address. Now it’s time to tell your home router it’s okay for your server to be on the internet.

PI POINTER
If you want a “real” web address like yourname.com, you’ll need to pay for it through a domain registration site. Countless options exist. Namecheap (namecheap.com), Hover (hover.com), and Dreamhost (dreamhost.com) are all reliable and relatively affordable.
Setting Up Port Forwarding on Your Router
This last step is one of the more difficult ones because all routers are different. However, once you find the setting you’re looking for, the rest is super easy.
Here’s what to do:
- Log in to your home router from your web browser. It’s usually something like 192.168.1.1. If you don’t know your router’s address, refer to your owner’s manual.
- Find the section for port forwarding. It’s usually under the NAT/QoS menu, but again, all routers are a little different.
- Next, you need to set up port forwarding for each of the services on your web browser. That means Webmin, Shell, ownCloud, and your WordPress installation. Use the following table to set up everything, substituting your IP where applicable.

Again, every router’s a little different, so you might need to play around and tweak these settings some.
When you’re set up, you’ll be able to access your server from anywhere in the world. If you used the examples in the preceding table, you’ll be able to access them like so:
- Webmin panel: yourserveraddress.ddns.net:12321
- WordPress: yourserveraddress.ddns.net/wordpress
- ownCloud: yourserveraddress.ddns.net/owncloud
- Shell: yourserveraddress.ddns.net:12320
With that, your server is online and ready to host your website.
The Least You Need to Know
- Setting up your Raspberry Pi as a web server takes about a day’s worth of work.
- When you’re finished with the setup, you’ll have a web server that hosts your private files, a website, a blog, and more.
- Running a server can be tough and take a lot of effort, but it’s a great skill to have.
- You’ll be able to create any type of website you want, and your Raspberry Pi will host it for you, so anyone in the world can see it.

