Lesson 11
Adding JOIN Queries
Relational databases model both data and relationships within the data. Their approach to relationships is clever.
- Related things don't have to be stored together.
- You can ignore related data when you don't need it.
- When you need related data, it's quick to retrieve.
Up to this point, the SELECT queries you've created ignore related data. They retrieve data from one table at a time. A single table SELECT is powerful, but it doesn't take advantage of SQL's full potential. With one small tweak, adding a bit of JOIN syntax, SELECT queries can read from multiple tables and express relationships between data explicitly.
STARTING WITH A SCHEMA
For this lesson, the TrackIt schema will be used. You can create this schema by running the trackit‐schema‐and‐data.sql script that can be found in the Lesson 11 folder on the downloadable files for this book.
The script contains a predefined set of data required for this lesson. The data is for a video game company, GameIt. Their workers (employees) contribute to software projects. Some of the terms used with this database include the following:
- Project is a large chunk of work that usually results in a deliverable. Projects take months or even years to complete. In the sample data, Projects are software projects, mostly video games.
- Worker is a person available to work on a Project.
- Task is a discrete chunk of work that can be completed within several hours. A Project is completed one Task at a time.
- TaskType is a Task category. Each task can have one and only one type, so TaskType has a one‐to‐many relationship with Task.
- TaskStatus is a Task status. Each Task can have one and only one status, so TaskStatus has a one‐to‐many relationship with Task.
Some of the additional relationships and rules for TrackIt include the following:
- Project has a one‐to‐many relationship with Task.
- Project has a many‐to‐many relationship with Worker.
- Worker has a one‐to‐many relationship with Task.
A Task has an optional relationship with itself. How does that make sense? If a Task is large, it can be divided into smaller Tasks. A relationship is created between parent and child by including the parent's identifier in each child row. There's nothing in the schema preventing multiple levels of parents and children, but the sample data provided for this lesson is only two levels deep.
The tables and relationships for the TrackIt database can be represented visually with an entity‐relation diagram (ERD) as shown in Figure 11.1. You should look at the relationships described in the previous bulleted lists and see how each is represented in the ERD.

Figure 11.1 ERD for the TrackIt database
This ERD represents the database schema. You may find it useful to refer to this diagram when creating JOIN queries on the database throughout this lesson, because it shows you where each field lives and how the tables are related to each other.
GET DATA FROM MULTIPLE TABLES
Imagine you work at GameIt. Your manager asks for a list of Tasks that are in resolved status. It's not possible to generate the list from one table. To find resolved statuses, you need to look in the TaskStatus table. To find Tasks with resolved statuses, you need to look in the Task table for records with a resolved TaskStatusId.
To accomplish this, you first SELECT resolved statuses, as shown in Listing 11.1.
Running this query on TrackIt will produce the following results:
| TaskStatusId | Name | IsResolved |
|---|---|---|
| 5 | Resolved | 1 |
| 6 | Resolved, Will Not Fix | 1 |
| 7 | Resolved, Duplicate | 1 |
| 8 | Closed | 1 |
You can now use these TaskStatusIds to grab Tasks from the Task table. Listing 11.2 presents the code for grabbing the tasks.
Because TaskStatusIds happen to be in a sequential order from 5 to 8, you can use BETWEEN to select the ones we want, in this case between 5 and 8. If the results were not in sequential order (such as 1, 3, 7 and 8), then you would use a WHERE clause with the IN operator, like the following:
WHERE TaskStatusId IN (1, 3, 7, 8);
When this query is executed, 276 resolved Tasks should be listed. The following is a partial set of the results:
| TaskId | Title | EstimatedHours | ProjectId | TaskStatusId |
|---|---|---|---|---|
| 3 | Refactor service layer and classes | 4.75 | payroll | 6 |
| 5 | Refactor interface | 7.75 | payroll | 6 |
| 6 | Log out | 26.25 | payroll | 8 |
| 8 | Construct service layer and classes | 2.25 | payroll | 7 |
You found the resolved Tasks, but the results are fragile. Consider why:
- If you want both the Task title and status name displayed together, then you must combine results from the two queries manually. With 276 tasks, that's a lot of copying and pasting.
- The second query may change each time it is executed. If the resolved statuses change, where statuses are added, removed, or edited, then the task query has to be modified. The queries can't be written once and then run whenever they are needed.
- Worst of all, the approach is error prone. It's easy to make a mistake. What happens if a status ID is missed while copying or an ID is included that doesn't belong?
USE THE JOIN CLAUSE
The JOIN clause is an optional clause in a SELECT statement. It expands a SELECT so it can retrieve results from more than one table and express relationships between rows. Rows from one table are joined to rows from another table and their values are combined in a single result.
A JOIN clause follows the FROM clause and precedes the WHERE in a SELECT. The basic structure is as follows:
SELECTTable1 .Column1,Table1 .Column2,Table2 .Column1,Table2 .ColumnNFROM Table1[Join Type ] JOIN Table2 ON [Relationship Condition ]WHERE [Filter Condition ];
JOIN [ Table2 ] adds the table, Table2, to the query and makes its rows available for retrieval and filtering.
ON [ Relationship Condition ] defines how rows in one table relate to rows in another.
[ Join Type ] modifies the JOIN. It determines how unmatched rows are handled. Valid values include the following:
INNERLEFT OUTERRIGHT OUTERFULL OUTERCROSS
Each of these will be covered in the remainder of this lesson.
INNER JOIN
An INNER JOIN returns a result only when rows from both tables match on their relationship condition. Visually, if you have tables A and B, the query results are the intersection of rows that satisfy the join condition, as shown in Figure 11.2. If a row from A doesn't match a row from B, it isn't included, and vice versa.
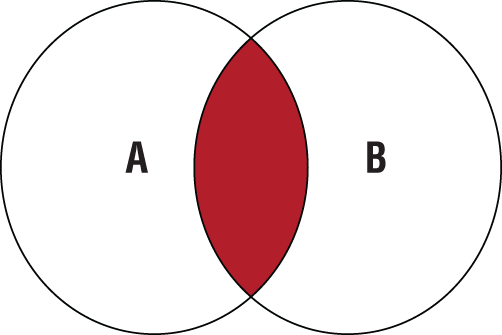
Figure 11.2 An INNER JOIN
Returning to the resolved tasks, an INNER JOIN addresses the shortcomings of the original approach. The result combines the Task title and status name, and it is done with a single query that can be written once yet will work again and again. There's never a need to change it.
Consider each keyword, table name, and column name in Listing 11.3. Map each to the basic JOIN structure. Pay special attention to the ON condition.
In this code you can see that a TaskId and Title are being selected along with a Name from the TaskStatus table. An INNER JOIN is being used to connect the Task table to the TaskStatus table. Records will be selected when a TaskStatus record and a Task record match as a result of having the same TaskStatusId. Finally, the results are filtered based on the IsResolved status being equal to 1.
When you execute this script, you should see 276 rows of data. The following is an example of what your first four rows might look like:
| TaskId | Title | Status (Name) |
|---|---|---|
| 3 | Refactor service layer and classes | Resolved, Will Not Fix |
| 5 | Refactor interface | Resolved, Will Not Fix |
| 6 | Log out | Closed |
| 8 | Construct service layer and classes | Resolved, Duplicate |
Of course, it is likely your first four rows will differ. This example purposefully repeats the four Tasks from our two‐query approach. You will soon see how to control the order of results.
Optional Syntax Elements
It's valid, though not necessarily recommended, to omit some of the JOIN basic structure. This includes table names, the INNER keyword, and more.
Omitting Table Names
If you look closely at the query in Listing 11.3 and compare it to single‐table SELECT queries, you will notice that each of the field names is qualified with the name of the table that contains that field.
SELECTTask.TaskId,Task.Title,TaskStatus.Name…
When dealing with a single table, it's obvious where each field lives, so qualifying each field name is redundant. When creating queries that reference two or more tables, the table names can usually be left out of the SELECT clause. Compare the queries in Listings 11.4 and 11.5.
These queries are equivalent other than the use of table names in the SELECT area of the statement. Their results and performance are identical. To the SQL engine, they are the same query.
Be aware that it is not always possible to omit table names. Execute the query in Listing 11.6.
When you execute this query, it returns an error.
Error Code: 1052. Column 'TaskStatusId' in field list is ambiguous
TaskStatusId is a column in both TaskStatus and Task. If it is included without a table name, the SQL engine doesn't know which one to use. In this case, it doesn't matter. The values are identical. But the SQL engine can't know that ahead of time, so it stops and warns us.
As a general rule of thumb, if your query includes two or more tables, you should qualify each field name with the appropriate table name. In cases where the same field exists in both tables and those fields represent a primary key and its related foreign key, you can technically use either table name. However, the convention is to use the name of the primary table rather than the name of the related table.
Similarly, in the INNER JOIN clause, the fields can be put in either order. However, because the fields have the same name, you must qualify both of them.
Omitting the INNER Keyword
The INNER keyword is also optional. If it is omitted, the SQL engine assumes an INNER JOIN. INNER JOIN is the default, as shown by running Listing 11.7.
You can see that the INNER keyword is omitted in this listing; however, it runs without issue. Regardless, you should always include the INNER keyword. When INNER is explicit, your intentions are clear. There's no possibility that you forgot it and intended a different join type.
Multiple JOINs
On the job, you will work with databases containing hundreds or even thousands of tables. It is common to join many tables in one statement, and SQL makes this easy. Once you understand how to build one JOIN clause, adding additional JOINs is simple—the JOIN syntax is repeated for each new relationship.
In a many‐to‐many relationship, there are at least three tables in a SELECT statement: one many, a bridge table, and the other many. Projects and Workers have a many‐to‐many relationship in the TrackIt schema. Let's use that relationship to determine who's working on the “Who's a GOOD boy!?” game Project.
Start by using Project in the FROM clause. Add the INNER JOIN for the ProjectWorker bridge. Finally, add the INNER JOIN to Worker, as shown in Listing 11.8.
You can see from the code that this script is selecting three fields from the tables: the project name and the first and last names of the workers. You can see that Project is being joined with ProjectWorker in the first INNER JOIN by using their ProjectId fields. In the second INNER JOIN you can see that ProjectWorker is being connected to Worker using the WorkerId. Finally, you can see that the results will only contain records where the ProjectId is equal to ‘game‐goodboy’.
When you run this script, you should see a list containing the project name, along with the first and last names, as shown here:
| Name | FirstName | LastName |
|---|---|---|
| Who's a GOOD boy!? | Vlad | Anfusso |
| Who's a GOOD boy!? | Ealasaid | Blinco |
| Who's a GOOD boy!? | Ardyce | Lewins |
| Who's a GOOD boy!? | Evita | Shepeard |
| Who's a GOOD boy!? | Philis | Marion |
| Who's a GOOD boy!? | Dannie | Bradly |
| Who's a GOOD boy!? | Winny | Lawles |
There are a couple of things to note about this script. After the first INNER JOIN clause, you can see that the second INNER JOIN clause was added. Note that there are no commas or separators between clauses.
Additionally, you should note that you are not required to use fields in the FROM or JOIN tables. FROM and JOIN make a table's fields available for retrieval or filtering, but you don't have to use them. In this case, ProjectWorker's fields are used only in the ON conditions. They're ignored in the SELECT value list and in WHERE.
To add a fourth table, add another JOIN and determine whether field retrieval or filtering is required. For example, if we want to see who's working on each Task in the “Who's a GOOD boy!?” project, connect the Task table with an INNER JOIN and retrieve the Task title, as shown in Listing 11.9.
You can see that in Listing 11.9, an additional INNER JOIN is added to connect the Task table. In this case, two fields are used to make the connection, ProjectWorker.ProjectId is connected to Task.ProjectId, and ProjectWorker.WorkerId is used to connect to the Task.WorkerId. Any Task records that have the two fields match the two in the ProjectWorker table will be joined. The results are that 21 records should be displayed. The following shows five of those records:
| Name | FirstName | LastName | Title |
|---|---|---|---|
| Who's a GOOD boy!? | Vlad | Anfusso | Model scene rules and structure |
| Who's a GOOD boy!? | Vlad | Anfusso | Prototype front‐end components |
| Who's a GOOD boy!? | Ealasaid | Blinco | Build Level 1 |
| Who's a GOOD boy!? | Ealasaid | Blinco | Model UI |
| Who's a GOOD boy!? | Ealasaid | Blinco | Add front‐end components |
Look closely at the INNER JOIN Task ON condition in Listing 11.9. The condition used can be any Boolean expression, as complex as required. In this case, the ON matches two different field values using an AND operator. The overall expression can use any of the Boolean operator including OR, AND, IS NULL, BETWEEN, etc. The expression can also match on field values or literal values. What you will find is that the use of ON is just as flexible as WHERE.
A number of common questions come up with using multiple joins. First, can you JOIN only on foreign key constraints? The answer is no. The ON condition can include anything that evaluates to a Boolean.
A second common question is does the order of JOINs matter? In this case, the answer is yes and no, but mostly no. As long as you define your relationships correctly, the SQL engine will come up with a strategy, or query plan, that optimizes your query's performance. The JOIN order is most important in expressing meaning to other developers. Start with the most important concepts and link related tables in the most meaningful way. Occasionally, the SQL engine gets confused and doesn't optimize your query correctly. In those rare cases, a DBA will work with you to rewrite your query. It's not a task for a junior developer.
To be successful with JOIN queries, you must first map out tables and conditions for the ON statements. A few minutes of research will save countless minutes of debugging.
INNER JOIN Limitations
INNER JOIN returns a record for each row match between joined tables. What happens when a row exists in one table but doesn't match a row in the other? For example, grab all TrackIt Tasks with this:
SELECT * FROM Task;
This query returns 543 rows. Now, JOIN each Task to its status.
SELECT *FROM TaskINNER JOIN TaskStatus ON Task.TaskStatusId = TaskStatus.TaskStatusId;
The asterisk effectively includes all fields from both tables (including the duplicated TaskStatusID), but this second query returns only 532 rows. What's going on?
To clarify, do one final query.
SELECT *FROM TaskWHERE TaskStatusId IS NULL;
The query returns 11 rows. There are our missing rows! The 532 results of the second query with the 11 results of this third query equal the total 543 shown in the first query.
532 + 11 = 543
In the Task status query, the JOIN condition Task.TaskStatusId = TaskStatus.TaskStatusId fails for the 11 tasks without a TaskStatusId. An INNER JOIN requires a match, so those tasks are eliminated from the result.
Sometimes that's what is wanted, but sometimes it's not. There are scenarios where every task is absolutely required regardless of its status. To accomplish that, a new JOIN type is needed.
OUTER JOIN: LEFT, RIGHT, AND FULL
OUTER JOINs are forgiving. They return a record even when rows don't match in joined tables. There are three types.
LEFT OUTER JOINRIGHT OUTER JOINFULL OUTER JOIN
The left or right designation indicates where a table is mentioned in relation to the JOIN clause. If a table is mentioned before a JOIN (e.g., in the FROM clause), it is “left” of the JOIN. If it is mentioned after, it is “right” of the JOIN.
Consider the following:
SELECT *FROM A[Join Type ] OUTER JOIN B ON [Condition ];
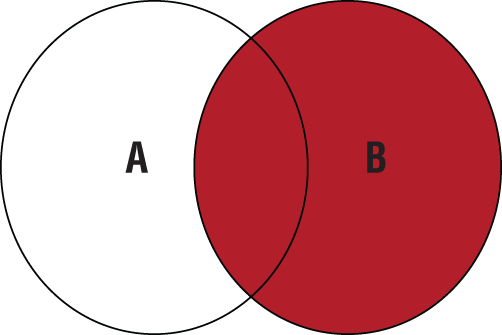
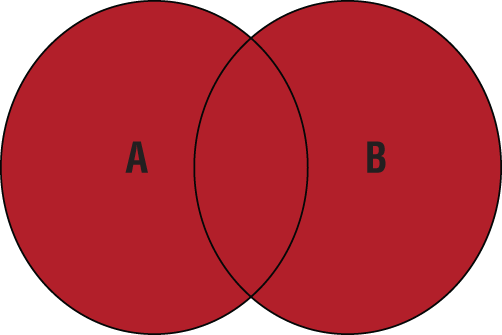
When the [ Join Type ] is LEFT, the results include “everything from table A and whatever matches from table B.” RIGHT results include “everything from table B and whatever matches from table A.” FULL OUTER JOIN results are “everything from both tables regardless of match.” Table 11.1 presents a visual representation of the three OUTER JOIN statements.
Table 11.1 Visual Representation of OUTER JOINs
JOIN Type |
Diagram |
|---|---|
LEFT (OUTER) JOIN |

|
RIGHT (OUTER) JOIN |
|
FULL (OUTER) JOIN |
|
Just like INNER, the OUTER keyword is optional. The LEFT, RIGHT, and FULL keywords are not optional. (If you omit both LEFT and OUTER, the SQL engine would assume an INNER JOIN.)
To fix the Task query, add a LEFT OUTER JOIN, as shown in Listing 11.10. Because a LEFT OUTER JOIN is being used, all records in the table mentioned before the JOIN, in this case the Task table, will be included.
With the addition of the LEFT OUTER JOIN, the results include all 543 records. This is true even though 11 of them don't contain status values.
Replacing a NULL Value with IFNULL()
NULL values can cause trouble. NULL is the absence of a value, so it's unsafe to treat it as a number, string, or date. Depending on how you receive the data (programming languages offer tools to fetch data from a database), you'll be forced to account for NULL values separate from validations that run on numbers, strings, and dates. It's often easier to specify a replacement value by using the IFNULL() function, as shown in Listing 11.11.
IFNULL takes two parameters. The first is a value. It can be a field, a calculation, or a literal value. If the field value is IS NOT NULL, it returns that value. Otherwise, if the value is IS NULL, it returns the second parameter. The second parameter can be any value from a field, a calculation, or a literal value.
IFNULL(Task.TaskStatusId, 0) is an expression, not a column, so the AS keyword is used to label it. Without AS, the column is labeled by the expression, something like IFNULL(Task.TaskStatusId, 0). That's not as clear as something like TaskStatusId.
The AS keyword is optional. A name can be assigned without using it.
IFNULL(TaskStatus.Name, '[None]') StatusName
Explicitly labeling a column is called aliasing. Aliases are discussed in‐depth later in this lesson.
Projects Without Workers
Consider another example. In the TrackIt schema, Workers are assigned to Projects (or vice versa). Are there Projects without Workers or Workers without Projects? How would this be determined?
To start, investigate Projects without Workers. You need a JOIN that will include Project rows even if there are no matched Worker rows. To make matters more complicated, Workers are associated with Projects via a bridge table. That means a minimum of two JOINs are needed.
If Project is put into the FROM clause, a LEFT OUTER can be used to ensure each Project row is included. The LEFT OUTER connects to ProjectWorker. From there, you can connect to Worker. Again, a LEFT OUTER is needed. If you connect ProjectWorker to Worker via an INNER JOIN, it will undo the plan for the LEFT OUTER from Project to ProjectWorker. The INNER JOIN requires a Worker, so the whole query would behave like an INNER JOIN. Listing 11.12 presents the code for these joins.
In this listing you can see that the project name is being selected and used with an alias. Also selected are the worker's first and last names. These are pulled from Project with the OUTER JOINs. The result is that 166 records are displayed including the ones without workers. The following are five of the records you should see:
| ProjectName | FirstName | LastName |
|---|---|---|
| GameIt Accounts Payable | Halli | Vel |
| GameIt Accounts Payable | Kenon | Kirkham |
| GameIt Accounts Payable | Ealasaid | Blinco |
| GameIt Accounts Payable | Zea | Irving |
| GameIt Accounts Payable | Cherri | Binden |
That works, but it's not great. There is a Project without Workers, but you have to scroll through 166 records to find it. Did you find it?
If all you care about are the Projects without Workers, then you can add a WHERE clause that throws out Projects with Workers. In a way, it's the inverse of an INNER JOIN. It's an INNER's negative space. From this, you can see that the following are true:
INNER JOIN: Relationship must existOUTER JOIN: Relationship is optionalOUTER JOINwith filter: Relationship must not exist
We filter missing relationships by detecting NULL. This is shown in Listing 11.13.
With the addition of the WHERE statement, you can see that the output has now changed. There's only one Project without Workers, which is now displayed. This is for ProjectId equal to game‐smell with the NameDo you smell that?
Because you don't care about Workers, you can simplify the query by omitting the Worker table, as shown in Listing 11.14. There is no reason to include Workers if you're only checking that they don't exist.
This listing operates exactly like the previous one; however, it is more efficient because it no longer includes the unneeded LEFT OUTER JOIN for the Worker table.
Workers Without a Project
It's also possible to find all Workers who are not assigned to a Project without changing the order of your query. If you change all LEFTs to RIGHTs, it's the last joined table, Worker, that is always included regardless of what's on the “left.” Add a NULL ProjectId filter, and you will get Workers without Projects. Listing 11.15 shows these changes.
This code contains the changes that were described. The result is 12 records of workers who don't have a project. The following are 5 of the 12 records:
| ProjectName | FirstName | LastName |
|---|---|---|
| Nora | Riha | |
| Carny | Atton | |
| Renell | Cathel | |
| Viviana | Seabridge | |
| Tabbie | Toothill |
Because you know these workers are not associated with a project, you know the project name is going to be blank. Thus, again, you can simplify the listing by omitting Project, as shown in Listing 11.16.
Better yet, rewrite the query to put the important concept, Worker, first. Change the RIGHT to LEFT OUTER JOIN and reorder the tables.
The results and performance characteristics of these queries in Listing 11.16 and Listing 11.17 are identical. It is simply two ways to get to the same results.
SELF‐JOIN AND ALIASES
Look closely at the foreign key, ParentTaskId, in the Task table in Figure 11.1 presented earlier in the lesson. ParentTaskId is nullable and references Task's primary key, TaskId. The Task table has a self‐referential relationship. Any single Task can be a parent to another Task by setting the parent's TaskId as the value of the child's ParentTaskId. The parent‐child relationship is optional because ParentTaskId is nullable.
Self‐referential relationships are unusual, but not that unusual. They're useful for homogeneous data organized in a hierarchy. Examples include the following:
- File system folders: Each folder lives inside another, root folder excluded.
- Comment threads: Comments may be a response to another comment, which in turn may be a response to a comment.
- Software UI menus: The File menu opens a list of menu options; select one and it opens a list of menu options, etc.
Can you JOIN a table to itself? You can try to do this as shown in Listing 11.18.
In this listing, you can see that all fields are being selected in the Task table. An INNER JOIN is being used to connect the TaskId to the ParentTaskID.
If you execute this query, you'll find that it won't work. You will get the following error:
Error Code: 1066. Not unique table/alias: 'Task'
The SQL engine can't tell how one Task table is different from the other. There needs to be a way to differentiate between parent and child. Earlier you learned about using a column alias. It's also possible to create a table alias. The syntax is similar: label the table with a name immediately following it and replace the table name with the label everywhere else it is used. Listing 11.19 shows table aliases in use.
In this listing, you can see that table aliases are being added for the Task table. Data is being selected from a Task table aliased as parent, which is then being joined to another Task table being aliased as child. The appropriate fields from the two aliased tables are then used to connect the tables. The result is that 416 records are displayed in the format shown here with four of the records:
| ParentTaskId | ChildTaskId | Title |
|---|---|---|
| 1 | 2 | Log in: Refactor data store |
| 1 | 3 | Log in: Refactor service layer and classes |
| 1 | 4 | Log in: Create network architecture |
| 1 | 5 | Log in: Refactor interface |
This listing prints three values for each record. The first two are the parent TaskId and the child record TaskId. The third, however, is a created value that uses the parent and child Titles. You can see that the CONCAT function is used to concatenate the two values along with a colon and space. The result is much more legible output.
Aliases aren't just for self‐referential joins. They are commonly used to tidy up queries and make them less verbose. Listing 11.20 is similar to the multitable project and task query shown earlier in Listing 11.9.
In this example, the field names are qualified, but an alias is used for each table name. The aliases themselves are defined after the name of each table.
FROM Project pINNER JOIN ProjectWorker pw ON p.ProjectId = pw.ProjectIdINNER JOIN Worker w ON pw.WorkerId = w.WorkerIdINNER JOIN Task t ON pw.ProjectId = t.ProjectIdAND pw.WorkerId = t.WorkerId
In some ways, these aliases feel like variables you might use in Java or another programming language, and in those languages, you have to define a variable before you can assign a value to it. The database engine executes the entire query as a unit, however, so it allows the aliases to be assigned after they have been used. When the database engine sees a qualifier it doesn't recognize, it simply reads the rest of the query to figure it out. Aliases also don't persist outside of the current query, even when they are in the same script. As soon as the database engine finishes running the query, the aliases are forgotten.
For many teams, this is less “chatty” than the version with explicit table names, but using individual letters as aliases can be tricky if you have multiple tables whose name starts with the same letter. Check on your team's coding standard. If it doesn't exist, collaborate and create one. Consistent layout and aliases make code easier to read.
CROSS JOIN
CROSS JOIN does not use an ON clause because it does not match on a condition. Instead, CROSS JOIN creates a Cartesian product, with every possible combination of rows between the joined tables included in the results.
Let's say you want to see Inez Fanthome, WorkerId 1, combined with every nongame Project. The results don't show actual relationships; they just show every possible combination. Listing 11.21 shows the query for this.
There are six nongame Projects and 1 Worker, so the Cartesian product consists of the six combinations shown here:
| WorkerName | ProjectName |
|---|---|
| Inez Fanthome | GameIt Accounts Payable |
| Inez Fanthome | GameIt Accounts Receivable |
| Inez Fanthome | GameIt Enterprise |
| Inez Fanthome | GameIt Human Resource Intranet |
| Inez Fanthome | GameIt HR Intranet V2 |
| Inez Fanthome | GameIt Payroll |
Another way to imagine a CROSS JOIN is to think of cards. If one table holds suits (hearts, clubs, diamonds, spades) and another table holds values (2–10, J, Q, K, A), the CROSS JOIN of suits and values would be a full deck of cards.
CROSS JOINs are rare in database processes, but they can appear in more advanced scenarios.
SUMMARY
The JOIN clause extends the SELECT statement. It allows data to be fetched from multiple tables and express relationships between rows in separate tables. JOIN combines values from multiple tables into a single record.
There are several JOIN types. They differ in the way they handle missing rows in related tables.
- INNER JOIN: Returns a record only when rows from each side of the relationship match.
- LEFT OUTER JOIN: Always returns rows from the table named before the
JOIN. Returns matching rows from the table named after theJOINif they exist. - RIGHT OUTER JOIN: Always returns rows from the table named after the
JOIN. Returns matching rows from the table named before theJOINif they exist. - FULL OUTER JOIN: Returns rows from both joined tables, regardless of a matching row on the other side of the relationship. MySQL does not support
FULL OUTER JOIN. - CROSS JOIN: Returns a Cartesian product of rows from two tables.
This lesson also mentioned that a self‐join is any JOIN that relates a table to itself. Additionally, you learned that an alias is an explicit label for result columns and tables. Aliases are useful to remove ambiguity and make queries less verbose.
EXERCISES
The following exercises are provided to allow you to experiment with concepts presented in this lesson:
- Exercise 11.1: User Stories
- Exercise 11.2: Personal Trainer Activities
Exercise 11.1: User Stories
Write a single SELECT statement that will allow you to present all the User Story tasks within the TrackIt database. Include the TaskType name along with the Project Names where the task has been included as well as the First and Last Name of the workers on that project.
Exercise 11.2: Personal Trainer Activities
Complete a series of JOIN queries in each of the following activities by using the PersonalTrainer schema. If you already have the PersonalTrainer database, you are welcome to use it. If not, you can use find and run the personaltrainer‐schema‐and‐data.sql script within the downloaded files for this book. This is the same database used in the previous lesson.
After running the script, use MySQL Workbench or a MySQL Command Line to review the tables in the database and the fields in each table. You may also want to reference the ERD in Figure 11.3 to identify the relationships between tables.
Use the following information to write queries shown in the following activities:
- Run each query and check your results against the expected row count.
- Remember to include an appropriate
USEstatement with each query. - You may use aliases if you want, but you are not required to do so unless the instructions specify it.
- Verify that the results include only the columns requested in the instructions.
Each activity indicates the number of expected rows that the results should include.
Activity 1 (64 Rows)
Select all columns from the ExerciseCategory and Exercise tables. The tables should be joined on ExerciseCategoryId. This query should return all Exercises and their associated ExerciseCategory.
Activity 2 (9 Rows)
Select ExerciseCategory.Name and Exercise.Name where the ExerciseCategory does not have a ParentCategoryId (it is null). Again, join the tables on their shared key (ExerciseCategoryId).

Figure 11.3 The Personal Trainer schema
Activity 3 (9 Rows)
The results of the query in Activity 2 might be a little confusing. If you used the field names, then at first glance, it is probably hard to tell which Name belongs to ExerciseCategory and which belongs to Exercise. Rewrite the query using aliases:
Alias ExerciseCategory.Name as 'CategoryName'.Alias Exercise.Name as 'ExerciseName'.
Activity 4 (35 Rows)
Select FirstName, LastName, and BirthDate from Client and EmailAddress from Login where Client.BirthDate is in the 1990s. Join the tables by their key relationship. What is the primary‐foreign key relationship?
Activity 5 (25 Rows)
Select Workout.Name, Client.FirstName, and Client.LastName for Clients with LastNames starting with C. How are Clients and Workouts related?
Activity 6 (78 Rows)
Select Names from Workouts and their Goals. This is a many‐to‐many relationship with a bridge table. Use aliases appropriately to avoid ambiguous columns in the result.
Activity 7 (200 Rows)
Select client names and email addresses. Select FirstName and LastName from Client. Select ClientId and EmailAddress from Login. Join the tables, but make Login optional. This should result in 500 rows.
Using the query just created as a foundation, select Clients who do not have a Login. This should result in 200 rows.
Activity 8 (0 or 1 Row)
Does the Client Romeo Seaward have a Login? Decide using a single query. Depending on how this query is set up, it will return 1 row or 0 rows.
Activity 9 (12 Rows)
Select ExerciseCategory.Name and its parent ExerciseCategory's Name. Hint: This requires a self‐join.
Activity 10 (16 Rows)
Rewrite the query from Activity 9 so that every ExerciseCategory.Name is included, even if it doesn't have a parent.
Activity 11 (50 Rows)
Are there Clients who are not signed up for a Workout? Write the query to determine the answer.
Activity 12 (6 Rows, 4 Unique Rows)
Which Beginner‐Level Workouts satisfy at least one of Shell Creane's Goals? Note that Goals are associated to Clients through ClientGoal. Additionally, Goals are associated to Workouts through WorkoutGoal.
Activity 13 (26 Workouts, 3 Goals)
Select all Workouts. Join to the Goal 'Core Strength', but make it optional. Note that you might need to look up the GoalId before writing the main query.
If you filter on Goal.Name in a WHERE clause, Workouts will be excluded. Why?
Activity 14 (744 Rows)
The relationship between Workouts and Exercises is…complicated. Workout links to WorkoutDay (one day in a Workout routine), which links to WorkoutDayExerciseInstance (Exercises can be repeated in a day so a bridge table is required), which links to ExerciseInstance (Exercises can be done with different weights, repetitions, laps, etc.), which finally links to Exercise.
Select Workout.Name and Exercise.Name for related Workouts and Exercises.