
Knitting socks is fun, but it also takes a lot of time, so we want to be sure that the socks we make by hand fit the way we intend. This takes a little bit of forethought and may not be completely intuitive.
When you want to be sure your beautiful handknit socks will fit, you have two main considerations: (1) how big are the feet you’re making the socks for, and (2) what needle size will give you the correct number of stitches per inch with the yarn you are using, thereby ensuring that the socks come out the right size. For the first, you need to take measurements; for the second, you need to make a gauge swatch.
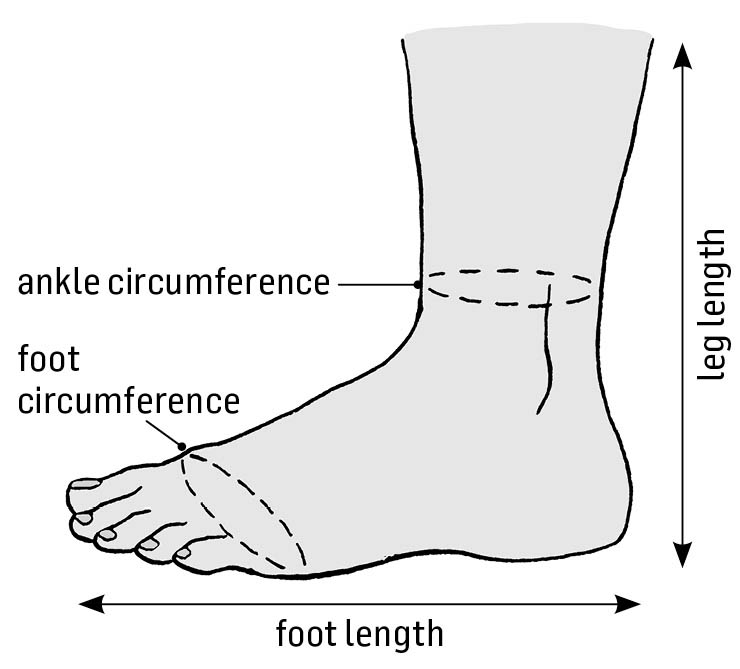
The key measurements for sock sizing are the ankle and foot circumferences. Most women’s sock patterns are written to knit up at about 8 inches around; for men, it’s about 10 inches. These average sizes provide a good fit for many people, but in actuality, our ankles are all different circumferences. If you want to get a really comfortable fit, therefore, it’s smart to find the correct measurements. Refer to Measuring Your Foot to find out just how to get them.
Once you have these key measurements, you must adjust them to account for what is called negative ease; that is, the measurements of the finished socks should be slightly smaller than the measurements of the feet the socks are meant to fit. (The term is used for other garments as well.) For stretchy knitting (stockinette stitch and lace, for instance), the sock should measure about 10 percent less than the size of the foot; for colorwork, 5 percent. If you’re knitting ribbing, the fabric is so stretchy, you can make a sock that is 25 percent less than your foot measurement and it will still fit. This makes ribbing an especially good pattern-stitch choice for knitting socks for gifts.
You can simply estimate 1 inch of negative ease when knitting for adults and 1⁄2 inch when knitting for kids or doing colorwork. Your socks should hug your foot snugly but not be so tight as to pinch or stretch out of shape when worn. Some people even prefer to have some wiggle room for their toes. Remember, too, that the sock leg and ankle need to be stretchy enough to fit over your heel.
A caveat about negative ease: Subtracting from the measurements assumes that you are knitting with typical sock yarn and that you are not doing stranded colorwork. If you are knitting with a much thicker yarn, do not subtract as much from the ankle measurement. If you’re knitting in colorwork, which is much less stretchy than single-color knitting, you’ll need your sock to be a little bigger. Remember, if you’re knitting k1, p1 or k2, p2 ribbing, you almost can’t make a sock too small.
In addition to measuring your foot (or feet if they are not the same size, which you will already know), you also need to measure the gauge of your knitting. Don’t whine. If you want socks that come out the right size, you absolutely do need to make a gauge swatch. Better still, work the swatch in the round rather than flat, since that’s how the sock will be knit.
When working with a yarn not originally meant for socks, use needles a size or two smaller than the ball band calls for. Socks are knit at a tighter gauge than other garments to maximize wear. You’ll find that they feel better on your feet that way, too.
To make your swatch, cast on enough stitches to work in the round (at least 36 stitches) and in a multiple of the number of stitches required for your pattern stitch. (For example, if your pattern stitch indicates that it is a multiple of 8 stitches, cast on 32 or 40 stitches, depending on what type of stitch you’re using.) Join to work in the round, being careful not to twist the stitches, and work several repeats of your pattern; you should have at least 3 to 4 inches of knitting.
Sometimes different parts of a sock have different gauges and different pattern stitches. You need to get the right gauge for each part of the sock for it to fit right, which may require using a different needle size for each part. I definitely (let’s be honest!) would never knit two gauge swatches for a project. Instead, I would put a lifeline (see below) in after I finished a section that came out just the way I wanted, then proceed with the needle size I think will work for the next section. If it isn’t right, I can always rip back to the lifeline and try a different size.
A lifeline can be a lifesaver in knitting! It is simply a piece of string or yarn that is pulled through all of the stitches on the needles. Whenever you reach a point in your knitting where you are very happy with the results so far, and you are ready to start another pattern repeat or a different section of the sock, you can place a lifeline. This will give you the assurance that even if you mess up and have to rip out the knitting that comes next, the part you’ve already completed is safe.
To add a lifeline, thread a piece of string or yarn that is thinner than your working yarn onto a tapestry needle; I suggest cotton yarn, sewing thread, or unwaxed dental floss. Draw the needle through all the stitches on the knitting needles, being sure not to draw it through any stitch markers. Remove the tapestry needle and tie the ends of the lifeline string together. Later if you have to rip, you can remove your needles and rip out the knitting down to the lifeline, and all your stitches will be secure and in the correct orientation to place back on the needles. If you have trouble getting the stitches back on the working needles, put them onto smaller needles first, then continue knitting with the correct size needles for your project.
Stitch gauge is important in almost all knitting projects. If your stitch gauge is not exact, your socks will not come out the size indicated in the pattern.
To measure the stitch gauge, place a ruler or tape measure across your swatch horizontally. With pins, mark the beginning and end of 4 inches, and count the stitches between the pins. (Because your gauge may vary over the knitted piece, measuring over 4 inches gives a more accurate result.) When you measure ribbing, stretch the fabric slightly.
Divide by 4 to calculate the number of stitches per inch. Check the recommended gauge for your pattern. If your swatch has more stitches per inch than recommended, your stitches are too tight; try again with a larger needle. If it has fewer stitches per inch than recommended, your stitches are too loose; try again with a smaller needle.
To measure row gauge, place the ruler across the swatch vertically, mark 4 inches with pins, and count the rows.
Sometimes it’s easy to think our gauge is “close enough,” but if you’re a stitch per inch or even a fraction of a stitch per inch off in your gauge measurements, the socks you are making will not come out the size specified in the pattern. For example, if a pattern calls for 9 stitches per inch and you get 8 stitches per inch, with 80 stitches in a sock, that’s the difference between an 83⁄4-inch circumference and a 10-inch circumference — not even close to the correct size! Even if the difference in gauge is as little as 1⁄4 stitch per inch (or 1 stitch per 4 inches), it can add up to an inch or more around an entire sock. (The variance will be slightly less if you’re making socks at a looser gauge with around 60 or 70 stitches for your size, but it still makes a substantial difference.)
Keep notes about your measurements and stitch counts on the first sock, as suggested below, especially if you make any changes, so you can make the second sock the same.
Remember that getting gauge is 10,000 times more important than using the same size needles listed in the pattern! In fact, I could say it’s infinitely more important because using the same needle size listed in the pattern is of zero importance. Even when you have faithfully knit your swatch, however, you still need to be ready to tweak as you go, because our knitting tension can change with our mood, and for many knitters, gauge loosens up as they relax into a project.

Here are a couple of ways to shortcut your swatching:
With these two gauge measurements (row and stitch), along with your foot measurements, you can figure out approximately how many stitches you need to cast on to knit your sock. An approximate number is just fine because you’ll be following a pattern, so this number helps you find the pattern size that is closest to the fit that you desire. Remember, too, that the number of stitches you cast on will also be determined somewhat by the ribbing you want to do. K1, p1 rib requires an even number of stitches; k2, p2 rib requires that the number of stitches be divisible by 4. If you’re doing a pattern stitch on the sock leg, you must account for the stitch multiple of the pattern as well.
When you calculate the number of stitches you need for the circumference of your sock, if your foot and ankle are not the same circumference, use your ankle measurement for cuff-down socks and your foot measurement for toe-up socks, because those are the parts you will knit first. You can make adjustments before or after the heel, if necessary, to accommodate different ankle and foot circumferences. Unless the difference is drastic, you won’t need to make any adjustments at all, because knitted fabric is stretchy. (See Making Adjustments as You Knit, for more tips on customizing sock fit.)
Finding out how many stitches you need for the circumference of your sock requires a little arithmetic. Don’t panic; it’s no more math than you need to halve or double a recipe! Here’s an example: If your yarn provides a gauge of 30 stitches over 4 inches, divide by 4 to get the number of stitches to the inch (71⁄2 stitches). Then multiply this number by the ankle/foot circumference less 1 inch (for single-color socks). So here’s the math for someone with an 8-inch ankle who wants a 7-inch sock (note that result is rounded down; see below):
71⁄2 stitches per inch × 7 inches = 52 stitches
Use the following formula to calculate your own stitch count.

†Ankle for cuff-down socks; foot for toe-up socks
††1" for adults; 1⁄2" for children and colorwork
Choose the size in the pattern that has the number of stitches in the cast on closest to the result you got when you calculated your stitch count. The patterns in this book are worked in ribbing stitches for maximum elasticity, but you will undoubtedly encounter patterns made with other stitches, so here’s what to keep in mind:
The biggest variation among sizes is foot length, but don’t worry about that when you’re selecting the size to knit. You can knit most socks to the desired length, and you can also try them on as you go. In fact, I recommend that the best way to ensure a good fit is: Try it on. Try it on. Try it on! Also, check gauge often, and change needle size if your gauge changes.
If you’re making socks for yourself or a family member, trying the socks on as you go is the best way to make sure they come out the right size. If you’re making socks for a gift, that’s not always possible, so working from a shoe-size chart is the next best thing.


The information in these charts is from the Craft Yarn Council Standard Body Measurements/Sizing guidelines.