Chapter 4:
Chest
PUT UP A GREAT FRONT
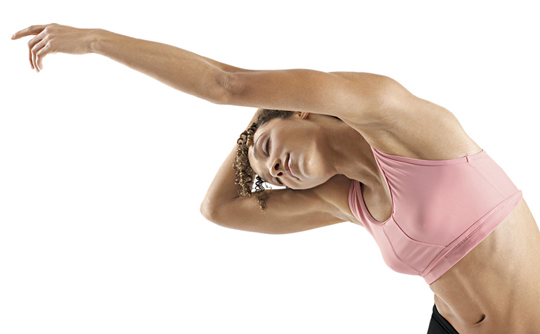
It’s true: Most women aren’t looking to make their pecs pop. But there are still plenty of reasons to work your chest. After all, the best exercises for targeting your pectoral muscles also help shape and firm your deltoids and triceps. So consider the movements in this chapter to be sculpting tools for your shoulders and arms as well as your chest. And that makes these exercises among the best ways to improve your upper-body strength. (Hey, who says you can’t be skinny and strong?)
What’s more, working all those muscles burns lots of calories. Or perhaps you should think of it this way: Skip your chest, and you’ll be missing out on that burn. The take-home message: Regularly training your chest also helps you fight belly fat.
Bonus Benefits
Perkier breasts! When combined with perfect posture, regularly working your chest muscles may even give your bosom a lift. Hint: Always keep your chest raised high, as if there’s a string pulling it toward the ceiling.
A stronger swing: Forehand strokes in tennis and other racquet sports rely on your chest muscles for velocity, in addition to your core musculature.
A stronger core: Pushups aren’t just a chest exercise; they’re great for your abs, too.
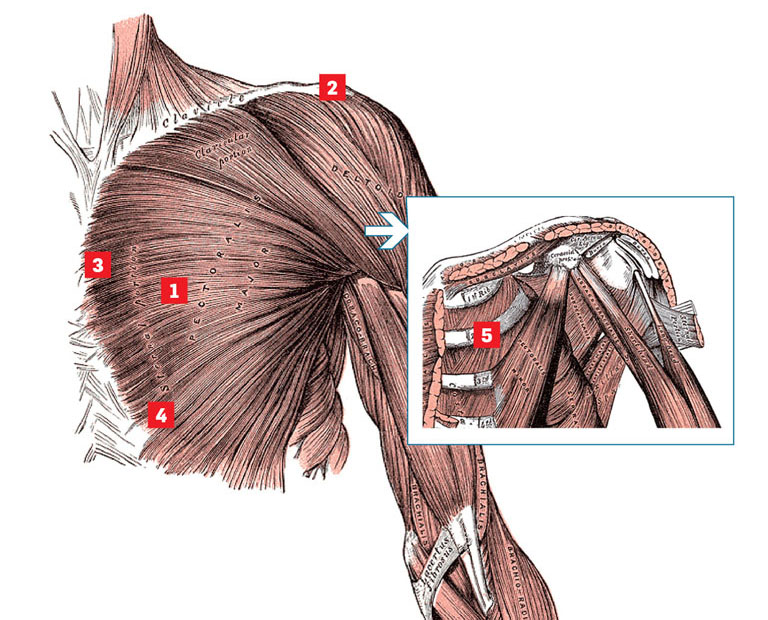
PECTORALIS MAJOR
• Your main chest muscle is the pectoralis major [1]. Its job: to pull your upper arms toward the middle of your body. Think about that in terms of a bench press. As you push the bar away from your torso, your upper arms move closer to your chest as they straighten. This is because your pectoralis major attaches to the inside of your upper arm bone. So when your pectorals contract, the muscle fibers shorten, pulling your upper arms toward the muscles’ origin, your mid-chest.
• This is why exercises such as pushups and bench presses are the best way to make your pecs pop. By holding a weight in your hands when you do a bench press, for instance, you increase the weight of your upper arms, which forces your pectoral muscles to contract harder. The end result: a bigger, stronger chest.
• The sternal portion of the muscle is collectively considered to be your lower chest.
• The fibers of your pectoralis major originate at three places on your chest: your collar bone [2], your breast bone [3], and your ribs [4], just below your breast bone.
PECTORALIS MINOR
• The pectoralis minor [5] is a thin, triangular muscle that lies beneath your pectoralis major. It starts at your third, fourth, and fifth ribs, and attaches near your shoulder joint. Although this muscle is technically a “chest muscle,” its main duty is to assist in pulling your shoulders forward—an action that occurs in back exercises such as the dumbbell pullover.
Chapter 4:
Quick Reference
• Chest: PUSHUPS
• Chest: DIPS
• Chest: PRESSES
• Chest: FLYS
• The Best Chest Exercise You've Never Done
• The Best Stretch for Your Chest
• WORKOUT: Sculpt the Perfect Chest
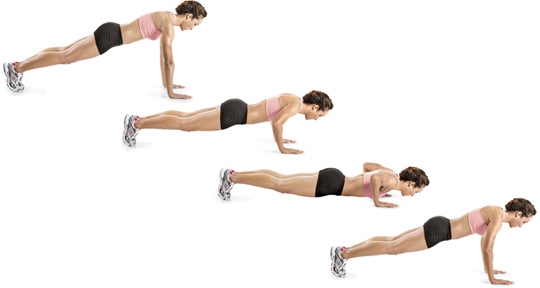
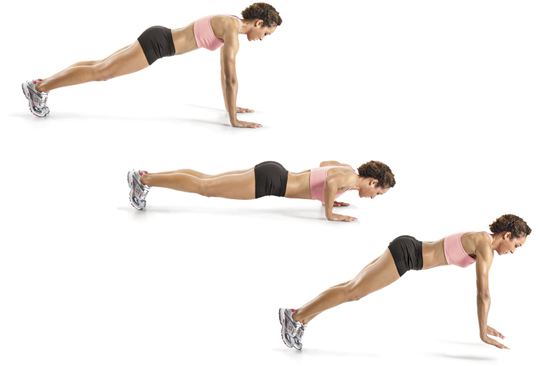
Chest: PUSHUPS
In this chapter, you’ll find 63 exercises that target the muscles of your chest. Throughout, you’ll notice that certain exercises have been designated as a Main Move. Master this basic version of a movement, and you’ll be able to do all of its variations with flawless form.
PUSHUPS AND DIPS
These exercises target your pectoralis major. However, they also hit your front deltoids and triceps, since these muscles assist in just about every version of the movements. What’s more, your rotator, trapezius, serratus anterior, and abdominals all contract to keep your shoulders, core, and hips stable as you perform the moves.
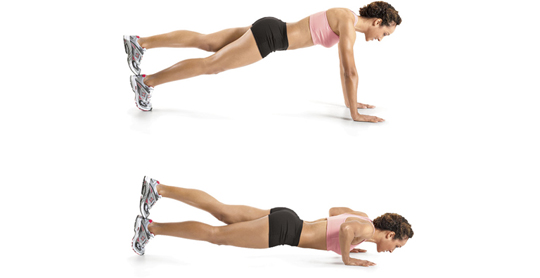
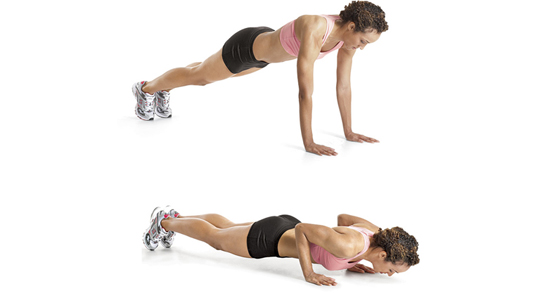
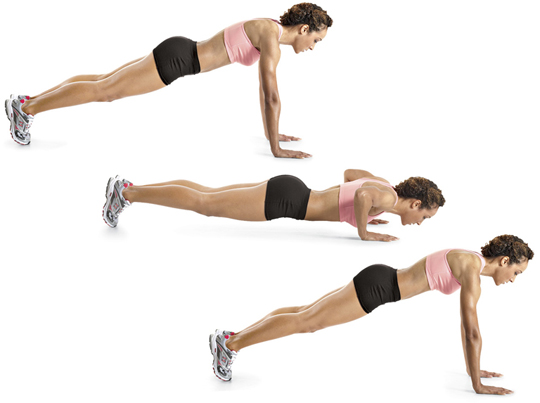
Pushup
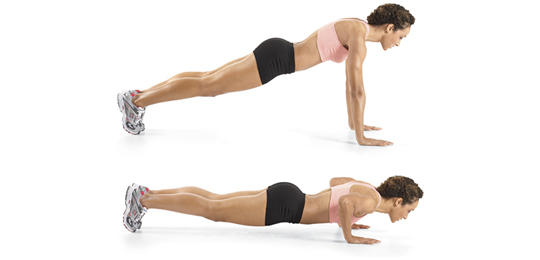
A
• Get down on all fours and place your hands on the floor so that they’re slightly wider than and in line with your shoulders.
• Set your feet close together, and straighten your legs, with your weight on your toes.
• Squeeze your glutes and hold them that way for the entire movement. This helps keep your hips stable and in line with your upper body.
• Brace your abdominals—as if you were about to be punched in the gut—and maintain that contraction for the duration of this exercise. This helps keep your body rigid, and doubles as core training.
• Your body should form a straight line from your ankles to your head.
• Your arms should be straight.
B
• Lower your body until your chest nearly touches the floor.
• Tuck your elbows as you lower your body so that your upper arms form a 45-degree angle with your body in the bottom position of the movement.
• Pause at the bottom, and then push yourself back to the starting position as quickly as possible.
• If your hips sag at any point during the exercise, your form has broken down. When this happens, consider that your last repetition and end the set.
Incline Pushup
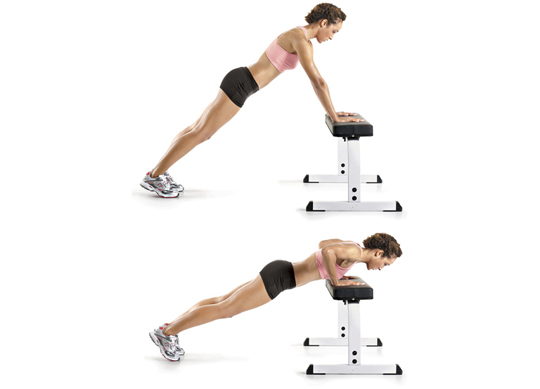
• Place your hands on a box, bench, or step instead of the floor. This reduces the amount of your body weight you have to lift, making the exercise easier.
TIP
• The higher the surface and the more upright your body, the easier the exercise is.
Modified Pushup

• Instead of performing the exercise with your legs straight, bend your knees and cross your ankles behind you. This is another way to make the classic pushup easier.
Decline Pushup
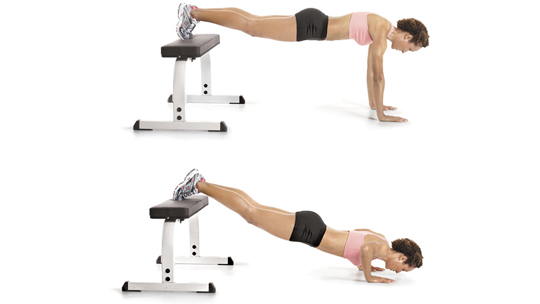
• Place your feet on a box or bench as you perform a pushup. This increases the amount of your body weight you have to lift, making the exercise harder. (The higher the surface, the harder the exercise.)
Single-Leg Decline Pushup
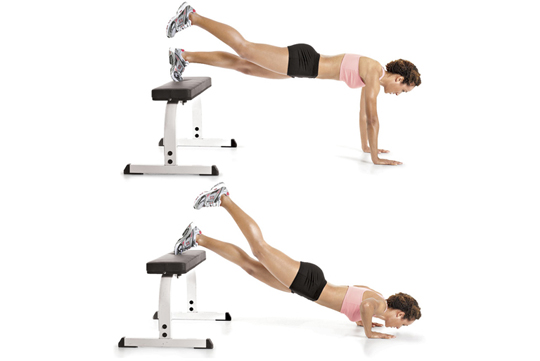
• Place one foot on a box or bench and hold the other in the air.
TIP
• If you feel strain on your lower back, you’re not keeping your core tight.
Pushup with Feet on Swiss Ball
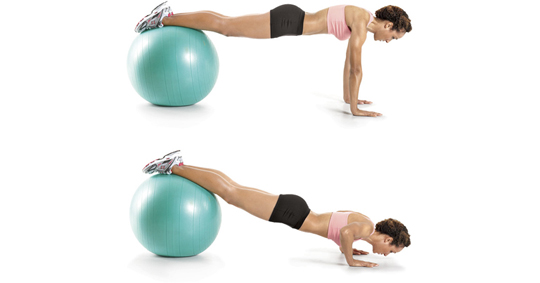
A
• Perform the movement with your feet placed on Swiss ball.
B
• Lower your body as far as you can, without allowing your hips to sag.
TIP
• The instability of the ball forces your core to work harder, increasing the difficulty of the exercise.
Stacked-Feet Pushup
• Place one foot on top of the other so that only the lower one supports your body.
Weighted Pushup
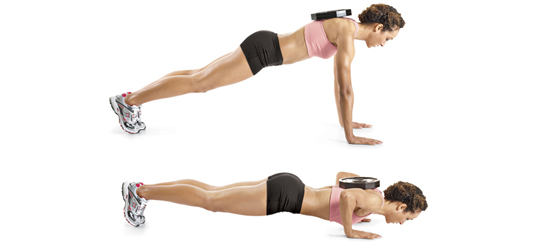
• Have a workout partner place a weight plate on your back, at the level of your shoulder blades.
Triple-Stop Pushup
A
• Do a standard pushup, but pause for 2 seconds at the positions shown.
B
• Pause at the halfway point on both your way down and your way up.
C
• Pause when your chest is just off the floor.
D
• As you push yourself back to the starting position, pause just before the point you straighten your arms.
Wide-Hands Pushup
• Place your hands about twice shoulder-width apart.
TIP
• Setting your hands wide puts a greater emphasis on your chest. The downside: It also increases the stress on your shoulders.
Close-Hands Pushup
• Position your hands directly under your shoulders.
• As you lower your body, keep your elbows tucked close to your sides.
TIP
• Placing your hands closer together works your triceps harder.
Staggered-Hands Pushup
• Place one hand in standard pushup position and your other hand a few inches farther forward.
TIP
• Alternate which hand is placed forward each set.
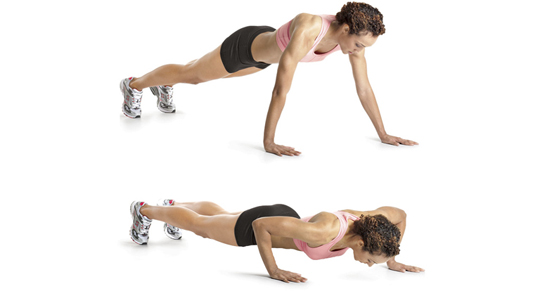
Spiderman Pushup
A
• Assume the standard pushup position.
B
• As you lower your body toward the floor, lift your right foot off the floor, swing your right leg out sideways, and try to touch your knee to your elbow.
• Reverse the movement, then push your body back to the starting position. Repeat, but on your next repetition, touch your left knee to your left elbow. Continue to alternate back and forth.
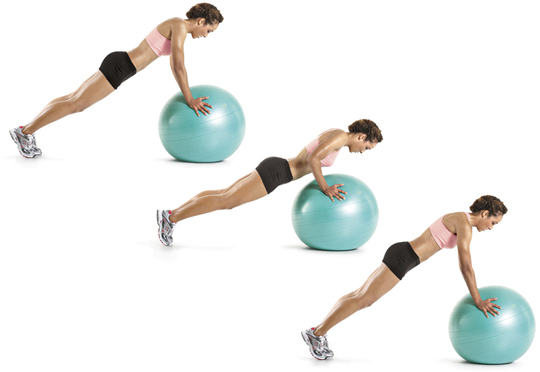
Swiss-Ball Pushup
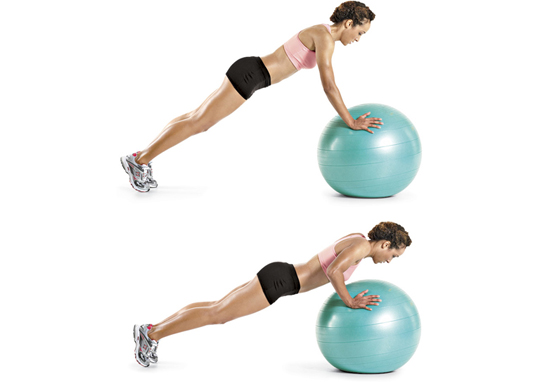
• Place your hands on a Swiss ball instead of the floor.
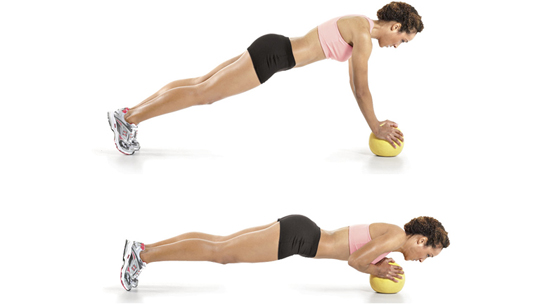
Single-Arm Medicine-Ball Pushup
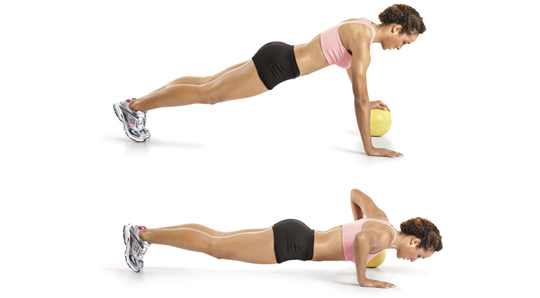
• Place one hand on a medicine ball.
TIPS
• Do an equal number of sets with each hand on the ball.
• If you don’t have a medicine ball, you can use a basketball in its place.
Two-Arm Medicine-Ball Pushup
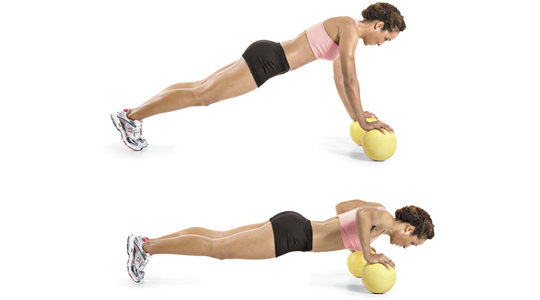
• Place each hand on a medicine ball.
TIP
• Don’t let your hips sag.
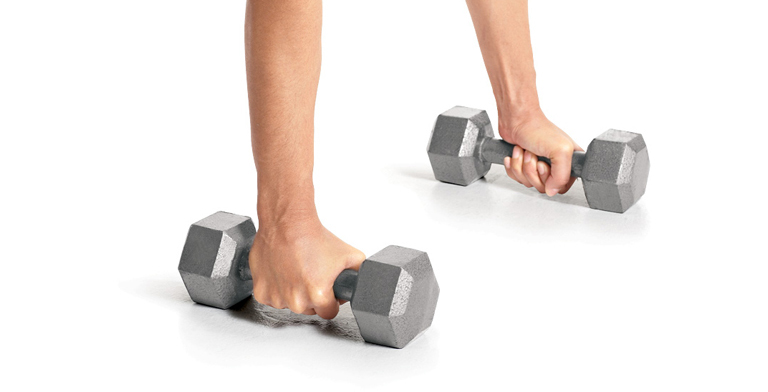
T-Pushup
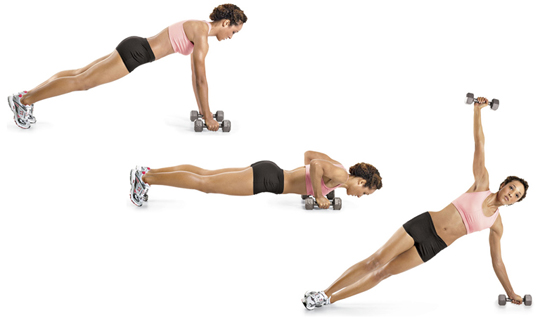
A
• Place a pair of hex dumbbells at the spot where you position your hands.
• Grasp the dumbbell handles and set yourself in pushup position.
• Set your feet hip-width apart.
B
• Lower your body to the floor.
C
• As you push yourself back up, rotate the right side of your body upward as you bend your right arm and pull the right dumbbell to your torso. Then straighten your arm so that the dumbbell is above your right shoulder. Your arms should form a T with your body.
• When you rotate your body, pivot on your toes and then lower your heels to the floor.
• Lower the dumbbell back down, and repeat, this time performing the move to your left.
Judo Pushup
A
• Begin in standard pushup position, but move your feet forward and raise your hips so your body almost forms an upside-down “V.”
B
• Keeping your hips elevated, lower your body until your chin nearly touches the floor.
C
• Lower your hips until they almost touch the floor, as you simultaneously raise your head and shoulders toward the ceiling. Reverse the movement back to the starting position and repeat.
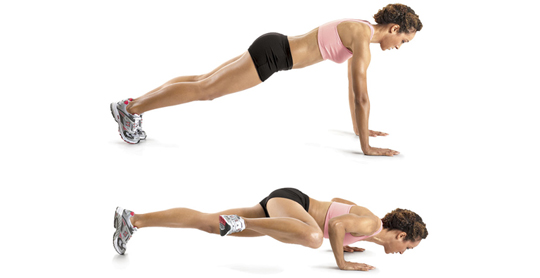
Explosive Pushup
A
• Assume a pushup position.
B
• Bend your elbows and lower your body.
C
• Press yourself up so forcefully that your hands leave the floor.
Iso-Explosive Pushup
• Do this movement just like the explosive pushup, but first pause 5 seconds in the down position. This pause technique eliminates all the elasticity in your muscles, which allows you to activate a maximum number of fast-twitch muscle fibers. These are the muscle fibers with greatest potential for size and strength gains.
Explosive Crossover Pushup
A
• Place your left hand on the floor and your right hand on the smooth side of a weight plate.
B
• Lower your body to the floor.
C
• Explosively push up and to the right so your hands leave the floor.
D
• Land with your left hand on the plate and your
E
• Then lower and repeat, alternating back and forth each repetition.
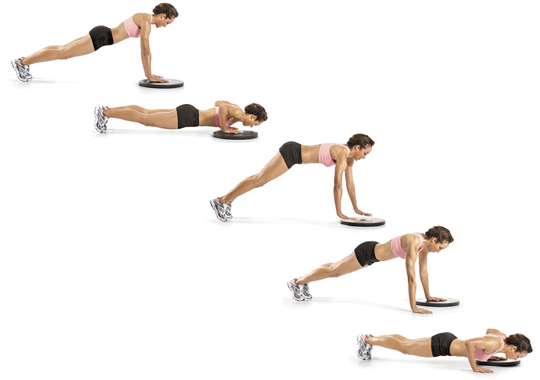
Bosu Pushup
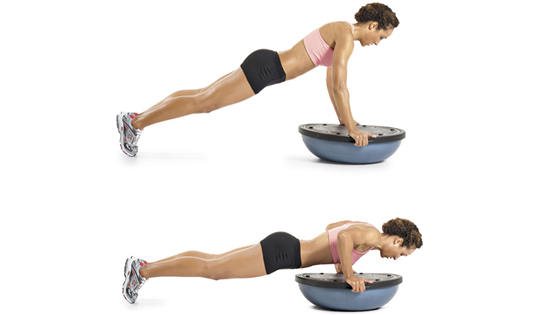
• Turn a Bosu ball over, so that the half-ball portion is on floor, and position your hands on the sides of the platform.
• Each time you lower your body, your chest should nearly touch the surface of the Bosu.
Suspended Pushup
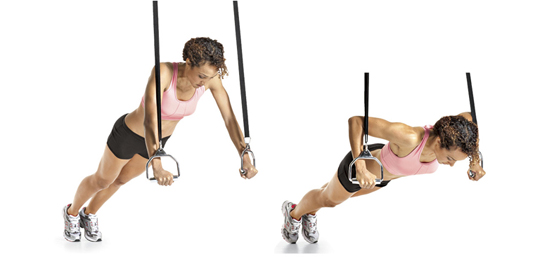
A
• Attach a pair of straps with handles to a secure bar, so that the handles are a foot or so off the floor.
B
• Lower your body until your upper arms dip below your elbows.
Pushup and Row
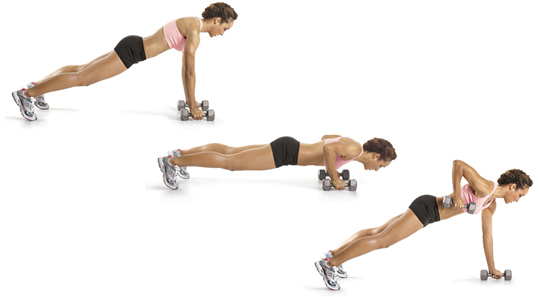
A
• Place a pair of hex dumbbells at the spot where you position your hands.
• Grasp the dumbbell handles and set yourself in pushup position.
• Set your feet hip-width apart or wider.
B
• Lower your body to the floor, pause, then push yourself back up.
C
• Once you’re back in the starting position, row the dumbbell in your right hand to the side of your chest, by pulling it upward and bending your arm.
• As your row, hold your core steady, so that your torso doesn't rotate.
• Pause, then lower the dumbbell back down, and repeat the same movement with your left arm. That’s one repetition.
Chest: DIPS
Dip
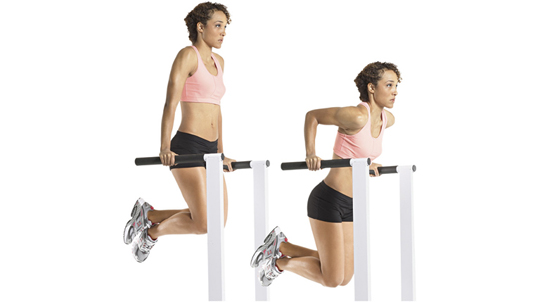
A
• Grasp the bars of a dip station and lift yourself so your arms are completely straight.
• Your torso should be upright.
• Cross your ankles behind you.
• Keep your wrists straight.
B
• Slowly lower yourself by bending your elbows until your upper arms dip just below your elbows.
• Keep your elbows tucked close to your body.
• Pause, then push back up to the starting position.
Incline Dip
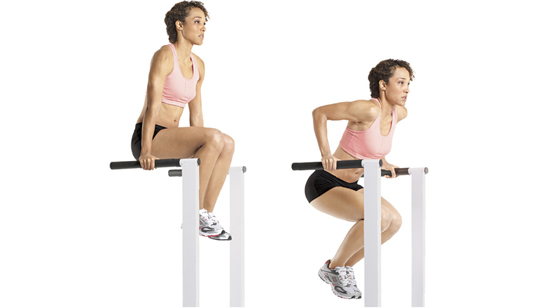
A
• Raise your hips and thighs and hold them that way for the entire movement.
• Your knees should be bent 90 degrees.
• Your thighs should be parallel to the floor.
B
• Lower your body until your upper arms are just below parallel to the floor.
• Don't drop your legs as you lower your body.
• Allow your torso to lean forward.
• Your upper arms should dip below your elbows.
Weighted Dip
• Perform the exercise with a dipping belt attached to your waist.
Chest: PRESSES
These exercises target your pectoralis major, the largest muscle of your chest. Most of the movements also hit your front deltoids and triceps, since these muscles assist in just about every version of the exercise. Your rotator cuff and trapezius also contract to help keep your shoulders stable as you perform the moves.
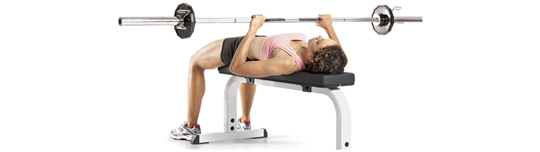
Barbell Bench Press
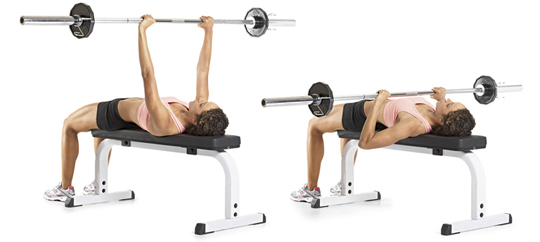
A
• Grasp a barbell with an overhand grip that’s just wider than shoulder-width, and hold it above your sternum with arms completely straight.
• Squeeze your shoulder blades down and together and hold them as tight as you can during each set. This creates a stronger foundation for you to press from, which allows you to generate greater force.
• Hold the bar above your sternum.
• Your wrists should be straight.
B
• Lower the bar straight down, pause, then press the bar in a straight line back up to the starting position.
• Keep your elbows tucked in, so that your upper arms form a 45-degree angle with your body in the down position. This reduces stress on your shoulder joints.
Close-Grip Barbell Bench Press
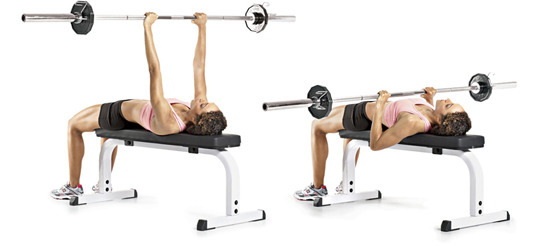
• Use an overhand grip that’s shoulder-width apart.
Reverse-Grip Barbell Bench Press
• Use an underhand grip that’s about shoulder-width apart.
• Tuck your elbows close to your sides as you lower the bar.
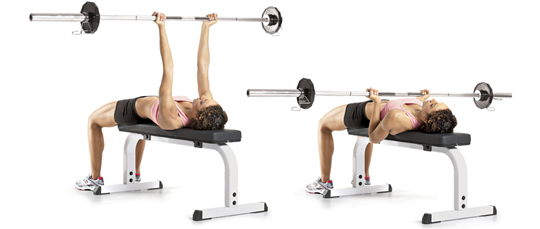
Barbell Towel Press
• Roll a towel and place it long ways in the middle of your chest. Now perform a bench press, lowering the bar to the towel instead of to your chest.
• Rest the barbell on the towel momentarily before you push the bar back to the starting position.
Triple-Stop Barbell Bench Press

A
• Perform a standard bench press, but pause for 10 seconds at each stop.
B
• First stop: A couple of inches below the starting position.
C
• Second stop: Halfway down.
D
• Third stop: Just above your chest.
• Then push the bar back to the starting position. That’s one set.
Isometric Barbell Bench Press
• Lift the bar off the uprights and lower it until it's about 4 inches off your chest. Hold that position for 40 seconds to build more muscle; hold the position for 6 to 8 seconds for greater gains in strength. That's one set.
• Warning: Never perform the isometric barbell bench press without an experienced spotter.
Barbell Pin Press
• Place a bench inside a power rack. Then set the safety pins just below where you think your sticking point is. Rest the bar on the pins. Lie on the bench, press the bar up, and then slowly lower it back onto the pins. Pause for a second and repeat.
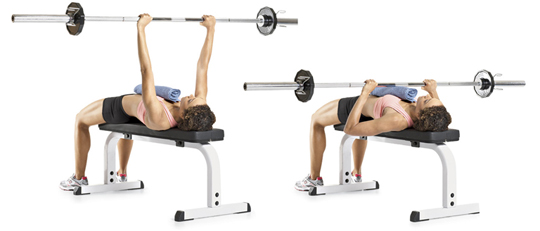
Barbell Board Press
• Perform this the same way as the towel press, but instead of the towel, use a pair of stacked 12-inch-long two-by-fours. Just make sure they’re secured together with a screw or a tight band.
Incline Barbell Bench Press
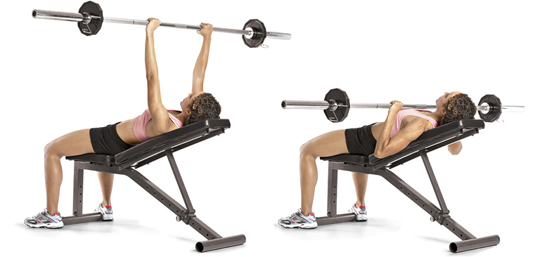
A
• Set an adjustable bench to its lowest incline, about 15 to30 degrees.
• Lie faceup on the bench and grab the barbell with an overhand grip that’s slightly beyond shoulder width.
• Hold the bar above your shoulders.
• Your arms and wrists should be completely straight.
B
• Lower the bar to your upper chest.
• Pause, and then push the bar back to the starting position.
Decline Barbell Bench Press
A
• Lie faceup on a decline bench and grab the barbell with an overhand grip that’s slightly beyond shoulder width.
• Secure your legs under the anchors.
• Hold the bar above your chest with your arms straight.
B
• Lower the bar to your lower chest.
• Pause, and then push the bar back to the starting position.
Barbell Floor Press
A
• Lie on the floor instead of on a bench and hold a barbell with an overhand grip.
• Your knees should be bent.
• Your hands should be slightly beyond shoulder-width apart.
B
• Lower the barbell until your upper arms touch the floor.
• Keep your elbows pulled in toward your sides as you lower the bar. In the down position, your upper arms should form a 45-degree angle with the sides of your torso.
• Pause, then push the bar back to the starting position.
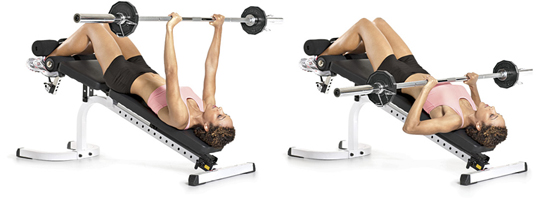
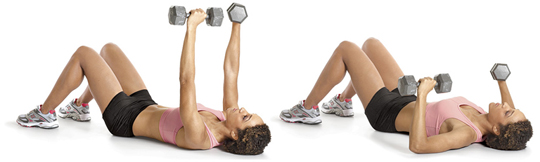
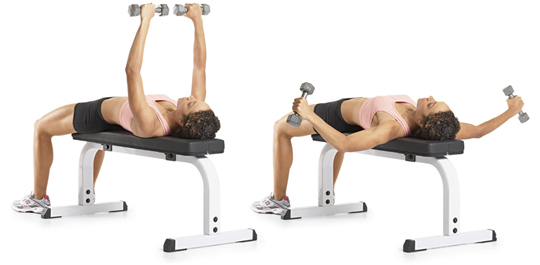
Dumbbell Bench Press
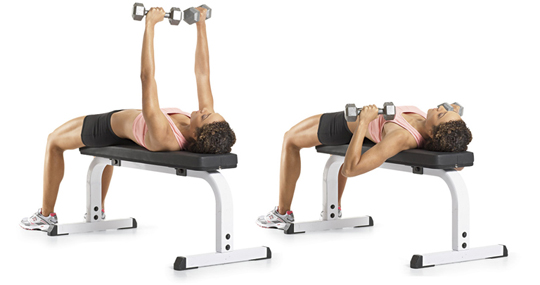
A
• Grab a pair of dumbbells and lie on your back on a flat bench, holding the dumbbells over your chest so that they’re nearly touching.
• Your palms should be facing out, but turned slightly inward.
• Before you begin, pull your shoulder blades down and together, and hold them as tight as you can throughout the entire exercise.
B
• Without changing the angle of your hands, lower the dumbbells to the sides of your chest.
• In the down position, both your upper arms and the dumbbells should form a 45-degree angle to your body.
• Pause, then press the weights back up to the starting position as quickly as you can.
• Straighten your arms completely at the top of each repetition.
Alternating Dumbbell Bench Press
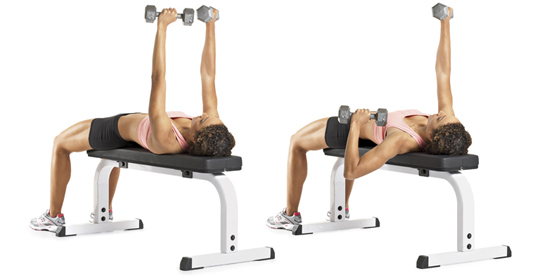
• Instead of pressing both dumbbells up at once, lift them one at a time, in an alternating fashion.
Alternating Neutral-Grip Dumbbell Bench Press
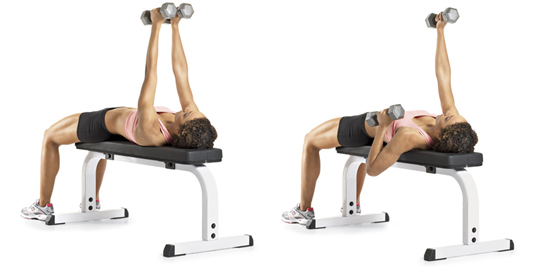
• Perform the exercise with your neutral-grip, your palms facing each other.
• Instead of pressing both dumbbells up at once, lift them one at a time, in an alternating fashion. So as you lower one dumbbell, press the other one up.
Neutral-Grip Dumbbell Bench Press
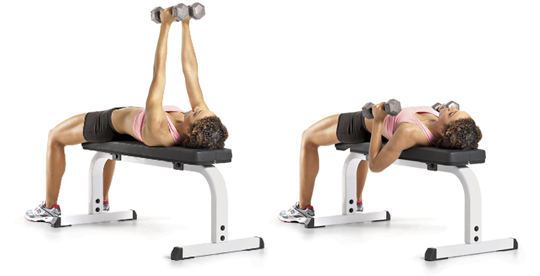
• Hold the dumbbells so that your palms face each other.
• Tuck your elbows close to your sides as you lower the weights.
Single-Arm Dumbbell Bench Press
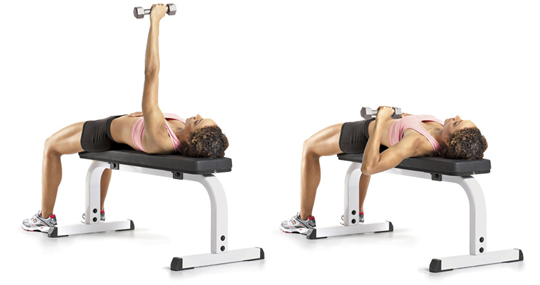
• For this exercise, simply use the same form as for a dumbbell chest press but complete the prescribed number of repetitions with one arm before immediately doing the same number with your other arm.
• Place your free hand on your abs.
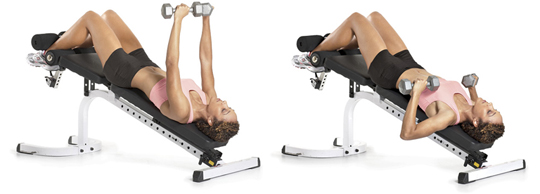
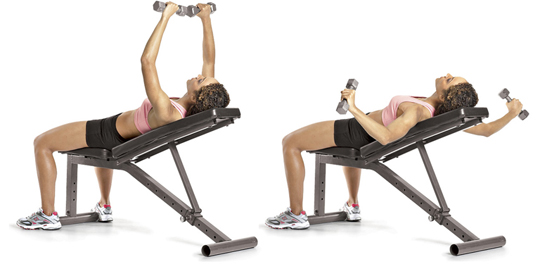
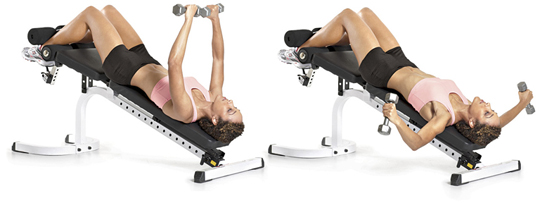
Incline Dumbbell Bench Press
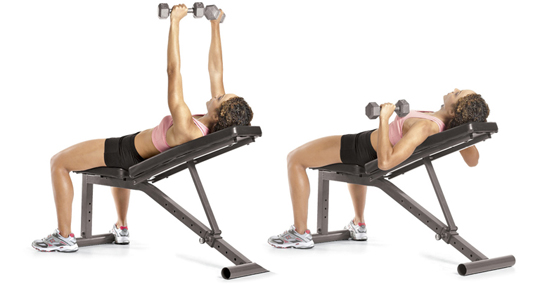
A
• Set an adjustable bench to its lowest incline, about 15 to 30 degrees.
• Lie faceup on the bench and hold the dumbbells above your shoulders, with your arms straight, and then press the weight.
B
• Lower the dumbbells to your chest.
• Pause, then press the weights back up to the starting position.
Neutral-Grip Incline Dumbbell Bench Press
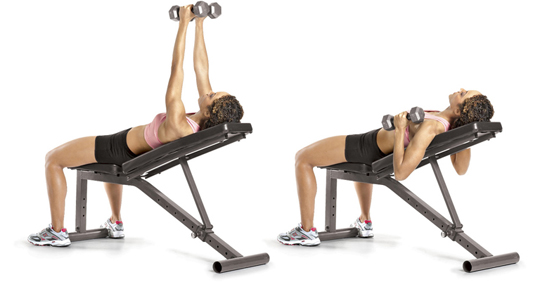
• Hold the dumbbells so that your palms face each other.
• Keep your elbows tucked close to your sides.
TIP
• The steeper the incline of the bench, the more work your shoulders have to do.
Alternating Incline Dumbbell Bench Press
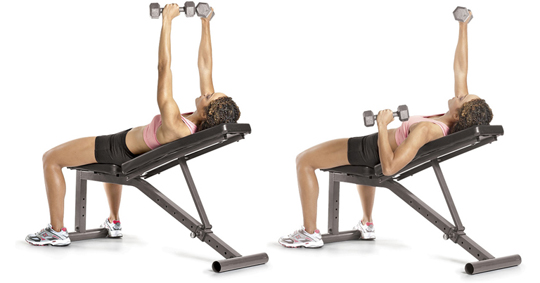
• Instead of pressing both dumbbells up at once, lift them one at a time, in an alternating fashion.
TIPS
• As you lower one dumbbell, press the other one up.
Decline Dumbbell Bench Press
A
• Grab a pair of dumbbells and lie faceup on a decline bench.
• Hold the dumbbells above your chest with your arms straight..
B
• Lower the dumbbells to the sides of your lower chest.
• Pause, then press the weights back up to the starting position.
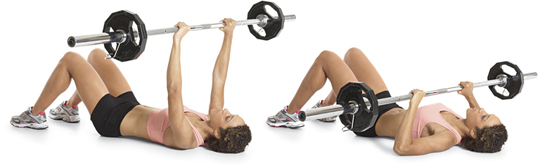
Dumbbell Floor Press
A
• Grab a pair of dumbbells and lie faceup on the floor.
• Your knees should be bent.
• Hold the dumbbells above your chest with your arms straight.
B
• Lower the dumbbells until your upper arms touch the floor.
• Your upper arms should form a 45-degree angle with the sides of your torso.
• Pause, then press the weights back up to the starting position.
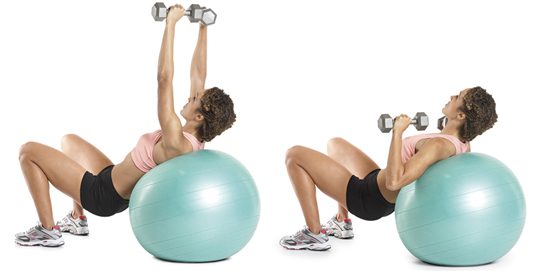
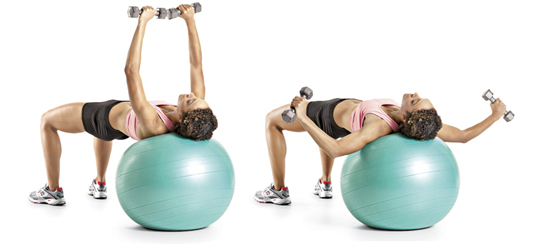
Swiss-Ball Dumbbell Chest Press
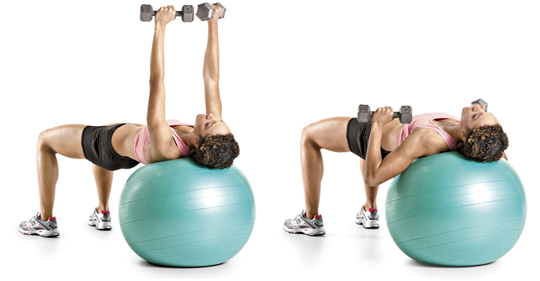
A
• Grab a pair of dumbbells and lie on your back on a Swiss ball.
• Your upper and middle back should be placed firmly on the ball.
• Raise your hips so that your body forms a straight line from your knees to your shoulders.
• Your palms should be facing out, but turned slightly inward.
• Brace your core.
B
• Without changing the angle of your hands, lower the dumbbells to the sides of your chest.
• Pause, then press the weights back up to the starting position as quickly as you can.
• Straighten your arms completely at the top of each repetition.
• Don't drop your hips at any point during the lift.
Alternating Swiss-Ball Dumbbell Chest Press
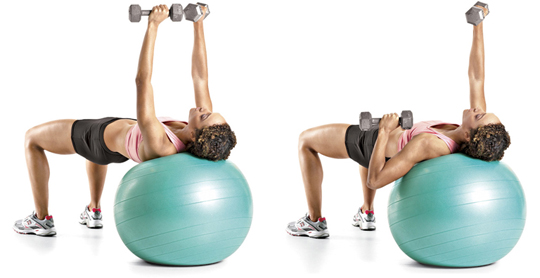
A
• Grab a pair of dumbbells and lie on your back on a Swiss ball.
B
• Instead of pressing both dumbbells up at once, lift them one at a time, in an alternating fashion.
Incline Swiss-Ball Dumbbell Chest Press
A
• Position yourself on your back on a Swiss ball so your torso is at a 45-degree angle to the floor.
• Hold the dumbbells straight above your chin, with your arms straight.
B
• Lower the dumbbells so that they end up just outside your upper chest.
• Pause, then press the weights back up to the starting position.
Single-Arm Cable Chest Press

A
• With your right hand, grab the high-pulley handle of a cable station and face away from the weight stack.
• Stagger your feet and hold the handle at shoulder height, with your right arm bent and parallel to the floor.
• Bend your right arm and pull it back.
• Hold your left arm straight in front of you.
• Keep your arm parallel to the floor.
B
• Without moving your torso or dropping your elbow, push the handle forward and straighten your right arm in front of you.
• As you push your right arm forward, pull your left arm back toward your shoulder.
• Then slowly bend your right elbow to return to the starting position.
• Complete the prescribed number of reps with your right arm, then switch hands and do the same number with your left.
Medicine-Ball Chest Pass
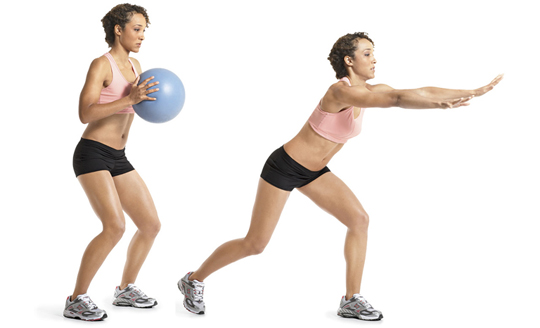
A
• Grab a medicine ball and stand about 3 feet in front of a concrete wall.
• Hold the ball with both hands next to your chest.
• Set your feet shoulder-width apart. Your knees should be slightly bent.
B
• Throw the ball at the wall with both hands, as if you were throwing a chest pass in basketball.
• Straighten your arms forcefully and completely as you throw the ball.
• Catch the ball as it rebounds off the wall, and repeat.
Chest: FLYS
These exercises target your pectoralis major. Your front deltoids assist in the movements.
Dumbbell Fly
A
• Grab a pair of dumbbells and lie faceup on a flat bench.
• Hold the dumbbells over your chest with your elbows slightly bent and your palms facing out.
B
• Without changing the bend in your elbows, slowly lower the dumbbells down and slightly back until your upper arms are parallel to the floor.
• In the down position, the dumbbells should be in line with your ears.
• Pause, then lift the dumbbells back to the starting position.
Incline Dumbbell Fly to Press
• This exercise combines the incline fly with an incline press. Start by doing the incline fly, performing as many repetitions as you can until you start to struggle. Then immediately switch to incline dumbbell presses and complete as many repetitions as you can with perfect form.
Swiss-Ball Dumbbell Fly
• Lie with your middle and upper back placed firmly on a Swiss ball.
Standing Cable Fly
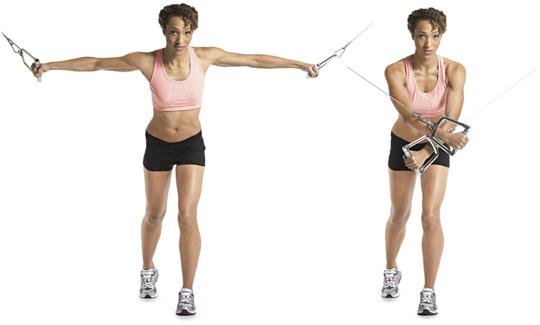
A
• Attach two stirrup handles to the high-pulley cables of a cable-crossover station.
• Grab a handle with each hand, and stand in a staggered stance in the middle of the station.
• Lean forward slightly at your hips; don’t round your back.
• Bend your front knee.
• Your arms should be outstretched but slightly bent.
B
• Without changing the angle of your elbows, pull the handles down and together, until they cross in front of your body.
• Pause, then return to the starting position.
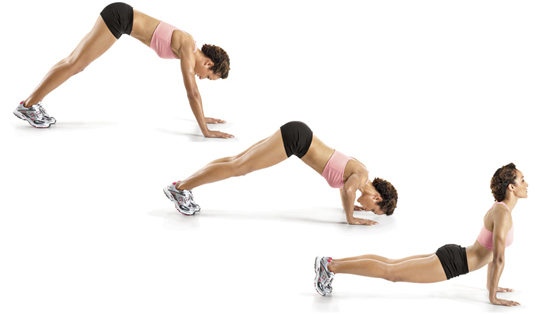
THE BEST CHEST EXERCISE YOU’VE NEVER DONE
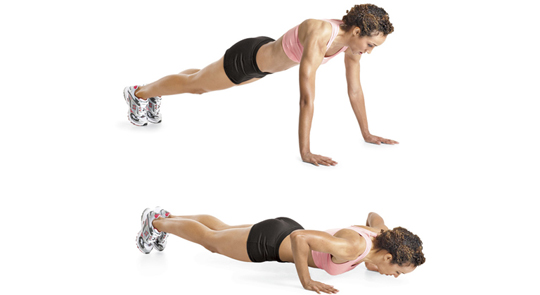
Pushup Plus
Besides working your chest, this exercise is highly effective at engaging your serratus anterior, a small but important muscle that helps move your shoulder blades. Neglect this muscle, as most people do, and it becomes weak. That puts you at high risk for shoulder impingement—a painful injury in which a muscle tendon becomes entrapped in your shoulder joint. What’s more, serratus anterior weakness often causes your shoulder blades to tilt forward and down, resulting in rounded shoulders—giving you a permanent slump.
Now, the classic pushup does work your serratus anterior. But adding the “plus”—pushing your upper back toward the ceiling at the end of the movement—makes the exercise even more effective. In fact, University of Minnesota researchers found that the pushup plus activates your serratus anterior 38 percent more than the standard pushup does.
A
• Get down on all fours and place your hands on the floor so that they’re slightly wider than and in line with your shoulders.
• Brace your abdominals—as if you were about to be punched in the gut—and hold them that way for the duration of this exercise.
• Your body should form a straight line from your ankles to your head.
B
• Lower your body until your chest nearly touches the floor.
• Tuck your elbows as you lower your body, so that your upper arms form a 45-degree angle with your body in the bottom position of the movement.
• Don't let your hips sag.
TIP
• You should push your upper back toward the ceiling. Your shoulders will raise an inch or so past your starting position.
C
• Pause, and then push yourself back to the starting position as quickly as possible.
• Once your arms are straight again, push your upper back toward the ceiling. The movement is very slight; it’s hard to see, but you’ll feel the difference.
• Pause for a count of one, then do another pushup and repeat.
Swiss-Ball Pushup Plus
A
• Place your hands directly under your shoulders and on the sides of a Swiss ball.
B
• Keeping your core tight, lower yourself until your chest grazes the ball, then push back up.
C
• Perform the “plus” by pushing your upper back away from the ball.
THE BEST STRETCH FOR YOUR CHEST
Doorway Stretch
Why it’s good: This stretch loosens your pectoralis minor. When these muscles are stiff—as they are in almost anyone who works a desk job—they yank your shoulder blades forward, making you appear hunched instead of tall and straight.
Make the most of it: Hold this stretch for 30 seconds on each side, then repeat twice for a total of three sets. Do this routine daily, and up to three times a day if you’re really tight.
A
• Bend your right arm 90 degrees (the “high-five” position) and place your forearm against a door frame.
• Stand in staggered stance, your left foot in front of your right.
B
• Step through the doorway with your right foot until you feel a comfortable stretch in your chest and the front of your shoulder. Switch arms and legs and repeat for your other side.
SCULPT THE PERFECT CHEST
Pick your plan: Here are three routines for the results you want.
1. The Chest-Chiseling Complex
The premise behind this workout is simple: Don’t allow your muscles time to fully recover and they’ll learn to withstand fatigue better. As a result, over time you’ll improve your ability to churn out more repetitions of any chest exercise. And that means better results.
What to do: Do eight dips and eight pushups without pausing between exercises. Continue alternating between moves, reducing the number of reps you do by one each time. So you’ll do seven dips and seven pushups next, six and six, and so on, until you’re down to one rep. Rest for 90 seconds, then try to repeat the complex. As your strength improves, add one rep to your starting number of reps. Do this workout once every 5 days, maximum.
2. The Super-Strength Workout
Research shows that people who vary their repetition ranges in a wavelike fashion—known by scientists as undulating periodization—gain twice as much strength as those who do the same routine every workout.
What to do: Do three workouts a week, resting for at least a day between sessions.
• On Monday (Workout 1), perform four sets of the barbell bench press, followed by four sets of the incline barbell bench press. Do four to six repetitions of each exercise, resting for 90 seconds between sets.
• On Wednesday (Workout 2), do three sets of the single-arm cable chest press, followed by three sets of the incline dumbbell bench press; perform 10 to 12 repetitions of each exercise, resting for 60 seconds between sets.
• On Friday (Workout 3), do two sets of dips followed by two sets of pushups. Perform 15 to 20 repetitions of each exercise, resting for 45 seconds between sets.
3. The Time-Saving Trifecta
Sure, performing three consecutive chest exercises without resting saves you time. But organizing your workout this way also keeps your muscles under tension longer, which is an effective means of conditioning your muscles.
What to do: Perform one set each of three different exercises in succession, without resting—a routine known as a triset. Mix and match movements as you like, choosing one from each of the exercise groups below (A, B, and C). Simply do four to six reps of Exercise A, 10 to 12 reps of Exercise B, and then 15 to 20 reps of Exercise C. Rest for 60 seconds, then repeat three times for a total of four rounds. Perform this workout 2 days a week, resting for at least 3 days between sessions.
EXERCISE GROUP A
Alternating Dumbbell Bench Press
Neutral-Grip Dumbbell Bench Press
Alternating Neutral-Grip Dumbbell Bench Press
Swiss-Ball Dumbbell Chest Press
Alternating Swiss-Ball Dumbbell Chest Press
EXERCISE GROUP B
Alternating Incline Dumbbell Bench Press
Neutral-Grip Incline Dumbbell Bench Press
Incline Swiss-Ball Dumbbell Chest Press
Reverse-Grip Barbell Bench Press
EXERCISE GROUP C