Casting On for Cuff-Down Socks
There are a variety of cast ons available to the sock knitter. A major consideration is flexibility—keeping cast-on stitches as elastic as possible adds to the comfort and wearability of the sock. The other consideration is appearance, and you’ll be surprised at how different the various cast ons appear. I suggest casting on with a needle that is a size or two larger than the needles you’ll be knitting with, then transferring the stitches to the correct needles. This method keeps the cast on elastic and prevents loose stitches from forming between the needles. Following are the cast-on techniques used in the patterns in this book.
Long-Tail Cast On
This method creates a knit stitch and is the most commonly used cast on for sock knitting.

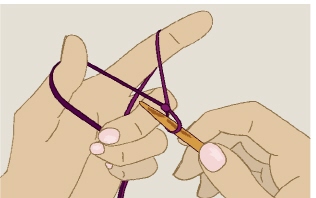
1. Position yarn
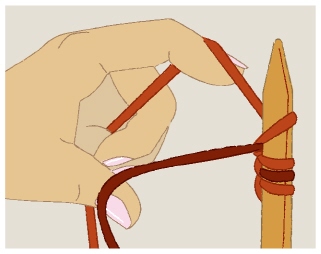
Make a slip knot, leaving a long tail (at least 4" [10cm] for every 1" [3cm] you’ll be casting on). Slide the slip knot onto the needle with the long tail toward the back of the needle. Slide your thumb and index finger between the 2 strands of yarn. Wrap the long tail around your index finger and the strand still attached to the skein around your thumb. Grasp both strands with your remaining fingers.
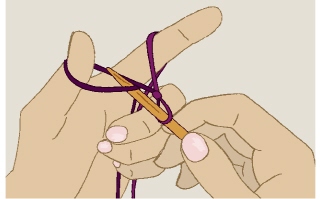
2. Bring needle through front loop
Slide the tip of the needle up through the loop of yarn wrapped around your thumb from front to back.
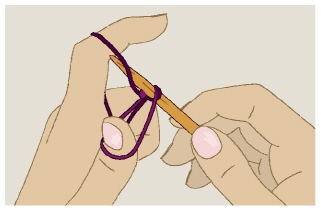
3. Catch second strand
Keeping the needle in the loop of yarn around the thumb, hook the needle behind the strand of yarn on the front of your index finger.
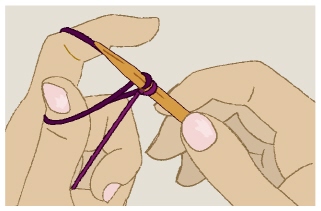
4. Draw back strand through front loop
Bring the yarn through the loop of yarn on your thumb, creating a second loop on your needle (the first cast-on stitch). Drop the loop of yarn on your thumb. Gently tug on the strands to tighten the cast-on stitch. Repeat to cast on the remaining stitches.
Include the slip knot in your stitch count.
Long-Tail Cast On Variation
This method works in the same manner as the Long-Tail Cast On, but creates a purl stitch.
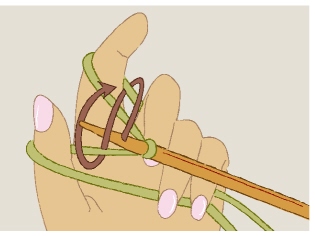
1. Begin stitch
Position yarn as described in Step 1 of Long-Tail Cast. Slide the tip of the needle through the loop of yarn wrapped around your index finger from back to front. Keeping the needle in the loop of yarn around the index finger, hook the strand of yarn on the back of your thumb.
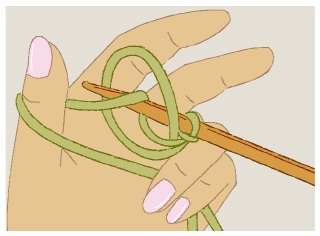
2. Complete stitch
Bring the yarn through the loop of yarn on your index finger, creating a new loop on your needle. Drop the loop on your index finger and gently tug on the strands to tighten the cast-on stitch. Repeat to cast on the remaining stitches. Include the slip knot in your stitch count.
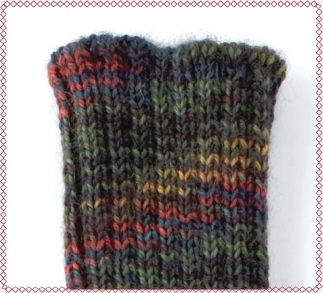
Rolled Edge Cast On
This cast on creates a very elastic cuff and begins with half the total number of stitches needed for the leg of the sock.
Using waste yarn, cast on the amount of stitches needed onto a straight needle and knit 2 rows. Divide the stitches onto 4 double-pointed needles, join for working in the round and continue to knit with waste yarn for 2 rounds. With a smooth cotton or nylon ravel cord, knit 1 round.
ROUND 1: Join the main sock yarn, *knit 1, yarn over; repeat from * to end of round.
ROUND 2: *Knit 1, yarn forward, slip 1 purlwise, yarn back; repeat from * to end of round.
ROUND 3: *Yarn back, slip 1 purlwise, yarn forward, purl 1; repeat from * to end of round.
ROUND 4: *Knit 1, purl 1; repeat from * to end of round.
Change to the needle that will be used to knit the rib. Continue in the rib pattern for the desired length. Remove the ravel cord by pulling on one end of it. The waste yarn will separate from the main yarn leaving an elastic cuff.
If you choose to work a K2, P2 rib, the number of stitches cast on must be divisible by four. Separate the knit and purl stitches onto separate needles. With the needle that will be used to knit the rib, work 2 knit stitches followed by 2 purl stitches over all stitches.

Patterned Cast On
If a sock cuff begins with a pattern such as ribbing or seed stitch, a Patterned Cast On lends a crisp look to the top of the sock. This method provides an elastic cast on that easily springs back into shape.
Follow the pattern of the sock to determine the number of stitches to cast on as knit stitches using the Long-Tail Cast On and the number of purl stitches to cast on using the Long-Tail Cast On Variation. For example, if the sock begins with a K2, P2 rib, cast on 2 stitches using the Long-Tail Cast On, then 2 stitches using the Long-Tail Cast On Variation. Continue to cast on by alternating 2 knit cast-on stitches and 2 purl cast-on stitches until the correct number of stitches have been cast on.
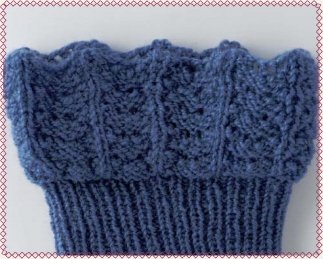
Two-Needle Long-Tail Cast On
Use this method to prevent the cast-on edge from being too tight and rolling upwards. This is especially important when knitting socks with lace patterns. Simply work the Long-Tail Cast over 2 needles, or cast on with a needle that is 3 sizes larger than the ones you’ll knit with.
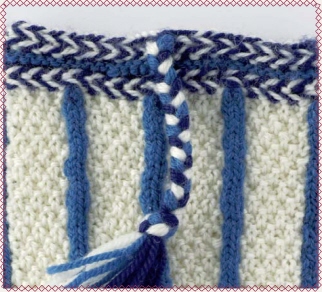
Two-Color Braided Cast On
This is a decorative cast on that looks great at the top of any sock, but especially multicolored socks. The cast on is done with 2 colors; alternating the 2 colors over 2 rows forms the braid.
Holding 2 yarns together (Color A and Color B), form a slip knot and place it on the needle. Cast on an even number of stitches using the Long-Tail Cast with Color A over the thumb and Color B over the index finger. Distribute the stitches evenly onto 4 double-pointed needles. Drop the slip stitch and join into a round, taking care not to twist the stitches. Knit one round with Color A.
NEXT ROUND: With both yarns forward, *purl 1 B, drop B, bring A over B, purl 1 A, drop A, bring B over A; rep from * to end of round.
NEXT ROUND: With both yarns forward, *purl 1 B, drop B, bring A under B, purl 1 A, drop A, bring B under A; rep from * to end of round.
Provisional Crochet Cast On
This is the cast on to use if you want to knit the leg of a sock back and forth and join it with Kitchener stitch to form a tube. See the Sea Squall Socks on for an example of this type of construction.
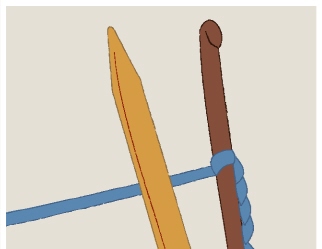
1. Set up for cast on
With waste yarn and a crochet hook, chain 5. Hold a knitting needle and the crochet hook parallel (with the crochet hook on right). Bring the waste yarn under the knitting needle.
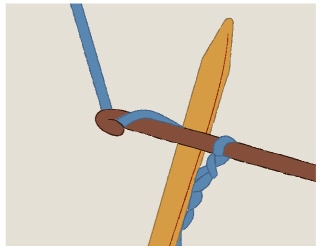
2. Wrap yarn
Bring the crochet hook over the knitting needle and wrap the yarn around the crochet hook.
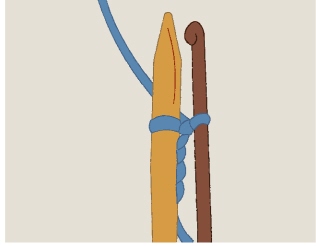
3. Form loop
Draw the yarn through the loop on the hook to form the first cast-on stitch on the knitting needle.
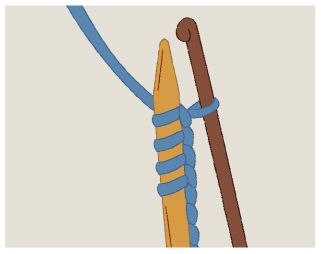
4. Continue casting on
Repeat Steps 1–3 (omitting the chain 5 at the beginning of Step 1) to cast on the number of stitches indicated in the pattern.
Invisible Provisional Cast On
With this cast on, plain or ribbed stitches remain live so they can be folded down and knit together with leg stitches, forming a doubled cuff . This can be used to add stability to the top of a calf-length sock or for the top of a short sport sock that won’t slip down into your shoe.
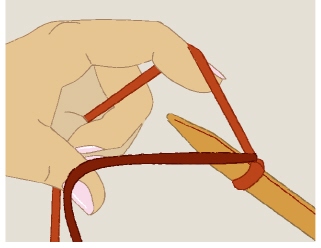
1. Set up for cast on
Holding sock yarn and waste yarn together, make a slip knot and place it on the needle. With the sock yarn over your index finger and the waste yarn over your thumb, bring the needle under the waste yarn from front to back.
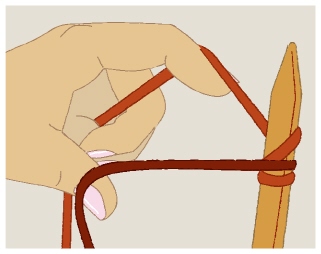
2. Continue first stitch
Bring the needle over the top of the sock yarn.
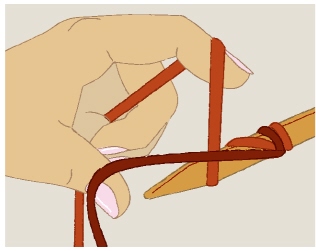
3. Complete first stitch
Bring the needle under the waste yarn from back to front, completing the first stitch.
4. Continue casting on
Bring the needle over the sock yarn, placing a second stitch on the needle. Continue casting on until you have the number of stitches indicated in the pattern.
When the cuff is complete, insert a circular needle 29 into the live cast-on stitches and remove the waste yarn. Bring the circular needle in back of the live stitches on the double-pointed needles and knit 1 stitch from each needle together.